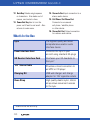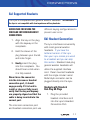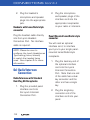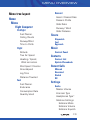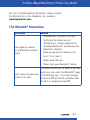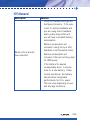
1
WELCOME
Thank you for choosing the Lynx Personal Flight Assistant from
Headsets, Inc. The Lynx has been designed to provide you
with many of the latest technologies in a compact, convenient
package. Headsets, Inc offers the Lynx tethered to a headset
or as a stand-alone device. Some of the advanced features this
revolutionary device offers are:
• Premium quality Bluetooth® interface for the cockpit*
• Noise-free cell phone use without fumbling to find your phone*
• Control your cell phone and media player remotely*
• Caller ID, direct dial, and redial functions*
• Voice dial feature with one touch*
• Download your phonebook and recent call lists from your
cellular phone*
• Automatically mutes music/phone for incoming radio
transmissions
• Streaming high-quality Bluetooth® audio*
• Comprehensive E6B flight computer with instantanteous
calculation update
• Stopwatches, Fuel Tank Timer and Approach Timers
• Large, daylight readable, backlit color LCD screen
• Ambient light sensor for day/night auto-dimming
• 18-key backlit keypad with navigation pad
• Long battery life with included rechargeable lithium ion battery
• Easy operation using menu driven interface
1
WELCOME (cont.)
• Full selection of 1/8” audio ports- stereo in,
auxiliary cell / satellite phone, stereo out
• Ergonomic design and solid construction
• Self-powered mode allows headsets to be used even if not
connected to a panel or intercom
• Powers ANR headset circuitry
• Includes wall and cigarette port charger
• 24-hour local and UTC (Zulu) clock with date and day of
the week and time zone selection
• Fully upgradable using included USB cable and a PC
* Requires Bluetooth® wireless technology enabled
cell phone / MP3-player with enabled protocols
(most modern phones)
NOTE: The Bluetooth® word mark and logos are owned by the
Bluetooth® SIG, Inc. and any use of such marks is under license.
Other trademarks and trade names are those of their respective
owners.
2
IMPORTANT SAFETY PRECAUTIONS
Read these simple guidelines. Breaking the rules may be dangerous
or illegal. Further detailed information is given in this user guide. m Warning! Violation of the instructions may cause serious
injury or death.
• Never use an unapproved battery since this could damage the
Lynx and/or battery and could cause the battery to explode.
• Never place your Lynx in a microwave oven as it will cause
the battery to explode.
• Never store your Lynx in temperatures less than -4°F or
greater than 122°F.
• Do not dispose of your battery near fire or with hazardous or
flammable materials.
• Do not use the Lynx in areas where its use is prohibited.
• Do not expose the battery charger or adapter to direct
sunlight or use it in places with high humidity, such as a
bathroom.
• Do not use harsh chemicals (such as alcohol, benzene,
thinners, etc.) or detergents to clean your Lynx. This could
cause a fire.
• Do not drop, strike, or shake your Lynx severely. It may harm
the internal circuitry.
• Do not use your Lynx in highly explosive areas as the unit may
generate sparks.
3
SAFETY PRECAUTIONS (cont.)
• Do not damage the power cord by bending, twisting,
pulling, or heating. Do not use the plug if it is loose as
it may cause electric shock or fire.
• Do not place any heavy items on the power cord. Do
not allow the power cord to be crimped as it may cause
electric shock or fire.
• Do not handle the Lynx with wet hands while it is being
charged. It may cause an electric shock or seriously
damage your unit.
• Do not disassemble the Lynx.
• Make sure that no sharp-edged items, such as animal’s
teeth or nails, come into contact with the battery. This
could cause a fire.
• Store the battery out of reach of children.
• Be careful that children do not swallow any parts, this
could cause asphyxiation or suffocation resulting in
serious injury or death.
• Unplug the power cord and charger during lightning
storms to avoid electric shock or fire.
• Only use batteries and chargers provided by Headsets,
Inc. The warranty will not be applied if the Lynx is used
with other batteries or chargers
4
• Only authorized personnel should service the Lynx and
its accessories. Faulty installation or service may result
in accidents and consequently invalidate the warranty.
TABLE OF CONTENTS
1) Welcome................................ 1 i. Connecting a Bluetooth® Device..... 19 2) Important Safety Precaution........ 3 j. Connecting a Wired Device........ 20 3) Table of Contents.................... 5 k. Dialing Calls............................. 20 4) Technical Details.................... 7 l. Receiving Calls.......................... 21 a. Important information................. 7
m. Bluetooth® Music.................... 21 5) Lynx Overview........................ 9 a. Keypad...................................... 9 n. E6B Flight Computer................ 22
b. Audio Ports............................... 9 0. Timers.................................... 22
c. Cables.................................... 10
9) Bluetooth®............................................... 23 6) Connections......................... 11 a. Overview................................. 23 a. Supported Headsets................. 11 b. Profiles................................... 23 b. Headset Connection................. 11 c. Pairing to the Lynx.................... 25 c. Radio/Intercom Connection........ 12
d. Connecting to the Lynx.............. 27
7) Menu Overview.................... 13
10) Dialing/Receiving Calls
a. Menu Navigation..................... 14 a. Dialing a Number..................... 28 8) Getting Started with the Lynx..... 15 b. Voice Dial................................ 28
a. Charging with the Wall Charger.... 15 c. Receiving Calls......................... 29
b. Panel Charging ....................... 16
11) Contacts / Call Lists............30 c. Charging with the DC Charger... 16
a. Importing the Contact List........ 30
d. Charging from your PC............. 16 b. Dialing from the Contact List..... 31 e. Turning the Power ON & OFF..... 17
c. Sorting Contacts...................... 31
f. Navigating the Lynx................... 17 d. Contact List Size...................... 31 g. Configuring Headphone Type...... 18 e. Call Lists................................. 32 h. Configuring Intercom Type......... 19 f. 'All Calls' Hotkey....................... 33
5
TABLE OF CONTENTS (cont.)
12) Music.................................34
13) E6B Flight Computer...........35
c. Self-Powered Mode.................. 49 d. ANR Power............................. 49
a. Overview................................. 35 e. Auto Passthrough.................... 50
b. Entering Data.......................... 35
f. Day/Night Mode........................ 50 c. Preflight.................................. 36
g. Firmware Upgrades.................. 50
d. Flight...................................... 37
17) Troubleshooting Guide........51 e. Fuel........................................ 37
a. Bluetooth® Connections............ 51
b. Calls....................................... 52 f. Descent................................... 38
14) Timers................................39
c. Contact List............................. 53
a. Overview................................. 39
d. Bluetooth® Music..................... 54 b. Stopwatch............................... 39
e. Audio...................................... 54 c. Fuel Tank Timer........................ 40
d. Approach Timers...................... 41
15) Settings............................. 42
f. General.................................... 55
18) Safety.................................56
a. Guidelines............................... 56 a. Audio...................................... 42
b. Tips on Efficient Operation......... 56 b. Display.................................... 45
c. Flying with the Lynx.................. 57
c. Bluetooth®. ............................. 46
d. Charger and Adapter Safety...... 57 d. Phonebook..................................................... 47
e. Battery Information and Care.... 58
e. Clock...................................... 48
f. Lynx Info.................................. 48
16) Special Features.................49 a. Auto Power-ON........................ 49
b. Smart Power-OFF.................... 49
6
19) Limited Warranty Statement.. 59
20) Glossary.............................61
a. Terminology............................. 61
b. Acronyms and Abbreviations..... 62
21) Regulatory..................................
Compliance Information............. 63
TECHNICAL DETAILS
4a) Important Information
This user’s guide provides important information on the use and
operation of the Lynx. Please read this guide carefully prior to using
the Lynx to be able to use the device to its greatest advantage
and to prevent any accidental damage or misuse. Any unapproved
changes or modifications will void your warranty.
Lynx Specifications
Weight
Length
Width
Thickness
Battery Life
Battery
Screen
Keypad
Temperature Range
130g (4.6oz)
18.5cm (7.3in)
5.5cm (2.2in)
2.7cm (1.1in)
15+ hours of normal usage
High quality 1700ma lithium-ion rechargeable
Full color backlit TFT LCD, daylight readable
Custom silicon rubber with light-guided-film (LGF)
backlight
-20-55 °C (-4-131 °F)
Lynx Inputs/Outputs
Bluetooth®
1/8” Stereo Input Jack
1/8” Output Jack
1/8” Phone Jack
Mini-USB
Panel Interface
Headphone Interface
Wireless phone and stereo audio connection
Stereo audio input for MP3, CD and video players
Stereo audio output for recording devices
Connection for legacy cell phones and satellite phones
Charging port and PC interface for firmware updates
High quality push-pull connector
High quality push-pull connector
7
TECHNICAL DETAILS (cont.)
Stereo In Port Configuration
3-conductor TRS 1/8” (3.5mm) TRS - Stereo Input
-- Tip - Left Channel
-- Ring - Right Channel
-- Sleeve - Ground
Stereo Out Port Configuration
3-conductor TRS 1/8” (3.5mm) TRS - Stereo Output
-- Tip - Left Channel
-- Ring - Right Channel
-- Sleeve - Ground
Cell Phone / Sat Phone Port Configuration
3-conductor 1/8” (3.5mm) TRS - Mono Input / Mono Output
-- Tip - Mono Output
-- Ring - Mono Input
-- Sleeve - Ground
8
LYNX OVERVIEW
1. Intercom Connection Port
2. LCD Screen
3. Ambient Light Sensor
4. Left Soft Key
5. All Mute Key
6. Send Key
10. Navigation Pad
11. Right Soft Key
12. Back Key
13. Power/End Key
7. OK Key
14. Stereo In Port
8. USB Port
15. Cell Phone / Sat Phone Port
16. Stereo Out Port
9. Headset
Connection
Port
1. Intercom Connection Port Connects
the Lynx to the aircraft's intercom.
2. LCD Screen Displays messages,
menus and indicators icons.
3. Ambient Light Sensor Used to detect
the current light level for autodimming of screen and keypad.
4. Left Soft Key Use to access specific
functionality as indicated in bottom
bar of screen.
5. All Mute Key Used to mute all audio
sources other than intercom. Press
again to unmute. Mute status is
indicated in top bar of screen with
an icon.
6. Send Key Use to make/receive calls.
7. OK Key Use to acknowledge and
select different options in the Lynx's
menus.
8. USB Port Connects the Lynx to the
battery charger and to a PC for
firmware updates.
9. Headset Connection Port Connects
the Lynx to the headsets.
10. Navigation Pad Use to scroll through
menus, control music, etc.
11. Right Soft Key Use to access
specific functionality as indicated in
bottom bar of screen.
9
LYNX OVERVIEW (cont.)
12. Back Key Deletes single spaces
or characters. Also backs out of
menus, one level at a time.
13. Power/End Key Use to turn the
power on/off and to end a call. Also
returns to main menu.
What’s In the Box
14. Stereo In Port Input connection to a
stereo audio device.
15. Cell Phone / Sat Phone Port
Connects to a monaural
cell phone / satellite phone
or other device.
16. Stereo Out Port Output connection
to a stereo audio device.
Lynx
The highest quality and most
comprehensive aviation audio
interface device
Panel Interface Cord
Connects the Lynx to your
aircraft using standard GA plugs
GA Headset Interface Cord
Interfaces your GA headsets to
the Lynx*
1/8” Stereo Cable
Provides a direct connection to
an MP3 or CD player
Charging Kit
USB wall charger and charge
adaptor for 12V cigarette outlets
Knee Strap
High quality elastic nylon, Velcro
strap allows convenient access
to the Lynx
*Stand-Alone version only.
10
CONNECTIONS
6a) Supported Headsets
The Lynx is compatible with general aviation headsets. This version of
the Lynx is not compatible with low-impedance military headsets. GUIDELINES FOR USING THE
CIRCULAR INTERCOM/HEADSET
CONNECTORS
1. Align the key on the plug
with the keyway on the
receptacle.
2. Hold the sleeve of the
plug between your thumb
and index finger.
3. Gently insert the plug
into the receptacle. You
should hear a click when
it is fully seated. Never force the connector
into the intercom or headset
connection port, it should
engage easily. If it is hard to
install or does not fully insert,
verify that the key and keyway
are properly aligned and that the
cable is being inserted into the
correct port.
The intercom connection port
and headset connection port use
different keying configurations to
prevent user error.
6b) Headset Connection
The Lynx interfaces conveniently
with most general aviation
headsets. If you have the
tethered version of the Lynx
then your Lynx comes pre-wired
to a headset and you can skip
this section. Standard dual-plug
general aviation headsets will
utilize the supplied interface
cord. Panel mounted headsets
with the single circular Lemo/
Redel style connector can be
plugged directly into the Lynx.
Headsets with Standard Dual-Plug GA Plugs
1. Plug the provided
headset interface cord
into the Lynx's Headset
Connection Port.
11
CONNECTIONS (cont.)
2. Plug the headset's
microphone and speaker
plugs into the appropriate
jack.
Headsets with Lemo/Redel style
connector
Plug the headset cable directly
into the Lynx's Headset
Connection Port. No interface
cable is required.
NOTE: Please be sure to
configure the Lynx's Headphones
Type setting (mono/stereo)
to match the headset being
used. See chapter 8 for more
information. 2. Plug the microphone
and speaker plugs of the
interface cord into the
appropriate receptacles
on your radio or intercom.
Panel Mounted Lemo/Redel-style
connector
You will need an optional
interface cord, to interface
your Lynx to your single panelmounted Lemo/Redel-style
receptacle.
1. Plug the dual-key end of
the optional interface
cord into the Lynx's
Intercom Connection
Port. Note that one end
of the cable has a dualkey connector and the
other end has a single
key.
6c) Radio/Intercom
Connection
Radio/Intercom with Standard
Dual-Plug GA Receptacles
1. Plug the provided panel
interface cord into
the Lynx's Intercom
Connection Port.
2. Plug the single-key
connector end of the
interface cord into your
panel.
12
MENU OVERVIEW
Menu tree layout:
Home
Menu
Flight Computer
Preflight
Fuel Planner
Ceiling Clouds
Runway/Wind
Time to Climb
Flight
Altitude
True Air Speed
Heading / Speed, Wind correction
Wind Speed / Direction
Groundspeed
Leg Time
Distance Traveled
Fuel
Fuel Planner
Endurance
Consumption Rate
Quantity Used
Descent
Ascent / Descent Rate
Descent Profile
Glide Ratio
Runway / Wind
Glide Distance
Timers
Stopwatch
Fuel
Approach
Music
Control Panel
Contacts
Contact List
Update Phonebook
Recent Calls
Missed
Received
Dialed
All
Settings
Audio
Master Volume
Intercom Type
Headphones Type*
Sidetone Settings
Sidetone Mode
Sidetone Volume
Sidetone Squelch
13
MENU OVERVIEW (cont.)
Output Port Volume
Automute ON/OFF
Automute Squelch
Keypad Volume
Input Port Muting
Master Reset
Display
Screen Brightness
Keypad Brightness
Backlight Timer
Day/Night Threshold
Color Scheme
Temperature
Phonebook
Phonebook Sorting
Phonebook Size
Clock Set Time and Date
Set Time Zone
Lynx Info
7a) Menu Navigation
• Use the center key in
the navigation wheel to
access the Main menu.
Bluetooth®
Bluetooth® ON/OFF
Charger PIN
Device Manager
*Stand-Alone version only.
• Use the up, left, right, and down arrows on the navigation
pad to access different parts of the menu.
• To access a function in one of the menu options use the
center of the navigation pad or the corresponding number on
the keypad. • The * key is used to enter decimal points. NOTE: Some content in this user guide may differ depending on the
Lynx firmware. Features and specifications are subject to change
without prior notice.
14
GETTING STARTED WITH THE LYNX
This section will aid you in the initial set up of the Lynx and is a
quick guide to using the devices main functions. For more in-depth
information on a specific feature, please reference the appropriate
chapter. Please familiarize yourself with your Lynx before you go
flying with it.
Fully charge your Lynx before the first use.
Charging the Battery - Precautions
• Make sure to only use Headsets, Inc. approved chargers with the Lynx. Using unapproved chargers or equipment could damage the Lynx and will void the warranty. • Ensure both the charger plug and charging jack are free from
debris or dirt.
• The Lynx can be charged while it is off or on.
8a) Charging with the
Wall Charger
3. Plug the charger into a
wall outlet.
4. Ensure that the red
indicator light is
illuminated; confirming
the charger is powered.
The wall charger can be used
with 110V - 220V AC electrical
outlets. To charge from an wall
outlet:
5. If the Lynx is powered
on, the on-screen battery
indicator will change to
yellow when the battery is
charging.
1. Connect the Mini-USB
plug of the charger cord
to the Lynx.
2. Connect the USB-A plug
of the charger cord to
the wall charger.
15
GETTING STARTED WITH THE LYNX
8b) Panel Charging
On aircraft wired for Lemo/
Redel-style single plug
headphone connectors, the Lynx
can be powered and charged by
the aircraft using the optional
Lemo/Redel-style panel interface
cord.
8c) Charging with the DC Charger
The DC charger can be used
on 12v - 24v DC electrical
systems. To charge from an
accessory outlet (cigarette
style):
1. Connect the Mini-USB
plug of the charger cord
to the Lynx.
2. Connect the USB-A plug
of the charger cord to the
DC charger.
3. Plug the charger into a
car or aircraft accessory
outlet.
4. Ensure that the red
indicator light is
16
illuminated; confirming the
charger is powered.
5. If the Lynx is powered
on, the on-screen battery
indicator will change to
yellow when the battery is
charging.
8d) Charging from a PC
You can use a computer to
charge the Lynx:
1. Connect the Mini-USB
plug of the charger cord
to the Lynx.
2. Connect the USB-A plug
of the charger cord to
a high-power USB port
on your PC (commonly
located on the front panel
of the computer).
3. If the Lynx is powered
on, the on-screen battery
indicator will change to
yellow when the battery is
charging.
NOTE: Low-power USB port
charging is not supported, such
as the USB port on your keyboard
or bus-powered USB hub.
(cont.)
Battery Charge Level
The current battery charge
level is indicated in the top
right corner of the LCD screen. When the charge level becomes
low, the battery icon will change
to red. If the charge level
reaches a critically low level, the
Lynx will automatically switch off.
8e) Turning the Power ON & OFF
Turning the Lynx On
1. Ensure the battery is
charged or connect the
Lynx to an external power
source.
2. Press and hold Power/End
Key until the LCD screen
lights up (approximately
5 seconds).
NOTE: The Lynx will also
automatically power itself ON
if it detects the presence of
an intercom or radio at the
intercom connection port.
Turning the Phone Off
1. Press and hold Power/
End Key until the display
turns off (approximately
5 seconds).
8f) Navigating the Lynx
When you turn the Lynx on, the
display will default to a home
screen. You will know that you
are on the home screen if you
see a date and time displayed
and an image of a plane and a
control tower. From most other
screens, pressing the Power/
End Key button will return you
to the home screen. To access
the main menu from the home
screen press the OK Key button.
Main Menu Options:
Flight Computer
• perform basic aviation
calculations • calculates results in real
time as data is entered
• intuitive layout for quick
access to keys and features. 17
GETTING STARTED WITH THE LYNX
• multiple lists allow you to
quickly access individual
lists quickly
Timers
• Three separate
stopwatches
• F uel Tank Interval Timer
to remind you to switch
tanks
• Approach Timer for timing
approach sequences
Music
• allows you to control your
Bluetooth® enabled media
player from the Lynx
Contacts
• allows you to access your
phones contact list from
the Lynx
• can be sorted by first or
last name. Recent Calls
• displays the recently
dialed calls
18
Settings
• provides you with
powerful control over the
Lynx to configure to your
exact needs
8g) Configuring
Headphone Type
The Lynx can be configured to
operate with mono or stereo
headsets. This is a configurable
stored setting. Be sure that this
setting matches the headphones
being used. This setting should
be configured properly before
first using the Lynx. If you have
the tethered version of the
Lynx then this setting is factory
configured and you can skip this
section.
From the home screen, press the
OK Key to enter the main menu.
1. Use 'right' button to
navigate to the Settings
menu. Select menu
option 1, 'Audio'.
(cont.)
2. Select menu option 3,
'Headphones Type'.
3. Select menu option 2,
'Intercom Type'.
3. Select 'Mono' or 'Stereo'
according to the
headphones being used. Press the OK Key to
register the setting.
4. Select 'Mono' or 'Stereo'
according to the intercom
being used. Press the
OK Key to register the
setting.
4. A message box stating
'New Setting Confirmed'
will appear when the
setting has been
registered.
5. A message box stating
'New Setting Confirmed' will
appear when the setting
has been registered.
8h) Configuring Intercom Type
The Lynx can be configured to
operate with mono or stereo
intercoms. This is a configurable
stored setting. Be sure that this
setting matches the intercom
being used. This setting should
be configured properly before
first using the Lynx:
1. From the home screen,
press the OK Key to enter
the main menu.
2. Use the 'right' button to
navigate to the Settings
menu. Select menu
option 1, 'Audio'.
8i) Connecting a
Bluetooth® Device
You may establish a Bluetooth®
connection between a device
(cell phone, MP3 player) to
the Lynx using the process
outlined in your device's user
manual. The default PIN for
the Lynx is '8888' (the PIN can
be configured to a different
value). The Lynx is always
in discoverable mode if it is
powered ON and Bluetooth®
is activated on the Lynx (the
Bluetooth® icon is present in the
top bar of the screen). You may
have up to 8 devices paired to
the Lynx at any one time.
19
GETTING STARTED WITH THE LYNX
During power-on, the Lynx will
auto-reconnect with the last
connected device.
8j) Connecting a Wired Device
The Lynx offers three wired
1/8'' audio plugs to support a
multitude of wired devices:
Stereo Input - plug your MP3
player, CD player, etc. into this
port using the supplied cable or
appropriate adaptor.
Stereo Output - attach your
recording device here to record
all audio communications.
Cell Phone / Satellite Phone connect your wired cell phone or
satellite phone to this port using
the appropriate adaptor cable
(not supplied).
No other action is necessary
to enable the audio ports. The
Lynx will automatically detect
the audio signals. Some port
audio settings can be adjusted
(see the audio settings section).
20
NOTE: For the calling features
described below you must have
a Bluetooth® enabled phone
connected to the Lynx. Not
all phones support all of the
Bluetooth® features offered by
the Lynx. Reference chapter 10
for information on Bluetooth®
connections.
8k) Dialing Calls
You can place calls using the
Lynx without the need to reach
for your phone.
To dial a number directly: From
the main home screen, simply
enter the phone number on the
Lynx's keypad and press the
Send Key to place the call.
To dial from the contact list:
First download the contact list
(option 3 under the contacts
main menu). Once downloaded,
access the contact list and
press the Send Key to dial a
contact.
To dial a recent call: Navigate to
the desired call list. Press the
up and down arrows to select
an entry. Press the Send Key to
dial a selected entry.
(cont.)
Voice Dial: From the main home
screen, press the Left Soft Key
to initiate voice dialing. 8l) Receiving Calls
You will hear a ring and the Lynx
will display an incoming call
notice when an incoming call is
present:
NOTE: This feature requires
a Bluetooth® device equipped
with A2DP (Advanced Audio
Distribution Profile). For music
controls, the device needs to
support AVRCP (Audio/Video
Remote Control Profile). Some
devices may not implement full
music control support.
To stream audio:
1. Ensure that a Bluetooth®
enable audio source is
connected. (Look for the
'Music' icon in the top bar
of screen.)
To answer the incoming call,
press the Send Key.
To reject the incoming call,
press the Power/End Key.
2. Start the audio. You can
initiate the audio stream
in two ways:
NOTE: The phone's speaker
volume can be changed while
a call is active by pressing
the up or down arrows on the
navigation pad. • From the music
device - simply start
the music using the
device's controls.
8m) Bluetooth® Music
• Using the Lynx's
music control panel navigate to the 'Music'
menu and select
'Control Panel'. Use
the Lynx's keypad
to control the audio
device.
You can stream stereo audio
to the Lynx wirelessly from a
Bluetooth® wireless technology
enabled device.
21
GETTING STARTED .... (cont.)
8n) E6B Flight Computer
The Lynx includes a
comprehensive E6B flight
computer. To access the E6B:
1. Navigate to the home
screen.
2. From the home screen,
press the Right Soft
Key (directly under 'E6B'
text) for direct access to
the E6B.
3. You can also navigate to
the E6B from the main
menu.
8o) Timers
The Lynx includes a complete
set of timers. The controls for
the timers can be accessed
from the Timers menu.
There are also home screen
shortcut keys for the
Stopwatches and Approach
Timer control screens:
1. Navigate to the home
screen.
22
2. From the home screen,
press the up arrow for
direct access to the
stopwatches control
screen.
3. From the home screen,
press the down arrow
for direct access to the
approach timer control
screen.
In addition to their control
screens, the timer values
can be viewed from the home
screen. Press the left or right
arrow to toggle through the
available timer/clock views.
Note: only active timers will be
displayed.
BLUETOOTH®
9a) Overview
The Lynx incorporates
Bluetooth® wireless technology. Bluetooth® is a specification
that describes how cellular
phones, computers, computer
peripherals, personal digital
assistants (PDAs), and
other devices can be easily
interconnected to one another
using a wireless short-range
connection. To use the Bluetooth® features
provided in the Lynx, you must
pair and connect to a device
that supports Bluetooth®
wireless technology. Through
the utilization of Bluetooth®
wireless technology, you can
connect your phone or media
player to the Lynx. This can
provide the ability to place
and receive calls, access your
phone's phonebook and call lists,
or stream stereo audio to
your Lynx.
9b) Profiles
In order to use Bluetooth®
wireless technology, a device
must be able to interpret
certain Bluetooth® profiles. To
determine if the device you
wish to connect to supports
the desired functionality, please
consult your device's user
manual. The following is a
list of the Bluetooth® profiles
supported by the Lynx and
the functionality provided by
the profile: 23
BLUETOOTH® (cont.)
9b) Profiles (cont.)
Advanced Audio
Distribution Profile (A2DP)
allows stereo quality audio to be
streamed from a media source to
the Lynx.
Audio/Video Remote
Control Profile (AVRCP)
provides the ability to control the
media source, e.g. play, pause,
stop, next track.
Hands-Free Profile (HFP)
allows you to place and receive calls
from your Lynx and provides a
two-way wireless audio connection.
Headset Profile (HSP)
provides a two-way wireless audio
connection to a phone or other
device. This profile is similar to
HFP but does not provide advanced
call features.
Phone Book Access Profile
(PBAP)
provides the ability to download
your phones' phonebook and
call lists.
NOTE: Some devices may provide support for some, but not all,
features of a specific profile. For example, a device listed as
supporting AVRCP may only support play, pause, and next/previous
track without supporting fast-forward/rewind.
24
9c) Pairing to the Lynx
set to discoverable, the
Bluetooth® device will allow
NOTE: Bluetooth® functionality
other Bluetooth® devices to
can be turned ON or OFF in
detect its presence and attempt
the Lynx via the Bluetooth®
®
to establish a connection. The
settings menu. The Bluetooth
functionality must be ON in order
Lynx is always in discoverable
for the Lynx to communicate
mode when it is ON and
with a Bluetooth® enabled device. ®
Bluetooth® is enabled.
When the Lynx's Bluetooth
functionality is ON, this is
indicated by a Bluetooth® icon in
the top bar of the screen.
Before a Bluetooth® device is
used with the Lynx, it must first
be paired to the Lynx. This is a
one-time process. Bluetooth®
pairing occurs when two
Bluetooth® devices agree to
communicate with each other
and establish a connection. You
can have up to eight devices
paired to the Lynx at any one
time. (To manage your paired
Bluetooth® devices, refer to the
section on 'Device Manager' in
the Bluetooth® settings chapter.)
In order to find other
Bluetooth® devices, the device
to be located must be set to
discoverable mode. When
There are two different pairing
methods. The method depends
on the version of Bluetooth®
used by the device you are
attempting to connect to. It will
be obvious what type of pairing
is in use when you start a pair.
Bluetooth v2.1+ devices use
SSP (Secure Simple Pairing).
When a pair is initiated, both
devices (the device you are
attempting to pair and the Lynx)
will display a 6-digit numeric
code. You should compare the
numbers to ensure they are
identical. Next, confirm the
pairing on both devices.
On Bluetooth v2.0 and prior
devices, legacy pairing is
25
BLUETOOTH® (cont.)
Select 'Lynx' and proceed
with the pairing.
used. You will be asked to
enter a security pin. The Lynx's
security PIN is set at time
of manufacturer to a default
value of '8888'. This value can
be changed (see Bluetooth®
settings chapter).
-- Either verify and
accept the 6-digit
code displayed on both
devices (Bluetooth v2.1+
devices) or if prompted
for a security PIN, enter
'8888' (default PIN). (If
you have changed the
Lynx's pin, enter the
appropriate value.)
To pair a device to the Lynx:
-- Ensure the Lynx is
powered on.
-- On the device to be
paired to the Lynx, find
the Bluetooth® setup
screen and scan for
Bluetooth® devices. (Consult your device's
user manual if needed,
this process can vary by
device. Note that the
Lynx is in discoverable
mode by default. You
may be asked to place
the connecting device in
discoverable mode- no
action is needed.)
-- The Bluetooth® device
should find the Lynx. 26
-- After the two devices
exchange security
information, the pairing
is complete.
NOTE: After pairing, many
devices will ask if you would like
to connect to the recently paired
device. It is fine to connect at
this point.
9d) Connecting to the Lynx
To connect a paired device you
must initiate the connection
from the device. This varies
by phone. Please consult your
device's user manual if needed. During power-on, the Lynx will
auto-reconnect with the last
connected device.
The 'Phone Icon' will be
displayed in the top bar of the
screen when a Bluetooth® phone
connection is present. A 'Music
Icon' will be displayed in the top
bar when a music connection
is present (this does not mean
that music is necessarily being
streamed at the moment
but only that a A2DP profile
connection is active). If your
phone supports the feature, the
Lynx will also display the current
phone signal strength in the top
bar using 0-5 bars to indicate
the current reception level.
27
DIALING/RECEIVING CALLS
NOTE: For the calling features
described below you must have
a Bluetooth® enabled phone
connected to the Lynx. Not
all phones support all of the
Bluetooth® features offered by
the Lynx.
10a) Dialing a Number
You can dial a number directly
by simply entering the number
on the Lynx's keypad:
1. Verify that a Bluetooth®
enabled phone is
connected. (Look for the
'Phone' icon in the top bar
of screen.)
2. Navigate to the main
home screen. (Pressing
the Power/End Key button
will exit most screen and
menus and return you to
the home screen.)
3. Enter the phone number
on the keypad. The
number will appear on
screen as you enter it.
4. If you make a mistake
while entering the
number, press the Back
28
Key to erase the last
digit.
5. Press the Send Key to
place the call. 10b) Voice Dial
You can initiate voice dialing
directly from the Lynx.
NOTE: This feature requires
a supported phone equipped
with the voice dial feature. As
implementation of this feature
is phone specific, please consult
your phone's user manual for
more information.
To activate voice dialing:
1. Verify that a Bluetooth®
enabled phone is
connected. (Look for the
'Phone' icon in the top bar
of screen.)
2. Navigate to the home
screen.
3. Press the Left Soft
Key (the button directly
underneath the 'VDial'
text).
4. Listen for your phone to
acknowledge the voice
dial command.
5. Proceed with your
voice dial. 10c) Receiving Calls
You will hear a ring and the Lynx
will display an incoming call
notice when an incoming call is
present:
To answer the incoming call,
press the Send Key.
To reject the incoming call,
press the Power/End Key.
NOTE: The phone conversation
volume can be changed while
a call is active by pressing
the up or down arrows on the
navigation pad. If you are not
connected to an intercom or
in any situation that the Lynx
is generating sidetone, the
sidetone volume can be changed
while a call is active by pressing
the left or right arrows on the
navigation pad.
29
CONTACTS/CALL LISTS
NOTE: For the calling features
described below you must have
a Bluetooth® enabled phone
connected to the Lynx. These
feature require a supported
phone equipped with PBAP
2. Navigate to the 'Contacts'
menu screen.
(Phone Book Access Profile).
4. Press the OK Key again
to start the download
process.
3. Select option 3- 'Update
Phonebook'
11a) Importing the
Contact List
With the Lynx and a supported
phone, you can download the
contact list from your phone and
access your phonebook directly
from the Lynx. This will also
enable the caller ID function to
display the contact name for an
incoming call and it will list the
contact names in the recent call
lists. Before you dial from your
contacts list you must first
download the contact list from
your phone:
1. Ensure that a Bluetooth®
enabled phone is
connected. (Look for the
'Phone' icon in the top bar
of screen.)
30
5. When the downloading
process is completed, a
message box will display. (The download process
can take anywhere from a
second or two to several
minutes depending on
phonebook size and
phone model.)
NOTE: The downloaded contact
list will be stored on the Lynx. You may store contact lists for
up to eight phones at any one
time. The Lynx will automatically
select the appropriate contact
list for the phone to which it is
connected. You do not need
to re-download the contact list
unless you have added or deleted
contacts on your phone and wish
to update the contact list stored
on the Lynx.
11b) Dialing from the Contact List
To dial a contact:
1. Ensure that a Bluetooth®
enabled phone is
connected. (Look for the
'Phone' icon in the top bar
of screen.)
2. Ensure that you have
followed the previous
instructions and
have downloaded the
phonebook of the
connected phone to
the Lynx.
3. Navigate to the
'Contacts' menu screen.
4. Select option 1'Contact List'.
5. Navigate to the contact
that you wish to call. You may use the keypad
to enter the letters of
the contact to jump to a
particular contact.
11c) Sorting Contacts
The Lynx allows you to configure
the downloaded contact list to
be alphabetically sorted either
by first name or last name. You
do not need to re-download
the contact list to change the
sorting method. To select the sorting method:
1. Navigate to the
'Settings' menu screen.
2. Select option 4'Phonebook'.
3. Select option 1'Phonebook Sorting'.
4. Select the desired
sorting method.
5. Press the OK Key to
register your selection.
6. Press the Send Key to
dial the selected contact.
31
CONTACTS/CALL LISTS (cont.)
11d) Contact List Size
11e) Call Lists
The Lynx can store up to 8
contact lists. In extreme cases,
a very large contact list may
require more memory than
normally allotted and you will
need to reconfigure the Lynx to
merge the contact lists memory
areas into fewer, larger memory
areas. There are 3 size
settings: 'Small', 'Medium' and
'Large'. These sizes correspond
to 8, 4 and 2 maximum contact
lists. The default setting is
'Medium'. This setting should
work fine for most users.
Recent call lists are downloaded
real-time. Supported call lists
are: 'Missed Calls', 'Received
Calls', 'Dialed Calls', and 'All
Calls' list.
To select the phonebook size:
1. Navigate to the 'Settings'
menu screen.
2. Select option 4'Phonebook'.
3. Select option 1'Phonebook Size'.
4. Select the desired
phonebook size.
5. Press the OK Key to
register your selection.
To access the call lists:
1. Ensure that a Bluetooth®
enabled phone is
connected. (Look for the
'Phone' icon in the top bar
of screen.)
2. Navigate to the 'Recent
Calls' menu screen.
3. Select the call list that
you wish to view.
4. Upon download
completion, the call lists
will be displayed on the
screen. (Downloading
of the call lists normally
takes only a few seconds
but can take up to a
minute or two.)*
5. Use the up and down
arrows to navigate
through the call lists.
32
6. To dial a selected entry,
press the Send Key.
* The Lynx automatically keeps
track of the call lists and will not
download a list again unless it
has changed. For example, once
the missed call list has been
downloaded you will be able
to access it directly (without
requiring a further download)
until you miss a call. If a call
list has changed since the last
time it was downloaded, it will
automatically be downloaded
the next time that call list is
selected.
11f ) 'All Calls' Hotkey
The Send Key behaves as a
shortcut key to the 'All Calls' list
when you are on the main home
screen. This is similar to the
functionality on many cellular
phones. This is a handy way to
quickly redial a recent number.
33
MUSIC
With the Headsets, Inc. Lynx,
you can listen to your MP3
player or other audio devices
using one of two methods:
Bluetooth®, or the wired input
port. It is also possible to use
both methods at the same time. To use the wired port, simply
plug your device into the 1/8''
stereo audio input jack.
You can stream stereo audio
to the Lynx wirelessly from a
Bluetooth® wireless technology
enabled device.
NOTE: This feature requires
a Bluetooth® device equipped
with A2DP (Advanced Audio
Distribution Profile). For music
controls, the device needs to
support AVRCP (Audio/Video
Remote Control Profile). Some
devices may not implement full
music control support. For
example, a device listed as
supporting AVRCP may only
support play, pause, and next/
previous track without supporting
fast-forward/rewind.
34
To stream audio:
1. Ensure that a Bluetooth®
enable audio source is
connected. (Look for the
'Music' icon in the top bar
of screen.)
2. Start the audio. You can
initiate the audio stream
in two ways:
• From the music
device - simply start
the music using the
device's controls.
• Using the Lynx's
music control panel navigate to the 'Music'
menu and select
'Control Panel'. Use
the Lynx's keypad
to control the audio
device.
E6B FLIGHT COMPUTER
13a) Overview
Headsets, Inc.'s Lynx includes
a built-in comprehensive E6B
flight computer. The Lynx's E6B
has been specifically designed
to offer the easiest and most
intuitive interface.
You can access the E6B in
two ways:
• Navigate manually to the
E6B main menu screen.
From the home screen,
press the Right Soft Key
to immediately jump to
the E6B menu screen
• From the E6B's main
page, you will be able
to access the separate
functions. We have
split the calculator into
four main categories:
Preflight, Flight, Fuel, and
Descent. NOTE: Be sure that you
understand the calculations
being made and double check
your units. Before using the
Lynx's E6B, we recommend that
you cross-check your calculations
either by hand or with another
E6B to ensure that you are using
the calculator correctly.
13b) Entering Data
• Use the up and down
arrows on the navigation
pad to select the desired
field.
• Use the left arrow to
erase digits.
• Use the numeric key
pad to enter data into a
field. A decimal point is
entered using the * key
on the numeric key pad.
• Heading entries are 3
digits. An entry made
with 2 digits will be
calculated as a heading
less then 100º, e.g.
entering 25 into the
heading field will be
calculated as 025º.
35
E6B FLIGHT COMPUTER (cont.)
• Runway designations are
2 digits (entered just like
the runway numbers),
e.g. entering 27 will
correspond to runway 27
which is a runway with
a heading between 265º
and 274º.
• In wind speed
calculations, headwinds
will be displayed as
a negative number
because you would
subtract that number
from your airspeed to
obtain your groundspeed.
Conversely, tail winds will
be displayed as a positive
number because it would
be added to your airspeed
to obtain groundspeed.
NOTE: Calculation results are
calculated and displayed realtime as the data is entered into
the input fields. A result field
will display a result as soon as
enough information has been
entered to calculate that result.
36
13c) Preflight
Fuel Planner
Calculates- Estimated Time
Enroute, Fuel Quantity
Required (USG), and
Range (nm)
Inputs- Trip Distance (nm),
Groundspeed (kts), Fuel
Consumption (gph), and
Quantity on Board (USG)
Ceiling Clouds
Calculates- Above Ground Level
(AGL) Cloud Base (ft)
Inputs- Outside Air
Temperature (degrees C)
and Dew Point (degrees C)
Runway/Wind
Calculates- Crosswind (kts) and
Headwind (kts)
Inputs- Wind Direction, Wind
Speed (kts) and Runway
Time to Climb
Calculates- Time to Climb Inputs- Ascent Rate (fpm),
Current Altitude (ft) and
Target Altitude (ft)
13d) Flight
Groundspeed
Calculates- Average
Groundspeed (kts)
Altitude
Calculates- Pressure Altitude (ft)
and Density Altitude (ft)
Inputs- Indicated Altitude (ft),
Altimeter Setting
(inHg) and Outside Air
Temperature (degrees C)
Inputs- Distance Traveled (nm)
and Elapsed Time
Leg Time
Calculates- Leg Time
Inputs- Distance Traveled (nm)
and Groundspeed (kts)
True Air Speed
Calculates- True Air Speed (kts)
Inputs- Calibrated Air Speed (kts),
Outside Air Temperature
(degrees C) and Pressure
Altitude (ft)
Heading and Groundspeed with Wind correction
Calculates- True Heading and
Groundspeed (kts)
Inputs- Course Heading, True Air
Speed (kts), Wind Direction
and Wind Speed (kts)
Wind Speed and Direction
Calculates- Wind Speed (kts)
and Wind Direction
Distance Traveled
Calculates- Distance Traveled (nm)
Inputs- Groundspeed (kts) and
Elapsed Time 13e) Fuel
Fuel Planner
Calculates- Estimated Time
Enroute, Fuel Quantity
Required (USG), and Range (nm)
Inputs- Trip Distance (nm),
Groundspeed (kts), Fuel
Consumption (gph), and
Quantity on Board (USG)
Inputs- Course, True Air
Speed (kts), Heading and
Groundspeed (kts)
37
E6B FLIGHT COMPUTER (cont.)
13e) Fuel (contin.)
Descent Profile
Calculates- Descent Distance
(nm) and Time in Descent
Endurance
Calculates- Endurance Time
Inputs- Indicated Altitude (ft),
Pattern Altitude (ft),
Groundspeed (kts), and
Descent Rate (fpm)
Inputs- Quantity on Board (USG)
and Fuel Consumption (gph)
Consumption Rate
Calculates- Fuel Consumption (gph)
Glide Ratio
Calculates- Glide Ratio
Inputs- Fuel Consumed (USG),
Consumption Time
Inputs- Starting Altitude (ft),
Distance Traveled (nm)
and Ending Altitude (ft)
Quantity Used
Calculates- Fuel Consumed
(USG)
Runway / Wind
Calculates- Crosswind (kts)
and Headwind (kts)
Inputs- Fuel Consumption (gph),
Consumption Time
Inputs- Wind Direction, Wind
Speed (kts) and Runway
13f) Descent
Ascent / Descent Rate
Glide Distance
Calculates- Glide Distance (nm)
Calculates- Ascent / Descent
Rate (fpm)
Inputs- Starting Altitude (ft),
Elapsed Time and
Target Altitude (ft)
Inputs- AGL Starting Altitude
(ft), Descent Rate (fpm)
and Groundspeed (kts)
38
TIMERS
14a) Overview
14b) Stopwatches
The Headsets, Inc. Lynx
incorporates a complete range of
convenient timers. Included are:
• Three separate
stopwatches
There are three independent
stopwatches. All of the
stopwatches count in increments
of 1 second and can count
up to 100 hours.
• Fuel tank timer
To access the stopwatches:
1. N
avigate to the 'Timers'
menu screen.
• Approach Timer
The fuel tank timer and
approach timer are countdown
timers. You select the interval
time. To enter time values:
2. S
elect option 1'Stopwatches'.
3. Alternatively, from the home
screen press the up arrow
to jump directly to the
stopwatches control screen.
1. Use the left arrow to
delete digits.
2. Use the numeric keypad
to enter digits. You may
enter a time value as long
as 1 hour.
In addition to their control
screens, the timer values
can be viewed from the home
screen. Press the left or right
arrow to toggle through the
available timer/clock views.
To control the stopwatches:
•
Use the up and down arrows
to select a stopwatch.
•
Press the OK Key to Start/
Stop a stopwatch.
•
Use the Left Soft Key to
reset a stopwatch (possible
only when the stopwatch is
stopped).
Note: only active timers will be
Note: The stopwatches will
continue to run when you exit the
stopwatch screen and can be
displayed.
viewed on the home screen.
39
TIMERS (cont.)
14c) Fuel Tank
Interval Timer
The fuel tank interval timer will
prompt you at specific intervals
to let you know that you need
to switch fuel tanks. Simply
designate an interval time (of up
to 1 hour) and start the timer.
The Lynx will prompt you when it
is time to switch tanks.
To access the fuel tank timer
control screen:
1. Navigate to the 'Timers'
menu screen.
2. Select option 2- 'Fuel'.
To control the fuel tank interval
timer:
• Enter an interval time
using the numeric keypad
to enter digits and the
left arrow to delete digits.
(Only possible when fuel
tank timer is not running.)
• Press the OK Key to
Start/Stop/Resume the
fuel tank interval timer.
• Use the Left Soft Key to
reset the timer (possible
40
only when the timer is
stopped.)
Note: The fuel tank interval timer
will continue to run when you exit
the control screen and can be
viewed on the home screen.
When the fuel tank interval timer
expires:
• A message box will
appear. This message box
will prompt you to switch
tanks and to enter '*1'
to acknowledge.
• You will hear a reminder
beep every 5 seconds until
you acknowledge the
tank timer.
• To acknowledge the fuel
tank timer, press '*1'
on the keypad.
• After acknowledgment,
the fuel tank timer will
automatically reset to the
specified interval time and
start counting down again.
(To turn the fuel tank
timer off, go back into the
control screen and stop
the timer.)
14d) Approach Timers
There are two sets of six
approach timer values that can
be used to time an approach
sequence. These approach
timer values are stored and
can be recalled to cycle through
a timed approach sequence.
Once the approach times have
been set, simply select the
approach timer and start the
timer. The Lynx will prompt you
when the timer has expired.
To access the approach timers
control screen:
1. Navigate to the 'Timers'
menu screen.
• Enter an interval time
using the numeric keypad
to enter digits and the left
arrow to delete digits.*
• Press the OK Key to
Start/Stop/Resume the
approach timer.
• Use the Left Soft Key to
reset the timer.*
* Only possible when approach
timer is not running.
Note: The approach timer will
continue to run when you exit the
control screen and can be viewed
on the home screen.
When the approach timer expires:
2. Select option 3- 'Approach'.
• A message box will appear.
3. Alternatively, from the
home screen press the
down arrow to jump
directly to the approach
timers control screen.
• You will hear a reminder
beep every second for
5 seconds.
To control the approach timers:
• Use the up and down
arrows to select the
desired approach timer.*
• To start the approach
timer again- navigate
to the approach timers
control screen, select the
desired approach timer
and press the OK Key.
41
SETTINGS
From the Settings menu, you
can customize the operation
of your Lynx for your particular
needs.
NOTE: The Lynx will automatically
route the audio based on the
intercom and headset type
being used. You do not need
to set your headsets to mono
simply because your intercom
is mono. The Lynx will bridge
the mono intercom channel to
both ears in this case. However,
when the Lynx is turned OFF the
Lynx operates in pass-through
mode. When operating in this
mode you will want to set your
headsets as you would normally
when connected directly to the
intercom.
15a) Audio
This section contains the
audio controls for configuring
the Lynx's audio settings and
controlling and balancing various
audio levels.
1. Master Volume
-- Controls the overall
volume of the Lynx.
The default setting is
generally sufficient. You
42
can increase this volume
setting if you need extra
volume and cannot
increase the volume
level at the source.
Decreasing this volume
level will reduce the level
of any background noise.
2. Intercom Type -- Configures the Lynx for
the type of intercom
being used. For stereo
intercoms, select
'Stereo'. For mono
intercoms, select
'Mono'.
3. Headset type
-- Specifies the type of
headsets being used.
For stereo headsets,
select 'Stereo'. For
mono headsets, select
'Mono'.
NOTE: It is important to have the
headset type setting configured
correctly. If configured
incorrectly, the battery may drain
faster than normal.
4. Sidetone Settings
(submenu)
a. Sidetone Mode
The Lynx is capable of
generating sidetone
(the speech from your
microphone reproduced
into your earphones).
There are four sidetone
modes:
i. Unplugged Only
-- The Lynx only generates
sidetone when
unplugged from an
intercom/panel.
ii.Unplugged calls only
-- Same as (i) but in
addition sidetone is
only generated when
a Bluetooth® call is
active.
iii.Auto
-- Sidetone is always
generated by the Lynx.
This mode should work
for most users.
iv.Auto - calls only
-- Sidetone is generated
anytime a Blueooth®
call is active but at no
other time.
b. Sidetone Volume
Controls the volume of
your voice as you hear
it when the Lynx is NOT
plugged into an intercom
system (intercoms
will produce their own
sidetone and will have
their own controls for
sidetone volume.) If your
microphone sounds much
louder or quieter when
you are unplugged from
the intercom compared to
when you are plugged in
you can use the sidetone
volume to match it to the
intercom sidetone volume
level or the desired sound
level.
c. Sidetone Squelch
Controls the squelch level
on the sidetone when the
Lynx is not plugged into an
intercom system. When
the Lynx is plugged in to
an intercom, sidetone
squelch is handled by
43
SETTINGS (cont.)
the intercom. If ambient
noise is breaking the
microphone squelch,
increase sidetone squelch.
If the microphone is
not responsive enough,
reduce sidetone squelch.
5. Output Volume
-- Controls the audio level
of the output port.
6. Automute ON/OFF
-- Turns the Automute
feature ON or OFF.
The Automute feature
automatically mutes the
Lynx's audio sources
for incoming radio or
intercom transmissions
so that only the radio or
intercom transmission
is heard. If you do not
want the Lynx to mute
audio sources for radio
calls then the Automute
should be set to OFF.
This setting is not
recommended for pilot
or critical crew.
7. Automute Squelch
-- Controls the audio level
44
threshold that the panel
audio must meet to
enable the Automute
feature. If you are using
an intercom with a
squelch function set the
Automute Squelch to 0.
If you are connected to
an intercom or a radio
that does not have a
squelch function then
Automute Squelch will
allow you to set the point
at which the Lynx's audio
sources are muted.
Adjust this setting for
the desired behavior.
8. Keypad Volume
-- Controls the volume of
the Keypad tones.
9. Input Port Muting
-- Configures input
port muting during
a Bluetooth® phone
call. The Lynx can
automatically mute the
audio from the 1/8»
stereo input when a
phone call is active. This
is the default behavior.
You can also choose
2. Keypad Brightness
to not mute during an
active call.
-- Controls the keypad's
backlight brightness. The day and night
mode can be adjusted
independently and have
separate settings. The
screen brightness level
will be adjusted for the
particular mode that the
Lynx is currently in, e.g.
if the Lynx is in night
mode then the screen
brightness setting will
adjust the night mode
setting.
10.Master Reset
-- Resets all audio settings
to their factory default
values.
15b) Display
This section allows you to Adjust
the Lynxs display settings.
1. Screen Brightness
-- Controls the LCD
screen's backlight
brightness. The day
and night mode can be
adjusted independently
and have separate
settings. The screen
brightness level will
be adjusted for the
particular mode that the
Lynx is currently in, e.g.
if the Lynx is in night
mode then the screen
brightness setting will
adjust the night mode
setting.
3. Backlight Timer
-- Controls the length
of time that passes
before the Lynx dims the
screen and turns off the
keypad lighting to save
battery power. Pressing
any keypad button or
receiving a phone call
will return the Lynx to
normal mode. Using
any timer setting other
than 'Always On' will
significantly increase
battery life.
45
SETTINGS (cont.)
4. Day/Night Threshold
-- Controls the light level at
which the Lynx transitions
between day and night
mode. The lower the
number the less light is
required to keep the Lynx
in day mode. If the Lynx
goes into night mode
and you feel it is still too
bright out, lower the Day/
Night Threshold to a level
that will keep it in day
mode. Similarly, if the
Lynx switches from night
mode to day mode and
you would like it to stay
in night mode at the the
current light level, raise
the Day/Night threshold
until the Lynx switches
back into night mode. Adjust this threshold
level slowly as it can take
up to 3 seconds for the
current setting to take
effect.
46
5. Color Scheme
-- Allows you to select
between different color
schemes.
6. Temperature
-- Controls the display of
temperature on the home
screen. The possible
settings are Celcius,
Fahrenheit or Off.
15c) Bluetooth®
Controls some important
Bluetooth® settings.
1. Bluetooth® ON/OFF
-- Allows you to turn the
Bluetooth® power ON
or OFF. If you are not
utilizing any Bluetooth®
features, you can turn
the power OFF to reduce
battery consumption.
2. Change PIN
-- Allows you to change the
security PIN used during
pairing. The default
security pin is '8888'.
3. Device Manager
-- Shows a listing of all
Bluetooth® devices that
are currently paired
to the Lynx. Individual
devices can be unpaired
by selecting the device
from the list and
pressing the Left Soft
Key. The Lynx can be
paired to up to eight
devices at any time. If
all pairing slots are
taken, the Lynx will
not be able to pair to
another device until at
least one pairing slot
has been cleared.
2. Phonebook Size
NOTE: Deleting a device will also
delete the contact list and call
lists associated with that device.
15d) Phonebook
-- Allows the memory
size that is allocated
to each contact list to
be configured and also
affects the total number
of contact lists that can
be stored on the Lynx
at one time. Selecting
the small phonebook size
allows the storage of up
to 8 separate contact
lists (i.e. contact lists
from each of 8 separate
phones). The medium
setting allows for 4
contact lists and the
large setting allows for 2
total contact lists. The
medium setting allows
plenty of space for most
contact lists.
1. Phonebook Sorting
-- Configures whether
contact lists are sorted
alphabetically by first or
last name.
47
SETTINGS (cont.)
15e) Clock
15f) Lynx Info
The Lynx displays the time in
a 24-hour format on the home
screen. Date and UTC time are
also displayed.
Contains information specific
to your Lynx: such as serial
number, hardware version and
software version. Please make
a note of this information before
contacting technical support.
1. Set Time and Date
-- The local time and date
are set here. Prior to
setting the local time,
make certain that the
time zone selection is
correct (option 2 below).
Use the left and right
arrows to highlight the
desired field. Use the
up and down arrows to
select the desired value.
Press the OK Key to
set the clock.
2. Set Time Zone
-- This allows you to
select your local time
zone. The time zone is
represented as plus or
minus UTC (Zulu/GMT).
Use the up and down
arrows to select the
time zone and press the
OK Key to set the time
zone.
48
SPECIAL FEATURES
16a) Auto Power-ON
Your Headsets, Inc. Lynx is
equipped with special circuitry
that allows it detect the
presence of an intercom or
radio at the intercom connection
port. The Lynx will automatically
power ON if it detects a
connection. This allows you to
plug directly into your aircraft
without having to manually turn
the Lynx on
each time.
16b) Smart Power-OFF
The Lynx will turn itself OFF
after a period of inactivity. The
device incorporates intelligent
logic to determine when to shut
down. If the Lynx was powered
ON through an automatic power
ON event then the Lynx will
automatically turn itself off 30
seconds after panel/intercom
power is removed. If the Lynx
was turned on manually and
a headset is detected then it
will stay on indefinitely. If the
Lynx was turned on manually
and no headset is detected
then the Lynx will automatically
power down after 30 seconds of
inactivity. Prior to an automatic
power OFF event, the Lynx will
always prompt the user to allow
to keep the unit ON by pressing
any keypad button. If you cancel
an automatic power OFF event,
the Lynx will stay on indefinitely
until it is manually turned OFF.
16c) Self-Powered Mode
The Lynx is capable of operating
without a panel (intercom/radio)
connection. The microphone
bias voltage will be supplied
by the Lynx. You can use all
of the Lynx's features in this
self-powered mode including
Bluetooth® and the auxiliary
input and output ports. Battery
consumption will increase in this
mode. 16d) ANR Power
Your Lynx can supply the
power required to drive most
ANR (active noise reduction)
headsets that utilize the single
circular panel connector. This
49
SPECIAL FEATURES (cont.)
allows you to use your ANRpowered headsets in situations
where panel power is not
present. ANR power will also
be supplied when the Lynx is
operating in self-powered mode.
ANR panel can be toggled
ON/OFF from the home screen
by pressing the right soft key. 16e) Auto Passthrough
For safety and convenience,
the Lynx provides a direct
electrical connection between
the intercom connection port
and the headset connection port
when the Lynx is powered off. 16f) Day/Night Mode
Your Lynx has a light sensor that
is used to detect the amount of
light present and automatically
configure the Lynx for the
current environment. There
are two modes: day mode and
night mode. In night mode, the
screen and keypad are dimmed
significantly and the screen's
background color is changed
to a dark color. The dual mode
50
system makes it easy to read
the screen in all conditions and
eliminates eye strain.
16g) Firmware Upgrades
Using the built in USB port
and a connection to a standard
PC, the Lynx's firmware
can be updated quickly and
conveniently. This allows you
to stay on top of the latest
software advancements and
add features as they are
released. Even the Bluetooth®
chip can be updated, meaning
that your Lynx can stay current
as improvements are made. Firmware updates are available
through our website. Please
see www.headsetsinc.com for
more details.
TROUBLESHOOTING GUIDE
For more troubleshooting information, please consult
the FAQ section on the Headsets, Inc. websitewww.headsetsinc.com.
17a)
Bluetooth® Connections
Description
I am unable to connect
to my Bluetooth® enabled
device.
Solution
-- Verify Bluetooth® is turned on in the Lynx.
-- Verify that the device you are
attempting to connect supports the
necessary Bluetooth® profiles (see the
Bluetooth® chapter).
Have you paired your device to the
Lynx? If not, pair it.
-- Power cycle the Lynx.
-- Power cycle your Bluetooth® device.
The default security pin is 8888 or you can
select your own under the Bluetooth® page
I can't recall my pass code in the Settings menu. If you have changed
to pair to the Lynx.
the security PIN and cannot remember what
you set it to, simply set a new PIN.
51
TROUBLESHOOTING GUIDE (cont.)
17a) Bluetooth® Connections (cont.)
Description
Solution
-- Not all phones support the signal
strength indicator feature.
The signal strength
indicator on the Lynx is
not visible.
My phone has connected
with the Lynx but I only
see the 'Music' or 'Phone'
icon in the top bar and I
need both.
-- If you have disconnected the Lynx's
battery or allowed the battery to run
completely out then you may need to
manually disconnect the Bluetooth®
connection and then reconnect so that
the Lynx can refresh some required
settings. Some devices will not connect all
profiles on the first connection attempt
after pairing or will not auto-reconnect
all profiles. In either case, manually
disconnect the Bluetooth® connection
using your phone's controls and then
reinitiate the connection.
17b) Calls
I am unable to place or
receive Bluetooth® calls
using the Lynx.
-- Make sure you have a Bluetooth®
connection to your phone. For phone
connections, you should see the phone
icon displayed on the top status bar.
-- Phones that are not Bluetooth®
enabled (plugged into the cell port)
require you to dial from the phone
itself.
-- Power cycle the Lynx and/or phone.
52
Description
I am having trouble
hearing the call volume
or the call volume is too
loud.
Solution
-- If the volume is too low, make sure the
volume settings on your headsets are
not too low.
-- Adjust your phone's volume level on
the phone or use the in-call volume
adjustments.
Adjust the Lynx's master volume
(available under 'Audio' in the 'Settings'
menu).
17c)
Contact List
-- Verify that your cell phone is
connected to the Lynx.
I can't download my
contact list.
-- Confirm that your phone supports PBAP.
Verify that your phone's Bluetooth®
and security settings allow it to
transfer contacts.
-- Have you waited long enough? Some
phones may take up to 2 minutes to
download large contact lists.
-- Power cycle the Lynx and/or phone.
53
TROUBLESHOOTING GUIDE (cont.)
17d)
Bluetooth® Music
Description
I can't hear music
streaming from my
Bluetooth® music player.
I can't control my music
player from the Lynx. 17e)
Solution
-- Verify that your phone or MP3 player
supports the Bluetooth® A2DP profile
and that audio streaming is enabled.
-- Verify the music player is properly
connected. The music icon will
appear in the top status bar when a
connection is present. -- Make sure that the AVRCP profile
is supported by your phone or MP3
player and that AVRCP is enabled on
your device.
-- Some devices only support a limited
number of controls. Please consult
your device's documentation or company
website for more information.
Audio
I only hear audio in one
ear of my headsets.
(applies to all audio)
Most likely you are using stereo
headsets and the Lynx is configured for
mono headsets. Change the headset
setting to stereo (available under 'Device'
in the 'Settings' menu).
I hear the music and
calls in both ears but
the radio and intercom
are only in one ear. You are using stereo headsets and the
Lynx is configured for a stereo intercom. Change the intercom setting to mono
(available under 'Device' in the 'Settings'
menu).
54
17f) General
Description
Solution
-- Verify the headset settings are
configured properly. If the Lynx
is set for stereo headsets and
you are using mono headsets,
audio quality may suffer and
you will have increased battery
consumption.
Battery life is shorter
than expected.
-- Battery consumption will
increase if using the Lynx with
headsets in self-powered mode.
-- Battery consumption will
increase if the Lynx is being used
for ANR power.
-- If the battery life seems
unreasonably short, it may be
time for a new battery. Under
normal conditions, the battery
should deliver acceptable
performance for 2-3+ years. This can vary depending on use
and storage conditions.
55
SAFETY
The first and foremost
responsibility of the pilot
in command is to fly the
aircraft. Do not use the Lynx
in any manner that hinders the
operation of, or diverts attention
away from, piloting the aircraft. Make sure the Lynx is secured
and plugged in before starting
the engine; connecting the Lynx
during flight could distract you
from the primary task of flying
the aircraft. Verify that the
Lynx is properly connected to
your phone or any other devices
before you take off. In the
event of a radio systems failure,
having the Lynx already setup
ready to make an emergency
call could prove important. 18a) Guidelines
• Do not submerge the
Lynx.
• Do not use the Lynx as a
wheel chock.
• Do not release the Lynx
from an Aircraft.
• Do not hit people or
objects with the Lynx.
56
• Do not incinerate the Lynx
or battery.
• Do not use the Lynx
around spinning
machinery or propellers
as the headset cord
could become entangled
causing physical harm.
• Do not give the Lynx to
your wife for her birthday
or Valentine's Day as it
may result in bodily harm
to your person or divorce.
18b) Tips on Efficient Operation
-- Make sure the Lynx is
secured and plugged
in before starting the
engine.
-- Verify the Lynx is
properly connected to
your phone or any other
devices before you take
off.
-- By saving important
numbers such as
ATC, flight service
and weather reporting
stations for your
intended routes of
flight and alternate
destinations you will
be able to immediately
access important
information when it is
most needed.
18c) Flying with the Lynx
-- Verify that the Lynx
is properly secured
in the cockpit to
prevent movement
during maneuvers and
turbulence
-- Utilize the recent call
lists to place calls to
numbers you have either
recently received or to
redial numbers that you
have called. This will
save you time and be
less distracting than
dialing a number directly. -- The Lynx will
automatically turn itself
ON and connect with
the last connected
Bluetooth® device when
the avionics master is
switched on.
-- Use the All Mute Key
to mute all other audio
sources when you need
to hear only the tower or
intercom.
-- Engage the master mute
feature (All Mute Key)
on the Lynx during all
critical phases of flight
so as not to cause a
distraction
-- Verify the Lynx, cables
and accessories do not
hinder movement or
access to any aircraft
controls.
18d) Charger and Adapter Safety
Only use Headsets, Inc.
approved chargers and adapter
cables. Using unapproved
equipment can damage the
Lynx. Damage caused by the
use of unapproved chargers or
adapter cables is not covered by
the warranty.
57
SAFETY (cont.)
18e) Battery Information
and Care
possible.
-- Do not leave the Lynx
plugged into the charger
for an extended period
of time.
Please dispose of your spent
battery properly or take it to a
recycling center.
-- Do not store the Lynx in
temperatures less than
-4°F or greater than
122°F. -- Replace the battery
when it's performance is
no longer acceptable
-- Battery life will vary
according to usage
patterns and storage
conditions. Higher
temperatures decrease
battery life considerably.
-- Do not let the battery
become completely
discharged.
-- If the battery is
completely discharged,
charge to at least half
charge as soon as
58
LIMITED WARRANTY STATEMENT
Two-Year Limited Warranty
Headsets, Inc. warrants only to the original purchaser of this product
from Headsets, Inc. or an authorized reseller or distributor that
this product will be free from defects in material and workmanship
under normal use and service for two years after date of purchase. Headsets, Inc. reserves the right, before having any obligation under
this limited warranty, to inspect the damaged product, and all costs
of shipping the product to Headsets, Inc. for inspection shall be
borne solely by the purchaser. In order to recover under this limited
warranty, Purchaser must make claim to Headsets, Inc. within 60
days of occurrence, and must present acceptable proof of original
ownership (such as original receipt, warranty card registration,
on-line registration, or other documentation Headsets, Inc. deems
acceptable) for the product. Headsets, Inc., at its option, shall repair
or replace the defective unit covered by this warranty. Please retain
the dated sales receipt as evidence of the original purchaser’s date
of purchase. You will need it for any warranty service. In order to
keep this limited warranty in effect, the product must have been
handled and used as prescribed in the instructions accompanying
this warranty. This limited warranty does not cover any damage due
to accident, misuse, abuse or negligence. This limited warranty is
valid only if the product is used with the equipment specified in the
product literature. Please check product literature for details or
call Headsets, Inc. technical support with questions. This limited
warranty is non-transferable and does not apply to any purchaser who
bought the product from a reseller or distributor not authorized by
Headsets, Inc., including but not limited to purchases from internet
auction sites. This warranty does not affect any other legal rights you
may have by operation of law. Phone Headsets, Inc. at 1-806-3586336 for warranty service procedures.
59
LIMITED WARRANTY... (cont.)
DISCLAIMER OF WARRANTY
EXCEPT FOR THE LIMITED WARRANTY PROVIDED HEREIN, TO
THE EXTENT PERMITTED BY LAW, HEADSETS, INC. DISCLAIMS
ALL WARRANTIES, EXPRESS OR IMPLIED, INCLUDING ALL
WARRANTIES OF MERCHANTABILITY AND/OR FITNESS FOR A
PARTICULAR PURPOSE. TO THE EXTENT THAT ANY IMPLIED
WARRANTIES MAY NONETHELESS EXIST BY OPERATION OF LAW,
ANY SUCH WARRANTIES ARE LIMITED TO THE DURATION OF
THIS WARRANTY. SOME STATES/PROVINCES DO NOT ALLOW
LIMITATIONS ON HOW LONG AN IMPLIED WARRANTY LASTS, SO
THE ABOVE LIMITATIONS MAY NOT APPLY TO YOU.
LIMITATION OF LIABILITY
REPAIR OR REPLACEMENT OF THIS PRODUCT, AS PROVIDED
HEREIN, IS YOUR EXCLUSIVE REMEDY. HEADSETS, INC.
SHALL NOT BE LIABLE FOR ANY SPECIAL, INCIDENTAL OR
CONSEQUENTIAL DAMAGES, INCLUDING, BUT NOT LIMITED TO,
LOST REVENUES, LOST PROFITS, LOSS OF USE OF SOFTWARE,
LOSS OR RECOVERY OF DATA, RENTAL OF REPLACEMENT
EQUIPMENT, DOWNTIME, DAMAGE TO PROPERTY, AND THIRDPARTY CLAIMS, ARISING OUT OF ANY THEORY OF RECOVERY,
INCLUDING WARRANTY, CONTRACT, STATUTORY OR TORT. NOTWITHSTANDING THE TERM OF ANY LIMITED WARRANTY OR
ANY WARRANTY IMPLIED BY LAW, OR IN THE EVENT THAT ANY
LIMITED WARRANTY FAILS OF ITS ESSENTIAL PURPOSE, IN NO
EVENT WILL HEADSETS, INC.’S ENTIRE LIABILITY EXCEED THE
PURCHASE PRICE OF THIS PRODUCT. SOME STATES/PROVINCES
DO NOT ALLOW THE EXCLUSION OR LIMITATION OF INCIDENTAL
OR CONSEQUENTIAL DAMAGES, SO THE ABOVE LIMITATION OR
EXCLUSION MAY NOT APPLY TO YOU. THIS WARRANTY GIVES YOU
SPECIFIC LEGAL RIGHTS AND YOU MAY ALSO HAVE OTHER RIGHTS
THAT VARY FROM STATE TO STATE AND PROVINCE TO PROVINCE.
60
GLOSSARY
20a) Terminology
Bluetooth® wireless technology
Technology used to allow mobile
phones, computers, and other
personal devices to be easily
coordinated and interconnected
using a short-range wireless
connection.
Sidetone
This is the effect of sound that
is picked up by your headset's
microphone and introduced
into the earpiece, acting as
feedback. Without sidetone,
you will not hear your own voice
in the earpiece.
Squelch
This is a feature that
Pairing
Bluetooth® pairing occurs when
two Bluetooth® devices agree to
communicate with each other
and establish a connection. Pairing is required before
two Bluetooth® devices can
communicate with one another. This is a once time procedure.
Voice Dial
This is an easy and convenient
way to make a hands-free call. Voice dial lets you speak a name
to dial a number instead of
manually entering the number on
a keypad or manually selecting
the entry from a phonebook.
suppresses audio signal in
the absence of a sufficially
strong input signal. Squelch
helps block low volume noise. The squelch level is usually
adjustable to set the point
at which the audio signal is
switched on.
61
GLOSSARY (cont.)
20b) Acronyms and Abbreviations
ANR
Active Noise Reduction
AVRCP
Audio/Video Remote Control Profile
A2DP
Advanced Audio Distribution Profile
HFP
Hands-Free Profile
HSP
Headset Profile
PBAP
Phone Book Access Profile
Revised 12.9.11
62
REGULATORY COMPLIANCE INFO
21) Regulatory Compliance Information
Europe - EU Declaration of Conformity
FCC Part 15 Class B Compliance
Headsets, Inc. hereby declares
that the Lynx is in compliance
with the essential requirements
and other relevant provisions
of Directive 1999/5/EC. The
declaration of conformity may be
consulted at www.headsetsinc.com/
euro/compliance.
This device and its accessories
comply with part 15 of
FCC rules.
Operation is subject to the
following two conditions:
1. This device and its
accessories may
not cause harmful
interference, and
2. this device and its
accessories must accept
any interference received,
including interference
that causes undesired
operation.
63