1
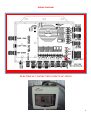
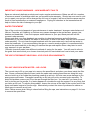
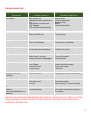
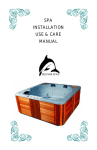
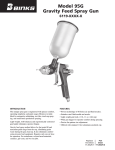
USER MANUAL
Botany Classic Spa
1
Contents
Important Safety Instructions ....................................................................................................................3
Warnings .................................................................................................................................................. 3-4
Hypothermia .................................................................................................................................................4
Information To Assist You Locating The Spa ...........................................................................................5
Outdoor Locations ........................................................................................................................................5
Location Considerations ...............................................................................................................................5
Spa Base .................................................................................................................................................. 5-6
Water Supply….............................................................................................................................................6
Safety ..........................................................................................................................................................6
Taking Delivery ............................................................................................................................................6
Electrical Installation .............................................................................................................................. 7-8
Wiring Diagram ...........................................................................................................................................8
Electrical Connection Point Location .............................................................................................................8
Warnings .....................................................................................................................................................9
Important Usage Warnings – Non Warranty Faults .......................................................................................9
Water Treatment ...........................................................................................................................................9
Filling Your Spa With Water – Air Locks .......................................................................................................9
Filters..........................................................................................................................................................10
Use Of Your Hardcover...............................................................................................................................10
Caring For Cedar Cabinets .........................................................................................................................10
Empty Spas ................................................................................................................................................10
How To Remove Your Spas Filters ..........................................................................................................11
Using The Drain ........................................................................................................................................11
Draining The Spa ........................................................................................................................................11
Operating Your Botany Classic Spa .................................................................................................. 12-13
Setting The Time Of Day ............................................................................................................................14
Setting The Cycle Cleaning ........................................................................................................................14
Turning On Heating ....................................................................................................................................15
Turning On The Heater Manually ................................................................................................................15
Turning On The Hot Water Pump ...............................................................................................................16
Turning On Waterfalls .................................................................................................................................16
Turning On The LED Lights ........................................................................................................................16
Frost Prevention System.............................................................................................................................16
Ozonator .....................................................................................................................................................16
Troubleshooting........................................................................................................................................17
2
IMPORTANT SAFETY INSTRUCTIONS
Your physiological response to hot water is very subjective and depends on your age, health and
medical history. If you don’t know your tolerance to hot water or experience dizziness, headaches
or nausea you should exit the spa immediately and cool down.
WARNINGS
Children in and around the spa should be supervised at all times by a responsible adult.
1. Use caution when entering or exiting the spa, where practical install a safety grab bar or
handrail. Turn off all the jets before entering or exiting the spa to improve visibility while
entering or exiting the spa. Remember that wet surfaces can be slippery.
2. Do not allow anyone to submerge their head under the water.
3. Do not use the spa unless all suction guards are installed to prevent body and hair
entrapment. Do not sit in front of or on top of the suction fittings or skimmer. This will
obstruct proper circulation of the water and may result in personal injury.
4. Never operate the spa pump/s without having all suction and return lines open.
5. Always keep the hardcover installed and locked when the spa is not in use.
6. Never allow anyone to sit or stand on the hardcover.
7. People using medications and or having any adverse medical history should consult a
physician before using the spa.
8. People with infectious diseases should not use the spa.
9. Do not use the spa if you are under the influence of alcohol or drugs.
10. Do not consume alcohol or drugs while using the spa.
11. Pregnant women should consult a physician before using the spa.
12. As prolonged immersion in water temperatures in excess of 38°C (100°F) may damage
your health, we recommend measuring the water temperature with an accurate
thermometer before entering the spa. We also recommend establishing lower temperatures
and shorter periods of use for users who may be affected by hot water temperature.
13. In order to avoid the possibility of hyperthermia (heat stress) occurring it is recommended
that the average temperature of spa-pool water should not exceed 38°
14. Do not use the spa immediately following strenuous exercise.
15. You must use a qualified electrician to connect the spa to power.
16. The power should be supplied through a residual current device (RCD) having a rated
residual operating current not exceeding 30 mA.
17. If your power supply cable is damaged switch the spa off at the residual current device
inside your houses meter box, contact a qualified electrician to replace the cable.
18. Live parts and connections must be inaccessible to any person in the spa.
19. Earthed appliances must be permanently connected to fixed wiring.
20. Do not permit or use electric appliances (such as lighting, telephone, radios, televisions
etc.) within 1.5 meters of the spa, unless the appliance is rated at 12VDC or less.
21. Parts incorporating electrical components except remote control devices must be located or
fixed so that they cannot fall into the spa.
22. Test the GFCI (Ground Fault Circuit Interrupter) or residual current device (RCD) monthly.
23. If water is leaking from the spa stop using the spa until a qualified technician has resolved
the problem.
24. Do not leave the spa empty for any period of time.
25. Post emergency phone numbers for Police, Fire Department and Ambulance at the nearest
phone.
26. Install a CPR Resuscitation chart within easy view of the spa.
27. Check with your local council to see if your spa is required to be fenced.
3
HYPOTHERMIA
Since your spa can be set to reach temperatures of 40°C (104°F) users should be aware that
extended submersion in water that exceeds normal body temperature can lead to hypothermia.
Hypothermia occurs when the internal temperature of the body reaches several degrees above the
normal body temperature of 37°C (98.6°F). The symptoms of hypothermia include drowsiness,
lethargy and an increase in the internal temperature of the body. The effects of hypothermia
include:
Unawareness of impending hazard
Failure to perceive heat
Failure to recognize the need to exit the spa
Physical inability to exit the spa
Fetal damage in pregnant woman
Unconsciousness resulting in the danger of drowning
If you feel any of the symptoms of hypothermia safely exit the spa immediately. Please note that
the use of Alcohol, Drugs or Medication can significantly increase the risk of Hypothermia.
INFORMATION TO ASSIST YOU LOCATING THE SPA
The following information will assist you in choosing the right location for your spa. When making
your decision always remember that spas can be enjoyed all year round, indoors or out regardless
of the climate. Many spa owners report that their favourite seasons are the cooler winter months
while others enjoy using their spa in the warmer summer months.
OUTDOOR LOCATIONS
For a variety of reasons outdoor locations are a far more popular choice, some of the reasons
include:
Limited indoor space.
Delivery complications due to door openings, stairwells etc.
Desire for an outdoor entertainment areas.
The spa is being installed adjacent to an existing or planned swimming pool
• Concerns over splashing water inside the home.
For those who choose an outdoor location, spa operating temperatures can be adjusted to match
the season. In colder months many owners will operate their spa in the range of 36-38°C. During
warmer months an operating temperature of 26-28°C will provide a refreshing retreat.
LOCATION CONSIDERATIONS
Contact your local council to determine if a building permit is necessary and for information
on applicable bylaws (distance from property lines, buildings, fencing requirements etc.).
If you are doing any excavating contact Dial before You Dig on 1100 to ensure that there are no
underground lines.
Locate the spa where possible within close distance of a door to the house, this will maximize
potential winter use.
Ensure that your pump(s), controls, drain-valve and thermal probe are easily accessible and
protected.
LOCATATION CONSIDERATIONS
4
If possible locate the spa where you will enjoy some privacy. If this is not possible a partial privacy
or wind partition or proper placement of the optional cover lifter should provide adequate privacy.
SPA BASE
Your spa needs a good solid foundation, the foundation on which your spa sits must be able to
support the weight of the spa the water in it and the weight of its users. If the foundation is
inadequate the spa may shift, this will cause stress to the shell which may lead to the shell
cracking. Damage caused by an inadequate or improper foundation is not covered under
warranty. It is the responsibility of the spa owner to provide a proper foundation for the spa.
A spa containing both water and people is extremely heavy, if you are installing the spa onto
decking or any other elevated structure it is advisable to consult a structural engineer to ensure
that the structure will support the weight of the spa.
Ideally the spa should be installed onto a concrete base at least 4” thick with reinforcing steel
inside the slab.
If you are installing your spa indoors ensure that your choice of flooring is impermeable to water.
Ensure that water drains away from the spa protecting the cabinet and electrical components from
water damage.
WATER SUPPLY
Spas do not require a permanent water supply however there must be a water supply and hose
within reach in order to fill the spa. A hose is also used for emptying the spa via the bottom drain
or by using a submersible pump.
SAFETY
Do not place your spa within 3 metres of overhead power lines. Make sure your spa is positioned
so that access to the equipment compartment and side panels will not be blocked.
TAKING DELIVERY
5
Depending on the delivery service you have ordered we will either drop the spa to curb side or
bring the spa into position (as long as there is clear access).
Check the dimensions of your spa and compare them to the width of any gates and paths along
the delivery route between the road and the installation site. It may be necessary for you to
remove a gate or partially remove a fence in order to provide an unobstructed passageway.
If the delivery route will require a 90° turn, don’t forget to check the measurements to ensure the
spa will fit through. Also look for any protruding utility meters, low roof eaves, overhanging trees
or gutters that might cause an obstruction.
In some circumstances it might be necessary to hire a crane for the installation.
ELECTRICAL INSTALLATION
6
You will need a suitable electrical supply to run the spa.
The Botany Classic Spa requires a 15Amp Power Connection. Your electrician can hardwire the
spa straight to the meter box in your house or they can install a 15Amp power point and make a 3
pin lead to connect the spa with.
ALL ELECTRICAL CONNECTIONS REQUIRE YOUR ELECTRICIAN TO INSTALL THE
APPROPRIATE SIZED RCD IN THE HOUSES METER BOX.
When appointing an electrician to prepare your spas electrics check that they are suitably qualified
and licenced to do so. Do not attempt to install the spas electrics yourself if you are not a fully
qualified electrician.
The spa must be hard wired on its own fused circuit back to your household meter box. The spa
should not be sharing power supply with any other appliances.
If your spa is being hardwired we recommend you install a Rotary Isolation Switch so that the spa
can be isolated from the power supply in an emergency or for service work. This is simply a rotary
on/off switch but should be sited more than 2 metres away for the spa so that users cannot be in
the spa whilst operating the switch.
3 Pin Plug
Rotary Isolation Switch
To locate the electrical connection point unscrew and
remove the cabinet panels directly underneath the spas
touch pad.
7
WIRING DIAGRAM
ELECTRICAL CONNECTION POINT LOCATION
8
IMPORTANT USAGE WARNINGS – NON WARRANTY FAULTS
Spas are extremely delicate products and require regular maintenance. Below we will list a number
of common causes of problems which are not covered under warranty. Should we ever need to visit
you to repair your spa you will be charged the full cost of a repair if we found that the cause was the
result of poor maintenance or customer negligence. Paying full attention to the issues below will
help to reduce the risk of damage to your spa.
WATER TREATMENT
One of the most crucial aspects of spa maintenance is water treatment. Improper water balance of
Lithium, Peroxide, pH, Alkalinity or Calcium may cause damage to the spa surface, pumps, jets,
heaters and headrests. If we find improper water balance in your spa, these parts will not be
covered under warranty.
Please note that your spas headrest are sensitive to chemical exposure and will discolour
immediately if you over sanitize the water or allow them to float in the water, this will not be covered
under warranty. Do not clean the spas headrests with the spas water only use fresh tap water to
clean the headrests. If you are sanitizing the spa on a once a week program it is recommended to
remove the spas headrest on the day you sanitize the spa and replace them a day later to avoid
over exposure to your sanitiser.
Different chemical packs have different methods of caring for the water. You will need to refer to
the guide that came which your chosen chemical pack for exact details on how to treat your water.
THE USE OF BROMINE TABLES WILL VOID YOUR SPAS WARRANTY
FILLING YOUR SPA WITH WATER – AIR LOCKS
The correct way to fill up your spa is to remove the spas filter/s and place your hose inside the filter
box. Some customers place the hose inside the spas main seating area however doing this may
cause a build-up of air inside the plumbing creating an air lock. Air locks can cause damage to the
spas pumps and heater. Damaged caused by an air lock will not be covered under warranty. To
avoid this problem ensure you fill up the spa through the filter box. You can tell if you have an air
lock by turning on the pumps, if no water appears to circulate through the system it is very likely that
you have an air lock. To resolve this problem, loosen the unions at the side of the suction end of the
pump until water begins to flow through. Alternatively contact the store of purchase for advice on
other ways to remove an air lock.
Note: Please ensure drain fitting is closed before filling the spa, see instructions on page 11 for how
to remove the spas filters.
9
FILTERS
Before you use the spa, please make sure the plastic wrap has been removed from the filters.
Poor filter conditions are one of the biggest causes of faults that are not covered under warranty.
Poor filter conditions allow particles to roam in the spas water. These tiny particles can cause
damage to the spas components. One of the first things our technician will check when visiting your
spa is the condition of your filter/s. If we find your filter/s are in poor condition your repair will not be
covered under warranty.
We recommend that you regularly soak your spas filter/s in filter cleaner every week. You should
also replace your spas filters every 12 months. It is advised to purchase a spare set of filters at the
time of ordering your spa and alternate between the two sets each week to make the cleaning
process easier.
USE OF HARDCOVER
Your spas hardcover must be locked to the spas cabinet when the spa is not in use. Leaving the
cover off exposes your spa to the elements which can cause damage to the spas acrylic and also
allows leaves, dust etc. to enter your spa. Debris in the spa can cause blockages or damage to the
equipment, if our technician finds items such as leaves or dirt inside your spa your repair will not be
covered under warranty.
CARING FOR CEDAR CABINETS
Wood skirting has a tendency to fade and lose its like-new appearance with time. You should restain your spa’s skirting once every three months. Lightly sand the surfaces to remove any dirt and
smoothen rough surfaces, re-stain the wood surfaces using a suitable stain. Do not use varnishes,
shellacs or surface sealants. Warranty on spa skirting is only valid if spas have been regularly
stained.
EMPTY SPAS
Your Spa must be filled with water at all times, an empty spa on a hot day will cause crazing or
blistering in the spas acrylic. This can happen within 30 minutes of the spa being emptied. Your
repair will not be covered under warranty for this issue.
10
HOW TO REMOVE YOUR SPAS FILTERS
WARNING: Be careful not to force the filter face past the waterfalls attached to the spa as this can
break the waterfall fittings, if you apply a small amount of pressure to push the filter face away from
the waterfall fitting as you remove the filter face you will clear the waterfall fittings without causing
damage.
Remove the flat head screw in the Filter box face.
Lift the face plate off the filter box vertically until it separates away from the filter box.
Remove the leaf catcher by sliding it horizontally toward the centre of the spa.
You will see the filters inside the filter box, to remove them turn the handle on the top of the filter
anti-clockwise until you can lift the filter out of the filter box.
To reinstall the filters reverse these steps.
USING THE DRAIN
When the drain fitting is pushed in the drain is closed.
When the drain fitting is pulled away from the fibreglass
base the drain is open.
DRAINING THE SPA
Attach the supplied hose fitting.
Connect your garden hose.
Release the drain fitting.
When finished draining the spa push the drain fitting back in.
11
OPERATING YOUR BOTANY CLASSIC SPA
• Your spa has two modes of operation, Standby and Active modes.
• To switch between Standby and Active modes
press
• The spa will display ‘---’ to indicate that the spa is in Standby mode.
Please Note: The Blue buttons will only operate when the spa is in Standby mode and the
Black buttons will only operate when the spa is in Active mode.
BUTTON
FUNCTION
MODE
Changes Between Active &
Standby Modes
N/A
Sets Cycle Cleaning
Standby Mode Only.
Sets Heating
Standby Mode Only.
Sets Fahrenheit or Celcius
Standby Mode Only.
Sets Temperature
Active Mode Only
No Function
Active Mode Only
Turns on LED Lights
Active Mode Only
12
OPERATING YOUR BOTANY CLASSIC SPA
BUTTON
FUNCTION
MODE
Turns on Water Jets 1
Active Mode Only
No Function
Active Mode Only
No Function
Active Mode Only
No Function
Active Mode Only
Turns on Heater
Active Mode Only
Starts Cycle Cleaning
Active Mode Only
13
SETTING THE TIME OF DAY
When turning on the spa for the first time you will need to set the clock time.
To set the clock time the spa must be in Standby mode.
Please ensure the spa is in Standby Mode (---). The three horizontal dashes must be displayed.
Press the
button to enter the time setting mode.
The hour and minutes will begin to flash on the display.
Press the
and
buttons to adjust the time, the time is set in a 24 hour clock.
Once the desired time is selected wait for 5 seconds.
The hour and minutes will remain static once this has completed.
SETTING THE CYCLE CLEANING
In order to keep your spa clean you need to set the cycle cleaning. This feature will automatically
turn on all of the spas jets temporarily to purge the spas water and then will run the spas filter for the
set period of time. You must run this feature for a minimum of 4 hours every day. Once the spa has
finished the cycle cleaning it will return to standby mode.
To set the 4 hour cleaning cycle ensure the spa is in Standby Mode (---)
Now press
Now enter the time of day you want the spa to begin the cycle cleaning, using a 24 hour clock.
To adjust the time press the
and
buttons.
Once you have selected an appropriate time press
Now enter the duration for which you want the spa to cycle clean.
To adjust the duration press the
and
buttons, you must set at least a 4 hour period.
Once you have selected an appropriate duration press
Now press the
This symbol
set.
button.
will now appear on the display panel to indicate that cycle cleaning has been
14
TURNING ON HEATING
If you intend to keep the spa at a set temperature use the preheating function at the same time you
run your cleaning cycle, the spa will return to standby mode once finished preheating. For the first
time you heat the spa we recommend you set this for 12 hours and then re set it the next day to run
at the same time you have set your cleaning cycle for.
Ensure the spa is in Standby Mode (---)
Press
Now enter the time of day you want the spa to begin preheating
(Use the same time set for the cleaning cycle).
To adjust the time press the
and
buttons.
Once you have selected an appropriate time press
Now enter the duration for which you want the spa to preheat
(Use the same time you have set for the cleaning cycle)
To adjust the duration press the
and
buttons.
Once you have selected an appropriate duration press
Now set the temperature you want the spa to preheat too.
Press the
button to adjust the temperature to the desired temperature.
Now press this
button an ‘on’ sign (see below) will now be displayed next to the time which
indicate that the preheating has been set.
15
TURNING ON THE HEATER MANUALLY
Ensure the spa is in Active Mode.
Press this
button to turn on the heater manually.
When the heater is on in active mode the heater will simply heat up to the spas maximum
temperature as fast as possible, pressing the button a second time will turn the manual heating off.
TURNING ON THE HOT WATER PUMP
Ensure the spa is in Active Mode.
Press this
button to turn on the hot water pump.
To turn off the hot water pump press the same button again.
This pump will automatically turn itself off after a set amount of time running, if it turns off while you
are in the spa you can press the same button to make it run again.
TURNING ON WATERFALLS & FEET JETS
The waterfalls and feet jets will only run whilst the spa is heating, once the desired heat is reached
the waterfalls and feet jets will not run. The waterfalls are adjustable with the topside fitting next to
the spas touch pad, please make sure you turn the fitting to the closed position when you finish
using this feature. You don’t want the waterfalls running while your spas hardcover is on.
TURNING ON THE LED LIGHTS
Ensure the spa is in Active Mode.
Press this
colours.
button once to turn on the lights, the lights will now alternate between a number of
To hold a particular colour press this
button a second time.
To turn the lights off press the button a third time.
FROST PREVENTION SYSTEM
If the temperature of the spas water drops below 5°C the spa will switch on the heater until the spa
reaches the temperature of 8°C.
OZONATOR
The spas ozonator will automatically turns itself on and off when required, there are no adjustments
you are able to make.
16
TROUBLESHOOTING
Symptoms
Possible Cause(s)
Possible Resolutions
No Power
MCB Switch off
Inadequate wiring of power to
spa
Fuse blown in control box
RCD Tripped
RCD Connected Improperly
Check MCB
Consult electrician
Replace fuse
Reset
Consult electrician
No Circulation
Impeller clogged
Water level too low
Access and clean
Top up water
RCD Repeatedly Tripping
Power Supply
Short in Grounding
Check power supply is adequate
Consult your electrician.
Jet Surge
Water level too low
Pump suctions are blocked
Top up water
Clear the suctions
No Heat
Heater is not switched on
Water level is too low
Heating element is damaged
Turn on heating (See Manual)
Top up the water
Contact seller
Noisy Motor
Damaged or worn bearings
Low voltage
Low water level
Frozen pump
Contact seller
Check electrical supply
Top up the water
Thaw out
Display Panel Not
Working
Poor connection
Unplug and reconnect the cable
Pump doesn't turn on
No power to the pump
Low water level
Air Lock
See “No Power” above
Top up the water
See “Air Lock” in user’s manual
Thermometer button
flashes
when the Heat Button is
pressed
Not enough pressure to the
circulation pump
Operate the circulation pump for
a few minutes before turning on
the heater.
UNLESS YOU HAVE THE APPROPRIATE ELECTRICAL LICENCE DO NOT OPEN THE SPAS
COMPUTER BOX, PLEASE CONTACT THE STORE OF PURCHASE FOR DETAILS OF A
LICENCED CONTRACTOR.
17