1
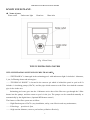
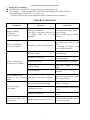
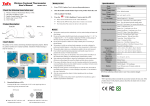
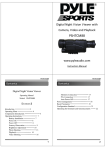
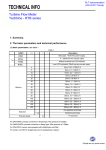
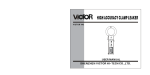
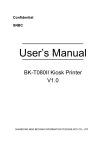
USER MANUAL FOR WTP-25 POOL FILTER WTP-25 POOL FILTER INSTALLATION OPERATION MANUAL 1 USER MANUAL FOR WTP-25 POOL FILTER KNOW YOUR PLANT: Name of parts: Water outlet Underwater light Plant box Water inlet (Fig. 1-Front View) WTP-25 FILTRATION SYSTEM WTP-25 FILTRATION SYSTEM INCLUDES TWO PARTS: ——“FILTER AREA” is immerged in the swimming pool,with underwater light。It includes 1 skimmers, 2 jets, 2xFiltering drums and union pipes. ——“TECHNICAL HOUSE” is located in the concrete pit which is behind the panel or pool wall. It includes 1 circulating pumps (25m3/h ) and the pipe which connects to the Filter Area.And the ozonater pipe is also in the area. Swimming pool water goes into the 1*skimmer active door of the filter area, go through the 2 filter drums into the pumps, and then return to pool via the jets. The pumps can be controlled manually or automatically by the digital timer. (Optional RF Remote control ) The features of the filter system are as follow: —— High filtration power 25m3/h ,easy installation, safety, cost effective and easy maintenance; ——2 filter bags, precision is 5μm; ——1 high suction skimmer, removes pool surface pollution effectively; 2 USER MANUAL FOR WTP-25 POOL FILTER ——Pipe free, no plant room,low pump power consumption; ——LED underwater light, low power consumption(18w); ——Inter cooling system, hot air is removed from the technical house by vacuum suction created by the water jets ; ——Filter bag is easy to clean(using high pressure water); Recommend: WTP-25 is to recommend to be used for new swimming pool and renovation pool. Technical specification: Power supply: Power consumption: Flow rate: Ozone Generator: Filtration precision: 220V/50Hz 1.6kw 25cbm/h 500mg/h <=5μm Underwater light: Pump outlet: Pump inlet: Dimension: Net weight: 18w/12V Φ40mm Φ40mm 1540*760*1020mm 65 kgs INSTALLATION INSTRUCTION: 1. Layout to put the plant: NOTE: before the paving of the pavement of the swimming pool, please connect a anti-corrosive and waterproof electrical cables of 3x4mm2 (L, N, G) from the residual current device (RCD) of power supply (8A/220V/50-60Hz which is our requirement) to the connection box of this plant. (Fig. 2- Dimensions) 3 USER MANUAL FOR WTP-25 POOL FILTER Ⅱ. Electrical installation instruction: NOTE: Electrical installation must be operated by the qualified technician. Fig.3- Wiring of control box) OPERATION INSTRUCTION FOR DIGITAL CONTROL PANEL: (Fig. 4- control panel) 1- ON/OFF: Control the power on and off. In manual mode, it also controls the ON and OFF for circulation pump. 2- LAMP: Turn on and turn off the underwater light. 3- O3: Manual control the ON and OFF of ozonator. 4- T3: Set the third circulation period. 5- T2: Set the second circulation period. 6- T1: Set the first circulation period. 7- T/ON: To set the starting time of circulation period. 8- T/OFF: To set the ending time of circulation period. 4 USER MANUAL FOR WTP-25 POOL FILTER 9- +: Set the clock and increase time. 10- A/M: The switch of manual mode and automatic mode. 11- -: Set the clock and decrease time. Ⅰ. Instructions for manual operation: Press “ON/OFF” key to make the power on and the control system is ready to run. Press “A/M” to start the manual mode (the indicator light on it is off). In manual mode, press “ON/OFF” key to turn on and turn off the circulating pump. Press the “LAMP” key to make the underwater light on (the indicator light on it will be on). NOTE: Press all the above keys again to make the functions off. Ⅱ. Instructions for automatic operation: Press “ON/OFF” key to make the power on and the control system is ready to run. Press “A/M” to start the automatic mode (the indicator light on it will show RED). In automatic mode, when the current time is during the period of set time, the indicator light on “T/ON” will be on; when the current time is out of the period of set time, the indicator light on “T/OFF” will be on; When the manual mode is cancelled, the circulation system will be controlled by the preset time in each use. 1. Set system clock: Long press “A/M” key for 3 seconds and loosen the hand, the panel will display system clock time and hour/minute digit flashes: Press “+”“-” to adjust the clock time. It will store and return to the previous working status after flashing 3 seconds. 2. Setting the first operating period: in automatic mode, press “T1” key to starting setting the first on operating period. ¾ Press “T/ON” key (the indicator light on it will be on) within 3 seconds after press “T1” key to start setting the starting time for the first period. Press “▲” and “▼” keys to adjust the minute (the minute number on LED screen will flash) within 3 seconds after press “T/ON” key. No action within 3 seconds, the minute number will stop flashing and be saved automatically. If need to adjust the hour, press “T1” key again within 3 seconds to start setting it. Press “▲” and “▼” keys to adjust the hour (the hour number on LED screen will flash). No action within 3 seconds, the minute number will stop flashing and be saved automatically. ¾ Press “T/OFF” key (the indicator light on it will be on) to start setting the end time within 3 seconds. Press “▲” and “▼” keys to adjust the minute (the minute number on LED screen will flash). No action within 3 seconds, the minute number will stop flashing and be saved automatically. If need to adjust the hour, press “T1” key again with 3 seconds to start setting the hour. Press “▲” and “▼” keys to adjust the hour (the hour number on LED screen will flash). No action within 3 seconds, the minute number will stop flashing and be saved automatically. PLEASE SET T2 AND T3 OPERATING PERIOD LIKE ABOVE OPERATION. REMARK: if no need to set the time in any of the 3 periods, just set the time to “zero” in that period to avoid it. Cautions before first using: Before running the device for the first time, turn on the ball valve of the pipe and fill water until the equipment box pipe are full of water and then turn off the ball valve. When it is ready to start running, press the “ON/OFF” key on control panel for several times until the circulation pump can work normally because there may be some air inside the pipes and pump for first running. 5 USER MANUAL FOR WTP-25 POOL FILTER 3. Setting device running: Manufacturer recommends:running time=water temperatur/2 (h) For example: if water temperature is 240C then the running time is 24/2=12hours Recommending to set time as:8:00-20:00 The device can do filtering at night time if noise pollution is not considered. TROUBLE SHOOTING PROBLEM Pump is running but filtering effect is not good Pump is working but no water circulation Pump is working but the water flow is small REASON SOLUTION Filter bag is removed; Put back the filter bags, replace Filter bag is not placed correctly in with clean bags the drums Filter bag is dirty Check if filter bag is installed &blocked correctly Open inlet valve and fill with water Air bubbles, pockets in Pump piping or start/stop the pump a few times to flush out the air Filter bag is dirty Clean filter bag Filter basket is blocked Clear out the leaves and garbage of the filter basket Water line is too low Fill up the pool to 3/4 skimmer Incorrect voltage Check the voltage of power supply Outlet is blocked Take out front part of jet to check for debris Water is found on the bottom of the technical Pump, pipe or union part is leaking house Underwater light not working Tighten the pump union re-seal the connection pipe Water is founded inside the light Change a new light Transformer no work Check if the outlet of transformer is 12V Wrong wire connection Check if the main power is closed Turn no the device but it Outside set filtration time T1,T2,T3 can not work 6 Switch to manual mode check if the device can work USER MANUAL FOR WTP-25 POOL FILTER SAFETY 1. ROUTINE z z z z z z z The device is limited to be used in tap water. The filter is limited to be used for swimming pool water treatment and prohibited to be used for other water treatment. Periodical checking is necessary. Please contact the supplier before you refit any part of the device. Only parts from the manufacturer will ensure smooth running of the filter. Any foreign parts installed without approval will cancel the manufacturer’s warranty . When working, do not insert& pull out, connect or do other operation. It is better to ask authorization personnel for maintenance and repair. Please read this manual before maintenance and repair. Please contact the manufacture or the nearest dealer when there is incorrect operation or damage. 2. NOTES FOR INSTALLATION AND ASSEMBLY z z Before connecting the cable to device, please check if it is installed and connected correct. Very important, do not let device and electrical parts get wet when the electricity power is on. 3. NOTES FOR STARTUP z Check the cable, operation location and others before start-up. z Do not start filtration function if the water line is not high enough. 4.NOTES FOR MAINTENANCE z Make sure the power is OFF when opening the technical house cover. 5.NOTES FOR USAGE z Do not stand on the filter cover. z Do not let children open the technical house (optional locking device) z Do not use device as springboard 7