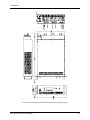
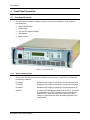
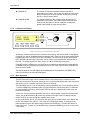
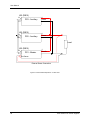
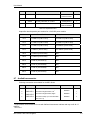
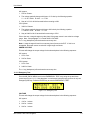
1
Revision K
August 2009
Copyright ©2003-2009
By AMETEK Programmable Power
All rights reserved.
P/N 5005-966
KDC Series II
DC Power Supply
User Manual
User Manual
About AMETEK
AMETEK Programmable Power, Inc., a Division of AMETEK, Inc., is a global leader in the design
and manufacture of precision, programmable power supplies for R&D, test and measurement,
process control, power bus simulation and power conditioning applications across diverse industrial
segments. From bench top supplies to rack-mounted industrial power subsystems, AMETEK
Programmable Power is the proud manufacturer of Elgar, Sorensen, California Instruments and
Power Ten brand power supplies.
AMETEK, Inc. is a leading global manufacturer of electronic instruments and electromechanical
devices with annualized sales of $2.5 billion. The Company has over 11,000 colleagues working at
more than 80 manufacturing facilities and more than 80 sales and service centers in the United
States and around the world.
Trademarks
AMETEK is a registered trademark of AMETEK, Inc. California Instruments is a trademark owned by
AMETEK, Inc. Other trademarks, registered trademarks, and product names are the property of their
respective owners and are used herein for identification purposes only.
Notice of Copyright
KDC Series II User Manual © 2003-2009 AMETEK Programmable Power, Inc. All rights reserved.
Exclusion for Documentation
UNLESS SPECIFICALLY AGREED TO IN WRITING, AMETEK PROGRAMMABLE POWER, INC. (“AMETEK”):
(a) MAKES NO WARRANTY AS TO THE ACCURACY, SUFFICIENCY OR SUITABILITY OF ANY
TECHNICAL OR OTHER INFORMATION PROVIDED IN ITS MANUALS OR OTHER
DOCUMENTATION.
(b) ASSUMES NO RESPONSIBILITY OR LIABILITY FOR LOSSES, DAMAGES, COSTS OR EXPENSES,
WHETHER SPECIAL, DIRECT, INDIRECT, CONSEQUENTIAL OR INCIDENTAL, WHICH MIGHT
ARISE OUT OF THE USE OF SUCH INFORMATION. THE USE OF ANY SUCH INFORMATION WILL
BE ENTIRELY AT THE USER’S RISK, AND
(c) REMINDS YOU THAT IF THIS MANUAL IS IN ANY LANGUAGE OTHER THAN ENGLISH,
ALTHOUGH STEPS HAVE BEEN TAKEN TO MAINTAIN THE ACCURACY OF THE TRANSLATION,
THE ACCURACY CANNOT BE GUARANTEED. APPROVED AMETEK CONTENT IS CONTAINED
WITH THE ENGLISH LANGUAGE VERSION, WHICH IS POSTED AT
WWW.PROGRAMMABLEPOWER.COM.
Date and Revision
August 2009, Revision K.
Part Number
5005-966
Contact Information
Telephone:
800 733 5427 (toll free in North America)
858 450 0085 (direct)
Fax:
Email:
858 458 0267
[email protected]
[email protected]
www.programmablepower.com
Web:
KDC Series II DC Power Supplies
i
User Manual
Important Safety Instructions
Before applying power to the system, verify that your product is configured properly for your
particular application.
warning
Hazardous voltages may be present when covers are removed. Qualified
personnel must use extreme caution when servicing this equipment.
Circuit boards, test points, and output voltages also may be floating above
(below) chassis ground.
warning
The equipment used contains ESD sensitive parts. When installing
equipment, follow ESD Safety Procedures. Electrostatic discharges might
cause damage to the equipment.
Only qualified personnel who deal with attendant hazards in power supplies, are allowed to perform
installation and servicing.
Ensure that the AC power line ground is connected properly to the Power Rack input connector or
chassis. Similarly, other power ground lines including those to application and maintenance equipment
must be grounded properly for both personnel and equipment safety.
Always ensure that facility AC input power is de-energized prior to connecting or disconnecting any
cable.
In normal operation, the operator does not have access to hazardous voltages within the chassis.
However, depending on the user’s application configuration, HIGH VOLTAGES HAZARDOUS TO
HUMAN SAFETY may be normally generated on the output terminals. The customer/user must
ensure that the output power lines are labeled properly as to the safety hazards and that any
inadvertent contact with hazardous voltages is eliminated.
Guard against risks of electrical shock during open cover checks by not touching any portion of the
electrical circuits. Even when power is off, capacitors may retain an electrical charge. Use safety
glasses during open cover checks to avoid personal injury by any sudden component failure.
Neither AMETEK Programmable Power Inc., San Diego, California, USA, nor any of the subsidiary
sales organizations can accept any responsibility for personnel, material or inconsequential injury, loss
or damage that results from improper use of the equipment and accessories.
SAFETY SYMBOLS
ii
KDC Series II DC Power Supplies
User Manual
Product Family: KDC Series II DC Power Supply
Warranty Period: 5 Years
WARRANTY TERMS
AMETEK Programmable Power, Inc. (“AMETEK”), provides this written warranty covering the
Product stated above, and if the Buyer discovers and notifies AMETEK in writing of any defect in
material or workmanship within the applicable warranty period stated above, then AMETEK may, at
its option: repair or replace the Product; or issue a credit note for the defective Product; or provide
the Buyer with replacement parts for the Product.
The Buyer will, at its expense, return the defective Product or parts thereof to AMETEK in
accordance with the return procedure specified below. AMETEK will, at its expense, deliver the
repaired or replaced Product or parts to the Buyer. Any warranty of AMETEK will not apply if the
Buyer is in default under the Purchase Order Agreement or where the Product or any part thereof:
•
is damaged by misuse, accident, negligence or failure to maintain the same as
specified or required by AMETEK;
•
is damaged by modifications, alterations or attachments thereto which are not
authorized by AMETEK;
•
is installed or operated contrary to the instructions of AMETEK;
•
is opened, modified or disassembled in any way without AMETEK’s consent; or
•
is used in combination with items, articles or materials not authorized by AMETEK.
The Buyer may not assert any claim that the Products are not in conformity with any warranty until
the Buyer has made all payments to AMETEK provided for in the Purchase Order Agreement.
PRODUCT RETURN PROCEDURE
1. Request a Return Material Authorization (RMA) number from the repair facility (must be done
in the country in which it was purchased):
•
In the USA, contact the AMETEK Repair Department prior to the return of the
product to AMETEK for repair:
Telephone:
•
800-733-5427, ext. 2295 or ext. 2463 (toll free North America)
858-450-0085, ext. 2295 or ext. 2463 (direct)
Outside the United States, contact the nearest Authorized Service Center (ASC). A
full listing can be found either through your local distributor or our website,
www.programmablepower.com, by clicking Support and going to the Service Centers
tab.
2. When requesting an RMA, have the following information ready:
•
Model number
•
Serial number
•
Description of the problem
NOTE: Unauthorized returns will not be accepted and will be returned at the shipper’s expense.
NOTE: A returned product found upon inspection by AMETEK, to be in specification is subject to an
evaluation fee and applicable freight charges.
KDC Series II DC Power Supplies
iii
User Manual
Table of Contents
1
Introduction .................................................................................................................................... 1
1.1
1.2
1.3
1.4
2
Specifications................................................................................................................................. 3
2.1
2.2
2.3
2.4
2.5
2.6
2.7
2.8
2.9
2.10
2.11
2.12
2.13
3
External Programming Modes ............................................................................................................. 58
Multi Unit Configurations ..................................................................................................................... 63
Principle of Operation .................................................................................................................. 71
6.1
6.2
6.3
6.4
6.5
iv
Functional Controls ............................................................................................................................. 21
Menu Structure.................................................................................................................................... 27
How to examples................................................................................................................................. 49
Programming output transient lists ...................................................................................................... 51
Setting the Power-on Initialization Values ........................................................................................... 53
Mode Status ........................................................................................................................................ 54
Remote Sensing.................................................................................................................................. 56
Remote Output ON / OFF Control....................................................................................................... 57
Operating Modes ......................................................................................................................... 58
5.1
5.2
6
Inspection............................................................................................................................................ 11
Location and Mounting ........................................................................................................................ 11
Input / Output Connectors ................................................................................................................... 12
Wire Sizing and Lug Size .................................................................................................................... 17
AC Input Wiring ................................................................................................................................... 18
Analog Controls (-IF Option) ............................................................................................................... 20
Front Panel Operation ................................................................................................................. 21
4.1
4.2
4.3
4.4
4.5
4.6
4.7
4.8
5
Electrical................................................................................................................................................ 3
Measurements ...................................................................................................................................... 5
Environmental ....................................................................................................................................... 5
Mechanical ............................................................................................................................................ 6
Agency Approvals ................................................................................................................................. 6
Remote Control Interfaces .................................................................................................................... 6
Analog Monitor Outputs......................................................................................................................... 7
Protection .............................................................................................................................................. 7
Controls and Indicators ......................................................................................................................... 7
Parallel Operation.............................................................................................................................. 8
Available Options and Accessories ................................................................................................... 9
-LC Option....................................................................................................................................... 10
-FT Option ....................................................................................................................................... 10
Installation and Functional Test ................................................................................................... 11
3.1
3.2
3.3
3.4
3.5
3.6
4
General Description............................................................................................................................... 1
KDC Controllers Series I versus Series II.............................................................................................. 2
Bench Top use ...................................................................................................................................... 2
Equipment Rack use ............................................................................................................................. 2
General ............................................................................................................................................... 71
Overall Description .............................................................................................................................. 71
Bias Power Supply (A7)....................................................................................................................... 71
Power Module (A9 through A11) ......................................................................................................... 76
Controller Module (A3) ........................................................................................................................ 78
KDC Series II DC Power Supplies
User Manual
7
Calibration .................................................................................................................................... 81
7.1
7.2
7.3
7.4
7.5
7.6
8
Calibration Equipment .........................................................................................................................81
Calibration Password ...........................................................................................................................82
Routine Calibration ..............................................................................................................................83
Output Calibration................................................................................................................................84
Measurement Calibration.....................................................................................................................87
Non-Routine Calibration.......................................................................................................................89
Service ......................................................................................................................................... 91
8.1
8.2
8.3
8.4
8.5
8.6
8.7
9
General................................................................................................................................................91
Basic Operation ...................................................................................................................................91
Module Removal..................................................................................................................................94
Controller Jumper Settings ..................................................................................................................97
Firmware Updates ...............................................................................................................................97
Replaceable Parts ............................................................................................................................. 100
Available accessories ........................................................................................................................ 101
Remote Control .......................................................................................................................... 103
9.1
9.2
9.3
9.4
9.5
9.6
9.7
9.8
10
11
Introduction........................................................................................................................................ 103
KDCGUI Program Requirements....................................................................................................... 104
RS232C Interface .............................................................................................................................. 104
Optional IEEE Interface ..................................................................................................................... 106
KDCGUI Installation.......................................................................................................................... 106
Trouble Shooting - RS232C............................................................................................................... 107
Trouble Shooting - IEEE-488 / GPIB ................................................................................................. 108
Software Registration ........................................................................................................................ 108
Programming Syntax.............................................................................................................. 109
Options ................................................................................................................................... 110
11.1
11.2
Introduction .................................................................................................................................... 110
MIL704 Option ............................................................................................................................... 111
Appendix A: Error Messages ............................................................................................................ 123
Index.................................................................................................................................................. 127
KDC Series II DC Power Supplies
v
User Manual
List of Figures
Figure 1-1: KDC Series DC Power Supply ............................................................................................................ 1
Figure 3-1: Location of rear panel connectors..................................................................................................... 16
Figure 3-2: DC Output bus bar studs. ................................................................................................................. 17
Figure 3-4: Toroid Installation, -400V input model............................................................................................... 18
Figure 3-5: Outline Drawing Chassis Dimensions (Shown with safety covers).................................................... 19
Figure 4-1: Front Panel View............................................................................................................................... 21
Figure 4-2: Shuttle Knobs.................................................................................................................................... 22
Figure 4-3: Front panel layout ............................................................................................................................. 23
Figure 4-4: Keypad layout ................................................................................................................................... 24
Figure 4-5: Display and Shuttle Knobs interaction............................................................................................... 25
Figure 4-6: Sample Transient Output Sequence ................................................................................................. 52
Figure 4-7: Constant Power Mode Profile. .......................................................................................................... 55
Figure 4-8: Remote Sensing Operation at the Load ............................................................................................ 56
Figure 4-9: Remote On / Off Control by Contact Closure .................................................................................... 57
Figure 4-10: Remote On / Off Using Isolated TTL/CMOS Voltage Supply .......................................................... 57
Figure 5-1: Remote Voltage Programming Using 0-5 or 0-10 VDC Source ........................................................ 58
Figure 5-2: Remove Voltage Programming Using Resistance ............................................................................ 60
Figure 5-3: Remote Voltage Programming Using a Current Source.................................................................... 60
Figure 5-4: Remote Current Programming Using 0-5 or 0-10 VDC Source......................................................... 61
Figure 5-5: Remote Current Programming Using Resistance ............................................................................. 62
Figure 5-6: Remote Current Programming Using a Current Source.................................................................... 62
Figure 5-7: Parallel Cable Interconnect Accessory.............................................................................................. 64
Figure 5-8: Auto-Parallel Operation – 2 KDC units.............................................................................................. 67
Figure 5-9: Auto-Parallel Operation – 3 KDC units.............................................................................................. 68
Figure 5-10: Auto-Series Operation .................................................................................................................... 69
Figure 5-11: Auto Tracking Operation ................................................................................................................. 70
Figure 6-1: DC Power Supply Block Diagram...................................................................................................... 73
Figure 6-2: DC Power Supply Block Diagram with -IF option .............................................................................. 74
Figure 6-3: KDC with -IF option, Simplified Block Diagram ................................................................................. 75
Figure 6-4: DC Module Block Diagram................................................................................................................ 77
Figure 7-1: Test Equipment Hookup for Routine Output and Measurement Calibration...................................... 83
Figure 8-1: Assembly Location............................................................................................................................ 94
Figure 8-2: Replaceable Fuse Locations........................................................................................................... 102
Figure 9-1: KDCGUI Main screen ..................................................................................................................... 103
Figure 9-2: Rear Panel View ............................................................................................................................. 106
Figure 11-1: OPTIONS screen .......................................................................................................................... 110
Figure 11-2: Available options........................................................................................................................... 110
Figure 11-3: APPLICATIONS Screen ............................................................................................................... 113
Figure 11-4: MIL704 Menu ................................................................................................................................ 113
Figure 11-5: MIL704 DC Menu - 1 of 3.............................................................................................................. 114
Figure 11-6: MIL704 DC Menu - 2 of 3.............................................................................................................. 114
Figure 11-7: MIL704 DC Menu - 3 of 3.............................................................................................................. 114
Figure 11-8: Steady State DC ........................................................................................................................... 114
Figure 11-9: Transient Menu ............................................................................................................................. 115
Figure 11-10: Abnormal Test Screen ................................................................................................................ 116
Figure 11-11: Emergency Test.......................................................................................................................... 117
vi
KDC Series II DC Power Supplies
User Manual
List of Tables
Table 3-1: Rear Panel Input and /Output Connectors..........................................................................................12
Table 3-2: Output Connection Description...........................................................................................................13
Table 3-3: Input Connection Description..............................................................................................................13
Table 3-4: RS232C Connector - J20 ...................................................................................................................13
Table 3-5: Analog I/O Connector (Isolated) - J22 ................................................................................................14
Table 3-6: Auxiliary I/O Connector (Non-Isolated) - J21 ......................................................................................15
Table 3-7: Minimum Wire Size Table...................................................................................................................17
Table 4-1: Front panel menu structure ................................................................................................................28
Table 4-2: Transient programming resolution from front panel. ...........................................................................38
Table 4-3: Configuration Control Modes. .............................................................................................................43
Table 4-4: Sample Transient List.........................................................................................................................52
Table 4-5: Factory Default Power on Settings .....................................................................................................53
Table 4-6: Operating Modes ................................................................................................................................54
Table 5-1: Master or Auxiliary Controller Configuration Jumper Settings ............................................................65
Table 5-2: Master Configuration Jumper Settings ...............................................................................................65
Table 7-1: Load Resistors and Current by model ................................................................................................81
Table 8-1: Basic Symptoms.................................................................................................................................91
Table 8-2: Poor Output Voltage Accuracy ...........................................................................................................91
Table 8-3: Poor Output Voltage Regulation .........................................................................................................91
Table 8-4: Unit Shuts Down After 3-5 Seconds ...................................................................................................92
Table 8-5: No Output and No Lights on Front Panel............................................................................................92
Table 8-6: No Output But "Display" Is On ...........................................................................................................92
Table 8-7: Master or Auxiliary Configuration Jumper Settings .............................................................................97
Table 8-8: Master or Auxiliary Configuration Jumper Settings .............................................................................97
Table 8-9: Replaceable Parts ............................................................................................................................ 101
Table 8-10: Power Module Output Capacitance ................................................................................................ 101
Table 11-1: KDC restrictions -704 option........................................................................................................... 112
Table 11-2: Error Messages .............................................................................................................................. 126
KDC Series II DC Power Supplies
vii
User Manual
1 Introduction
1.1
General Description
Figure 1-1: KDC Series DC Power Supply
The Argantix KDC Series DC Programmable Power Supplies are designed specifically for
laboratory test and systems applications requiring single output, variable DC voltage and current
with good ripple and regulation characteristics and sophisticated control and measurement
capabilities. The KDC Series comes in a 3U chassis and can operate in constant current or
constant voltage mode with auto crossover feature. Available Power levels are 5kW, 10kW and
15kW.
Simple menu driven front panel controls enable the voltage and current limit to be changed.
Measurements of voltage, current, peak current and power can also be read from the front panel
LED displays.
The front panel contains an output on/off button for controlling the DC supply output and an
output LED indicator that informs the operator of the output status at all time.
The LCD display is used to display the programmed voltage and current as well as all
measurements. More advanced functions can be accessed through nested levels of menus.
A standard RS232C and optional IEEE 488 interface is available for applications that require
remote control and measurements. While operated remotely, the front panel can be locked out
and the remote control status is indicated by a REMOTE LED.
A power on/off switch can be used to turn the DC supply on or off.
KDC Series II DC Power Supplies
1
User Manual
1.2
KDC Controllers Series I versus Series II
The original controller version used in the KDC Series has been updated and is now referred to
as KDC II or Series II. The difference is in the way parallel operation of two or more units is
accomplished. KDC units with KDC II controllers have a top-level assembly revision of E as
indicated on the model serial tag. Revisions D and older have an original KDC controller.
Series II KDC models use either controller assembly 5005-721-1 or 5005-724-1. The 5005-724-1
replaced the 5005-721-1 controller as of August 2006 product shipments and is back ward
compatible with the 5005-721-1 controller.
Note:
It is not possible to parallel a KDC Series I with a KDC Series II. Thus only
KDC units having the same generation controller can used in master /
auxiliary configuration.
This user manual is intended for use with KDC Units having a revision letter of E or higher. If the
unit you are using has a revision letter of D or lower, use user manual P/N 5005-960 instead.
Both user manuals are distributed on the same CD-ROM or are available for download from the
Argantix web site (www.argantix.com).
1.3
Bench Top use
The KDC Series DC Supply may be used as a bench top unit provided adequate provisions are
made to protect the end-user from touching the output terminals on higher voltage models. To
this end, output covers are provided on all KDC units. These covers must be installed during use
and may only be removed when the unit is not in use and disconnected from AC mains.
Adequate air flow must be maintained at all times so care should be taken not to block the top
and side air intakes or the rear air exhaust. Leave at least 4" of clearance at the back of the unit
to allow proper airflow.
1.4
Equipment Rack use
The KDC Series uses a 19" cabinet with rack ears and can be installed in a standard equipment
rack. Due to the weight of the unit however, it must be properly supported by either a shelf or L
brackets on both sides. The rack ears are not designed to support the full weight of the KDC unit
when installed in a cabinet but only to prevent it from sliding out.
Contact AMETEK Programmable Power customer support ([email protected]) for
information on rack mount kits for specific cabinets depths. See also paragraph 2.11 for available
rack mount brackets.
Proper airflow must be maintained in the instrument cabinet and the rear of the cabinet should
not be closed off by a door but rather a perforated screen allowing adequate airflow. It is also
important to leave enough clearance above each unit as some of the air intake is on the top
cover.
Note:
It is recommended to leave a 1.75" (1 U) space above each KDC unit.
A louvered cover plate to allow some air intake from the front of the cabinet may be used to cover
this space. When planning total cabinet space, allow for 4U per DC supply.
If space is at a premium, units may be mounted with no space. Maximum operating temperature
may have to be derated to 35° under these conditions.
2
KDC Series II DC Power Supplies
User Manual
2 Specifications
All specifications at 23 ± 5°C unless noted otherwise.
2.1
2.1.1
2.1.2
Electrical
Input Voltage
Standard:
-208:
208 VAC L-L -10% to 230VAC L-L +10 %
Options:
-400:
400VAC L-L ± 10 %
-480:
480VAC L-L ± 10 %)
Frequency:
50 to 60 Hz ± 3 Hz
Phases:
3-phase, 3-wire plus safety ground
Power Factor:
> 0.65 typical.
Maximum Input Current per Phase at Low Line
Current
5 KW
10 KW
15 KW
Standard
-208
27A
54A
81A
Options
-400
-480:
18A
18A
36A
36A
54A
54A
Recommended circuit protection per phase. (CB)
2.1.3
Standard
-208
30A
60A
90A
Options
-400
-480:
20A
20A
40A
40A
60A
60A
Output Power
DC Power:
2.1.4
See section 2.1.5. Maximum power is available at full-scale
voltage.
Output Voltage
Voltage
Voltage Ranges:
See section 2.1.5
Voltage Programming:
Internal
Accuracy:
Resolution:
0.05 % Setting + 0.1 % FS
0.025 % FS
Analog Input
Accuracy:
Noise and Ripple:
0.1 % Setting + 0.2 % FS
See section 2.1.5
Line Regulation:
< 0.1% of V Range
KDC Series II DC Power Supplies
3
User Manual
Load Regulation:
< 0.1% of V Range
External Sense
External Voltage Sense mode.
Maximum voltage drop allowed at load terminals is 5% of voltage
range.
Note: For 600V models, maximum drop allowed is 3% (20Vdc).
Output Impedance
Programmable in CV mode only.
Resolution:
1 mOhm
Range:
0 mOhm to N mOhm.
N = Voltage FS / 2 * Current FS. Voltage will not be reduced
below 50% of programmed value.
2.1.5
OVP Range:
0 to 110 % of V Range
105 to 115 % of V set
0 to 1.1 x Vmax range value
Transient Response:
A 30% step load will recover to within 2% of original value within 2
msec.
Stability:
+/- 0.05% of set point after 8 Hrs. warm up at fixed line, load and
temp
Ranges, Noise and Ripple
Model
4
Output
KDC 30-167
Power
Max.
5
Volts
Max.
30
Amps
Max.
167
Typical
RMS Ripple
15 mV
Typical
PkPk Ripple
45 mV
Max
PkPk Ripple
90 mV
KDC 30-333
10
30
333
15 mV
45 mV
90 mV
KDC 30-500
15
30
500
15 mV
45 mV
90 mV
KDC 40-125
5
40
125
15 mV
45 mV
90 mV
KDC 40-250
10
40
250
15 mV
45 mV
90 mV
KDC 40-375
15
40
375
15 mV
45 mV
90 mV
KDC 50-100
5
50
100
15 mV
45 mV
90 mV
KDC 50-200
10
50
200
15 mV
45 mV
90 mV
KDC 50-300
15
50
300
15 mV
45 mV
90 mV
KDC 80-62
5
80
62.5
25 mV
100 mV
250 mV
KDC 80-125
10
80
125
25 mV
100 mV
250 mV
KDC 80-187
15
80
187.5
25 mV
100 mV
250 mV
KDC 100-50
5
100
50
25 mV
125 mV
250 mV
KDC 100-100
10
100
100
25 mV
125 mV
250 mV
KDC 100-150
15
100
150
25 mV
125 mV
250 mV
KDC 150-33
5
150
33.3
25 mV
150 mV
300 mV
KDC 150-66
10
150
66.7
25 mV
150 mV
300 mV
KDC 150-100
15
150
100
25 mV
150 mV
300 mV
KDC 250-17
5
250
20
100 mV
200 mV
400 mV
KDC 250-33
10
250
40
100 mV
200 mV
400 mV
KDC 250-50
15
250
60
100 mV
200 mV
400 mV
KDC 300-17
5
300
17
100 mV
200 mV
400 mV
KDC 300-33
10
300
33.3
100 mV
200 mV
400 mV
KDC Series II DC Power Supplies
User Manual
2.1.6
KDC 300-50
15
300
50
100 mV
200 mV
400 mV
KDC 400-12
5
400
12.5
250 mV
2V
2V
KDC 400-25
10
400
25
250 mV
2V
2V
KDC 400-37
15
400
37.5
250 mV
2V
2V
KDC 500-10
5
500
10
250 mV
2V
2V
KDC 500-20
10
500
20
250 mV
2V
2V
KDC 500-30
15
500
30
250 mV
2V
2V
KDC 600-8
5
600
8.33
250 mV
2V
2V
KDC 600-17
10
600
17
250 mV
2V
2V
KDC 600-25
15
600
25
250 mV
2V
2V
Output Current
Current
Current Ranges:
See section 2.1.5
Current Programming:
Internal
Accuracy:
Resolution:
0.05 % Setting + 0.1 % FS
0.025 % FS
Analog Input
Accuracy:
2.2
0.1 % Setting + 0.2 % FS
Line Regulation:
< 0.1% of V Range
Load Regulation:
< 0.1% of V Range
Stability:
+/- 0.05% of set point after 8 Hrs. warm up at fixed line, load and
temp
Measurements
Measurement
2.3
Voltage
Accuracy: +/- (0.05% of Reading + 0.1% of Full Scale)
Resolution: +/- (0.025% of Full Scale)
Current
Accuracy: +/- (0.1% of Reading + 0.2% of Full Scale)
Resolution: +/- (0.025% of Full Scale)
Power
Accuracy: +/- (0.2% of Reading + 0.3% of Full Scale)
Resolution: +/- (0.05% of Full Scale)
Environmental
Temperature Coefficient
Voltage Set Point:
0.02%/C of V Range
Current Set Point:
0.03%/C of I Range
Ambient Temperature
Operating:
Storage:
Humidity:
KDC Series II DC Power Supplies
0 to 50 C / 32 to 122 F
-40 to 75 C /-40 to 167 F
0 to 80 % RH, non condensing
5
User Manual
Cooling:
Forced Air. Front, side and top air intake, rear exhaust.
Altitude
2.4
Operating:
2000 meters max.
Storage:
6000 meters max.
Mechanical
Dimensions:
Width:
Depth:
Height:
Unit Weight:
19.00 “/ 482.6 mm
22.19”/ 563.3 mm
(excluding bus bars and cover)
5.25”/133.35 mm
15 kW model: Net: 84 Lbs. / 38.1 Kg.
Gross: 110 Lbs. / 50 Kg
10 kW model: Net: 70 Lbs. / 31.8 Kg.
Gross: 96 Lbs. / 44 Kg
2.5
5 kW model:
Net: 56 Lbs. / 25.4 Kg.
Gross: 82 Lbs. / 37.2 Kg
Material:
Chassis:
Top cover:
Front panel
Steel. (Anodized)
Aluminum (Anodized)
Aluminum (Anodized)
Cooling:
Forced air, side and top intake, rear exhaust
Acoustic Noise Level:
(Measured at 1 meter
from front of unit).
5 KW: < 55 dBA
10KW: < 60 dBA
15KW: < 65 dBA
Internal Construction:
Modular construction.
Rear Panel
Connections:
AC Power Input, DC power out, RS232, GPIB (option), Analog
Programming (option)
Rack Mounting
Unit must be supported by shelf or brackets when mounted in 19"
cabinet.
No provisions for rack slides are made on instrument.
Agency Approvals
CE Mark:
2.6
GENERAL:
SAFETY:
EMC:
IEC 61326-1, 1998
IEC 61010-1, 2001
EN55011, Class A, Group 1
IEC 61000-4-2, 1995 IEC 61000-4-4, 1995
IEC 61000-4-5, 1995 IEC 61000-4-6, 1996
IEC61000-4-8, IEC 61000-4-11, 1994
Remote Control Interfaces
Standard:
RS232C Interface:
9 pin D-Shell connector
Handshake:
6
CTS, RTS
KDC Series II DC Power Supplies
User Manual
Data bits:
8
Stop bits:
1
Baud Rates:
9600, 19200, 38400, 57600,
115200
SCPI Syntax
-IF Option:
IEEE-488 Interface option:
IEEE-488 (GPIB) talker listener
Subset: SH1, AH1, T6, L3, C0, DC1, DT1, PP0, RL2, SR1
IEEE-488.2 SCPI Syntax
2.7
Analog Monitor Outputs
I nom
Current Monitor
Range:
Model specific.
Accuracy:
V mon
0.05 % Setting + 0.1 % FS
Voltage Monitor (requires –IF option).
Range:
0 – 10 VDC
Accuracy:
2.8
Protection
•
•
•
•
•
2.9
0.1 % Setting + 0.2 % FS
Over temperature shut down
Short circuit protection
Remote Sense, Open Sense.
Overload protection
Over voltage protection
Controls and Indicators
Controls:
Indicators:
Voltage Setting:
Digitally encoded rotary knob
Current Setting:
Digitally encoded rotary knob
Function Keys:
Five Push Buttons
Output on/off:
Push button
Power on/off:
Toggle Switch
Display:
Dual 16 character matrix LCD
LED’s for:
Output on/off
Constant Current mode
Constant Voltage mode
Constant Power mode
Remote Interface states
KDC Series II DC Power Supplies
7
User Manual
2.10 Parallel Operation
Two or more KDC power supplies of the same voltage range may be combined to create a higher
power system. This requires one master unit (default) and one or more auxiliary units (-AUX). If
both units have the same power level (same model numbers), the sharing will be equal between
the chassis and the programmed current limit set on the master will be multiplied. If units are not
of equal power, the user needs to be aware of the ratio between master and auxiliary(s). This can
be confusing and such a setup is generally not recommended.
The maximum number of KDC units that can be paralleled is 5 (1 master + 4 auxiliary units). The
following specifications apply to multi-box KDC configurations:
Parameter
Current Range:
Multiply by number of KDC units.
Current Programming:
Accuracy:
Resolution:
Current Sharing
Current ripple
8
Multiply by number of KDC units. E.g. for a 3 unit AUX AP
system, accuracy = 0.15 % + 0.3 % FS.
Multiply by number of KDC units. Programmable current is set for
master unit only. Total current will be set current times number of
units.
Within 2 % typical of combined current range. (If adjusted as
master/aux system.)
Multiply by number of KDC units
KDC Series II DC Power Supplies
User Manual
2.11 Available Options and Accessories
The following factory installed options are available for the KDC II series and may be specified at
the time of order. Installed options are shown on the model and serial tag of the KDC power
supply.
Other options may be added in the future and may not be shown in this manual revision.
Option
-IF
Description
GPIB / Analog Interface. This option is required for parallel
operation.
-400
400 V L-L AC input
-480
480 V L-L AC input
-704
Mil-Std 704 Test firmware
-AMD
Airbus A400 AMD24 Test software (requires KDCGUI and
Windows PC).
-AUX
Factory configured and calibrated for use as an Auxiliary unit with
KDC II Master DC supply.
-RPV
Factory configured and calibrated for analog voltage
programming.
-RPC
Factory configured and calibrated for analog current
programming.
Following accessories are available for the KDC Series.
PART #
DESCRIPTION
VENDOR
QTY
5005-053-1
KDC Series II parallel mode cable.
AMETEK
1
5005-255-1
Rack mount angle bracket, Left1.
AMETEK
1
1
2
5005-255-2
Rack mount angle bracket, Right .
AMETEK
5005-255-3
Rack mount clamp. (For use with 5005-255-1 and –2)
AMETEK
2
1
Angle brackets are dimensioned for use with California Instruments cabinets and may not fit all 19”
cabinets.
2
See note 1.
KDC Series II DC Power Supplies
9
User Manual
2.12 -LC Option
The –LC option has been replaced by the –FT option.
2.13 -FT Option
The –FT option provides a high current bleeder and reduces the output capacitance of each DC
power module to support faster down programming times. This results in further improved fall
times compared to a standard KDC unit. The output noise and ripple specification is increased by
a factor of 2 when adding the –FT option.
This option is available only on models with voltage ranges of 30, 40, 60 or 80V. The –FT option
must be ordered at time of initial order. This option cannot be retrofitted.
The performance specification of KDC power supplies with the –FT option is the same as a KDC
power supply except as noted below:
The voltage loop compensation is adjusted to reduce overshoot normally associated with the
reduced output capacitance of the power modules. This results in reduced load regulation
performance. An auto level control (ALC) mode is provided on –FT models to adjust for load
regulation. The ALC mode applies to CV mode of operation only and is automatically disabled
when the DC supply operates in CC or CP modes. The ALC mode can be turned on from the
CONTROL menu.
Parameter
Specification
Voltage Ranges:
30V, 40V, 50V, 80V
Load Regulation:
< 6 % of V Range (ALC mode off).
< 0.2% of V Range (ALC mode on).
Other Features:
OPV Mode:
Fixed to % of V setting.
OVP Settings of % of Range or Absolute are disabled with –FT option.
Voltage Transients
KDC40, KDC50
Down programming
Up programming
28V – 0V
< 1.0 ± 0.5 msec
0V – 28V, no load
< 1.3 ± 0.5 msec
0V – 28V, full load
< 1.5 ± 0.5 msec
28V – 0V
< 2.0 ± 0.5 msec
0V – 28V, no load
< 2.3 ± 0.5 msec
0V – 28V, full load
< 2.5 ± 0.5 msec
KDC30, KDC80
Down programming
Up programming
-FT Option
10
Output capacitance with -FT option
Capacitance per 5 KW module.
Standard Unit
Capacitance per 5 KW module.
30V
11200 uF
44000 uF
40V
7800 uF
30000 uF
50V
7800 uF
24000 uF
80V
3000 uF
7800 uF
KDC Series II DC Power Supplies
User Manual
3 Installation and Functional Test
3.1
Inspection
Inspect the shipping carton for possible damage before unpacking the unit. Carefully unpack the
equipment.
Save all packing materials until inspection is complete. Verify that all items listed on the packing
slips have been received. Visually inspect all exterior surfaces for broken knobs, connectors or
meters. Inspect for dented or damage exterior surfaces. External damage may be an indication of
internal damage. If any damage is evident, immediately contact the carrier that delivered the unit
and submit a damage report. Failure to do so could invalidate future claims.
3.2
Location and Mounting
Bench Use
The KDC Series DC Supply may be used as a bench top unit provided adequate provisions are
made to protect the end-user from touching the output terminals. To this end, output covers are
provided on all KDC units. These covers must be installed during use and may only be removed
when the unit is not in use and disconnected from AC mains.
Adequate air flow must be maintained at all times so care should be taken not to block the top
and side air intakes or the rear air exhaust. Leave at least 4" of clearance at the back of the unit
to allow proper airflow.
Rack Use
The KDC Series uses a 19" cabinet with rack ears and can be installed in a standard equipment
rack. Due to the weight of the unit however, it must be properly supported by either a shelf or L
brackets on both sides. The rack ears are not designed to support the full weight of the KDC unit
when installed in a cabinet but only to prevent it from sliding out. Four screws, two on each side
of the front panel, should be used to secure the unit in place.
Proper airflow must be maintained in the instrument cabinet and the rear of the cabinet should
not be closed off by a door but rather a perforated screen allowing adequate airflow.
NOTE:
The unit should be provided with the proper ventilation. The top, rear and
both sides of the unit should be free of obstructions. A 1.75" (1 U) spacing
between units mounted in the same cabinet is recommended.
KDC Series II DC Power Supplies
11
User Manual
3.3
Input / Output Connectors
Table 3-1 lists all external connections for the KDC Series. Table 3-2 through Table 3-6 provides
detailed input and output connector descriptions.
NOTE:
DO NOT REVERSE THE EXTERNAL SENSE CONNECTION POLARITY OR
DAMAGE TO THE KDC SUPPLY WILL RESULT.
For permanently connected equipment, a readily accessible disconnect device shall be
incorporated in the fixed wiring. For equipment connected through an outlet, the outlet socket
must be installed near the equipment and must be easily accessible.
NOTE:
For proper connection to the mains, a suitable circuit breaker or fuse is
required. The rating will depend on the units' nominal AC input voltage. If a
fuse is used, a suitable disconnect device should be installed to allow AC
input to be removed from the supply.
NOTE:
When connecting the AC Input wiring, DO NOT APPLY MORE THAN 32
INCH POUND (equivalent to 2.67 lb feet or 3.62 Nm) of torque to the input
terminal connection studs and screws.
Connector
AC Input
L1 – AC in
L2 – AC in
L3 – AC in
CHASSIS - GND
Function
Primary AC Power Input
Connects To
208 - 230 VAC nominal (Std)
400 VAC nominal
480 VAC nominal
Table 3-3
DC Output
Positive Bus Bar
Negative Bus Bar
Other
Analog I/O
(Isolated)
Auxiliary I/O (NonIsolated)
RS232/485
Function
DC output
Connects To
User Load, Table 3-2
Function
Control Interface (option)
Table
DB15, J22, Table 3-5
Control Interface (option)
DB9, J21, Table 3-6
Control Interface
RS485
Control Interface (inactive)
IEEE-488
Control Interface (option)
DB9, J20, Table 3-4. Operates in RS232
mode only.
DB9, J19. Do not use. Reserved for future
use.
See IEEE-488 standard for pin out. J23
Limit torque applied to 32 inch pound max.
Table 3-1: Rear Panel Input and /Output Connectors
12
KDC Series II DC Power Supplies
User Manual
Supply Type
Connection Description
For Output voltages <= 60V
Bus Bar with threaded Stud
For Output Voltages > = 80V
Bus Bar with threaded Stud and a rear safety cover
Table 3-2: Output Connection Description
AC In.
Designator
Dir.
Connection Description
1
ØA
Input
10-32 Threaded Stud
2
ØB
Input
3
ØC
Input
4
GND
Table 3-3: Input Connection Description
J20, Pin
Designator
Dir.
Description
1
Not used
N/C
2
TxD
Output
Transmit data
3
RxD
Input
Receive data
4
Not used
N/C
5
Common
Common
6
Not used
N/C
7
CTS
Input
Clear to send
8
RTS
Output
Request to send
9
Not used
N/C
Table 3-4: RS232C Connector - J20
KDC Series II DC Power Supplies
13
User Manual
J22, Pin
Designator
Dir.
Description
1
ON / OFF
Input
On / Off (Remote Inhibit). Switch/relay contacts or a
direct short between this terminal and ISO RTN (pin
10) will turn off the power supply.
2
TRIGGER
INPUT
Input
3
V PROG 5V
Input
Programmable from Front panel or remotely. It will
receive a Positive edge TTL pulse of 100 usec.
Duration
Remote voltage programming. Using a 0 – 5VDC
referenced to pin 14 (ISO COM), will program the
output voltage from 0 to 100%.
4
V PROG 10V
Input
Remote voltage programming. Using a 0-10VDC
referenced to pin 14 (ISO COM) source will program
the output voltage from 0 to 100%.
5
IP RES
Output
Remote current programming using a resistor. A 0 to
5K ohms resistor referenced to pin 6 (ISO VP/IP
RTN) and a jumper between pins 5 and 11 (IPROG
5V) will program the output current from 0 to 100%.
6
ISO VP/IP
RTN
7
I NOM
8
Not used
9
FUCTION
STROBE /
TRIGGER
OUTPUT
10
ISO RTN
11
I PROG 5V
Input
Remote current programming. Using a 0-5VDC
referenced to pin 14 (ISO COM) will program the
output current from 0 to 100%.
12
I PROG 10V
Input
Remote current programming. Using a 0-10VDC
source referenced to pin 14 (ISO COM) will program
the output current from 0 to 100%.
13
VP RES
Output
Remote voltage programming using a resistor. A 0
to 5K ohms resistor referenced to pin 6 (ISO VP/IP
RTN) and a jumper between pins 13 and 3 (VPROG
5V) will program the output voltage from 0 to 100%.
14
ISO COM
Isolated common return. Internally connected to pins
6 and 10.
15
Not used
N/C
Output
Return path to be used with pins V PROG 5V, I
PROG 5V, I PROG 10V, V PROG 10V, IP RES and
VP RES.
Master unit drive output to auxiliary unit(s) in parallel
mode of operation. Referenced to pin 14 (ISO COM).
N/C
Output
Programmable from the Front panel or remotely. It
will generate a 5V to 0V pulse (active low) of at least
1 usec duration every time the programmed voltage
or current changes. This output can be reassigned
as a trigger output under program control. See
Programming manual.
Return path to be used for ON/OFF, FUNCTION
STROBE (TRIG OUT) and TRIGGER pins.
Table 3-5: Analog I/O Connector (Isolated) - J22
14
KDC Series II DC Power Supplies
User Manual
J21, Pin
Designator
Dir.
Description
1
V MON
Output
Output voltage monitor. 0-10 VDC equals to 0 to
100% rated voltage.
2
COM MON
3
EXT MOD LO
4
Not used
N/C
5
Not used
N/C
6
Not used
N/C
7
EXT MOD HI
8
Not used
N/C
9
Not used
N/C
Circuit common (electrically referenced to the
negative output of the supply.)
Input
Input
Output voltage modulation. A 0 to +/- 5V signal will
modulate the output voltage from 0 to +/- 10% of
Vout.
Table 3-6: Auxiliary I/O Connector (Non-Isolated) - J21
KDC Series II DC Power Supplies
15
User Manual
Figure 3-1: Location of rear panel connectors
16
KDC Series II DC Power Supplies
User Manual
3.4
Wire Sizing and Lug Size
The DC output is available from a set of copper bus bars, one for the positive terminal, out for the
negative terminal. Each bus bar has two screw studs, (Penn Engineering, HFHB-0518-24, see
www.pennfast.com ) to which a set of two nuts and lock washers are attached. The
recommended ring-lug size that mates with these 5/16-18 thread studs for connecting output
wiring is 5/16” (standard) or M8 (metric). Crimp ring lugs are generally available from Tyco/AMP
and catalog vendors like Mouser, Digikey etc. The wire gauge and ring-lug crimp size must be
matched. See paragraph 3.5 for AC input wire lug size.
Figure 3-2: DC Output bus bar studs.
Care must be taken to properly size all conductors for the input and output of the power supply.
Table 3-7 provides guidelines for minimum recommended wire sizes for the AC input and DC
output wires. This table is derived from the National Electrical Code and is for reference only.
Local laws and conditions may have different requirements. The table is for copper wire only. The
use of Aluminum wiring is not recommended.
Size
AWG
MCM
14
12
10
8
6
4
3
2
1
0
00
000
0000
Temperature Rating of Copper Conductor
60 C
75 C
Types
Types
RUW, T, TW UF
FEPW, MR, RHW,
RUH, THW, THWN,
XHHW, USE, ZW
Current Rating
20
20
25
25
30
35
40
50
55
65
70
85
85
100
95
115
110
130
125
150
145
175
165
200
195
230
85 C
Types
V, MI
90 C
Types
TA, TBS, SA, AVB,
SIS, FEP, FEPB,
RHH, THHN, XHHW
25
30
40
55
70
95
110
125
145
165
190
215
250
25
30
40
55
75
95
110
130
150
170
195
225
260
Table 3-7: Minimum Wire Size Table
For higher ratings wires can be paralleled or refer to the applicable National Electrical Code.
KDC Series II DC Power Supplies
17
User Manual
3.5
AC Input Wiring
All KDC models require 3 phase AC input. A neutral
connection is not available, as the KDC only requires a
delta input. If only three-phase Wye AC power is available,
verify the correct Line-to-Line voltage and connect only the
phase wires.
The Safety Ground connection MUST be made to the stud
marked with the earth ground symbol.
The AC input wires must be terminated with ring lugs (AC
input stud size is ¼”-20 thread, M4 metric) of at least ¼” (7
mm) diameter. See Figure 3-3.
Before attaching wires to line input terminals, wires must
pass-thru strain relief on the safety cover. Always install
the AC input safety cover and strain relief provided with the
unit. The ground wire should be longer than the three
power phase wires by at least 1 inch.
Figure 3-3: AC Input Terminals
3.5.1
EMI Toroid Installation – 400V Models
To meet CE Mark conducted emissions, models with 400V AC input must have the supplied
ferrite toroid installed on the AC input wiring as shown. Loop the three phase conductors through
the supplied toroid 4 times (4 turns). This means they loop around the outside of the toroid three
times. This should be done before passing the AC input wires through the safety cover strain
relief and attached them to the AC input terminal studs on the rear of the KDC unit.
Wind 3 line
input wires 4
turns thru
toroid.
Figure 3-4: Toroid Installation, -400V input model.
18
KDC Series II DC Power Supplies
User Manual
Figure 3-5: Outline Drawing Chassis Dimensions (Shown with safety covers)
KDC Series II DC Power Supplies
19
User Manual
3.6
Analog Controls (-IF Option)
When equipped with the -IF option, the power supply may be
configured via the Isolated ANALOG I/O connector on the rear
panel for different operating configurations: remote current
programming, remote voltage programming or auto-parallel
modes. The use and operating requirements of each
configuration are provided in the following paragraphs.
Reference Table 3-5 for Analog I/O connector designations and
functions. The pin out orientation is shown in the diagram on
the right.
CAUTION:
These control inputs are referenced to the negative output of
the power supply. Grounding the positive output of the power
supply or biasing the output of the supply above chassis
potential will cause this input (along with the output of the
supply) to have a potentially hazardous offset voltage. Exercise
caution under these conditions.
20
KDC Series II DC Power Supplies
User Manual
4 Front Panel Operation
4.1
Functional Controls
The KDC Series front panel is shown in Figure 4-3 and can be divided in a small number of
functional areas:
•
Status Indicator lights
•
Shuttle knobs
•
Two line LCD character display
•
LED displays
•
Button controls
Figure 4-1: Front Panel View
4.1.1
Status Indicator Lights
Seven green LED status indicators are located on the front panel. These LED’s correspond to
the following conditions:
CV MODE
Indicates the DC Supply is operating in Constant Voltage mode.
CC MODE
Indicates the DC Supply is operating in Constant Current mode.
CP MODE
Indicates the DC Supply is operating in Constant Power mode.
OUTPUT
The Output LED indicates the status of the OUTPUT. The output
is controlled by the OUTPUT ON/OFF button located directly
below the LED. When the Output LED is not lit, the output
voltage is not present at the output terminals regardless of the
voltage setting.
KDC Series II DC Power Supplies
21
User Manual
REMOTE
4.1.2
The REMOTE LED indicates that the unit is in remote control
mode. If the RS232C interface is used, the REMOTE state can
be enabled by the controller using the SYST:REM command.
Any time the REMOTE LED is lit, the front panel of the KDC
Series unit is disabled. The BACK button acts as a GOTO
LOCAL button while the unit in remote state. This allows the user
to regain control of the front panel. For RS232 use, the
SYST:LOC command will enable the front panel controls. When
using the optional IEEE interface, the remote /local state is
controlled by the REN (Remote Enable) interface line.
The LOCAL button can be disabled by using the SYST:RWLock
command over RS232 or the using Local Lockout message
when using the GPIB bus.
Shuttle knobs
VOLTAGE
CURRENT
DECREASE
INCREASE
Figure 4-2: Shuttle Knobs
There are two shuttle knobs located to the right of the LCD display which are used to change
settings for voltage and current or scroll through menu parameter lists. The left shuttle always
controls the output voltage while the SET menu is displayed. Otherwise, it may be used to
change the value of any menu parameter pointed to be the left arrow on the right hand side of the
displayed menu.
The right shuttle always controls the current level while the SET menu is displayed. or the second
line (bottom line) of the displayed menu. Otherwise, it may be used to change the value of any
menu parameter pointed to be the left arrow on the right hand side of the displayed menu.
22
KDC Series II DC Power Supplies
User Manual
Figure 4-3: Front panel layout
KDC Series II DC Power Supplies
23
User Manual
4.1.3
Buttons
MODE
CV
CC
CP
REMOTE
OUTPUT
ON/OFF
VOLT 120.0V
CURR 30.00A
SET
MEAS
MENU ENTER BACK
Figure 4-4: Keypad layout
There are eight buttons on the front panel. The following is a description of these buttons:
24
KEY
DESCRIPTION
OUTPUT ON/OFF
The OUTPUT ON/OFF button will toggle the output on or off.
The LED above the button will light when the output is on. No
output voltage will be present when the OUTPUT ON/OFF
button is off despite the level of voltage programmed.
SET
The SET key selects the top level output setting menu. You can
get to this menu from any other sub menu directly by pressing
the SET key. The SET key also puts the DC supply in the set
mode of operation, which allows a new setting to be entered first
before it takes effect. This allows discrete output changes to be
made. The shuttle knobs are used to change settings.
MEAS
The MEAS key selects the Measurement menu. This menu
displays all available measurements.
MENU
The MENU key selects the main menu (Level 1). Since there are
more than two entries in the main menu, pressing the MENU key
repeatedly will cycle through all available pairs of entries. From
these entire, lower level menus can be selected by pressing the
ENTER key. Sub menus are used to change secondary settings
such as mode of operation, interface options or advanced
features.
ENTER
The ENTER key activates any selection made, either with
regards to the output settings or any other many selection made.
It is used to confirm a setting or selection.
BACK
The BACK key may be used to back up to a previous menu level
or to erase a selection already made.
The BACK button acts as a GOTO LOCAL button while the unit
in remote state. This allows the user to regain control of the front
panel. For RS232 use, the SYST:LOC command will enable the
front panel controls. When using the optional IEEE interface, the
remote /local state is controlled by the REN (Remote Enable)
interface line.
The LOCAL button can be disabled by using the SYST:RWLock
command over RS232 or the using Local Lockout message
when using the GPIB bus.
KDC Series II DC Power Supplies
User Manual
4.1.4
▲ CURSOR UP
The Cursor UP key (▲) is used to scroll through lists of
parameters in any menu. The UP key will cause the list to scroll
down until the top of the list is reached. At that point, pressing
the UP no longer has any effect.
▼ CURSOR DOWN
The Cursor DOWN key (▼) is used to scroll through lists of
parameters in any menu. The DOWN key will cause the list to
scroll up until the bottom of the list is reached. At that point,
pressing the DOWN no longer has any effect.
LCD Dual Line Display
VOLTAG
CURREN
VOLT 120.0V
CURR 30.00A
SET
MEAS MENU ENTER
Figure 4-5: Display and Shuttle Knobs interaction
All settings, measurements and menu selections are shown on the two-line back-lit LCD display.
It consists of 2 lines of 20 alphanumerical characters each. Either one of the rotary knobs affects
the parameter on the "ACTIVE" line of the LCD display. The active line is the line, which has a
LEFT ARROW (◄) at the end. The knobs can be used to scroll to parameter values shown on
the LCD. To change the ACTIVE field, use the UP (▲) or DOWN (▼) cursor keys.
If the SET screen is selected, the VOLTAGE knob only affects the programmed voltage and the
CURRENT knob only affects the programmed current. This is the only time there is a difference
between the two knobs.
The viewing angle of the LCD display can be adjusted from the Calibration (CALIBRATION)
menu (see section 0) to meet individual tastes.
4.1.5
Menu Operation
The KDC Series DC supply can be operated from the front panel through a series of menus.
There are several levels of menus, starting at level 1 (top level) and drilling down into sub menus.
See section 4.2 for a complete overview of the menu structure.
The main MENU (Level 1) can be reached by pressing the MENU key. To see all entries at level
1, press the MENU key repeatedly and it will cycle through the various entry pairs. To drill down
to a level 2 menu (sub-menu), place the ACTIVE line (◄) on the desired main menu entry and
press the ENTER key.
A Level 2 or 3 menu can have anywhere from one to multiple entries. If there are more than two
entries, the up (▲) and down (▼) cursor keys located to the right of the LCD display may be
used to scroll up or down through the available list of entries.
As you scroll through the list, you will notice that one of the two visible entries on the display will
have a "◄" marker to the right of it. This is the ACTIVE selection marker. To select an entry,
place the marker next to the desired entry and press the ENTER key. This will 'drill' down to a
lower menu level. To back up, use the BACK key or press the MENU key to return to menu level
1 (top menu).
KDC Series II DC Power Supplies
25
User Manual
If the selected entry contains a parameter setting instead of a sub-level menu, the parameter
values can be changed by turning any one of the rotary knobs. This allows the user to scroll to
all possible settings for this parameter.
26
KDC Series II DC Power Supplies
User Manual
4.2
Menu Structure
Operation of the KDC Series is menu driven. This section provides an overview of the menu
structure implemented on the KDC product line and an explanation of each of the menu fields
and parameter options.
The menu structure is only two levels deep for easy navigation. The ENTER key allows the user
to drill down to level 2. The BACK key returns to the top level or level 1.
Table 4-1 shows the layout of the menus available to the user. The MENU key must be to select
any menu. Once in the menu display mode, the UP (▲) or DOWN (▼) cursor keys can be used
to move through the menu entries on each level.
KDC Series II DC Power Supplies
27
User Manual
LEVEL 1
PROGRAM
CONTROL
LEVEL 2
VOLT
CURR
120.0V
30.00A
LEVEL 1
OUTP CAL
MEAS CAL
LEVEL 2
VIEW ANGLE
CAL PWORD
OVP MODE SVOLT
LEVEL 110.0%
RPV 5V
RPI 5V
2000
1234
VOLT REF EXT5V
CURR REF INT
RPV 10V
RPI 10V
4000
1012
MODE
POWER
CC
N/A
PRV RES
RPI RES
4000
1012
IMP STATE
OFF
VOLT NOM
CURR NOM
-2345
-1895
VOLT F/S
CURR F/S
2321
-1243
300.00V 20.000A
6000.0W 20.000AP
VOLT OFST
CURR OFST
0
0
TRAN ST
IDLE
COUNT
10
MVOLT F/S
MCURR F/S
11OO
1200
TRIG SOURCE IMM
TRAN STEP AUTO
MVOLT OFST
MCURR OFST
127
12
LEVEL 200mΩ
ALC STATE
MEASUREMENT
TRANSIENT
OFF
VOLT #12 120.0
VSLEW #12 1e+06
APPLICATIONS
OPTIONS
MIL704
DO160
CURR #12 30.00
CSLEW #12 100.0
DWELL #12 10.00
TTLT #12
ON
REGISTERS
CONFIGURATION
-5
96
MIL704
DO160
ETIME/TEMP
LIMITS
ETIME
TEMP
SAVE
REG #
RECALL REG #
ADDRESS
01
BAUD RATE 38400
21:20:03
25:33°C
LIM VOLT
LIM CURR
Power on Screens
#1
ON
OFF
80.00V
62.50A
ARGANTIX.
CIC6XX-1,Rev X.X
POWER ON REG 07
CONTROL MASTER
#2
MODEL KDC80-125
SERIAL #12345
LANGUAGE
SCPI
#3
Self test passed
Table 4-1: Front panel menu structure
28
KDC Series II DC Power Supplies
User Manual
4.2.1
Power on screens
At initial power up, the KDC series power supply will display important configuration information
in a series of power on screens. These displays are only visible for a short period of time and will
not re-appear until the next time the unit is turned on.
There are three screens that will appear in the same order:
1. Company and firmware information. Displays the manufacturer (AX, which is short for
Argantix and the firmware part number and revision. The firmware part number starts with
CIC followed by a three digit code. The firmware revision has a major revisions before the
decimal point and a minor revision after the decimal point.
2. Model and Serial number information. The model will be a function of the configuration and
will include the series designation (KDC), the voltage range and the maximum current.
The serial number is a 5 digit number. This number should match the model type sticker
located on the outside of the unit.
3. Self test result. If all internal functions pass the power-on self-test, the message "SELF
TEST PASSED" will appear. If any part of the internal self-test fails, an error message will be
displayed instead. This information may be useful when calling in for service support.
Once the power on sequence is completed, the power supply will always revert to the
PROGRAM screen shown here.
The power supply is now ready to be used.
KDC Series II DC Power Supplies
29
User Manual
4.2.2
Top Level Menu
The top level or Level 1 menu can always be reached by pressing the MENU key. There are
more than two entries at this level so the up down cursor keys must be used to scroll through all
available entries. To enter a particular menu, scroll to the desired entry. The selected entry is
marked by a "W" marker. Once the marker is on the desired entry, press the ENTER key to
select.
The entries that are available at this level are as follows:
ENTRY
30
DESCRIPTION
PROGRAM
Main output setting control for voltage, current and OVP mode.
The voltage and current control screen can also be called up
directly by pressing the SET key.
CONTROL
Selects operating modes, internal or external reference and
other settings.
MEASUREMENT
Selects the measurement screen. This screen can also be
called up directly by pressing the MEAS button.
TRANSIENT
Selects the transient data entry and execution screens.
REGISTERS
Selects the front panel setup registers.
CONFIGURATION
Selects the various configuration screens that determine
settings for remote control interfaces, IEEE address (if
installed), power on register, control mode and elapsed time.
OUTP CAL
Selects the output calibration screen.
MEAS CAL
Selects the measurement calibration screen.
ETIME / TEMP
Selects the elapsed time information and internal temperate
read out status screen.
LIMITS
Selects the voltage and current range configuration limits
screen. This screen is for information purposes only and
cannot be edited.
KDC Series II DC Power Supplies
User Manual
4.2.3
Program Menu
The program menu allows the output of the DC Supply to be programmed. While in the Program
menu, the voltage knobs slews the output voltage up or down and the current knob slews the
current limit value up or down.
There are additional screen at this level but only the first two are visible as shown above. To see
the remaining entries, use the DOWN (T) arrow key to scroll down. These menus can also be
accessed from the CONTROL entry of the main screen. (Level 1)
ENTRY
DESCRIPTION
VOLT
Sets the output voltage. Use the left knob (VOLTAGE) to slew
the voltage value.
SET or SLEW mode data entry:
The voltage can be slewed or set depending on the mode this
screen is in. Press the SET button to enter the set mode while
on the voltage field. The cursor will change to a blinking black
block. Changes made to the voltage will now not take effect
until the ENTER key is pressed. This allows the voltage to be
changed abruptly instead of slewing it. Press the SET key
again to exit the set mode. The blinking cursor will revert back
to the regular underline cursor. Changes made with the
voltage knob will take effect immediately in this mode.
The range is a function of the DC supply model. Refer to the
LIMIT screen to determine the maximum voltage that can be
set. (see paragraph 4.2.12)
CURR
Sets the current limit. Use the right knob (CURRENT) to slew
the current value.
SET or SLEW mode data entry:
The current can be slewed or set depending on the mode this
screen is in. Press the SET button to enter the set mode while
on the current field. The cursor will change to a blinking black
block. Changes made to the current limit will now not take
effect until the ENTER key is pressed. This allows the current
limit to be changed abruptly instead of slewing it. Press the
SET key again to exit the set mode. The blinking cursor will
revert back to the regular underline cursor. Changes made
with the current knob will take effect immediately in this mode.
The range is a function of the DC supply model. Refer to the
LIMIT screen to determine the maximum current that can be
set. (see paragraph 4.2.12)
KDC Series II DC Power Supplies
31
User Manual
4.2.4
Control Menu
The Control menu is used to define the operating mode of the power supply and the optional
analog interface.
ENTRY
OVP MODE
DESCRIPTION
Use the left knob to toggle the OVP mode. The OPV function
acts as a protection against over voltage conditions. When an
OVP condition is generated, an internal bleeder circuit is
activated to pull the output voltage down. If the OVP condition
persists, the dc supply will shut down the output. The level set
is a function of the mode selected. The following modes are
available:
SVOLT
Sets the OVP level to a percentage of the set
voltage. Range is 105 to 110% of setting. In this
mode, the bleeder circuit will be engaged when
programming the voltage down.
Note that for programmed values below 20% of
the available voltage range, the OVP SVOLT
level may have to be set closer to 110% to avoid
false tripping due to noise margin immunity.
Note: Default mode with –FT option.
RANGE
Sets the OVP level to a percentage of the
voltage range. (Default).
Note: Not available with –FT option.
ABS
32
Sets the OVP level to an absolute voltage level.
Valid data range is 0 to 1.1 x of KDC model
voltage range.
Note: Not available with –FT option.
KDC Series II DC Power Supplies
User Manual
ENTRY
DESCRIPTION
LEVEL
Sets the level at which the OVP engages if OVP mode is
enabled. Use the left knob to change the OVP set level. The
level is set in percent of programmed voltage, percentage of
voltage range or absolute voltage depending on the mode.
Range is from 105 to 110 % for SVOLT mode, 0 to 110% for
RANGE mode and 0 to 1.1 x Vmax for ABS mode.
VOLT REF
Sets the voltage control source to internal (INT) or external
(EXT). If external, either Voltage, current or resistance control
can be set. Available settings are:
INT
CURR REF
EXT5V
Sets voltage programming to external dc
reference. 0 - 5 V for 0 to full-scale output.
EXT10V
Sets voltage programming to external dc
reference. 0 - 10 V for 0 to full scale output.
EXTRES
Sets voltage programming to external resistance
mode.
Sets the current control source to internal (INT) or external
(EXT). If external, either Voltage, current or resistance control
can be set. Available settings are:
INT
MODE
KDC Series II DC Power Supplies
Sets voltage programming to internal reference.
(Default).
Sets current programming to internal reference.
(Default).
EXT5V
Sets current programming to external dc
reference. 0 - 5 V for 0 to full scale output.
EXT10V
Sets current programming to external dc
reference. 0 - 10 V for 0 to full scale output.
EXTRES
Sets current programming to external resistance
mode.
Sets the operating mode of the supply.
CV
Constant voltage mode. The supply maintains
the set voltage. If the current limit is exceeded,
the output trips off.
CC
Constant current mode. The supply maintains
the set voltage as long as the load current is
below the set current limit. If the current limit is
exceeded, the output voltage is reduced to
maintain the set current level. If the load
currents falls below the set current limit, the
33
User Manual
ENTRY
DESCRIPTION
output voltage returns to its set value.
CP
Constant power mode. The supply maintains the
set voltage as long as the power level is below
the set power level. If the power reaches the set
level, the voltage is reduced as needed to
maintain the set power level.
Note: This mode requires firmware revision 1.11 or
higher.
34
POWER
This field is only valid is the MODE is set to CP (constant
power). It sets the power level for the CP mode. The constant
power mode operation is also determined by the voltage and
current limit settings. See paragraph 4.6.1 for details.
IMP STATE
Sets output impedance mode. Available settings are:
OFF
The output impedance is at its minimum
possible value and the supply zero-regulates.
ON
The output impedance is maintained at the set
level by reducing the output voltage as a
function of the load current as needed.
Note that this function is only available if the
DC supply is set to Constant Voltage mode
(CV)
LEVEL
This field is only valid is the IMP STATE is set to ON. It sets
the desired output impedance level. The available range is a
function of the voltage and current ranges of the KDC model
used. The minimum value is zero mOhm. The maximum
value can be calculated by dividing the voltage range by 2
times the maximum current of the DC supply model. Thus, a
KDC40-125 would have a maximum programmable
impedance of 40 / 250 = 0.16 Ohm or 160 mOhm.
ALC STATE
ON / OFF. The ALC (auto level control) state setting is only
available on models with the –FT (fast transient) option. Refer
to section 2.13. On all other models, this mode is always off.
When enabled, the ALC state regulates the output voltage as
long as the DC supply operates in the CV mode. This provides
load regulation on a par with models without the –FT option.
The ALC has a maximum adjustment range. If the required
adjustment cannot be made, no fault is generated.
KDC Series II DC Power Supplies
User Manual
4.2.5
Measurement Menu
The measurement menu is used only for display purposes. There are no user settable fields in
this screen. The measurement screen displays all four available measurements.
The measurement menu can also be reached by pressing the MEAS key.
ENTRY
VOLTAGE
DESCRIPTION
Upper left corner field is used to display the output voltage at
the load terminals or the external sense connection. If the
output state is off, this reading will be close to zero, regardless
of the programmed voltage settings.
If the power supply is operating in the constant current or
constant power mode (CC or CP), the measured voltage may
be less than the programmed (set) voltage.
CURRENT
Upper right corner field is used to display the average dc load
current. If the output state is off or there is no load connected
to the dc supply, this reading will be close to zero, regardless
of the programmed current settings.
If the power supply is operating in the constant voltage or
constant power mode (CV or CP), the measured current may
be less than the programmed (set) current.
POWER
The lower left corner is used to display the load power
dissipation in W (Watt) or KW.
PEAK CURRENT
The lower right corner is used to display the peak current. This
is the maximum dc current level captured for any given
acquisition window. For non-transient load conditions, the
peak current reading will be close to the average dc current
reading. If the load is transient in nature, the peak current can
be significantly higher.
As of revision 2.06 firmware, the display shows a peak-hold
value of the peak current so updates will only occur if a higher
value is measured. The peak-hold can be reset by positioning
the cursor on the lower line and pressing the BACK key. This
makes it easier to determine inrush current.
KDC Series II DC Power Supplies
35
User Manual
4.2.6
Transient Menu
The transient menu is used to program and execute user-defined output sequences. These
output sequences are defined as a sequential list of voltage and/or current settings that can be
executed in a time controlled manner.
Each step in these lists is assigned a sequence number ranging from #0 through #99. The
numbering determines the order in which each step is executed.
Each step can control the voltage setting, voltage slew rater, current setting, current slew rate
and dwell time. The dwell time determines how long the output dwells at the current step before
progressing to the next step. Dwell times can range from 1 msec up to 900000 secs.
Transient lists can be set up from the front panel or over the bus. The transient list can be saved
with the rest of the front panel settings in one of the setup registers. (See Register Menu).
ENTRY
TRAN STATE
DESCRIPTION
Indicates the status of the transient system. Available modes
of operation are:
IDLE
WTRIG
BUSY
Transient system is armed and waiting for a
trigger event.
Transient system is active. A transient list
execution is in progress.
COUNT
Sets the execution count for the transient system. A count of 1
indicates the transient will run 1 times. The count value can be
set with either voltage or current knob while the cursor is on
this field. The range for COUNT is from1 through 2E8. Values
above 200,000 will be displayed in floating point notation
(2E+05). Display resolution is limited when displayed as a
floating point number so it is not advised to use values above
2E5 from the front panel.
TRIG SOURCE
Indicates the trigger source for transient system. Available
trigger sources are:
IMM
36
Transient system is in IDLE or inactive state. To
start a transient list, press the ENTER key while
on the TRAN STATE field. Note that the output
must be ON to run a transient program or an
error message will be displayed.
Immediate mode. The transient is started from
KDC Series II DC Power Supplies
User Manual
ENTRY
DESCRIPTION
the front panel using the ENTER key.
TRAN STEP
BUS
Bus mode. The transient system is started by a
bus command or a group execute trigger (GET).
EXT
External mode. The transient system is started
by a user-provided external trigger signal.
Indicates the transient system execution mode. Available
modes are:
AUTO
When triggered, the transient system will
automatically execute each list point
sequentially without waiting for a trigger
between list points. This execution is paced by
the dwell time set for each data point.
ONCE
When triggered, the transient system will
execute the first list point and wait for a new
trigger once the dwell time expires. This allows
triggered execution of each step in the transient
list.
VOLT
Step #
Voltage set point. See Table 4-2.
VSLEW
Step #
Voltage slew rate in V/sec
Minimum setting: 0.001 V/s
Maximum setting: 1E6 V/s or Vrange * 1000
whichever is smaller.
Resolution: 1 msec
CURR
Step #
Current set point. See Table 4-2.
CSLEW
Step #
Current slew rate in A/sec
Minimum setting: 0.001 A/s
Maximum setting: 1E6 A/s or Irange * 1000
whichever is smaller.
Resolution: 1 msec
DWELL
Step #
Dwell time in seconds.
Range is 0.001 to 9E4 sec
Resolution: 1 msec
TTLT
Step #
ON:
OFF:
List parameters:
Generates an output trigger at this step.
No output trigger.
Transient List points data entry method.
Transient list points are numbered sequentially from 0 through 99 and executed in this order.
Each list point or list entry has 6 parameters as shown in the table above. To enter list point data,
KDC Series II DC Power Supplies
37
User Manual
the right hand knob (CURRENT) is used to increment or decrement the parameter value. The
left-hand knob (VOLTAGE) is used to increment or decrement the list point sequence number (#).
The sequence number can only be increased to the next available empty (new) list point.
To move to the next or previous parameter, use the UP (S) or DOWN (T) cursor keys
The voltage and current slew parameters can be set to their maximum slew rates by turning the
CURRENT knob counter clock-wise past 0. This will cause the slew parameter to 'wrap around'
to its maximum available value. This value is a function of the voltage and current range and is
different for different models.
It is not necessary to use all list points, only as many needed to accomplish the desired output
sequence.
Setting Data Values
Data values can be set for each point in a list. If all data values in a specific list are going to be
the same value (e.g. the current limit parameter is set to the same value for the entire transient
program), only the first data value for that parameter has to be set. Setting only the first data
point will automatically repeat that value for all subsequent points in the transient list.
The programming resolution from the front panel for setting data values for voltage is a function
of the voltage range. The programming resolution from the front panel for setting data values for
current is a function of the current range, which is determined by the voltage and power range.
Table 4-2 shows these values as a function of voltage range and power level.
Voltage Range
Voltage
resolution (V)
Current
Resolution (A)
Current
Resolution (A)
Current
Resolution (A)
5 KW
10 KW
15 KW
30 V
0.01
0.05
0.1
0.2
40 V
0.01
0.05
0.1
0.2
50 V
0.02
0.1
0.1
0.1
80 V
0.02
0.02
0.1
0.1
100 V
0.1
0.02
0.1
0.1
150 V
0.1
0.01
0.02
0.1
250 V
0.1
0.01
0.01
0.02
300 V
0.1
0.01
0.01
0.02
400 V
0.1
0.01
0.01
0.01
600 V
0.2
0.01
0.01
0.01
Table 4-2: Transient programming resolution from front panel.
38
KDC Series II DC Power Supplies
User Manual
Setting Slew Rates
Very often, output changes must be done as fast as the DC supply can make them. This means
the transient list slew rate is set to its maximum value. If this is the case for all the data points in
the list, it is sufficient to set just the first data point's slew rate for either voltage and/or current.
Setting only the first point of any parameter in the list will automatically cause all points for that
parameter to be set to the same value. This saves a lot of data entry time.
If however, one or more data points require a specific slew rate such as needed to do a ramp, all
other points have to be specifically set to their required slew rates, including the maximum slew
rate.
Note:
While it is possible to set specific voltage and current slew rates, the actual
output performance is limited by the output stage and is a function of
voltage range, power level and load. Any load, especially capacitive load,
will limit slewing the voltage up. Slewing the voltage down will be more
limited under no load condition or cap load conditions. As such, the
programmed slew rate may not actually be observed on the output.
Saving Transient Lists
Once completed, a transient sequence can be saved along with the steady state setup of the DC
supply by using the REGISTER, SAVE menu. It is advisable to so, especially for longer transient
lists.
KDC Series II DC Power Supplies
39
User Manual
4.2.7
Registers Menu
The registers menu provides access to the non-voltage setup storage of the DC power supply. A
total of 8 front panel setups can be stored in registers numbered from 0 through 7. Each register
can hold the complete front panel setup, including the programmed transient list. This allows for
quick recall of different setups and transient programs.
One of the setup registers can be assigned as the power on default setting for the KDC power
supply. This is accomplished from the Configuration menu. See section 4.2.8.
ENTRY
SAVE
REG 0 - 7
Recalls the selected setup and transient list
from memory. The left knob (VOLTAGE) may
be used to scroll through the available list of
setup register numbers.
Use the ENTER key to perform the save
operation
RECALL
REG 0 - 7
Saves the selected setup and transient list to
memory. The left knob (CURRENT) may be
used to scroll through the available list of
setup register numbers.
Use the ENTER key to perform the recall
operation
Note:
40
DESCRIPTION
When operating the KDC power supply as an auxiliary unit in a multi box
configuration, do not recall settings that were saved while the KDC was in
Master (normal) mode as this may invalidate the auxiliary settings. This is
especially important if a register is assigned to the power on default
setting.
KDC Series II DC Power Supplies
User Manual
4.2.8
Configuration Menu
The configuration menu may be used to configure various aspects of the dc supply such as the
serial port, GPIB bus (if installed) and the power on settings of the supply.
ENTRY
DESCRIPTION
ADDRESS
0 - 31
Sets the selected IEEE / GPIB bus address
for the optional IEEE/GPIB interface.
Factory default is address 1. The left knob
(VOLTAGE) can be used to scroll through the
0 through 31 address range. Do not use
address 0 as this address is typically reserved
for the GPIB controller.
BAUD RATE
9600
19200
38400
57600
115200
Sets the baud rate for the RS232C serial
communications port.
Factory default is 38400 baud. Available
settings are 9600 through 115200 baud. The
right knob (CURRENT) can be used to scroll
through these selections.
POWER ON
REG 0 – 7,
DEF
Selects the non-volatile register to be recalled
automatically at power-on.
Factory default is DEF, which recalls the
factory settings. Available parameters are
REG 0 through REG 7, which recalls any of
the user-defined setups, or DEF for factory
default.
Note that to use a register for power-on
default, the contents of the register must be
programmed first. See section 4.2.7. If an
empty register is selected, the DC supply will
revert back to DEF (factory setting).
Note: When operating the KDC power supply
as an auxiliary unit in a multi box
configuration, do not recall settings that were
saved while the KDC was in Master (normal)
mode as this may invalidate the auxiliary
settings. This is especially important if a
register is assigned to the power on default
setting.
KDC Series II DC Power Supplies
41
User Manual
ENTRY
CONTROL
DESCRIPTION
MASTER
AUX
Selects controller operation mode. Default is
MASTER, which is the normal mode of
operation for a stand-alone unit.
Alternatively, one of the auxiliary modes may
be selected if this DC supply is an auxiliary to
a master supply.
Note that setting this field sets the internal
settings of the controller for the selected mode
of operation. It is not recommended to change
settings further as they may conflict with the
chosen mode of operation. For example, in
AUX AP mode, the current limit mode is set to
CC. Changing the mode to CV may generate
a current fault in parallel operation.
Available auxiliary modes are:
AP:
AS:
AT:
Auto parallel mode. Parallel operation of
2 or more units to increase current. This
mode also requires the controller to
be reconfigured to an -AUX so
changing this field in the configuration
menu alone is NOT sufficient. See
section 5.2.1 for additional configuration
details.
Auto series mode. This mode is not
functional on an –AUX configured unit.
See section 5.2.2 for details.
Auto tracking mode. This mode is not
functional on an –AUX configured unit.
See section 5.2.3 for details.
See chapter 5 for operating mode details.
LANGUAGE
42
SCPI
Reserved
The standard bus syntax used by the KDC
Series is the Standard Commands for
Programmable Instruments (SCPI).
If an alternative syntax is available, it can be
selected from this menu.
KDC Series II DC Power Supplies
User Manual
Configuration Control Modes.
Note that the control settings can be used to select one of four operating modes. The modes and
their impact on the user’s ability to change settings on a unit are shown in Table 4-3. The control
mechanism used in each mode of operation is also indicated for reference. For more information
on multi-box configurations, see section 5.2.
Operating Mode
MASTER
Master unit
SET Display
Control
VOLT
CURR
<set value>
<set value>
Voltage and current limit set
from front panel or over bus.
AUX AP
Auxiliary, auto parallel
Requires controller
configured for –AUX.
VOLT
CURR
N/A
EXT
Current controlled by
MASTER unit. Voltage same
as MASTER unit.
CURR REF: EXT5V
AUX AS
Auxiliary, auto series
VOLT
CURR
EXT
N/A
Voltage controlled by
MASTER. Current tracks
MASTER unit.
VOLT REF: EXT10V
VOLT
CURR
EXT
<set value>
Voltage tracks MASTER.
Current limit set from front
panel.
VOLT REF: EXT10V
Requires controller to be
configured for stand-alone
operation.
Requires controller to be
configured for stand-alone
operation.
AUX AT
Auxiliary, auto tracking
Requires controller to be
configured for stand-alone
operation.
Table 4-3: Configuration Control Modes.
Note that the active configuration mode is saved when saving a setup to a non-volatile register. If
the firmware of the KDC power supply is updated in the field, it may be necessary to reset NVM
settings with the correct configuration setting. This can be done by changing the power on default
to RST, cycling the power, setting the unit up as desired, saving the new setup in REG0 and then
assigning REG0 as the power on setting. See 4.2.7 for details on using setup registers.
Note:
Switching modes between MASTER, AUX AS and AUX AT can be done by
changing the configuration setting only. Switching to AUX AP mode
however requires changes to the controller jumper settings. See section
5.2.1 for hardware configuration details.
KDC Series II DC Power Supplies
43
User Manual
Output Calibration Menu
The output calibration menu can be used to perform routine calibration of the dc supply output.
The recommended calibration interval is 12 months. The output calibration menu allows
calibration of both the output and the external analog inputs if installed.
Note: Refer to chapter 7 for details on routine calibration procedures and equipment
requirements. Do not attempt calibration without consulting the user manual.
This menu also contains the LCD viewing angle adjustment.
ENTRY
DESCRIPTION
VIEW ANGLE
-10 to +10
LCD viewing angle adjustment.
CAL PWORD
V range
Calibration password required to access all
calibration screens. The calibration password
is the voltage range value. Thus, for a KDC80187, the cal password is 80. The password
can be set using the voltage or current knob.
Analog I/O option Calibration Menus
1
2
RPV 5V
± 9999
Calibration coefficient for full-scale voltage 5V
RPV analog input
RPI 5V
± 9999
Calibration coefficient for full-scale current 5V
RPV analog input
RPV 10V1
± 9999
Calibration coefficient for full-scale voltage
10V RPV analog input.
RPI 10V2
± 9999
Calibration coefficient for full-scale current
10V RPV analog input.
RPV RES
± 9999
Calibration coefficient for full-scale voltage
resistive analog input
RPI RES
± 9999
Calibration coefficient for full-scale current
resistive analog input
When using 10V input, it is recommended to ground the 5V input to avoid noise pickup.
When using 10V input, it is recommended to ground the 5V input to avoid noise pickup.
44
KDC Series II DC Power Supplies
User Manual
ENTRY
DESCRIPTION
Output Calibration Menus
VOLT NOM
± 9999
Calibration coefficient for voltage scaling.
(Factory set)
CURR NOM
± 9999
Calibration coefficient for current scaling.
(Factory set)
VOLT F/S
± 9999
Calibration coefficient for voltage zero offset.
CURR F/S
± 9999
Calibration coefficient for current zero offset.
VOLT OFST
-128 - + 127
Calibration coefficient for voltage zero offset.
CURR OFST
-128 - + 127
Calibration coefficient for current zero offset.
KDC Series II DC Power Supplies
45
User Manual
4.2.9
Measurement Calibration Menu
The measurement calibration menu can be used to perform routine calibration of the internal
measurement system. The recommended calibration interval is 12 months.
Note: Refer to chapter 7 for details on routine calibration procedures and equipment
requirements. Do not attempt calibration without consulting the user manual.
This menu also contains the LCD viewing angle adjustment.
ENTRY
DESCRIPTION
VIEW ANGLE
-10 to +10
LCD viewing angle adjustment.
CAL PWORD
V range
Calibration password required to access all
calibration screens. The calibration password
is the voltage range value. Thus, for a KDC80187, the cal password is 80. The password
can be set using the voltage or current knob.
Measurement Calibration Screens
46
MVOLT F/S
± 9999
Calibration coefficient for full-scale voltage
measurement.
MCURR F/S
± 9999
Calibration coefficient for full-scale current
measurement.
MVOLT OFST
-128 - + 127
Calibration coefficient for voltage
measurement offset.
MCURR OFST
-128 - + 127
Calibration coefficient for current
measurement offset.
KDC Series II DC Power Supplies
User Manual
4.2.10 Applications and Options Menu
The Applications and Options menu provides access to application specific firmware functions
and other optional features if available. Note that there may be no options or applications
installed in which case this screen will still be shown but has no function.
4.2.11 Elapsed Time and Temperature Screen
The Etime/Temp screen displays the elapsed time since the power supply has first been turned
on. This is an accumulated total time in hours, minutes and seconds.
The same screen also displays the internal temperature of the power supply.
ENTRY
DESCRIPTION
ETIME
01:23:45
The ETIME field displays the total
accumulated elapsed time for the DC supply
since it's initial manufacture. This value
cannot be changed or reset. The TEMP field
is not a user selectable parameter but rather a
readout of the internal controller board
temperature. It is provided for informational
purposes only.
TEMP
37.342°
The TEMP field is not a user selectable
parameter but rather a readout of the internal
temperature in degrees Celsius. It is provided
for informational purposes only.
KDC Series II DC Power Supplies
47
User Manual
4.2.12 Limit Menu
The Limit menu displays the maximum available value for voltage and current range of the DC
supply. This screen is used for information only and contains no user changeable fields. The limit
values shown cannot be changed.
ENTRY
48
DESCRIPTION
LIM VOLT
V range
Displays maximum available output voltage.
LIM CURR
C range
Displays maximum available current under full
load conditions.
KDC Series II DC Power Supplies
User Manual
4.3
How to examples...
This section covers some common tasks that are often performed with an DC power supply.
These examples are written in a How to... format and provide step by step instructions on how to
set up the DC supply for a specific task.
4.3.1
Set the Output
Output parameters are Voltage and Current Limit.
1. Disable the output by pressing the OUTPUT button. The LED above the button will turn off.
2. Press the SET button if the PROGRAM screen is not visible.
SLEW MODE
3. Use the left shuttle to change the displayed output voltage setting. Clockwise will increase
the setting, counter clockwise will reduce the setting. The LCD display will show the voltage
setting. The output will change as the setting changes. This is called the slew mode of
operation.
4. Alternatively, you can use the SET mode. The set mode is entered by pressing the SET key
again while the PROGRAM screen is visible. Once in SET mode cursor will blink on/off until
the ENTER key is pressed, indicated a new set value has been dialed in but not yet entered.
SET MODE
5. While in SET mode, changing the voltage setting will not affect the output until ENTER is
pressed. To cancel the SET mode, either press ENTER to update the output with the new
voltage setting or press the SET key again to return to the slew mode.
6. Use the right shuttle to set the current limit. The setting will blink on/off until the ENTER key is
pressed, indicating a new set value has been dialed in but not yet entered.
7. Enable the output by pressing the OUTPUT button.
8. Press the ENTER button to activate the new settings.
4.3.2
Display Measurement Data
Measurements are always active and can be displayed as follows:
1. Press the MEASURE button located below the LCD display.
2. All measurements are displayed on the LCD screen.
KDC Series II DC Power Supplies
49
User Manual
4.3.3
Control the Output
The Output can be disabled or enabled using the ON/OFF button as follows:
1. Pressing the OUTPUT button when the output LED is on will turn off the DC supply output.
The programmed voltage setting will remain at the last program value.
2. Pressing the OUTPUT button again will engage the output and the output will revert to the
last programmed value.
4.3.4
Measure Peak Inrush Current
To measure the inrush current of an EUT, proceed as follows:
1. Turn of the supply output using the OUTPUT ON/OFF button and connect the EUT.
2. Press the MENU key and select the PROGRAM entry. Press ENTER to bring up the
PROGRAM screen.
3. Set the output to zero volt and enable the output using the OUTPUT ON/OFF button.
4. Use the SET key as described in section 4.3.1 above to change the output voltage to the
nominal supply voltage of the EUT.
5. Press the MEAS key to bring up the measurement screen, including the peak current
measurement.
6. Read the inrush current from the AP field in the lower right corner of the screen.
50
KDC Series II DC Power Supplies
User Manual
4.4
Programming output transient lists
The output transient system allows sequences of programmed voltage and or current changes to
be executed in a time controlled manner. Changes can be either step changes (maximum slew
rate) or ramps (specified slew rates). Keep in mind however that the output will follow the
programmed changes as fast as the DC module can follow the controller signal. This is often a
function of the load. For example, stepping to a higher output voltage with no load connected will
invariably result in a faster slew rate on the output than under full load conditions. This is due to
the need to charge up the output storage capacitors. Under no load conditions, more current is
available to so than under full load conditions. Conversely, down programming will be
considerable faster under full load conditions than it is under no load conditions as the load will
enable the output storage capacitors to discharge faster. Note that a special bleeder circuit is
provided in the KDC Series to help pull down the output voltage under no or light load conditions
to accomplish faster slew down rates.
The section provides some examples of programming output changes (transients). Transients
are defined as a series of numbered steps in a list. The list is executed sequentially. Each step
has a number of fields that can be set by the user:
Voltage, Voltage slew rate, Current, current slew rate, Dwell time, Trigger out.
The voltage and current settings are the same as one would do form the setup screen using the
knobs. At each step, the output will be set to the specified voltage and/or current. The rate of
change is determined by the slew rate set. If the voltage is changed from 10 Vdc to 20 Vdc and
the V slew is set to 100 V/sec, the voltage will ramp from 10 to 20 Vdc in 100 msec. ( [20 - 10] /
100 = 0.1 sec). The dwell time is the time the output will remain at this setting. In this example, it
should be set long enough to reach the final programmed value of 20 Vdc, e.g. it should be at
least 0.1 sec. If not, the voltage will never reach the final value of 20 Vdc before the next step in
the transient list is executed. The dwell time may be set longer than 0.1 sec in this example. If for
example the dwell time is set to 1.0 sec, the voltage will ramp from 10 Vdc to 20 Vdc over a 0.1
sec period and then remain at 20 Vdc for 0.9 sec.
Once the dwell time set for a step in the list expires, the next step is entered (if available, if not,
execution stops and the output remains at the final values set in the last step of the list.)
Note that while there are parameters for both voltage and current level and slew rates, there is
only one dwell time, which applies to each step in the transient list.
The following sample illustrates the use of transient system to program controlled output
changes.
KDC Series II DC Power Supplies
51
User Manual
#1
#2
#3
#4
#5
#6
#7
Limit Line (model specific)
100V
#8
150A
75V
112.5A
50V
75A
25V
37.5A
0V
0A
1.000
2.000
= Voltage
3.000
4.000
5.000
= Current
Figure 4-6: Sample Transient Output Sequence
This output can be accomplished using the following transient list.
Volt
VSlew
Current
CSlew
Dwell
1
0.00
MAX
75.00
MAX
0.100
2
50.00
125.00
100.00
MAX
0.900
3
75.00
MAX
50.00
200.00
0.250
4
25.00
66.67
50.00
MAX
0.750
5
25.00
MAX
105.00
MAX
1.000
6
50.00
MAX
100.00
MAX
0.800
7
20.00
MAX
100.00
MAX
0.200
8
50.00
MAX
100.00
MAX
1.000
Step #
(data point)
Table 4-4: Sample Transient List
52
KDC Series II DC Power Supplies
User Manual
4.5
Setting the Power-on Initialization Values
The power supply is shipped with default factory settings when the unit is powered up. The
factory settings are:
Parameter
Factory default setting
Voltage
0.0 Volt
Current limit
Maximum available current.
Display mode
Current measurement
Output state
OFF
Local / Remote State
Local. Front panel unlocked.
Table 4-5: Factory Default Power on Settings
It is possible to change the power on initialization values in one of two ways:
1. Using the RS232 or optional IEEE-488 interface and the supplied KDCGUI program.
2. Using the front panel.
To change the power on initialization values from the front panel, proceed as follows:
1. Set the unit up in the desired way from the front. (Voltage, current limit, output state, display
mode).
2. Press the MENU button to select the top-level menu and scroll down to the REGISTERS
entry. Press ENTER to select the configuration menu.
3. In the REGISTERS screen, select any number from 0 through 7 you want to use to save this
setup. Press ENTER to save the present setup and remember the NVM register number
used.
4. Press the MENU button to select the top-level menu and scroll down to the CONFIGATION
entry. Press ENTER to select the configuration menu.
5. In the configuration screen, scroll down to the POWER ON REG entry. With the cursor on the
POWER ON REG field, use the knob to scroll to the NVM number used in step 3.
6. Press ENTER to make this register the new power-on default.
7. This procedure can be repeated as often as needed by the user.
KDC Series II DC Power Supplies
53
User Manual
4.6
Mode Status
The KDC Series can operate in one of two modes of operation, voltage mode or current mode
with automatic cross over.
Mode
Description
Voltage Mode (CV) mode
Constant voltage mode. The supply maintains
the set voltage. If the current limit is exceeded,
the output trips off.
Constant Current (CC) mode
Constant current mode. The supply maintains
the set voltage as long as the load current is
below the set current limit. If the current limit is
exceeded, the output voltage is reduced to
maintain the set current level. If the load
currents falls below the set current limit, the
output voltage returns to its set value.
Constant Power (CP) mode
Constant power mode. The supply maintains the
set voltage as long as the power level is below
the set power level. If the power reaches the set
level, the voltage is reduced as needed to
maintain the set power level.
Note: This mode requires firmware revision 1.11 or
higher.
Table 4-6: Operating Modes
The currently active mode is always indicated by the CV, CC and CP status LED's on the front
panel and may also be queried through he remote control interface. Note that when transitioning
between states, both or neither LED may be on due to some hysteresis in the circuitry.
54
KDC Series II DC Power Supplies
User Manual
4.6.1
Constant Power mode operation profile
The constant power mode attempts to maintain constant power into the load. This concept is
bound by the voltage and current mode limitations however. Thus, it may not be possible to
maintain constant power mode under all load conditions. For example, if the required voltage to
maintain constant power exceeds the programmed (set) voltage, the power supply will revert to
CV mode once the maximum voltage is reached and the output power will be less than set in the
POWER field of the CP mode screen. The same is true if the required load current exceeds the
current limit set point.
The constant power mode operating profile is shown below. The Vset and Iset bounds are the set
values for voltage and current limit.
Vset
CV mode
CP mode
CC mode
Iset
User sets Vset, Iset and CP mode = nnn Watt
If Iout < Iset and Vout < Vset, KDC is in CP mode, varies voltages
as needed to maintain P.
If Iout > Iset, KDC switches to CC mode. Current stays at Iset,
voltage can vary as needed. P is not CP setting.
If Vout > Vset, KDC switches to CV mode. Current may vary and P
is less than CP setting.
Figure 4-7: Constant Power Mode Profile.
The Constant Power mode requires power measurements to operate. Obtaining these
measurements takes time as several readings are averaged to avoid instability. As such,
changes in setting will typically occur at a slower rate than the CV or CC modes. Also, the voltage
is dominant parameter used in the CP mode.
This means that when the CP mode is first selected and the output is turned ON, the voltage will
be set to the programmed value until the CP mode determines that the voltage needs to be
reduced as a function of the load detected. To avoid damage to the EUT, do not set the voltage
past the maximum level the EUT can sustain.
Once engaged, the output can be turned off. When turned back on, the voltage will resume at the
last value in effect in the CP mode. If the load has been changed, it will take some time to react
again.
Note: KDC units with firmware revisions below 1.11 do not have the CP mode enabled.
KDC Series II DC Power Supplies
55
User Manual
4.7
Remote Sensing
In applications where the load is located some distance from the power supply, or the voltage
drop of the power output leads significantly affects load regulation, remote voltage sensing may
be used. When remote sensing is used, voltage is regulated at the load versus the power supply
output terminals. To connect the power supply for remote voltage sensing (see Figure 4-8 for
connection requirements), perform the following procedure.
Connect sensing leads from the load positive to REMOTE SENSE CONNECTOR Positive and
the load negative to REMOTE SENSE CONNECTOR Negative. A shielded, twisted-pair, hookup
wire is recommended to avoid potential noise interference. Use red wire for the positive sense,
black wire for the negative sense.
WARNING: The following conditions should be avoided, as they will damage the power supply
and any warranty will be voided:
•
Opening the sense connection while power is applied. This will cause the output voltage
to shoot past the maximum voltage. (Open loop condition).
•
Reversing positive and negative sense connections (reversed polarity).
•
Shorting the external sense wires while power is applied. This will cause the output
voltage to shoot past the maximum voltage. (Open loop condition).
•
Disconnecting one or both of the load connections using a breaker or switch but leaving
the external sense connections in place while power is applied. This will cause the output
voltage to shoot past the maximum voltage and may damage the sense circuits. (Open
loop condition).
Figure 4-8: Remote Sensing Operation at the Load
56
KDC Series II DC Power Supplies
User Manual
4.8
Remote Output ON / OFF Control
Remote on/off (remote inhibit) control may be accomplished by contact closure or TTL/CMOS
voltage source. The output will remain OFF while the remote inhibit state is active. Once
removed, the output will resume the state (on or off) that was in effect when the remote inhibit
was applied. During the remote inhibit state, the on/off button on the front panel may still be used
to toggle the on/off state but the change of state will not take effect until the remote inhibit is
released and will not be reflected by the on/off LED until the remote inhibit is released. It is
possible to query the internal on/off state over the bus but the state of the remote inhibit cannot
be queried. Thus, the output state may be reported as on while the remote inhibit is active.
1. Remote on/off by contact closure. Output is OFF when contacts are closed. See Figure 4-9
for connection requirements.
2. Remote on/off control may be accomplished by a TTL/CMOS source. Application of a high
state TTL/CMOS voltage will turn off the power supply. See Figure 4-10 for connection
requirements.
ANALOG I/O
ON/OFF 1
10 ISO RTN
15
Figure 4-9: Remote On / Off Control by Contact Closure
ANALOG I/O
ON/OFF 1
TTL\
CMOS
10 ISO RTN
15
Figure 4-10: Remote On / Off Using Isolated TTL/CMOS Voltage Supply
KDC Series II DC Power Supplies
57
User Manual
5 Operating Modes
5.1
External Programming Modes
Units are shipped from the factory configured for local voltage/current control and local voltage
sensing. In this mode, all controls and operation are performed from the front panel of the unit.
This mode is covered by chapter 4. The external input signal operating modes and multi unit
configurations described in this chapter require the presence of the analog interface option board.
(Option –IF).
5.1.1
Note:
When using external programming modes, always use shielded and or
twisted pair signal wires to minimize noise pick up. Keep control wires
away from possible RF noise sources as much as possible.
Note:
When using the 10V RPV or RPI inputs, it may be necessary to ground the
5V RPV or 5V RPI inputs to avoid noise pickup on these unused inputs.
Remote Voltage Programming
For applications that require the output voltage be programmed (controlled) from a remote source
, the remote voltage programming configuration may be used. In this mode of operation, an
external resistor or external voltage source may be used as a programming device. When using
remote voltage programming, a shielded, twisted-pair, connection wire is recommended to
reduce noise interference on programming signals.
1. External Voltage Programming Using a 5 VDC or 10 VDC Voltage Source. A DC voltage
source for remote voltage programming is connected between pin 3 (V PROG 5V) or PIN 4
(V PROG 10V) and the return terminal PIN 14 (ISO COM). To program voltage slightly
above the rated output will not damage the unit, but degraded performance may result.
Figure 5-1 for connection requirements.
From the CONTROL menu, set the VOLTAGE REF to EXT5V or EXT10V.
ANALOG I/O
VPROG 5V 3
VPROG 10V 4
1
9
14 ISO COM
8
0 - 5 VDC
VOLTAGE
SOURCE
15
0 - 10 VDC
VOLTAGE
SOURCE
Figure 5-1: Remote Voltage Programming Using 0-5 or 0-10 VDC Source
58
KDC Series II DC Power Supplies
User Manual
KDC Series II DC Power Supplies
59
User Manual
2. External Voltage Programming using a resistor. The resistance coefficient for remote voltage
programming is 5k ohms/100% of rated output voltage with respect to the (ISO VP/IP RTN),
pin 6. The programming current from pin 13 (VP RES) is 1 milliamp through a 5 V DC
supply. This yields a coefficient of 1.0% of rated output current for each 50 ohms. If multiple
switches or relays are used to program different levels, make-before-break contacts are
recommended. See Figure 5-2 for connection requirements.
From the CONTROL menu, set the VOLTAGE REF to EXTRES
ANALOG I/O
1
9
VPROG 5V 3
13 VP RES
VP/IP RTN 6
15
8
0 - 5 KOHM
PROGRAM
Figure 5-2: Remove Voltage Programming Using Resistance
3. External Voltage Programming using an external current source. This is similar to the use of
a voltage source except the available current source is converted to a voltage source by
using an external resistor. If the current source is fixed, a variable resistor will result in a
voltage input to the RPV input proportional to the resistor setting. See Figure 5-2 for
connection requirements.
From the CONTROL menu, set the VOLTAGE REF to EXT5V.
ANALOG I/O
VPROG 5V 3
1
9
14 ISO COM
8
15
R
CURRENT
SOURCE
Figure 5-3: Remote Voltage Programming Using a Current Source
60
KDC Series II DC Power Supplies
User Manual
5.1.2
Remote Current Programming
The remote current programming is used for applications that require the output current be
programmed (controlled) from a remote source. An external resistance or external voltage
source may be used as a programming device. When using remote current programming, a
shielded, twisted-pair, hookup wire is recommended to prevent noise interference with
programming signals.
1. External Current Programming Using a 0-5 VDC or 0-10 VDC Voltage Source. A DC voltage
source for remote current programming is connected between PIN 11 (I PROG 5V) or PIN 12
(I PROG 10V) and the return PIN 14 (ISO COM). The voltage coefficient for 5V remote
current programming is 50 millivolts = 1% of rated output, i.e., for a 100 amp model, each 100
millivolts of programming voltage equals 2 amps of output current. See Figure 5-4 for
connection requirements.
From the CONTROL menu, set the CURRENT REF to EXT5V or EXT10V. Leave voltage on
INT.
ANALOG I/O
1
9
11 IPROG 5V
12 IPROG 10V
14 ISO COM
8
15
0 - 10 VDC
VOLTAGE
SOURCE
0 - 5 VDC
VOLTAGE
SOURCE
Figure 5-4: Remote Current Programming Using 0-5 or 0-10 VDC Source
KDC Series II DC Power Supplies
61
User Manual
2. External Current Programming Using Resistance. The resistance coefficient for remote
current programming is 5k ohms/100% rated output with respect to pin 6 (ISO VP/IP RTN).
The programming current from PIN 5 (IP RES) is factory set for 1 milliamp. This yields a
coefficient of 1.0% of rated output current for each 50 ohms. If multiple switches or relays
are used to program different levels, make-before-break contacts are recommended. . See
Figure 5-5 for connection requirements.
From the CONTROL menu, set the CURRENT REF to EXTRES.
ANALOG I/O
1
9
IP RES 5
VP/IP RTN 6
11 IPROG 5V
8
0 - 5 KOHM
PROGRAM
15
R
Figure 5-5: Remote Current Programming Using Resistance
4. External Current Programming using an external current source. This is similar to the use of
a voltage source except the available current source is converted to a voltage source by
using an external resistor. If the current source is fixed, a variable resistor will result in a
voltage input to the RPI input proportional to the resister setting. See Figure 5-2 for
connection requirements.
From the CONTROL menu, set the CURRENT REF to EXT10V.
ANALOG I/O
1
9
11 IPROG 5V
14 ISO COM
8
15
R
CURRENT
SOURCE
Figure 5-6: Remote Current Programming Using a Current Source
62
KDC Series II DC Power Supplies
User Manual
5.2
Multi Unit Configurations
The following modes of operation are used for applications requiring more current or voltage than
is available from a single power supply. To meet the requirements for greater output voltage or
current, two supplies may be connected in series or parallel. This requires the –IF analog
interface option.
To obtain these higher output levels, the power sources must be configured and the specific
signal connections must be made between the two units using the Auxiliary I/O and Analog I/O
connectors on the rear panel. One unit will always act as the master power supply, the other unit
as the auxiliary (-AUX).
Note that measurement data in these configurations is not consolidated so to obtain output
measurement data, it will be necessary to query both units’ measurements individually.
5.2.1
Auto-Parallel Operation
In the auto-parallel mode of operation, a master/auxiliary configuration is established. The
following conditions have to be met for this mode of operation:
1. All units must be the same voltage range. Thus, it is not possible to mix KDC models with
different voltage ranges. It is possible however to mix units with the same voltage range
but a different power level (current range). In this case, the contribution to the total load
current from each KDC unit will be proportional to its power level. Thus, a 15 KW master
will contribute 75% of the load current when paralleled with a 5 KW auxiliary unit.
Note: This will make setting the current limit more confusing as only the master unit’s
current limit is set. The Auxiliary units will contribute in proportion as indicated
2. Use the unit with the lowest serial number as the Master unit. It's GPIB address is factory
set to 1. Use with the –AUX option in the model string have been factory set to operate
as auxiliary units. If the –AUX option was not factory set, it will be necessary to
reconfigure the controller of the unit or units that will be used as auxiliaries. See
paragraph 5.2.1.1.
3. Assign incremental GPIB addresses to the Auxiliary unit(s) as needed if the GPIB
interface will be used. Use GPIB address 2 for first auxiliary, 3 for next etc. Set the GPIB
address in the CONFIGURATION, ADDRESS screen.
4. Only the Ext. voltage sense connections of the Master unit must be connected to the
output bus bars (use correct polarity). The sense connections of the auxiliary units are
not used but may be left connected to the output bus bars.
5. The outputs of all units must be connected to the load in parallel. Make sure not to
reverse polarity on any of the outputs.
KDC Series II DC Power Supplies
63
User Manual
5.2.1.1 Configuring the auxiliary units.
Parallel operation requires the use of a suitable interconnect cable between the Master power
source J22 15 pin connector and each Auxiliary power J22 15 pin connector. Connectors for this
purpose are supplied in the ship kit of each KDC unit.
The interconnect cable must be wired such that J22 pin 7 of the Master unit connects to J22 pin
11 of each Auxiliary unit. J22 pin 14 of the Master source must connect to J22 pin 14 of each
Auxiliary source. Note that this cable must be marked “MASTER” and “AUX” as the correct
orientation of connection is important.
A suitable interconnect cable for a two unit parallel system can be order through AMETEK
Programmable Power customer service department ([email protected]). Specify
AMETEK P/N 5005-053-1.
Figure 5-7: Parallel Cable Interconnect Accessory
5.2.1.2 Auxiliary unit controller configuration
The auxiliary KDC units’ controllers must be configured for auxiliary mode. Units with the –AUX
option on the model serial tag have been configured as an auxiliary unit at the factory. If the unit
was not factory configured, it has to be reconfigured. This requires the top cover to be removed.
With the top cover removed, check the position of jumpers W17 and W18 on the Controller CPU/
Analog board, assembly P/N 5005-721. For operation as an Auxiliary power source, remove
jumper W17 and install jumper W18. Refer to Table 5-1.
Reinstall the top cover once all jumper settings are correct.
64
KDC Series II DC Power Supplies
User Manual
5.2.1.3 Master unit controller configuration
The master unit’s controller must be configured as a Master. Unless the unit was originally
shipped as an auxiliary (-AUX on model tag), it should be set to master already. If not, install
jumper W17 and remove jumper W18.
If the total system power is from 15 KW to 45 KW install jumper W13 on the Master Controller
board, 5005-721. In addition install W14 if the power is from 45 to 60 KW. Settings for W13 and
W14 on the auxiliary (-AUX) unit’s controller(s) are not relevant.
KDC II Master or Auxiliary Controller jumper settings
Available configuration settings are shown in the table below.
Configuration Option
W17
W18
Master
1
0
Auxiliary (-AUX)
0
1
Table 5-1: Master or Auxiliary Controller Configuration Jumper Settings
Relevant power level configuration settings for the MASTER controller only are shown in the
table below. The auxiliary units (-AUX) jumper settings for W13 and W14 are not relevant.
Check these settings if the system was not configured for parallel operation at this power level at
the factory.
Configuration Option
W13
W14
Master, 5 KW, 10 KW
0
0
Master, 15 KW
1
0
Master / AUX 15 to 45 KW
1
0
Master / AUX 45 to 60 KW
1
1
Table 5-2: Master Configuration Jumper Settings
Note:
If the system was not configured for parallel operation at this power level at
the factory or has been reconfigured from its original shipped
configuration, it will be necessary to check the current programming
calibration.
This can be accomplished in one of two ways:
1. Check and as needed recalibrate the full-scale output current programming, or
2. Load the calibration coefficient for the selected mode of operation in the Calibration
screen.
Since the number of DC amplifiers is different when the master unit is used stand alone as
opposed to the Master of a multi-box system, the current loop gain will be different and thus the
current calibration will shift. To correct for this, the correct calibration coefficient must be entered.
If the same unit is used often as either a stand-alone master unit or a multi-box master unit, it is
advisable to note down the full-scale current calibration coefficients for each configuration.
See chapter 7.4 for calibration details.
KDC Series II DC Power Supplies
65
User Manual
5.2.1.4 System Setup
To setup a parallel system, proceed as follows:
1. Turn on the line power first for the Master power source followed by each Auxiliary
source.
2. The Auxiliary Power Source Controller must be configured for that mode of operation. To
power up in this mode of operation press the MENU key several times until
CONFIGURATION is displayed. If necessary use the ↓ key to point the cursor to
CONFIGURATION and press ENTER. Repeatedly press the ↓ key to point the cursor to
CONTROL. Turn the Voltage encoder so AUX AP is displayed. Press ENTER key to
save this mode of operation. The unit(s) will retain this setting at power on.
3. Press the SET key to select the setup menu.
4. Repeatedly press the ↓ key until OVP MODE is displayed.
5. Turn the Voltage encoder until RANGE LEV is displayed. Make sure the value is 110%.
6. Set the programmed output voltage of the master unit to 0 VDC.
7. Apply the output of each Auxiliary source followed by the Master source using the Output
On/Off button on the front panel of each unit. Make sure that the output voltage stays at a
low value, less than 0.5% of full-scale voltage, after each Auxiliary source has the output
applied.
8. Apply a load and program a voltage on the Master unit.
5.2.1.5 Current Sharing
Note: If the Master and Auxiliary power supplies are not of the same power level (5, 10 or 15 KW)
a constant (Ratio R) must be determined for the full-scale current tracking of the Auxiliary power
source.
Ratio R = (Auxiliary maximum current)/ (Master maximum current)
For most power systems the model number of the Master and Auxiliary will be the same to the
value of R will be equal to 1. This would mean the current delivered by the supplies should be the
same
Under load, the full-load current from each Auxiliary source should match the full-load current
delivered by the Master within 5%. The current delivered by each Auxiliary supply must match the
current delivered by the Master times the constant R. For example if the constant is 2/3 when the
Master is delivering 100 amps the Auxiliary with the constant R should be delivering 66.66 amps.
In order to check the current sharing, slowly increase the output voltage of the Master source
while observing the load current supplied by each Auxiliary source. The Auxiliary sources will not
precisely track the current of the Master (the Master current times the value of R) at the lower
values of current.
If the auxiliary units were not shipped as –AUX units, it may be necessary to adjust the current
sharing. To do so, increase the voltage until the total load current of the power system is equal to
the maximum current of the Master power source. Use R54 on the Controller Interface Board,
5005-722, in each Auxiliary source to adjust the load current contributed by the Auxiliary source
equal to that of the Master source times the value of R for the individual Auxiliary power source.
66
KDC Series II DC Power Supplies
User Manual
5.2.1.6 System Connection Parallel Mode
J22 (DB15)
14
11
PS2 - Auxiliary
+
Vaux
-
Cable assembly
CI P/N 5005-053-1
J22 (DB15)
14
7
PS1 - Master
Load
+
Vmstr
-
Ext Sense
External Sense Connection
Figure 5-8: Auto-Parallel Operation – 2 KDC units
KDC Series II DC Power Supplies
67
User Manual
J22 (DB15)
14
11
PS3 - Auxiliary
J22 (DB15)
14
11
PS2 - Auxiliary
+
Vaux
-
+
Vaux
Load
J22 (DB15)
14
7
PS1 - Master
+
Vmstr
-
Ext Sense
External Sense Connection
Figure 5-9: Auto-Parallel Operation – 3 KDC units
68
KDC Series II DC Power Supplies
User Manual
5.2.2
Auto-Series Operation
In the auto-series mode of operation, a master/auxiliary configuration is established as shown in
Figure 5-10.
Note:
For this mode of operation, both power supply controllers are hardware
configured for stand-alone operation. Thus, the auxiliary unit must not be
configured for the –AUX parallel mode. The –AUX configuration settings
outlined in section 5.2.1.3 only apply to the auto parallel mode.
Rx
PS1 - Master
+
Vmstr
Vsum
Vprog
4
6
Load
J22 (DB15)
PS2 - Auxiliary
(tracks PS1)
+
Vaux
-
Iso Rtn
Vsum = Vmstr + Vaux (Note: Maximum allowed is 600 VDC).
Rx = 2 * (Vmstr - 10) KOhm
For units with range > 300Vdc, use 2 RN60 Resistors
(0.5 Rx + 0.5 Rx ) in series.
Figure 5-10: Auto-Series Operation
Note:
The cable used to connect to the analog I/O connector J22 on the Auxiliary
unit must have a ferrite bead with 5 turns of both wires through it to reduce
RF noise pickup. Suitable bead is C/I P/N 211159, Amidon # FT87A-F.
KDC Series II DC Power Supplies
69
User Manual
5.2.3
Auto-Tracking Operation
In the auto-tracking mode of operation, a master/auxiliary configuration is established as shown
in Figure 5-11.
Note:
For this mode of operation, both power supply controllers are hardware
configured for stand-alone operation. Thus, the auxiliary unit must not be
configured for the –AUX parallel mode. The –AUX configuration settings
outlined in section 5.2.1.3 only apply to the auto parallel mode.
J22 (DB15)
6
PS2 - Auxiliary
(tracks PS1)
4
Vprog
+
Vaux
-
Load
Rx
PS1 - Master
+
Vmstr
-
Load
Iso Rtn
Vsum = Vmstr + Vaux
Rx = 2 * (Vmstr - 10) KOhm
For units with range > 300Vdc, use 2 RN60 Resistors
(0.5 Rx + 0.5 Rx ) in series.
Figure 5-11: Auto Tracking Operation
Note:
70
The cable used to connect to the analog I/O connector J22 on the Auxiliary
unit must have a ferrite bead with 5 turns of both wires through it to reduce
RF noise pickup. Suitable bead is C/I P/N 211159, Amidon # FT87A-F.
KDC Series II DC Power Supplies
User Manual
6 Principle of Operation
6.1
General
An explanation of the circuits in the DC supply is given in this section. Refer to block diagram in
Figure 6-2.
6.2
Overall Description
Referring to block diagram in Figure 6-1, the KDC DC power source consists of one to three high
power DC modules, a controller, and a power supply board. The controller uses three boards:
CPU/Analog board, display board, and interface board. An EMI filter is mounted to the rear panel
and also serves as the input connection to the three phase AC mains.
The three phase mains is connected at the rear panel and passes through the EMI filter to
provide AC power to each DC module and to the power supply board. Overcurrent protection for
the AC input is provided by appropriately sized fuses on each module. There is no master switch
or circuit breaker, so, as long as mains power is applied to the input, the DC modules and power
supply board are powered. A front panel switch enables the DC supply board to put the whole
unit in the active state.
The controller, power supply, and each DC module are interconnected with a ribbon cable. This
ribbon cable serves as the Supply/Control bus. The low voltage power supplies are directed from
the power supply board to the controller and DC modules on this bus. Control signals also pass
between all assemblies on this bus. Among other uses, these signals program the output, sense
the output voltage, and detect fault conditions.
The standard interface assembly takes signals from the controller CPU board and drives the
RS232 connection on the rear panel.
The optional interface assembly drives the GPIB rear panel interface as well as the RS232. A
rear panel analog I/O connection allows remote isolated voltage and current programming of the
DC output. Multi chassis systems use the analog I/O connection and an auxiliary I/O connection
to coordinate operation of master and auxiliary units with a common output.
6.3
Bias Power Supply (A7)
The power supply board (A7) uses the three phase AC mains to generate the various low voltage
supplies required by the internal control circuits.
Three phase AC mains from the chassis EMI filter feeds the power supply board through one
amp fuses. The AC is full wave rectified to feed bulk electrolytic capacitors through surge limiting
thermistors. The bulk DC voltage is used by a fly-back PWM converter to generate five isolated
output windings and a sense winding. The PWM uses the sense winding to power it’s circuitry
and regulate all of the outputs. Two of the output windings generate the +/- 19V SELV supply,
two of the output windings generate the +/- 19V control supply, and the last output winding
generates the +24 VDC supply to power the fans. Each of the five outputs goes through various
stages of rectification and filtering, and each is protected by a polymeric fuse.
The +19 V control supply is down regulated by a small converter to create the relatively high
current +15 V supply required by the DC module gate drive circuits.
The +24 V fan supply passes through a small variable output voltage converter. The output
voltage is controlled between +12 V and +24 V depending on the master DC module output
current. This controls the fan speed to reduce audible noise when the module is lightly loaded.
KDC Series II DC Power Supplies
71
User Manual
An over voltage-under voltage comparator monitors the rectified input AC voltage and sends
isolated logic signals to the controller if the mains voltage is not within the operating range.
Each of the DC output modules is synchronized to a common frequency, 93.75 kHz. The
reference clock is generated from a crystal-controlled oscillator on the power supply board. The
oscillator frequency is divided down to provide three separate 93.75 kHz references; each
separated by 120 degrees of phase from the other two.
The three phase AC mains is always active on the DC output modules and the DC supply board;
there is no master switch or circuit breaker. The chassis is turned on or off by a small switch on
the front panel. This switch applies or removes power from the DC supply board PWM controller
chip. When the power to the PWM chip is removed, the fly-back converter stops switching, all
the bias supplies discharge to zero, and the complete unit is put in an “off” state.
72
KDC Series II DC Power Supplies
User Manual
Figure 6-1: DC Power Supply Block Diagram
KDC Series II DC Power Supplies
73
User Manual
Figure 6-2: DC Power Supply Block Diagram with -IF option
74
KDC Series II DC Power Supplies
User Manual
A
3 Phase AC Power Bus
EMI
FILTER,
3 PHASE
B
C
Supply/Control Bus
J6
GND
AC INPUT
J6
A11
DC MODULE
J6
A10
DC MODULE
A9
DC MODULE
V
SENSE
J6
VOUT +
A7
POWER SUPPLY
J9
J12
B1
VOUT -
B2
SELV Supply
P10
J15
STANDARD
J20
RS232
J13
OPTIONAL
J23
GPIB
J14
OPTIONAL
J19
RS485
J16
OPTIONAL
J21
AUX I/O
J17
OPTIONAL
J22
ANLG I/O
B3
J5
A2
DC CONTROLLER
CPU/ANALOG
J4
P7
A1
DC CONTROLLER
DISPLAY
J8
P3
A3
INTERFACE
Figure 6-3: KDC with -IF option, Simplified Block Diagram
KDC Series II DC Power Supplies
75
User Manual
6.4
Power Module (A9 through A11)
Refer to Figure 6-3 for a block diagram of the DC module. The DC module rectifies and filters
the AC mains voltage, switches the voltage with a phase modulated full bridge converter, passes
the switched voltage through a voltage scaling isolation power transformer, rectifies and filters
the output voltage, and directs the voltage to the output via bus bars.
The module mostly consists of the long amplifier board (A4), the small snubber (A5) and output
filter (A6) boards, electrolytic filter capacitors on the input and output, power transformer, current
sense transformer in the primary path of the power transformer, output rectifiers, and output
inductor. Power semiconductors are soldered to the amplifier board to provide various
functions. A heat sink provides not only a low impedance thermal path for the module, but also
the structural base to which most of the components are mounted.
The AC mains from the three phase AC power bus enters the DC module at E1/E2/E3. The
voltage passes through fuses and then a full wave rectifier (CR8-CR13). The DC voltage is
filtered and stored on two electrolytic capacitors. The capacitors are configured in parallel for
208 volt mains or in series for 400/480 volt mains. High inrush current to the electrolytics is
limited by a resistor. The resistor is shorted out by an SCR, CR14, during module operation.
The rectified/filtered mains voltage provides the high power bus for the H-bridge converter. The
converter is phase-shift pulse width modulated using four IGBT’s, Q12-Q15. The 93.75 kHz
PWM clock frequency yields a 46.9 kHz frequency from the output of the H-bridge to the primary
of the power transformer. A current transformer in the primary wire of the power transformer
senses over current situations and is used for protection of the H-bridge.
The secondary arrangement of the power transformer depends on the output voltage. High
voltage output models used a full-bridge arrangement. Low voltage output models use a centertapped circuit. The latter is shown in Figure 6-4. The snubber board (A5) holds RC snubbers to
control voltage spikes on the rectifiers. Circuit arrangement on this board varies per model
output voltage. Secondary return current is monitored with a shunt resistor and represents the
current in the output inductor. This current sense signal is used by the PWM controller for
stability and protection.
The rectified output passes through a large filter inductor, to an electrolytic capacitor, through
smaller inductors, and to a final electrolytic capacitor. A shunt in the output return lead senses
output current for measurement and current programming. The output filter board (A6) mounts
to the electrolytic capacitors. This board holds small filter capacitors and remote voltage sense
circuitry. The voltage sense signals are fed back to the CPU controller assembly through the
DC module amplifier board.
A thermal switch on the DC module heat sink opens if the monitored temperature is too high.
This disables the DC module and is reported by the CPU controller.
A discharge circuit on the DC module amplifier board sinks current from the output electrolytic
capacitors to quickly remove charge from the output. The level of discharge depends on the
model output voltage and amount of external capacitance added by the user.
Note:
This bus bar is always live, even if the front panel On/Off switch is in the
Off position. Use extreme cautions when servicing any part of this
product.
Each power module is made up of three PCB's, A4 through A6.
76
KDC Series II DC Power Supplies
User Manual
AC
E1
AC
E2
AC
E3
SUPPLY/
CONTROL
BUS
A4
MODULE AMPLIFIER
INDUCTOR
CURRENT
SENSE
J6
E4
E5
OUTPUT
CURRENT
SENSE
DISCHARGE
E6 E7
E10 E11
T-SWITCH
E8 E9
CT
VOUT INPUT BULK
STORAGE
CAPACITORS
VOUT +
POWER
TRANSFORMER
OUTPUT
INDUCTOR
A5
MODULE
SNUBBER
A6
MODULE
OUTPUT FILTER
REMOTE
SENSE
Figure 6-4: DC Module Block Diagram
6.4.1
Amplifier Module (A4)
The amplifier module board is located perpendicular to the base heat sink of each power
module. This board contains the switching control logic and power devices of the power module.
6.4.2
Snubber Board (A5)
The snubber board is a small board located below the input electrolytic caps on the power
board. The snubber board connects directly to the power diodes which mount on an isolated
mounting plate between the transformer and the output inductor.
6.4.3
Output Filer Board (A6)
The output filter board is located in the back of each power module, directly above the output
electrolytic caps. One of the three power modules has an output filter board with external sense
connector. (5005-700-1) This module is always on the far right of the chassis. The other two
power modules (if present) have an output filter board without sense connections. (5005-700-2).
KDC Series II DC Power Supplies
77
User Manual
6.5
Controller Module (A3)
The Controller Module has the circuits to perform the following operations:
1. Generates the output voltage and current reference signals and load regulates the output
voltage or current.
2. Allows setting of Voltage and Current from the front panel or the standard RS232C or
optional GPIB interface.
3. Measures and displays the output voltage, current, peak current and power.
The controller assembly consists of the DC controller display board (A1), the DC controller
CPU/Analog board (A2), and the DC controller interface board (A3). Refer to Figure 6-1 and
Figure 6-2.
The CPU/Analog board is the core of this assembly. This board has a DSP, memory, D/A
converters, A/D converters, reference, and logic circuits to program, calibrate, and measure the
output of the KDC Power source. Voltage and current error amplifiers control the overall output
according to programmed user values. Sensed voltage and current signals from the DC Output
modules feed these error amplifiers and the measurement circuits.
The Display board (A1) holds the switches, rotary pulse generators, LED’s, and liquid crystal
display at the front panel. The CPU board (A2) communicates directly with the liquid crystal
display and LED’s via a parallel bus and indirectly with the switches and rotary pulse generators
via the same parallel bus through a microcontroller.
The standard interface board (A3) only provides a rear panel RS232 interface. The board uses
opto-isolators and SELV supplies to drive the serial interface chips.
The optional interface board (A3) has the same RS232 interface as the standard board as well
as similar SELV interfaces for GPIB and RS232. A programmable logic device takes the serial
data from the CPU board and directs it to the three interfaces.
The optional interface board has isolated circuits to provide function strobe, on/off, and trigger
logic signals, and analog SELV user programming of output voltage and current. This analog
programming allows 5 volt, 10 volt, or resistive user references.
The three boards that make up the controller are stacked together using stand-offs and
interconnected using ribbon cables. The whole assembly attaches to the front panel. The board
closes to the front panel is the keyboard display board. The center board in the stack is the DSP
board which also contains the control and measurement logic. The third board is either the
standard RS232C isolated interface board or the optional (-IF option) Analog I/O and GPIB
interface board.
6.5.1
Remote Control [Option] Interfaces (A8)
The KDC Series comes standard with an RS232C remote control interface. It can also be
outfitted with an analog I/O and GPIB / IEEE 488 interface board. (Option -IF, Assembly A8).
The GPIB address for the DC power supply (if installed) is selected through the
CONFIGURATION menu.
78
KDC Series II DC Power Supplies
User Manual
6.5.2
Analog Programming Interface (A8)
The optional GPIB interface board (A8) also contains an analog programming interface. This
analog input may be used to control either the output voltage or current. It is also required to
operate multiple KDC Series unit in parallel or series mode. The operation of the analog I/O is
controlled through CONFIGURATION and CONTROL menu settings from the front panel or over
the bus.
KDC Series II DC Power Supplies
79
User Manual
CAUTION
VOLTAGES UP TO 528 VAC AND 600 VDC MAY BE PRESENT
IN CERTAIN SECTIONS OF THIS
POWER SUPPLY. THIS EQUIPMENT GENERATES
POTENTIALLY LETHAL VOLTAGES.
DEATH
ON CONTACT MAY RESULT IF PERSONNEL FAIL TO
OBSERVE SAFETY PRECAUTIONS. DO NOT TOUCH
ELECTRONIC CIRCUITS WHEN POWER IS APPLIED.
80
KDC Series II DC Power Supplies
User Manual
7 Calibration
Routine calibration should be performed every 12 months. Non-routine calibration is only
required if a related assembly is replaced or if the periodic calibration is unsuccessful.
All routine calibrations can be performed without removing the top cover (Closed case
calibration) through the front panel menus or over the remote control interface.
7.1
Calibration Equipment
Equipment
Description
Digital Multimeter (DMM):
Two (2) HP 34401A
0.1%, 10 miliohm Current Shunt or
0.1%, 1 miliohm Current Shunt:
Isotek Model RUG-Z-R010-0.1 or equivalent or
Isotek Model RUG-Z-R001-0.1 or equivalent
Load Bank:
Various power load resistors will be needed
Model
Voltage Range
Power
max.
KDC30-XXX
30
KDC40-XXX
40
KDC50-XXX
50
KDC80-XXX
80
KDC100-XXX
100
KDC150-XXX
150
KDC250-XXX
250
KDC300-XXX
300
KDC400-XXX
400
KDC600-XXX
600
5 KW
10 KW
15 KW
5 KW
10 KW
15 KW
5 KW
10 KW
15 KW
5 KW
10 KW
15 KW
5 KW
10 KW
15 KW
5 KW
10 KW
15 KW
5 KW
10 KW
15 KW
5 KW
10 KW
15 KW
5 KW
10 KW
15 KW
5 KW
10 KW
15 KW
Current
max.
167
333
500
125
250
375
100
200
300
62
125
187
50
100
150
33
67
100
20
40
60
17
33
50
12.5
25
37.5
8.33
16.67
25
Load
0.18
0.09
0.06
0.32
0.16
0.107
0.5
0.25
0.167
1.29
0.64
0.428
2.0
1.0
0.67
4.545
2.273
1.5
12.5
6.25
4.167
17.647
8.823
6
32
16
10.67
72
36
24
Table 7-1: Load Resistors and Current by model
KDC Series II DC Power Supplies
81
User Manual
7.2
Calibration Password
All Calibrations on the KDC series can be made from the front panel or over the bus. The
Calibration screens are protected by a password to prevent unauthorized calibration however.
When selecting either the MEAS CAL or OUTPUT CAL screens, the operator will be prompted
for a calibration password.
The calibration password is equivalent to the maximum voltage range value. Thus, for a KDC
100-50 model, the password is "100". The password can be entered by dialing it in with one of
the rotary knobs on the front panel or sent over the bus. See programming manual (P/N 5005961) for details on bus operation.
Once entered, the calibration system will be unlocked until power on the DC supply is cycled.
82
KDC Series II DC Power Supplies
User Manual
7.3
Routine Calibration
Setup:
Connect the test equipment to the power supply as shown in Figure 7-1. The DMM can be
connected to the common output terminal at the rear of the unit.
Never connect the load wire to the SENSE terminal at the Rear Panel terminal strip. The load
must be connected to the POWER bus bars and a jumper between the POWER and SENSE
terminal. Always connect the external DVM to the SENSE terminal.
POS.
NEG.
SHUNT
DC SUPPLY
(rear view)
RL
CURRENT
Measure output
voltage at sense
connection.
VOLTAGE
Figure 7-1: Test Equipment Hookup for Routine Output and Measurement Calibration
KDC Series II DC Power Supplies
83
User Manual
7.4
Output Calibration
Following calibration screens are used to calibrate the output voltage and current programming
from either the internal controller or the optional external analog interface.
7.4.1
Output Voltage Calibration
Offset
1. Set the DC supply to constant voltage mode.
2. Program the output voltage to 2 % of full-scale voltage.
3. Monitor the output voltage using an external DMM
4. Select the OUTP CAL, VOLT OFST screen.
5. Increment or decrement the VOLT OFST calibration coefficient while monitoring the output
voltage until the measured voltage matches the programmed setting.
Note:
It may be convenient to perform the voltage measurement offset
calibration at this point as well.
Full Scale - Internal
1. Program the output voltage to 100% of full-scale voltage
2. Monitor the output voltage using an external DMM
3. Select the OUTP CAL, VOLT F/S screen.
4. Increment or decrement the VOLT F/S calibration coefficient while monitoring the output
voltage until the measured voltage matches the programmed setting.
Note:
It may be convenient to perform the voltage measurement full-scale
calibration at this point as well.
The following calibrations are required only if the analog programming option is installed
(Option -IF)
Full Scale - External 10 V Input
1. Change the DC supply control mode for VOLT to REF EXT10V from the CONTROL screen.
2. Use a small precision DC supply or DC calibrator to apply a 10 V DC input to the RPV input.
3. Monitor the output voltage using an external DMM
4. Select the OUTP CAL, RPV 10V screen.
5. Increment or decrement the RPV 10V calibration coefficient while monitoring the output
voltage until the measured voltage matches the programmed setting.
Full Scale - External 5 V Input
1. Change the DC supply control mode for VOLT to REF EXT5V from the CONTROL screen.V
2. Use a small precision DC supply or DC calibrator to apply a 5 V DC input to the RPV input.
3. Monitor the output voltage using an external DMM
4. Select the OUTP CAL, RPV 5V screen.
84
KDC Series II DC Power Supplies
User Manual
5. Increment or decrement the RPV 5V calibration coefficient while monitoring the output
voltage until the measured voltage matches the programmed setting.
Full Scale - External R Input
1. Change the DC supply control mode for VOLT to REF EXTRES from the CONTROL screen.
2. Use a suitable resistor between the Remote R voltage programming input.
3. Monitor the output voltage using an external DMM
4. Select the OUTP CAL, RPV RES screen.
5. Increment or decrement the RPV RES calibration coefficient while monitoring the output
voltage until the measured voltage matches the programmed setting.
7.4.2
Output Current Calibration
Offset
1. Set the load to Constant Current mode.
2. Apply a load that will draw more than 2 % of full-scale current.
3. Set the output voltage high enough to force the DC supply in CC mode.
4. Monitor the output current using an external current shunt and DMM
5. Select the OUTP CAL, CURR OFST screen.
6. Increment or decrement the CURR OFST calibration coefficient while monitoring the output
current until the measured current matches the programmed setting.
Note:
It may be convenient to perform the current measurement offset
calibration at this point as well.
Full Scale - Internal
1. Apply a load that will draw more close to 90 % of full-scale current.
2. Monitor the output current using an external current shunt and DMM
3. Select the OUTP CAL, CURR F/S screen.
4. Increment or decrement the CURR F/S calibration coefficient while monitoring the output
current until the measured current matches the programmed setting.
Note:
It may be convenient to perform the current measurement full-scale
calibration at this point as well.
The following calibrations are required only if the analog programming option is installed
(Option -IF)
Full Scale - External 10 V Input
1. Change the DC supply control mode for CURR to REF EXT10V from the CONTROL screen.
2. Use a small precision DC supply or DC calibrator to apply a 10 V DC input to the RPI input.
3. Monitor the output current using an external current shunt and DMM
4. Select the OUTP CAL, RPI 10V screen.
5. Increment or decrement the RPI 10V calibration coefficient while monitoring the output
current until the measured current matches the programmed setting.
KDC Series II DC Power Supplies
85
User Manual
Full Scale - External 5 V Input
1. Change the DC supply control mode for CURR to REF EXT5V from the CONTROL screen.
2. Use a small precision DC supply or DC calibrator to apply a 5 V DC input to the RPI input.
3. Monitor the output current using an external current shunt and DMM
4. Select the OUTP CAL, RPI 5V screen.
5. Increment or decrement the RPI 5V calibration coefficient while monitoring the output
current until the measured current matches the programmed setting.
Full Scale - External R Input
1. Change the DC supply control mode for CURR to REF EXTRES from the CONTROL
screen.
2. Use a suitable resistor between the Remote R current programming input.
3. Monitor the output current using an external current shunt and DMM
4. Select the OUTP CAL, RPI RES screen.
5. Increment or decrement the RPI RES calibration coefficient while monitoring the output
current until the measured current matches the programmed setting.
86
KDC Series II DC Power Supplies
User Manual
7.5
Measurement Calibration
Following calibration screens are used to calibrate the voltage and current measurements.
7.5.1
Voltage Measurement Calibration
Offset
1. Set up the DC supply as described under output voltage offset calibration.
2. Read the measured output voltage from the DMM.
3. Enter the value measured in the MEAS CAL, MVOLT OFST screen using one of the
shuttles.
4. Press the ENTER key.
5. The DC supply measurement systems will take a few seconds to set its measurement
calibration coefficient based on the reference measurement value provided.
Full Scale
1. Set up the DC supply as described under output voltage full-scale calibration.
2. Read the measured output voltage from the DMM.
3. Enter the value measured in the MEAS CAL, MVOLT F/S screen using one of the shuttles.
4. Press the ENTER key.
5. The DC supply measurement systems will take a few seconds to set its measurement
calibration coefficient based on the reference measurement value provided.
KDC Series II DC Power Supplies
87
User Manual
7.5.2
Current Measurement Calibration
Current measurement calibration applies to both average current and peak current
measurement functions.
Offset
1. Set up the DC supply as described under output current offset calibration.
2. Read the measured output current using an external shunt and DMM.
3. Enter the value measured in the MEAS CAL, MCURR OFST screen using one of the
shuttles.
4. Press the ENTER key.
5. The DC supply measurement systems will take a few seconds to set its measurement
calibration coefficient based on the reference measurement value provided.
Full Scale
1. Set up the DC supply as described under output current full-scale calibration.
2. Read the measured output current using an external shunt and DMM.
3. Enter the value measured in the MEAS CAL, MCURR F/S screen using one of the shuttles.
4. Press the ENTER key.
5. The DC supply measurement systems will take a few seconds to set its measurement
calibration coefficient based on the reference measurement value provided.
7.5.3
Power Measurements
All other measurements except voltage and current made by the DC supply are mathematically
derived from the voltage and current measurements. As such, no other measurement
calibrations are required.
88
KDC Series II DC Power Supplies
User Manual
7.6
Non-Routine Calibration
The following calibrations are not required on a routine basis:
7.6.1
VOLT NOM Adjustment
Since the KDC controller is used for all output voltage range models, the internal reference
signals are normalized for each model using calibration DAC's. This normalization is generally
done at the factory and does not have to be repeated unless a power module has been replaced
in the field.
This normalized voltage reference signal is available at TP21 and also at the Auxiliary I/O DB9
connector (J21) if the -IF option is installed. See Table 3-6 for pin-out. If the -IF option is not
installed, the top cover has to be removed to access TP21 on the back of the controller board
behind the front panel. The normalized output voltage at these test points is 10.00 volts for full
scale output voltage, regardless of the model.
The first step in the adjustment of the normalized output is to establish a known voltage output
condition. The first normalized output that should be adjusted is the voltage.
1. Program an output voltage that gives an actual output of ½ scale voltage as verified by an
external DVM.
2. Attach a DC voltmeter to TP21. Use TP1 for the DC voltmeter common.
3. Adjust the Vnom DAC for a voltage at TP21 indicated by the following formula: The Vnom
DAC adjustment is available from the front panel Calibration menu. Select Output Cal,
Vnom.
Use the formula below to determine correct TP21 test point measured voltage:
V (TP21) = 10 x (Actual Output Voltage)/ (Full Scale Voltage Range)
Note:
The Actual Output Voltage will change while adjusting the VOLT NOM
DAC. If there w as any change made to this adjustment, the output voltage
and voltage measurement must be re-calibrated. Refer to paragraph 7.4.1
and 7.5.1 respectively.
KDC Series II DC Power Supplies
89
User Manual
7.6.2
CURR NOM Adjustment
Since the KDC controller is used for all output current range models, the internal reference
signals are normalized for each model using calibration DAC's. This normalization is generally
done at the factory and does not have to be repeated unless a power module has been replaced
or added to an existing unit in the field.
This normalized current reference signal is available at TP24 and also at the Auxiliary I/O DB9
connector (J21) if the -IF option is installed. See Table 3-6 for pin-out. If the -IF option is not
installed, the top cover has to be removed to access TP24 on the back of the controller board
behind the front panel. The normalized output current at these test points is 5.00 volts for full
scale output current, regardless of the model.
The first step in the adjustment of the normalized output is to establish a known current output
condition.
The procedure for adjusting the normalized output for current is as follows:
1. Attach an external precision shunt. Monitor the shunt current with an external DVM.
2. Apply a load that will give an output current more than 50% of the maximum rated current.
3. Make sure that the Current Limit is programmed to the maximum value.
4. Attach a DC voltmeter to TP24. Use TP1 for the DC voltmeter common.
5. Program the output voltage to obtain 50 % of max load current into the load.
6. Adjust the Inom DAC for a voltage at TP24 indicated by the following formula:
Use the formula below to determine correct TP24 test point measured voltage:
V (TP24) =5 x (Actual Output Current) / (Maximum Current Rating of Power Source)
Note:
7.6.3
The Actual Output Current w ill change w hile adjusting the CURR NOM
DAC. If there was any change made to this adjustment, the output current
limit and current measurement must be re-calibrated. Refer to paragraph
7.4.2 and 7.5.2 respectively.
Master Configuration Change Calibration
If the same KDC II DC Supply is used both stand-alone and as the master unit of a multi-box
auto parallel configuration, it may be necessary to adjust the current programming calibration
when changing configurations. This applies to the master unit only. KDC II units with a –AUX
option are set for use as auxiliary auto parallel units only. However, if a KDC II with the –AUX
configuration is changed to a Master configuration and used as the master for other –AUX units,
it too may require current programming calibration.
If a unit is frequency applied in different configuration settings, it is strongly recommended to
record the full scale current calibration coefficient for each mode of operation and enter the
correct value each time a unit is reconfigured. This avoids having to recalibrate the unit.
For instructions on how to perform full-scale current calibration, refer to sections 7.2 and 7.4.2.
To directly enter a calibration coefficient, unlock the calibration screens first as described in
section 7.2. Then select the OUTPUT calibration screen and scroll down to the CURR FS entry.
Change the coefficient to the desired setting using the Voltage knob.
90
KDC Series II DC Power Supplies
User Manual
8 Service
8.1
General
This section describes suggested maintenance and troubleshooting procedures. The
troubleshooting procedure is divided into two sections. The first section deals with basic
operation and connection of the equipment. The second section requires opening the unit and
using the LED indicators and a simple multimeter to troubleshoot the unit down to the module
level. Only a qualified electronic technician should attempt this level of troubleshooting.
8.2
Basic Operation
Table 8-1: Basic Symptoms
8.2.1
PARAGRAPH
PROBLEM
8.2.1
8.2.2
8.2.3
8.2.4
8.2.5
8.2.7
Poor Output Voltage Accuracy
Poor Output Voltage Regulation
Unit Shuts Down After 3-5 Seconds
No Output and no lights on front panel
No output but “Display” on front panel is on
Can’t program DC supply on GPIB or RS232
Poor Output Voltage Accuracy
If the power supply exhibits poor programmed voltage accuracy, the following item may be at
fault:
Table 8-2: Poor Output Voltage Accuracy
8.2.2
CAUSE
SOLUTION
The calibration is incorrect.
Calibrate the output.
Poor Output Voltage Regulation
If the power supply exhibits poor voltage regulation the following item may be at fault:
Table 8-3: Poor Output Voltage Regulation
CAUSE
SOLUTION
The Remote Sense lines are not
connected at the same point monitored by
the external voltmeter used for load
regulation check.
The External voltage sense connection is
open.
Connect DC voltmeter to Remote Sense
lines on the Rear Panel Power Output
terminal strip.
KDC Series II DC Power Supplies
Check the sense connections. Make sure
not to reverse the sense polarity or
damage to the unit may occur.
91
User Manual
8.2.3
Unit Shuts Down After 3-5 Seconds
Table 8-4: Unit Shuts Down After 3-5 Seconds
8.2.4
CAUSE
SOLUTION
Output shorted.
Output grossly overloaded.
Operating load with too high inrush or start
up currents.
Remove output short.
Remove overload.
Consult factory for application advice.
No Output and No Lights on Front Panel
Table 8-5: No Output and No Lights on Front Panel
8.2.5
CAUSE
SOLUTION
Front panel power switched off.
No input power to the input connector.
Blown fuse.
Switch the breaker on.
Ensure correct input power.
Check fuses on the DC bias power supply
and replace with same type and rating.
See Figure 7-2.
No Output but “Display” on Front Panel is On
Table 8-6: No Output But "Display" Is On
8.2.6
CAUSE
SOLUTION
“OUTPUT ON” switch is turned off.
Current limit programmed down or to zero.
Voltage programmed down or to zero.
Voltage sense connection is reversed
Turn OUTPUT ON switch to “ON”.
Program current limit higher.
Turn amplitude control up.
Check polarity of external sense
connections.
Error Message
Error messages may appear on the LCD display. Some of these errors may be hardware
related. It is usually associated with an over power, sense connection or over temperature
condition. A more specific error may be indicated as well, e.g. Temp / Sense Fault (3).
CAUSE
SOLUTION
Error 3: Ambient temperature is too high.
Operate power supply between 0 and
50°C.
Remove obstructions.
Error 3: Fans or ventilation holes are
blocked.
Error 3: Fans not working.
Error 3: Sense Fault
92
Check DC bias supply (A7) and
connection cable harness for DC fans. If
+24 VDC is present at fan terminals and
fans don’t' turn, replace fans.
Check for reversed polarity sense or
KDC Series II DC Power Supplies
User Manual
8.2.7
CAUSE
SOLUTION
Error 23-25: AC Line input not within
operating range.
shorted sense connections. If the sense
wires have been reversed and the output
turned on, damage may have occurred to
the sense board. Contact service if the unit
no longer functions with proper sense
connections restored.
Check for missing phase, high line or low
line conditions.
Can’t Program on GPIB or RS232
If the power supply does not respond to RS232C or GPIB programming, the following items may
be at fault:
CAUSE
SOLUTION
The power supply unit address is
incorrect.
GPIB or RS232 cable is loose at power
supply rear panel.
RS232 has failed.
GPIB Assembly has failed.
Update address. See section 0.
KDC Series II DC Power Supplies
Check connection, tighten jackscrews.
Replace or repair the Controller.
Replace the GPIB Assembly.
93
User Manual
8.3
Module Removal
Figure 8-1 shows the location of the internal modules and assemblies.
Figure 8-1: Assembly Location
94
KDC Series II DC Power Supplies
User Manual
8.3.1
Controller Module Removal / Replacement
If a fault is found that requires the replacement of the Controller Module (Assembly A3) follow
the following steps and refer to Figure 8-1 for the module locations:
1. Turn off the front panel On/Off switch. Remove any input power from the rear panel terminal
block by disconnecting or unplugging or otherwise disconnecting the AC input.
2. Allow time for any caps to discharge. This may take several minutes.
3. Remove the top cover.
4. Remove the screws along the bottom of the front edge that hold the front panel to the
chassis.
5. Remove the two nuts in the top corners of the front panel that hold the front panel to the
chassis.
6. Disconnect the system interface (40 pin) ribbon cable from the controller and disconnect the
power ribbon cable (10 pin). You can now remove the front panel assembly from the
chassis.
7. Place the front panel assembly on a static free work surface.
8. Remove the two front panel knobs. Requires a small Allen wrench.
9. Remove 5 screws that hold the controller PCB assembly to the front panel. The controller
assembly can now be removed.
10. Any new controller that is installed must be correctly configured for the Voltage and Current
ranges of the KDC model. The voltage and current limits and the serial number stored in
the NVM configuration data of the controller must also be set correctly using the RS232C
interface. The KDCGUI may be used for this purpose if the authorized password is known.
KDC Series II DC Power Supplies
95
User Manual
8.3.2
Power Module Removal / Replacement
If a fault has been found that indicates the failure of the amplifier module (Assembly A9 through
A11), check the condition of the AC line input fuses on each of the power modules. before
replacing the amplifier. Refer to Figure 8-1 for the location of the fuse.
If it is determined that the amplifier module must be replaced, perform the following procedure:
1. Turn off the input circuit breaker.
2. Disconnect all AC input power at the rear panel. Allow any capacitors to bleed down.
3. Remove the power supply top cover by removing (13) #6-32 x 5/16” FLH
screws.
4. Remove the (2) #6-32 x 1” screws and lock washers that hold the amplifier module at the
rear panel.
5. Disconnect the 40 pin ribbon system interface cable that connects all power modules along
the top and then remove the EMI shield. If any cables run across the top of the EMI shield,
they may have to be unplugged at the controller as well.
6. Remove the horizontal AC input power bus bars that run across the top of the three power
modules.
7. Remove the fan in front of the power module that needs to be removed.
8. Remove the screw at the front of the heat sink that holds the power module to the chassis.
9. Remove the amplifier by pulling it away from the rear panel and lifting it up and out of the
chassis.
10. The amplifier may be replaced by following this procedure in reverse order.
11. Check the amplifier AC fuses located on the front of the power module PCB (A4), and
replace it if necessary.
96
KDC Series II DC Power Supplies
User Manual
8.4
Controller Jumper Settings
If it is necessary to change controller configurations due to adding or removing DC modules or
reconfiguring a system from Master to Auxiliary, the following jumper configurations have to be
set.
KDC II Master Controller jumper tables
Available configuration settings are shown in the table below.
Configuration Option
W17
W18
Master
1
0
Auxiliary (-AUX)
0
1
Table 8-7: Master or Auxiliary Configuration Jumper Settings
Relevant power level configuration settings are shown in the table below. Check these settings if
the system was not configured for parallel operation at this power level at the factory.
Configuration Option
W13
W14
Master, 5 KW
0
0
Master, 10 KW
1
0
Master, 15 KW
1
0
Master / AUX 15 to 45 KW
1
0
Master / AUX 45 to 60 KW
1
1
Table 8-8: Master or Auxiliary Configuration Jumper Settings
8.5
Firmware Updates
The firmware of the KDC Series DC power supply controller is contained in Flash memory and
can be updated through the RS232 serial interface if needed. The firmware revision of the KDC
controller is displayed during power up sequence. It can also be queried over the bus using the
*IDN? command.
From time to time, Argantix may release updated firmware for the KDC product line. Firmware
updates will be posted on the Argantix website at www.argantix.com for customer download.
Customers must register on the Argantix web site to gain download privileges.
Should be need arise to update the firmware of the KDC unit, the required Flash download utility
program can be obtained from the Argantix website, as well as the new firmware file itself. A
windows PC and RS232 cable will be needed to perform this upgrade.
To install new firmware, proceed as follows:
Copy both AxFlashLoaderComm.exe and CIC662rn.nn.hex to a folder or disk. The
AxFlashLoaderComm.exe is the utility used to update the firmware. CIC662rn.nn.hex is the hex
file that contains the firmware update. The n.nn will be the revision number of the firmware.
Please record the revision of the previous firmware before the update for reference. The
firmware revision is displayed during power up sequence.
1. Connect a straight-through (not a null modem) RS232 cable (9 pin to 9 pin) between the
power supply and the com port of the PC.
2. Power up the KDC supply while holding down the ENTER key on the keyboard. Release the
ENTER key as soon as the first text appears on the LCD display. Do not hold the ENTER
KDC Series II DC Power Supplies
97
User Manual
key too long as the unit will revert back to normal operation mode if you do. This will put the
unit’s controller into the Flash down load mode. Wait until the last screen appears that
shows the RS232 setup.
3. Open up the Flash Loader utility program “AXFlashLoaderComm.exe”. This utility is
available from the Argantix website at www.argantix.com in the Gui and Drivers download
section.
4. Select the COM port. Leave “Baud rate” and “Cmd Delay” to the defaults shown.
5. Select “Init Port” followed by “Flash Update”.
6. Select Browse and locate the file CIC662rn.nn.hex. This file is supplied with this instruction
and can be copied to the same directory as AxFlashLoaderComm.exe file or any other drive
or directory.
7. Select “Download”. This will start the firmware update procedure. The front panel display for
the KDC supply will display the message “Erasing flash” followed by “Flash erase complete”
and “Programming Flash”. The down load will be completed in about 6 to 7 minutes.
8. Once completed, close the Maintenance Panel window. Next, close the serial port by
clicking on the “Close Port” button. You can now close the Flash loader utility.
9. Cycle the power on the KDC unit and verify that the new firmware revision is displayed on
the LCD at power up. You can also use the *IDN? query commend over the bus the verify
the firmware revision.
If you encounter problems, try repeating the above procedure. If problem cannot be resolved,
contact Argantix for assistance. (email to: [email protected] )
98
KDC Series II DC Power Supplies
User Manual
KDC Series II DC Power Supplies
99
User Manual
8.6
Replaceable Parts
In order to ensure prompt, accurate service, please provide the following information, when
applicable for each replacement part ordered.
a. Model number and serial number of the instrument.
b. Argantix part number for the sub-assembly where the component is located. (California
Instruments PART #)
c. Component reference designator if applicable (REF #)
d. Component description.
e. Component manufacturers (VENDOR)
All replaceable part orders should be addressed to:
California Instruments Corporation.
Attention: Argantix Customer Service
9689 Towne Centre Drive
San Diego, California 92121-1964
United States of America
Orders may also be placed using the following fax number: 1 858 677 0904
REF #
PART #
DESCRIPTION
VENDOR
QTY
1
5005-721-1
or
5005-724-1
PC Assy, Controller (pre 08-2006)
or
PC Assy, Controller (post 08-2006)
AMETEK
1
2
5005-707-1
PC Assy, RS232C only
AMETEK
1
1
3
5005-722-1
PC Assy, GPIB / RPV (-IF option)
AMETEK
4
5005-703-1
5005-723-1
PC Assy, Bias Supply - or PC Assy, Bias Supply.
AMETEK
1
5
5005-4XX-X
PC Assy, Power Module1.
Contact factory for specific module
assembly P/N based on KDC Model.
AMETEK
1-3
6
5005-700-1
PC Assy, Output Filter w Sense
AMETEK
1
PC Assy, Output Filter w/o Sense
AMETEK
0-2
7
5005-700-2
8
241182
Fan, 4, 24 VDC
EBM W2G110
EBM 4214H
Comair MS24B3
1-3
9
270212
Fuse, Bias Supply, 600 V, 1A
Bussman KTK1
LitteFuse KLK1
3
208 V Input Models (-208)
250753
PC Assy, EMI Filter, 75 A, 250 V
Tri-Mag SF1813
1
270168
Fuse, Power Module, 600 V, 30A
Bussman KTK30
LitteFuse KLK30
3 / Mod
PC Assy, EMI Filter, 57 A, 440 V
Tri-Mag SF1812
1
400V Input Models (-400)
250763
1
Note that power modules used in KDC units with the –LC option have different output capacitor
components. See Table 8-10.
100
KDC Series II DC Power Supplies
User Manual
REF #
PART #
DESCRIPTION
270227
Fuse, Power Module, 600 V, 20A
VENDOR
QTY
Bussman KTK20
LitteFuse KLK20
3 / Mod
480 V Input Models (-480)
250762
PC Assy, EMI Filter, 45 A, 480 V
Tri-Mag SF1811
1
270180
Fuse, Power Module, 600 V, 15A
Bussman KLM15
LitteFuse KLKD15
3 / Mod
Table 8-9: Replaceable Parts
Output filter board capacitor part numbers for a 5 KW DC power module.
Model
Standard Power Module
-FT Option
30 V
2 x 22000 uF (P/N 611437)
2 x 5600 uF (P/N 611435)
40 V
2 x 15000 uF (P/N 611436)
2 x 3900 uF (P/N 611422)
50 V
2 x 12000 uF (P/N 611441)
2 x 3900uF (P/N 611422)
80 V
2 x 3900 uF (P/N 611422)
2 x 1500uF (P/N 611439)
100 V
2 x 2200 uF (P/N 611438)
N/A
150 V
2 x 1500 uF (P/N 611439)
N/A
250 V
2 x 560 uF (P/N 611472)
N/A
300 V
2 x 470 uF (P/N 611440)
N/A
400 V
2 x 330 uF (P/N 611449)
N/A
600 V
4 x 220 uF (P/N 611445)
N/A
Table 8-10: Power Module Output Capacitance
8.7
Available accessories
Following accessories are available for the KDC Series.
REF #
PART #
DESCRIPTION
VENDOR
QTY
1
5005-053-1
KDC Series II parallel mode cable.
AMETEK
1
2
5005-255-1
Rack mount angle bracket, Left1.
AMETEK
1
1
2
3
5005-255-2
Rack mount angle bracket, Right .
AMETEK
4
5005-255-3
Rack mount clamp. (For use with 5005255-1 and –2)
AMETEK
2
1
Angle brackets are dimensioned for use with California Instruments cabinets and may not fit all 19”
cabinets.
2
See note 1.
KDC Series II DC Power Supplies
101
User Manual
Figure 8-2: Replaceable Fuse Locations
102
KDC Series II DC Power Supplies
User Manual
9 Remote Control
9.1
Introduction
The KDC Series comes standard with an RS232C serial interface on the rear panel. It can
optionally be furnished with a combination IEEE-488 and RPV analog control interface at the
time of purchase. The GPIB interface is part of the -IF option package.
Units are shipped with the Argantix KDC Graphical User Interface program - KDCGUI. This
Windows™ program provides a soft front panel to the instrument when connected to a PC
through the RS232C or IEEE-488 interface. Additional benefits are obtained from using the PC
as a control interface. Some of these benefits include the ability to store measurement data to
disk and produce output transients to simulate commonly occurring AC line conditions.
The KDCGUI is a Windows™ program and as such requires a PC capable of running Windows
98™, or Windows NT™/2000/XP. For best performance, a Pentium based PC is recommended.
Complete information on how to use the KDCGUI can be found in the on-line help supplied with
the program. Use the Help menu or press on any of the many Help keys located in all program
windows for an explanation of the relevant screen or function.
Figure 9-1: KDCGUI Main screen
KDC Series II DC Power Supplies
103
User Manual
9.2
KDCGUI Program Requirements
To successfully install and operate the KDCGUI program, you will need the following equipment:
Argantix KDC Series DC power supply.
PC capable of running Windows 98™ , Windows 2000™ or Windows XP™
•
RS232C communications port
•
RS232C serial cable (supplied with the product.)
or
•
Note:
9.3
If option -IF (GPIB) is installed, a National Instruments IEEE-488 Controller Card
The KDCGUI can be run in the absence of a DC power supply. If no DC supply is
available, the KDCGUI can be operated in a simulation mode. The program will
detect these conditions and start up in simulation mode after notifying the
operator. Measurements in this case will be simulated and should not be used for
any analytical purpose.
RS232C Interface
A suitable cable to connect the power supply to a 9 pin PC-AT style serial port is supplied with
the power supply.
The KDC Series expects a LF (Hex 10) terminator at the end of each string sent over the
RS232C interface. If the programming environment you use to develop test programs does not
append a LF terminator to each output string, the KDC Series will not respond. This may be the
case for programs like LabView™ using VISA drivers.
9.3.1
Serial Communication Test Program
The following sample program written in Quick-BASIC can be used to check communication to
the KDC Series Power supply over the RS232C serial interface. The interface is optional and
must be installed for this to work.
'Argantix RS232C Communication Demo Program
'(c) 2002 Copyright California Instruments, All Rights Reserved
'
'This program is for demonstration purposes only and is not to be
'used for any commercial application
'================================================================
'Function and Subroutine Declarations
DECLARE FUNCTION retstring$ ()
'================================================================
'MAIN PROGRAM CODE
'================================================================
'OPEN COM2. Replace with COM1, COM3 or COM4 for Com port used
'The input and output buffers are set to 2K each although
'this is not required for most operations.
OPEN "COM2:19200,n,8,1,BIN,LF,TB2048,RB2048" FOR RANDOM AS #1 LEN = 1
CLS
PRINT "**** INTERACTIVE MODE ****"
'Enter and endless loop to accept user entered commands
DO
104
KDC Series II DC Power Supplies
User Manual
INPUT "Enter Command ('quit' to exit)--> ", cmd$
IF cmd$ <> "QUIT" AND cmd$ <> "quit" THEN
IF cmd$ <> "" THEN
PRINT #1, cmd$ + CHR$(10);
END IF
IF INSTR(cmd$, "?") THEN
PRINT "Power supply query response = "; retstring$
END IF
'Check for Errors after each command is issued
PRINT "Sending non-query syntax check *ESR?"
'On fast PC's we may have to hold off between commands
FOR t = 0 TO 1000: NEXT t
PRINT #1, "*ESR?" + CHR$(10);
esr% = 0 'Clear last error
'Mask off bits 5,4,3,2 only. Other bits are not used.
esr% = VAL(retstring$) AND 60
'Process esr% value for error bits
IF esr% AND 4 THEN
PRINT "*** Query Error Reported by power supply ***"
END IF
IF esr% AND 8 THEN
PRINT "*** Instrument Dependent Error Reported by power supply ***"
END IF
IF esr% AND 16 THEN
PRINT "*** Command Execution Error Reported by power supply ***"
END IF
IF esr% AND 32 THEN
PRINT "*** Command Syntax Error Reported by power supply ***"
END IF
'Clear ERR. -XXX Message from front panel if any error occurred
IF esr% <> 0 THEN
PRINT #1, "*CLS" + CHR$(10);
END IF
END IF
LOOP UNTIL cmd$ = "QUIT" OR cmd$ = "quit"
'Close COM port on exit
CLOSE #1
END
'================================================================
FUNCTION retstring$
'This function returns a response string from the KDC Series
'power supply. The QBasic statement LINE INPUT cannot be used
'as the KDC Series does not return a CR <13> after a response
'message. The LINE INPUT function waits for a CR before
'returning a string. The P Series returns a LF <10> instead
'so we need to poll each returned character for a LF to
'assemble the response string. The COM port needs to be
'opened AS random with a record length of 1 for it to support
'this function. Also, the device number is assumed to be #1
'Optionally, this value could be passed as a parameter to
'make this program more generic.
DIM char AS STRING * 1
DIM resp AS STRING
char = ""
resp = ""
DO
char = INPUT$(1, #1)
resp = resp + char
LOOP UNTIL char = CHR$(10)
'Return result
retstring = LEFT$(resp, LEN(resp) - 1)
END FUNCTION
KDC Series II DC Power Supplies
105
User Manual
9.4
Optional IEEE Interface
The KDC Series can optionally be equipped with an IEEE-488 interface in addition to the
standard RS232C interface.
Figure 9-2: Rear Panel View
The IEEE address of the KDC DC Supply is set from the CONFIGURATION menu. See
paragraph 4.2.8 on page 41 for details.
9.5
KDCGUI Installation
This section covers installation of the KDCGUI from the distribution disk to the user’s PC. Make
sure the PC is capable of running Windows.
9.5.1
Connecting to the PC Using RS232
Connect the power supply to the PC using an RS232C cable. Use the 9 pin D sub connector on
the rear panel labeled RS232/RS485. The other port is for future expansion and is not active.
The power supply RS232C port settings are set as follows:
Baud rate:
Data bits:
Stop bits
Parity bits:
Handshake:
Selectable from Configuration menu. . See paragraph 4.2.8 on page 41 for
details.
8
1
none
Hardware
The power supply source is configured to accept the above setting.
9.5.2
Connecting to the PC Using the optional IEEE-488/GPIB interface
Connect the power supply to the PC using an IEEE-488 interface cable. A National Instruments
GPIB controller card is required to use the KDCGUI program. Set the desired IEEE address
from the configuration menu.
106
KDC Series II DC Power Supplies
User Manual
9.5.3
Installing the Software from CD ROM
The KDCGUI software is distributed on CD-ROM. The KDCGUI must be installed from CD using
the included setup program as all required files are compressed. To install the KDCGUI,
proceed as follows:
1.
Turn on the PC and boot up in Windows™
2.
Insert the CD in your CD-ROM drive.
3.
Run the Setup.exe program from the root directory of the CD.
4.
A CD Browser like program will open. Select the product series for which you want
to install the software and select the GUI Software tab. Select an available
operating system (typically 32 bit Windows OS) and click on the Install button to
begin the installation.
5.
Follow the instructions provided by the setup program to complete the installation.
6.
When the installation has completed, remove the CD ROM and store in a safe
place.
If prompted to do so, reboot the PC to activate the new settings. You are now ready to start
using the KDCGUI software.
9.6
Trouble Shooting - RS232C
This section provides guidelines for resolving communication problems that may occur when
using the KDCGUI software under Windows™.
You may encounter problems when using the serial interface with the KDCGUI program that is
supplied with the interface option for this source.
Symptoms:
1. Unable to verify connection to the power supply through RS232C interface. Time-out occurs
and dialog box appears that asks if you want to switch to simulation mode. An error
message (ERR -100) may appear on the front panel LED’s of the power supply.
- Or 2. Verification is successful but slewing of voltage, frequency or current limit results in an ERR
-100.
Things to check:
1. Is any PC com port available for communication with the power supply? On older PC’s com
port interrupts are often shared between com 1 and com3 as well as com2 and com 4. If any
of these other com ports is in use, it may prevent you from using the com port that shares
the same interrupt.
2. Did you use the RS232C cable that was supplied with the power source? If not, make sure
you obtain the correct cable. (DB9 to DB9, straight through, male to female).
3. Did you connect the serial cable to the 9 pin D-Sub marked “RS232/RS485” on the rearpanel? The secondary RS232C port labeled with RS232 only is not active even when
present.
KDC Series II DC Power Supplies
107
User Manual
9.7
Trouble Shooting - IEEE-488 / GPIB
This section provides guidelines for resolving communication problems that may occur when
using the 2001RP with or without the KDCGUI software with a IEEE-488 / GPIB interface.
Symptoms:
1. Unable to verify connection to the power supply through IEEE-488 interface. Time-out
occurs any time an attempt is made to verify connection.
Things to check:
1. Is the interface option set to use the IEEE-488 interface instead of the RS232C interface?
The DIP switch on the right side panel of the power supply is used to select the desired
interface mode. Refer to section 0. If the GPIB option (option -IF) was ordered, it should be
set this way from the factory but may have been changed after shipment).
2. Does the bus address selected in the System, Interface dialog match the address set using
the DIP switches on the 2001RP? The GPIB address selected must match the settings on
the DIP switch. If changes are made to the DIP switch setting, the power supply must be
cycled off and on to have the new settings take effect.
3. Did you connect the cable in correctly and are both ends of the GPIB cable securely tied
down?
Select the GPIB interface and click on the NI-488.2M Settings tab. An Advanced button at the
bottom of the screen will provide access to the Bus Timing parameter. Set this value to 2µsec to
operate with the power supply's GPIB interface.
9.8
Software Registration
Updates of this and other Argantix programs are posted on a regular basis on the Argantix web
site. You can find available programs by selecting the Software, GUI's and Drivers menu. To
gain access to these downloads, you will need to register as a user on the Argantix web site.
For instructions on how to register and obtain the required access level for software and user
manual downloads, visit our web site at
www.argantix.com
108
KDC Series II DC Power Supplies
User Manual
10 Programming Syntax
SCPI (Standard Commands for Programmable Instruments) is a programming language for
controlling instrument functions over the RS232 or IEEE 488 bus. The command syntax
supported by the KDS Series DC power supplies is covered in the KDS Programming Manual
(P/N 5005-961), which is distributed on the same CD ROM as this user manual. The
programming manual may also be downloaded from the Argantix web site by registered users at
www.argantix.com .
Refer to the KDS Programming Manual for command syntax information.
KDC Series II DC Power Supplies
109
User Manual
11 Options
11.1 Introduction
There are a number of options available for the KDC Series, both hardware and software. While
not all or no options may be present on your specific unit, this section of the manual incorporates
the user documentation for all available options. There is no separate manual for these options
except possible manual addendum's for specials engineering request (SER) systems. If your
system has an SER number as part of the model number, refer to any manual addendum that
was shipped with the unit.
Firmware options such as -704 or -160 can be accessed from the front panel through the
APPLICATIONS menu. They may also be controlled through the remote control interface. Refer
to 5005-961 KDC Programming manual for details on MIL704 commands.
Note that the –AMD option is not implemented in firmware but rather provided through the
KDCGUI Windows software which is supplied on CD ROM CIC658. As such there is no front
panel access to this option.
The availability of any installed options can be checked from the OPTIONS screen. Toggle the
<MENU> key until the APPLICATIONS/OPTIONS screen appears as shown below. Then move
the cursor to the OPTIONS entry and press the <ENTER> key.
A sample OPTIONS screen is shown below showing both the -160- and -704 options present.
Figure 11-1: OPTIONS screen
Figure 11-2: Available options
110
KDC Series II DC Power Supplies
User Manual
11.2 MIL704 Option
11.2.1 General
The MIL704 option is capable of performing all DC power sections of the MIL-STD-704 test
standard in either revision D or E. Depending on the nominal EUT voltage, use of this option
may require a specific voltage range KDC model to support the highest possible output voltage
to be generated during certain test steps.
11.2.2 KDC Series -704 Option Restrictions:
The –704 firmware option on the KDC series provides preprogrammed output sequences per
MIL-STD-704 revision D and E. At the time of publication, no requirements were specified for
DC voltage slew rates during voltage transient changes.
However, with the publication of revision F and the accompanying handbook in 2005, voltage
transition times less than 1 msec are now required when transitioning from one DC level to the
next for some of the tests. The handbook retroactively stipulates this to be done for older
revisions of the standard as well.
The KDC series is a switching DC power supply that offers high power density. Its output slew
rate is bandwidth limited and is also a function of the load connected. As such, it is generally not
able to meet the new < 1 msec output voltage change requirements for all DC voltage transients
in the MIL-STD 704 standard.
Argantix makes no claim that adding the –704 option will make the KDC series fully compliant
with all requirements set forth in the MIL-STD 704 handbook.
The specific limitations and restrictions that apply are shown in the table below.
Rev
Section
Test Requirement
Exception
Comments
E
LDC103
Voltage distortion
spectrum
50kHz
Required frequency range exceeds
KDC capability.
Requires additional
equipment
D
LDC103
Voltage distortion
spectrum
20kHz
Required frequency range exceeds
KDC capability.
Requires additional
equipment
D, E
LDC104
Ripple Test
16.8kHz
Required ripple frequency range
exceeds KDC capability. –704
option applies 400 Hz ripple only.
Requires additional
equipment
D, E
LDC105
Normal Operation,
Voltage Transients
Output voltage change may be
longer than 1 msec.
Requires KDC50 model to
support 50Vdc test level.
D, E
LDC201
Power Interrupt,
Voltage change
< 250 usec
Output voltage transient time
exceeds requirement.
Hardware limit
D, E
LDC302
Abnormal Operation,
Voltage Transients
Output voltage change may be
longer than 1 msec.
Requires KDC50 model to
support 50Vdc test level.
D, E
LDC501
Starting Voltage
Transient
Output voltage change may be
longer than 1 msec.
28VDC
KDC Series II DC Power Supplies
111
User Manual
Rev
Section
Test Requirement
Exception
Comments
E
HDC103
Voltage distortion
spectrum
50kHz
Required frequency range exceeds
KDC capability.
Requires additional
equipment
D
HDC103
Voltage distortion
spectrum
20kHz
Required frequency range exceeds
KDC capability.
Requires additional
equipment
D, E
HDC104
Ripple Test
16.8kHz
Required ripple frequency range
exceeds KDC capability. –704
option applies 400 Hz ripple only.
Requires additional
equipment
D
HDC105
Normal Operation,
Voltage Transients
Output voltage change may be
longer than 1 msec.
Requires KDC600 model to
support 475Vdc test level.
E
HDC105
Normal Operation,
Voltage Transients
Output voltage change may be
longer than 1 msec.
Requires KDC400 model to
support 330Vdc test level.
D, E
HDC201
Power Interrupt,
Voltage change
< 250 usec
Output voltage transient time
exceeds requirement.
Hardware limit
D
HDC302
Abnormal Operation,
Voltage Transients
Output voltage change may be
longer than 1 msec.
Requires KDC600 model to
support 475Vdc test level.
E
HDC302
Abnormal Operation,
Voltage Transients
Output voltage change may be
longer than 1 msec.
Requires KDC400 model to
support 350Vdc test level.
D, E
HDC501
Starting Voltage
Transient
Output voltage change may be
longer than 1 msec.
270VDC
Table 11-1: KDC restrictions -704 option
112
KDC Series II DC Power Supplies
User Manual
11.2.3 Initial Setup
Nominal parameters for the DC Power supply in Mil-Std 704 test mode are as follows:
Output Voltage:
28V or 270V.
A setting outside these nominal values will disable the test and will prevent access to its Menu
screens.
11.2.4 Revision
The MIL704 option defaults to Revision E. The System is capable of performing Revision D
tests by changing the selection to Revision D.
All levels and timing in this document refers to Revision E. For Revision D refer to MILSTD-704D date 9/30/1980.
11.2.5 Tests Performed
STEADY STATE
•
Steady State Voltage test
•
Ripple test
TRANSIENT TEST
•
Transient Voltage low
•
Transient Voltage high
EMERGENCY TEST
•
Emergency Voltage minimum and maximum test
ABNORMAL TEST
•
Abnormal Voltage under
•
Abnormal Voltage over
11.2.6 Front Panel Entry
To perform a test from the keyboard, press the MENU key until the APPLICATIONS screen
appears. The APPLICATIONS screen is shown in Figure 11-3.
Figure 11-3: APPLICATIONS Screen
Select APPLICATIONS and press the ENTER key to display available applications. Use the
cursor to select the MIL704 entry as shown below.
Figure 11-4: MIL704 Menu
KDC Series II DC Power Supplies
113
User Manual
Press the ENTER key to select the MIL704 main menu. One of the screens will appear as
shown in Figure 11-4. The voltage mode and setting will define which menu to select. Refer to
Section 11.2.3
Note: The user has to turn on the Output relay before starting a test and set the programmed
output voltage to a valid DC level for MIL-STD 704 testing. (27 to 29 VDC or 270 to 290 VDC). If
not, the MIL-STD 704 test mode cannot be selected.
11.2.7 Test Revision and Test Selection
If the output voltage is set for 28V DC or 270V DC the first of three MIL704 DC screens will
appear as shown in Figure 11-5. The default Revision is E. Revisions supported are D and E.
The Revision can be changed from the front panel by setting the cursor to the REV entry and
using one of the rotating knobs to scroll between D and E.
The -704 option has several menu entries spread over 3 screens as follows:
Figure 11-5: MIL704 DC Menu - 1 of 3
Figure 11-6: MIL704 DC Menu - 2 of 3
Figure 11-7: MIL704 DC Menu - 3 of 3
11.2.8 Steady State Test
Scroll to the STEADY ST MENU entry using the up and down cursor keys. Press the ENTER
key to select the STEADY STATE screen. The screen will appear as shown
Figure 11-8: Steady State DC
The MIL704 STEADY STATE screen has the following tests:
1
VOLTAGE
2
RIPPLE
The above tests can be selected by scrolling to the highlighted selection using the up and down
key and the ENTER key to start the selected test.
VOLTAGE
114
KDC Series II DC Power Supplies
User Manual
This test will change the output voltage for the selected phase in the following sequence:
28V system:
1. 22V for 1 minute.
2. 29V for 1 minute.
3. 28V for 1 minute.
270V system:
1. 250V for 1 minute.
2. 280V for 1 minute.
3. 270V for 1 minute.
The ← key (backspace) will terminate the test at any time.
RIPPLE
This test will impose a 400Hz frequency component to the output voltage. The test will last for 2
minutes. The level of the ripple is as follows:
28V system:
•
±1.5V.
270V system:
•
±6.0V.
The ← key (backspace) will terminate the test at any time.
11.2.9 Transient Test
From the MIL704 DC MENU scroll to the TRANSIENT MENU entry using the up and down
cursor keys. Press the ENTER key to select the TRANSIENT TEST screen. The screen will
appear as shown in.
Figure 11-9: Transient Menu
The Transient Test has the following tests:
1
HIGH VOLTAGE
2
LOW VOLTAGE
HIGH VOLTAGE
This test will change the output voltage for the selected phase in the following sequence:
28V System
1. 50V for 12.5 msec.
2. Linearly reduce to29V in 70msec.
3. Stay at 29V for 92.5msec before returning to 28V.
KDC Series II DC Power Supplies
115
User Manual
270V System
330V for 20 msec.
1. Linearly reduce to280V in 20msec.
2. Stay at 280V for 135msec before returning to 270V.
Prior to the test, a range change may take place if the power source is set for the low voltage
range.
The ← key (backspace) will terminate the test at any time.
Note: A range change will result in momentary loss of power to the EUT. If this is not
acceptable, the power source must be left in high range at all times.
LOW VOLTAGE
This test will change the output voltage for the selected phase in the following sequence:
28V System
1. 18V for 15 msec.
2. Linearly increase to 22V in 85msec.
3. Stay at 22V for 75msec before returning to 28V.
270V System
1. 200V for 10 msec.
2. Linearly increase to 250V in 30msec.
3. Stay at 250V for 135msec before returning to 270V.
The ← key (backspace) will terminate the test at any time.
11.2.10 Abnormal Test
From the MIL704 DC MENU scroll to the ABNORMAL MENU entry using the up and down
cursor keys. Press the ENTER key to select the ABNORMAL TEST screen. The screen will
appear as shown in Figure 11-10.
Figure 11-10: Abnormal Test Screen
The Abnormal Test has the following tests:
1
OVER VOLTAGE
2
UNDER VOLTAGE
The above tests can be selected by scrolling to the highlighted selection using the up and down
cursor keys and the ENTER key to start the selected test.
OVER VOLTAGE
This test will change the output voltage for the selected phase in the following sequence:
116
KDC Series II DC Power Supplies
User Manual
28V system:
1. 50V for 50msec.
2. The voltage gradually decays with time to 31.5 volts by the following equation:
V = 31.38 + 0.93/t. for 0.05 ≤ t ≤ 7.758
3. Stay at 31.5V for 92.242 seconds before returning to 28V.
270V system:
1. 350V for 50msec.
2. The voltage gradually decays with time to 290 volts by the following equation:
V = 289.6 + 3.02/t. for 0.05 ≤ t ≤ 7.55
3. Stay at 290V for 92.45 seconds before returning to 270V.
Prior to the test, a range change may take place if the power source is set at the low voltage
range. Note: See paragraph 11.2.9 under HIGH VOLTAGE.
The ← key (backspace) will terminate the test at any time.
Note: A range change will result in momentary loss of power to the EUT. If this is not
acceptable, the power source must be left in high range at all times.
UNDER VOLTAGE
This test will change the output voltage for the selected phase in the following sequence:
28V system:
1. 0V for 7sec.
2. 20V for 93sec.
270V system:
1. 0V for 7sec.
2. 240V for 93sec.
The ← key (backspace) will terminate the test at any time.
11.2.11 Emergency Test
From the MIL704 DC MENU scroll to the EMERGENCY TEST entry using the up and down
cursor keys (Figure 11-11). Note that there is no submenu below this entry as there is only one
Emergency test step. Press the ENTER key to start the EMERGENCY TEST.
Figure 11-11: Emergency Test
VOLTAGE
This test will change the output voltage for the selected phase in the following sequence:
28V system:
1. 18V for 1 minute.
2. 29V for 1 minute.
3. 28V for 1 minute.
KDC Series II DC Power Supplies
117
User Manual
270V system:
1. 250V for 1 minute.
2. 280V for 1 minute.
3. 270V for 1 minute.
The ← key (backspace) will terminate the test at any time.
118
KDC Series II DC Power Supplies
User Manual
11.3 AMD Option
11.3.1 General
The -AMD option supports the DC Voltage power group of the Airbus AMD-24 rev C immunity
tests.
The –AMD option is based on Airbus A400M Directive: AMD-24 Issue C, Electrical
characteristics of aircraft AC and DC systems Appendix C dated March 22, 2005.
Future revisions of the AMD-24 directive may be issued over time and updates may be made
available to cover any changes in test levels, durations, procedures etc. Furthermore, the –AMD
option is completely data file driven to allow a large degree of customization by the end-user if
needed so many changes can be supported without the need for software updates.
This section of the manual explains the amount of test coverage and limitations of this test
option.
This manual is not intended to elaborate on the intent or purpose of the immunity tests and the
expected behavior of the EUT as described in the Airbus documents. It is assumed that the
end-user is familiar with the content of the AMD-24 test standard.
11.3.2 AMD Power Groups
The –AMD option supports only the DC mode of operation. As such, only the LDC power group
as described in the Airbus A400M AMD-24 directive is covered.
Grou
p
Description
LDC
28VDC
The required steady state output settings for each power group must be selected based on the
type of EUT to be tested. These settings can be made from the front panel of the power source
or from the main Gui control screen.
KDC Series II DC Power Supplies
119
User Manual
11.3.3 KDC Series -AMD Option Restrictions:
The extent of coverage of the –AMD option as implemented on the KDC Series platform is
shown in the table below. Tests marked with an ‘x’ generally require additional hardware to be
used. Tests marked ‘N/A’ are not applicable to the corresponding table. Tests marked with a ‘√’
are covered by the –AMD tests.
No.
Description
101
Steady State Voltage
√
101-APU
Steady State Voltage
√
102
Voltage Transients
√
102-APU
Voltage Transients
√
103
Voltage Ripple
X
103-APU
Voltage Ripple
X
104
Voltage Spikes
X
105
Inrush Current
X
105-APU
Inrush Current
X
106
Voltage Variations Due to APU Starting
√
107
DC Ripple Due to Equipment
X
108
Voltage Spike Due to Equipment Load Switching
X
109
Compatibility with SEPDC Voltage Clipping Devices
X
201
Voltage Transients
√
201-APU
Voltage Transients
√
301
Steady State Voltage
√
302
Voltage Ripple
X
303
Inrush Current
X
401
Transparency Time
√
401-APU
Transparency Time
√
402
Voltage Switching Transients 1
√
402-APU
Voltage Switching Transients 1
√
403
Voltage Switching Transients 2
√
403-APU
Voltage Switching Transients 2
√
Power Failure
X
501
Table LDC
Table 11-2: -AMD Option iX Test Coverage
120
KDC Series II DC Power Supplies
User Manual
11.3.4 AMD Option Test Tables
Test
No.
Section
LDC101
LDC101
APU
LDC102
LDC102
APU
LDC103
LDC103
APU
Subject
Test Limits
Comment
File Ref.
Steady State Voltage
32 to 24 Volts RMS
DO160 16.6.1.1.b
LDC101
Steady State Voltage
32.5 to 23.5 Volts RMS
DO160 16.6.1.1.b
LDC101-APU
Voltage Transients
Surge to 36V max, Sag to 18.5V min
Per Table LDC 102-1
LDC102
Voltage Transients
Surge to 40V max, Sag to 17V min
Maximum 5kHz ripple.
Per Table LDC 102-APU
Requires Additional Equipment
LDC102-APU
Voltage Ripple
Voltage Ripple
Maximum 5kHz ripple.
Requires Additional Equipment
Requires Additional Equipment
LDC104
Voltage Spikes
LDC105
Inrush Current
Test requires multiple load cables
Requires Additional Equipment
Inrush Current
Test requires multiple load cables
Requires Additional Equipment
LDC106
Voltage Variations Due to APU Starting
Start at 12.5V, ramp up to 26.5V
Per Figure 13, Appendix B
LDC107
DC Ripple Voltage Due to Equipment
Requires Additional Equipment
LDC108
Requires Additional Equipment
LDC109
Voltage Spike due to Equipment Load Switching
Compatibility with SEPDC Voltage Clipping
Devices
LDC201
Abnormal Voltage Transients
36 to 0 Volts
DO160 16.6.2.4.c and 16.6.2.3.b
LDC201
Abnormal Voltage Transients
46 to 0 Volts
DO160 16.6.2.4.c and 16.6.2.3.b
LDC201-APU
Emergency Steady State Voltage
32 to 18.5 Volts
LDC301
LDC302
Emergency Voltage Ripple
Maximum 5kHz ripple.
DO160 16.6.1.1.b
Requires Additional Equipment
LDC303
Emergency Inrush Current
Test requires special cables
Requires Additional Equipment
LDC105
LDC201
APU
APU
LDC301
LDC401
LDC401
APU
LDC402
LDC106
Requires Additional Equipment
Transparency Time
3ms dropouts
Per Figure LDC 401-1
LDC401
Transparency Time
10ms dropouts
Per Figure LDC 401-1
LDC401-APU
Voltage Switching Transients 1
Test Conditions 1-18
Per Figure LDC 402-1
LDC402
LDC402
APU
Voltage Switching Transients 1
Test Conditions 1-17
Per Figure LDC 402-APU
LDC402-APU1
LDC402
APU
Voltage Switching Transients 1
Test Conditions 18-27
Per Figure LDC 402-APU
LDC402-APU2
LDC402
APU
Voltage Switching Transients 1
Test Conditions 28-36
Per Figure LDC 402-APU
LDC402-APU3
LDC402
APU
LDC402-APU4
LDC403
LDC403
APU
Voltage Switching Transients 1
Test Conditions 37-42
Per Figure LDC 402-APU
Voltage Switching Transients 2
T=1 to T=100
Per Figure LDC 403-1
LDC403
Voltage Switching Transients 2
T=1 to T=49
Per Figure LDC 403-APU
LDC403-APU1
KDC Series II DC Power Supplies
121
User Manual
LDC403
APU
Voltage Switching Transients 2
T=50 to T=99
Per Figure LDC 403-APU
LDC403-APU2
LDC403
APU
Voltage Switching Transients 2
T=100 to T=200
Per Figure LDC 403-APU
LDC403-APU3
Power Failure
Test requires physically removing line
cables
Test not performed with software
LDC501
122
KDC Series II DC Power Supplies
User Manual
Appendix A: Error Messages
Any errors that occur during operation from either the front panel or the remote control interface
will result in error messages. Error messages are displayed on the LCD display. They are also
stored in the error message queue from which they can be queried using the SYST:ERR?
Query. The error queue has a finite depth. If more error messages are generated than can be
held in the queue, a queue overflow message will be put in the last queue location. To empty the
queue, use the error query until the No Error result is received.
Errors appearing on the LCD will generally remain visible until the user moves to another
screen. If multiple error messages are generated in succession, only the last message will be
visible as there is only space for one error message on the LCD display.
The same area of the display is also used to display status messages. While error messages
always have a negative error number, status messages have a positive number.
The table below displays a list of possible error and status messages along with their possible
cause and remedy.
Number
0
Message String
Cause
Remedy
"No error"
No errors in queue
-100
"Command error"
Unable to complete
requested operation
Unit may be in a mode inconsistent
with request.
-102
"Syntax error"
Command syntax
incorrect.
Misspelled or unsupported command
-103
"Invalid separator"
SCPI separator not
recognized
See SCPI section of programming
manual.
-104
"Data type error"
Data type invaled.
Check command for supported data
types
-108
"Parameter not
allowed"
One or more
additional parameters
were received.
Check programming manual for
correct number of parameters
-109
"Missing parameter"
Too few parameters
received for
requested operation
Check programming manual for
correct number of parameters
-110
"Command header
error"
Command header
incorrect
Check syntax of command.
-111
"header separator
error"
Invalid command
separator used.
Use semi-colon to separate command
headers
-112
"Program mnemonic
too long"
Syntax error
Check programming manual for
correct command syntax
-113
"Undefined header"
Command not
recognized error
Check programming manual for
correct command syntax
-120
"Numeric data error"
Data received is not a
number
Check programming manual for
correct command syntax
-121
"Invalid character in
number"
Number received
contains non-numeric
character(s)
Check programming manual for
correct command syntax
-123
"Exponent too large"
Exponent in number
exceeds limits
Check programming manual for
correct parameter range
-128
"Numeric data not
allowed"
Number received
when number is not
allowed.
Check programming manual for
correct command syntax
-168
"Block data not
Block data was sent.
Check programming manual for
KDC Series II DC Power Supplies
123
User Manual
124
Number
Message String
allowed"
Cause
Remedy
correct command syntax
-200
"Execution error"
Command could not
be executed
Command may be inconsistent with
mode of operation.
-201
"Invalid while in local"
Command issued but
unit is not in remote
state
Put instrument in remote state before
issuing GPIB commands.
-203
"Command protected"
Command is locked
out
Some commands are supported by
the unit but are locked out for
protection of settings and are not user
accessible.
-210
"Trigger error"
Problem with trigger
system.
Unit could not generate trigger for
transient execution or measurement.
-211
"Trigger ignored"
Trigger request has
been ignored.
Trigger setup incorrect or unit was not
armed when trigger was received.
Check transient system or
measurement trigger system settings.
-213
"Init ignored"
Initialization request
has been ignored
Unit was told to go to armed state but
was unable to do so. Could be
caused by incorrect transient system
or measurement acquisition setup.
-220
"Parameter error"
Parameter not
allowed.
Incorrect parameter or parameter
value. Check programming manual
for allowable parameters
-221
"Setting conflict"
Requested setting
conflicts with other
setting in effect.
Check other settings.
-222
"Data out of range"
Parameter data
outside of allowable
range.
Check programming manual for
allowable parameter values
-223
"Too much data"
More data received
than expected
Check programming manual for
number of parameters or data block
size
-224
"Illegal parameter
value"
Parameter value is
not supported
Check programming manual for
correct parameters
-226
"Lists not same length"
One or more transient
lists programmed has
different length.
All lists must be of same length or
transient cannot be compiled and
executed.
-241
"Hardware missing"
N/A
N/A
-254
"Media full"
No storage space left
to save settings or
data.
Delete other settings or data to make
room.
-255
“Directory full”
Too many directory
entries
Delete one or more files from memory
to make room.
-256
“File name not found”
File requested not in
directory
Check directory for file names
present.
-257
“File name error”
Incorrect filename
Too many or non-ASCII characters
used in waveform file definition.
-283
“Illegal variable name”
Variable name illegal.
Use ASCII characters only
-300
"Device specific error"
Hardware related
error
Check hardware for proper operation.
-311
"Memory error"
Memory checksum
May be the result of incomplete data
KDC Series II DC Power Supplies
User Manual
Number
Message String
Cause
error.
Remedy
download. Check interface and try
downloading data again. Successful
download may clear this error
condition.
-314
"Save/recall memory
lost"
User setup register
contents lost
Store setup in same register again.
-315
"Configuration memory
lost"
Hardware
configuration settings
lost.
Contact Argantix service department
at [email protected] to obtain
instructions on restoring configuration
data.
"Self-test failed"
Internal error
Contact Argantix service department
at [email protected]
-330
HTU
UTH
HTU
UTH
-350
"Queue overflow"
Message queue full.
Too many message. Read status
using SYST:ERR query until 0, "No
Error" is received indicating queue
empty.
-400
"Query error"
Unable to complete
query.
Check programming manual for
correct query format and parameters
-410
"Query
INTERRUPTED"
Query issued but
response not read.
Check application program for correct
flow. Response must be read after
each query to avoid this error.
-420
"Query
UNTERMINATED"
Query incomplete.
Check for terminator after query
command.
-430
"Query
DEADLOCKED"
Query cannot be
completed
Check application program for
multiple queries
-440
"Query
UNTERMINATED"
Query incomplete.
Check for terminator after query
command.
1
"Output volt fault"
Output voltage does
not match
programmed value.
Load exceeds current limit and unit is
in Constant Voltage (CV) mode of
operation. Reduce load or increase
CL setting
Output voltage is driven above
programmed voltage by external
influence (Load, voltage kickback,
etc.)
2
"Current limit fault"
Current limit
exceeded.
Load exceeds current limit and unit is
in Constant Voltage (CV) mode of
operation. Reduce load or increase
CL setting
3
”Temperature fault”
Temperature of heat
sink too high
Reduce load. Ensure proper airflow
and exhaust clearance. Check fan(s)
for operation.
4
"External sync. error"
Could not sync to
external sync signal.
External sync signal missing,
disconnected or out of range.
5
"Initial memory lost"
Power on settings
could not be recalled.
Save power on settings again to
overwrite old content.
6
"Limit memory lost"
Hardware
configuration settings
lost.
Contact Argantix service department
at [email protected] to obtain
instructions on restoring configuration
data.
HTU
UTH
7
"System memory lost"
Memory corrupted.
Recycle power.
8
"Calibration memory
Calibration data lost.
Contact Argantix service department
KDC Series II DC Power Supplies
125
User Manual
Number
Message String
lost"
Cause
Remedy
13
"Missing list
parameter"
One or more transient
list parameters
missing.
Check programmed lists.
14
"Voltage peak error "
Peak voltage
exceeds internal bus
voltage
This error may occur when selecting
user defined wave shapes with higher
crest factors. Reduce programmed
RMS value.
15
"Slew time exceed
dwell"
Time needed to slew
to final value is less
than dwell time.
Check dwell times in transient list
settings. Increase dwell time or
change slew rate for affected
parameter.
16
"Illegal during
transient"
Operation requested
not available while
transient is running.
Wait till transient execution is
completed or abort transient
execution first.
17
"Output relay must be
closed"
Operation not
possible with open
relay
Close relay before attempting
operation. E.g. transient execution
requires output relay to be closed.
18
"Trans. duration less
then 1msec"
Dwell time below
minimum or 1 msec
Increase dwell time to at least 1
msec.
19
"Clock and sync must
be internal"
Operation not
possible with external
clock
Switch to internal sync. (Default)
20
"Input buffer full"
Too much data
received.
Break up data in smaller blocks.
Try lower baud rates.
21
"Ambient temperature
exceed limit"
Ambient air
temperature
measured at
controller exceeds
operating range..
Improve airflow / circulation or use
climate control to keep ambient
temperature below 40° C. Output will
trip off. (For firmware older than 1.20,
this error message is not available).
23
“Input line under
voltage”
AC Input line too low
or missing phase.
Check AC Line input against input
specifications or check for phase loss.
24
“Input line over
voltage”
AC Input line too
high.
Check AC Line input against input
specifications.
25
“Over voltage
protection trip”
Output exceeds OVP
trip level.
Check OVP mode and setting.
at [email protected] to obtain
instructions on restoring calibration
data or recalibrate unit.
HTU
UTH
Table 11-3: Error Messages
126
KDC Series II DC Power Supplies
User Manual
Index
7
704.........................................................121, 129
A
accessories .....................................................10
address
GPIB ............................................................46
IEEE.............................................................46
ALC............................................................11, 37
Altitude...............................................................6
auto level control .............................................37
B
baud rate .........................................................46
bus address
setting ..........................................................46
C
calibration ........................................................88
Calibration password.................................49, 51
Connect .........................................................116
constant power ................................................60
Construction
internal ...........................................................6
controls and indicators ......................................7
Cooling ..............................................................6
Current
Constant ......................................................59
Input ...............................................................3
Output ............................................................5
current sharing
adjustment R54............................................72
D
Dimensions........................................................6
E
electrical specifications .....................................3
environmental specifications .............................5
error messages .............................................133
external
sense ...........................................................62
External Sense ..................................................4
F
factory
default power on setting ..............................58
firmware
updates ......................................................105
front panel ...............................................24, 112
lock ..............................................................25
KDC Series II DC Power Supplies
FT option......................................................... 11
Function Strobe .............................................. 15
G
GPIB ............................................................. 116
address selection ...................................... 116
troubleshooting.......................................... 118
H
Humidity ............................................................ 6
I
IEEE-488................................................. 85, 116
address selection ...................................... 116
troubleshooting.......................................... 118
impedance
output .......................................................... 37
programmable ............................................. 37
initialization
changing...................................................... 58
installation ..................................................... 116
program ..................................................... 116
Installing
software..................................................... 117
interconnect cable........................................... 70
Introduction ....................................................... 1
K
KDCGUI ........................................................ 112
knob ................................................................ 25
L
LabView
RS232C terminator ................................... 113
LCD
viewing angle ........................................ 49, 51
LED ................................................................. 98
LED indicators ................................................ 98
LOCAL button ........................................... 25, 28
Local Lockout.................................................. 28
M
maintenance ................................................... 98
Material
chassis .......................................................... 6
Measurements .................................................. 5
mechanical........................................................ 6
N
Noise and Ripple .............................................. 4
127
User Manual
O
options.............................................................10
output
impedance ...................................................37
Output
remote on/off ...............................................63
P
Parallel Mode ....................................................9
Password
Calibration .............................................49, 51
power group ..................................................129
power groups ................................................129
power on screens............................................32
power-on .........................................................46
R
registration ....................................................118
remote
sense ...........................................................62
REMOTE .........................................................25
remote control .................................................25
remote inhibit...................................................63
Remote interface...............................................7
replacement parts .........................................108
Requirements
KDCGUI.....................................................113
RS232C...........................................................85
S
SCPI ..............................................................119
self-test............................................................32
128
sense
external ....................................................... 62
set mode ......................................................... 54
setting
baud rate ..................................................... 46
GPIB address.............................................. 46
Setup
program..................................................... 116
shuttle ............................................................. 25
simulation mode ........................................... 113
slew mode....................................................... 54
status .............................................................. 24
T
Temperature ..................................................... 5
terminator
RS232C..................................................... 113
Transient list
execution..................................................... 40
front panel data entry .................................. 42
Trigger output ................................................. 15
troubleshooting ............................................... 98
V
viewing angle
adjustment............................................. 49, 51
Voltage
Constant...................................................... 59
Input .............................................................. 3
Output ........................................................... 3
W
Weight............................................................... 6
KDC Series II DC Power Supplies