1
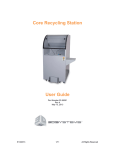
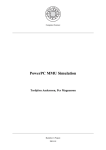
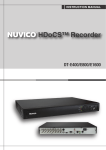
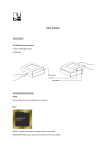
Self-Positioning Handheld 3D Scanner
Method Sheet:
How to scan in Color and prep for Post Processing
ZScan: Version 3.0
POWERED BY
Last modified: 03/13/2009
Background theory
The ZScanner™700CX was built and designed on the same platform as the ZScanner
™700, but with ability to scan in full color. The ZScanner™700CX has custom designed
software to perform the calculations required to digitize a surface and texture image.
That software, named ZScan™, is capable of producing a real time rendering of the
surface as it is being digitized. While the software is designed for digitalization, it also
has few simple STL editing tools and texture editing tools.
As with any computerized system, the ZScanner™700CX has both hardware and
software. The ZScanner™700CX, the hardware, transmits the actual data and ZScan,
the software, uses the data to compute the scanned object’s shape, texture and image.
The software has been designed with two key ideas in mind:
Ease of Use
ZScan is designed so that a user can be up and running in very little time. The scanner
is self-calibrated so the only step required before scanning is to optimize the calibration;
a process that takes about one minute to perform. See MS050015 – How to Optimize
the Calibration of the Scanner for more details.
Data integrity
Data processing is also automated and uses unique and extremely powerful algorithms.
These algorithms use the entire laser line to generate a clean and constant STL mesh
While this is going on, another set of algorithms are used to display a real time surface
and texture rendering of what is being scanned (see Figure 1). This allows the user to
easily see which parts of the object have been scanned and which have not.
Figure: 1 – Real time scanning
This Method Sheet will simply explain how to scan in the color and prep for post
processing using a ZScanner700CX.
ZCorporation® - Scanning in Color and prepping for Post Processing.
Page 2
When to use it?
This technique should be used when scanning in color and prepping for post processing
of scanned data.
Why to use it?
This technique will help you obtain good results with less iteration, as well as maximize
the use of your computer’s resources. It will also optimize the results as enough good
data should then be available for ZScan™ to build the surface with most of the details
accurately.
How to use it?
Note: Don’t forget to configure the scanner according to the type of surface you will
scan. It is also very important to use the glass calibration plate to optimize the
calibration at the beginning of the session. Refer to the User manual for any further
instruction.
1. The part should be prepared as usual, i.e. ZScanner markers should be applied
on it, as they would be on a regular part.
2. Once the part and ZScanner preparation are made, make sure you adjust your
facets, surface and texture setting that meets your needs. Remember these
settings can also be adjusted even after a scan.
3. When ready to scan in color please make sure your press the color button on the
ZScanner™700CX to activate color mode, or else the scanner will only scan as
monochrome. (See Figure 2 below) Click record scan and begin scanning.
Activate Color
Figure: 2 – ZScanner™700CX Color Button
ZCorporation® - Scanning in Color and prepping for Post Processing.
Page 3
Scanning with and without color. (See Figure 3)
NO COLOR ------------------------------------- COLOR
Figure: 3
4. When capturing data be sure to capture all data needed. The ZScanner cannot
add/capture texture without surface mesh. (See Figure 4 )
Figure: 4
5. When finished capturing all data, we now can begin to prep for post processing
the scan data. The ZScan software provides some basics editing tool for the
textures captured during scan. Below show the tools available in ZScan texture
mode.
Texture Mode
The texture mode in ZScan will allow user to manipulate all
functions relative to the texture of the object acquired with
the ZScanner™700CX. When selected, the textured object
appears in the 3D Viewer. It is then possible to perform
manipulations of the texture of the object.
When this mode is activated, the texture functions are
activated in the toolbar. These functions are summarized in
the table below.
ZCorporation® - Scanning in Color and prepping for Post Processing.
Page 4
Texture Mode Functions
Toolbar Icon
Menu
File | Save
Texture
Action
This function saves the bitmap image of the
texture on the hard drive for modifications in an
external application
File | Open
Texture
This function re-imports the modified bitmap and
applies it on the scanned object.
Edit | View
Texture
This function displays the texture mapped on
the 3D object. The output is dependent on the
type of projection used
Edit | Move
Allows moving the projection volume, if a
projection other than None is used.
Texture Mode Expanding Panels
Texture Details
This expanding panel informs the user about the
size of the texture used to represent the object.
Texture Size is the current size of the bitmap
image currently used by ZScan. The Hardware
Limit is linked to the amount of memory the
current video card has.
ZScan offers the possibility to display texture on
the object beyond the hardware limit if the
projection type is set to None. However, in this
case, the texture will not be displayed in other
software on this computer. The solution is then to
change computer to one with a better graphics
card, or to use a projection and specify a smaller
texture size.
ZCorporation® - Scanning in Color and prepping for Post Processing.
Page 5
Resolution: This parameter controls the resolution of the texture used to represent the
object. The default value is 150 dpi and it can take values from 50 dpi to 250 dpi. A
higher dpi count will increase the texture size of the object and will take it closer to the
hardware limit.
Default color: This is the color used when no color information is detected by the
ZScanner™700CX. The three digits represent the RGB (Red - Green - Blue) value and
can range from 0 to 255. For example, a bright green will be noted as 0 - 255 - 0.
Contrast / Brightness: These two sliders allow the user to control the contrast and the
brightness of the texture of the object. The results of changing the value of these sliders
are reflected in real-time in the 3D Viewer. When satisfied with the changes, they can
be made permanent when clicking on Apply. Both sliders can take values ranging from
-1.00 to 1.00.
Paint Positioning Features: When this option is checked, ZScan will fill the positioning
features on the object in order to blend them in the texture of the object. If unchecked,
the default color defined in this expanding panel will be applied.
Optimize Texture: This function analyzes the texture and will optimize its matching with
the geometry of the object.
Open/Save Texture: ZScan allows saving the texture of the object on the computer for
further manipulations. The output file is a .bmp (bitmap image) file, which can then be
modified in an external editor, such as Adobe Photoshop or The GIMP. Once the
modifications are made on this file, the .bmp can be re-imported on the object by using
the Open Texture function. This function is useful to correct small defects on the object
or to put annotations directly on the object.
Open/Save Photo: This function is akin to Open/Save Texture. However, the file save
here will be the view of the object from the point of view currently represented in the 3D
Viewer. The saved file will then be a .tiff image, which can be modified in any editor
supporting uncompressed TIFF files, such as Adobe Photoshop or The GIMP. Upon reimportation of the image in ZScan with the Open Photo function, the modifications will
be applied on the object.
Projections in ZScan
In ZScan, projections are a way to represent the texture of the object in such a way
that it is easily understood by the user. There are 5 types of projections which can be
used, but in all of them, the principle is the same: the object's texture is projected onto a
geometric primitive which can then be easily represented in a 2D image for edition in an
external software package.
• None: This is ZScan’ s internal texture representation mode. While not easily
editable in 2D, this texture representation mode is the most precise and
guarantees a constant texture resolution on the whole object. This is also the
only projection mode which allows the user to go beyond the hardware limit for
the current computer.
ZCorporation® - Scanning in Color and prepping for Post Processing.
Page 6
•
•
•
Spherical: The texture is projected on a sphere. The parameters editable by the
user are the sphere's radius and its location in space.
Cylindrical: The texture is projected on a cylinder. The parameters editable by
the user are the cylinder radius, length as well as its location in space.
Cubic: The texture is projected on a cube. It is possible to edit all of the cube's
edges lengths as well as its location in space.
UV – Mapping
Once you have made your changes, you can than save your UV Map of your scan. UV
is a 3D modeling process of making a 2D image representing a 3D model. When a
model is created as a polygon mesh using a 3D modeler, UV coordinates can be
generated for each vertex in the mesh. One way is for the 3D modeler to unfold the
triangle mesh at the seams, automatically laying out the triangles on a flat page. If the
mesh is a UV sphere, for example, the modeler might transform it into an
equirectangular projection. Once the model is unwrapped, the artist can paint a texture
on each triangle individually, using the unwrapped mesh as a template. (See Figure 5)
Figure: 5 – UV Texture Map + Photo
Saving
ZCorporation® - Scanning in Color and prepping for Post Processing.
Page 7
When saving from ZScan, there are multiple files that can be saved for future post
processing in necessary. See below.
3D Files: .OBJ, .WRL, .X3D, .ZPR, .PLY, .STL, .MA, and .DAE
Texture/Color: JPEG, TIFF, and BUM
Results
The following image shows the resulting .OBJ of a simple object scanned using the
aforementioned technique (see Figure 6).
Figure 1 : Resulting .STL File
This technique can be used for objects scanned in color and when prepping for post
processing to achieve the best scan results.
ZCorporation® - Scanning in Color and prepping for Post Processing.
Page 8