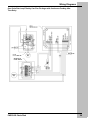
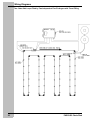
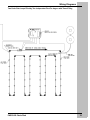
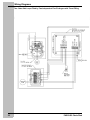
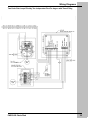
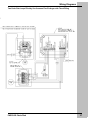
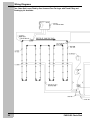
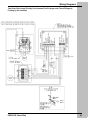
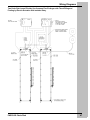
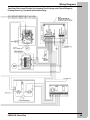
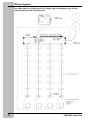
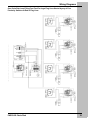
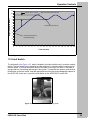
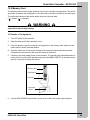
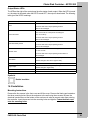
1
Model 236
Installation & Operation Manual
PNEG-602
Date: 01-22-08
PNEG-602
2
PNEG-602 Chain Disk
Table of Contents
Contents
Chapter 1 Safety .................................................................................................................................. 5
Safety Guidelines ................................................................................................................ 5
General Safety Statement ................................................................................................... 6
Chapter 2 Decals ................................................................................................................................. 8
Chapter 3 Introduction ..................................................................................................................... 10
Applications ....................................................................................................................... 10
Using the Manual .............................................................................................................. 10
Background ....................................................................................................................... 10
Chapter 4 Specifications .................................................................................................................. 11
Chapter 5 Optional Equipment ........................................................................................................ 12
Chapter 6 Tubing & Drop Kit ............................................................................................................ 13
Tubing Options .................................................................................................................. 13
Laying Out the Tubing ....................................................................................................... 13
Assembly & Gluing Sections of PVC Tubing ..................................................................... 13
Cutting Outlet Holes .......................................................................................................... 14
Suspension of Tubing ....................................................................................................... 15
Drop Kit Installation ........................................................................................................... 15
Drop Feeder Installation .................................................................................................... 16
Chapter 7 Drive Unit Installation ..................................................................................................... 17
Location ............................................................................................................................. 17
Structural Integrity of Support ........................................................................................... 17
Suspension of the Drive Unit ............................................................................................. 18
Chapter 8 Corner Installation ........................................................................................................... 19
Measuring & Cutting Tube ................................................................................................ 19
Chapter 9 Fill System ....................................................................................................................... 20
Installation ......................................................................................................................... 20
Fill Hopper Installation ....................................................................................................... 21
Chapter 10 Wiring Diagrams ............................................................................................................ 23
Wiring Instructions ........................................................................................................... 23
Chapter 11 Operation Controls ........................................................................................................ 52
Current Sensor ................................................................................................................. 52
Limit Switch ...................................................................................................................... 53
Chapter 12 Chain Disk Controller - APCD-295 ............................................................................... 55
Terms and Symbols ......................................................................................................... 55
Installation ........................................................................................................................ 56
Controller’s Operation ...................................................................................................... 57
Parameter Settings .......................................................................................................... 68
Technical Specifications .................................................................................................. 82
Memory Card ................................................................................................................... 83
Chapter 13 Chain Disk Controler - APCD-295-S ............................................................................. 85
Terms and Symbols ........................................................................................................ 85
Installation ........................................................................................................................ 87
Controller’s Operation ...................................................................................................... 88
Technical Specifications .................................................................................................. 89
PNEG-602 Chain Disk
3
Table of Contents
Chapter 14 Chain Disk Controler - APCD-300 ................................................................................90
Terms and Symbols .........................................................................................................90
Installation ........................................................................................................................91
Controller’s Operation ......................................................................................................92
Parameter Settings ..........................................................................................................95
Technical Specifications .................................................................................................101
Memory Card .................................................................................................................101
Chapter 15 Testing of Controls ......................................................................................................104
Limit Switch ...................................................................................................................104
Chapter 16 Chain Installation .........................................................................................................105
Check Drive Sprocket Rotation ......................................................................................105
Direction of Travel ..........................................................................................................105
Pulling Chain Through Tubing ........................................................................................105
Final Assembly of Corners .............................................................................................106
Wrapping Chain Around Drive Unit Wheels ..................................................................106
Chain Take-Up ...............................................................................................................107
Mounting Proximity Switch .............................................................................................109
Adjusting Sensitivity .......................................................................................................109
Chapter 17 Maintenance .................................................................................................................111
Chain and Disk Tension .................................................................................................111
Gearbox Fluid Level Check ............................................................................................111
Bushing Replacement in Idler Wheel .............................................................................111
Limit Switch Inspection ...................................................................................................112
Chapter 18 Parts List ......................................................................................................................113
Proximity Feed Sensor for Tube ....................................................................................114
Corner Assembly, 90 Degree W/Hardware Package .....................................................116
Chain Disk Drive Unit .....................................................................................................118
Pneumatic Drop Kit Accessories ....................................................................................122
Fill Hopper Assembly .....................................................................................................124
Drop Kit & Pneumatic Drop Kit Chain Disk ....................................................................126
Proximity Switch .............................................................................................................128
Chain Disk Control Unit ..................................................................................................130
Chapter 19 Troubleshooting .........................................................................................................132
Chapter 20 Warranty .......................................................................................................................133
4
PNEG-602 Chain Disk
Safety
1. SAFETY
Safety Guidelines
This manual contains information that is important for you, the owner/operator, to know and
understand. This information relates to protecting personal safety and preventing equipment
problems. It is the responsibility of the owner/operator to inform anyone operating or working in
the area of this equipment of these safety guidelines. To help you recognize this information, we
use the symbols that are defined below. Please read the manual and pay attention to these
sections. Failure to read this manual and it’s safety instructions is a misuse of the equipment and
may lead to serious injury or death.
This is the safety alert symbol. It is used to alert
you to potential personal injury hazards. Obey all
safety messages that follow this symbol to avoid
possible injury or death.
DANGER indicates an imminently hazardous situation
which, if not avoided, will result in death or serious
injury.
WARNING indicates a potentially hazardous
situation which, if not avoided, could result in death or
serious injury.
CAUTION indicates a potentially hazardous situation
which, if not avoided, may result in minor or moderate
injury.
CAUTION used without the safety alert symbol
indicates a potentially hazardous situation which, if not
avoided, may result in property damage.
NOTE indicates information about the equipment that
you should pay special attention to.
PNEG-602 Chain Disk
5
Safety
General Safety Statement
Our principle concern is your safety and the safety of others associated with this equipment. We
want to keep you as a customer. This manual is to help you understand safe operating
procedures and some problems which may be encountered by the operator and other personnel.
As owner and/or operator, it is your responsibility to know what requirements, hazards and
precautions exist, and to inform all personnel associated with the equipment or in the area.
Safety precautions may be required from the personnel. Avoid any alterations to the equipment.
Such alterations may produce a very dangerous situation, where SERIOUS INJURY or DEATH
may occur.
This equipment shall be installed in accordance with the current installation codes and applicable
regulations which should be carefully followed in all cases. Authorities having jurisdiction should
be consulted before installations are made.
Keep Hands Clear of Chain Disk
Moving Chain Disk can cut and crush.
Keep hands clear.
Disconnect and lockout power before servicing.
Do not operate with guards removed.
Moving Parts
Install & Operate Electrical Equipment Properly
Electrical controls should be installed by a qualified
electrician and must meet the standards set by the
national electrical code and all local and state codes.
Disconnect and lock out all power sources before
installing wires/cables or servicing equipment.
Electric Shock Hazard
Practice Safe Maintenance
Understand service procedures before doing
work. Keep area clean and dry.
Never lubricate, service, or adjust machine while
it is in operation. Keep hands, feet, and clothing from
all rotating parts.
Keep all parts in good condition and properly
installed. Fix damage immediately. Replace worn or
broken parts. Remove any build up grease, oil, or
debris.
6
Maintain Equipment and Work
Area
PNEG-602 Chain Disk
Safety
Prepare for Emergencies
Be prepared if fire starts.
Keep a first aid kit and fire extinguisher
handy.
Keep emergency numbers for doctors,
ambulance service, hospital, and fire
department near your telephone.
Keep Emergency Equipment Quickly
Accessable.
Wear Protective Clothing
Wear close fitting clothing and safety
equipment appropriate to the job.
Eye Protection
Safety glasses should be worn at all times
to protect eyes from debris.
Wear gloves to protect your hands from
sharp edges on plastic or steel parts.
Wear steel toe boots to help protect your
toes from falling debris.
A respirator may be needed if a hog house
has poor ventilation. Waste fumes can be
toxic.
Gloves
Steel Toe Boots
Respirator
Remove all jewelry.
Tuck in any loose or dangling shoe strings.
Long hair should be tied up and back.
Wear hard hat to help protect your head.
PNEG-602 Chain Disk
Hard Hat
7
Decals
2. DECALS
DC-491 is located on the front
cover of the drive unit.
DC-996 is located on the
front cover of the drive unit.
8
PNEG-602 Chain Disk
Decals
DC-490 is located on the electrical
box of the drive unit.
DC-889 is located on the
electrical box of the drive unit.
DC-997 is located inside the
drive unit.
PNEG-602 Chain Disk
9
Introduction
3. INTRODUCTION
3.1 Applications
Typical Chain Disk System applications are shown as follows:
In poultry applications, switches may be placed in more than one hopper to assure that no
hopper empties before the control unit hopper requires feed. If this is done, all switches must be
wired in parallel so that any one switch can start the system. If only one hopper level control is
used it must be located at the end of the delivery system.
Figure 3A Typical Application
In most swine applications, the feed control is installed in the last hooper at the end of the
delivery system. If a tube mounted proximity switch is used, it should be installed just beyond the
last feeder.
3.2 Using the Manual
Read the entire manual prior to any work being done. This installation/owner manual is to be
used as a guideline for the installation of the Chain Disk Feed System Model 236. All instructions
should be construed as recommendations only, as the actual installation may vary according to
local conditions. Wiring diagrams can be found later in this manual. Instructions presented in this
manual should only be carried out by a trained technician. It is essential that the technician has
a sound understanding of technical matters and drawings in both mechanical and electrical
areas.
3.3 Background
The Chain Disk Feed System consists of a drive unit which pulls a chain with polypropylene disks
attached to it through tubing, thus conveying feed from a storage bin to animals inside a building.
The disks have approximately the same diameter as the inside of the tube, therefore being a
highly efficient conveying system with total clean-out of the tube. This system can be adapted to
complex configurations because of its ability to go through tight corners and at any angle
including vertical. The delivery of feed can be controlled manually or automatically with the use
of a control unit, sensors and drop kits.
10
PNEG-602 Chain Disk
Specifications
4. SPECIFICATIONS
Capacity
Overall system
length
The rated capacity is up to 50 lbs/min (23 kg/min). Capacity is based on
a feed density of 40 lbs/ft.3 (641 kg/m3). Refer to Page 20.
The maximum effective length for this system is 1000 ft. (305 m).
Subtract 25 ft. (7.6 m) per corner or
Effective Length = (Total ft.of Chain) + 25 ft. (# of Corners)
Types of feed
The Model 236 Chain Disk is specifically designed to convey normal
types of swine and poultry feeds. When conveying any other type of
material contact the manufacturer as the warranty may be invalidated.
Tubing
There are three options:
Clear and white PVC tubing having dimensions of 2.00" (51 mm) I.D.
and 2.36" (60 mm) O.D. coming in 10 ft. (3 m) lengths. Clear and white
PVC couplers having dimensions of 2.38" (60.5 mm) I.D. and 2.63"
(67 mm) O.D. are used to join sections of tubing together.
-Ribbed Tube 2.00" O.D. 1.9" I.D. w belled end refer to Page 127 for
Length and Configuration.
Corners
Each corner has a 9.3" (236 mm) diameter steel cast wheel with
nongreasable ball bearings encased in a nylon housing with a
removable cover.
Chain
The chain is heat treated and case hardened with a 3000 lb. (13.3 kN)
breaking strength. Polypropylene disks having 1.8" (46 mm) O.D. are
molded on every other chain link. The chain is connected together
using a special open link connector.
Drive unit
The drive unit, having dimensions of 46" (1.2 m) length, 16.5" (.4 m)
height, and 16.25" (.4 m) width, is an enclosed stainless steel housing
with a spring loaded aluminum idler tensioning wheel and drive
sprocket inside. The drive sprocket is directly coupled to the output
shaft. of an aluminum housed speed reducer, which in turn is driven by
an electric motor.
Electric motor
Control unit
There are 3 special built 2 HP motors to choose from: 230 V, 1 Ph,
60 Hz; 230 V, 1 Ph, 50 Hz; 208-230/460 V, 3 Ph, 50/60 Hz.
A 230 V, 1 Ph unit is available. With an additional 3 PH contactor, it can
be used to control a 3 Ph drive unit. The APCD- 295 control unit has a
built in 24 hr time clock, max run timer and drop feed control. The
APCD - 300 has a built in max run timer and is used for continuous
feeding. The APCD-295-S is used in conjunction with the APCD-295,
when configuring feed systems with multiple chain disk drive units. A
single APCD- 295 can control up to seven APCD 295-S control units.
PNEG-602 Chain Disk
11
Optional Equipment
5. OPTIONAL EQUIPMENT
Part Number
Description
Model 300 Flex Flo Fill System or comparable equivalent having a maximum of 50 lbs/min
(23 kg/min) rated capacity.
12
APCD-279
Chain Disk fill hopper which connects to Flex Flo Control Unit
APCD-109
Manual Kwik Attach Drop Kit (single)
APCD-110
Manual Kwik Attach Drop Kit (Box of 10)
APCD-119
Pneumatic Kwik Attach Drop Kit Assembly
FLXDF-1172
Proximity Switch, 20 V DC to 240 V AC, N.C
FLX- 4256
Proximity Switch, 20 V DC to 240 V AC, N.O
AP-1002
Proximity Switch 220 V (1 sec to 60 min time delay)
AP-1260
ACCU-DROP feeders fitting tube with 2.36" (60 mm) outside diameter
AP-2259
Farrowing drop Feeder-Model 236 (8.5 lb capacity)
AP-2263
Farrowing Drop Feeder - Model 236 (12 lb capacity)
APCD-114
Suspension kit for drive unit
APCD-294
Tube mounted prox switch
AP-2385
ECONO DROP feeder fitting tube w/2.36" O.D (Uses FLX-4256 Proximity Switch)
AP-3800
Ultra Drop feeders for Gestation w/2.36" O.D
AP-3800A
Ultra Drop feeders for Farrowing w/2.36" O.D
AP - 3202
Feeder Adapter for Ribbed tube when attaching ACCU-DROP, ECONO DROP or Kwik attach
drop kits to Ribbed tube
PNEG-602 Chain Disk
Tubing & Drop Kit
6. TUBING & DROP KIT
6.1 Tubing Options
There are three options for tubing Ribbed tubing w/belled end 2.00" O.D and 1.9" I.D coming in
various lengths and hole spacings (See Page 127). Both clear and white PVC tubing having
dimensions of 2.00" (51 mm) I.D and 2.36" (60 mm) O.D coming in 10 ft. (3 m) lengths are
available. Clear and white PVC couplers having dimensions of 2.38" (60.5 mm) I.D and 2.63"
(67 mm) O.D are used to join these sections of tubing together.
6.2 Laying Out the Tubing
Laying out the tubing is one of the most important steps in the installation of the Chain Disk
System. Place the tubes in approximately the position where they will be installed (either on the
ground or on top of the penning for the time being). If white PVC or Ribbed tubing is used it would
be helpful to place sections of clear PVC tubing at various places throughout the system for easy
viewing of the feed, especially before and after the fill hopper and where the proximity switch is
located. Things to consider: the system must be closed looped, sections of tubing can go
in any direction, and the change in direction of the tubing must be 90 degrees. For now
overlap the tubes where there is to be a corner and leave the cutting of the tubes to fit various
components until these components are installed which will be later on. Establish where the
outlet drops are to be. Make sure that the ends of these tubes don’t meet where there is to
be a drop kit or drop feeder. If they do, one end of the tube must be cut off enough so the
coupler or belled end will miss the drop kit.
6.3 Assembly & Gluing Sections of PVC Tubing
Once the tubing has been properly layed out the 10 foot (3 m) tubes need to be connected
together in long sections.
Note: Maximum length of each glued section should not exceed the length of fish tape
which will be used later on to install chain.
Note: For extremely long systems we recommend gluing only one side of the coupler
leaving an 1/8" (3 mm) gap between ends of tubing to allow for tubing expansion.
Chain Disk Systems have specially formulated PVC tubing. For strong tube connections, apply
the PVC solvent cement as the instructions below suggest:
1. Square tube ends and remove all burrs and dirt.
2. Check to make sure all connections are smooth.
3. When the temperature is below 40° Fahrenheit or above 85° Fahrenheit, consult PVC solvent
cement container.
4. Apply a coat of cement to both parts being connected.
5. Assemble parts quickly! CEMENT MUST BE FLUID - if not fluid, re-coat both parts.
6. Hold parts together for 30 seconds - wipe off excess cement with cloth. Completed joints
should not be disturbed until they have cured enough to withstand handling. Keep container
closed when not in use.
PNEG-602 Chain Disk
13
Tubing & Drop Kit
6.4 Cutting Outlet Holes
With the sections of tubing still layed out and the placement of the drop kits already established,
the next step is to mark on the top of the tube where each drop kit is to be. The reason for
marking the tube in advance is to make sure the holes stay aligned even if the tubes rotate as
the holes are being cut. Once the tubes are marked, cut the holes for the outlet drops as shown
in Figure 6A and Figure 6B. When carry-over is acceptable drill two 1.5" (38 mm) dia. holes in
the tube (Figure 6A) approximately 3.0" (76 mm) apart using a holesaw. If total dropout is
necessary, cut a 6.5" (165 mm) long by .625" (16 mm) deep hole (Figure 6B) using a saber saw
or hacksaw. Be sure to remove any burrs after cutting so the drop kit can perform properly.
Note:
Ribbed Tubing Comes with Pre-punched Outlet Holes.
Figure 6A Outlet Holes with Carry-over
Figure 6B Outlet Holes with Total Dropout
14
PNEG-602 Chain Disk
Tubing & Drop Kit
6.5 Suspension of Tubing
Important: Suspend the sections of PVC tubing and Ribbed tubing from the ceiling at
least once every 4 feet (1.2 m). To minimize drag and wear keep the sections
of tubing as straight as possible. Failure to do this will void the warranty.
6.6 Drop Kit Installation
1. Snap the slide around the tube over the outlet hole (Figure 6C and Figure 6D).
2. When using ribbed tube, the adapter must be used (Figure 6E).
3. Fasten the housing to the tube using two hose clamps. Make sure the outlet hole is in the
middle of the housing.
4. Slide can be rotated from side to side to open and close the drop kit.
Figure 6C Drop Kit Installation
Figure 6D Pneumatic Drop Kit Installation
PNEG-602 Chain Disk
15
Tubing & Drop Kit
Figure 6E Ribbed Tube Installation
6.7 Drop Feeder Installation
Refer to the Drop Feeder Installation and Operational Manual to install the drop feeders. When
Installing ACCU-DROP feeders and ECONO DROP feeders to ribbed tube, the ribbed tube
adapter must be used.
When installing ultra drop feeders, to ribbed tubing, do not use the ribbed tube adapter.
16
PNEG-602 Chain Disk
Drive Unit Installation
7. DRIVE UNIT INSTALLATION
7.1 Location
The Chain Disk Model 236 drive unit is designed in such a way that if feed enters the drive unit,
it is able to carry it back out again. Because of this, the drive unit can be placed anywhere in the
system given consideration to accessibility and potential traffic around it. The drive unit can also
be bolted to the floor (bolts not provided) or suspended, keeping in mind that the position of it in
relationship to the rest of the system will affect the number of corners needed.
However the best position to locate the drive unit is between the last feeder and the fill hopper.
This ensures that only a minimum amount of feed flows through the drive unit.
7.2 Structural Integrity of Support
The entire drive unit weighs approximately 170 lbs. If the drive unit is suspended, the structural
member(s) from which it is suspended must be able to support it. Extreme caution should be
used to avoid structural damage and bodily injury. To evaluate structural integrity of the
support consult a qualified structural engineer.
PNEG-602 Chain Disk
17
Drive Unit Installation
7.3 Suspension of the Drive Unit
Although the drive unit can be bolted to the floor, the most common installation is to suspend the
drive unit (See Figure 7A). Angle Iron, bolts, chain and eyebolts are included in the suspension
package which must be ordered separately.
1. Bolt angle iron to each bottom support of drive unit using four 5/16 x 1" bolts and 5/16" nuts.
2. Screw eyebolts into structural members approximately 48" (1.2 m) apart from one another
to provide a stable suspension.
3. Measure and cut chain into four sections leaving each plenty long for adjustment later.
4. Fasten chain to angle iron using four 5/16 x 1" bolts, 5/16" nuts and 5/16" flat washers.
5. Suspend drive unit by hooking other end of the chain on the eyebolts.
6. Level drive unit by rehooking chain or by screwing eyebolts in or out.
7. Cut the PVC or Ribbed tubing so that it butts up to the stainless steel tubing on both the inlet
and outlet side of the drive unit.
8. Clamp a Ribbed tube adapter to Ribbed tube. If Ribbed tube is used.
9. Glue a coupler to the PVC tube as detailed on Page 13.
a. Clamp a coupler to the ribbed tube adapter when using ribbed tube.
10. Clamp the coupler to the drive unit using saddle clamps.
Figure 7A Drive Unit Installation
18
PNEG-602 Chain Disk
Corner Installation
8. CORNER INSTALLATION
8.1 Measuring & Cutting Tube
8.1.1. Ends for Corners
1. Remove the top from the corner and hold the rest of it in place to mark the tubes for cutting
(See Figure 8A).
2. Cut the tubes so they extend into the corner up to the shoulder provided in the molding.
8.1.2. Initial Assembly of Corners
1. If Ribbed tubing is used, clamp ribbed tube adapter on the end of the Ribbed tube.
2. Bolt the bottom of the corner to the tubes using the add on clamps (these parts need to be
snapped off of the top), 5/16 x 1-1/4" bolts, 5/16" nuts.
3. Replace the 1/2" Neoprene backed flat washer and 1/2" locknut on the pivot shaft to retain
the idler wheel from being pulled off during chain and disk installation. The top of the corner
can remain off until after the chain and disks are installed. Corner must be suspended using
the two angles provided to avoid tubing wear. Use one angle on each side of the corner
(See Figure 8A). Place angles over the add on clamps so that corners will be supported
before tops are installed.
Important: Two corner suspension angles must be used to support each corner. Failure
to properly suspend corners will void warranty.
Neoprene Backed
Flat Washer
Figure 8A Corner Installation
PNEG-602 Chain Disk
19
Fill System
9. FILL SYSTEM
9.1 Installation
Figure 9A shows a typical Chain Disk installation including a Flex Flo System. A Flex Flo System
must be used to transport feed from the bulk feed tank to the Chain Disk System inside the
building. In colder climates the Chain Disk System can lock up when used outside due to freezing
whereas the auger in the Flex Flo System can break loose frozen feed due to its outside
rotational motion and winding up tendency.
Important: The correct gearbox must be used on the Model 300 Flex Flo System to
prevent overfilling of the Chain Disk System.
Table 1 shows the maximum fill system rate for different effective lengths of a Chain Disk System
and the corresponding flex flo gearbox R.P.M to deliver that rate. The effective length is
determined by adding the length of chain plus 25 ft (.7 m) per corner. Refer to the Model 300
Flex Flo Installation & Operation Manual for proper installation of the Flex Flo System. The
Flex-Flo System can run parallel or perpendicular to the Chain Disk System.
Maximum Fill System Rates
Flex Flo Feed Tank
Configuration
(Single or Tandem)
Effective Length of
Chain Disk System,
ft. (m)
Maximum Fill
System Rate,
lbs/min (kg/min)
Model 300 Flex
Flo Gearbox RPM
Single
Up to 700 (213)
50 (23)
358 (Standard)
Single
700-1000 (213-305)
35 (14)
250
Tandem
Up to 700 (213)
50 (23)
250
Tandem
700-1000 (213-305)
35 (14)
250
Effective Length= (Total ft of Chain) + 25 ft (# of Corners)
Figure 9A Typical Fill System Installation
20
PNEG-602 Chain Disk
Fill System
9.2 Fill Hopper Installation
1. Attach fill hopper to the Flex Flo control unit using #10 x 1" self drilling screws provided with
Flex Flo control (Figure 9B).
2. Adjust the suspension height of the control unit until fill hopper is in line with tubing.
3. Cut the tubing so that it butts up to the steel tubing on both the inlet and outlet side of the fill
hopper.
4. If Ribbed tubing is used, clamp ribbed tube adapter on the end of the Ribbed tube.
5. Glue the coupler to the PVC tube as detailed on Page 13.
6. Clamp the coupler to the drive unit using saddle clamps.
A proximity switch with time delay can be used in the Fill Hopper to prevent the flex-flo auger
from short-cycling and keep the Fill Hopper from bridging. Use the “KNOCK- OUT” hole in one
end of the fill hopper to insert the rubber grommet in to hold the proximity switch in place.
Figure 9B Fill Hopper Installation
PNEG-602 Chain Disk
21
NOTES
22
PNEG-602 Chain Disk
Wiring Diagrams
10. WIRING DIAGRAMS
10.1 Wiring Instructions
WARNING
1. Disconnect all electrical power before
inspecting or servicing equipment unless
maintenance instructions specifically state
otherwise.
2. Keep hands and tools away from exposed
chain disks.
3. Do not operate equipment without covers
and guards properly positioned. Failure to
do so may cause personal injury or
damage to the equipment.
Fig. 10-B Master Chain Disk Control Unit
APCD-295
SAFETY REGULATIONS
1. All wiring should be done by a qualified
electrician in accordance with local and
national electrical codes.
2. Ground all electrical equipment for safety.
3. Use proper size wire according to the
national electrical codes to wire all
systems.
Fig. 10-C Slave Chain Disk Control Unit
APCD-295-S
Fig. 10-A Chain Disk Junction Box
PNEG-602 Chain Disk
Fig. 10-D Chain Disk Control Unit APCD-300
23
Wiring Diagrams
Illustration Showing Communication Wires Between Master and Up to 7 Slave Controls
24
PNEG-602 Chain Disk
Wiring Diagrams
Illustration Showing Communication Wires Between Master and Up to 7 Slave Controls
PNEG-602 Chain Disk
25
Wiring Diagrams
One Chain Disk Loop Filled by One Flex-Flo Auger with Timed Filling
26
PNEG-602 Chain Disk
Wiring Diagrams
One Chain Disk Loop Filled by One Flex-Flo Auger with Timed Filling
PNEG-602 Chain Disk
27
Wiring Diagrams
One Chain Disk Loop Filled by one Flex-Flo Auger with Continuous Feeding After
Time Delay
28
PNEG-602 Chain Disk
Wiring Diagrams
One Chain Disk Loop Filled by One Flex-Flo Auger with Continuous Feeding After
Time Delay
PNEG-602 Chain Disk
29
Wiring Diagrams
Two Chain Disk Loops Filled by Two Independent Flex-Flo Augers with Timed Filling
30
PNEG-602 Chain Disk
Wiring Diagrams
Two Chain Disk Loops Filled by Two Independent Flex-Flo Augers with Timed Filling
PNEG-602 Chain Disk
31
Wiring Diagrams
Two Chain Disk Loops Filled by Two Independent Flex-Flo Augers with Timed Filling
32
PNEG-602 Chain Disk
Wiring Diagrams
Two Chain Disk Loops Filled by Two Independent Flex-Flo Augers with Timed Filling
PNEG-602 Chain Disk
33
Wiring Diagrams
Two Chain Disk Loops Filled by One Common Flex-Flo Auger with Timed Filling
34
PNEG-602 Chain Disk
Wiring Diagrams
Two Chain Disk Loops Filled by One Common Flex-Flo Auger with Timed Filling
PNEG-602 Chain Disk
35
Wiring Diagrams
Two Chain Disk Loops Filled by One Common Flex-Flo Auger with Timed Filling
36
PNEG-602 Chain Disk
Wiring Diagrams
Two Chain Disk Loops Filled by One Common Flex-Flo Auger with Timed Filling
PNEG-602 Chain Disk
37
Wiring Diagrams
Two Chain Disk Loops Filled by One Common Flex-Flo Auger with Timed Filling and
Feeding by Air Actuation
38
PNEG-602 Chain Disk
Wiring Diagrams
Two Chain Disk Loops Filled by One Common Flex-Flo Auger with Timed Filling and
Feeding by Air Actuation
PNEG-602 Chain Disk
39
Wiring Diagrams
Two Chain Disk Loops Filled by One Common Flex-Flo Auger with Timed Filling and
Feeding by Air Actuation
40
PNEG-602 Chain Disk
Wiring Diagrams
Two Chain Disk Loops Filled by One Common Flex-Flo Auger with Timed Filling and
Feeding by Air Actuation
PNEG-602 Chain Disk
41
Wiring Diagrams
NOTES
42
PNEG-602 Chain Disk
Wiring Diagrams
Two Chain Disk Loops Filled by One Common Flex-Flo Auger with Timed Filling and
Feeding by Electric Actuation
PNEG-602 Chain Disk
43
Wiring Diagrams
Two Chain Disk Loops Filled by One Common Flex-Flo Auger with Timed Filling and
Feeding by Electric Actuation
44
PNEG-602 Chain Disk
Wiring Diagrams
Two Chain Disk Loops Filled by One Common Flex-Flo Auger with Timed Filling and
Feeding by Electric Actuation
PNEG-602 Chain Disk
45
Wiring Diagrams
NOTES
46
PNEG-602 Chain Disk
Wiring Diagrams
Two Chain Disk Loops Filled by One Common Flex-Flo Auger with Timed Filling and
Feeding by Electric Actuation with Isolation Relay
PNEG-602 Chain Disk
47
Wiring Diagrams
Two Chain Disk Loops Filled by One Common Flex-Flo Auger with Timed Filling and
Feeding Electric by Actuation with Isolation Relay
48
PNEG-602 Chain Disk
Wiring Diagrams
Two Chain Disk Loops Filled by One Common Flex-Flo Auger with Timed Filling and
Feeding Electric by Actuation with Isolation Relay
PNEG-602 Chain Disk
49
Wiring Diagrams
One Chain Disk Loop Filling Four Flex-Flo Auger Flag Lines Started by any of Four
Proximity Switches at End of Flag Lines
50
PNEG-602 Chain Disk
Wiring Diagrams
One Chain Disk Loop Filling Four Flex-Flo Auger Flag Lines Started by any of Four
Proximity Switches at End of Flag Lines
PNEG-602 Chain Disk
51
Operation Controls
11. OPERATION CONTROLS
11.1 Current Sensor
The Chain Disk System can over fill if the fill system’s capacity is greater than the capacity of the
Chain Disk System or if longer systems are allowed to recirculate. Overfilling will overload the
Chain Disk motor causing the thermal reset switch on the motor to kick out and/or premature
motor failure. To prevent this from occurring a current sensor has been installed on the circuit
board of the Chain Disk Control Unit. This Current sensor monitors the Amp draw of the Chain
Disk motor and controls a relay which has the fill system (Ex. Flex-Flo) wired to it. While the
Chain Disk system is filling, the amp draw of the motor will increase steadily. If the amperage
reaches the maximum point of a specified range, the current sensor will automatically turn off the
fill system temporarily. As the Chain Disk system continues to empty itself, the amp draw of the
motor will decrease steadily. If the amperage reaches the minimum point of a specific range, the
current sensor will automatically turn the fill system back on. This ON/OFF cycling of the
Flex-Flo will occur every few minutes untill the Chain Disk feed system is full, at which time both
the Chain Disk and flex-flo will shut OFF (See Figure 11B on page 53).
Center of Window switches
Window size switches
dealy run timers
Figure 11A PC Board
52
PNEG-602 Chain Disk
Operation Controls
11
Window Size=1.5 Amps
10
Max Current Fill System shuts Off
Amps (Chain Disk Motor)
9
8
7
Fill System turns back On
6
5
4
3
Feed System Turned On
(Fill System Runing)
2
1
0
0
1
2
3
4
5
6
7
8
9
10 11 12
13 14 15
16 17 18
19 20
Time (minutes)
Figure 11B Graphical Illustration of Current Sensor Operation for Typical Feed System
11.2 Limit Switch
The limit switch (See Figure 11C), which is located in the chain disk drive unit, is used as a safety
switch. The limit switch can be activated in either direction by a bracket which is connected to
the idler wheel. It will shut the system down if the chain is too long or too short, if the chain or
spring breaks or if something gets caught in the system. To reactivate the system, push the blue
reset button on the limit switch, reset the appropriate control unit by acknowledging the alarm on
the APCD-295 control unit, or push the reset button on the APCD-295-S control unit.
Figure 11C Limit Switch in Normal Operating State
PNEG-602 Chain Disk
53
Operation Controls
Blue Reset
Button
Figure 11D Limit Switch in Activated Shut Down State
WARNING
Disconnect power and fix the problem before pushing the reset button, or acknowledge the alarm
on the APCD-295 control.
54
PNEG-602 Chain Disk
Chain Disk Controller - APCD-295
12. CHAIN DISK CONTROLLER - APCD-295
12.1 Terms and Symbols
LCD Display
The LCD display on the left gives the current readings and parameters to be adjusted when you
select a function. The three keys at the right of the display are used to edit parameters and to
navigate through the screen display. When the parameters for a given function cannot all be
presented at once on the display, arrows are displayed on the right hand side to indicate that
additional parameters can be displayed using the arrow keys
. After 4 minutes of inactivity,
the display returns to the STATUS display.
Arrow Keys
The arrow keys that are located next to the LCD display have 2 purposes. They are first used to
step through the parameters that are displayed on the display. They are also used to modify a
parameter's value when a parameter flashes on the display.
Menu Select Buttons
These keys are used to select the functions that are located in the main menu.
Adjusting a parameter
Use the arrow keys to select the parameter that needs to be adjusted. Once the parameter is
selected, press MODIFY. The parameter then flashes on the display. It can now be adjusted with
the arrow keys. Once it is properly set, Press MODIFY once again to validate the new value. If
the value does not flash after having pressed the MODIFY, it means that the value is a reading.
A reading cannot be modified.
PNEG-602 Chain Disk
55
Chain Disk Controller - APCD-295
Status LEDs
The LEDs at the right of the control panel give the status of each output. The following table gives
the meaning of each pilot light:
LED
Meaning
Turns ON when an alarm is detected.
Alarm
The feeding system stops operating until the alarm is
acknowledged.
Current Overload
Flashes when the amperage draw of the APCD-295 feeder has
exceeded the Max Current limit for the Overload Delay or flashes
when this occurs to a slave feeder (APCD-295-S).
Fix the problem then press and hold the RESET button to restart the
system.
Chain Disk Safety Switch
Turns ON when the drive unit of the APCD-295 has reached its
safety switch; flashes when this occurs to a slave feeder
(APCD 295-S).
Max Run Time
Turns ON when the run time of the APCD-295 feeder exceeds the
Max. Run Time parameter value (only if a proximity sensor is used);
flashes when this occurs to a slave feeder (APCD- 295-S).
Feed Switch
Turns ON when the proximity sensor detects feed.
Flashes during the Feed Bypass Delay.
Chain Disk Output
Turns ON when the master Chain Disk feeder is running.
Auger Output
Turns ON when the bin auger is running;
Flashes during the Auger Delay.
Actuator Open
Turns ON when the dumps are opened.
Actuator Close
Turns ON when the dumps are closing.
Manual Mode
Turns ON when an output is manually controlled.
Automatic Mode
Turns ON when the automatic control mode is active.
Symbols
Double Insulation
12.2 Installation
Mounting Instructions
Remove the four screws in the front cover and lift the cover. Remove the black caps located on
the three mounting holes. Mount the enclosure to the wall using three screws. Be sure the
electrical knockouts are at the bottom of the enclosure in order to prevent water from entering
the controller. Insert the screws into the mounting holes and tighten. Fasten the black caps
onto the mounting holes.
Connections
To connect the controller, refer to the wiring diagram enclosed with this user's manual. Use the
electrical knockouts provided at the bottom of the enclosure. Do not make additional holes in the
enclosure, particularly on the side of the enclosure when using a computer communications
module.
56
PNEG-602 Chain Disk
Chain Disk Controller - APCD-295
1. Do not install rigid conduit into electrical knockouts. Only nylon cable glands are permitted
for cable or wire fastening.
2. A switch or circuit breaker shall be included in the building installation. It shall be in close
proximity to the equipment and within easy reach of the operator. It shall be marked as the
disconnecting device for the equipment.
3. The main supply circuit breaker for feeder motor (L1/L2 POWER IN) shall be 20 A.
4. Wire gage used for mains supply (L1/L2 POWER IN) and feeder motor shall be at least
12 AWG.
5. Separate circuit breaker shall be used for auger motor.
6. The mains supply breaker for auger motor shall be 15 A.
7. Wire gage used for auger motor shall be at least 14 AWG.
WARNING
All wiring must be done by an authorized electrician and must comply with applicable
codes, laws and regulations. Be sure power is off before doing any wiring to avoid
electrical shocks and equipment damage.
Safety may be jeopardized if the equipment is used in a manner not specified by the
manufacturer.
12.3 Controller’s Operation
Controller’s Description
The APCD-295 controls the feed entry into Chain Disk feeders and the distribution of feed to the
animals. When used in combination with APCD-295-S auxiliary units, this controller can control
up to 8 Chain Disk feeders.
Due to its great number of options, the APCD-295 controller can suit most Chain Disk setups:
1. Timed or continuous feed cycles.
2. With or without proximity sensors at the end of the feeders.
3. With or without actuators/electric valves to open the drops.
4. With one or multiple bin augers.
5. With one or multiple Chain Disk feeders.
6. With cascade or independent Chain Disk setups.
PNEG-602 Chain Disk
57
Chain Disk Controller - APCD-295
Feeder Setup
Up to 7 slave units (APCD-295S) can be used to drive additional Chain Disk feeders. These
supplementary feeders can share common bin augers, they can be linked together, or they can
operate independently one from another. The following section explains the three possible
feeder setups that can be managed by the controller. Refer to the Installation Setup Section to
select your specific feeder setup.
Cascade Setup
In this setup, all feeders are connected together and share a common bin auger. When this
auger starts bringing feed into the feeders, all drive units start running to send feed towards the
farthest Chain Disk feeder (APCD-295-S unit with the highest ID number). When this feeder is
filled-up, feed then goes toward the preceding feeder, etc.
Figure 12A
58
PNEG-602 Chain Disk
Chain Disk Controller - APCD-295
Independent Feeders with a Common Auger
Independent feeders that share a common bin auger are filled following the numerical order: The
master Chain Disk feeder is filled first, followed by slave feeder #1, slave feeder #2, etc.
Figure 12B
Independent Feeders with Individual Augers
Independent feeders that all have their own bin auger are being filled simultaneously when a
feed cycle starts. Each feeder filled according to its respective parameter settings.
Figure 12C
Feed Distribution Modes
Timed Feed Distribution
When feed is distributed according to a timer, the user chooses at what time the feeders start
being filled and at what time feed starts being delivered to the animals. Up to daily 20 feed cycles
can be programmed. Refer to Installation Setup Section to enable the timed feed distribution
method.
PNEG-602 Chain Disk
59
Chain Disk Controller - APCD-295
Continuous Feed Distribution Method
The continuous feeding method allows filling the feeders from the moment they are empty: When
the proximity sensor located at the end of the master Chain Disk feeder stops detecting feed, a
delay is launched to restart filling all feeders.
Proximity Sensor Location
Proximity sensors are used to detect the presence and absence of feed at the end of the feed
lines.
In Timer Mode
When feed is distributed according to a timer, optional proximity sensors can be used to stop the
entry of feed when feed is detected at the end of the feed line (See Figure 12D). If proximity
sensors are used, one sensor must be located at the end of each feeder.
Figure 12D
In Continuous Mode
When using the continuous feed distribution mode, a proximity sensor must be located in the
tube of the last drop of each feeder.
Figure 12E
60
PNEG-602 Chain Disk
Chain Disk Controller - APCD-295
Filling Chain Disk Feeders
Operation of the Bin Auger
At the start-up of each feeding cycle, right after the Auger's Delay has elapsed, the bin auger
starts bringing feed into the feeders and stops when the feeder is loaded. There are two ways
the controller can detect that a feeder is full:
Figure 12F
1. The proximity sensor located at the end of the line detects feed for 5 seconds without
interruption.
2. The drive unit has been running for the Max Run Time parameter value (only if no proximity
sensor is used).
Chain Disk Overload Protection:
The controller monitors the amperage draw of Chain Disk drive units to prevent overloading the
system. If the amperage exceeds the limit (Max Current Consumption), the controller will
temporarily shut down the bin auger while the Chain Disk keeps running in order to discharge
the feed. As the feed load decreases the amperage draw also decreases; the bin auger restarts
when the current consumption gets lower than the Max Current Consumption - Window Size.
Refer to Installation Setup Section to set bin auger parameters
Filling Process
The filling process of Chain Disk feeders is based on two factors:
1. Feeder setup:
a. Cascade setup.
b. Independent feeders with a common bin auger.
c.
Independent feeders with individual bin augers.
2. Feed Distribution Mode:
a. Continuous feed distribution.
b. Timed feed distribution.
PNEG-602 Chain Disk
61
Chain Disk Controller - APCD-295
The following sections explain all possible ways Chain Disk feeders can be filled. Refer to the
Filling Chain Disk Feeders Section that suit your particular feeder setup and feed distribution
method.
WARNING
Please note that the whole feeding system stops when an alarm is active!
Filling Cascaded Feeders
Figure 12G Cascade Setup
Option A-
Continuous Feed Distribution
1. Beginning the Filling Process:
The filling process starts when the Continuous Delay has elapsed (this delay is launched
when the proximity sensor located in the last drop of the master Chain Disk feeder stops
detecting feed).
2. Emptying the Feeders:
Once the Continuous Delay has elapsed, the controller activates all drive units during
the Auger Delay to make sure all feeders are empty before bringing new feed.
3. Filling the Farthest Chain Disk Feeder:
When the Auger Delay has elapsed, all drive units keep running while the bin auger
brings feed into the feeders. Feed is first directed towards the farthest feeder (Chain
Disk with the highest ID number).
62
PNEG-602 Chain Disk
Chain Disk Controller - APCD-295
4. The Farthest Feeder is Full:
The controller knows the farthest feeder is full when the proximity sensor located at its
end detects feed for 5 seconds without interruption. When feed is detected, the drive unit
of the loaded feeder stops and all other feeders continue running until they are all full.
5. The Last Feeder is Full:
When the last feeder is loaded (last feeder = master Chain Disk feeder), the bin auger
stops and all drive units are Off. As the animals eat, the feed load will decrease
gradually; the Continuous Delay will be launched once again when the proximity sensor
of the master Chain Disk feeder will stop detecting feed (Back to Step 1).
Option B-
Timed Feed Distribution
1. Beginning the Filling Process:
The filling process starts at the start-up of each feed cycle.
2. Cleaning the Drops:
If actuators are used and the “Clean Drop” option is enabled in the INSTALLATION
menu, the controller opens and closes the drops tree times in a row to evacuate feed
leftovers from the system.
3. Emptying the Feeders:
To ensure all feeders are empty before bringing new feed, the controller activates all
drive units during the Auger Delay.
4. Filling the Farthest Chain Disk Feeder:
When the Auger Delay has elapsed, all drive units keep running while the bin auger
brings feed into the feeders. Feed is directed towards the farthest feeder at first (Chain
Disk with the highest ID number).
5. The Farthest Feeder is Full:
a. If a proximity sensor is used: The controller knows the feeder is full when the proximity
sensor located its end detects feed for 5 seconds without interruption. When feed is
detected, the controller stops the feed entry (bin auger), and stops all other drive units;
the drive unit of the loaded feeder keeps running for the Shutdown Delay then stops.
b. If no proximity sensor is used: When no proximity sensor is used, the controller knows
the farthest feeder is full when the drive unit of this feeder has been running for its
respective Run Time parameter value. The controller stops the drive unit of this feeder
once it is full.
6. Filling the Next Feeder:
When the loaded feeder stops, the drive units of all empty feeders restart, and feed
enters once again into the feed line. Steps 4 and 5 are repeated up until all feeders are
full.
PNEG-602 Chain Disk
63
Chain Disk Controller - APCD-295
7. Feed Dumping:
When the Chain Disk system is fully loaded, feed is ready to be delivered to the animals.
Step to Proximity Sensor Location Section.
Filling Independent Feeders with a Common Bin Auger
Figure 12H Independent Feeders with a Common Auger
Option A-
Continuous Feed Distribution
1. Beginning the Filling Process:
The filling process starts when the Continuous Delay has elapsed (this delay is launched
when the proximity sensor located in the last drop of the master Chain Disk feeder stops
detecting feed).
2. Emptying the Bin Auger and Feeders:
Once the Continuous Delay has elapsed, the controller activates all drive units during
the Purge Time and launches the Auger Delay. Once the Auger Delay has elapsed, the
bin auger starts bringing feed into the feeders. Normally, the Purge Time should be
longer than the Auger Delay to prevent feed accumulation at the end of the bin auger.
3. Filling the First Chain Disk Feeder:
When the Purge Time is over, all drive units stop except for the first feeder to be filled:
the master Chain Disk feeder. When the Auger Delay is over, the bin auger starts
bringing feed toward this feeder.
4. The Feeder is Full:
The controller knows the feeder is loaded when the proximity sensor located its end
detects feed for 5 seconds without interruption. When feed is detected, the drive unit of
this feeder stops.
5. Filling the Next Feeder:
When a feeder is full, the drive unit of the next empty feeder starts (following numerical
order) and the bin auger keeps running.
64
PNEG-602 Chain Disk
Chain Disk Controller - APCD-295
6. The Last Feeder is Full:
When the last feeder is full (slave feeder with the highest ID #), the bin auger stops and
all drive units are off. As the animals eat, the feed load in the feeders will decrease
gradually; the Continuous Delay will be launched once again when the proximity sensor
of the master Chain Disk feeder will stop detecting feed (Back to Step 1).
Option B-
Timed Feed Distribution
1. Beginning the Filling Process:
The filling process starts at the start-up of each feed cycle.
2. Cleaning the Drops:
If actuators are used and the "Clean Drop" option is enabled in the INSTALLATION
menu, the controller opens and closes the drops tree times in a row to evacuate feed
leftovers from the system.
3. Emptying the Bin Auger and Feeders:
To ensure the bin auger and feeders are empty before bringing new feed, the controller
first activates all drive units during the Purge Time and launches the Auger Delay. Once
the Auger Delay has elapsed, APCD-295 rev.07 19 the bin auger starts bringing feed
into the feeders. Normally, the Purge Time should be longer than the Auger Delay to
prevent feed accumulation at the end of the bin auger.
4. Filling the First Chain Disk Feeder:
When the Purge Time is over, all drive units stop except for the first feeder to be filled:
the master Chain Disk feeder. When the Auger Delay is over, the bin auger starts
bringing feed toward this feeder.
5. The Feeder is Full:
a. If a proximity sensor is used: The controller knows the feeder is full when the proximity
sensor located its end detects feed for 5 seconds without interruption. When feed is
detected, the controller stops the feed entry (bin auger), and stops all other drive units;
the drive unit of the loaded feeder keeps running for the Shutdown Delay then stops.
b. If no proximity sensor is used: The controller knows the feeder is full when the drive
unit has been running for its Run Time parameter value. The controller stops the drive
unit of this feeder once it is full.
6. Loading Next Feeder:
When the loaded feeder stops, the next empty feeder starts and the bin auger starts
sending feed towards this feeder. Steps 4 and 5 are repeated up until all feeders are full.
7. Feed Dumping:
When the Chain Disk system is fully loaded, feed is ready to be delivered to the animals.
Step to Proximity Sensor Location Section.
PNEG-602 Chain Disk
65
Chain Disk Controller - APCD-295
Filling Independent Feeders with Individual Bin Augers
Figure 12I Independent Feeders with Individual Augers
Option A-
Continuous Feed Distribution
1. Beginning the Filling Process:
The filling process starts once the Continuous Delay has elapsed (this delay is launched
when the proximity sensor located in the last drop of the master Chain Disk feeder stops
detecting feed).
2. Emptying the Feeders:
Once the Continuous Delay has elapsed, the controller activates all drive units during
their respective Auger Delay to make sure all feeders are empty before bringing new
feed.
3. Filling Chain Disk Feeders:
When the Auger Delay of a feeder has elapsed, all feeders keep running and start being
filled by their respective bin auger.
4. A Feeder is Full:
The controller knows a feeder is full when the proximity sensor located at its end detects
feed for 5 seconds without interruption. When a feeder is full, its drive unit and
associated bin auger stop.
5. All Feeders are Full:
When the last feeder is full, all bin augers and drive units are off. As the animals eat, the
feed load in the feeders will decrease gradually. The Continuous Delay will be launched
once again when the proximity sensor of the master Chain Disk feeder will stop
detecting feed (Back to Step 1).
66
PNEG-602 Chain Disk
Chain Disk Controller - APCD-295
Option B-
Timed Feed Distribution
1. Beginning the Filling Process:
The filling process starts at the start-up of each feeding cycle.
2. Cleaning the Drops:
If actuators are used and the “Clean Drop” option is enabled in the INSTALLATION
menu, the controller opens and closes the drops tree times in a row to evacuate feed
leftovers from the system.
3. Emptying Feeders:
To ensure all Chain Disk feeders are empty before bringing new feed, the controller
activates all drive units during their respective Auger Delay.
4. Filling Chain Disk Feeders:
When the Auger Delay of a feeder has elapsed, the feeder keeps running and its
respective bin auger starts filling it.
5. The Feeder is Full:
a. If a proximity sensor is used: The controller knows a feeder is full when the proximity
sensor located at its end detects feed for 5 seconds without interruption. When feed is
detected, the controller stops the feed entry (bin auger) and the drive unit keeps running
for the Shutdown Delay then stops.
b. If no proximity sensor is used: The controller knows the feeder is full when the drive
unit has been running for the Run Time parameter value. The controller stops the drive
unit of this feeder once it is full.
6. Feed Dumping:
When the Chain Disk system is fully loaded, feed is ready to be delivered to the animals.
Step to Proximity Sensor Location Section.
Feed Delivery Process
After the feeders have been filled up, feed is ready to be delivered to the animals. This section
explains how feed is dumped by actuators and electric valves and how feed is delivered when
no actuator/electric valve is used. Note that actuators and electric valves can only be used when
using the timer-based feed distribution method and note that their parameters are common to all
feeders in use.
1. Feed Delivery using Actuators:
a. The actuator opens the drops during the opening time.
b. Once the opening time has elapsed, the actuator stops moving during the Actuator
Delay;
c.
Once the Actuator Delay has elapsed, the actuator fully closes the drops during twice the
opening time or until the security sensor (limit switch) is reached.
d. End of the feed cycle.
PNEG-602 Chain Disk
67
Chain Disk Controller - APCD-295
2. Feed Delivery using Electric Valves:
a. Electric valves open the dumps at the DumpTime.
b. The dumps remain opened during the Electric Valve Delay.
c.
Electric valve close after the Electric Valve Delay has elapsed.
d. End of the feed cycle.
3. Feed Delivery without Actuators / Electric Valves:
If no actuator or electric valve is used, the feed that enters into Chain Disk feeders
directly falls in the drops while the feeders are being filled. Once all feeders are full, feed
will unload gradually as the animals eat.
Feed Cycles
When the feed distribution is performed in timer mode, the user must program feed cycles to
signal the time at which the feeders are being filled and the time at which feed is delivered to the
animals. Up to 20 feed cycles can be performed every day. Refer to section 5.6 to enable the
required number of cycles.
1. Feed Cycle Start Time:
This is the time at which each feed cycle starts.
WARNING
The controller restrains the time at which feed cycles can start so that no cycle overlaps
another.
2. Dump Time:
If actuators or electric valves are used, set the time at which the dumps must open.
Make sure this dump is performed when all feeders are full (Start time + Max Run Time
of all feeders - see below).
3. Run Time:
This is the time that is required to fill-up each feeder. This function is only available if no
proximity sensor is used.
12.4 Parameter Settings
Controller Status
The STATUS menu shows the ongoing operations of the controller. All alarms situations must
also be acknowledged from this menu (Refer to Manual & Test Modes Section for further
information about alarms). The controller automatically returns to this STATUS menu after 4
minutes of inactivity.
68
PNEG-602 Chain Disk
Chain Disk Controller - APCD-295
The STATUS menu tells you:
•
If the test mode is active;
•
If the manual mode is active;
•
When the next feeding cycle will start;
•
When the drive units will stop (Shut Down Delay);
•
When the actuator will stop moving;
•
When the Actuator Delay will end.
•
When the Purge Time will end.
•
When the next dump will be performed;
•
What is the amperage draw of each drive unit;
1. Use the menu select buttons to select the STATUS main menu.
2. Use the arrow keys to scroll the display.
Run Time History
The APCD-295 keeps a daily history master Chain Disk run times. These values are kept in
memory for the past 6 days.
1. Use the menu select buttons to select the RUN TIME HISTORY menu. The total run time of
the last cycle is displayed.
1. Use the down-arrow key to scroll the display. The chain disk run times of the past 6 days are
displayed.
Time & Date
1. Use the menu select buttons to select the TIME / DATE menu. The current time and date
are displayed.
2. Press MODIFY. The hours flash on the display. Use the arrow keys to set the hours to the
PNEG-602 Chain Disk
69
Chain Disk Controller - APCD-295
proper value.
3. Press MODIFY once again. The minutes flash on the display. Use the arrow keys to set the
minutes to the proper value.
4. Press MODIFY once again. The seconds flash on the display. Use the arrow keys to set the
seconds to the proper value.
5. Press MODIFY. The day flashes on the display. Use the arrow keys to set the day to the
proper value.
6. Press MODIFY once again. The month flashes on the display. Use the arrow keys to set the
month to the proper value.
7. Press MODIFY once again. The year flashes on the display. Use the arrow keys to set the
year to the proper value.
Feed Cycle Settings
Refer to Filling Chain Disk Feeders Section to get information on feed cycles.
To ease programming the feed cycles, write down each of your settings in the feed
cycle template in the Feed Cycle Settings section.
1. Use the menu select buttons to select the FEED CYCLES menu. This menu is only
accessible if feed is distributed according to a timer (the continuous feeding mode is disabled
in the installation). A password may also be required to access this menu (See Installation
Setup Sectiion).
2. Press MODIFY. The start time of the first feed cycle flashes on the display. Use the arrow
keys to adjust it to the proper value. Press MODIFY once again to validate.
3. Press the down-arrow key once. The dump time of the first feed cycle is displayed.
Accessible if actuators or electric valves are enabled (See Installation Setup Sectiion).
4. Press MODIFY. The dump time of the first feed cycle flashes on the display. Use the arrow
keys to adjust it to the proper value. Press MODIFY once again to validate the new value
5. Press the down-arrow key once. The start time of the second feed cycle is displayed.
Proceed in similar fashion to set the start and dump times of all feed cycles in use.
70
PNEG-602 Chain Disk
Chain Disk Controller - APCD-295
Check Feed Cycles
WARNING
The controller automatically rearranges the feed cycles in the case of a programming
error. The warning message “Check Feed Cycles” is displayed afterwards. The user has
to validate the new arrangement of the feed cycles by scrolling down the whole Feed
Cycle menu. The warning message will then disappear.
Feed Cycle Temperature
Feeders Max Run Time1
Feed
Cycles
Start
Time
Example 09:00A
Master
Feeder
Slave
Feeder
1
Slave
Feeder
2
Slave
Feeder
3
Slave
Feeder
4
Slave
Feeder
5
Slave
Feeder
6
Slave
Full at² Dump
Feeder
Time³
7
01:30
00:30
00:30
N.U
N.U
N.U
N.U
N.U
Cycle 1
_:_
_:_
_:_
_:_
_:_
_:_
_:_
_:_
_:_
11:30A 11:45A
_:_
_:_
Cycle 2
_:_
_:_
_:_
_:_
_:_
_:_
_:_
_:_
_:_
_:_
_:_
Cycle 3
_:_
_:_
_:_
_:_
_:_
_:_
_:_
_:_
_:_
_:_
_:_
Cycle 4
_:_
_:_
_:_
_:_
_:_
_:_
_:_
_:_
_:_
_:_
_:_
Cycle 5
_:_
_:_
_:_
_:_
_:_
_:_
_:_
_:_
_:_
_:_
_:_
Cycle 6
_:_
_:_
_:_
_:_
_:_
_:_
_:_
_:_
_:_
_:_
_:_
Cycle 7
_:_
_:_
_:_
_:_
_:_
_:_
_:_
_:_
_:_
_:_
_:_
Cycle 8
_:_
_:_
_:_
_:_
_:_
_:_
_:_
_:_
_:_
_:_
_:_
Cycle 9
_:_
_:_
_:_
_:_
_:_
_:_
_:_
_:_
_:_
_:_
_:_
Cycle 10
_:_
_:_
_:_
_:_
_:_
_:_
_:_
_:_
_:_
_:_
_:_
Cycle 11
_:_
_:_
_:_
_:_
_:_
_:_
_:_
_:_
_:_
_:_
_:_
Cycle 12
_:_
_:_
_:_
_:_
_:_
_:_
_:_
_:_
_:_
_:_
_:_
Cycle 13
_:_
_:_
_:_
_:_
_:_
_:_
_:_
_:_
_:_
_:_
_:_
Cycle 14
_:_
_:_
_:_
_:_
_:_
_:_
_:_
_:_
_:_
_:_
_:_
Cycle 15
_:_
_:_
_:_
_:_
_:_
_:_
_:_
_:_
_:_
_:_
_:_
Cycle 16
_:_
_:_
_:_
_:_
_:_
_:_
_:_
_:_
_:_
_:_
_:_
Cycle 17
_:_
_:_
_:_
_:_
_:_
_:_
_:_
_:_
_:_
_:_
_:_
Cycle 18
_:_
_:_
_:_
_:_
_:_
_:_
_:_
_:_
_:_
_:_
_:_
Cycle 19
_:_
_:_
_:_
_:_
_:_
_:_
_:_
_:_
_:_
_:_
_:_
Cycle 20
_:_
_:_
_:_
_:_
_:_
_:_
_:_
_:_
_:_
_:_
_:_
1. The Maximum Run Time parameter value is common to all feed cycles.
2. The time at which all feeders are full corresponds to the Start Time + Max Run Time of all
feeders.
3. Make sure the dump is performed after all feeders are full. The Dump Time must only be
defined if actuators or electric valves are enabled.
PNEG-602 Chain Disk
71
Chain Disk Controller - APCD-295
Run Time Settings
The run time parameter represents the time that is required to fill-up each feeder. It can be
adjusted from 00:00 hh:mm to 04:00 hh:mm. Refer to Filling Chain Disk Feeders Section to get
information about this parameter.
1. Use the menu select buttons to select the FEED CYCLES menu.
This menu is only accessible if feed is distributed according to a timer (the continuous
feeding mode is disabled in the installation) and if no proximity sensor is used. A password
may also be required to access this menu (See Installation Setup Sectiion).
2. Press the down-arrow key in order to select the first run time screen display. This is the Run
Time of the master Chain Disk.
3. Press MODIFY then use the arrow keys to set this parameter to the desired value. Press
MODIFY once again to validate.
4. If slave feeders are used, press the down-arrow key to select the Run Time of the first slave
feeder.
5. Press MODIFY then use the arrow keys to set this parameter to the desired value. Press
MODIFY once again to validate.
6. Proceed in similar fashion to set the Run Time of all feeders in use.
Installation Setup
The following section describes how to customize the controller for your particular application.
Normally, this setup needs to be done only once.
Enter Password
Use the menu select buttons to select the INSTALLATION main menu. A password may be
required to access this menu. By default, the password is set to 6-1-0.
72
PNEG-602 Chain Disk
Chain Disk Controller - APCD-295
The following parameters are presented below in the order they appear on the display. To modify
a parameter, press MODIFY then use the arrow keys to change it. When you are finished
adjusting a parameter, press MODIFY once again to validate the new value and return to the
display mode. Press the down-arrow key to move to the next parameter.
Use Password
Select “Yes” to enable a password; this password is used to restrain the access to the
Installation and Feed Cycle menus.
# of Slaves
Enter the number of additional Chain Disk feeders in use. Up to 7 slave feeders (APCD-295S)
can be controlled.
Feeder setup
If slave feeders are used, select the proper feeder setup: Select Cascade if the feeders are
connected together; select Independent if they are separated from one another.
This menu is shown if slave feeders are enabled below.
PNEG-602 Chain Disk
73
Chain Disk Controller - APCD-295
Common Auger
If independent slave feeders are enabled above, select if all feeders have their own bin auger or
if they share a common auger.
This menu is shown if independent slave feeders are enabled below.
Proxy Switch
Select “Yes” if proximity sensors are used to detect the presence of feed at the end of the
feeders.
Proxy Switch Status
Choose the normal contact status of all proximity sensors in use: Normally Opened (NO) or
Normally Closed (NC).
Only shown proximity sensors are enabled.
Feed Sensor Bypass
If a proximity sensor is used, the Chain Disk stops when feed is detected at the end of the feeder.
However, when a feed cycle starts, some feed leftovers from the previous cycle are likely to
remain at the end of the feed line. The Feed Sensor Bypass delay allows ignoring the presence
of these leftovers at the beginning of a feed cycle. Set this delay separately for each feeder in
use: (S1 = Slave 1, S2 = Slave 2, etc.,) It can be adjusted from 0 to 30 minutes.
Only shown if proximity sensors are enabled above and if feed distribution is based on a timer
(if the continuous feeding mode is disabled below).
74
PNEG-602 Chain Disk
Chain Disk Controller - APCD-295
Continuous Feeding / Timed Feeding
Select “YES” to use the continuous feeding mode; select “No” to use timed feed distribution
(See Feed Distribution Modes Sectiion).
Only shown proximity sensors are enabled below.
Continuous Feeding Delay
When using the continuous feed distribution method, the Continuous Delay tells when to start a
feed cycle from the moment where no feed is detected at the end of the master Chain Disk feeder
(See Timed Feed Distribution Sectiion). It can be adjusted from 1 min. to 23 h 59 min.
Only shown if the continuous feeding mode is enabled below.
Feed Dump: Actuators / Electric Valves
Select “Actua” to enable feed dumps that are controlled by an actuator; select “Valve” to enable
feed dumps that are controlled by an electric valve; select “None” to disable feed dumps.
Only shown if feed distribution is based on a timer (if the continuous feeding mode is disabled
below).
Clean Drops
This function allows cleaning the drops at the very beginning of each feed cycles: The controller
uses the “Actuator Open Time” parameter to open and close the drops 3 times in a row in order
to evacuate feed leftovers from the system.
PNEG-602 Chain Disk
75
Chain Disk Controller - APCD-295
Actuator Open Time
Delay that is required for the actuator to open the dumps. It can be adjusted from
0 to 120 minutes.
Only shown if the actuator is enabled below.
Actuator Delay
This is the time the dumps remain opened right after having been opened. It can be adjusted
from 0 to 60 minutes.
Only shown if the actuator is enabled below.
Security Sensor
Select “Yes” if the actuator has a security sensor (limit switch).
Only shown if the actuator is enabled below.
Electric Valve Delay
This is the time electric valves remain opened to dump the feed. It can be adjusted from 0 to 60
minutes.
Only shown if electric valves are enabled below.
Maximum Current of the Master Feeder
Select the maximum allowable current that can be consumed by the drive unit of the master
feeder. This parameter can be adjusted from 1 to 14 Amp.
76
PNEG-602 Chain Disk
Chain Disk Controller - APCD-295
Window Size
This parameter is used to restart a drive unit that was stopped due to an over current
condition. The drive unit restarts when its amperage draw becomes lower than its respective
Max Current Consumption - Window Size. The window size is common to all drive units and can
be adjusted from 0.5 to 3.0 Amp.
Maximum Current of Slave Feeders
Select the maximum allowable current that can be consumed by the drive unit of each slave
feeder (S1 = Slave 1, S2 = Slave 2, etc.) The Maximum Current Consumption can be adjusted
from 1 to 14 Amp.
Available if slave feeders are enabled below.
Over Current Delay
An alarm is set off when the amperage draw of a drive unit exceeds its respective
maximum current limit for this time delay. The Over Current Delay is common to all drive units
and can be adjusted from 30 seconds to 15 minutes.
Auger Delay
When a feed cycle starts, the activation of the bin auger is postponed until the end of this delay.
This allows emptying the feeders before bringing new feed into the system. If all feeder have their
own bin augers, set this delay separately for each slave feeders. The Auger Delay can be
adjusted from 0 to 60 minutes.
PNEG-602 Chain Disk
77
Chain Disk Controller - APCD-295
Max Run Time
This is the maximum allowable running time of a feeder. The controller sounds an alarm when
the continuous run time of a feeder exceeds the Max Run Time limit of this feeder. Set this
parameter separately for each feeder in use. It can be adjusted from 00:00 hh:mm to
04:00 hh:mm.
# of Feeding Cycles
Activate the proper number of daily feed cycles. Up to 20 cycles can be activated.
The controller automatically restrain the number of feed cycles so that no cycle overlaps another.
Refer to (See Feed Cycle Settings Sectiion) to set the feed cycles.
Time Mode
Select the desired time display format: 12 h or 24 h mode.
Shut Down Delay
When a proximity sensor detects feed at the end of a feeder, the controller stops the feed entry
(bin auger) and launches the Shutdown Delay before stopping the drive unit. This delay can be
adjusted from 0 to 10 minutes.
Only shown if proximity sensors are enabled above.
Change password?
Select “Yes” if you wish to modify the controller's password then press the down-arrow key.
1. Press MODIFY. The first two digits of the password flash on the display.
78
PNEG-602 Chain Disk
Chain Disk Controller - APCD-295
2. The new password must be entered, one number at a time. Use the arrow keys to enter the
first number. Press MODIFY to step to the next number. Use the arrow keys to enter the
second number, etc.
Version
This is the current version of your controller.
Manual & Test Modes
The manual mode allows activating manually the actuators, electric valves and drive units.
Manual Filling of the Feeders
It is possible to fill some Chain Disk feeders without waiting for a feed cycle to start. When this
manual start-up is performed, the Manual Mode pilot light turns on and the controllers activates
the proper outputs in order to fill up the required feeder(s) (see the different filling methods in
Filling Process Section). The manual filling process ends when the feeder is full.
WARNING
If the user starts a manual fill-up of a feeder while a feed cycle is ongoing, the ongoing
cycle is bypassed and replaced by the manual filling process. When the controller returns
to the automatic mode, it will not resume the previous cycle but will perform the dump at
the next Dump Time (if applicable). A manual dump can also be performed (See Manual
Start/Stop Sectiion). Do not forget to exit from the manual mode once the manual filling
process is completed.
1. Use the menu select buttons to select the MANUAL MODE menu.
A password may be required to access this menu (See Installation Setup Sectiion).
2. Before enabling the manual filling, select which feeder must be filled: Press the down-arrow
key to select the Manual Start menu.
3. Press MODIFY then use the arrow keys to select the feeder that needs to be filled manually
(Master Chain Disk feeder, All feeders or slave 1-7 feeders). Press MODIFY once again to
validate. Once the desired feeder is selected, activate the manual mode as shown in Manual
Start/Stop Section.
PNEG-602 Chain Disk
79
Chain Disk Controller - APCD-295
Manual Start/Stop
It is possible to start filling some feeders manually (as explained in previous section) or to stop
the whole Chain Disk system manually.
1. Use the menu select buttons to select the MANUAL MODE menu.
A password may be required to access this menu (See Installation Setup Sectiion).
2. The manual mode status is displayed on screen.
3. Press MODIFY then use the arrow keys to select the desired status: Select Start to enable
the manual mode; Select Stop to stop the Chain Disk system; Select Auto to return to the
automatic control mode.
Manual Dump
The actuator/electric valve can only be activated manually when no drive unit is running. The
Manual Mode pilot light flashes while an actuator or electric valve is controlled manually.
1. Use the menu select buttons to select the MANUAL MODE menu.
2. Press the down-arrow key to select the manual mode status of the actuator.
Only shown if the actuator is enabled (See Installation Setup Sectiion).
3. Press MODIFY then use the arrow keys to select the desired status (Auto /Open /Stop/
Close). Press MODIFY again to validate.
The answer is validated after an 8 second delay.
4. Press the down-arrow key once. The manual mode status of the electric valve is displayed.
Only shown if the electric valve is enabled (See Installation Setup Sectiion).
5. Press MODIFY then use the arrow keys to select the proper status (Auto/Open/Close).
Press MODIFY again to validate.
The answer is validated after an 8 second delay.
Toggle Switch
A toggle switch can be connected to the main board. This switch allows stopping the drive unit
of the master Chain Disk feeder and stopping bin augers manually, without sounding the Chain
Disk is Not Running alarm until the next feed cycle. Refer to the wiring diagram enclosed with
this manual to connect the toggle switch.
WARNING
The toggle switch does not cut the power lines to the chain disk motor. Shut off the circuit
breaker for servicing and maintenance.
80
PNEG-602 Chain Disk
Chain Disk Controller - APCD-295
Test Mode
The test mode allows simulating the amperage draw of all drive units in order to verify the
controller's performances.
1. Use the menu select buttons to select the MANUAL MODE menu.
2. Press the down-arrow key to select the amperage draw display of the drive unit of the master
Chain Disk feeder or of a slave feeder.
3. Press the down-arrow key to select the amperage draw of the selected drive unit.
4. Press MODIFY then use the arrow keys to set the simulated current consumption. Press
MODIFY to validate.
The answer is validated after an 8 second delay.
WARNING
Do not forget to exit from the test mode when the tests are completed.
Alarms
The following table shows the possible alarms conditions. When an alarm occurs, the whole
Chain Disk system stops operating until the alarm is acknowledged.
Alarm Messages
Meaning
Actuator is not Closed
The limit switch of an actuator has not been reached after the Closing Time
(this type of alarm can only occur if the safety sensor is enabled).
Actuator is not Opened
The limit switch of an actuator is still detected after the Opening Time (this
type of alarm can only occur if the safety sensor is enabled in the
installation).
APCD-295-S # X Comm Alarm
Communication is disrupted between the main controller and an
APCD-295-S slave module ID # X.
Chain Disk is not Running
The amperage draw of the master Chain Disk is lower than 2.0 Amps.
Current Overload
The amperage draw of the master Chain Disk exceeded its Maximum
Current Consumption limit for the Over Current Delay.
Current Overload
APCD-295-S # X
The amperage draw of slave feeder ID # X exceeded the Maximum
Current Consumption limit for the Over Current Delay.
Max Run Time
The running time of the master Chain Disk drive unit exceeded the
Max.Run Time parameter value.
Max Run Time
APCD-295-S # X
The running time of slave feeder ID # X exceeded the Max.Run Time
parameter value.
Chain Disk Safety Switch
The safety switch of the master Chain Disk feeder has been reached.
Chain Disk Safety Switch
APCD-295-S # X
The safety switch of slave feeder ID # X has been reached.
Trouble Light
It is possible to connect a trouble light to the main controller. This light turns on whenever an
alarm occurs. Refer to the Wiring Diagram enclosed with this manual to connect this light.
PNEG-602 Chain Disk
81
Chain Disk Controller - APCD-295
Acknowledging an Alarm
1. Use the menu select buttons to select the STATUS menu. The current alarm
acknowledgment menu is displayed.
2. Press MODIFY. The acknowledgment status flashes on the display.
3. Press the up-arrow key to acknowledge the alarm then press MODIFY to validate. The alarm
is now acknowledged.
12.5 Technical Specifications
Type
APCD-295
Main Supply Fuse F1
F 1A, 250V, Fast-blow
Main Supply/Frequency
230V+10% - 20%, 12A, 50/60Hz
Housing
Plastic Casing
Operating Temperature
0 to 40° C
Storage Temperature
-15 to 50° C
Ambient Relative Humidity
MAX 95% (non condensing)
Alarm
10 mA to 2A, 24 VAC or DC MAX
Chain Disk Motor
230 VAC / 2 HP MAX
Auger Motor
230 VAC / 1 HP MAX
115 VAC / 1/2 HP MAX
Actuator/Electric Valve
230 VAC MAX, 5A MAX
Trouble light
500W MAX, 115 VAC
Installation Category
Categorie II: Overvoltage Category
Pollution Degree
2
Altitude
Up to 2000m
The room temperature where the controller is located MUST ALWAYS
REMAIN BETWEEN 32° AND 104°F (0° AND 40°C). For indoor use.
82
PNEG-602 Chain Disk
Chain Disk Controller - APCD-295
12.6 Memory Card
The memory card is used to create a backup copy of your controller's configuration. The card is
also useful to transfer the configuration of one controller to another controller of the same type.
The switch at the bottom of the card is used to lock or to unlock the card
( = locked,
= unlocked).
WARNING
Turn off power each time you open the controller's enclosure. This prevents accidental
exposure to areas of high voltage.
To Transfer a Configuration
1. Turn OFF power to the controller.
2. Open the latch and lift the controller’s cover.
3. If you are about to copy the controller’s configuration on the memory card, make sure the
card’s switch is at the unlocked position.
4. Insert the card in the J9 connector located on the electronic board inside the controller.
Components of the memory card must face down as illustrated.
5. Close the cover then reapply power to the controller. The transfer menu should be shown on
screen (if this is not the case, simultaneously press the MENU SELECT up and down-arrow
keys for 3 seconds to display this menu).
Memory Card
Card Switch
Connector
J9
Electronic
Board
Figure 12J
6. Use the ADJUSTMENT up and down arrow keys to select the proper type of transfer:
PNEG-602 Chain Disk
83
Chain Disk Controller - APCD-295
Memory Card
Controller:
To transfer the memory card’s content into the controller, select the “Mem. Card to Control”.
Once it is selected, simultaneously press the ADJUSTMENT up and down arrow keys to start
the transfer.
Controller
Memory Card:
To save the controller’s configuration into the memory card, select the “Control to Mem. Card”
menu. Once it is selected, simultaneously press the ADJUSTMENT up and down arrow keys to
start the transfer.
7. Once the transfer is over, simultaneously press and hold the MENU SELECT up and down
arrow keys for 5 seconds to exit the transfer menu, then remove the memory card from the
connector as follows:
- Turn OFF power to the controller;
- Open the controller’s cover;
- Remove the card from the connector;
- Close the cover then reapply power to the controller.
8. Lock the card’s switch (
) if required.
Transfer Error
WARNING
The controller will not warn you if the transfer is incorrect. Respect the following rules to
make sure the transfer works properly:
Make sure the card switch is at the unlocked position before transferring a configuration
on the card.
Do not move or hold the card while a transfer is ongoing.
84
PNEG-602 Chain Disk
Chain Disk Controler - APCD-295-S
13. CHAIN DISK CONTROLER - APCD-295-S
13.1 Terms and Symbols
Figure 13A
Status Leds
The LEDs at the right of the control panel give the status of each output. The following table gives
the meaning of each pilot light:
Figure 13B
PNEG-602 Chain Disk
85
Chain Disk Controler - APCD-295-S
LED
Meaning
Power ON
The APCD-295-S is correctly powered.
Current Overload
Flashes when the amperage draw of the drive unit has exceeded
the Max Current limit for the Overload Delay.
Fix the problem then press and hold the RESET button to restart the
system.
Chain Disk Safety Switch
Turns ON when the drive unit has reached its safety switch.
Fix the problem then press and hold the RESET button to restart the
system.
Feed Switch
Turns ON when the proximity sensor detects feed.
Flashes during the Feed Bypass Delay.
Chain Disk Output
Turns ON when the drive unit is running.
Internal Switches
The internal switches are located inside the box on the bottom board. When the controller is
shipped from the factory, all the switches are set to OFF.
Figure 13C
Internal switches 1-7 are used to set the ID number of each APCD-295-S unit. Internal switch #8
is used to return to the previous communiation method as explained below.
#
OFF
ID #1
2
ID #2
3
4
ID #3
Only lift the switch that corresponds to
the ID# of the APCD-295-S unit.
ID #4
5
ID #5
6
ID #6
7
ID #7
8
86
ON
1
Communication terminals are enabled.
Communication terminals are disabled.
Do not turn this switch on unless your
dealer tells you to do it.
PNEG-602 Chain Disk
Chain Disk Controler - APCD-295-S
Communication Mode
WARNING
Internal switch #8 allows stepping back to the communication mode that was previously
used by the APCD-295 controller (without using COMM terminals). This option is used to
ensure the compatibility between APCD-295-S units and older versions of the APCD-295.
Do not turn this switch ON unless your dealer tells you to do it.
Note that turning internal switch #8 ON completely changes the way the APCD-295-S
works. If you turn it ON, refer to revision 01 of the APCD-295-S manual and to revision 02
of the wiring diagram (contact your dealer).
13.2 Installation
Mounting Instructions
Open the latch and lift the cover. Remove the black caps located on each of the four mounting
holes. Mount the enclosure on the wall using four screws. Be sure the electrical knockouts are
at the bottom of the enclosure in order to prevent water from entering the controller. Insert the
screws in the mounting holes and tighten. Fasten the four black caps provided with the controller
onto the four mounting holes. The enclosure must be mounted in a location that will allow the
cover to be completely opened right up against the wall.
Connections
To connect the controller, refer to the Wiring Diagram enclosed with this user's manual. Use the
electrical knockouts provided at the bottom of the enclosure. Do not make additional holes in the
enclosure, particularly on the side of the enclosure when using a computer communications
module.
WARNING
All wiring must be done by an authorized electrician and must comply with applicable
codes, laws and regulations. Be sure power is off before doing any wiring to avoid
electrical shocks and equipment damage.
PNEG-602 Chain Disk
87
Chain Disk Controler - APCD-295-S
13.3 Controller’s Operation
Controller’s Description
APCD-295-S units allows adding up to 7 feeders to a Chain Disk system that is controlled by an
APCD- 295 controller. The following illustration sums up the situation:
APCD-295-S
ID #3
APCD-295-S
ID #2
APCD-295-S
ID #1
APCD-295
Master
Bins
Figure 13D
Slave Unit’s Operation
The feeders connected to all APCD-295-S units are controlled by the master APCD-295
controller. This is true except when a current overload occurs or when the drive unit's safety
switch is reached: When one of these situations occurs, the APCD-295-S stops its respective
drive unit and stops the feed entry (bin auger).
Reset Button
This button is only used if your APCD-295-S unit operates according to the previous
communication method (if internal switch #8 is set to ON). With the new communication mode
(internal switch #8 to OFF), this reset must be performed from the master Chain Disk controller
(APCD-295 controller).
Toggle Switch
A toggle switch can be connected to the main board. This switch allows stopping the drive unit
of the APCD-295-S unit and stopping bin augers manually, whithout sounding the Chain Disk is
Not Running alarm until the next feed cycle.
WARNING
The toggle switch does not cut the power lines to the chain disk motor. Disconnect the
breaker for servicing and maintenance.
88
PNEG-602 Chain Disk
Chain Disk Controler - APCD-295-S
13.4 Technical Specifications
Type
Main Supply Fuse F1
APCD-295-S
1 A, fast-blow
Mains Supply/Frequency
230 V+10% -20%, 2 HP, 50/60 Hz
Housing
IP54, plastic casing
Operating Temperature
0 to 40°C
Storage Temperature
-15 to 50°C
Ambient Relative Humidity
Max. 95%
Chain Disk Motor
230 VAC, Max2 HP
Auger Motor
Max230 VAC, Max1/2 HP
The room temperature where the controller is located MUST ALWAYS
REMAIN BETWEEN 32° AND 104°F (0° AND 40°C).
PNEG-602 Chain Disk
89
Chain Disk Controler - APCD-300
14. CHAIN DISK CONTROLER - APCD-300
14.1 Terms and Symbols
LCD Display
The LCD display on the left gives the current readings and parameters to be adjusted when you
select a function. The three keys at the right of the display are used to edit parameters and step
through the screen display. When the parameters for a given function cannot all be presented at
once on the display, arrows are displayed on the right hand side to indicate that additional
parameters can be displayed using the arrow keys
. After 4 minutes of inactivity, the
display returns to the STATUS display.
Arrow Keys
The arrow keys that are located next to the LCD display have 2 purposes. They are first used to
step through the parameters that are displayed on the display. They are also used to modify a
parameter’s value when a parameter flashes on the display.
Menu Select Buttons
These keys are used to select the functions that are located in the main menu.
Adjusting a Parameter
Use the arrow keys to select the parameter that needs to be adjusted. Once the parameter is
selected, press MODIFY. The parameter then flashes on the display. It can now be adjusted with
the arrow keys. Once it is properly set, Press MODIFY once again to validate the new value. If
the value does not flash after having pressed the MODIFY, it means that the value is a reading.
A reading cannot be modified.
90
PNEG-602 Chain Disk
Chain Disk Controler - APCD-300
Output Status LEDs
The LEDs at the right of the control panel give the status of each output. When the LED is turned
on, the output is activated; when the LED is turned OFF, the output is deactivated. The following
table gives the LEDS' meanings:
LED
Meaning
Turns ON when an alarm is detected.
Alarm
The chain disk control stops operating until the
alarm is acknowledged .
Current Overload
Turns ON when the chain disk's current exceeds the
max current limit for a time period exceeding the
over current delay.
The chain disk control stops operating until the
alarm is acknowledged .
Turns ON when the safety switch is reached.
Chain Disk Safety Switch
The chain disk control stops operating until the
alarm is acknowledged.
Turns on when the chain disk's running time exceeds
the max run time.
Max Run Time
The chain disk control stops operating until the alarm is
acknowledged.
Turns ON when feed is detected by the proxy switch.
Feed Switch
Flashes during the feed sensor bypass delay.
Chain Disk Output
Turns ON when the Chain Disk is operating.
Auger Output
Turns ON when the bin auger is operating.
Flashes during the Auger Delay.
Manual Mode
Turns ON when the chain disk is on manual mode.
Automatic Mode
Turns ON when the chain disk is on the automatic mode.
Symbols
Double Insulation
14.2 Installation
Mounting Instructions
Remove the four screws in the front cover and lift the cover. Remove the black caps located on
the three mounting holes. Mount the enclosure to the wall using three screws. Be sure the
electrical knockouts are at the bottom of the enclosure in order to prevent water from entering
the controller. Insert the screws into the mounting holes and tighten. Fasten the black caps
onto the mounting holes.
PNEG-602 Chain Disk
91
Chain Disk Controler - APCD-300
Connections
To connect the controller, refer to the wiring diagram enclosed with this user’s manual. Use the
electrical knockouts provided at the bottom of the enclosure. Do not make additional holes in the
enclosure, particularly on the side of the enclosure when using a computer communications
module.
1. Do not install rigid conduit into electrical knockouts. Only nylon cable glands are permitted
for cable or wire fastening.
2. A switch or circuit breaker shall be included in the building installation. It shall be in close
proximity to the equipment and within easy reach of the operator. It shall be marked as the
disconnecting device for the equipment.
3. The main supply circuit breaker for feeder motor (L1/L2 POWER IN) shall be 20 A.
4. Wire gage used for mains supply (L1/L2 POWER IN) and feeder motor shall be at least
12 AWG.
5. Separate circuit breaker shall be used for auger motor.
6. The mains supply breaker for auger motor shall be 15 A.
7. Wire gage used for auger motor shall be at least 14 AWG.
WARNING
All wiring must be done by an authorized electrician and must comply with applicable
codes, laws and regulations. Be sure power is off before doing any wiring to avoid
electrical shocks and equipment damage.
Safety may be jeopardized if the equipment is used in a manner not specified by the
manufacturer.
14.3 Controller’s Operation
Controller’s Description
The APCD-300 is an electronic device used to control a chain disk system in livestock buildings.
The APCD-300 takes in charge the feed intake from the bin into the feed line and controls the
feed distribution process using a proximity sensor (Proxy Switch).
92
PNEG-602 Chain Disk
Chain Disk Controler - APCD-300
Auger’s Operation
At the start-up of each feeding cycle, the auger starts bringing feed into the feed distribution line,
right after the Auger’s Delay. The auger’s motor is stopped when the feed line is loaded. The
following steps describe the whole process.
Figure 14A
1. The auger’s screw brings feed into the feed line.
2. The feed line gets loaded and the chain disk reaches its Max. Current Consumption. The
auger’s motor is then stopped.
3. The chain disk keeps running regularly. Feed evacuates from the feed line.
4. The chain disk motor's current consumption decreases as the feed load decreases. When
the current consumption is below Max. Current Consumption - Window Size, the auger's
operation is resumed and feed starts being delivered again into the feed line.
Refer to Installation Setup Sectiion to set auger’s parameters.
Chain Disk Operation
The controller has two different ways of operating the chain disk system depending on the
location of the Proxy Switch. The proximity sensor can either be located in the last drop or
directly mounted on the feed line tube.
Figure 14B
PNEG-602 Chain Disk
93
Chain Disk Controler - APCD-300
Operating Mode 2: If the Proxy Switch is Mounted in the Last Drop:
Figure 14C
Step 1 - The chain disk motor runs continuously when as no feed is being detected by the Proxy
Switch.
Step 2 - The chain disk motor stops when the Proxy Switch detects feed for 5 seconds without
interruption. The feed line is now loaded. The controller waits for the feed line to empty.
Step 3 - The Proxy Switch stops detecting feed. The Continuous Feed Delay is launched. The
controller waits for the end of this delay before restarting the chain disk system.
Step 4 - The chain disk motor restarts (back to Step 1).
Operating Mode 2: If the Proxy Switch is Mounted in the Feed Line Tube:
Figure 14D
Step 1 - The Proxy Switch does not detect feed: The chain disk motor runs continuously.
Step 2 - The Proxy Switch detects feed for 5 seconds without interruption: the chain disk motor
stops; the feed line is now loaded.
Step 3 - The Continuous Feed Delay is launched. This delay is required to empty the feed line.
Step 4 - Once the Continuous Feed Delay has elapsed, the chain disk motor restarts during the
Feed Bypass Delay.
Step 5 - If feed is detected by the Proxy Switch: the Continuous Feed Delay is relaunched
(back to Step 3).
If no feed is detected by the Proxy Switch: the chain disk motor restarts
(back to Step 1).
94
PNEG-602 Chain Disk
Chain Disk Controler - APCD-300
WARNING
Note that the whole feed distribution process is stopped when an alarm is active!
14.4 Parameter Settings
Controller Status
This menu indicates the controller’s status. The following pieces of information can be displayed:
- The chain disk is in manual mode
- A countdown before the chain disk stops (Shut down delay)
- The current that is consumed by the chain disk's motor.
The alarm acknowledgment must also be performed from this menu (Refer to Alarms Sectiion
for further information about the alarms). The controller automatically returns to this menu after
4 minutes of inactivity.
1. Use the menu select buttons to select the STATUS main menu.
2. Use the arrow keys to scroll the display.
Run Time History
The APCD-300 keeps a daily history master Chain Disk run times. These values are kept in
memory for the past 6 days.
1. Use the menu select buttons to select the RUN TIME HISTORY menu. The total run time of
the last cycle is displayed.
2. Use the down-arrow key to scroll the display. The chain disk run times of the past 6 days are
displayed.
PNEG-602 Chain Disk
95
Chain Disk Controler - APCD-300
Setting the Time & Date
1. Use the menu select buttons to select the TIME / DATE menu. The current time and date
are displayed.
2. Press MODIFY. The hours flash on the display. Use the arrow keys to set the hours to the
proper value.
3. Press MODIFY once again. The minutes flash on the display. Use the arrow keys to set the
minutes to the proper value.
4. Press MODIFY once again. The seconds flash on the display. Use the arrow keys to set the
seconds to the proper value.
5. Press MODIFY. The day flashes on the display. Use the arrow keys to set the day to the
proper value.
6. Press MODIFY once again. The month flashes on the display. Use the arrow keys to set the
month to the proper value.
7. Press MODIFY once again. The year flashes on the display. Use the arrow keys to set the
year to the proper value.
Installation Setup
The following section describes how to customize the controller for your particular application.
Normally, this setup needs to be done only once.
1. Use the menu select buttons to select the INSTALLATION main menu.
A password may be required to access this menu.
By default, the password is set to 6-1-0.
96
PNEG-602 Chain Disk
Chain Disk Controler - APCD-300
The following parameters are presented below in the order they appear on the display. To
modify a parameter, press MODIFY then use the arrow keys to change it. When you are
finished adjusting a parameter, press MODIFY once again to validate the new value and
return to the display mode. Press the down arrow key to move to the next parameter.
2. Use Password
Select “Yes” to enable a password; This password is used to restrain the access to the
Installation and Feed Cycle menus.
3. Proxy Switch Status
Choose the normal status of the proximity switch relay: Normally Open (NO) or Normally
Closed (NC).
4. Continuous Feeding Delay
The Continuous Delay has a different utility depending on the location of the Proxy Switch.
In both cases, the delay can be adjusted from 1 minute to 23 h 59 m.
1. If the Proxy Switch is located in the last drop:
(Feed Sensor Bypass = 0 second):
The Continuous Feed Delay is the time period that is required before restarting the chain
disk once feed stops being detected.
2. If the Proxy Switch is located in the last drop:
(Feed Sensor Bypass = 0 second):
The Continuous Feed Delay is the time period that is required before restarting the chain
disk once feed stops being detected.
5. Feed Sensor Bypass
Delay over which the chain disk runs right after the Continuous Delay. Set the bypass delay
to 0 second if the Proxy Switch is located in the last drop. The bypass delay can be adjusted
from 0 to 30 minutes.
PNEG-602 Chain Disk
97
Chain Disk Controler - APCD-300
6. Maximum Current
Select the maximum allowable current that can be consumed by the feeder motor.
Adjustable from 1 to 14 Amp.
7. Window Size
This is the current difference, below the Max. Current, at which the auger motor restarts. The
auger motor restarts at: Max Current - Window Size. It can be adjusted from 0.5 to 3.0 Amp.
8. Over Current Delay
An alarm is set OFF when the chain disk motor’s current consumption exceeds the
Maximum Current limit for this delay. The Over Current Delay can be adjusted from 30
seconds to 15 minutes.
9. Auger’s Delay
The auger starts running when this delay has elapsed, right after the chain disk’s start-up
(once the Continuous Delay has elapsed). Adjustable from 0 to 60 minutes.
10. Max Run Time
The Max. Run Time is the maximum allowable running time of the chain disk. Whenever the
chain disk reaches this running time, an alarm is set off and the system stops operating until
the alarm is acknowledged. The Max Run Time can be adjusted from 0 to 4 hours.
98
PNEG-602 Chain Disk
Chain Disk Controler - APCD-300
11. Time Mode
Select the desired time display format: 12 h or 24 h mode.
12. Shut Down Delay
Once feed is detected by the proximity switch at the end of the line, a delay is launched
before stopping the chain disk motor. The bin auger also stops bringing feed into the line
over this delay. The shut down delay can be adjusted from 0 to 10 minutes.
13. Change password?
Select “Yes” if you wish to modify the controller’s password then press the downarrow key.
1. Press MODIFY. The first two digits of the password flash on the display.
2. The new password must be entered, one number at a time. Use the arrow keys to enter
the first number. Press MODIFY to step to the next number. Use the arrow keys to enter
the second number, etc.
14. Version
Show the current version of your controller.
PNEG-602 Chain Disk
99
Chain Disk Controler - APCD-300
Manual Mode
This mode allows to manually perform a feed cycle: The chain disk runs up until feed is detected
by the proximity sensor. The Manual Mode led is lit when this mode is in use. Do not forget to
select the automatic mode again once the manual feed cycle is completed.
1. Use the menu select buttons to select the MANUAL MODE menu.
2. Press MODIFY to change the feed cycle mode; use the arrow keys to choose the proper
mode (Auto/Start/Stop). Press MODIFY once again to validate.
The new mode is validated after an 8 second delay if the user does not press on the Modify
button.
Toggle Switch
It is possible to connect a toggle switch to the main board. This switch allows to manually stop
the chain disk and auger motors without setting off the Chain Disk is Not Running alarm until the
next feeding cycle. Refer to the Wiring Diagram enclosed with this manual to connect the toggle
switch.
The Toggle Switch DOES NOT Cut The Power Lines To The Chain Disk Motor. Shut OFF The
Circuit Breaker For Servicing And Maintenance.
Alarms
The following table shows the possible alarms conditions. When an alarm occurs, the system
stops operating until the alarm is acknowledged.
Condition
Meaning
Chain Disk is not Runing
The Chain Disk Motor uses less than 0.2 Amps
Current Overload Occured
The Chain Disk Motor’s current consumption exceeded the Max.
Current limit for a time period exceeding the over current delay.
Max Run Time Occured
The Chain Disk’s run time exceeded the Max. run time.
This Alarm can only occur if a proxy switch sensor has been
enabled in the installation setup.
Chain Disk Safety Switch
The chain Disk’s safety switch has been reached.
Trouble Light
It is possible to connect a trouble light to the main controller. This light turns on whenever an
alarm occurs. Refer to the wiring diagram enclosed with this manual to connect the trouble light.
100
PNEG-602 Chain Disk
Chain Disk Controler - APCD-300
Acknowledging an Alarm
1. Use the menu select buttons to select the STATUS menu. The current alarm
acknowledgment menu is displayed.
2. Press MODIFY. The acknowledgment status flashes on the display.
3. Press the up-arrow key to acknowledge the alarm then press MODIFY to validate. The alarm
is now acknowledged.
14.5 Technical Specifications
Type
APCD-295
Main Supply Fuse F1
F 1A, 250V, Fast-blow
Main Supply/Frequency
230 V+10% - 20%, 12A, 50/60Hz
Housing
Plastic Casing
Operating Temperature
0 to 40×C
Storage Temperature
-15 to 50×C
Ambient Relative Humidity
Max95% (non condensing)
Alarm
10mA to 2A, 24 VAC or DC Max
Chain Disk Motor
230 VAC / 2HP Max
Auger Motor
230 VAC / 1HP Max
115 VAC / 1/2 HP Max
Trouble light
500 W Max, 115VAC
Installation Category
Categorie II : Overvoltage Category
Pollution Degree
2
Altitude
Up to 2000 m
The room temperature where the controller is located MUST ALWAYS
REMAIN BETWEEN 32° AND 104°F (0° AND 40°C). For indoor use.
14.6 Memory Card
The memory card is used to create a backup copy of your controller’s configuration. The card is
also useful to transfer the configuration of one controller to another controller of the same type.
The switch at the bottom of the card is used to lock or to unlock the card
( = locked,
= unlocked).
WARNING
Turn off power each time you open the controller’s enclosure. This prevents accidental
exposure to areas of high voltage.
PNEG-602 Chain Disk
101
Chain Disk Controler - APCD-300
To Transfer a Configuration
1. Turn OFF power to the controller.
2. Open the latch and lift the controller’s cover.
3. If you are about to copy the controller’s configuration on the memory card, make sure the
card’s switch is at the unlocked position.
4. Insert the card in the J9 connector located on the electronic board inside the controller.
Components of the memory card must face down as illustrated.
5. Close the cover then reapply power to the controller. The transfer menu should be shown on
screen (if this is not the case, simultaneously press the MENU SELECT up and down arrow
keys for 3 seconds to display this menu).
Memory Card
Card Switch
Connector
J9
Electronic
Board
Figure 14E
6. Use the ADJUSTMENT up and down arrow keys to select the proper type of transfer:
Memory Card
Controller:
To transfer the memory card’s content into the controller, select the “Mem.Card to Control”.
Once it is selected, simultaneously press the ADJUSTMENT up and down arrow keys to start
the transfer.
102
PNEG-602 Chain Disk
Chain Disk Controler - APCD-300
Controller
Memory Card:
To save the controller’s configuration into the memory card, select the “Control to Mem. Card”
menu. Once it is selected, simultaneously press the ADJUSTMENT up and down arrow keys to
start the transfer.
7. Once the transfer is over, simultaneously press and hold the MENU SELECT up and down
arrow keys for 5 seconds to exit the transfer menu, then remove the memory card from the
connector as follows:
- Turn off power to the controller;
- Open the controller’s cover;
- Remove the card from the connector;
- Close the cover then reapply power to the controller.
8. Lock the card’s switch (
) if required.
Transfer Error
WARNING
The controller will not warn you if the transfer is incorrect. Respect the following rules to
make sure the transfer works properly:
Make sure the card switch is at the unlocked position before transferring a configuration
on the card.
Do not move or hold the card while a transfer is ongoing.
PNEG-602 Chain Disk
103
Testing of Controls
15. TESTING OF CONTROLS
WARNING
If a Flex-Flo System is used, turn the toggle switch to the OFF position.
15.1 Limit Switch
With the motor turned on activate the limit switch in one direction (Figure 15A). If the motor does
not stop, refer to the troubleshooting guide. To restart, refer to Section 11.2 on page 53.
Figure 15A Test Limit Switch
104
PNEG-602 Chain Disk
Chain Installation
16. CHAIN INSTALLATION
16.1 Check Drive Sprocket Rotation
Check to make sure the drive sprocket is turning counter clockwise as viewed from inside the
drive unit (Figure 15A). If not, rewire the wire connections to the motor according to the wiring
connection diagram on the motor.
16.2 Direction of Travel
WARNING: The chain and disks must be installed in the right direction! The flat side of the disk
must be the leading side (See Figure 16A). If the chain and disks are installed correctly, the disks
will smoothly release from the drive sprocket after they travel around it and the system will be
more efficient in transporting feed. If the chain and disks are installed incorrectly, the disks will
catch on the drive sprocket during operation causing the system to be “jumpy” and resulting in
excessive wear on the disks.
Figure 16A Chain and Disks with Connector Link
16.3 Pulling Chain Through Tubing
Note: Fish tape required (length must be equal to or longer than the longest section of
glued PVC tubing).
Note: You may want to mark or paint the linked sections, so they can easily be identified
through a clear tube.
1. Start installing chain at one end of the drive unit so after all the chain is installed the final
connection can be made inside the drive unit.
2. At the other end of the first section of tubing start pushing the fish tape through the tube until
it comes out into the drive unit.
3. Connect one end of a section of chain and disks to the fish tape (make sure the chain and
disks are going in the right direction - See Figure 16A).
PNEG-602 Chain Disk
105
Chain Installation
4. Pull the section of chain and disks through the tubing until there is only about 5 feet (1.5 m)
left in the drive unit. If the section of tubing is longer than the chain and disks, use more than
one section of chain and disks and connect them together using a connector link. The plastic
in the end links will need to be drilled out using a 5/16" drill bit , so the connector link will fit
(See Figure 16A).
5. Go to the other end of the next section of tubing and start pushing the fish tape through the
tube until it comes out this end of the tubing.
6. Connect one end of a new section of chain and disks to the fish tape (make sure the chain
and disks are going in the right direction - See Figure 16A).
7. Pull the section of chain and disks through the tubing until there is only about 1 foot (1.5 m)
left hanging out the tube.
8. Connect the two sections of chain and disk together using a connector link (See Figure 16A).
The plastic in the last link will need to be drilled out using a 5/16'' bit so the connector link
will fit.
9. Pull on the chain and disks until the slack is out of the section.
10. Connect the sections of tubing together.
11. Connections of chain and disk can be made at the corners as well.
12. Repeat steps 4 through 10 until all the chain and disks are pulled through the tubing.
16.4 Final Assembly of Corners
Important: Before the final connection of the chain and disks is made in the drive unit the
top on each corner must be replaced. Otherwise, the tension in the chain will warp the
corner housings and make it difficult to replace the tops.
1. Remove the 1/2" locknut and 1/2" neoprene backed flat washer which were placed on the
pivot shaft previously (See Figure 8A).
2. Connect the top to the corner using 5/16 x 1-1/4" bolts and 5/16" nuts. Torque Hex nuts to 5
ft-lbs (DO NOT OVERTIGHTEN!).
3. Replace the 1/2" Neoprene backed flat washer and 1/2" locknut on the pivot shaft. Torque
locknut to 10 ft-lbs (DO NOT OVERTIGHTEN!).
16.5 Wrapping Chain Around Drive Unit Wheels
1. Unhook the spring inside the drive unit (See Figure 16B).
2. Slide the idler wheel until it is as close to the drive sprocket as possible.
3. Wrap one end of the chain and disks around the idler and the other around the drive sprocket
as shown in (See Figure 16B). The fan end of the motor has a shaft extension with flat sides
which can be turned with a 1/2'' wrench to thread the chain and disks around the drive
sprocket. Remove the plastic protector cap to expose the motor shaft extension.
106
PNEG-602 Chain Disk
Chain Installation
4. Cut the two ends of the chain and disks so that the connection can be made in a conventient
location. Drill out plastic to 5/16" Diameter.
5. Connect the ends using a connector link (See Figure 16A).
6. Rehook the spring.
7. Put the drive unit cover on.
Idler Wheel
Connector Link
Drive Sprocket
Chain and Disks
Spring
Figure 16B Drive Unit Chain and Disk Connection
16.6 Chain Take-Up
1. Run the Chain Disk System for 10 - 15 seconds.
2. Disconnect all electrical power.
D
3. Remove drive unit cover.
4. Check to see that the limit switch is in the middle of the switch actuator bracket
(See Figure 15A). In process of breaking in the chain and disks, the chain will lengthen
causing the switch actuator bracket to move to the left eventually hitting the limit switch and
shutting down the system. If the switch actuator bracket has moved to the left or has already
hit the limit switch, links of chain need to be taken out of the system.
Note: Always remove twice as much chain as the idler wheel needs to move. As an
example, if the idler wheel should move 4 inches to the right, remove 8 inches of
chain.
PNEG-602 Chain Disk
107
Chain Installation
5. Unhook the spring inside the drive unit.
6. Slide the idler until it is as close to the drive sprocket as possible.
7. Cut out a section of chain making sure that the connection can be made in a convenient
location. Drill out plastic to 5/16'' diameter.
8. Connect the two ends of chain using a connector link (See Figure 16A).
Note: You may want to mark or paint the linked sections, so they can easily be identified
through a clear tube.
9. Rehook the spring. Reset limit switch. Reset the appropriate chain disk control (Refer to
Section 11.2 on page 53).
10. Replace drive unit cover.
11. Connect all electrical power.
12. Repeat steps 1 - 11 until the limit switch stays approximately 2" from the left limit switch tab
as shown in (Figure 16C) actuator bracket. Increase the time that the system runs each time
these steps are repeated until the system has run for at least 10 minutes.
Left Limit
Switch Tab
2"
Figure 16C Limit Switch Adjustment
108
PNEG-602 Chain Disk
Chain Installation
16.7 Mounting Proximity Switch
1. Mount Proximity Switch to a CLEAR section of tubing located after the last drop tube and
before the drive unit (See Figure 16D).
2. Attach the Proximity Switch Mounting Bracket to the clear tubing using the hose clamps
provided. Adjust the bracket so the proximity switch is mounted at a 45° angle
(See Figure 16D).
45
Figure 16D
3. The Proximity Switch must touch the clear tube. Adjust the top plastic nut until the top of the
switch is touching the tube. Adjust the bottom plastic nut to secure into place
(See Figure 16E).
Indicator
Light
Bottom
Plastic
Nut
Sensitivity
Adjustment
Figure 16E
16.8 Adjusting Sensitivity
1. Turn OFF the flex auger so no feed is being added to the line.
2. Turn chain disk on in Manual Mode and clear all feed from inside of line. You may want to
adjust the Feed Sensor Bypass time to allow the line to run longer during setup.
PNEG-602 Chain Disk
109
Chain Installation
3. If the light is ON when the tube is empty, the switch is to sensitive. You must reduce the
sensing distance by turning the sensitivity screw counter clockwise. To increase the sensing
distance adjust the screw clockwise (See Figure 16E).
4. To set the correct sensitivity, place your index finger on the tubing so it is 1/4" from the top
of the proximity switch. Then turn the sensitivity screw until the indicator light turns on. The
light may be solid or may just blink on when a disk passes by. Either setup is fine.
Note: Make sure that you have your fist closed with only your index finger open. Also,
do not touch the tube with your other hand or leave anything laying over the tube
to interfere with the sensitivity (See Figure 16F & Figure 16G).
1/4''
Figure 16F
Clear Area
Around Tube
Keep Hand
Closed
Figure 16G
5. Reset the Feed Sensor Bypass time if it was changed for setup.
110
PNEG-602 Chain Disk
Maintenance
17. MAINTENANCE
WARNING
Always disconnect power before removing any covers from equipment.
17.1 Chain and Disk Tension
Check the tension in the chain and disk weekly. If the switch actuator bracket is close to the limit
switch (Refer to Section 16.6) on “Chain Take-up”, Steps 2 - 11 on how to remove a section of
chain.
Remember to always remove twice as much chain as the distance the idler wheel needs to move
to the right.
17.2 Gearbox Fluid Level Check
Check the gearbox fluid level monthly. Maintain a level 1" from top, always add a gear lubricant
Mobile SHC 634 (Part No. APCD-286). The Fill plug is at the top of the gearbox. The chain disk
drive unit may have to be lowered a few inches to provide access.
17.3 Bushing Replacement in Idler Wheel
Check nylon bushings (Part No. APCD-007) in main drive idler wheel annually. If bushings show
excessive wear contact manufacturer for replacements. Refer to Parts List later in this manual
for a drawing of this bushing.
Fill Plug
Figure 17A Back of Control Unit
PNEG-602 Chain Disk
111
Maintenance
17.4 Limit Switch Inspection
Check the operation of the limit switch in drive unit monthly.
1. Disconnect power and remove drive unit cover.
2. Activate the limit switch in one direction.
3. Replace cover and turn ON power.
4. Turn the chain disk control to the manual start position. If the chain disk safety switch and
alarm indicator light do not come on; disconnect power, inspect wiring and limit switch, and
replace if necessary. If the alarm indicator light comes on then the switch is working properly.
5. Turn the chain disk control to the manual stop.
6. The chain disk is now ready for normal operation.
112
PNEG-602 Chain Disk
Parts List
18. PARTS LIST
1. Proximity Feed Sensor for Tube
2. Corner Assembly, 90 Degree W/Hardware Package
3. Chain Disk Drive Unit
4. Pneumatic Drop Kit Accessories
5. Fill Hopper Assembly
6. Drop Kit & Pneumatic Drop Kit Chain Disk
7. Proximity Switch
8. Chain Disk Control Unit
PNEG-602 Chain Disk
113
Parts List
1. Proximity Feed Sensor for Tube
114
PNEG-602 Chain Disk
Parts List
Proximity Feed Sensor for Tube
key
Part #
Qty
Description
1
APCD-294
Prox Feed Sensor for Tube 220 V
2
AP-0583
2
Clamp 1 3/4" - 2 3/4" S.S Hose
3
APCD-136
1
Prox Switch Mounting Bracket
4
FLX-4256
1
Proximity Switch N.C. 20-250 VAC
5
FLDX-1172N
2
Proximity Switch Mounting Nut
6
APCD-104
PNEG-602 Chain Disk
Clear PVC tubing 2.00" (51mm) I.D x 2.36" (60 mm) O.D x 10 ft (3 m)
115
Parts List
2. Corner Assembly, 90 Degree W/Hardware Package
FOR RIBBED TUBE
116
PNEG-602 Chain Disk
Parts List
Corner Assembly, 90 Degree w/Hardware Package
Key
Part #
1
APCD-100-4
2
S-7417
Qty
4
APCD-100-4
Description
Corner Assembly, 90 Degree w/Hardware (Box of 4)
Corner Assembly, 90 Degree w/Hardware Package
2
Lock Nut, 1/2-13" Stainless Steel
3
S-8139
2
Flat Washer, 1/2" Stainless Steel
4
APCD-000
1
Corner Top, 90 Degree Corner
5
APCD-009
2
Add on Clamp, 90 Degree Corner
6
APCD-330
2
Bearing, 15 mm I.D x 32 mm O.D x 9 mm width
7
APCD-006
1
Idler Wheel, 90 Degree Corner
8
APCD-327
1
Shaft, 90 Degree Corner
9
APCD-001
1
Corner Bottom, 90 Degree
10
APCD-228
2
Ribbed Tube Adapter for Ribbed Tube Only (Refer Page 127)
11
APCD-104
Clear PVC Tubing, 2.00" (51 mm) I.D x 2.36" (60 mm) O.D x 10 ft (3 m)
APCD-112
White PVC Tubing, 2.00" (51 mm) I.D x 2.36" (60 mm) O.D x 10 ft (3 m)
12
S-8452
16
Hex Nut, 5/16-18" Stainless Steel
13
S-7683
16
Bolt, 5/16-18 x 1 1/4" Stainless Steel
14
S-9379
2
Washer 1/2 SS/NEOP-Bonded Flat
15
APCD-013
1
Chain Disk Corner Wheel Assembly (Including Key Numbers 6, 7, 8)
16
DC-1244
1
Decal, Warning Chain Disk
17
APCD-313
2
Corner Suspension Angle Idler
PNEG-602 Chain Disk
117
Parts List
3. Chain Disk Drive Unit
118
PNEG-602 Chain Disk
Parts List
Chain Drive Unit
Key
Part #
1
APCD-175-150
2
NS
NS
Qty
Description
Chain Disk Drive Unit Model 236, 1 Ph,50 Hz
APCD-175-160
Chain Disk Drive Unit Model 236, 1 Ph,60 Hz
APCD-175-350
Chain Disk Direct Drive Unit Model 236, 3 Ph, 50 Hz & 60 Hz
APCD-234
2
Plate, Gearbox Mounting
S-7413
2
Bolt, 1/2-13 x 1 S.S
S-7417
4
Nut Nylock 1/2-13 S.S
3
APCD-174A
1
Trough Assembly D.D Chain Disk
4
APCD-181
1
Electrical Box Drilled
S-6732
3
Screw # 10-24 x 1/2" Truss S.S
NS
NS
S-7931
3
Nut # 10-24 S.S
APCD-138
1
Bracket, Terminal Block Mounting
NS
DC-1374
1
Decal Terminal Block Label
NS
S-8823
1
Screw TCS23 #8-32 x 3/8 HWHS GRN
E240-1107
1
Terminal Block 12 Connector (Cut Off 3 Terminals to Make 9)
S-7663
2
Screw MS # 6-32 x 3/4 PHP S.S
NS
APCD-089
2
Wire, 18 GA BLK x 8'' with Terminal
7
FLX-4561
1
Electrical Box Gasket 4 x 6
8
FLX-4560
1
Electrical Box Lid 4 x 6
S-8766
4
Screw # 10-24 x 1 1/4" PHP S.S
NS
S-7931
4
Nut # 10-24 S.S
9
20-5060
1
Switch SPST 15 A On/Off Toggle
5
6
NS
NS
NS
S-6622
1
Plate On/Off/ Back
NS
DC-889
1
DECAL Danger High Voltage
10
70-0129
1
Boot Switch Weatherproof
11
S-7604
1
Light, 250 V Sealed Red Pilot
12
APCD-014
1
Sprocket, Drive Chain Disk
13
S-7991
2
Washer, 11/32 I.D. S.S Fender
14
S-7821
2
Bolt 5/6-18 x 3/4 S.S
15
APCD-169
1
Bracket, Limit Switch Chain Disk
NS
S-7821
2
Bolt 5/6-18 x 3/4 S.S
NS
S-7356
2
Nut Nylock 5/16-18 S.S
16
APCD-352
1
Cord, Limit Switch Chain Disk
17
APCD-155
1
Limit Switch Chain Disk Drive Unit
NS
S-8766
2
Screw # 10-24 x 1-1/4 PHP S.S
NS
S-7931
2
Nut # 10-24 x S.S
18
APCD-173
1
Rod Assembly D.D. Idler Slide
19
APCD-168
1
Actuator, Right D.D Chain Disk
NS
S-7344
2
Bolt 5/16-18 x 3/4 S.S
NS
S-7356
2
Nut Nylock 5/16-18 S.S
APCD-244-150
1
Gear-Motor Chain Disk 1 Ph, 50 Hz (Includes Key Numbers 2, 12, 13, 14, 20, 21, 22, 46)
APCD-244-160
1
Gear-Motor Chain Disk 1 Ph, 60 Hz (Includes Key Numbers 2, 12, 13, 14, 20, 21, 22, 46)
APCD-244-350
1
Gear-Motor Chain Disk 3 Ph, 50/60 Hz (Includes Key Numbers 2, 12, 13, 14, 20, 21, 22, 46)
PNEG-602 Chain Disk
119
Parts List
3. Chain Disk Drive Unit
Fig. 18-C Chain Disk Drive Unit
120
PNEG-602 Chain Disk
Parts List
Chain Drive Unit
Key
Part #
Qty
Description
20
APCD-241
1
Gearbox Electra 40:1, 56C Face, Right Angle
21
APCD-351
1
Cord 1 Ph Chain Disk Motor
APCD-246-3 Ph
1
Cord 3 Ph Chain Disk Motor
22
07100051
1
Motor, 2 HP, 1 Ph, 230 VAC, 1725 RPM, 60 Hz
07100051-150
1
Motor 2 HP, 1 Ph, 230 VAC, 1425 RPM, 50 Hz
07100051-350
1
Motor, 2 HP, 3 Ph, 230/380 VAC, 1425/1725 RPM, 50/60 Hz
23
APCD-055
4
Eyebolt, 5/16 LAG x 4
NS
FLX-2377
1
Key 3/16 x 3/16 x 1" Sq.GR2 (For Motor)
NS
S-7104
4
Bolt 3/8-16 x 1 S.S (Motor to Gearbox)
NS
S-8403
4
Bolt, Metric M10 x 1.5 x 20 S.S (Mounting Plate to Gearbox)
24
HT-1414
2
Chain 3/16" Grade 30 (10 ft)
25
APCD-025
2
Angle, Drive Unit Suspension
26
APCD-114
Suspension Kit for Drive Unit (Includes Key Numbers 23-25)
APCD-102-20
Bag of Chain with Disks (Includes 20 Ft of Key #26)
APCD-102-50
Bag of Chain with Disks (Includes 50 Ft of Key #26)
APCD-102-100
Bag of Chain with Disks (Includes 100 Ft of Key #26)
APCD-102-150
Bag of Chain with Disks (Includes 150 Ft of Key #26)
APCD-103
Bag of Connector Links (Includes 12 of Key #27)
27
S-7977
Chain Connector Link
28
S-7998
2
Nut 5/8-11 S.S Hex Jam
29
S-7999
3
Washer Flat .641 x 1.187 x 0.62 S.S
30
APCD-007
2
Bushing, Main Drive Idler
31
APCD-010
1
Wheel, Main Drive Idler
32
APCD-154
1
Shaft, Drive Unit Idler Wheel
33
APCD-167
1
Actuator, Left D.D. Chain Disk
34
S-8184
1
Knob, Bar 2 1/4" Dia. 5/16
35
S-7008
2
Nut 5/16 x 18 S.S.
36
S-8724
1
Washer, 5/16 x 1 1/2 S.S Flat
37
S-8191
1
Eyebolt, 5/16-18 x 2-1/4 S.S
38
APCD-043
1
Spring, 18.5'', 1.1'' Dia. S.S
39
APCD-293
1
Door, Direct Drive Chain Disk
40
S-8006
3
Knob, 1/4-20 x 1/2 S.S Stud
41
DC-1709
1
Decal Logo Chain Disk
42
DC-490
1
DECAL,3" Automated Production
43
DC-996
1
DECAL Warning! Chain Sprocket
44
DC-997
1
DECAL Danger! Chain Sprocket
45
PR-331
1
Peak Cap Handle
S-3611
1
Nut Flanges 5/16-18 YDP GR2
S-6606
1
Bolt Flanges 5/16-18 x 3/4 Zinc Grade
NS
S-8045
2
#10 x 3/4" Self Drilling Screw
46
APCD-233
1
Shaft, Chain Disk Gearbox Output
NS
D31-0137
2
Key, 3/8 x 3/8 x 2-1/2
NS
DC-889
1
DECAL, Danger High Voltage
47
DC-1307
1
Decal, Mfg Label 1 Ph, 60 Hz, CD
DC-1308
1
Decal, Mfg Lable 3 Ph, 60 Hz, CD
DC-1308A
1
Decal, Mfg Lable 3 Ph, 50 Hz, CD
PNEG-602 Chain Disk
121
Parts List
4. Pneumatic Drop Kit Accessories
122
PNEG-602 Chain Disk
Parts List
Pneumatic Drop Kit and Accessories
Key
1
Part #
Description
APCD-120
12 V DC Solenoid Valve
APCD-122
24 V DC Solenoid Valve
APCD-123
110 V AC Solenoid Valve
2
APCD-133
Adapter fitting- 1/8" NPT Male x 1/4" Tube Stem
3
APCD-128
Flow control Valve - 1/8" NPT Female (Brass)
4
APCD-134
Straight fitting - 1/8" NPT Male x 1/4" Tube
5
APCD-124T
1/4" O.D. Polyenthylene Tubing (500 Ft. roll) Twin
6
AP-2712
“T” fitting-1/8" NPT Male x 1/4" Tube x 1/4" Tube
7
AP-2713
90 Degree Elbow Fitting - 1/8" NPT Male x 1/4" Tube
8
APCD-119
Pneumatic Drop Kit, Chain disk
9
AP-2588
Shut off Valve - 1/8" NPT Female x 1/8" NPT Female (Brass)
10
APCD-135
90 Degree Elbow Fitting 1/8" NPT Male x 1/8" NPT Male (Brass)
PNEG-602 Chain Disk
123
Parts List
5. Fill Hopper Assembly
124
PNEG-602 Chain Disk
Parts List
Fill Hopper Assembly
Key
1
Part #
Qty
APCD-279
Description
Fill Hopper Assembly - Chain Disk
2
FLX-3486
4
Washer, Power Head Drop
3
S-7621
4
Screw, # 10 x 1" Self Drilling
4
AP-1003
1
Grommet, 36.5 x 2 mm Groove (Use with Proximity Switch)
5
AP-2983
1
Universal Proximity Switch Feed Sensor
5
AP-1001
1
110 V Proximity Switch, N.O. or N.C. 1 second - 5 minutes time delay (optional)
6
S-7906
1
1/2" Cord Connector
7
FLX-4496
1
220-300-350 Control Unit (220 V Coil)
FLX-4520
1
220-300-350 Control Unit (110 V Coil)
8
AP-1770
1
220-300-350 Control Unit (220 V Coil) w/proximity Switch
APCD-275
1
Chain Disk Fill Hopper
9
S-8004
2
U-bolt 5/16 - 18 x 2 1/2" with Saddle
10
APCD-105
2
Coupler, 2.63" (67 mm) O.D. x 2.38" (60.5 mm) I.D. Clear PVC
APCD-113
2
Coupler, 2.63" (67 mm) O.D. x 2.38" (60.5 mm) I.D. White PVC
11
APCD-228
2
Ribbed Tube Adapter for Ribbed Tube (Refer Page 126) Only
12
APCD-104
Clear PVC tubing, 2.00" (51 mm) I.D. x 2.36" (60 mm) O.D. x 10 ft (3 m)
12
APCD-112
White PVC tubing, 2.00" (51 mm) I.D. x 2.36" (60 mm) O.D. x 10 ft (3 m)
13
APCD-281
1
Hopper Screen Weld Assy.
14
APCD-276
1
Outer Access Door CTR.Hopper
NS
S-3558
2
3/8" (.434) STL Back NEO Washer
Ref Only
Ribbed Tube (Refer Page 126)
NS
S-4490
2
2 1/4" Tube Clamp. (For Ribbed Tube Only)
15
DC-1107
1
2 1/2" AP Logo for Basket Fans
NS
S-4301
2
5/16-18 Wing Nut, GRD. 2, Zinc
PNEG-602 Chain Disk
125
Parts List
6. Drop Kit & Pneumatic Drop Kit Chain Disk
126
PNEG-602 Chain Disk
Parts List
Drop Kit & Pneumatic Drop Kit Chain Disk
Key
Part #
Qty
Description
1
APCD-109
Drop Kit, Chain Disk (Single)
APCD-110
Drop Kit, Chain Disk (Box of 10)
2
APCD-119
Pneumatic Drop Kit, Chain Disk
3
APCD-104
Clear PVC Tubing, 2.00" (51 mm) I.D. x 2.36'' (60 mm) O.D. x 10 ft (3 m)
APCD-112
White PVC Tubing, 2.00'' (51 mm) I.D. x 2.36'' (60 mm) O.D. x 10 ft (3 m)
APCD-248H
Ribbed Tube Coupler 15'' Long with Drop Out Hole
APCD-251
2'' x 48'' No Holes
APCD-285
2'' x 62'' No Holes
APCD-238
2'' x 111'' No Holes
APCD-250
2'' x 144'' No Holes
APCD-314
2'' x 120'' 60'' Spacing, 2 Holes
APCD-356
2'' x 120'' 120'' Spacing, 1 Hole
APCD-307
2'' x 132'' 66'' Spacing, 2 Holes
APCD-237
2'' x 132'' 22'' Spacing, 6 Holes
APCD-236
2'' x 138'' 23'' Spacing, 6 Holes
APCD-296
2'' x 140'' 20'' Spacing, 7 Holes
APCD-235
2'' x 144'' 24'' Spacing, 6 Holes
APCD-252
2'' x 144'' 48'' Spacing, 3 Holes
APCD-380
2'' x 130'' 26'' Spacing, 5 Holes
3a
APCD-3202
4
APCD-058
Feeder Adapter For Ribbed Tube
5
AP-0583
2
Stainless Steel Hose Clamp, 1 3/4'' (44 mm) - 2 3/4'' (70 mm)
6
APCD-059
1
Housing, Chain Disk Drop Kit
1
Slide, Chain Disk Drop Kit
7
S-8120
2
Nut, 3/8-24 UNF Hex S.S. Jam
8
APCD-088
1
Rack, Drop kit Actuator
9
APCD-121
1
Cylinder, 1-1/4" x 3" Double Acting
PNEG-602 Chain Disk
127
Parts List
7. Proximity Switch
128
PNEG-602 Chain Disk
Parts List
Proximity Switch
Key
Part #
Qty
1
Description
1
FLX-2425
2
FLXDF-1172
1
Proximity Switch, normally Closed, 20 V DC - 250 V AC
3
S-7906
1
1/2" Cord Connector
4
FLDX-1172N
2
Proximity Switch Mounting Nut
PNEG-602 Chain Disk
Drop Tube, 3.00'' I.D. x 3.188" O.D. x 12 Ft
129
Parts List
8. Chain Disk Control Unit
2
3
4
1
6
7
5
8
10
11
9
130
12
PNEG-602 Chain Disk
Parts List
Chain Disk control Unit
Key
Part #
Description
1
APCD-295
Chain Disk Auto Drop Feed Master Control
2
APCD-295B
Bottom Board for APCD-295
3
E260-1036
Relay for APCD-295
4
APCD-295T
Top Board for APCD-295
5
APCD-295-S
Chain Disk Slave Control
6
APCD-295B-S
Bottom Board for APCD-295-S
7
E260-1036
Relay for APCD-295-S
8
APCD-295T-S
Top Board (Slave) for APCD-295-S
9
APCD-300
Chain Disk Continuous Feed Control
10
APCD-300B
Bottom Board for APCD-300
11
E260-1036
Relay for APCD-300
12
APCD-300T
Top Board for APCD-300
PNEG-602 Chain Disk
131
Troubleshooting
19. TROUBLESHOOTING
Problem
Possible Cause
No power to system
Check circuits, fuses, and ON-OFF
switches on equipment.
Limit switch activated in drive unit.
Refer to limit switch Section 11.2.
Motor thermal overload switch
activated.
Refer to motor overload problem later in
this guide.
Low voltage (motor runs slow and
overheats).
Check line voltage at motor; use adequate
wire size in circuits.
Foreign object caught in chain.
Check system for any foreign objects and
remove them.
Chain Disk System to full with feed.
Check Flex Flo Fill System rate; check
feed sensing switch; check current sensor
setting.
Wet feed being conveyed or allowed to
stand in system.
Clean your system; avoid conveying wet
feed or empty line after each feeding.
Defective motor.
Replace motor.
Chain in system not tight enough.
Take out a section of chain referring to
Section 16.6; push reset button.
Chain has broken somewhere in
system.
Find where chain has broken and fix using
special connector link; reset limit switch
and then push control unit reset button.
Foreign object in system.
Check system for any foreign objects and
remove them; reset limit switch and then
push the control unit reset button.
Chain Disk System to full with feed.
Check Flex Flo Fill System rate; check
feed sensing switch; reset limit switch and
then push control unit reset button.
Polypropylene disks
catch on main drive
sprocket.
Chain installed in the wrong direction.
Refer to Section 16.2 on chain installation.
Gearbox overheating.
Low fluid level.
Add fluid refer to Section 17.2.
Chain disk motor does
not shut OFF when full.
Proximity switch sensitivity impropely
adjusted.
Refer to Section 16.7 for proper proximity
switch adjustment.
Chain disk motor
always shut OFF
immediately after prox
by-pass time.
Proximity switch sensitivity improperly
adjusted.
Refer to Section 16.7 for proper proximity
switch adjustment.
Chain Disk motor will not
run.
Motor overloads after
running briefly.
Limit switch activated.
132
Corrective Action
PNEG-602 Chain Disk
Limited Warranty
The GSI Group, LLC. (“GSI”) warrants products which it manufactures to be free of defects in materials
and workmanship under normal usage and conditions for a period of 12 months after sale to the original
end-user or if a foreign sale, 14 months from arrival at port of discharge, whichever is earlier. The enduser’s sole remedy (and GSI’s only obligation) is to repair or replace, at GSI’s option and expense,
products that in GSI’s judgment, contain a material defect in materials or workmanship. Expenses
incurred by or on behalf of the end-user without prior written authorization from the GSI Warranty Group
shall be the sole responsibility of the end-user.
Warranty Extensions: The Limited Warranty period is extended for the following products:
AP Fans and
Flooring
Cumberland
Feeding/Watering
Systems
Grain Systems
Grain Systems
Farm Fans
Zimmerman
Product
Performer Series Direct Drive
Fan Motor
All Fiberglass Housings
All Fiberglass Propellers
Feeder System Pan Assemblies
Feed Tubes (1.75" & 2.00")
Centerless Augers
Watering Nipples
Grain Bin Structural Design
Portable & Tower Dryers
Portable & Tower Dryer Frames
and Internal Infrastructure †
Warranty Period
3 Years
Lifetime
Lifetime
5 Years **
10 Years *
10 Years *
10 Years *
5 Years
2 Years
5 Years
* Warranty prorated from list price:
0 to 3 years – no cost to end-user
3 to 5 years – end-user pays 25%
5 to 7 years – end-user pays 50%
7 to 10 years – end user pays 75%
** Warranty prorated from list price:
0 to 3 years – no cost to end-user
3 to 5 years – end-user pays 50%
† Motors, burner components and
moving parts not included. Portable
Dryer screens included. Tower Dryer
screens not included.
GSI further warrants that the portable and tower dryer frame and basket, excluding all auger and auger
drive components, shall be free from defects in materials for a period of time beginning on the twelfth (12th)
month from the date of purchase and continuing until the sixtieth (60th) month from the date of purchase
(extended warranty period). During the extended warranty period, GSI will replace the frame or basket
components that prove to be defective under normal conditions of use without charge, excluding the labor,
transportation, and/or shipping costs incurred in the performance of this extended warranty.
Conditions and Limitations:
THERE ARE NO WARRANTIES THAT EXTEND BEYOND THE LIMITED WARRANTY DESCRIPTION
SET FORTH ABOVE. SPECIFICALLY, GSI MAKES NO FURTHER WARRANTY OF ANY KIND,
EXPRESS OR IMPLIED, INCLUDING, WITHOUT LIMITATION, WARRANTIES OF MERCHANTABILITY
OR FITNESS FOR A PARTICULAR PURPOSE OR USE IN CONNECTION WITH: (i) PRODUCT
MANUFACTURED OR SOLD BY GSI OR (ii) ANY ADVICE, INSTRUCTION, RECOMMENDATION OR
SUGGESTION PROVIDED BY AN AGENT, REPRESENTATIVE OR EMPLOYEE OF GSI REGARDING
OR RELATED TO THE CONFIGURATION, INSTALLATION, LAYOUT, SUITABILITY FOR A PARTICULAR
PURPOSE, OR DESIGN OF SUCH PRODUCTS.
GSI shall not be liable for any direct, indirect, incidental or consequential damages, including, without
limitation, loss of anticipated profits or benefits. The sole and exclusive remedy is set forth in the Limited
Warranty, which shall not exceed the amount paid for the product purchased. This warranty is not
transferable and applies only to the original end-user. GSI shall have no obligation or responsibility for any
representations or warranties made by or on behalf of any dealer, agent or distributor.
GSI assumes no responsibility for claims resulting from construction defects or unauthorized modifications
to products which it manufactured. Modifications to products not specifically delineated in the manual
accompanying the equipment at initial sale will void the Limited Warranty.
This Limited Warranty shall not extend to products or parts which have been damaged by negligent use,
misuse, alteration, accident or which have been improperly/inadequately maintained. This Limited Warranty
extends solely to products manufactured by GSI.
Prior to installation, the end-user has the responsibility to comply with federal, state and local codes which
apply to the location and installation of products manufactured or sold by GSI.
9101239_1_CR_rev7.DOC
(revised July 2009)
This Equipment Shall Be Installed In Accordance With The Current
Installation Codes And Applicable Regulations Which Should Be
Carefully Followed In All Cases. Authorities Having Jurisdiction
Should Be Consulted Before Installations Are Made.
The GSI Group, Inc.
1004 E. Illinois St.
Assumption, IL 62510-0020
Phone: 1-217-226-4421
Fax: 1-217-226-4420
Internet: http://www.grainsystems.com
Copyright © 2008 by The GSI Group
Printed in the USA