1
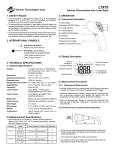
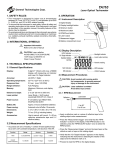
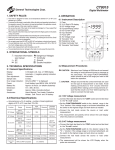
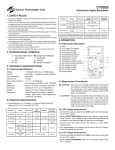
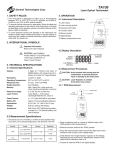
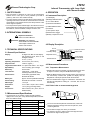
LTX12
General Technologies Corp.
1. SAFETY RULES
• This Instrument is designed for indoor use at temperatures
between 32°F to 122°F (0°C to 50°C), altitudes up to 6500 ft.
(2,000 m), and 10% to 90% relative humidity.
• To ensure that the instrument is used safely, follow all safety and
operating instructions in this manual. If the instrument is not used
as described in this operation manual, the safety features of this
device might be impaired.
• To avoid personal injuries and damage to the instrument use extreme caution when working around hot machine or engine parts,
like radiators, exhaust manifolds, catalytic converters, etc. 2. INTERNATIONAL SYMBOLS
!
4.1 Instrument Description
1) LCD Display
2) Backlight ON/OFF Button
3) °C/°F Select Button
5) LASER ON/OFF Button
6) IR Sensor
3.1 General Specifications
Display: Temperature readout
3½ digits LCD, Max. of 1999 display
with measuring units, laser on and
backlight indicators.
0.1 to 1 (°C or°F)
Resolution:
Operating Temperature: 32°F to 122°F (0°C to 50°C)
<500 ms (approx.)
Response time:
Target Size/ Field of View: 10:1 optics ratio with a 1” min. target
0.5% of reading, plus one digit
Repeatability:
Fixed at 0.95
Emissivity:
Laser Diode, < 1mW output
Laser Pointer:
wavelength 630-670 nm, Class II
Power Source:
9-volt battery type NEDA 1604,
IEC6F22 IEC 6LR61
Battery life:
Power Saving:
Approx. 20 hours (w/alkaline batteries)
Automatic shut off after 7 seconds
Wavelength:
Dimensions:
Weight:
7 to 14 µm
3.13”x 1.88”x 7.0” (80 x 48 x 178 mm)
7.6 oz. (215 g) including battery.
Accessories:
User’s manual, soft pouch, and 9 V
alkaline battery
3.2 Measurement Specifications
• Accuracies are ±(% of reading + number of least significant
digits) at 23°C ±3°C (73°F ± 6°F) ambient temperature, with less
than 75% relative humidity.
Temperature
ºC
Temperature
ºF
Accuracy (whichever is greater of)
± 2°C
0°C to 199.9 ºC
1°C or 1.5%+2 (whichever is greater)
200°C to 650°C
2.0% + 2
-22°F to 32°F
± 4°F
-32°F to 199.9 °F
2°F or 1.5%+4 (whichever is greater)
200°F to 1200°F
2.0% + 2
8
9
4.2 Display Description
Laser on
Backlight on
Low battery warning
Range
7
1
2
3
4
5
9) Battery compartment cover
Important information
Refer to the User’s Manual
-30°C to 0°C
IR
7) Laser pointer output
3. TECHNICAL SPECIFICATIONS
Function
MEASURE
6
4) ThermoSounder Button
8) Measurement Trigger
CAUTION: Laser Radiation
AVOID DIRECT EYE EXPOSURE
1mW Output at 630-670 nm
Class II Laser Product
Infrared Thermometer with Laser Sight
with ThermoSounder
4. OPERATION
ThermoSounder on
MEASURE HOLD
Continuous measure
Display on hold
°F scale selected
°C scale selected
Measuring mode
IR
4.3 Measurement Procedures
4.3.1 Temperature Measurement
• Hold the instrument by its handle, point the IR Sensor at the area
or object to measure, and press the Measurement Trigger.
• While the Measurement Trigger is kept pressed, the instrument
will continuously measure and update the display with the
temperature of the object pointed at with the IR Sensor.
• After the Measurement Trigger is released the instrument will
hold the last temperature reading for 7 seconds, then shut off
automatically.
4.3.2 Field of view or measurement target area
Spot
(D/10)
D
Resolution
0.1°C
1°C
0.1°F
1°F
• To ensure accurate temperature measurements, make sure
that the target object is larger than the unit spot size, at the
measuring distance.
• The smaller the target, the closer you should be.
• For maximum accuracy, make sure that the target area is at
least twice as large as the spot size.
4.3.3 Selecting Temperature Units (°C/°F).
• Make sure the instrument is turned ON, if not press the
Measurement Trigger.
• Pressing the “°C /°F” button will switch between Celsius and
Fahrenheit Degrees as the temperature measurement units.
temperature reading and selected measurement units will be
The
•
displayed on the LCD.
5. MAINTENANCE
5.1 Battery Replacement
•When the battery is low and needs to be replaced, the “Low Battery Warning” symbol will appear on the lower left hand side of the
display.
4.4 ThermoSounder
4.4.1 Introduction
The ThermoSounder is a feature of your LTX12 that facilitates finding
temperature variations or differentials (e.g. cold and hot spots)
quickly and easily by providing a sound that varies proportionally to
temperature differences.
Pull to open
battery cover
4.4.2 Activating the ThermoSounder function
• Make sure the instrument is turned ON, if not press the
Measurement Trigger.
Pressing
the “ ” button will turn on and off the ThermoSounder
•
function.
• The ThermoSounder indicator will display on the LCD when
activated.
4.4.3 Using the ThermoSounder function
• Activate the ThermoSounder function as described in 4.4.2.
• Point at the area or object whose temperature you want to use as
reference and press the Measurement Trigger.
• The LTX12 will use the reference temperature to generate a
‘reference’ beeping.
temperatures (than the reference) will be indicated by a
Higher
•
faster pace of beeping, the more the difference the faster the
pace of the beeping (i.e. pace is proportional to the temperature
difference).
• Lower temperatures (than the reference) will be indicated by a
slower pace of beeping, the more the difference the lower the
pace of beeping (i.e. pace is proportional to the temperature
difference).
• The reference temperature for the ThermoSounder will be
maintained as long the Measurement Trigger is pressed.
• To choose a new reference temperature release the Measurement
Trigger, then point at the area or object with the new temperature
you want to use as reference and press the Measurement
Trigger.
4.5 Other Functions
4.5.1 Display Hold
•The instrument will automatically hold the last temperature
reading after the Measurement Trigger has been released for
approximately 7 seconds.
4.5.2 Display Backlight
Battery
•To replace the battery, open the battery compartment cover
(located at the front of the handle) by pulling on the finger indents
near the trigger, and remove the battery.
•Replace with a new 9 V alkaline battery type NEDA 1604 or
IEC6F22 observing the proper polarity when connecting to the
battery terminals.
•Close the battery cover.
5.2 Cleaning
5.2.1 Lens cleaning
Debris or dirt on the lens may cause obstruction and reduce the
accuracy of the thermometer. If this occurs, either wipe the lens
with a Q-tip (moistened with water only) or blow the loose particles
off with clean compressed air. Do not use solvent on the lenses, as
it may damage the instrument.
5.2.2 Exterior cleaning
Periodically wipe the case with a soft damp cloth and mild household cleanser. Do not use abrasives or solvents. Ensure that no
water gets inside the instrument to prevent possible short circuits
and damage.
6. WARRANTY
One year limited warranty, excluding batteries and fuses. For
details see Standard Warranty Information on our web page or you
may request a printed copy.
• Make sure the instrument is turned ON, if it is not, press the
Measurement Trigger.
Pressing
the Backlight ON/OFF Button, will turn the display
•
backlight ON or OFF.
• When the backlight is not needed, turn it off to prolong battery
life.
4.5.3 Laser Pointer
!
CAUTION:Laser Radiation is emitted
Avoid direct eye contact
• To turn the laser sight ON or OFF, press the “LASER” button,
when the unit is ON. The laser sight indicator will appear on the
display when the laser sight function is ON.
General Technologies Corp.
#121 - 7350 72nd Street
Delta, BC Canada V4G 1H9
Tel.: (604) 952-6699
Fax: (604) 952-6690
www.gtc.ca
© Copyright 2008 General Technologies