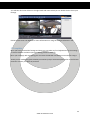
1
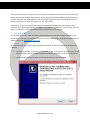
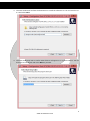
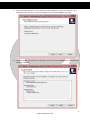
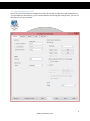
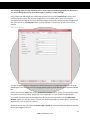
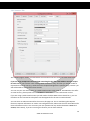
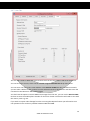
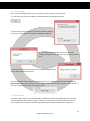
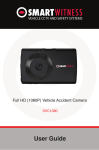
3G/4G Instant Video Transmission Vehicle Accident Camera KP1 KP1 SD Card Quick Start Guide Contents 1. Configuration Tool .............................................................................................................................. 3 1.1. Install ............................................................................................................................................ 3 1.2. Open Configuration Tool.............................................................................................................. 6 1.3. Initialise SD Card .......................................................................................................................... 7 1.4. Settings Configuration ................................................................................................................. 8 1.4.1. Device Tab ............................................................................................................................. 9 1.4.2. Record Tab .......................................................................................................................... 10 1.4.3. Event Tab ............................................................................................................................ 11 1.4.4. Info Tab ............................................................................................................................... 12 1.4.5. 3G/LTE Tab .......................................................................................................................... 13 1.4.6. Account Tab ........................................................................................................................ 14 1.4.7. User Tab .............................................................................................................................. 15 1.5. Save settings .............................................................................................................................. 17 1.6. Second Card ............................................................................................................................... 17 2. KP1 Unit............................................................................................................................................. 18 2.1. Insert SD Card............................................................................................................................. 18 2.2. Test............................................................................................................................................. 18 2.3. Check Footage ............................................................................................................................ 19 2.3.1. Install Analysis Software ..................................................................................................... 19 2.3.2. View Footage ...................................................................................................................... 21 3. Complete ........................................................................................................................................... 22 4. Appendix ........................................................................................................................................... 23 4.1. APNs ........................................................................................................................................... 23 4.2. SMS Center Numbers ................................................................................................................. 24 4.3. SMTP Email Settings................................................................................................................... 25 2 www.smartwitness.com This guide will take you through the steps necessary to initialise your SD card for use in the KP1 unit. Please note that the settings displayed here are our basic recommended default settings and are to be used as a guide. We recommend to read the full user manual for more in depth detail on each setting so that you can customise the unit for your own needs. This guide is correct at the time of print; it will be updated accordingly for future releases. Please note that some options and features are subject to change and should only serve as a quick reference guide. It is advised to check with your provider to confirm the correct settings. 1. Configuration Tool The Configuration Tool is used to initialise the SD card(s) and to edit the settings for the KP1 unit. Please ensure that you are using the latest version of the software, this can be downloaded from the support section at www.smartwitness.com. 1.1. Install Once downloaded you will then need to install the software. Please note that this is Windows only software. 1. The downloaded file will come in a compressed ZIP file. To install you can simply open up the ZIP file and then double click the setup.exe executable file within to start the install process. 2. The Setup Wizard will then begin, on the first window you can select Next. 3 www.smartwitness.com 3. The next window will confirm the destination to install the software to. You can leave this as it is and select Next. 4. The next window will ask to confirm what folder it will appear as in your Start Menu. You can leave this as the default and select Next to proceed. 4 www.smartwitness.com 5. The next window will give you the option to create a desktop icon for the software. If you would like to do this you can tick the checkbox. You can click on Next to proceed. 6. The final window will confirm your settings. You can click on the Install button to finalise and install the software. 5 www.smartwitness.com 1.2. Open Configuration Tool Now that you have installed the Configuration Tool you can open it, either from the Programs list in your Start Menu or alternatively, if you created a desktop icon during the install process, you can run the shortcut from your desktop. 6 www.smartwitness.com 1.3. Initialise SD Card The first step to preparing your SD card(s) for use is to initialise it. This will format the card and put configuration files on that will allow the KP1 unit to use it and read information from it. 1. First, insert your SD card into your PC or Laptop. If you have an SD card reader in your computer you can use this otherwise you will need a USB SD card reader. 2. Once done click the Initialise SD Card button in the bottom left hand corner of the Configuration Tool. 3. You will then need to select the drive for your SD card. Once selected press the OK button 4. Once selected you will be given options to format the SD card. It is advisable to select Quick Format. You will also need to select Master SD Card, if you are using a second SD card with your unit you would need to un-tick this option when initialising the card, this will be covered at a later stage in this guide. You can also select to copy the installation files for the Analysis software and Configuration Tool to the SD if you wish; this is optional although it is recommended. Once done click the Start button to begin the format. 7 www.smartwitness.com 5. With Quick Format selected the process should only take a few seconds. Once complete you will receive a message to say that the card has been initialised. Please note: If formatting the card fails please check your Antivirus settings. If it will still not format after this please check with your place of purchase or direct with Smart Witness. 1.4. Settings Configuration Now that the SD card has been initialised you can then start applying the settings to configure your unit. You can use the following settings as a basic set up for your unit, however, it is advised that you read through the full breakdown of each of these settings in the User Manual to get the most from your unit. Please use the images on the next few pages to copy these settings from, additional information will also be provided below these images to further advise you. 8 www.smartwitness.com 1.4.1. Device Tab The first page to configure is the Device settings, in most cases this can be left with the default values but you can change this if desired. If you are using a second camera with your KP1 unit you will need to tick the “2nd Camera” checkbox to enable this camera, please confirm if this is a PAL or NTSC camera. If you are planning to record in event mode you can use the Simple Setting Mode to adjust the sensitivity levels of the G-Sensors so that you only receive alerts for the incidents you wish (e.g. sharp braking or turning). Once you have completed this guide it is advisable to go on a test drive with the unit in your vehicle to ensure that the sensitivity level is not set too high or low. 9 www.smartwitness.com 1.4.2. Record Tab You can use the settings under the Record tab to alter how the unit records and at what quality. Depending on the size of your SD card you may wish to use a slightly lower quality or frame rate to increase the amount of footage you can fit onto your SD card. You can use the Resolution, FPS and Quality settings to adjust this. Please see the User Manual for more information on these settings as well as a recording time table to give you an idea of what recording times to expect from the settings. You have 3 options for the Recording Mode Continuous: Constant recording the whole time the unit is powered. Event: Only records when triggered, i.e. from a G-Sensor shock, Alarm or Panic Button press. Continuous + Event: Constant recording at 1 FPS until an Event and then it will record at the full frame rate. 10 www.smartwitness.com 1.4.3. Event Tab If you have selected Event recording you can use this page to select what events will trigger the unit to record. The checkboxes under Record CH represents the camera channels; the left hand box being the main camera built into the unit and the right hand box being the second camera. If you have enabled the second camera you can set this to record on an event if you wish. You can also set two GPS speed limit alerts here, you can set the limits to any value you wish. If you are planning on using a 3G dongle with the unit you can set the unit to email or text you when these limits are exceeded, this will be covered in later steps of this guide. 11 www.smartwitness.com 1.4.4. Info Tab The information tab can be generally left at its default settings however you may wish to enter your vehicles registration plate details into the Vehicle ID section. If you are planning to use a 3G dongle with the unit then this step is mandatory. There are also blank fields at the bottom of this page that you can use to fill in any additional information that you wish to store on the card such as driver contact details or policy details. 12 www.smartwitness.com The following steps are only needed if you are using a 3G or 4G USB dongle with your KP1 unit. If you are not doing this you can proceed to page 17, section 1.5. Save Settings. Using a 3G or 4G USB dongle with a SIM card will allow you to receive email alerts from the unit based on certain events. You can also configure the unit to allow you to email it and request information and footage as well as to remotely configure the unit by sending it a new configuration file. This is known as the Request feature, you can find more information on this in the full user manual. 1.4.5. 3G/LTE Tab The 3G/LTE page is used to configure the network settings for your SIM card used in the 3G or 4G USB dongle. If you are using your own dongle please speak to Smart Witness for a supported model list. Please note that the APN shown is only an example, you will need to contact your network provider to get the correct information. Please also see the Appendix for a list of common APN details. If you wish to receive SMS text messages from the unit you will also need to set the SMS Center Number. Again, you will also need to contact your network provider for this but please also see the Appendix for a list of common numbers. You must ensure that you select the Service Type as Email, once this has been set the next two tabs for you to configure will show. 13 www.smartwitness.com 1.4.6. Account Tab The Account page is used to provide details of an email account for the KP1 to send emails from. If you are using multiple KP1 units with 3G or 4G dongles then this email address must be unique for each unit. If you have the same sending email account on every unit then you will be unable to request data from the unit (e.g. email the unit to request footage from a specific time), however you will still be able to receive alerts from the unit. You can use your own email server or a public email account such as Gmail. SmartWitness also offer an email service, please speak to the SmartWitness sales team for more information on this. If you are using a public email account you will need to find the SMTP server details for it, you can find these on the internet but also please see the Appendix for the most common details. You can enter an Admin Password for the unit on this page too. This is used during the Request feature to request information or send a new configuration file. Please see the main User Manual for more information on this. You can enter your own password of any number between 100000 and 999999, alternatively, if you are not using this feature you can leave it blank. 14 www.smartwitness.com 1.4.7. User Tab The user tab is used to define the email accounts that the unit will email to and what will be sent. You can have up to 5 users, these can be selected using the Selected User drop down menu. You can enter one of the users email address in the Receiver E-Mail text box. To add more emails you can select a different User number from the Selected User drop down menu and then enter the new email in the Receiver E-Mail text box again. You also have the option to receive SMS text messages from the unit, you can use the Receiver SMS text box to enter the mobile phone number for that user. Please note that this will need to start with the country code e.g. +44. If you wish to request video footage from the unit using the Request feature you will need to set a user password. This can be any number between 1000 and 9999. 15 www.smartwitness.com The Allowed Requests section controls what permissions the user has when using the Requests feature. Please see the main User Manual for more information on this feature. Finally, you can set what alerts you wish to receive from the unit from the Event Notify section. You can use the checkboxes to set what type of alert you wish to receive from the unit and from what event. E-Mail Notifications will contain information such as a small video clip and GPS location information. E-Mail Alerts will be just a quick line of text indicating what type of alert has been triggered (e.g. Excessive Speed). An SMS Alert will give the same information as an E-Mail Alert. 16 www.smartwitness.com 1.5. Save settings Once you have configured the unit you can then save the settings to the SD card. 1. To do this first click the Save button at the bottom of the Configuration Tool. 2. You will then have the option to select the Media to Save to, click on your SD card drive (it should be labelled as HDREC2). 3. Once selected it will prompt you to overwrite the existing config file on the unit, you can click Yes to confirm this. 4. After a few seconds you will receive a message showing that the file has been saved to the SD card. If you would like to keep a copy of the settings file you can repeat this process but instead chose Select Folder rather than your SD card. You can then chose the directory you wish to save the file to. All of the settings are stored in the settings.ini file. 1.6. Second Card If you are using a second card you will need to initialise this before proceeding with the next step. You can follow the same steps on page 7, section 1.3. Once done you will then need to save the same settings to the card, you can do this by following the previous step above in section 1.5. 17 www.smartwitness.com 2. KP1 Unit 2.1. Insert SD Card Once you have initialised your SD card(s) and applied the settings you wish to use, the next step is to insert the card(s) into the KP1 unit and power it on. Insert the SD card into the slot labelled 1 on the KP1 unit. If you are using 2 cards the Master card is inserted into slot 1 and the second card is inserted into the slot labelled 2. Please see the main User Manual for information on installing and powering the unit. If you are using a 3G/4G USB dongle you will also need to ensure that this is inserted before you power on the unit. 2.2. Test Leave the unit powered on for a few minutes to get some footage. The unit will take around 1 minute to power on and once booted the blue LED will slowly flash. Please see the user manual for more information on the LED sequences. If you are using the card with a 3G/4G USB dongle try triggering an event (such as Panic Button press) to see if the unit sends an email or SMS text message. If the APN and SMTP settings are correct the green LED will flash when the unit is trying to send data. You can then check your emails to see if you have received and alert. Please note that this may take a few minutes depending on your signal strength. If you are using event recording or G-Sensor emails it is also advisable to take the vehicle on a test drive to ensure that your sensitivity levels are set to trigger for the events you desire (e.g. sharp turning or braking). 18 www.smartwitness.com 2.3. Check Footage Once you have finished testing you can power off the unit and remove the SD card. Then insert it into your PC and view the footage through the Analysis software. 2.3.1. Install Analysis Software First you will need to install the Analysis software; this can be downloaded from www.smartwitness.com or alternatively, if you selected to copy the Analysis setup file when initialising the SD card you will find it directly on the SD card in the folder named Software. Please ensure that you are using the latest version of the software. 1. Once downloaded or located on the SD card, double click the Setup.exe file to start the installation wizard. 2. The Setup Wizard will then begin, on the first window you can select Next. 3. The next window will confirm the destination to install the software to. You can leave this as it is and select Next. 19 www.smartwitness.com 4. The next window will ask to confirm what folder it will appear as in your Start Menu. You can leave this as the default and select Next to proceed. 5. The next window will give you the option to create a desktop icon for the software. If you would like to do this you can tick the checkbox. You can click on Next to proceed. 6. The final window will confirm your settings. You can click on the Install button to finalise and install the software. 20 www.smartwitness.com 2.3.2. View Footage Once installed you can open up the Analysis Software and open the SD card to view the footage. You can do this with the Select SD Card button in the top left hand corner of the application, as shown below. You will then be asked to confirm the SD card, select it from the top option. It will be similar to that shown below. 21 www.smartwitness.com You will then find a list of files on the right hand side menu which you can double click to show your footage. Please see the main User Manual for more information on using the Analysis Software in full. 3. Complete Once you have reviewed the footage and alerts you can make any final adjustments to the settings or camera location and then repeat the testing process to confirm. Once you are happy with everything you can insert the SD card into the KP1 unit and start using it. Thank you for reading this guide. Should you need any help or assistance please refer to the full user manual or contact your place of purchase. 22 www.smartwitness.com 4. Appendix 4.1. APNs Please see below for typical APN details for the most common providers. If the username or password is blank below then you can leave the username or password blank in Configuration Tool. EE APN: everywhere Username: eesecure Password: secure T-Mobile APN: everywhere Username: eesecure Password: secure EE M2M SIM from SmartWitness APN: wlapn.com Username: Password: Talk Talk APN: mobile.talktalk.co.uk Username: Password: O2 APN: mobile.o2.co.uk Username: o2web Password: password Talk Mobile APN: talkmobile.co.uk Username: Password: O2 (Pay as You Go) APN: payandgo.o2.co.uk Username: payandgo Password: password Three APN: three.co.uk Username: Password: Orange APN: everywhere Username: eesecure Password: secure Vodafone APN: internet Username: web Password: web Please note that these are subject to change and should only serve as a quick reference. It is advised to check with your provider to confirm the correct settings. 23 www.smartwitness.com 4.2. SMS Center Numbers Please see below for typical SMS Centre Number details for the most common providers. EE + 447958879879 T-Mobile +447958879879 EE M2M SIM from SmartWitness +447973100973 Talk Talk +447785011324 O2 Pay Monthly +447802000332 Talk Mobile +447785014318 O2 Pay as You Go +447802092035 Three +447802000332 xxxx is the prefix code of the mobile number e.g. for 07782, replace xxxx with 7782 Orange +447973100973 Vodafone +447785016005 Please note that these are subject to change and should only serve as a quick reference. It is advised to check with your provider to confirm the correct settings. 24 www.smartwitness.com 4.3. SMTP Email Settings Please see below for typical SMTP Server settings for the most common providers. Please note that Smart Witness recommend to only use Gmail, Hotmail/Live/Outlook.com, KP1mail.com or your own locally hosted SMTP server. Other hosts can be used but are not fully supported. You will need to support your own SMTP setup. Gmail SMTP Server Name: smtp.gmail.com POP3 Server Name: pop.gmail.com Use SSL: Yes (SMTPS/POP3S) Use SMTP Auth: Yes (Use) Hotmail/Live/Outlook.com SMTP Server Name: smtp.live.com POP3 Server Name: pop.live.com Use SSL: Yes (SMTPS/POP3S) Use SMTP Auth: Yes (Use) KP1 Mail Account Provided from Smart Witness SMTP Server Name: kp1mail.com POP3 Server Name: kp1mail.com Use SSL: Yes (SMTPS/POP3S) Use SMTP Auth: Yes (Use) 25 www.smartwitness.com