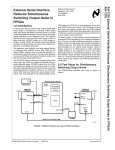
1
Glyndŵr University BEng (Hons) Aeronautical and Electronic Engineering (Avionics) Final Project: Level sensing system Name: Javier García Fernández Supervisor: Reg Holme Year: 2010 - 2011 Glyndŵr University Project Title: Level sensing system Name: Javier García Fernández Supervisor: Reg Holme Author’s Declaration Statement 1 This work has not previously been presented in any form to Glyndŵr University or at any other institutional body whether for assessment or for any other purposes. Save for any express acknowledgements, references, and/or bibliographies cited in the work, I confirm that the intellectual content of the work is the result of my own efforts and no other person. Statement 2 It is acknowledged that the author of this work shall own the copyright. However, by submitting this copyright work for assessment, the author grants to the Institute a perpetual royalty-free license to do all or any of those things referred to in section 16(I) of the copyright, designs and patents act 1988 (viz: to copy work; to issue copies to the public; to perform or show or play the work in public, to broadcast the work or make an adaptation of the work). Signed: Date: i Glyndŵr University Project Title: Level sensing system Name: Javier García Fernández Supervisor: Reg Holme Abstract This report is to present the design and development of a liquid level sensing system based on SCADA system. It is a synthesis of the actions carried out for the construction of the liquid level measuring system. It is structured in five chapters that explain the steps for the realisation of the project. Knowing the content level of liquid in tanks is very important in industry, although accuracy demands vary according to business requirements. Therefore, it becomes extremely important to monitor and control the level of tanks, vessels, reservoirs, etc. In this project a liquid tank is analysed with a pressure sensor, and is monitored with the aid of a PLC and a SCADA software. ii Glyndŵr University Project Title: Level sensing system Name: Javier García Fernández Supervisor: Reg Holme Acknowledgements I owe a great many thanks to the people who helped and supported me during the realisation of this project. I would like to dedicate this dissertation to them. Firstly, I want to dedicate it to my parents, who have always supported me both personal and academically, and who have always encouraged me to continue studying. Besides, I want to dedicate it to my sister, to encourage her to go to the university too. Secondly, I want to dedicate it to Reg Holme, my project supervisor, for sharing his valuable time and giving me helpful information to finish the project. Finally, I would also like to thank the Erasmus programme and Glyndwr University for giving me the opportunity to study and live in a foreign country, which has become one of the best experiences in my life. iii Glyndŵr University Project Title: Level sensing system Name: Javier García Fernández Supervisor: Reg Holme Table of Contents Author‟s Declaration .................................................................................................................... i Abstract ......................................................................................................................................... ii Acknowledgements ...................................................................................................................... iii Table of Contents ..........................................................................................................................iv List of Figures ................................................................................................................................vi 1. 2. Introduction .......................................................................................................................... 1 1.1 Background.................................................................................................................... 1 1.2 Aim ................................................................................................................................ 2 1.3 Objectives ...................................................................................................................... 2 1.4 Block diagram ................................................................................................................ 3 1.5 Gantt chart .................................................................................................................... 4 Research ................................................................................................................................ 5 2.1 2.1.1 2.2 Fluids ............................................................................................................................. 5 Density....................................................................................................................... 5 Measuring the level ....................................................................................................... 6 2.2.1 Magnetic, lateral and bulb buoys .............................................................................. 7 2.2.2 Conduit sensor .......................................................................................................... 7 2.2.3 Hydrostatic ................................................................................................................ 8 2.2.4 Ultrasonic .................................................................................................................. 9 2.2.5 Capacitive level sensor ............................................................................................ 10 2.2.6 Radioactive level sensor .......................................................................................... 10 2.2.7 Selecting the best method ...................................................................................... 11 2.3 Pressure ....................................................................................................................... 12 2.3.1 General definition ................................................................................................... 12 2.3.2 Units ........................................................................................................................ 13 2.3.3 Types ....................................................................................................................... 13 2.3.4 Variation with depth ............................................................................................... 14 2.3.5 The hydrostatic paradox.......................................................................................... 16 2.4 Pressure sensors.......................................................................................................... 16 2.4.1 Mechanical pressure meters ................................................................................... 17 2.4.2 Pneumatic pressure meters .................................................................................... 19 iv Glyndŵr University Project Title: Level sensing system Name: Javier García Fernández Supervisor: Reg Holme 2.4.3 2.5 3. Industrial Control ........................................................................................................ 20 2.5.1 Introduction to PLCs ................................................................................................ 20 2.5.2 Introduction to SCADA ............................................................................................ 21 Design .................................................................................................................................. 22 3.1 Sensor .......................................................................................................................... 22 3.1.1 The transducer ........................................................................................................ 23 3.1.2 Amplifying the signal ............................................................................................... 25 3.1.3 Converting voltage to current ................................................................................. 26 3.2 The Programmable Logic Controller (PLC) .................................................................. 28 3.2.1 The input module .................................................................................................... 29 3.2.2 Ladder logic programming ...................................................................................... 32 3.3 4. Electromechanical and electronic pressure meters ................................................ 19 Human Machine Interface (HMI) ................................................................................ 40 3.3.1 Control Philosophy .................................................................................................. 41 3.3.2 Starting a project ..................................................................................................... 41 3.3.3 Graphic windows of the SCADA .............................................................................. 45 Testing & Analysis ............................................................................................................... 51 4.1 Sensor .......................................................................................................................... 51 4.1.1 The transducer ........................................................................................................ 51 4.1.2 The amplifying circuit .............................................................................................. 56 4.1.3 The current to voltage circuit converter ................................................................. 59 4.2 Testing the ladder logic programming ........................................................................ 60 4.3 Testing the SCADA ....................................................................................................... 63 5. Conclusions ......................................................................................................................... 66 6. Recommendations .............................................................................................................. 68 7. References ........................................................................................................................... 69 8. Appendices .......................................................................................................................... 72 v Glyndŵr University Project Title: Level sensing system Name: Javier García Fernández Supervisor: Reg Holme List of Figures Fig. 1.1 Vertical water pipes in the E12 Fig. 1.2 Block diagram of the project Fig.2.1 Magnetic buoy [3] Fig. 2.2 Conduit sensor [3] Fig. 2.3 Hydrostatic sensors [3] Fig. 2.4 Ultrasonic sensors [3] Fig. 2.5 Capacitive sensor [3] Fig. 2.6 Radioactive sensor [4] Fig. 2.7 Variation with depth [1] Fig. 2.8 Fundamental law of hydrostatics demonstration [8] Fig. 2.9 Hydrostatic paradox [8] Fig. 2.10 Basic manometer [10] Fig. 2.11 Bourdon tube [11] Fig. 2.12 Diaphragm sensor [12] Fig. 2.13 Nozzle-plug system [9] Fig. 2.14 Electronic pressure sensors [9] Fig. 3.1 Depth sensor [15] Fig. 3.2 Depth sensor setup [15] Fig. 3.3 Pressure transducer [16] Fig. 3.4 Sensor transfer function [16] Fig. 3.5 Non-inverting amplifying circuit Fig. 3.6 Voltage-to-current converter [17] Fig. 3.7 Voltage-to-current converter [18] Fig. 3.8 PLC SLC 500 Fig. 3.9 Communications module 1747-L532 Fig. 3.10 Input module configuration [20] Fig. 3.11 Voltage input module wiring [20] Fig. 3.12 Current input module wiring [20] Fig. 3.13 Converting analog input data [20] Fig. 3.14 RSLogix 500 main screen [21] Fig. 3.15 I/O Configuration Fig. 3.16 SCP function Fig. 3.17 Input data file window Fig. 3.18 Pressure CPT function Fig. 3.19 Volume CPT function Fig. 3.20 End rung vi Glyndŵr University Project Title: Level sensing system Name: Javier García Fernández Supervisor: Reg Holme Fig. 3.21 Full program for the current output sensor Fig. 3.22 Ladder scaling step by step Fig. 3.23 Ladder program for the voltage sensor Fig. 3.24 RSView32 file tree, channel and node configuration windows Fig. 3.25 Scan class selection Fig. 3.26 User accounts configuration Fig. 3.27 New graphic window Fig. 3.28 Tag database window Fig. 3.29 Graphic windows Fig. 3.30 Welcome window Fig. 3.31 Main window Fig. 3.32 Trend window Fig. 3.33 Alarm summary window Fig. 3.34 Tag monitor window Fig. 3.35 Datasheets window Fig. 4.1 Water pipe at home Fig. 4.2 Sensor breadboard assembly Fig. 4.3 Measuring the sensor output Fig. 4.4 Sensor output function Fig. 4.5 Amplifying circuit running in PROTEUS (I) Fig. 4.6 Amplifying circuit in PROTEUS (II) Fig. 4.7 Amplifying circuit on breadboard Fig. 4.8 Final sensor assembly Fig. 4.9 Fitting the sensor hose into the pipe Fig. 4.10 Converting 0V to 4mA Fig. 4.11 Converting 10V to 20mA Fig. 4.12 RSLogix verify buttons Fig. 4.13 RSLogix online bar Fig. 4.14 Ladder logic running Fig. 4.15 SCADA stop-run button Fig. 4.16 Main window running (1) Fig. 4.17 Main window running (2) Fig. 4.18 Tag monitor window running Fig. 4.19 Alarm summary window running Fig. 4.20 Trend window running vii Glyndŵr University Project Title: Level sensing system Name: Javier García Fernández Supervisor: Reg Holme 1. Introduction 1.1 Background This project consists in monitoring depth in a vertical water pipe (Fig. 1.1) in the Avionics with Instrumentation & Control laboratory (E12). For that purpose, it has been used a submersible sensor within the pipe, which in the real world it would be suitable for use in rivers, reservoirs, tanks, boreholes, vessels or channels. The sensor was provided by the university, and once the project worked, another of the objectives was to design and build a new depth sensor. The sensor is connected to a PLC, which can be seen as a little industrial computer highly specialized in getting some inputs, reading its control program, and with some mathematic calculus controlling some outputs. With the use of a SCADA (Supervisory Control and Data Acquisition) the data is sent to a PC which allows an operator to manage and control it. Fig. 1.1 Vertical water pipes in the E12 laboratory 1 Glyndŵr University Project Title: Level sensing system Name: Javier García Fernández Supervisor: Reg Holme 1.2 Aim The intention of this project was to monitor the level in a water pipe with the use of a submersible depth sensor. Once it worked, a new depth sensor was built. The sensor data is sent to a PC, using a SCADA system which connects the PLC to the computer. 1.3 Objectives In order to achieve the aim, a set of objectives have been planned as follows: - Research about fluids. - Study pressure. - Research on level sensors and pressure measuring. - Research on principles of control engineering and apply them to the project. - Design a program for a PLC (Programmable Logic Controller). - Design a SCADA system. - Monitoring and analysis of the pressure data given by the provided sensor. - Design and develop a pressure sensor. 2 Glyndŵr University Project Title: Level sensing system Name: Javier García Fernández Supervisor: Reg Holme 1.4 Block diagram The element to be controlled is the level in the vertical pipe, which is filled with the aid of the water pump. Level is controlled with a depth sensor and the signal it generates is sent to the PLC, which is the brain of the system and will compute the input to obtain height, pressure and volume. The computed data will be sent to a PC and displayed using a SCADA software. LEVEL SENSOR PLC CONTROL VALVE PC / SCADA WATER PIPE PUMP CONTROL VALVE SOURCE/ DEPOSIT Fig. 1.2 Block diagram of the project 3 Glyndŵr University Project Title: Level sensing system Name: Javier García Fernández Supervisor: Reg Holme 1.5 Gantt chart The project has two main phases. The first stage will last until Christmas and will include the introduction and research. After Christmas, the programming of the PLC and SCADA as soon as the design and development of the depth sensor will take place. The project report and logbook have to be finished by the end of April. 4 Glyndŵr University Project Title: Level sensing system Name: Javier García Fernández Supervisor: Reg Holme 2. Research 2.1 Fluids Fluids include liquids and gases. Liquids flow under gravity until they fill the lower zones of the vessel they are in. In a liquid, molecules are joined and they make a force between them which could be compared to the force that join atoms in order to form molecules, so there is an interaction between the molecules like in solids. Molecules in a liquid create short range links transitorily, which are broken due to the kinetic energy in the molecules and then they are formed again. These links are responsible of the liquid union, or else liquid would evaporate immediately as vapour does. The magnitude of this force depends on the molecule [1]. 2.1.1 Density An important property of any substance is the quotient between its mass and its volume, which is called density. Therefore, it is possible to write density as: ( ) ( ) ( ) Where: ρ, density, is in kg/m3 m, mass, is in kilograms [kg] V, volume, is in cubic metres [m3] Since the gram is defined as the mass of 1 cm3 of water, water density is 1 g/cm3 in the cgs system. If we make the conversion to the International System of Units we obtain that: ρ = 1000 kg/m3. Precise measurements of density must take into account temperature and pressure, since density in most of materials varies with temperature and pressure changes. The given value of water is for 4°C and 1 atm of pressure. Generally speaking, liquids are essentially incompressible and their variation with pressure is insignificant. For example at room temperature (20 °C), water density changes from 998 kg/m3 at 1 atm to 1003 kg/m3 at 100 atm, this is only 0.5%. Density relies more on temperature than on pressure. For example if we fix the pressure at 1 atm, water density changes from 998 kg/cm3 at 20°C to 975 kg/cm3 at 75°C, this is a 2.3% so it can also be ignored in most of engineering calculus. This is very well known from the ideal gas law [2]. 5 Glyndŵr University Project Title: Level sensing system Name: Javier García Fernández Supervisor: Reg Holme Where: P, pressure, is in Pascals [Pa] ρ, density, is in kg/m3 R, mass, is in J / kg · K T, temperature, is in Kelvin [K] Although the cubic meter is the SI unit for volume, the litre (L) is very common especially for liquids and it is defined as 1 L = 1 dm3 = 10-3 m3. So the density of water is 1 kg/L. 2.2 Measuring the level Level is defined as a position, line, or flat surface according to which height is measured. Some of the most commonly used liquid-level measurements methods are [3]: Direct methods: Hook indicator Glass window Float levels Indirect methods: Conduit levels Pressure Ultrasonic impulses Capacitor levels Radioactive levels Vibrant sheets levels Piezoelectric levels Before taking the decision of which is right for the intended application, some different type of level measuring devices will be studied. 6 Glyndŵr University Project Title: Level sensing system Name: Javier García Fernández Supervisor: Reg Holme 2.2.1 Magnetic, lateral and bulb buoys The main characteristics are that it is easy to install, operation and calibration are not affected by foam, gases, vapours or variations in the fluid characteristics like dielectric constants or conductivity. It is ideal when a trusted and cheap solution is wanted [3]. Fig.2.1 Magnetic buoy [3] The measurement is started either by a pushbutton or a timer. The float is connected to a cable at rest over the liquid. The magnitude which is actually sensed is the variation of the cable tension. The level indication is provided by an electrical circuit associated to the engine which pulls up and down the cable [4]. 2.2.2 Conduit sensor They are mainly used in applications involving control/detection of conduit liquid levels in tanks, deposits or profound shafts. Easy to install and without mobile parts, so there is no need of constant maintenance. There are two versions: rigid or flexible [3]. Fig. 2.2 Conduit sensor [3] 7 Glyndŵr University Project Title: Level sensing system Name: Javier García Fernández Supervisor: Reg Holme It is a very popular method which actually uses the pressure difference transmitter. It sends an electrical or pneumatic signal proportional to the difference of the two liquids, one due to the object liquid level and the other due to a reference pressure, for example, atmospheric pressure [4]. 2.2.3 Hydrostatic They are used in applications where continuous monitoring of liquid level is necessary. There are no mobile parts and they are not affected by turbulences, foam, gases/vapours or fluid characteristics variations like dielectrical constant or conductivity. There are two models: pendulum and lateral [3]. Fig. 2.3 Hydrostatic sensors [3] With a very similar principle of the conduit sensor, it senses the pressure in the bottom of the vessel, and as it has another pressure input at the end of the cable which is measuring atmospheric pressure, it sends a signal proportional to the pressure difference [4]. 8 Glyndŵr University Project Title: Level sensing system Name: Javier García Fernández Supervisor: Reg Holme 2.2.4 Ultrasonic They give excellent precision and quality, and there is no physical contact between the sensor and the measured media. It allows its use in critical applications like tanks of little diameter or with gases/vapours or powders, although they are sensitive to foams. They can be used with a wide range of materials like water, inflammable and corrosive liquids and granulated solids like lime, concrete, flour or sawdust [3]. Fig. 2.4 Ultrasonic sensors [3] There is a hydra-wave transmitter which generates a high-frequency wave (20-40 KHz) which propagates through the gas until it collides with the liquid. Then it reflects and reaches the receiver, located in the same place as the transmitter. The time between transmission and receipt is inversely proportional to the level. As propagation depends on temperature, time will have to be corrected for very accurate measurements. It is essentially a radar method [4]. Advantages are that it has no moving parts hence no wear and tear; it is a non-contact technology and it is easy to calibrate. Disadvantages are that it is affected by powders, heavy vapours, surface turbulence and foam; it cannot operate in vacuum or high pressure; and it needs good reflective surface. 9 Glyndŵr University Project Title: Level sensing system Name: Javier García Fernández Supervisor: Reg Holme 2.2.5 Capacitive level sensor They have no mobile parts and due to its operation principle (RHF – Radio High Frequency) they are extremely multipurpose with the possibility to be used with products like conductive, viscous or aggressive liquids, apart from granulated materials or powders. They are available for critical temperature conditions and for heavy applications like mining among others [3]. Fig. 2.5 Capacitive sensor [3] The principle of operation is based on the measurement of the variation of the capacitance of the dielectric media between the metallic sensor and the deposit, or between two sensors in case the deposit is not metallic [4]. Advantages are that it can operate under extreme temperature and pressure, it works with all types of materials and it is typically inexpensive. Disadvantages are that there are intrusive measurements, there are errors due to build-up and varying dielectric strength and it is sensitive to certain applications. 2.2.6 Radioactive level sensor Radioactive devices can also be used for both discrete and continuous level measurements. They are used when there is no possibility of installing something inside the vessel like in high temperature processes or very corrosive materials. The radioactive source and the receiver are placed in each side of the vessel, when the material is between them the radiation received changes proportionally [4]. 10 Glyndŵr University Project Title: Level sensing system Name: Javier García Fernández Supervisor: Reg Holme Fig. 2.6 Radioactive sensor [4] 2.2.7 Selecting the best method The decision is basically made due to the initial cost and the suitability of a certain technique for a given application. However, the decision should considerate that a low initial cost may be accompanied by high maintenance costs or loss of accuracy over time. Suppliers often provide recommendations based on process material, material characteristics, process information, vessel function or power requirements [6]. 11 Glyndŵr University Project Title: Level sensing system Name: Javier García Fernández Supervisor: Reg Holme Average product cost 100 Continuous Point 0 RF Conductivity capacitance Hydrostatic Radar Ultrasonic The final decision has been to use a hydrostatic head. Firstly, because the sensor provided by the university was of this type and the intention was to develop a similar sensor. Secondly, because it is the cheapest and it has the easiest working principle. So this method which uses pressure is going to be further studied now. 2.3 Pressure 2.3.1 General definition The pressure is defined as the normal force of a fluid per unit area. Pressure is only for fluids, while its equivalent for solids is normal stress. So mathematically it is written [1]: ( ) ( ) ( ) Where everything is in SI units, therefore: F is in Newtons [N] Area is in squared metres [m2] Pressure is in Pascals [Pa = N/m2] 12 Glyndŵr University Project Title: Level sensing system Name: Javier García Fernández Supervisor: Reg Holme 2.3.2 Units As it has already been shown, the SI unit for pressure is the Pascal (Pa), but it is very small for pressures which usually appear in real problems. Therefore, the kilopascal 1 KPa = 103 Pa and the megapascal 1 MPa = 106 Pa are more used [2]. Other units which are very used include: 1 atm = 101.325 KPa = 1.01325 bars = 760 mmHg at 0°C = 1.03323 kg(f)/cm2 = 14.696 psi = 14.696 lb(f)/in2 2.3.3 Types It is possible to define a few types of pressure depending on the reference value of zero [2]. Absolute pressure refers to real pressure, which is measured referenced against a perfect vacuum. In an ideal vacuum the measure would be zero. Differential or relative pressure is the difference in pressure between two points. Atmospheric pressure, which is necessary to define the next type of pressure, is the pressure exerted by the weight of air above Earth‟s surface. It changes under pressure and temperature [2]. Manometric or gauge pressure is a particular case of relative pressure and its reference value is the atmospheric pressure. It is very common for example when measuring the pressure in a car tyre. 13 Glyndŵr University Project Title: Level sensing system Name: Javier García Fernández Supervisor: Reg Holme Now, considering the movement of the fluid two types of pressure will be defined. Static pressure is uniform in all directions, so measurements are independent of direction. Dynamic pressure is the pressure exerted by the flow, which applies additional pressure in the perpendicular plane of it. In this project a static gauge pressure will be measured. 2.3.4 Variation with depth It is possible to prove that pressure in a static fluid does not change in horizontal planes by doing the balance of forces. However, it does in a vertical plane due to the gravity field. Pressure increases with depth because the deeper you go, the more fluid, and thus the more weight. This “extra weight” in a lower layer is balanced with a pressure increase [1]. Fig. 2.7 Variation with depth [1] In order to obtain the relation between pressure (p) and depth (z), an equilibrium fluid of height dy and surface S is considered [8]. 14 Glyndŵr University Project Title: Level sensing system Name: Javier García Fernández Supervisor: Reg Holme Fig. 2.8 Fundamental law of hydrostatics demonstration [8] Where: y and dy, height and differential of height, are in metres [m] p and dp, pressure and differential of pressure, are in Pascals [Pa] ρ, density, is in kg/m3 S, surface, is in m2 Given that the density of the fluid (ρ) is constant and provided the gravity (g) is equal to 9.81 m/s2, the balance of forces in the y axis is as follows: ( ) ( ) Now, integrating this equation with the random limits B, A. Finally, changing the height ∆y by depth -∆z, fundamental law of hydrostatics is obtained: 15 Glyndŵr University Project Title: Level sensing system Name: Javier García Fernández Supervisor: Reg Holme Where: is in Pascal [Pa] ρ, density, is in kg/m3 g, gravity, is in m/s2 Z, depth, is in m 2.3.5 The hydrostatic paradox It has already been demonstrated that pressure only depends on depth and it is independent of the vessel shape. However, there may be temptation to think that the pressure is bigger in a vessel in which there is a bigger volume of water [8]. Fig. 2.9 Hydrostatic paradox [8] The hydrostatic paradox states that the force due to the pressure exerted by a fluid in the base of a vessel can be bigger or smaller than the weight of the liquid that contains the vessel [8]. This means that in each of the vessels, given a fix level, there is a fix pressure value, no matter how the vessel is or the volume of water it has inside. 2.4 Pressure sensors There are several kinds of instruments to measure pressure: mechanical, pneumatic, electromechanical and electronic sensors. 16 Glyndŵr University Project Title: Level sensing system Name: Javier García Fernández Supervisor: Reg Holme The principle of operation is as follows: Pressure transducers with deformation meters work with a diaphragm deviation due to pressure difference between the two chambers. When the diaphragm enlarges due to pressure change, the deformation meter enlarges and a Wheatstone bridge amplifies the signal. A capacitance transducer works with the same principle. Piezoelectric transducers work based on the principle that an electric potential is generated in a crystalline structure when this is under mechanic pressure. They are faster and more suitable for high pressure applications than diaphragm sensors although they are not as sensitive. 2.4.1 Mechanical pressure meters The most basic and old of the instruments is the manometer, invented by Torricelli in 1643. It is based on height to measure pressure, according to the principle above. It is a U-shape tube which contains mercury, water, alcohol or oil depending on the expected pressure differences [2], [9]. Fig. 2.10 Basic manometer [10] 17 Glyndŵr University Project Title: Level sensing system Name: Javier García Fernández Supervisor: Reg Holme Another mechanical device to measure pressure is the Bourdon tube, due to its inventor, consisting on a metallic bended hollow tube, like a hook, finishing on an indicating needle. When the tube is open to atmosphere it has no deviation and the needle is calibrated to zero. When it is pressurized, the tube lengthens and the needle moves proportionally to the applied pressure. Other types of Bourbon tubes have different shapes like spiral, helicoidal or twisted [2]. Fig. 2.11 Bourdon tube [11] The diaphragm sensor consists on a capsule divided by a membrane, one side is open to targeted pressure and the other side is connected to a reference pressure [12]. Fig. 2.12 Diaphragm sensor [12] Therefore, with this kind of devices it is possible to obtain the gauge pressure. The bellows sensor is similar to the diaphragm but in a single piece flexible axially, which allows a big displacement. They have a great service life, which means they bear millions of flexion cycles without deformation [9]. 18 Glyndŵr University Project Title: Level sensing system Name: Javier García Fernández Supervisor: Reg Holme 2.4.2 Pneumatic pressure meters The pneumatic transmitter instruments are based on the nozzle-plug system. They consist on a pneumatic tube augmented to a constant pressure P, with a nozzle in the end which can be obstructed by a plug, the position of which depends on the output [9]. Fig. 2.13 Nozzle-plug system [9] 2.4.3 Electromechanical and electronic pressure meters Electronics has also changed the pressure measuring. Pressure transducers convert the pressure change to a voltage, magnetic, resistance, inductance or capacitance change. They are lighter, faster, more sensitive, trustworthy and precise that their mechanic equivalents. They also have a great range varying from a millionth of 1 atm to some thousands of atm [2]. Fig. 2.14 Electronic pressure sensors [9] 19 Glyndŵr University Project Title: Level sensing system Name: Javier García Fernández Supervisor: Reg Holme Manometric pressure transducers use atmospheric pressure as a reference and they give a zero output signal at atmospheric pressure whichever the altitude is. Absolute pressure transducers give a zero output value when in vacuum. Differential pressure transducers measure the difference between two pressure values directly instead of using two pressure transducers and calculating the difference. 2.5 Industrial Control 2.5.1 Introduction to PLCs PLCs (Programmable Logic Controllers) are solid-state members which use integrated circuits instead of electromechanical devices to control in real time a sequential process in an industrial environment. They produce an output to the information provided by the sensors of the automatized system. They implement control functions, so they are capable of storing instructions, such as sequencing, timing, counting, arithmetic, data manipulation, and communication, to control industrial machines and processes [13], [14]. The idea was born in 1968 when General Motors specified the design criteria for the first PLC to substitute high-cost relay-controlled systems. Their main characteristics are the survivability in industrial environments, ease of program and maintain by engineers and technicians and reusable. Apart from that, the price had to be competitive with current relay systems, and it had to interact with a central system. By the end of the year the first PLC had been developed. They met the requirements of modularity, ease of install, reduced space, programmability, reusability and capability of use in an industrial environment. The programming was a little tedious but the ladder diagram format standard had been developed. By 1971, the use of PLCs had spread to other industrial sectors. Nowadays, PLCs have improved in areas like speed of operation, interfaces or data-processing but the main requirements are the same of their predecessors. The improvements are not only in hardware but in software too. 20 Glyndŵr University Project Title: Level sensing system Name: Javier García Fernández Supervisor: Reg Holme This section is just an introduction to understand what a PLC is since further study and programming of PLCs and will be included in the next chapters. 2.5.2 Introduction to SCADA SCADA is an acronym for “Supervisory, Control and Data Acquisition”. SCADA get together all the processes in charge of doing the specific functions which have to be done in a general system from the equipment that form a given installation. Then, the data is sent to a central computer to be managed and controlled [14]. HMI environment (Human Machine Interface) is the SCADA interface and must be able of managing the use of the different sources in real time, taking into account the constraints of the different processes which form the system and which force each process to take place within a given interval of time. This tool has to be friendly to the user, which is usually a forgotten part in the automation process. Summing up, a SCADA system is a joint of devices and programs aimed to control and supervise secure and efficiently an industrial process in real time from an operator post. Its goal is to ease the operation of the control system and must provide the operator real time centralized information, remote control and historical information of the system variables. With this, a better vision of the system is provided and allows easier problem detection and solving. With the obtained data some statistical studies and curves of variables trends may be done. 21 Glyndŵr University Project Title: Level sensing system Name: Javier García Fernández Supervisor: Reg Holme 3. Design In this chapter, the whole system design will be done. Firstly, a sensor provided by the University will be used as a benchmark to test the software. Then, a new sensor will be designed with the purpose of getting a cheaper solution to the system. This sensor output will be treated in a PLC, which will compute level, pressure and volume. Finally, this data will be monitored on a PC using a SCADA software. 3.1 Sensor Firstly, the depth sensor used was the one provided by the University, corresponding to the model Pi9911-4mWG-C10 from Applied Measurements LTD. Fig. 3.1 Depth sensor [15] This sensor gives an output ranging 4-20 mA, with a range of 4 metres Water Gauge (mWG) and a cable length of 10 metres. It assures a high integrity waterproof assembly which is rated to 200 metres depth. It has an accuracy greater than 0.25% of the pressure range. It has three wires and a static pressure input coming out from the cable. The sensor connections are as follows: Red = Positive Supply Blue = Negative Supply Green = Earth 22 Glyndŵr University Project Title: Level sensing system Name: Javier García Fernández Supervisor: Reg Holme The setup would probably be similar to the diagram below so the sensor has a constant power supply that is normally 24vdc. When the sensor changes output the current in milliamps varies between 4 and 20. Fig. 3.2 Depth sensor setup [15] 3.1.1 The transducer One of the main objectives of the project was developing a new depth sensor. In order to do that, a research on pressure transducers was carried out. The decision was to use the piezoresistive silicon pressure sensor SSCSANN005PGAA3 from Honeywell [16]. Fig. 3.3 Pressure transducer [16] This code shows: SSC = Series S = SIP (Single Inline Package) AN = Pressure Port: Axial, single port N= No diagnostics 005PG = Pressure Range 0 psi to 5 psi (Gage) A = Output type: Analog Voltage 23 Glyndŵr University Project Title: Level sensing system Name: Javier García Fernández Supervisor: Reg Holme A = Transfer function: 10 % to 90 % of Vsupply 3 = Supply Voltage Range: 3.3V The transfer function for this sensor with “A” calibration is the following: ( ) ( ) Since pressure depends lineary on height, it is possible to transform the equation to the one below: ( ) ( ) Fig. 3.4 Sensor transfer function [16] Knowing that the vertical water pipe is 3.2m of height, it is possible to calculate the maximum pressure that will be applied. Now, it is known that pressure values will vary from 0 psi – 4.553 psi. Therefore, the output voltage values will be: 24 Glyndŵr University Project Title: Level sensing system Name: Javier García Fernández Supervisor: Reg Holme ( ) ( ( ) ) 3.1.2 Amplifying the signal Since the intention was to develop a similar sensor than the one provided by the university, the next step was to amplify the output voltage to a range of 0-10 Vdc. In order to do that, firstly the gain needed was calculated. Then, a very common circuit to amplify without inverting the signal was used: Fig. 3.5 Non-inverting amplifying circuit 25 Glyndŵr University Project Title: Level sensing system Name: Javier García Fernández Supervisor: Reg Holme The main characteristics of this circuit are: ( ) So, as a gain of 3.66 is needed, Taking a value of 10 kΩ for Ri, the value obtained for Rf is approximately 25 kΩ. Now, the output voltage ranges from 1-10V. The opamp that will be used will be the LM741CN from National Semiconductor, the most important characteristic for us is that the supply voltage is ±18V. 3.1.3 Converting voltage to current The final step to make the sensor similar to the one provided, would be converting the voltage output ranging 0-10 Vdc to a current ranging 4-20 mA, with 4 mA representing the lowest end of the range and 20 mA the highest. Since the circuit is a few metres far from the sensor, the voltage gets attenuated due to the resistance of the wires. Converting the voltage signal to current using the technique known as the current loop improves the accuracy of the signal, which is not affected by voltage drop in the wiring whatever the electrical resistance in the wiring is. So, in order to make the conversion, it is possible to use an integrated circuit like the XTR110, a precision voltage-to-current converter designed for analog signal transmission. It accepts inputs of 0 to 10V and can be connected for outputs of 4mA to 26 Glyndŵr University Project Title: Level sensing system Name: Javier García Fernández Supervisor: Reg Holme 20mA. The main problem of these IC‟s is the price, which ranges from 20 to 100 GBP, and the complexity of its design. The other possibility is to design a circuit which performs the conversion, in order to do that it is possible to look at the internal circuit of the XTR110: Fig. 3.6 Voltage-to-current converter [17] The other option is found in textbooks. The voltage to current converters feeding to grounded loads circuit is the following: Fig. 3.7 Voltage-to-current converter [18] 27 Glyndŵr University Project Title: Level sensing system Name: Javier García Fernández Supervisor: Reg Holme This conventional circuit gives 4 to 20 mA of output for an input of 0 to 10 V. First, it is necessary to adjust P1 for zero (4 mA) and then P2 for span (20 mA). The circuit needs a positive and negative supply, which depend on the operational amplifier but typically are ±15V. Finally, this part was not developed. the reason is related to the resolution of the PLC and will be further studied later. So the sensor developed in this project gives a voltage output ranging 1-10 V depending on the pressure. 3.2 The Programmable Logic Controller (PLC) The PLC has already been introduced, so now the specific model used in this project will be analysed. It is the SLC 500 with 10 slot rack from Allen-Bradley (AB), which is a chassis-based, modular family of controllers and I/O, Fig. 3.8 PLC SLC 500 In order to make a PLC work, it is necessary at least one power supply module and one controller (CPU), which is also the communications module. In this case, the power supply module is the 1746-P1 which allows 110/240V input and 2 A of output. Besides, the controller module is the 1747-L532 with the CPU SLC 5/03 which has the following features [19]: 28 Glyndŵr University Project Title: Level sensing system Name: Javier García Fernández Supervisor: Reg Holme Controller Series SLC 5/03 Instruction Memory Words 8 K, 16 K, or 32 K Max. I/O Points 4096 I/O Options Local I/O, remote I/O Built-in Ports DH-485, RS232-C (ASCII or DF1) Additional Features Connects to external intelligent devices using the RS-232 port, without additional modules Also in this case, the communications will be through the RS232 port, which has a DE-9 pin connector. It is possible to see a photo of the module below. Fig. 3.9 Communications module 1747-L532 3.2.1 The input module The input module is the 1746-NI4, which is an analog module containing 4 analog input channels that are user selectable per channel for voltage or current to support a variety of monitoring and controlling applications [20]. Each analog input channel can be configured for either voltage or current. The NI4 has 4 individual DIP switches that control the input mode of input channels 0 through 3. A switch in the ON position configures the channel for current input. A switch in the OFF position configures the channel for voltage input. These switches can be seen in red in the photo below. 29 Glyndŵr University Project Title: Level sensing system Name: Javier García Fernández Supervisor: Reg Holme Fig. 3.10 Input module configuration [20] The wiring of the module would be like this for the voltage wiring: Fig. 3.11 Voltage input module wiring [20] And since the current sensor has positive and negative supply plus earth wires, the connection would look like this for the current input: Fig. 3.12 Current input module wiring [20] 30 Glyndŵr University Project Title: Level sensing system Name: Javier García Fernández Supervisor: Reg Holme The table below identifies the current and voltage input ranges for the input channels, the number of significant bits for the applications using input ranges less than full scale, and their resolution. Fig. 3.13 Converting analog input data [20] Therefore, by using 1-10 Vdc instead of 4-20 mA as input, one bit more is used resulting in an improvement in the resolution. In order to convert this input value to a physical one, scaling is necessary. Scaling consists on enlarging or diminishing the value until the desired range. Firstly, the scaling will be done for the current analog input from the sensor provided by the University. As seen above, max and min values will be 3,277 and 16,384 corresponding to 4 and 20 mA respectively. Max = 214 = 16,384 16,384 ≈ 20 mA 3,277 ≈ 4 mA 819.2 ≈ 1 mA SPAN = 16 mA ≈ 13,107 To get the multiplying factor: From the true value which enters the PLC, the minimum value 3,277 is subtracted and the result is multiplied by this factor in order to get the physical value of level. For example, if 12,000 is the value which enters the PLC: 31 Glyndŵr University Project Title: Level sensing system Name: Javier García Fernández Supervisor: Reg Holme ( ) Secondly, the scaling for the voltage input will be done. Max = 215 = 32,767 32,767 ≈ 10 Vdc 3,277 ≈ 1 Vdc SPAN ≈ 9 Vdc ≈ 29,490 To get the multiplying factor: 3.2.2 Ladder logic programming RSLogix 500 software is a 32-bit Windows ladder logic programming package for the SLC 500 and MicroLogix® processors. RSLogix 500 is compatible with SLC 500 and MicroLogix programs created with any of Rockwell Software‟s programming packages. The main screen in RSLogix 500 is: Fig. 3.14 RSLogix 500 main screen [21] 32 Glyndŵr University Project Title: Level sensing system Name: Javier García Fernández Supervisor: Reg Holme A brief explanation of these bars is found in the RSLogix Getting Results Guide: Menu bar - Select functionality from the menus that appear as you click each selection on this bar [21]. Icon bar - The icon bar contains many functions that you will use repeatedly as you develop and test your logic program. If you want to know what any of the icons represent, RSLogix 500 can tell you. Move your cursor over the icon, and floating ToolTip window appears to tell you what the icon is used for [21]. Online bar - See at a glance the processor mode and whether you have online edits or forces present. You can also view the communications driver and node number [21]. Project tree - This view contains all the folders and files contained in your project. You can usually click an icon in this tree and then click the right mouse button for a menu that applies only to the icon selected. For example, if you click the right mouse button on a program file, you see options to rename the program file, open the program file, hide the program file, or reveal properties of the program file [21]. Status bar - Look here for ongoing status information and prompts as you use the software [21]. Results pane - Displays the results of a Find All search or a verification procedure. You can hide this pane or place it anywhere on your screen [21]. Ladder view - This is where you edit your ladder logic. You can view several program files at the same time [21]. Instruction toolbar - Displays instruction mnemonics in tabbed categories. When you click on a category tab the instruction toolbar just above it changes to show that category of instructions. Click an instruction to insert it in your ladder program [21]. Communications from RSLogix 500 take place through another software package, called RSLinx Classic. To do this, the RSWho function in RSLinx is very useful, the remote device shown must be opened, if everything is OK, the processor should be seen now. If not, there is a communication problem which must be solved before continuing programming. When a new project is created, the chassis and the processor must be selected, and then the IO configuration, meaning that all the inputs and outputs modules must installed must be declared in the RSLogix. The result is: Rack 1: 1746-A10 10 slot rack Slot 0: 1747-L532C/D, CPU 5/03 Memory 16K OS302 33 Glyndŵr University Project Title: Level sensing system Name: Javier García Fernández Supervisor: Reg Holme Slot 1: 1746-NI4, 4 analog channel input module Slot 2: 1746-OB8, 8 digital channel output module, it will not be used in this project, but as it is installed in the rack, it has to be declared. Fig. 3.15 I/O Configuration In order to enter the logic program, the instruction toolbar must be used. Initially, the program file will only have the end rung, so a new rung must be added using the icon from the user toolbar. In this project, two programs files have been programmed. One program per each sensor, so firstly the program for the current output sensor will be shown. In this first case, the SCP (Scaling with Parameters) function has been used. In this function the input memory direction, with its maximum and minimum, the scaled maximum and the scaled minimum must be declared, as well as the output memory direction. Fig. 3.16 SCP function 34 Glyndŵr University Project Title: Level sensing system Name: Javier García Fernández Supervisor: Reg Holme In the print screen above, it is possible how addressing to the memory directions is done: I:1.0, SOURCE, which indicates that the file type is an input, from the first slot, and the terminal number is 0. F8:1, H (height), which indicates that the file type is a float number, the file number is the eight, and the bit number is 1. So, in that direction the height will be directly calculated. Below, it is possible to see exact explanation of the addressing format: In this function the input memory direction, with its maximum and minimum, the scaled maximum and the scaled minimum must be declared, as well as the output memory direction. Fig. 3.17 Input data file window Once the height is known, and considering that the desired data are height, pressure and volume, it is pretty easy to calculate the rest of magnitudes in different new rungs. As stated before in this project, P=ρ·g·h, and there are two ways of calculating that, the first one would be using the multiplying function from the math toolbar, but as it is 35 Glyndŵr University Project Title: Level sensing system Name: Javier García Fernández Supervisor: Reg Holme only useful to multiply A·B, that procedure has been dismissed. The other way of calculating pressure is by using the compute (CPT) function. Fig. 3.18 Pressure CPT function Since it is known that the liquid which is going to be measured is water, and that the measurement is going to take place in the earth‟s surface, density and gravity can be taken as parameters equal to 1000 kg/m3 and 9.8 m/s2 respectively. Therefore, the function is written directly, these two parameters times the height gives the pressure, which is allocated in F8:2. F8:2, PRESSURE, which indicates that the file type is a float number, the file number is the eight, and the bit number is 2. So, in that direction the pressure will be stored in Pascals, which is the SI unit. After that, in a new rung, the final magnitude which is volume will be computed. The procedure is the same, using the next formula: Now, the known parameters are pi, which equals 3.14159, and the radius of the water pipe, which is 3 inches, approximately 7.5 cm. It has to be noticed that in order to make the equation have the right result, everything must be in SI units, so although pi is an adimensional number, the radius must be written in metres, resulting in r = 0.075m. Therefore, the compute function in the ladder would look like this: Fig. 3.19 Volume CPT function 36 Glyndŵr University Project Title: Level sensing system Name: Javier García Fernández Supervisor: Reg Holme F8:3, VOLUME, which indicates that the file type is a float number, the file number is the eight, and the bit number is 3. So, in that direction the volume will be stored in cubic metres (m3), which is the SI unit. Fig. 3.20 End rung Finally, each program has to finish with an end rung like the one above. So, the full program with comments on the function on each rung would look like this: Fig. 3.21 Full program for the current output sensor 37 Glyndŵr University Project Title: Level sensing system Name: Javier García Fernández Supervisor: Reg Holme Summarising in a list the memory directions used for this program: I:1.0, SOURCE, input ranging 3277 to 16384. F8:1, H (height), in metres (m) F8:2, PRESSURE in Pascals (Pa) F8:3, VOLUME, in cubic metres (m3) Next step is to make a similar ladder program for the voltage output sensor which has been developed in this project. In this case, the scaling has been done step by step instead of using a function which automatically performs it. Fig. 3.22 Ladder scaling step by step In the first rung, 0000, the input from the sensor ranging 3277 to 32767 is moved from the I:1.0, the source, to an integer memory direction N7:0. N7:0, INPUT, which indicates that the file type is an integer number, the file number is the seven, and the bit number is 0. So, in that direction the input ranging 3277 to 32767 will be stored. In the second rung, 0001, the SPAN is calculated with the subtract function from the math toolbar, this function operates A-B. In this case, A is the integer stored in N7:1 and B is the integer stored in N7:2. The result of this operation is saved in N7:3. 38 Glyndŵr University Project Title: Level sensing system Name: Javier García Fernández Supervisor: Reg Holme N7:1, MAX, which indicates that the file type is an integer number, the file number is the seven, and the bit number is 1. So, in that direction the maximum input possible, 32767 is saved. N7:2, MIN, which indicates that the file type is an integer number, the file number is the seven, and the bit number is 2. So, in that direction the minimum input possible, 3277 is saved. N7:3, SPAN, which indicates that the file type is an integer number, the file number is the seven, and the bit number is 3. So, in that direction the input span, which is 29490, is stored. Finally, in the third rung, 0002, the scaling factor which will multiply every input is calculated. This factor is obtained dividing the 3.2 m of height which has the water pipe between the span stored in N7:3. This is computed with the divide function from the math toolbar, and the result is stored in F8:0. F8:0, MULTIPLIER, which indicates that the file type is a float number, the file number is the eight, and the bit number is 0. So, in that direction the scaling factor is stored. The rest of the program is pretty similar to the one for the current sensor. It is studied below: Fig. 3.23 Ladder program for the voltage sensor 39 Glyndŵr University Project Title: Level sensing system Name: Javier García Fernández Supervisor: Reg Holme Firstly, in rung 0003 the compute function is used again to calculate the height, this calculation is made by subtracting the minimum value to the input true value which enters the PLC, and then by multiplying the result times the scaling factor. The result of this computation is the height which is stored in F8:1 like in the current ladder program. Next, the procedures in rungs 0004 and 0005 are the same that the ones for the current sensor ladder program, so the memory directions used in this more complex program are going to be listed now. 3.3 I:1.0, MY_INPUT, input ranging 3277 to 16384. N7:0, INPUT, input ranging 3277 to 16384 stored in an integer file. N7:1, MAX, maximum value that the input can achieve, 32767. N7:2, MIN, minimum value that the input can achieve, 3277. N7:1, SPAN, the difference between the maximum and minimum possible inputs. F8:0, MULTIPLIER, scaling factor. F8:1, H (height), in metres (m) F8:2, P (pressure) in Pascals (Pa) F8:3, V (volume), in cubic metres (m3) Human Machine Interface (HMI) RSView32™ is a Windows®-based software program for creating and running data acquisition, monitoring, and control applications. Designed for use in Microsoft® Windows Server 2003, Windows XP and Windows 2000 environments, RSView32 contains the tools you need for creating all aspects of a human-machine interface, including real-time animated graphic displays, trends, and alarm summaries. RSView32 integrates easily with Rockwell Software, Microsoft, and other third-party products to maximize the power of ActiveX®, VBA, OLE, ODBC and OPC® technologies [22]. There are two packages: RSView32 Works contains both development and runtime software. Use this software to develop and run RSView32 applications. RSView32 Runtime contains only runtime software. Use this software to run applications developed in RSView32 Works. 40 Glyndŵr University Project Title: Level sensing system Name: Javier García Fernández Supervisor: Reg Holme 3.3.1 Control Philosophy Depending upon the application and the requirements of the control specification, there are different techniques that can be applied. This would greatly depend upon where the „control‟ of the system lies and what is required from the SCADA system. The different methods of control are [23]: Full SCADA Control. This method entails the control being passed over to the PC and the SCADA software running. All of the logic and sequential control (normally done by a PLC programme) is processed by SCADA. Inputs to the system may be „real‟ plant devices which are simply passed through a PLC (acting like an expensive data bridge) onto the PC where the SCADA programme reads the inputs. Similarly „real‟ plant output devices may be driven via a PLC but controlled by the SCADA programme. Thus the PLC does not have any „decision‟ making within this type of control Philosophy. Besides utilising „real‟ I/O, mimicked I/O can be created using graphics within the SCADA programme. Full PLC Control. The PLC will have full control of the plant actions and the PLC programme will determine the plant operation. The SCADA programme will simply be used as a data collection point and display information for the user/operator. However the user/operator cannot control the plant from the PC/SCADA, neither can data nor parameters be changed within the PLC programme. Shared Control. This is a mixture of the two above methods, and is the most common way to utilise SCADA. In this project, no control is done and only monitoring is made due to the kind of pump installed, which cannot be automatized. 3.3.2 Starting a project To start a New project, some parameters must be set up using the file tree. Firstly, the cannel configuration must be selected. Next, if RSLinx is running, configured and online with the PLC in use, the node configuration should be as easy as selecting the appropriate PLC. This will read the node address of the PLC and check the first stage of the SCADA communications, a failure here would indicate a fault with the set up. 41 Glyndŵr University Project Title: Level sensing system Name: Javier García Fernández Supervisor: Reg Holme Fig. 3.24 RSView32 file tree, channel and node configuration windows From the file tree select scan class, the setting within this screen will determine the sample rate for given classes. It should be noted that if there are many devices within a system and they are all on a fast scan class, then there is a high possibility the system will „clog up‟ – too much data to be collected within too short a period. Therefore consideration should be given as to which devices really need a fast scan and for which devices would a slower scan be acceptable. User inputs, in the form of a mouse click, require a fast scan (so as not to be missed) hence the default setting for class A to a fast setting will be changed, as shown below. Fig. 3.25 Scan class selection The remainder of the system set up can be left for now as a basic SCADA program will function with the parameters at default. But in this project also the user accounts option has been configured. Apart from the DEFAULT user, which has all the security 42 Glyndŵr University Project Title: Level sensing system Name: Javier García Fernández Supervisor: Reg Holme codes allowed, two more user profiles, ADMIN and USER, have been created. ADMIN has the same conditions that the DEFAULT user, and its password is “admin”, this will be required as soon as the project is run. The USER only has access to tags and options labelled with codes A-D. Fig. 3.26 User accounts configuration Now, graphic images, which can represent plant devices, can be created using the drawing tools. Clicking on the display folder a new „work screen‟ will appear, similar to that shown below. Fig. 3.27 New graphic window The screen is resized to nearly the maximum, it is useful to leave a small margin to the right of the screen, enabling to see the edge of the file tree, so it can then be quickly brought back to the foreground when required. Now, the project is ready to start being programmed, graphic images can either be drawn or obtained from the inbuilt libraries. Images can simply represent the appearance of the plant i.e. just a picture that has no other function, or they can represent a plant device that has a control or data acquisition purpose, a programme is built up with a mixture of the two. The control philosophy will determine the way in which the images function [23]. 43 Glyndŵr University Project Title: Level sensing system Name: Javier García Fernández Supervisor: Reg Holme The difference between an image which represent an appearance and the images or text with a function, is that these ones need to be linked to an address, the term used for this is “tag”. This tag may be a real I/O address within a PLC or a memory address within the PC. In the image below different tags can be seen, and the way to configure them in the particular case of this project. The most important thing is to declare the data source, which in this case is the device called “one”, which refers to the PLC, and the address stated in the ladder programming. Apart from that, minimum and maximum values, unit and data type are important for the correct display of the tag. Fig. 3.28 Tag database window It is possible to see that in this project four tags have been created, they will be further explained later. Another important characteristic which can be declared for each tag are alarms, there are several levels of importance of alarms. In this project, three levels of alarm have been created for the “height tag”. Level 1, when the level is below 10 cm, because there is the risk that the application for which the tank is being used runs out of water. Level 2, when the level is over 3.10 m, because the limit is 3.20 m and there is a risk of water overflowing the pipe. Level 3, the higher level of alarm declared, when the level is over 3.20 m because surely the water is overflowing the pipe. 44 Glyndŵr University Project Title: Level sensing system Name: Javier García Fernández Supervisor: Reg Holme 3.3.3 Graphic windows of the SCADA In this project seven graphic displays have been designed. They are listed below in the tree file. Fig. 3.29 Graphic windows The initial window is the welcome display, which should allow the user selecting the language between English, Spanish and French. So the flags are the first example of images acting as buttons, in this case they link the user to the main screen. Fig. 3.30 Welcome window To configure that, it is necessary to right-click on the image and select animation>touch, there it is possible to touch which action the image will perform when pressed, repeated and released. In this case, the option chosen has been from the navigation group, when pressed, the “main” window will be displayed centered on the screen and the “welcome” window will be closed. 45 Glyndŵr University Project Title: Level sensing system Name: Javier García Fernández Supervisor: Reg Holme Fig. 3.31 Main window In the image above, it is possible to see the main windows in the editing mode. This is the most important window, and therefore the most interesting to analyse. Graphically, it tries to represent the environment in the E12 lab, in which there is a big vertical water pipe with a smaller transparent pipe attached to it in order to control the level. This pipe is filled from the top when the pump is connected to the power supply and is emptied the tap in the bottom is opened, the water is both taken from and released to a deposit below the pipe. The other part of the assembly is related to the sensor, which is connected to the input module of the PLC. The final connection is between the PLC and the PC. Besides, it is possible to see many arrays of “s” and “#” which indicate string and numeric displays. The main displays in this window are the ones in the centre, next to the vertical pipe. There will be displayed the level in metres, for that purpose the tag “heightdisp” has been created. It gets directly the height datum from the PLC memory F8:1. Just below it, another numeric display indicates the height in feet, since it is the imperial unit, very extended in the UK. The same tag “heightdisp” is used for this, and the conversion is made directly in the SCADA, dividing that tag by 0.3048 m, which is the equivalent to 1 ft. Pressure and volume displays are made in the same way. For pressure the tag “pressuredisp” has been created, but in this case, since it “comes” in Pascals, which is a very little unit, it is displayed multiplied by a 1000 factor making the display unit Kilopascals, which is much more used. For the pounds per square inch (psi), the pressure is obtained in pascals and converted to psi using the equivalence 1psi equals 46 Glyndŵr University Project Title: Level sensing system Name: Javier García Fernández Supervisor: Reg Holme 6,894.757 Pa. In the case of volume, the tag is defined “volumedisp” and it is displayed directly in the first case. But for liquid volumes litres are much more common and volume is also displayed in this unit. To do that, the “volumedisp” is multiplied by a 1000 factor, since there is 1000 l in a cubic metre of water. Finally, another numeric display shows the percentage of filling of the tank. Apart from that, in order to make the level more visual there are two arrows moving along the grey pipe showing where the level is, this is an automatic option that RSView offers which only needs a tag, in this case the tag used has been obviously “heightdisp”. The other effect is in the transparent pipe next to it, in which the water will also be as high as the level. To make this easier, the grey pipe is 320 pixels high, and the transparent is 290 pixels starting at 30 pixels from the base, trying to copy as much as possible the real pipes in the laboratory. This effect has been made by drawing two rectangles, the white rectangle in the back copies the transparent pipe, and there is an animated blue rectangle in front of it which simulates the water. This blue rectangle has the height animated, with the following code. Heightdisp*100-30 Although the code is quite simple, the key to make it work correctly has been to initially give the blue rectangle the maximum height. The reason for this code is that, since the height ranges 0-3.2 and the pipe is 320 height, it needs a 100 multiplying factor. Besides, the transparent pipe starts 30 cm from the base of the grey one, so it is only 290 pixels height and the difference needs to be subtracted. In order to interact with the SCADA, there are also string and numeric inputs. In this main window there is a numeric input on the left hand side, below the “Fix setpoint” label, actually this tag has been defined “setpoint” and must be a number between 0 and 3.2, so the setpoint will be the level in metres. Once a setpoint is introduced, a message will appear below indicating the operator if he has to fill the pipe, empty it or if the level is in a range of ±10 cm of the fixed one. That message has been programmed with the following function: If heightdisp < (setpoint-0.1) Then "Continue filling the pipe" Else If heightdisp > (setpoint+0.1) Then "Run the tap until desired level" else "You have reached the desired level" Another string display is at the bottom of the page. This will only appear showing caution messages when the level is both over 3.10 m and below 10 cm. If not, no message will appear and this lower part of the screen will remain in blank. The code for this message is the following: If heightdisp > 3.1 Then "CAUTION! The level is over 3.1m and the limit is 3.2m!" else If heightdisp < 0.1 47 Glyndŵr University Project Title: Level sensing system Name: Javier García Fernández Supervisor: Reg Holme Then "CAUTION! The level is below 10cm" else " " Next, analysing the rest of the screen buttons and information it is possible to see the last numeric display in this screen is the one in the upper left corner, which shows the time and date. In the upper right corner there are two hyperlinks which display the main window in Spanish and French. On the lower right corner there are two buttons, the first one is for printing the current screen, and the second one makes some help information on what everything on the screen does when the operator clicks on it, and it makes that help messages disappear when he clicks again. The other four buttons: “Plot trend”, “View datasheets”, “View alarms” and “Monitor tags” will be explained one by one because their function are to display new windows which will be explained next. Fig. 3.32 Trend window In this window, a predefined trend window has been imported from the library, sit i has only been necessary to include the tags to monitor: height, pressure and volume. Buttons allow moving and resizing both magnitude and time axis as well as pausing/resuming the monitoring. The other three buttons apart from the “return to the main page” button have already been explained. 48 Glyndŵr University Project Title: Level sensing system Name: Javier García Fernández Supervisor: Reg Holme Fig. 3.33 Alarm summary window In the image above the alarm summary window can be seen. There is a big table which is a predefined function from RSView32, but the information displayed must be selected. In this case that information is: Tagname Tag value Analog Level Alarm Time Alarm Type Tag Description In the windows below, the tag monitor window is shown in both editing modes. This is also a predefined function, but the tags which are going to be monitored must be written in the first column after double clicking on the table. This table will show the current value, the state, and a description of the tag. Fig. 3.34 Tag monitor window 49 Glyndŵr University Project Title: Level sensing system Name: Javier García Fernández Supervisor: Reg Holme The last window is “datasheets” and it should allow the visualization of the datasheets from the two sensors, and the installation instructions and user manual of the 1746-NI4, the input module of the PLC. Fig. 3.35 Datasheets window The problem with this is that this ActiveX function also requires Visual Basic, and it is not available in the laboratory computer. This also explains the reason why it has not been possible to implement a list box instead of using plain text acting as hyperlinks. 50 Glyndŵr University Project Title: Level sensing system Name: Javier García Fernández Supervisor: Reg Holme 4. Testing & Analysis Now, the design of the project is finished, so it is the time to develop and test the level sensing system designed. Firstly, the sensor output will be tested. Then, the amplifying circuit will be simulated and implemented. After that, the ladder program will be verified and download to the PLC. Finally, with the aid of the RSLinx for the communications, the SCADA windows will be run. 4.1 Sensor 4.1.1 The transducer Firstly, once the sensor had been chosen and purchased, the first step was to get its output function. In order to do that, the laboratory environment was tried to be reproduced in a room at home. Below it is possible to see some photos of the assembly. Fig. 4.1 Water pipe at home In the image it can be seen the water pipe used to test the sensor, it measures 2.10 metres and similarly to the one in the laboratory, a transparent tube has been attached to control the level. Similarly to the laboratory one, it is filled from the top and at the 51 Glyndŵr University Project Title: Level sensing system Name: Javier García Fernández Supervisor: Reg Holme bottom, a tap has been installed to empty it. In the image, it is possible to appreciate that the pipe has been marked with the height and the litres, so there were two magnitudes to take as reference. Furthermore, the transducer input was connected to a small hose with a weight on the tip so it sank to the bottom of the pipe. Apart from that, since the transducer pins are quite easy to bend, it was installed on a breadboard placed on a shelf near to the top of the pipe, so power supply and output wires ran from the top of the pipe until the voltage source and the amplifying circuit. Images below try to show these concepts. Fig. 4.2 Sensor breadboard assembly Now, everything was prepared to make some measurements and deduce the output function of the sensor. Just as a reminder, the sensor must be fed with 3.3 Vdc. Fig. 4.3 Measuring the sensor output 52 Glyndŵr University Project Title: Level sensing system Name: Javier García Fernández Supervisor: Reg Holme The results are shown in the table below, the voltage values were taken each 10 cm of depth: Height (m) Voltage (V) 2,00 1,423 1,90 1,395 1,80 1,330 1,70 1,264 1,60 1,219 1,50 1,151 1,40 1,095 1,30 1,052 1,20 1,000 1,10 0,948 1,00 0,885 0,90 0,845 0,80 0,780 0,70 0,727 0,60 0,675 0,50 0,614 0,40 0,561 0,30 0,502 0 0,334 With this data, the first step was to do a regression analysis, as expected trend is linear, linear regression analysis has been carried out. The method used will be the least squares, consisting on minimizing the sum of the squares of the difference between experimental and theoretical values. The solution will be of the form y=ax+b, in this case y will be the voltage and x will be the height. To get the equation, the following formula must be substituted: ( ̅ ̅) Where knowing that n=19: ∑ ̅ ̅ ∑ 53 Glyndŵr University Project Title: Level sensing system Name: Javier García Fernández Supervisor: Reg Holme ̅ ∑ ∑ ̅̅ ̅ Substituting in equation 4.1 and simplifying: ( ) Where, y is the voltage in volts (V) and x the height in metres (m). It is also possible to compute the correlation coefficient (r), which shows the “quality” of the approach. If r is around 1 the approximation will be very good and if the coefficient is near to 0 the deviation will be quite important. Being, ∑ Substituting, 54 Glyndŵr University Project Title: Level sensing system Name: Javier García Fernández Supervisor: Reg Holme This means that the quality of the approximation is very good. Next, the data will be plot using MS Excel, which also allows knowing the regression so it is possible to check the hand computed one. 1,600 Sensor output Output Voltage (V) 1,400 1,200 1,000 0,800 y = 0,5465x + 0,3415 0,600 0,400 0,200 0,000 0,00 0,20 0,40 0,60 0,80 1,00 1,20 1,40 1,60 1,80 2,00 Water level (m) Fig. 4.4 Sensor output function It is also possible to use excel to obtain other regressions: Exponential regression: y = 0,4305·e0,6543·x This has a correlation coefficient (r) = 0.9772921774 Polynomical of 2nd order: y = -0,0053x2 + 0,5576x + 0,3373 Polynomical of 3rd order: y = 0,0119x3 - 0,0414x2 + 0,5867x + 0,3325 Polynomical of 4th order: y = -0,0007x4 + 0,0145x3 - 0,0447x2 + 0,588x + 0,3324 Polynomical of 5th order: y = -0,0762x5 + 0,3846x4 - 0,6712x3 + 0,4571x2 + 0,461x + 0,3348 Polynomical of 6th order: y = -0,1718x6 + 0,9828x5 - 2,0869x4 + 2,0252x3 0,896x2 + 0,7069x + 0,3337 It can be seen easily that linear regression is better than exponential, since the graph is much more similar to a straight line than an exponential function. On the other 55 Glyndŵr University Project Title: Level sensing system Name: Javier García Fernández Supervisor: Reg Holme hand, the higher the polynomial is and the better the approximation will be, but it has been demonstrated that first order polynomial, which is the linear regression, is good enough. 4.1.2 The amplifying circuit The first test after designing the amplifying circuit was to simulate it on the computer. For that purpose, the PROTEUS software by Labcenter Electronics has been used. Since the sensor was not in the library, a voltage source has been placed doing its function. It is noticeable that a 24 kΩ has been used instead of the 25 kΩ because that is the standardized industrial value. Fig. 4.5 Amplifying circuit running in PROTEUS (I) 56 Glyndŵr University Project Title: Level sensing system Name: Javier García Fernández Supervisor: Reg Holme Fig. 4.6 Amplifying circuit in PROTEUS (II) Once the simulation proved the circuit was correct, it was implemented on a breadboard. Fig. 4.7 Amplifying circuit on breadboard This caused a lot of problems, although theoretically it should work. On practice it did not, it worked well with big voltages, but with an input below 2 V approx. it did not 57 Glyndŵr University Project Title: Level sensing system Name: Javier García Fernández Supervisor: Reg Holme amplify correctly, the output stabilized at 6.7 V approx. The problem was that since it does not require negative voltages, it should work perfectly, but reality shows that in order to amplify correctly low voltages, the negative supply of the amplifier is required or it saturates. Therefore, another source was required, making three voltages sources in total, one of 3.3 V to feed the sensor and the other two of ±18V to feed the amplifier. So finally, the sensor assembly is: Fig. 4.8 Final sensor assembly The tip of the hose which is stuck to an iron bar with insulating tape can be seen on the right of the photo. On the image below, it is showed how the hose is fit in the water pipe from the top. Fig. 4.9 Fitting the sensor hose into the pipe 58 Glyndŵr University Project Title: Level sensing system Name: Javier García Fernández Supervisor: Reg Holme 4.1.3 The current to voltage circuit converter It has already been mentioned that this part was not implemented in the project. Anyway, it has been simulated with PROTEUS to demonstrate whether it could worked or not, and the results were positive. Fig. 4.10 Converting 0V to 4mA Fig. 4.11 Converting 10V to 20mA 59 Glyndŵr University Project Title: Level sensing system Name: Javier García Fernández Supervisor: Reg Holme 4.2 Testing the ladder logic programming It has already been showed how to wire the PLC and how to test whether it has communication with the PC by using RSLinx. In order to test the ladder, the first step is to check it using the RSLogix command buttons “Verify file” and “Verify project” which can be seen below: Fig. 4.12 RSLogix verify buttons Next, one the problems found have been solved, the online bar status must be changed from “OFFLINE” to “DOWNLOAD” Fig. 4.13 RSLogix online bar The software will now load the RSLINX driver for downloading and communication to the CPU. The screen will bring up a series of prompts for the operator to acknowledge. Now, the system should be REMOTE RUN, but there is the possibility that it stays in the REMOTE PROGRAM mode, from the same list box the GO ONLINE option must be selected. After that, the PLC must be online, an example of the program running can be seen below. 60 Glyndŵr University Project Title: Level sensing system Name: Javier García Fernández Supervisor: Reg Holme Fig. 4.14 Ladder logic running A “random” set of samples have been recorded, they have been represented in the following table. Voltage input (V) Bit input Height (m) 1 3550 0.028 2 6602 0.36 2.5 8258 0.54 3 10067 0.73 61 Glyndŵr University Project Title: Level sensing system Name: Javier García Fernández Supervisor: Reg Holme 4.3 14238 1.185 5.2 17136 1.5 6 19548 1.766 6.7 21840 2.01 7.5 24668 2.3 8.7 28523 2.73 9.7 31593 3.07 9.9 32243 3.14 Height (m) Using Excel to plot the results and get the linear regression: 3,50 3,25 3,00 2,75 2,50 2,25 2,00 1,75 1,50 1,25 1,00 0,75 0,50 0,25 0,00 y = 0,3506x - 0,3299 0,00 1,00 2,00 3,00 4,00 5,00 6,00 7,00 8,00 9,00 10,00 Input voltage (V) 62 Glyndŵr University Project Title: Level sensing system Name: Javier García Fernández Supervisor: Reg Holme 4.3 Testing the SCADA Finally, it is the time to test the visual interface, to do that the PLC must be online. Next, from the bar above, the status must be changed from stop to running by clicking on the following button: Fig. 4.15 SCADA stop-run button Now, some of the screens will be shown while running: Fig. 4.16 Main window running (1) Fig. 4.17 Main window running (2) 63 Glyndŵr University Project Title: Level sensing system Name: Javier García Fernández Supervisor: Reg Holme It is possible to see that all the main window displays worked well, and the programmed messages too. In the first image since the setpoint is 2 m, and the level is 1.587 m, it encourages the operator to fill the pipe until the desired level. In the second screen, the level is 3.169 m, so an alert message has appeared at the bottom of the screen since the limit is very close. Besides, as the desired level is still 2 m, the recommendation to the operator is to run the tap. Once the main window is opened, tags are started to monitor and their status can be checked with the button on the lower right corner. The window mentioned can be seen below. Fig. 4.18 Tag monitor window running After increasing and decreasing the level very fast, the alarm summary window has the following appearance. Alarms are saved whenever the level is below 10cm, with an alarm level of 1, when the level is over 3.10 m, with an alarm level of 2, and when the level is over 3.20 m, with the highest level of alarm since the water must be falling to the floor. The time when the level comes back to allowed values is also saved. Fig. 4.19 Alarm summary window running 64 Glyndŵr University Project Title: Level sensing system Name: Javier García Fernández Supervisor: Reg Holme The last important window is the trend, which can be seen below. It plots the evolution of the selected tags. The y axis shows the magnitude of the current selection, which can be changed by clicking on the tags below the graph, it can also be zoomed and scrolled using the buttons on the right. The x axis shows the time, which can be “moved” using the buttons at the bottom of the screen. Fig. 4.20 Trend window running 65 Glyndŵr University Project Title: Level sensing system Name: Javier García Fernández Supervisor: Reg Holme 5. Conclusions The aim of this project was designing and developing a level sensing system. The hardware consisted on a pressure sensor measuring from a vertical water pipe and connected to a PLC which converted the input in height, pressure and volume and sent it to a PC. The conclusions obtained for this project are: For this project, the choice was to use the simplest principle to measure level, so a pressure transducer was used. Using pressure to measure the level is advisable regardless the dimensions and shape of the tank. One of the obtained conclusions with the implementation of this level sensing system is the acquisition of that reading safely and with a greater reliability than the one obtained by an operator. An operator would give a subjective reading since in order to read the level correctly it is necessary to be at the same height of the level. So, it would be necessary a ladder or a mechanism to observe the tank level accurately enough when reading above 2 metres height. Besides, this implies a risk for the operator which is completely solved with this application. Another factor which can affect to a false reading is the mental fatigue of an operator when doing a repetitive task like reading tank levels, especially in those cases when the number of tanks is very high. Another conclusion of this project is the flexibility to increase the number of tanks allowing this application to be used in several industries, simply connecting more sensors to the PLC inputs and adding objects in the SCADA to monitor the level, this allows an operator to supervise with no risk a great number of tanks. SCADAs are very powerful tools for real time monitoring and control of an industrial plant. But, the final operator must always be taken into account when designing it since the easiest to use it is, the least errors there will be. The alarm configuration allows being proactive with possible risks of both very full or too empty tanks in real time and take actions to correct the incidence avoiding undesirable consequences like non-programmed stops. 66 Glyndŵr University Project Title: Level sensing system Name: Javier García Fernández Supervisor: Reg Holme From an economic point of view, this application allows supervision from a control room of as many levels as desired. This is an important advantage if the levels to monitor are in an industry big enough to employ more than one operator to supervise everything. With this application, human resources could be sent to other tasks which improve quality for both the professional task of the operator and the company. From a safety point of view, this application allows supervision of the level regardless it is inflammable, corrosive, etc. from a distance safe enough for the operator. As a remarkable experience in the development of this application, it is noticeable the behaviour between both theoretical and practical work. Firstly, according to the datasheet of the sensor, it should give a voltage as a function of measured pressure which, after the development of the sensor and the data acquisition has been proved experimentally how the change in the behaviour is almost 50% less with respect to the expected values in the sensor datasheet. Another remarkable experience in this topic is related to the problem with the negative supply of the Opamp, although theoretically it is not necessary if the output does not require negative voltages, in practice the opamp saturates when trying to amplify very low voltages. To sum up, the development of this application fulfils the initial objectives of supervision since the desired functionality was obtained. It allows registering the tank filling. It detects maximum and minimum levels and warns the operator with an alarm to allow him take real time decisions and solve conflictive situations. 67 Glyndŵr University Project Title: Level sensing system Name: Javier García Fernández Supervisor: Reg Holme 6. Recommendations As future work, it would be important to fully automatize the process to control the level. By doing that, the operator could both fill and empty the tank according to the current need. This would be a great improvement since time and fatigue would be reduced for the operator and hence, money would be saved. In order to do that, an initial investment is required to change the water pump and the filling and emptying valves. Apart from that, to improve the SCADA it would be advisable to include Visual Basic options, which improve a lot the visibility of the interface and which would allow for example to create a window to display datasheets. Besides, with an internet connection a remote supervision could be possible. This would allow an operator to connect everywhere to monitor the process, or send him an e-mail or a sms to the mobile phone whenever an alarm appears. Another improvement would be the implementation of a database with the purpose of saving the register of levels and alarms to study trends and correct repetitive errors. Finally, the sensor with its amplifying circuit should be built on a PCB or even make it waterproof and convert it into a submersible depth sensor with no need of a hose with a weight on the tip to introduce it in the pipe. : 68 Glyndŵr University Project Title: Level sensing system Name: Javier García Fernández Supervisor: Reg Holme 7. References [1] P.A. Tipler and G. P. Mosca, Physics for Scientist and Engineers, 6th ed., Barcelona: Reverté, 2010, pp 365-371. [2] Y.A. Çengel and M. A. Boles, Thermodynamics. An Engineering Approach, 6th ed., Mexico: McGraw-Hill, 2009, pp 21-31. [3] J. E. Barrios Deluquez, Industrial Control II, Lecture Notes, Colombia: Pamplona University. Available: http://www.scribd.com/doc/490864/EL-ENTORNO-DEL-PLC [4] J. C. Villajulca (2010, May). Instrumentation and Control. [Online]. Available: http://www.instrumentacionycontrol.net/es/curso-completo- instrumentacion-industrial/217-medidores-de-nivel-un-interesante-resumen-ymuy-completo.html [5] TDK (2007, February). Powder level sensors. [Online]. Available: http://www.tdk.co.jp/tefe02/eb461_ts.pdf [6] G. Bass (2000, October). The principles of level measurement. [Online]. Available: http://www.sensorsmag.com/sensors/leak-level/the-principles-level- measurement-941 [7] S. M. Labat & S. M. Rodrigo, Level measurements, Lecture Notes, Spain: Zaragoza University. Available: http://www.scribd.com/doc/7192985/Apunte-de-Medicion-de-Nivel [8] A. Franco, Fluid Statics, Lecture Notes, Spain: Basque Country University. Available: http://www.sc.ehu.es/sbweb/fisica/fluidos/estatica/introduccion/Introduccion.htm 69 Glyndŵr University Project Title: Level sensing system Name: Javier García Fernández Supervisor: Reg Holme [9] A. Creus, Industrial Instrumentation, 5th ed., Brazil: Marcombo, 1993, pp 6379. [10] Manometers and barometers. [Online]. Accessed: November 2010. Available: http://www.kentchemistry.com/links/GasLaws/manBar.htm [11] Science experiments (2006, November). Bourdon tube. [Online]. Available: http://science-experiments.info/2006/11/bourdon-tube/ [12] Diaphragm pressure gauges: Introduction. [Online]. Accessed: November 2010. Available: http://www.efunda.com/designstandards/sensors/diaphragm/diaphragm_intro.cfm [13] Rocatek S.A.S. (undated). [Online]. Accessed: November 2010. Available: http://www.rocatek.com/forum.php [14] L.A. Bryan and E.A. Bryan, Programmable controllers. Theory and Implementation, 2nd ed., USA: Industrial Text Company, 1997. [15] Applied Measurements LTD. 2008/2009. Pi9911 Field Re-Rangeable Submersible Level / Depth Sensor / Transducer / Transmitter. [Online]. Accessed: April 2011 Available: http://www.appmeas.co.uk/pdf/level-and-depth-sensors/Pi9911.pdf [16] Honeywell. July 2009. SSCSANN005PGAA3 - SENSOR, TRUSTABILITY, 5PSI, 3.3V, SIP. [Online]. Accessed: April 2011 Available: http://www.farnell.com/datasheets/578749.pdf [17] Texas Instruments. September 2009. XTR110. Accessed: April 2011 Available: http://focus.ti.com/lit/ds/symlink/xtr110.pdf [18] Electronic design. (undated) Voltage to current circuit converter. [Online]. Accessed: April 2011 Available: http://archive.electronicdesign.com/files/29/2985/figure_01.gif 70 Glyndŵr University Project Title: Level sensing system Name: Javier García Fernández Supervisor: Reg Holme [19] Rockwell Automation. (undated) SLC 500 Controllers. [Online]. Accessed: April 2011 Available: http://ab.rockwellautomation.com/Programmable-Controllers/SLC-500Controllers [20] Allen Bradley. June 2004. SLC 500 4-Channel Analog I/O Modules. [Online]. Accessed: April 2011 Available: http://literature.rockwellautomation.com/idc/groups/literature/documents/um/1746 -um005_-en-p.pdf [21] Rockwell Automation. January 2007. RSLogix 500 Getting Results Guide. [Online]. Accessed: April 2011 Available: http://www.plctrainer.net/RSLogix500.pdf [22] Rockwell Automation. August 2007. RSView32 Getting Results Guide. [Online]. Accessed: April 2011 http://samplecode.rockwellautomation.com/idc/groups/literature/documents/gr/vw 32-gr001_-en-e.pdf [23] Holme R., Lecture Notes, United Kingdom: Glyndwr University. Quick Start Guide to RSView32 71 Glyndŵr University Project Title: Level sensing system Name: Javier García Fernández Supervisor: Reg Holme 8. Appendices Appendix I: Pi9911 Level Sensor Datasheet Appendix II: SSCSANN005PGAA3 Pressure Sensor Datasheet Appendix III: LM741CN Opamp Datasheet 72 5:1 Turndown Ø30mm Field Rangeable Submersible Pi9911 Series DEPTH SENSOR + Depth Ranges 150mmWG to 200mWG + Sealed to IP68 (200mWG) + Robust Construction + Field Adjustable (5:1 turndown) + Lightning (Surge) Protection to EN61000-4-5 + Excellent Long Term Stability + Temperature Compensated + Outstanding Performance + 3 YEAR WARRANTY Options Available Special Ranging (consult factory) Extended Temperature Ranges Different Cable Length DESCRIPTION The Pi9911 submersible 2-wire 4-20mA Depth Sensor offers great flexibility with its two piece body design providing ease of access to the 5:1 turndown facility DIL switches and zero & span potentiometers. Manufactured from 403 Stainless Steel, these two halves are held together using a locking ring and are sealed by means of an 'O' ring arrangement. This, in conjunction with an IP68 sealed polyurethane cable outlet, completes a high integrity waterproof assembly which is rated to 200 metres depth. Both sensor and electronics are protected against the effects of surges created by lightning strikes, offering distinct advantages over competitive products. The Pi9911 offers rugged construction, excellent long term stability and performance. To further support our claim of long term reliability we offer the product as standard with a 3 Year Warranty. Transducer Specialists... APPLIED MEASUREMENTS LIMITED 3 MERCURY HOUSE - CALLEVA PARK - ALDERMASTON - BERKSHIRE - RG7 8PN - UK Tel: (+44) 0118 981 7339 Fax: (+44) 0118 981 9121 email: [email protected] Internet: www.appmeas.co.uk Wiring Schematic Diagram SPECIFICATION + Pi9911 Depth Sensor Power Supply - Resistive Load Process Measurement Instrumentation CHARACTERISTICS Pressure Ranges: Safe Overpressure: Burst Pressure: Supply Voltage: Load Driving Capacity: Output Current Zero Pressure: Max. Pressure: Pi9911 0.15, 0.5, 1, 2, 5, 10, 20, 50, 100, 200* 150 300 12- 30 1000 4.0 20.0 4-core screened polyurethane sheathed cable with Electrical Connections: Accuracy: Temperature Range Operating: Compensated: Temperature Effect On Output: On Zero: Environmental Protection: Weight Construction: vent tube plus strain and drain wires <0.25 -40 to +80 0 to +70 <0.01 <0.015 IP68 to 200mWG 600 (not including cable) 403 St. Steel body with 316 St. Steel Sensing Diaphragm UNITS Metres Water Gauge (mWG) %Pressure Range %Pressure Range Volts DC Ohms at Max. Supply Voltage Milliamps (mA) Milliamps (mA) ±%Pressure Range °C °C ±%Pressure Range/°C ±%Applied Pressure/°C grams *Interim ranges are available if required All dimensions in mm 230 nominal Ø30 Cable Removable Stainless Steel Housing uPVC Self Flushing Nose Cone IP68 Cable Exit Ordering Information The product part number is coded to assist with ordering, as follows: e.g.. Pi9911 - 5mWG - C10 - T Pi9911 Product series type (4-20mA output) 5mWG Range to be set for normal use C10 Cable length in metres - i.e. 10 metres T Optional ¼” BSPP female thread for tapping to pipe. (A nose cone is supplied as standard) APPLIED MEASUREMENTS LIMITED Continuous product development may result in minor changes to published specifications. Issue 08/09 2 - www.honeywell.com/sensing - Honeywell Sensing and Control 3 4 www.honeywell.com/sensing SSCSANN100PGAA3 Output (%Vsupply) 0 10 20 30 40 50 60 70 80 90 100 0 10 20 40 50 Pressure (psig) 30 2 % FSS Total Error Band 60 70 80 SSCSANN100PGAA3 Output vs. Pressure 90 Honeywell Sensing and Control 100 5 6 www.honeywell.com/sensing Honeywell Sensing and Control 7 8 www.honeywell.com/sensing Honeywell Sensing and Control 9 10 www.honeywell.com/sensing Port 2 Port 1 Honeywell Sensing and Control 11 www.honeywell.com Golden Valley, MN 55422 1985 Douglas Drive North Honeywell Sensing and Control 008167-2-EN IL50 GLO Printed in USA July 2009 © 2009 Honeywell International Inc. LM741 Operational Amplifier General Description The LM741 series are general purpose operational amplifiers which feature improved performance over industry standards like the LM709. They are direct, plug-in replacements for the 709C, LM201, MC1439 and 748 in most applications. The amplifiers offer many features which make their application nearly foolproof: overload protection on the input and output, no latch-up when the common mode range is exceeded, as well as freedom from oscillations. The LM741C is identical to the LM741/LM741A except that the LM741C has their performance guaranteed over a 0˚C to +70˚C temperature range, instead of −55˚C to +125˚C. Features Connection Diagrams Metal Can Package Dual-In-Line or S.O. Package 00934103 00934102 Note 1: LM741H is available per JM38510/10101 Order Number LM741H, LM741H/883 (Note 1), LM741AH/883 or LM741CH See NS Package Number H08C Order Number LM741J, LM741J/883, LM741CN See NS Package Number J08A, M08A or N08E Ceramic Flatpak 00934106 Order Number LM741W/883 See NS Package Number W10A Typical Application Offset Nulling Circuit 00934107 © 2004 National Semiconductor Corporation DS009341 www.national.com LM741 Operational Amplifier August 2000 LM741 Absolute Maximum Ratings (Note 2) If Military/Aerospace specified devices are required, please contact the National Semiconductor Sales Office/ Distributors for availability and specifications. (Note 7) LM741A LM741 ± 22V ± 22V ± 18V 500 mW 500 mW 500 mW ± 30V ± 15V ± 30V ± 15V ± 30V ± 15V Output Short Circuit Duration Continuous Continuous Continuous Operating Temperature Range −55˚C to +125˚C −55˚C to +125˚C 0˚C to +70˚C Storage Temperature Range −65˚C to +150˚C −65˚C to +150˚C −65˚C to +150˚C 150˚C 150˚C 100˚C N-Package (10 seconds) 260˚C 260˚C 260˚C J- or H-Package (10 seconds) 300˚C 300˚C 300˚C Vapor Phase (60 seconds) 215˚C 215˚C 215˚C Infrared (15 seconds) 215˚C 215˚C 215˚C Supply Voltage Power Dissipation (Note 3) Differential Input Voltage Input Voltage (Note 4) Junction Temperature LM741C Soldering Information M-Package See AN-450 “Surface Mounting Methods and Their Effect on Product Reliability” for other methods of soldering surface mount devices. ESD Tolerance (Note 8) 400V 400V 400V Electrical Characteristics (Note 5) Parameter Conditions LM741A Min Input Offset Voltage LM741 Min LM741C Typ Max 1.0 5.0 Min Units Typ Max Typ Max 0.8 3.0 2.0 6.0 mV 4.0 mV TA = 25˚C RS ≤ 10 kΩ RS ≤ 50Ω mV TAMIN ≤ TA ≤ TAMAX RS ≤ 50Ω RS ≤ 10 kΩ 6.0 Average Input Offset 7.5 15 mV µV/˚C Voltage Drift Input Offset Voltage TA = 25˚C, VS = ± 20V ± 10 ± 15 ± 15 mV Adjustment Range Input Offset Current TA = 25˚C 3.0 TAMIN ≤ TA ≤ TAMAX Average Input Offset 30 20 200 70 85 500 20 200 nA 300 nA 0.5 nA/˚C Current Drift Input Bias Current TA = 25˚C Input Resistance TA = 25˚C, VS = ± 20V 1.0 TAMIN ≤ TA ≤ TAMAX, 0.5 30 TAMIN ≤ TA ≤ TAMAX 80 80 0.210 6.0 500 80 1.5 0.3 2.0 500 0.8 0.3 2.0 nA µA MΩ MΩ VS = ± 20V Input Voltage Range ± 12 TA = 25˚C TAMIN ≤ TA ≤ TAMAX www.national.com ± 12 2 ± 13 ± 13 V V Parameter (Continued) Conditions LM741A Min Large Signal Voltage Gain Typ LM741 Max Min Typ 50 200 LM741C Max Min Typ 20 200 Units Max TA = 25˚C, RL ≥ 2 kΩ VS = ± 20V, VO = ± 15V 50 V/mV VS = ± 15V, VO = ± 10V V/mV TAMIN ≤ TA ≤ TAMAX, RL ≥ 2 kΩ, VS = ± 20V, VO = ± 15V 32 V/mV VS = ± 15V, VO = ± 10V VS = ± 5V, VO = ± 2V Output Voltage Swing 25 15 V/mV 10 V/mV ± 16 ± 15 V VS = ± 20V RL ≥ 10 kΩ RL ≥ 2 kΩ V VS = ± 15V RL ≥ 10 kΩ ± 12 ± 10 RL ≥ 2 kΩ Output Short Circuit TA = 25˚C 10 Current TAMIN ≤ TA ≤ TAMAX 10 Common-Mode TAMIN ≤ TA ≤ TAMAX Rejection Ratio 25 35 Supply Voltage Rejection TAMIN ≤ TA ≤ TAMAX, Ratio VS = ± 20V to VS = ± 5V RS ≤ 50Ω 25 ± 14 ± 13 V 25 mA 95 86 96 90 70 90 dB 77 96 77 96 dB µs TA = 25˚C, Unity Gain 0.25 0.8 0.3 0.3 Overshoot 6.0 20 5 5 TA = 25˚C Slew Rate TA = 25˚C, Unity Gain Supply Current TA = 25˚C Power Consumption TA = 25˚C 0.437 1.5 0.3 0.7 VS = ± 20V 80 LM741 % MHz 0.5 0.5 V/µs 1.7 2.8 1.7 2.8 mA 50 85 50 85 mW 150 VS = ± 15V LM741A dB dB Rise Time Bandwidth (Note 6) V mA 70 80 RS ≤ 10 kΩ Transient Response ± 12 ± 10 40 RS ≤ 10 kΩ, VCM = ± 12V RS ≤ 50Ω, VCM = ± 12V ± 14 ± 13 mW VS = ± 20V TA = TAMIN 165 mW TA = TAMAX 135 mW VS = ± 15V TA = TAMIN 60 100 mW TA = TAMAX 45 75 mW Note 2: “Absolute Maximum Ratings” indicate limits beyond which damage to the device may occur. Operating Ratings indicate conditions for which the device is functional, but do not guarantee specific performance limits. 3 www.national.com LM741 Electrical Characteristics (Note 5) LM741 Electrical Characteristics (Note 5) (Continued) Note 3: For operation at elevated temperatures, these devices must be derated based on thermal resistance, and Tj max. (listed under “Absolute Maximum Ratings”). Tj = TA + (θjA PD). Thermal Resistance θjA (Junction to Ambient) θjC (Junction to Case) Cerdip (J) DIP (N) HO8 (H) SO-8 (M) 100˚C/W 100˚C/W 170˚C/W 195˚C/W N/A N/A 25˚C/W N/A Note 4: For supply voltages less than ± 15V, the absolute maximum input voltage is equal to the supply voltage. Note 5: Unless otherwise specified, these specifications apply for VS = ± 15V, −55˚C ≤ TA ≤ +125˚C (LM741/LM741A). For the LM741C/LM741E, these specifications are limited to 0˚C ≤ TA ≤ +70˚C. Note 6: Calculated value from: BW (MHz) = 0.35/Rise Time(µs). Note 7: For military specifications see RETS741X for LM741 and RETS741AX for LM741A. Note 8: Human body model, 1.5 kΩ in series with 100 pF. Schematic Diagram 00934101 www.national.com 4 LM741 Physical Dimensions inches (millimeters) unless otherwise noted Metal Can Package (H) Order Number LM741H, LM741H/883, LM741AH/883, LM741AH-MIL or LM741CH NS Package Number H08C 5 www.national.com LM741 Physical Dimensions inches (millimeters) unless otherwise noted (Continued) Ceramic Dual-In-Line Package (J) Order Number LM741J/883 NS Package Number J08A Dual-In-Line Package (N) Order Number LM741CN NS Package Number N08E www.national.com 6 LM741 Operational Amplifier Physical Dimensions inches (millimeters) unless otherwise noted (Continued) 10-Lead Ceramic Flatpak (W) Order Number LM741W/883, LM741WG-MPR or LM741WG/883 NS Package Number W10A National does not assume any responsibility for use of any circuitry described, no circuit patent licenses are implied and National reserves the right at any time without notice to change said circuitry and specifications. For the most current product information visit us at www.national.com. LIFE SUPPORT POLICY NATIONAL’S PRODUCTS ARE NOT AUTHORIZED FOR USE AS CRITICAL COMPONENTS IN LIFE SUPPORT DEVICES OR SYSTEMS WITHOUT THE EXPRESS WRITTEN APPROVAL OF THE PRESIDENT AND GENERAL COUNSEL OF NATIONAL SEMICONDUCTOR CORPORATION. As used herein: 1. Life support devices or systems are devices or systems which, (a) are intended for surgical implant into the body, or (b) support or sustain life, and whose failure to perform when properly used in accordance with instructions for use provided in the labeling, can be reasonably expected to result in a significant injury to the user. 2. A critical component is any component of a life support device or system whose failure to perform can be reasonably expected to cause the failure of the life support device or system, or to affect its safety or effectiveness. BANNED SUBSTANCE COMPLIANCE National Semiconductor certifies that the products and packing materials meet the provisions of the Customer Products Stewardship Specification (CSP-9-111C2) and the Banned Substances and Materials of Interest Specification (CSP-9-111S2) and contain no ‘‘Banned Substances’’ as defined in CSP-9-111S2. National Semiconductor Americas Customer Support Center Email: [email protected] Tel: 1-800-272-9959 www.national.com National Semiconductor Europe Customer Support Center Fax: +49 (0) 180-530 85 86 Email: [email protected] Deutsch Tel: +49 (0) 69 9508 6208 English Tel: +44 (0) 870 24 0 2171 Français Tel: +33 (0) 1 41 91 8790 National Semiconductor Asia Pacific Customer Support Center Email: [email protected] National Semiconductor Japan Customer Support Center Fax: 81-3-5639-7507 Email: [email protected] Tel: 81-3-5639-7560