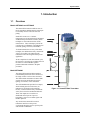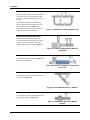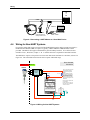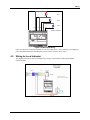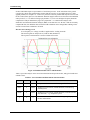
1
Model CET5000 Series SmartCET® Corrosion Monitoring Transmitter Model CET5000 – M Model CET5000 – G Model CET5000 - P Operator Manual Industrial Measurement and Control Doc. No.: 34-SC-25-01 Revision Date: 11/06 Copyright, Notices, and Trademarks Printed in U.S.A. – © Copyright 2006 by Honeywell Rev. 3– November 2006 Warranty/Remedy Honeywell warrants goods of its manufacture as being free of defective materials and faulty workmanship. Contact your local sales office for warranty information. If warranted goods are returned to Honeywell during the period of coverage, Honeywell will repair or replace without charge those items it finds defective. The foregoing is Buyer's sole remedy and is in lieu of all other warranties, expressed or implied, including those of merchantability and fitness for a particular purpose. Specifications may change without notice. The information we supply is believed to be accurate and reliable as of this printing. However, we assume no responsibility for its use. While we provide application assistance personally, through our literature and the Honeywell web site, it is up to the customer to determine the suitability of the product in the application. Trade Marks HART® Registered trademark of HART Communication Foundation, Austin, USA Viton® Registered trademark of the company E.I. Du Pont de Nemours & Co., Wilmington, USA Honeywell International, Inc. Industrial Measurement and Control 2500 W. Union Hills Drive Phoenix, Arizona 85027 ii SmartCET CET5000 User Manual 11/06 Notices Safety Instructions Designated Use The SmartCET 5000 is a compact, 4-20 mA corrosion transmitter used to detect general or localized corrosion in a wide range of industries. The transmitter measures a general corrosion rate in mils per year or millimeters per year and provides an indicator of localized corrosion activity in the form of a Pitting Factor. The readings are taken in real time and a new measurement is available approximately every seven (7) minutes. Installation, commissioning and operation The SmartCET 5000 transmitter has been designed to operate safely in accordance with current technical, safety and relevant standards. If installed incorrectly or used for applications for which it is not intended, it is possible that application-related dangers may arise. For this reason, the instrument must be installed, connected, operated and maintained according to the instructions in this manual by suitably trained personnel. This manual must be read and understood and the instructions followed. Modifications and repairs to the device are permissible only when they are expressly approved in this manual. Operational safety Measurement systems used in a hazardous (classified) area must comply with all existing national standards. It must be assured that all technical personnel are sufficiently trained. All measurement and safety regulations that apply to the measuring points are to be observed. Maintenance safety The transmitter should always be mounted so that the safety warning label will at all times be visible to any employee or other person called upon to replace the electrodes or otherwise service the transmitter. The label is on every safety bracket that comes with adjustable probes. 11/06 SmartCET CET5000 User Manual iii About This Document Abstract This manual describes the installation and operation of the SmartCET 5000 Corrosion Transmitter. Contacts World Wide Web The following lists Honeywell’s World Wide Web sites that will be of interest to our customers. Honeywell Organization WWW Address (URL) Corporate http://www.honeywell.com Industrial Measurement and Control http://www.honeywell.com/imc Process Solutions http://www.honeywell.com/ps Telephone Contact us by telephone at the numbers listed below. Region United States and Canada iv Organization Honeywell SmartCET CET5000 User Manual Phone Number 1-800-423-9883 1-800-525-7439 Tech. Support Service 11/06 Symbol Definitions The following table lists those symbols that may be used in this document to denote certain conditions. Symbol Definition This DANGER symbol indicates an imminently hazardous situation, which, if not avoided, will result in death or serious injury. This WARNING symbol indicates a potentially hazardous situation, which, if not avoided, could result in death or serious injury. This CAUTION symbol may be present on Control Product instrumentation and literature. If present on a product, the user must consult the appropriate part of the accompanying product literature for more information. This CAUTION symbol indicates a potentially hazardous situation, which, if not avoided, may result in property damage. WARNING PERSONAL INJURY: Risk of electrical shock. This symbol warns the user of a potential shock hazard where HAZARDOUS LIVE voltages greater than 30 Vrms, 42.4 Vpeak, or 60 Vdc may be accessible. Failure to comply with these instructions could result in death or serious injury. ATTENTION, Electrostatic Discharge (ESD) hazards. Observe precautions for handling electrostatic sensitive devices Protective Earth (PE) terminal. Provided for connection of the protective earth (green or green/yellow) supply system conductor. Functional earth terminal. Used for non-safety purposes such as noise immunity improvement. NOTE: This connection shall be bonded to protective earth at the source of supply in accordance with national local electrical code requirements. Earth Ground. Functional earth connection. NOTE: This connection shall be bonded to Protective earth at the source of supply in accordance with national and local electrical code requirements. Chassis Ground. Identifies a connection to the chassis or frame of the equipment shall be bonded to Protective Earth at the source of supply in accordance with national and local electrical code requirements. 11/06 SmartCET CET5000 User Manual v Contents 1. INTRODUCTION ................................................................................................... 1 1.1 Overview ........................................................................................................................................ 1 1.2 Features .......................................................................................................................................... 2 1.3 Identification .................................................................................................................................. 2 2. SPECIFICATIONS AND MODEL SELECTION GUIDES...................................... 3 2.1 Specifications ................................................................................................................................. 3 2.2 Probe Specifications ....................................................................................................................... 4 2.2.1 Adjustable 316 Stainless Steel Probe .................................................................................. 4 2.2.2 Fixed Length 316 Stainless Steel Probe .............................................................................. 4 2.2.3 Epoxy Adjustable Probe ...................................................................................................... 4 2.3 Electrical Specifications ................................................................................................................. 5 2.4 Mechanical Specifications.............................................................................................................. 5 3. INSTALLATION .................................................................................................. 15 3.1 Contents of delivery ..................................................................................................................... 15 3.2 Pre-installation Information.......................................................................................................... 15 3.3 Mounting ...................................................................................................................................... 16 3.3.1 Dimensions ........................................................................................................................ 16 3.3.2 Mounting safety procedures and hints............................................................................... 16 3.4 Installation .................................................................................................................................... 19 3.4.1 Introduction ....................................................................................................................... 19 3.4.2 Overview ........................................................................................................................... 19 3.4.3 Electrode installation ......................................................................................................... 19 3.4.4 Probe installation ............................................................................................................... 20 3.4.5 Safety Bracket installation................................................................................................. 20 3.4.6 Mounting Bracket Installation ........................................................................................... 21 4. vi WIRING ............................................................................................................... 22 4.1 Transmitter Wiring Guide ............................................................................................................ 22 4.2 Galvanic Isolation......................................................................................................................... 23 4.3 Wiring for HART ......................................................................................................................... 23 4.3.1 Introduction ....................................................................................................................... 23 4.3.2 Wiring................................................................................................................................ 23 4.4 Wiring for Non-HART Systems................................................................................................... 24 4.5 Wiring for Local Indicator............................................................................................................ 25 4.6 Surge Protection and IS Barriers .................................................................................................. 26 4.7 Post Installation Check ................................................................................................................. 26 SmartCET CET5000 User Manual 11/06 5. CONFIGURATION .............................................................................................. 27 5.1 Overview ...................................................................................................................................... 27 5.2 SmartCET Default Setup .............................................................................................................. 27 5.3 Sensor Configuration.................................................................................................................... 27 6. OPERATION ....................................................................................................... 28 6.1 Overview ...................................................................................................................................... 28 6.2 Variables and Definitions ............................................................................................................. 28 6.3 Online Parameters ........................................................................................................................ 30 6.4 Device Setup Parameters .............................................................................................................. 31 6.4.1 Process Variables............................................................................................................... 31 6.4.2 Diag/Service ...................................................................................................................... 32 6.4.3 Basic Setup ........................................................................................................................ 33 6.4.4 Range and Units ................................................................................................................ 34 6.4.5 Detailed Setup ................................................................................................................... 34 6.4.6 Review............................................................................................................................... 36 6.5 Initial Operation ........................................................................................................................... 36 7. REPLACEMENT PARTS AND ACCESSORIES................................................. 37 7.1 SmartCET5000 Parts .................................................................................................................... 37 7.1.1 Transmitter, Probe with Electrodes, or Electrode Replacement ........................................ 37 7.1.2 Transmitter Accessories..................................................................................................... 37 7.2 HART Accessories ....................................................................................................................... 37 8. TROUBLESHOOTING ........................................................................................ 38 8.1 Overview ...................................................................................................................................... 38 8.2 Diagnosis of Transmitter Health from Measurement Data........................................................... 38 8.3 General Troubleshooting Procedures ........................................................................................... 39 8.4 Recommended Operating Conditions........................................................................................... 41 8.4.1 SmartCET Use in Low Conductivity Environments ......................................................... 42 9. APPENDIX A - CET5000M OVERVIEW OF TECHNOLOGY AND OUTPUT PARAMETERS ............................................................................................................. 43 9.1 Introduction .................................................................................................................................. 43 9.2 General Corrosion Rate ................................................................................................................ 43 9.3 The B value .................................................................................................................................. 45 9.4 The Pitting Factor......................................................................................................................... 47 9.5 The Corrosion Mechanism Indicator............................................................................................ 48 11/06 SmartCET CET5000 User Manual vii Tables Table 2-1 Electrode Material Guide............................................................................................................ 14 Table 3-1 Mounting safety procedures and hints....................................................................................... 17 Table 8-1 Diagnosis of Transmitter Health................................................................................................ 38 Table 8-2 Troubleshooting Procedures ...................................................................................................... 39 Table 9-1 Corrosion Rate and Environment Characterization ................................................................... 44 Table 9-2 Corrosion Rate and Environment Characterization ................................................................... 46 Table 9-3 Pitting Factor Values ................................................................................................................. 47 Table 9-4 CMI Values ............................................................................................................................... 48 Figures Figure 1-1 SmartCET5000 Transmitter ....................................................................................................... 1 Figure 2-1 Adjustable 316 Stainless Steel Probe ......................................................................................... 4 Figure 2-2 Fixed Length 316 Stainless Steel Probe..................................................................................... 4 Figure 2-3 Epoxy Adjustable Probe............................................................................................................. 4 Figure 3-1 SmartCET5000 Transmitter and Probe Dimensions ................................................................ 16 Figure 3-2 Incorrect SmartCET Transmitter Installation............................................................................ 17 Figure 3-3 Correct SmartCET Transmitter Installation .............................................................................. 17 Figure 3-4 Correct SmartCET Pipeline Position......................................................................................... 17 Figure 3-5 SmartCET Located in Tee......................................................................................................... 17 Figure 3-6 SmartCET Located in Bypass Loop.......................................................................................... 18 Figure 3-7 SmartCET Mounted with Different Electrodes......................................................................... 18 Figure 3-8 SmartCET Installed in a Condensate Flash Tank...................................................................... 18 Figure 3-9 SmartCET Mounted in Y-Strainer ............................................................................................ 18 Figure 3-10 SmartCET Mounted in Basket Strainer................................................................................... 18 Figure 3-11 Electrodes and Viton Gasket ................................................................................................... 19 Figure 3-12 Probe Mounting....................................................................................................................... 20 Figure 3-13 Safety Bracket Installation ...................................................................................................... 21 Figure 3-14 Mounting Bracket Installation................................................................................................. 21 Figure 4-1 Transmitter Wiring.................................................................................................................... 22 Figure 4-2 Galvanic Isolation connection................................................................................................... 23 Figure 4-3 Connecting a HART Modem or a Hand-Held Device .............................................................. 24 Figure 4-4 Wiring for Non-HART Systems ............................................................................................... 24 Figure 4-5 HIM Output Wiring................................................................................................................... 25 Figure 4-6 Wiring for Local Indicator ........................................................................................................ 25 Figure 6-1 Device Setup Variables ............................................................................................................. 28 Figure 6-2 Online Parameters Dialog Box.................................................................................................. 30 Figure 6-3 Device Setup Dialog Box.......................................................................................................... 31 Figure 6-4 Process Variable Dialog Box .................................................................................................... 31 Figure 6-5 Diagnosis and Service Dialog Box............................................................................................ 32 Figure 6-6 Basic Setup Dialog Box ............................................................................................................ 33 Figure 6-7 Device Information Dialog Box ................................................................................................ 33 Figure 6-8 Range and Units Dialog Box..................................................................................................... 34 Figure 6-9 Detailed Setup Dialog Box........................................................................................................ 34 Figure 6-10 Corrosion Parameters Dialog Box........................................................................................... 35 Figure 6-11 Advanced Variable Dialog Box .............................................................................................. 36 Figure 6-12 Review Screen......................................................................................................................... 36 viii SmartCET CET5000 User Manual 11/06 Figure 9-1 Individual Anodic and Cathodic Tafel Slopes .......................................................................... 45 Figure 9-2 Fundamental Sine Waves and Harmonics................................................................................. 46 11/06 SmartCET CET5000 User Manual ix Specifications 1. Introduction 1.1 Overview Models CET5000G and CET5000P The SmartCET® instrument utilizes state-ofthe-art algorithms and data analysis techniques to accurately measure corrosion rate and pitting. SmartCET executes on a 7-minute measurement cycle and performs an automated standard linear polarization resistance (LPR) technique or electrochemical noise (ECN) measurement. These techniques provide the corrosion rate (CET5000G) or an indication of localized (pitting) corrosion (CET5000P). To further enhance the accuracy of the LPR technique, the default Stern-Geary constant (B value) is accessible to be changed in the transmitter better reflecting the actual process application. Transmitter Housing Optional Extended cable For Remote Mounting At the completion of each measurement cycle, the respective corrosion rate or Pitting Factor in the form of a 4-20mA HART signal is produced and made available to the plant personnel. Model CET5000M (6 or 12 feet length) The SmartCET® multivariable transmitter (CET5000M) performs the same functions as the single variable versions above and more. The multivariable transmitter will detect both general corrosion and localized corrosion (pitting) in real-time, in one instrument. The CET5000M model provides four outputs, which include general corrosion rate, an indicator for localized corrosion (Pitting Factor), a measured Stern-Geary constant (B value), and a corrosion mechanism indicator. These four outputs are accessible to a distributed control system or process knowledge system via a 4-20mA signal with HART® protocol. Probe Electrode Figure 1-1 SmartCET5000 Transmitter Any model of the SmartCET corrosion transmitter interfaces to the process environment through a process specific probe and electrode combination. 11/06 SmartCET CET5000 User Manual 1 Specifications 1.2 1.3 Features • On-line, Real-Time Corrosion Monitoring • Two-wire 4-20mA HART®Transmitter • General or Localized Corrosion (Pitting) Monitoring • Withstands 1500 psi (102 bar) Process Pressure (higher pressures can be accommodated through additional probe designs) • Standard ¾” NPT Process Connection for Insertion Probe style, other connections supported • Custom Configuration • Multivariable Output (Model CET5000M) with general corrosion rate, localized corrosion indicator (pitting), dynamic B value, and an additional variable for corrosion mechanism analysis Identification The SmartCET transmitter has two labels on the transmitter housing. Shown on the left is the label with full CSA and ATEX certification. General purpose rated transmitters will not have the certification body references. The label on the right will contain a stamped model number and serial number. 2 SmartCET CET5000 User Manual 11/06 Specifications 2. Specifications and Model Selection Guides 2.1 Specifications General Specifications Output signal 4-20mA signal (two-wire) with HART Supply voltage 9-30 Vdc Rated Operating Voltage 9 VDC minimum at max loop current 2-wire (4-20mA) Max load with 24VDC power supply 680 ohms with high alarm capability Linearity 0.0015% non linear Resolution 17 bit B value (default) 25.6mV 750 ohms without high alarm Operating and Storage Conditions Operating Temperature -40°F to +158°F (-40°C to +70°C) Storage Temperature -40°F to +185°F (-40°C to +85°C) Process Conditions Process Temperature (Max.) 316 Stainless Steel Probe Direct Mount: Remote Mount: Glass Epoxy Probe Process Pressure (Max.) Custom probes with higher ratings available 250°F (121°C) 500°F (260°C) peak, 400°F average 150°F (65°C) 3600 psi (245 bar) 316 stainless steel, retrievable probe double sealed 1500 psi (102 bar) 316 stainless steel probe double sealed 100 psi (7 bar) glass epoxy probe O-Ring (set of 3) Viton (Viton® is registered trademarks of DuPont Dow Elastomers) Physical Specifications Protection NEMA 4X (applies to transmitter with direct mount probe) Enclosure Material Aluminum Process connection ¾”NPT (for insertion probes) Electrical connection ¾”NPT Wiring Terminal Accept up to 1.5mm - 14AWG Mounting Probe mounts direct on process pipe, transmitter can be direct or remote mounted to probe. Weight 1.1 lb (500g) Certifications and Approvals Electrical Classifications 11/06 • • • • CSA (Canada and US) Class 1 Div 2, Groups A, B, C, D CSA Intrinsic Safety Class I, II, III; Div 1 Groups A, B, C, D, E, F, G CE Mark ATEX – Ex II 1G EEx ia IIC T4, -40C <Ta < 70C SmartCET CET5000 User Manual 3 Specifications 2.2 Probe Specifications 2.2.1 Adjustable 316 Stainless Steel Probe The adjustable 316 stainless steel probe (Figure 2-1) is an adjustable probe commonly used in most field applications. The assembly consists of a ¾” NPT compression fitting, an insertion rod with a hermetically sealed threeelectrode end-cap, and a six-pin connector welded in place. The insertion length is adjustable using the compression fitting. Electrodes shown in the picture are ordered separately. Specifications: Probe Body- 316 Stainless Steel Endcap Seal- Glass Fill Material- Epoxy Temperature Rating- 500°F/260°C Figure 2-1 Adjustable 316 Stainless Steel Probe Pressure Rating- 1500 psi/102 bar Mounting- ¾” NPT fitting 2.2.2 Fixed Length 316 Stainless Steel Probe The fixed 316 stainless steel probe (Figure 2-2) is a fixed-length probe. The probe assembly consists of an insertion rod with a three-electrode end-cap, a hermetically sealed connector and a ¾” NPT pipe plug that is welded in place. The insertion length (I. L.) is calculated to the end of the electrode and can be specified by the customer. Electrodes shown in the picture are ordered separately. Specifications: Probe Body- 316 Stainless Steel Endcap Seal- Glass Fill Material- Epoxy Temperature Rating- 500°F/260°C Pressure Rating- 3000 psi/204 bar Mounting- ¾” NPT fitting Figure 2-2 Fixed Length 316 Stainless Steel Probe 2.2.3 Epoxy Adjustable Probe The epoxy adjustable probe (Figure 2-3) consists of a glass epoxy probe with a ¾” NPT nylon compression fitting for insertion into the system. The studs for mounting the electrodes and the six-pin connector are held in place by the epoxy fill material. This probe is available only in 11” length. Electrodes shown in the picture are ordered separately. Specifications: Probe Body- Glass Epoxy Endcap Seal- Epoxy Fill Material- Epoxy Temperature Rating- 150°F/65°C Figure 2-3 Epoxy Adjustable Probe Pressure Rating- 100 psi/7 bar Mounting- ¾” NPT nylon fitting 4 SmartCET CET5000 User Manual 11/06 Specifications 2.3 2.4 Electrical Specifications Supply 9-30 Vdc Rated Operating Voltage 9 Vdc min at max loop current Max Load with 24Vdc supply 680Ω with high alarm/750Ω without alarm Linearity 0.0015% non-linear Resolution 17 bit B Value (default) 25.6 mV High Alarm current 22.5 mA Low Alarm current 3.7 mA Mechanical Specifications Transmitter Housing 11/06 Protection 4X Enclosure Material Aluminum Electrical Connection ¾” NPT Weight 1/1 lb (500g) Operating Temperature -40ºF to +158 ºF (-40 ºC to +70 ºC) SmartCET CET5000 User Manual 5 Specifications Model Selection Guide Model Selection Guide 34-SC-16-01 Issue 1 SmartCET corrosion transmitter for Real-time, online corrosion measurement corrosion is the new process variable The SmartCET multivariable transmitter will detect general corrosion and localized corrosion (pitting) in real-time connecting to a distributed control system or process knowledge system. The CET5000M model provides four outputs, which include general corrosion rate, an indicator for localized corrosion (Pitting Factor), Stern-Geary constant (B value), and fourth variable to help diagnose the corrosion mechanism. The transmitter connects to the process environment through a process specific probe and electrode combination. Features include: - 4-20mA signal and compatible HART protocol - New corrosion measurements available approximately every seven minutes - Flexible sensor configuration and design allows for process specific probe and electrode application. This MSG produces a valid model number for ordering the transmitter. Probes and/or electrodes are ordered separately. SmartCET CET5000 Instructions Select the desired key number. The arrow to the right marks the selection available. Make the desired selections from Tables I through VI using the column below the proper arrow. Key Number A dot ( ) denotes availability. I ________ - ___ - II ______ - III __ - IV _____ - V VI __ - ___ KEY NUMBER - SmartCET CET5000 Corrosion Transmitter Description SmartCET single variable for General Corrosion SmartCET single variable for Localized Corrosion (Pitting Factor) SmartCET Multivariable Ouput Selection Availability CET5000G CET5000P CET5000M TABLE I - Process Connection 3/4" NPT, 316L 3/4" NPT Nylon Adjustable Fitting 1" - 150 lb Flange 1" - 300 lb Flange 1 1/2" - 150 lb Flange Process Connection 1 1/2" - 300 lb Flange 2" 150 lb Flange 2" 300 lb Flange Ring electrode No selection N21 NP3 A31 A32 A51 A52 A61 A62 000 XXX TABLE II - Probe Material / Mounting / Length Inches 316 L Inches Epoxy Glass Measurement / Probe Millimeters 316L Material Millimeter Epoxy Glass Ring Electrode No selection CB _ CF _ DB _ DF _ NA _ XX _ ___ ___ ___ ___ ___ ___ ● ● ● ● ● ● ● ● ● ● ● ● ● ● ● ● ● ● ● ● ● ● ● ● ● ● ● ● ● ● a a a b b b a a a b b b c c c ● ● ● Table II continued next page 6 SmartCET CET5000 User Manual 11/06 Specifications Availability TABLE II - Probe Material / Mounting / Length (continued) Standard Insertion, Direct Mount, Fixed, SS, Viton Standard Insertion, Remote Mount, Fixed, SS, Viton Standard Insertion, Direct Mount, Adjustable, SS, Viton Standard Insertion, Remote Mount, Adjustable, SS, Viton Retractable Insertion, Remote Mount, Adjustable, SS, Viton Special (Consult Factory) Standard Insertion, Direct Mount, Fixed, SS, Kalrez Standard Insertion, Remote Mount, Fixed, SS, Kalrez Standard Insertion, Direct Mount, Adjustable, SS, Kalrez Standard Insertion, Remote Mount, Adjustable, SS, Kalrez Retractable Insertion, Remote Mount, Adjustable, SS, Kalrez Flush Probe, Direct Mount, Fixed, SS, Triangle disks geometry Flush Probe, Remote Mount, Fixed, SS, Triangle disks geometry Flush Probe, Direct Mount, Adjustable, SS, Triangle disks geometry Flush Probe, Remote Mount, Adjustable, SS, Triangle disks geometry Probe Mounting and Retractable Flush, Remote Mount, Adjustable, SS, Triangle disks geometry Style Flush Probe, Direct Mount, Fixed, SS, Interleaved Flush Probe, Remote Mount, Fixed, SS, Interleaved Flush Probe, Direct Mount, Adjustable, SS, Interleaved Flush Probe, Remote Mount, Adjustable, SS, Interleaved Retractable Flush, Remote Mount, Adjustable, SS, Interleaved High pressure insertion, Remote, Fixed, SS High pressure flush, Remote, Fixed, SS, Triangle disks geometry High pressure flush, Remote, Fixed, SS, Interleaved Probe Length 11/06 Selection G P M __A___ __B___ __C___ __D___ __E___ __F___ __G___ __H___ __I___ __J___ __K___ __L___ __M___ __N___ __0___ __P___ __Q___ __R___ __S___ __T___ __U___ __V___ __W___ __X___ d d d d d d d d d d d d d d d ● ● ● d d d d d d d d d d d d d d d d d d d d d d d d d d d d d d d d d d d d d d d d d d d d d d d d d d d d d d Ring electrode, Remote Mount, Virgin PTFE gasket. (Specify electrode, flange, class and finish) __Y___ e e e Ring electrode, Remote Mount, Garlock Gylon gasket. (Specify electrode, flange, class and finish) __Z___ e e e Ring electrode, Remote Mount, other gasket material. (Specify electrode, size and pressure rating) No selection 8 inch for 316L or epoxy glass, NPT Process Connection 12 inch for 316L, NPT or Flange Process Connection 18 inch for 316L, NPT or Flange Process Connection 24 inch for 316L, NPT or Flange Process Connection 200 mm for 316L or epoxy glass, NPT Process Connection 300 mm for 316L, NPT or Flange Process Connection 450 mm for 316L, NPT or Flange Process Connection 610 mm for 316L, NPT or Flange Process Connection Ring Electrode No selection __1___ e e e __2___ _ _ _ 080 _ _ _ 120 _ _ _ 180 _ _ _ 240 _ _ _ 200 _ _ _ 300 _ _ _ 450 _ _ _ 610 _ _ _ RRR _ _ _ XXX ● ● ● f f f g g g g g g g g g g g g g g g g g g g g g c c c ● ● ● SmartCET CET5000 User Manual 7 Specifications TABLE III - Electrode Material Guide 1018 Carbon Steel A53 Grade B Carbon Steel AISI 304 (Check with factory) AISI 304L AISI 316 (Check vith factory) AISI 316L Carpenter 20 Cb3 Monel 400 CDA715 70-30 Cu-Ni CDA 110ETP 99.9 Cu CDA 706 90-10 Cu-Ni CDA687 (Al Brass) (Check with factory) CDA443( ARS AD. Brass) Aluminum 1100 Aluminum 2024 Titanium GR2 Electrode Material Hastelloy C-276 ASTM A105 Carbon Steel AISI 1010 Carbon Steel AL6061 Aluminum A106 GrB A36 5LGrB C2000 C22 Ductile Iron Grade 65-45-12 A182 F5, 5Cr 1/2Mo A182 F9, 9Cr 1Mo API5LX-65 Carbon maganese pipeline steel Duplex 2205 A516 Gr70 API 5LX52 (STE 360.7) 317L stainless steel TABLE IV - Transmitter Housing Aluminum housing with 3/4" electrical Electrical Output Electronic Output - 4-20mA with HART Direct Mount (not for ring electrodes) Remote 6 feet cable Transmitter Mount Remote 12 feet cable Special (Consult Factory) Selection Availability G P M 0A 0B 0C 0D 0E 0F 0G 0H 0I 0J 0K 0L 0M 0N 00 0P 0Q 0R 0S 0T 0U 0V 0W 0X 0Y 0Z 1A 1B 1C 1D 1E 1F 1G ● ● ● ● ● ● ● ● ● ● ● ● ● ● ● ● ● ● ● ● ● ● ● ● ● ● ● ● ● ● ● ● ● ● ● ● ● ● ● ● ● ● ● ● ● ● ● ● ● ● ● ● ● ● ● ● ● ● ● ● ● ● ● ● ● ● ● ● ● ● ● ● ● ● ● ● ● ● ● ● ● ● ● ● ● ● ● ● ● ● ● ● ● ● ● ● ● ● ● A2_ _ _ _ _ IH _ _ _ _ _1 _ _ _ _2 _ _ _ _3 _ _ _ _4 ● ● ● ● ● ● h h h i i i i i i ● ● ● ● ● ● ● ● ● ● ● ● TABLE V - Approvals Approvals 8 General Purpose CSA, NI, Class 1, Div 2, Group A-D CSA, IS, Class 1, Div 1, Group A-D; ATEX, FM SmartCET CET5000 User Manual GP D2 IS 11/06 Specifications TABLE VI - Insertion Length for Insertion Probes or Ring Flange Size+Class+Finish 5.0 inches 5.2 inches 5.4 inches 5.6 inches Insertion length - 5.8 inches 6.0 inches inches 6.2 inches 6.4 inches 6.6 inches 6.8 inches 7.0 inches 7.2 inches 7.4 inches 7.6 inches 7.8 inches 8.0 inches 8.2 inches 8.4 inches 8.6 inches 8.8 inches 9.0 inches 9.2 inches 9.4 inches 9.6 inches 9.8 inches 10.0 inches 10.2 inches 10.4 inches 10.6 inches 10.8 inches 11.0 inches 11.2 inches 11.4 inches 11.6 inches 11.8 inches 12.0 inches 12.2 inches 12.4 inches 12.6 inches 12.8 inches 13.0 inches or mm 13.2 inches 13.4 inches 13.6 inches 13.8 inches 14.0 inches or mm 14.2 inches 14.4 inches 14.6 inches 14.8 inches 15.0 inches or mm 15.2 inches 15.4 inches 15.6 inches 15.8 inches 16.0 inches or mm 16.2 inches 16.4 inches 16.6 inches 16.8 inches Selection 050 052 054 056 058 060 062 064 066 068 070 072 074 076 078 080 082 084 086 088 090 092 094 096 098 100 102 104 106 108 110 112 114 116 118 120 122 124 126 128 130 132 134 136 138 140 142 144 146 148 150 152 154 156 158 160 162 164 166 168 Availability G P M j j j j j j j j j j j j j j j j j j j j j j j j j j j j j j j j j j j j j j j j j j j j j j j j j j j j j j j j j j j j j j j j j j j j j j j j j j j j j j j j j j j j j j j j j j j j j j j j j j j j j j j j j j j j j j j j j j j j j j j j k k k j j j j j j j j j j j j k k k j j j j j j j j j j j j k k k j j j j j j j j j j j j k k k j j j j j j j j j j j j Table VI continued next page 11/06 SmartCET CET5000 User Manual 9 Specifications TABLE VI - Insertion Length for Insertion Probes or Ring Flange Size+Class+Finish 17.0 inches or mm 17.2 inches 17.4 inches Insertion length - 17.6 inches 17.8 inches inches 18.0 inches or mm 18.2 inches 18.4 inches 18.6 inches 18.8 inches 19.0 inches or mm 19.2 inches 19.4 inches 19.6 inches 19.8 inches 20.0 inches or mm 20.2 inches 20.4 inches 20.6 inches 20.8 inches 21.0 inches or mm 21.2 inches 21.4 inches 21.6 inches 21.8 inches 22.0 inches or mm 22.2 inches 22.4 inches 22.6 inches 22.8 inches 23.0 inches or mm 23.2 inches 23.4 inches 23.6 inches 23.8 inches 24.0 inches or mm 24.2 inches 24.4 inches 24.6 inches 24.8 inches 25.0 inches or mm 25.2 inches 25.4 inches 25.6 inches 25.8 inches 26.0 inches or mm 26.2 inches 26.4 inches 26.6 inches 26.8 inches 27.0 inches or mm 27.2 inches 27.4 inches 27.6 inches 27.8 inches 28.0 inches or mm Selection 170 172 174 176 178 180 182 184 186 188 190 192 194 196 198 200 202 204 206 208 210 212 214 216 218 220 222 224 226 228 230 232 234 236 238 240 242 244 246 248 250 252 254 256 258 260 262 264 266 268 270 272 274 276 278 280 Availability G P M k k k j j j j j j j j j j j j k k k j j j j j j j j j j j j k k k j j j j j j j j j j j j k k k j j j j j j j j j j j j k k k j j j j j j j j j j j j k k k j j j j j j j j j j j j k k k j j j j j j j j j j j j k k k j j j j j j j j j j j j k k k j j j j j j j j j j j j k k k j j j j j j j j j j j j k k k j j j j j j j j j j j j k k k Table VI continued next page 10 SmartCET CET5000 User Manual 11/06 Specifications TABLE VI - Insertion Length for Insertion Probes or Ring Flange Size+Class+Finish 135 mm 145 mm 155 mm Insertion length - 165 mm 175 mm millimeters 185 mm 195 mm 205 mm 215 mm 225 mm 235 mm 245 mm 255 mm 265 mm 275 mm 285 mm 290 mm 295 mm 300 mm 305 mm 310 mm 315 mm 320 mm 325 mm 330 mm 335 mm 340 mm 345 mm 350 mm 355 mm 360 mm 365 mm 370 mm 375 mm 380 mm 385 mm 390 mm 395 mm 400 mm 405 mm 410 mm 415 mm 420 mm 425 mm 430 mm 435 mm 440 mm 445 mm 450 mm 455 mm 460 mm 465 mm 470 mm 475 mm 480 mm 485 mm 490 mm 495 mm Selection 135 145 155 165 175 185 195 205 215 225 235 245 255 265 275 285 290 295 300 305 310 315 320 325 33 335 340 345 350 355 360 365 370 375 380 385 390 395 400 405 410 415 420 425 430 435 440 445 450 455 460 465 470 475 480 485 490 495 Availability G P M m m m m m m m m m m m m m m m m m m m m m m m m m m m m m m m m m m m m m m m m m m m m m m m m m m m m m m m m m m m m m m m m m m m m m m m m m m m m m m m m m m m m m m m m m m m m m m m m m m m m m m m m m m m m m m m m m m m m m m m m m m m m m m m m m m m m m m m m m m m m m m m m m m m m m m m m m m m m m m m m m m m m m m m m m m m m m m Table VI continued next page 11/06 SmartCET CET5000 User Manual 11 Specifications TABLE VI - Insertion Length for Insertion Probes or Ring Flange Size+Class+Finish 500 mm 505 mm 510 mm Insertion length - 515 mm 520 mm millimeters 525 mm 530 mm 535 mm 540 mm 545 mm 550 mm 555 mm 600 mm 605 mm 610 mm 615 mm 620 mm 625 mm 630 mm 635 mm 640 mm 645 mm 650 mm 655 mm 660 mm 665 mm 670 mm 675 mm 680 mm 685 mm 690 mm 695 mm 700 mm 705 mm 710 mm No Selection No selection Selection 500 505 510 515 520 525 530 535 540 545 550 555 600 605 610 615 620 625 630 635 640 645 650 655 660 665 670 675 680 685 690 695 700 705 710 XXX Availability G P M m m m m m m m m m m m m m m m m m m m m m m m m m m m m m m m m m m m m m m m m m m m m m m m m m m m m m m m m m m m m m m m m m m m m m m m m m m m m m m m m m m m m m m m m m m m m m m m m m m m m m m m m m ● ● ● RESTRICTIONS Restriction Letters a Available Only With Selection Table Table I I b I c 12 Not Available With Selection NP3 000 N21 A31, A32 A51, A52 A61, A62 000 N21 NP3 A31, A32 A51, A52 A61, A62 SmartCET CET5000 User Manual 11/06 Specifications RESTRICTIONS Restriction Letters Available Only With Selection Table II Not Available With Selection CF _ _ _ _ DF _ _ _ _ NA _ _ _ _ N21 NP3 A31, A32 A51, A52 A61, A62 CB _ _ _ _ II DB _ _ _ _ Table II d I e CF _ _ _ _ DF _ _ _ _ I A31, A32 A51, A52 f g h A61, A62 II I II 000 NA _ _ _ _ 000 CF _ _ _ _ DF _ _ _ _ NA _ _ _ _ I 000 II II NA _ _ _ _ __A___ __C___ __G___ __I___ i __L___ __N___ __Q___ __S___ j I NP3 II 000 CF _ _ _ _ DB _ _ _ _ DF _ _ _ _ NA _ _ _ _ k I NP3 II 000 CF _ _ _ _ DF _ _ _ _ NA _ _ _ _ m I NP3 II 000 CB _ _ _ _ CF _ _ _ _ DF _ _ _ _ NA _ _ _ _ 11/06 SmartCET CET5000 User Manual 13 Specifications CET5000 Supplemental SmartCET Corrosion Transmitter Accessories & Kits Description Galvanic Isolator – 1 Channel Galvanic Isolator – 2 Channel Remote Probe Cable – 6 Ft Remote Probe Cable – 12 Ft Hart USB Modem Hart Interface Module –no relays Hart Interface Module –two relays Part Number List Price 50022364-001 50022364-002 50022365-001 50022365-002 50022366-001 50022367-001 50022367-002 ** ** ** ** ** ** ** ** Consult Honeywell Order Entry Systems for current parts pricing. Table 2-1 Electrode Material Guide 14 Model Key# UNS # Electrode material K value A G10180 1018 Carbon steel 11597.63 B K03005 A53 Grade B Carbon Steel 11583.07 C S30400 AISI 304 11334.57 D S30403 AISI 304L 11342.80 E S31600 AISI 316 11513.39 F S31603 AISI 316L 11519.53 G N08020 Carpenter 20 Cb3 11595.52 H N04400 Monel 400 11077.87 I C71500 CDA715 (Cu/Ni 70/30) 11337.86 J C11000 CDA 110ETP 99.9Cu 11686.71 K C70600 CDA 706 (Cu/Ni 90/10) 11513.44 L C68700 CDA 867 (Aluminum Brass) 12411.53 M C44300 CDA 443 (ARS AD Brass) 12324.74 N A91100 Aluminum 1100 10940.96 O A92024 Aluminum 2024 11400.51 P R50400 Titanium GR2 8644.02 Q N10276 Hastelloy C-276 11666.48 SmartCET CET5000 User Manual 11/06 Installation 3. Installation 3.1 Contents of delivery It is essential to follow the instructions concerning the unpacking, transport and storage of this instrument given in the section 3.2 “Pre-installation Information”. The contents of delivery consist of: Assembled instrument Stainless steel probe (for insertion style probes) 3-electrodes elements (attached loosely to insertion probes or could be standalone 3 ring electrodes) Cable (remote mount version only) Safety bracket Remote transmitter mount bracket (remote mount version only) Accessories (if any are ordered) Instruction manual (this document) 3.2 Pre-installation Information Unpacking If the transmitter has not been removed from its shipping carton, inspect the carton for damage then remove the transmitter. • Inspect the unit for any obvious shipping damage and report any damage due to transit to the carrier. • Make sure a bag containing mounting hardware is included in the carton with the controller. • Check that the model number shown on the inside of the case agrees with what you have ordered. Attention! All probes are shipped with the insulating gaskets installed. Upon removing the protective cap, ensure that the O-rings are not loose. The O-rings are made of Viton® and if not installed the probe will not operate properly. Please refer to Figure 3-11. Transport Protect the transmitter electrodes from damage. Do not attempt to carry the transmitter by its electrodes. Storage Pack the instrument for storage or transport so it is protected against impact. The original packing material provides the optimum protection for the device. The permissible storage temperature is -40°F to +176°F (40°C to +80°C). 11/06 SmartCET CET5000 User Manual 15 Installation 3.3 Mounting 3.3.1 Dimensions Figure 3-1 SmartCET5000 Transmitter and Probe Dimensions 3.3.2 Mounting safety procedures and hints The corrosion probe must be installed in a location that is most susceptible to corrosion. In most cases, corrosion tends to occur where water is trapped or stagnant. However, it can also accelerate at the bend of the pipe or where corrosion has occurred previously, but is accelerated by high flow or turbulence. The electrodes should be selected to reflect the same metal properties as the piping or other components that might be susceptible to corrosion. For example, in applications where the pipe is made of stainless steel and the water pump’s impeller is made of carbon steel, the impeller will corrode faster than the pipe. In this case it is advisable to select the electrodes to be the same material as the pump’s impeller. 16 SmartCET CET5000 User Manual 11/06 Installation Table 3-1 Mounting safety procedures and hints Incorrect Transmitter Location The transmitter should not be mounted in a pipe drop since the corrosive liquid may not be in full contact with the electrodes as shown in Figure 3-2. Figure 3-2 Incorrect SmartCET Transmitter Installation Correct Transmitter Location The transmitter should be mounted in the riser of a pipe near an elbow where the velocity is the highest. In general, SmartCET5000 should be mounted in pipes or tanks at locations of highest liquid velocity and constant immersion, shown in Figure 3-3. Figure 3-3 Correct SmartCET Transmitter Installation Correct Pipeline Position SmartCET5000 can be located at any point on the pipeline but should always be immersed in the corrosive material as shown in Figure 3-4. Figure 3-4 Correct SmartCET Pipeline Position Located in Tee SmartCET5000 can be located at any point on the pipeline but should always be immersed in the corrosive material as shown in Figure 3-5 Figure 3-5 SmartCET Located in Tee 11/06 SmartCET CET5000 User Manual 17 Installation Located in Bypass Loop SmartCET5000 should be located downstream of a control valve for best performance and can also be located in the deadleg portion of a by-pass. Note that the transmitter located in the bypass leg should be mounted before the valve for best performance. See Figure 3-6. This guarantees the electrodes will always be immersed in the corrosive material. Figure 3-6 SmartCET Located in Bypass Loop Mounted with Different Electrodes Installing SmartCET5000 with different electrode materials on the suction side of the pump will ensure monitoring of the pump impeller and the pipe as shown in Figure 3-7. Figure 3-7 SmartCET Mounted with Different Electrodes Installed in a Condensate Flash Tank A condensate flash tank, shown in Figure 3-8, is also a good application. Figure 3-8 SmartCET Installed in a Condensate Flash Tank Mounted in Y-Strainer The transmitter is shown in the blow down of a Y-strainer in Figure 3-9. Figure 3-9 SmartCET Mounted in Y-Strainer Mounted in Basket Strainer The transmitter is shown in the discharge side of the basket strainer in Figure 3-10 Figure 3-10 SmartCET Mounted in Basket Strainer 18 SmartCET CET5000 User Manual 11/06 Installation 3.4 Installation 3.4.1 Introduction A trained specialist must perform the necessary installation and commissioning of SmartCET5000. Recognized rules of the technology and setup requirements must be maintained both during and after installation. Safety requirements must be observed during all installation steps. If the pipe or vessel into which the SmartCET5000 is to be inserted is under pressure and/or contains any hazardous substance, such as steam, caustic solutions, acids, toxins or other substances specified by OSHA as physical or health hazards, the pipe or vessel must first be depressurized and any hazardous substance purged there from, and appropriate lockout/tagout procedures observed in accordance with Section 1910.147 of the OSHA Regulations, before SmartCET5000 can be installed. Failure to follow these procedures may result in serious injury or death. 3.4.2 Overview SmartCET5000 consists of three basic components: 1. A transmitter housing that contains the electronics and provides the 4-20 mA HART output signal. 2. The probe. There are two basic options, direct mount and remote mount. The remote mount probe is supplied with a 6’ or 12’ cable. Note, for flange inserted electrodes, a probe may not be included. 3. The electrodes. This part of the probe will corrode in the same manner as the metal being investigated. Note: some custom probes may have electrodes that are integral to the probe assembly and will not be shipped loose as described in the next section. 3.4.3 Electrode installation If the electrodes are shipped loose, the electrodes must be installed hand-tight. Ensure that the Viton® gaskets are in place prior to installing the electrodes. Depending upon the actual corrosion rate, it may be necessary to check or replace the electrodes every three months because the element might be too corroded or bent to give a correct reading. See Figure 3-11. NOTE: Clean the electrodes with rubbing alcohol or another similar material prior to operation. This establishes a reliable baseline for the transmitter electronics. 11/06 Electrode Vito ® Gasket Figure 3-11 Electrodes and Viton Gasket SmartCET CET5000 User Manual 19 Installation 3.4.4 Probe installation Insert the probe into the pipe, adjust the insertion to desired depth and apply 1and 1/4 turns from hand-tight to provide the seal as shown in Figure 3-12. Please see safety bracket installation instructions below. Some probes are supplied with an adjustable, compression NPT fitting (e.g. Swagelok). With this fitting, please follow the tightening sequence described next to ensure a tight seal. 1. The Swagelok fitting should be held onto place with a plastic zip-tie around the probe body. The zip-tie should be removed. 2. Determine the depth that the probe should extend into the pipe. 3. Tighten the larger upper nut until the tubing will not rotate freely by hand. 4. Make a mark on the nut. This mark will serve as a reference as the 6 o’clock position. 5. While holding fitting body steady, tighten the large upper nut 1 + 1⁄4 turns to the 9 o’clock position. 6. This tightening sequence will crimp the internal ring onto the probe body and should lock the fitting in place now. 7. Tighten the lower nut onto the pipe nipple or access point. Note: For fixed type probes (without the adjustable compression fitting) only the 1 1/16 hex nut needs to be tightened and the safety bracket is not required (below). 11/8” Hex Flat 11/16” Hex Flat Pipe Figure 3-12 Probe Mounting Additionally, ensure the flow rate of the process fluid does not exceed 20 feet per second (fps). Stronger flow might damage probes with three finger electrodes and interfere with the reading. If the flow rate exceeds the recommendation, a different probe style may be required. 3.4.5 Safety Bracket installation The adjustable version of the SmartCET5000 probe uses a compression fitting to provide the seal. A safety bracket is provided with every adjustable probe and must be installed before the process is under pressure. See Figure 3-13. Please follow the assembly 20 SmartCET CET5000 User Manual 11/06 Installation instructions below. 1. Screw nut (2) onto threaded rod (3). 2. Screw threaded rod (3) into base plate 1. 3. Tighten nut (2) to lock threaded rod (3) in place. 4. Slide top plate (4) onto threaded rods (3). Note: Top plate (4) must be assembled with label on top. 5. Place lock washer (5) and nut (6) onto threaded rod (3). 6. After sensor is mounted into pipe, slide safety bracket into place and tighten nut (6) to lock bracket into place. Note: If threaded rods (3) are too short for proper adjustment, contact the factory for replacements. Figure 3-13 Safety Bracket Installation 3.4.6 Mounting Bracket Installation A mounting bracket is available for use with the remote mount version of SmartCET5000. The assembly and installation is shown in Figure 3-14. Please follow the assembly instructions below. 1. To assemble locking clamps (5) on to mounting bracket (2), angle clamp (5) out, slide tabs into holes and angle back in. 2. Secure mounting bracket to sensor housing using two screws (6) provided. FOR PIPE MOUNT 1. Position mounting bracket (2) on pipe. 2. Using the U-bolt (1) provided, secure the mounting bracket (2) to the pipe using the lock washer (3) and nut (4) provided. Figure 3-14 Mounting Bracket Installation FOR WALL MOUNT 1. 11/06 Secure mounting bracket (2) to the wall using a sturdy fastener (not provided). SmartCET CET5000 User Manual 21 Wiring 4. Wiring 4.1 Transmitter Wiring Guide Before connection, please note the following: • The power supply must be identical to the data on the nameplate. • Switch off power supply before connecting up the device. • Connect equipotential bonding to transmitter ground terminal before connecting the device. Connect SmartCET as follows: 1. Unscrew housing cover. 2. Insert cable through one of the ¾” NPT electrical ports. 3. Make electrical connection. See terminal assignment in Figure 4-1. 4. If the cable has a shield, it should only be connected at one end. Please follow the convention at the plant site of whether to connect the cable shield at the field side (e.g. in the transmitter) or at the controller side. In general, most users elect to connect the cable shield in the control cabinet. 5. Screw on housing cover. Max 3 mm Figure 4-1 Transmitter Wiring 22 SmartCET CET5000 User Manual 11/06 Wiring 4.2 Galvanic Isolation In general for Honeywell equipment, the negative side of the analog termination screw on the controller is connected to the MRG (Master Reference Ground). The SmartCET probe, being in contact with the process and plant equipment, could also be grounded. The existence of two grounds will cause errors in the SmartCET corrosion values. Therefore, a galvanic isolation module should be connected as shown in order to provide proper isolation. NOTE: isolator power leads not shown (+24V,-24V) + - Galvanic Isolator 250 ohms Earth Figure 4-2 Galvanic Isolation connection 4.3 Wiring for HART 4.3.1 Introduction The SmartCET5000 transmitter supports HART communication protocol. HART is an acronym for Highway Addressable Remote Transducer. The HART protocol makes use of the Bell 202FSK standard to superimpose digital signals at a low level on top of the 4-20 mA signal. The HART protocol enables twoway communication and makes it possible for additional information beyond just the normal process variable to be communicated to and from a smart field instrument. 4.3.2 Wiring Due to the sensitive nature of corrosion measurement, it is important to provide good electrical isolation between the I/O system/power supply and each 4-20mA/HART signal from SmartCET. For this reason, isolators are required to be installed between the transmitter and the control system if the I/O card is not fully isolated from ground. Please observe the following guidelines: • • 11/06 Always use a grounded power supply (on the AC side). Ensure that the I/O card is isolated from ground. SmartCET CET5000 User Manual 23 Wiring DC power supply unit or PLC 4-20 mA 250 SDC625 PACTware +- HART handheld HART modem HART modem HART handheld tool Honeywell MC tool kit Figure 4-3 Connecting a HART Modem or a Hand-Held Device 4.4 Wiring for Non-HART Systems For customer orders that require conversion of the HART digital signal to analog current loop signals, a HART Interface Module (HIM) is required. Typically, a Moore Industries HIM should have been provided. The HIM is CSA approved and rated for general/ordinary locations. It is certified for nonincendive Class 1, Division 2, Groups A – D. A suitable enclosure is required for hazardous locations. The HIM device requires a loop resistor of at least 250 ohms and a maximum of 1100 ohms, as shown in Figure 4-4. The selected IS barrier must be able to operate within this range. Hazardous Area Prime Variable Connection Safe Area CET5000 + - 1 3 Pepperl+Fuchs Galvanic Isolator 14 + 8 7 + - R sense R HART 15 - +IN T2 -IN T3 Note. In this setup, the power to the transmitter is being supplied from the galvanic isolator. Most controllers in the field are setup to provide power to the field device. If that is the case, the controller setup should be changed so that it does not provide power to the field device. R HART must be present and equal to 250 Ω . R sense can be any value as long as R sense + R HART is >250 and <1100 Ω. Moore Industries HART Interface Module B12 Gnd Earth B11 DCC B10 DC Figure 4-4 Wiring for Non-HART Systems 24 SmartCET CET5000 User Manual 11/06 Wiring 4 0 AO 3 3 0 AO 2 2 T4 0 AO 1 T5 T7 T8 T10 T11 Ancillary Variables Figure 4-5 HIM Output Wiring Figure 4-5 shows the wiring of the HIM device if it is providing power. If the controller is providing loop power, the HIM terminal pairs that should be used are 5 and 6, 8 and 9, and 11 and 12. 4.5 Wiring for Local Indicator The diagram below shows the recommendation for wiring to a local indicator and using the HART interface module. Figure 4-6 Wiring for Local Indicator 11/06 SmartCET CET5000 User Manual 25 Wiring 4.6 Surge Protection and IS Barriers Using an intrinsically safe transmitter in a hazardous area requires an IS barrier. Depending upon the Honeywell controller, intrinsic safety protection system could be already present on the termination assembly; however, additional consultation with other suppliers for the required isolators, signal conditioners, surge barriers, intrinsic safety barriers, maybe required. Determination and implementation of proper surge protection and IS barriers are specific to the application and local codes. Each user should determine the level of protection that is required. An intrinsic safety isolator used in combination with an intrinsically safe SmartCET mounted in a hazardous location meets this requirement so additional isolation is not required. For all other applications, a signal conditioner capable of repeating the 4-20mA/HART signals and providing at least 500V of isolation must be used. Experion R300, R210 and R201 Systems The Rail IO Modules - Series H are a Din-rail mounted solution that provides a compact Experion I/O interface, which can be mounted and operated in potentially hazardous locations. The Series H Rail IO Module provides corrosion protection to test level G3, according to ISA-S71.04-1985, is a standard feature of Series H I/O components. In the US: Modules can be mounted in Class I, Division-1, Groups B, C, D. Devices can be located in Class I, II, III, Division-1, Groups A, B, C, D, E, F, G. In Europe: Modules can be mounted in Zone-1, Group IIC. Devices can be located in Zone-0, Group IIC. For further information, please consult Experion publication EP03-420-300 or 210. TPN Network The Process Manager family of controllers offers field termination assemblies (FTA) built-in with galvanic isolators and intrinsic safety barriers. Please consult with your local HPS Systems Account Manager to determine correct FTA to order. 4.7 Post Installation Check After wiring the transmitter and connecting the probes, perform the following checks: 26 • Is the probe secure and tightened to specified torque? (See section 3.4.4) • Have the electrodes been cleaned? (See section 3.4.3) • Is the terminal assignment correct? (See section 4.1) • Is the housing cover screwed tight? • Is the signal conditioner installed between the SmartCET5000 and the PLC or controller? SmartCET CET5000 User Manual 11/06 Configuration 5. Configuration 5.1 Overview Under standard delivery conditions, the SmartCET transmitter will be delivered pre-configured with user specific data. The user only needs to enter a tag name and descriptor if that information was not provided previously. Tag name and descriptor entry can be completed using a HART compatible handheld tool like the Honeywell MC Toolkit with SDC625 tool, or through a network software configuration tool like the Experion System Field Device Manager (FDM). Both of these configuration options use the SmartCET DD (Device Description) file. This file is provided with the product and can also be downloaded from the HART foundation website. Either of the HART configuration options can be used to access and change the default transmitter setup parameters or the sensor parameters, which are detailed next. 5.2 SmartCET Default Setup As shipped, the SmartCET corrosion transmitter will have the following default values already setup for use: PV units: mpy URV: 100 mpy LRV: 0 mpy Damping: N/A Alarm config: Auto reset / high Line Freq: 60Hz B value: 25.6mV Measurement: Meter Method: Reflects the transmitter purchased, e.g. general (G), pitting (P), or multivariable (M) 5.3 Sensor Configuration The sensing element of the SmartCET corrosion transmitter is the electrode. Specific electrode data must be configured into the transmitter for accurate corrosion measurement. Electrode specific data includes: Electrode area (cm3) Density (gm/cm3) No. of electrons Atomic mass (gm) Resistance (ohms) K comp (Table 2-1 contains a list of common values for specific electrode materials) Use this table to enter the K value for the electrode that is in service. The K value is a composite value that represents the density, # electrons, atomic# and resistance, all in a single constant K. The Honeywell factory will ship with the specific electrode data (matching the electrode ordered) configured into the transmitter. Honeywell uses a three electrode setup as shown in Figure 3-11. The SmartCET corrosion transmitter will not work correctly with a probe using a two electrode configuration. Additionally, there is no universal standard for the internal wiring of three electrode probes so non-Honeywell supplied three electrode probes may or may not be compatible. 11/06 SmartCET CET5000 User Manual 27 Operation 6. Operation 6.1 Overview The multivariable version of the SmartCET corrosion transmitter outputs four corrosion measurements, which are: • General Corrosion Rate • Pitting Factor (also referred to as localized corrosion indicator) • B value • Corrosion Mechanism Indicator The General Corrosion Rate is the average or general corrosion rate, and is generally expressed in mils per year (mpy) or millimeters per year (mmpy). The Pitting Factor is a dimensionless number that indicates the presence of a pitting (localization) corrosion environment. The B value is expressed in millivolts per decade, and is commonly also known as the Stern-Geary constant. The measurement unit for the Corrosion Mechanism Indicator is µF/cm2. Details on each output, including a description of the technology used to calculate or measure the output, are given in Section 9 - Appendix A - CET5000M Overview of Technology and Output Parameters A handheld HART communicator can access all operational data (e.g. process variables); however the more convenient and intended target for corrosion data access is connection to a distributed control system (DCS) or process knowledge system (PKS). 6.2 Variables and Definitions The following are examples of screens and variables that are available using SDC625 tool and a HART modem. Figure 6-1 Device Setup Variables 28 SmartCET CET5000 User Manual 11/06 Operation PV Units: General corrosion rate can be expressed in either mil/year (1 mil = 0.001inch) or mm/year. URV and LRV: Upper range value and lower range value for the corrosion rate. For example: URV= 100 mil/year LRV=0.000 The 4 mA would be the zero point at 0 mil/year and 20 mA would correspond to maximum corrosion rate at 100 mil/year in this case. Damping: Determines how quickly the output will change with respect to the input. Because of long update time (7 minutes) there is no need to increase damping. Alarm Config: Set the alarm preferences for certain corrosion rates (i.e., 0-110 mil) with this pull down menu. The alarm activates when corrosion goes beyond the URV and LRV range. The available options are: High and Auto: Output goes to 22.5 mA. Alarm resets automatically after the next reading (~7 min) Low and Auto: Output goes to 3.7 mA. Alarm resets automatically after the next reading (~7 min) High and Manual: Output goes to 22.5 mA. Alarm is reset manually by sending another alarm command. For example, you can select a No Alarm option or select the same alarm option High and Manual from the pull down menu. The device will also reset automatically after the next successful reading. Low and Manual: Output goes to 3.7 mA. Alarm is reset manually by sending another alarm command. For example, you can select a No Alarm option or select the same alarm option Low and Manual from the pull down menu. The device will also reset automatically after the next successful reading. No Alarm: Alarm is turned off. Method: Method 2 is the default setting. Do not change. B Stearn-Geary: B value is expressed in mV and is typically 25.6 mV (set as default) for most reactions. For more information please contact the factory. A Elec Area: All electrode lengths are standard from the factory 4.75 cm2. This value should reflect the electrode style selected. The factory default applies the three finger electrode style used on insertion probes. K Comb Props: A corrosion constant K is dependent on the metal properties and required for proper corrosion current measurement Reference Table 2-1 on page 14 provides a list of values already calculated for common materials. New materials can use the formula below. Corrosion constant K [mm/year] is determined by: K= 3270.22*(Atomic mass of metal in grams) (# of e- in corrosion reaction)*(Density g/cm3) Local Corrosion – HART Secondary Measurement Output Stearn-Geary: HART Tertiary Measurement Output DLC: HART Quarternary Measurement Output 11/06 SmartCET CET5000 User Manual 29 Operation 6.3 Online Parameters Double click on “Main”, and then double click on “Online”. Figure 6-2 Online Parameters Dialog Box You can change the URV and LRV on this screen. Note, items in bold text are changeable. URV: The upper range value is 100 mil/year maximum (default) LRV: The lower range value is 0 mil/year minimum (default) Double click on URV or LRV in the dialog box to call up the change dialog box. High light the value and change, and then press “Set”. On the “Loop Change Warning” dialog box, select “Yes “to change or “No” to cancel. 30 SmartCET CET5000 User Manual 11/06 Operation 6.4 Device Setup Parameters Double click on “Device Setup”. From the Device Setup menu, several tools are available for reviewing and adjusting information from the device. Double click on the desired topic and refer to the section shown below for details • Process Variables – Section 6.4.1 • Diagnosis and Service – Section 6.4.2 • Basic Setup - Section 6.4.3 • Detailed Setup – Section 6.4.5 • Review – Section 6.4.6 Figure 6-3 Device Setup Dialog Box 6.4.1 Process Variables Double click on Process variables and the following screen appears. All parameters are read only. Figure 6-4 Process Variable Dialog Box PV – The units used to measure general corrosion rates. General corrosion rate can be expressed in either mil/year or mm/year PV % rnge - – (Percent of Range) Variable that tracks the Digital Value representation with respect to the range defined by the Lower Range Value and Upper Range Value, for normal operating modes. The units of this variable are always in percent. AO1 – Analog output in current, 4 to 20 mA. This shows the current value output 11/06 SmartCET CET5000 User Manual 31 Operation PV Avg – Average of the selected measurement over the number of measurement cycles since these were last cleared. Sample Count – The number of measurement cycles since these were last cleared. Local Corrosion – HART Secondary Measurement Output Stearn-Geary – HART Tertiary Measurement Output DLC – HART Quarternary Measurement Output 6.4.2 Diag/Service Double click on Diag/Service and the following screen appears: Figure 6-5 Diagnosis and Service Dialog Box Loop Test – Allows you to manually manipulate the Analog output to a selected constant output value. There are several selections available: 4mA, 20mA, Other, End. Right click on “Loop Test”, then select Execute and follow the prompts. Reset Device – Resets the transmitter. “Right click on ‘Reset Device”, then select Execute and follow the prompts. Reset Fact Default – Resets the transmitter to factory default. Right click on “Reset Fact Default”, then select Execute and follow the prompts. Reset Counter Average – Resets Sample Count and PV Average to zero. Right click on “Reset Counter Average”, then select Execute and follow the prompts. Status – The status of the device. Displays system errors if there are any present. Toggle password – Proprietary V Offset – Voltage Channel Offset Typically 625 mV ±6. Right click on “V Offset”, and then select Edit to call up the change dialog box. Highlight the value and change, and then press “Set”. I Offset – Current Channel Offset Typically 625 mV ±6. Right click on “I Offset”, and then select Edit to call up the change dialog box. Highlight the value and change, and then press “Set”. D/A Trim – (Digital to Analog Trim) – Allows the calibration of a selected Analog Output with an external reference at the operating endpoints of the Analog Output. Right click on “D/A Trim”, then select Execute and follow the prompts. Scaled D/A Trim – (Digital to Analog Scaled Trim) Allows the calibration of the Analog Output with an external reference at the operating endpoints of the Analog Display. Right click on “Scaled D/A Trim”, then select Execute and follow the prompts. 32 SmartCET CET5000 User Manual 11/06 Operation 6.4.3 Basic Setup Double click on “Basic Setup” and the following screen appears: Figure 6-6 Basic Setup Dialog Box Preference – Type refers to either general or localized (pitting) corrosion monitoring. The Type is set at the factory and cannot be changed. Type 1 is general corrosion. Type 2 is localized (pitting) corrosion. Damping – Determines how quickly the output will change with respect to the input. Because of long update time (7 minutes) there is no need to increase damping. If you wish to change the value, right click on “Damping”, and then select Edit to call up the change dialog box. Highlight the value and change, and then press “Set”. The two subsets of the Basic Setup menu are Device Information, and Range and Units. The Device Information screen is shown in Figure 6-7. Range and Units is represented in Figure 6-8. 6.4.3.1 Device Information Figure 6-7 Device Information Dialog Box Tag: Customer specified identification. If you wish to change the value, right click on “Tag”, and then select Edit to call up the change dialog box. Highlight the tag name and change, and then press “Set”. Comm Date: Commissioning date Dev Id: Field Device identification Manufacturer: Honeywell Serial Number: This serial number is used to identify specific customer requirements. It is also tagged on the outside of the transmitter head. 11/06 SmartCET CET5000 User Manual 33 Operation 6.4.4 Range and Units Figure 6-8 Range and Units Dialog Box PV Units: General corrosion rate can be expressed in either mil/year (1 mil = 0.001inch) or mm/year. If you wish to change the value, right click on “PV Units”, and then select Edit to call up the change dialog box. Highlight the tag name and change, and then press “Set”. URV and LRV: Upper range value and lower range value for the corrosion rate. For example: URV= 100 mil/year LRV=0.000 The 4 mA would be the zero point at 0 mil/year and 20 mA would correspond to maximum corrosion rate at 100 mil/year in this case. Not applicable if “Preference” is set to type 2. If alarm is enabled, the loop current will go to alarm condition if the measured value exceeds this limit. 6.4.5 Detailed Setup Double click on “Detailed Setup” and the following screen appears: Figure 6-9 Detailed Setup Dialog Box Alarm Config: Set the alarm preferences for certain corrosion rates, 0-110 mil, for example, with this pull down menu. The alarm activates when corrosion goes beyond the URV and LRV range. The available options are: High and Auto: Output goes to 22.5 mA. Alarm resets automatically after the next reading (~7 min) Low and Auto: Output goes to 3.7 mA. Alarm resets automatically after the next reading (~7 min) High and Manual: Output goes to 22.5 mA. Alarm is reset manually by sending another alarm command. For example, you can select a No Alarm option or select the same alarm option High and 34 SmartCET CET5000 User Manual 11/06 Operation Manual from the pull down menu. The device will also reset automatically after the next successful reading. Low and Manual: Output goes to 3.7 mA. Alarm is reset manually by sending another alarm command. For example, you can select a No Alarm option or select the same alarm option Low and Manual from the pull down menu. The device will also reset automatically after the next successful reading. No Alarm: Alarm is turned off. If you wish to change the selection, right click on “Alarm Config”, and then select Edit to call up the change dialog box. Pull down the menu and make a selection, and then press “Set”. Method: Method 1 not used. Method 2 default setting. Filter Freq: 50Hz or 60Hz, in reference to line power frequency (120 vs. 220 VAC). If you wish to change the selection, right click on “Filter Freq”, and then select Edit to call up the change dialog box. Pull down the menu and make a selection, and then press “Set”. Meas Mode: The default is Meter. Other parameters require additional evaluation software. If you wish to change the selection, right click on “Meas Mode”, and then select Edit to call up the change dialog box. Pull down the menu and make a selection, and then press “Set”. The two subsets of the Detailed Setup Screen menu are Corrosion Parameter and Advance Variable. The Corrosion Parameter screen is shown in Figure 6-10, the Advance variable screen is represented in Figure 6-11. 6.4.5.1 Corrosion Parameters Figure 6-10 Corrosion Parameters Dialog Box B Stearn-Geary: B value is expressed in mV and is typically 25.6 mV (set as default) for most reactions. For more information please see Section 9.3. A Elec Area: The factory default is 4.75 cm2 which is the value for finger electrodes. K Comb Props: A corrosion constant K is dependent on the metal properties and required for proper corrosion current measurement. Corrosion constant K is determined by: referencing Table 2-1. 11/06 SmartCET CET5000 User Manual 35 Operation 6.4.5.2 Advanced Variable Figure 6-11 Advanced Variable Dialog Box AdvPassword: N/A 6.4.6 Review Click Review. The review screen shows all of the variables for corrosion measurement. The values shown in Figure 6-12 are the default values. Figure 6-12 Review Screen 6.5 Initial Operation Now that the probe and electrode is in the process fluid and the SmartCET corrosion transmitter is properly wired, the SmartCET should be ready for normal operation. The electrodes will require some residence time in the process fluid before corrosion can be accurately measured. SmartCET should also go through multiple measurement cycles, each cycle is approximately seven minutes long, before the corrosion measurements represent the true corrosive conditions. This waiting period is especially necessary if the SmartCET transmitter was powered up prior to being connected to a probe. 36 SmartCET CET5000 User Manual 11/06 Replacement Parts and accessories 7. Replacement Parts and Accessories 7.1 SmartCET5000 Parts Please submit the serial tag number and model number when ordering replacement parts for SmartCET5000. 7.1.1 Transmitter, Probe with Electrodes, or Electrode Replacement The model number will have the following form factor: CET5000 M - N21 CB A 080 - 0A - A2 IH1- D2 - 050 The combination of the model number and serial number will provide the necessary information to order a replacement transmitter, probe with electrode, or electrode only. Please specify which item is required since the model number contains information on the entire product. If the pipe or vessel into which the SmartCET5000 is to be inserted is under pressure and/or contains any hazardous substance, such as steam, caustic solutions, acids, toxins or other substances specified by OSHA as physical or health hazards, the pipe or vessel must first be depressurized and any hazardous substance purged there from, and appropriate lockout/tagout procedures observed in accordance with Section 1910.147 of the OSHA Regulations, before SmartCET5000 can be removed or the electrodes replaced. Failure to follow these procedures may result in serious injury or death. 7.1.2 Transmitter Accessories Common transmitter accessories which are supplied at the time of order placement are shown below. 7.2 Model No. Description 50022362-001 Safety bracket for transmitters with direct mount probes 50022362-002 Safety bracket for probes remotely mounted 50022363-001 Remote mount transmitter mounting bracket 50022365-001 Remote cable – 6 foot 50022365-002 Remote cable – 12 foot HART Accessories Some installations include a HART interface module that converts the HART SV, TV, and QV parameters into three analog signals. This module is designed for those systems that do not natively support the HART protocol in the controller of the process control system. If a replacement is required, please contact your Honeywell representative to submit a replacement order. 11/06 SmartCET CET5000 User Manual 37 Troubleshooting 8. Troubleshooting 8.1 Overview This section describes various possible problems and the means to correct them. If the pipe or vessel into which theSmartCET5000 is to be inserted is under pressure and/or contains any hazardous substance, such as steam, caustic solutions, acids, toxins or other substances specified by OSHA as physical or health hazards, the pipe or vessel must first be depressurized and any hazardous substance purged there from, and appropriate lockout/tagout procedures observed in accordance with Section 1910.147 of the OSHA Regulations, beforeSmartCET5000 can be removed or the electrodes replaced. Failure to follow these procedures may result in serious injury or death. 8.2 Diagnosis of Transmitter Health from Measurement Data The output from the SmartCET corrosion transmitter can provide insight into the health of the transmitter operation. Table 8-1 shows the output expected for each variable when the transmitter is operating properly and the table also shows an indication when a probe short condition exists and when no probe is connected. Table 8-1 Diagnosis of Transmitter Health Description Corrosion rate Transmitter output variable PV General Corrosion Pitting / Localized Corrosion Probe short No probe connected Across range Across range Maximum value ~0 Note 1. Note 3. Pitting Factor SV <0.1 >0.1 <0.001 ~1 B value TV (Stable) (Unstable) (Unstable) (Unstable) Note 2. Note 2. Note 2. Note 2. Across the range Across the range (~ 0) ~0 Corrosion Mechanism Indicator QV Note 2. Notes: 38 1. Corrosion rate maximum will depend on the material constants and surface area entered. From a measurement perspective, it relates to the absolute value of the polarization resistance of the working electrode. If the polarization resistance is very low (<10 ohms), the instrument will be close to current saturation. For optimal operation it is preferable to maintain the polarization resistance of the working electrode at values of >100 ohms. This may be achieved to some extent by changes to the surface area of the working electrode. Therefore, a specific threshold value in mpy cannot be applied generically. However, instead of using the corrosion rate reaching a max value as the indicator, it might be possible to use one of the command 48 indicators to provide the same thing, e.g. Corrosion rate out of range. 2. Items shown in brackets are general statements. No specific value can be provided. SmartCET CET5000 User Manual 11/06 Troubleshooting 3. An exact zero value will not be achieved. It will be essentially be zero or something very small, e.g. 0.001 mpy. Under conditions when general corrosion is prevalent on the material being monitored, the measured corrosion rate observed as the primary variable (PV) may be expected to show evidence of being stationary for a short term. In these cases the corrosion rate will tend to exhibit only slight variation in the short term, perhaps over periods of hours or longer. Any slight process change, such as temperature variability is often reflected in the corrosion rate behavior. Larger excursions in the corrosion rate may be experienced if there are more pronounced changes to the environment, for example due to flow rates or changes in composition. The secondary variable, Pitting Factor, will typically be a low value under these conditions (e.g. <0.01), although it may exhibit some short term response to abrupt changes in the environment, for example sudden changes in temperature, flow rate or fluid composition. The tertiary variable (the B value) will usually fall in a range of 0.010 to 0.030 volts, and will be stable. The quaternary variable (Corrosion Mechanism Indicator) is largely dependant on the type of material being studied, but generally, if active corrosion is being observed (>5mpy), it will tend to be significantly larger than the case for very low corrosion rates. If low general corrosion rates are being observed, which are close to instrument baseline (< 0.05 mpy), the Pitting Factor may appear artificially high (e.g. > 0.01). When localized corrosion is occurring, the observed general corrosion rate values may be in the range 0.1 to 10 mpy or higher, depending on the material and the environment. The Pitting Factor will tend to exhibit higher magnitude peaks of activity during pit initiation events, whereas propagating pits may be associated with a general increase in the observed corrosion rate and lower levels of pitting factor (<0.1). The general corrosion rate in the case of propagating pits often exhibits short term variation and is noticeably less stable than the case for general corrosion. Pitting is often accompanied by increased variability in the B value. With increasing degrees of pit propagation, the CMI values will also tend to increase. 8.3 General Troubleshooting Procedures The CET5000 is designed to operate over a broad range of corrosion rates. However, most problems associated with the corrosion rate calculation arise when the actual corrosion rate is extremely high, and there is likelihood that the instrument is approaching or exceeding its stated operating limits. In some circumstances, this can be remedied by using sensors with a smaller surface area. Another factor to be considered is severe diffusion limiting or mass transport control of the corrosion processes. In this case the B value determination may become difficult, and erratic behavior with very high values may be observed. Troubleshooting procedures that deal with this condition and general situations are shown in Table 8-2. Table 8-2 Troubleshooting Procedures Symptom 11/06 Possible Cause Recommended Checks No 4-20 mA output Check voltage and compare it with the specifications on the nameplate Connect the correct voltage Measuring correct voltage but unit does not respond Check polarity on the terminals. See Section 4.1 – Transmitter Wiring Guide HART communication does not function The communication resistor is not installed properly See Section 4.3: Wiring with HART SmartCET CET5000 User Manual 39 Troubleshooting Symptom Corrosion rate values are very low and do not change Possible Cause 1.Probe or probe cable fault – bad connection to probe electrodes 2. Transmitter fault Recommended Checks 1. Check continuity with test cell connected at probe end of cable. May be necessary to remove probe and carry out continuity checks between connecting pins and probe sensing elements. 2. Check with test cell connected directly to Amphenol connector on transmitter. Consult with the factory for additional information. Corrosion rates are very high, Pitting Factor very low, and B values are very low. This problem could be due to a shorting condition between probe sensing elements 1a. Disconnect probe and the corrosion rate should fall. 1b. Remove probe and physically check for electrode to electrode contact. 1c. May be caused by the presence of conductive corrosion deposits e.g. iron sulfide (B value very low). 2. Use probe with smaller surface area. Corrosion rate switches abruptly from high to very low levels, Pitting Factor is very high, and the B value goes to the current default value. This situation is symptomatic of when the (internal) polarization resistance calculation has apparently gone to a negative value, with the result that the corrosion rate is indeterminate and a default low value is returned. Apparent negative polarization resistances may occur in situations where the corrosion rates are very high and the electrode area is incorrect for the process situation. 1. The electrodes could be too large. Investigate using electrodes with a smaller area. 2. Another possible cause may be due to an asymmetrical response of the electrodes, for example due to crevice corrosion occurring on one of the electrodes. The electrodes should be inspected in this case. 3. All the variables being measured corrosion rate, Pitting Factor, B value and CMI are suspect and could be in error. Consult with the factory for additional information. 40 SmartCET CET5000 User Manual 11/06 Troubleshooting Symptom Possible Cause Recommended Checks All corrosion variables are very unstable exhibiting one or more of the following: These systems are typically caused by high and variable corrosion rates in the process environment, hard diffusion limiting processes, and/or electrode surface areas being too large for the application. 1. Disconnect probe. Corrosion values should return to baseline levels. 1. Corrosion rate unstable, may drop to very low values 2. Pitting Factor low when corrosion rate high and vice versa. 3. Electrode surface area could be incorrect for the application. Contact a Honeywell corrosion specialist to review the application. 3. B values unstable switching between ~0.02 and > 0.1 Corroding systems with real diffusion / mass transport limiting scenarios are problematic monitoring situations. 4. CMI unstable switching from very low value 1e-3 to large value e.g. > 0.5 8.4 2. Check with test cell, transmitter should give a standard response. Recommended Operating Conditions SmartCET utilizes electrochemical techniques that are applicable for a wide range of corrosive conditions. The following table provides the applicable operating envelope for SmartCET with additional comments when the operating range is outside envelope. Measuremen t Range Comments Corrosion rate 0-250 mpy dependent upon the electrode surface area, typically in range of 1 to 10 cm2. (Default URV setting is 100 mpy and the electrode area is 4.75 cm2.) • Higher sensitivity at low corrosion rates may be achieved by using larger electrodes - consult factory for additional information. Pitting Factor 0.001 to 1. With low corrosion rates, the Pitting Factor may appear artificially high due to very low observed general corrosion rates – consult factory for additional information. B value Expected range: 5 to 60mV (0.005 to 0.06V). • Low values may be due to formation of surface films having redox behavior (e.g. Iron sulfide). The electrode essentially starts to become non-polarizable. • The higher corrosion rate range is achieved with appropriately sized electrodes (e.g. small areas). If symptoms listed in Table 8.2 occur, the B value should be fully reviewed and analyzed before providing a corrosion rate estimate. It is recommended to qualify the rate estimate against mass loss from electrodes – consult factory for additional information. • High values predominantly may be due to diffusion limiting processes. As the electrochemical processes become more diffusion limiting, the B value may not achieve a stable value. Applying the B value from this type of situation (e.g. updating the default value) is not recommended. Consult with the factory for additional information. Corrosion Mechanism 11/06 Expected range: 0 Values are dependent on material and environment. SmartCET CET5000 User Manual 41 Troubleshooting Measuremen t Range Indicator to 2 µA/cm2. Comments 8.4.1 SmartCET Use in Low Conductivity Environments SmartCET uses electrochemical techniques to analyze and measure corrosion in process environments. The electrochemical measurements require a low level of ionic conductivity in the fluid to which the probe is exposed. Some compensation may be required using special probe arrangements when dealing with extremely low conductivity environments. Please consult with the Honeywell factory for additional information. 42 SmartCET CET5000 User Manual 11/06 9. Appendix A - CET5000M Overview of Technology and Output Parameters 9.1 Introduction The multivariable version of the SmartCET corrosion transmitter outputs four corrosion measurements, which are: • General Corrosion Rate • Pitting Factor • B value • Corrosion Mechanism Indicator The General Corrosion Rate is the average or general corrosion rate, and is generally expressed in mils per year (mpy) or millimeters per year (mmpy). The Pitting Factor is a dimensionless number that indicates the presence of a pitting (localization) corrosion environment. The B value is expressed in millivolts per decade, and is commonly also known as the Stern Geary constant. The measurement unit for the Corrosion Mechanism Indicator is µA/cm2. The values are all updated every 430 seconds, which is the total measurement cycle time of the instrument. The values for the General Corrosion Rate, the Pitting Factor and the Corrosion Mechanism Indicator are set to output the most recent values. The B value is slightly different in that the output value is an average of the values over the last 2-3 hour period. This averaging provides a more stable representation of the B value. If there is a large change in the B value, for example, from a high value e.g. 0.15 volts to a low value e.g. 0.015V, the new value will be approached asymptotically over a period of approximately three hours. This is normal behavior and will only be noticeable if there are large sustained changes in the B value – such as may occur during commissioning of the device or when switching from a test cell to a corrosion probe. Detail of each output parameter is presented in this appendix, including a description of the technology used to calculate or measure the output. 9.2 General Corrosion Rate SmartCET uses the Linear Polarization Resistance (LPR) technique to calculate the General Corrosion Rate. This calculation is usually the prime variable of interest since it reflects the overall rate of metallic corrosion. Corrosion may be directly related to operational parameters such as temperatures, flow, chemical composition, etc. SmartCET uses three electrodes that are referred to as the working, counter and reference electrodes. A low frequency sinusoidal voltage excitation is applied to the working electrode with respect to the reference electrode, and the current is measured and analyzed (on the counter electrode) synchronously with the applied signal. Given a sinusoidal pattern, the working electrode becomes positively charged and then negatively charged (in other words, polarized positively and negatively). It is a DC voltage applied in a sinusoidal pattern and resembles an AC pattern. The peak-to-peak value of the sinusoidal wave is 50mV. 11/06 SmartCET CET5000 User Manual 43 Troubleshooting Strictly, this is a measurement of the real part of the low frequency impedance of the working electrode. This method of analysis is selected due to its superior noise rejection, which is particularly useful when studying corroding systems since they exhibit varying degrees of intrinsic noise. The result is equivalent to measuring the linear polarization resistance of the working electrode. With this measurement, the corrosion current (hence, the corrosion rate) is inversely proportional to the polarization resistance. This measurement also employs the Stern-Geary approximation where the Stern-Geary constant (or B value) is the proportionality constant. In practice, with no prior knowledge of the system, the “default” value of B for this type of measurement is typically chosen to be in the range 25 to 30 mV; in reality, the value of B is system-dependent. Use of the default B value may result in the absolute corrosion rate being somewhat in error, but in some instances, it is the general trend of the corrosion rate that could be of interest instead of the absolute value. Working method summary: There are three electrodes in use, which are designated working electrode (WE), counter electrode (CE) and reference electrode (RE). A sinusoidal DC voltage is applied on the WE (voltage is varied). In turn, the current response is measured between the CE and WE. The ratio of voltage to current provides the polarization resistance. The polarization resistance is not a true resistance in the traditional sense, but can be treated as such in describing the LPR technology. The corrosion current is inversely proportional to the polarization resistance. How does LPR distinguish polarization resistance due to corrosion versus general resistance of the solution? How does an electrical model represent a corrosion process? What makes corrosion look like an electrical system? First, SmartCET includes a measurement cycle where the solution resistance is measured and calculated. This allows the resistance due to the solution to be quantified. Corrosion comprises an anodic process and a cathodic process, i.e. electrochemical processes that occur at anodic and cathodic sites on the metal surface. When corrosion is occurring, there is an increase of ionic flow between the anodic and cathodic sites (i.e. Faradaic process). A non-corrosive system would not exhibit any ionic flow. SmartCET applies a sinusoidal wave to facilitate an increase in flow. The sinusoidal wave is a very slight DC voltage to enhance the anodic sites during one part of the wave and then enhance the cathodic sites in the other half of the wave. SmartCET measures the polarization resistance during these cycles. A heavily corroding system would be characterized by greater ionic flow. The small DC voltage does not affect the naturally occurring corrosion process. The anodic and cathodic sites exist on any of the three electrodes (versus one electrode being the anode and the other the cathode). It is the flow of current from the anodic site on one electrode to the cathodic site on the other electrode that is being measured. Table 9-1 shows the relationship between corrosion rate, environment characterization and the recommendation for getting accurate General Corrosion Rate measurements. Table 9-1 Corrosion Rate and Environment Characterization Corrosion Rate 44 Environment Comments >200 mpy Highly conductive, highly corrosive This could be at upper level of SmartCET accuracy range. If used in this environment, electrodes with small area should be used (e.g. 1cm2). 1-200mpy Average corrosion rate Use correct probe type according to process application. 0.01-1mpy Low conductivity or passive system Electrodes with large area should be used (e.g. 10cm2). <0.01mpy Extreme passivity or low conductivity (e.g. organic medium) This could be at lower level of SmartCET accuracy range. If used in this environment, electrodes with large area should be used (e.g. 10cm2). SmartCET CET5000 User Manual 11/06 9.3 The B value The B value represents a correction factor ‘constant’ that is determined by the mechanism and kinetics of the corrosion process. In a dynamic process, research has shown that the B value is not constant. For example, the B value for a sour system with a microbiological influence on corrosion activity could be 4mV. The average “industry-accepted” default B value is typically between 25 and 30mV. Houston tap water gives a B value of 15mV. A severely scaled system (i.e. inorganic scale deposits on the metal surface) would show a B value of around 100 mV. By evaluation of the non-linearities in the current response from the LPR measurement, it is possible to determine a B value for the system being studied. This involves the analysis of the higher order harmonic content of the current response, and computation of a value of B for the system being studied. With knowledge of the B value it is possible to refine the LPR-generated corrosion rate estimate, since the uncertainty regarding the standard (default) B value is removed. The B value is directly related to the mechanistic properties of the component anodic and cathodic corrosion processes. The anodic process is essentially the metal oxidation and the cathodic process is, for example, the oxygen reduction or hydrogen evolution. These are essentially non-linear processes, and the current will typically (but not always) have a logarithmic dependence on the applied voltage. The B value is a composite of the individual anodic and cathodic Tafel slopes. Potential ba (anodic Tafel slope) Ecorr bc (cathodic Tafel slope) Log (Icorr) Log (Current density) Figure 9-1 Individual Anodic and Cathodic Tafel Slopes The B value is calculated using the following B=ba*bc/2.303*(ba+bc) 11/06 SmartCET CET5000 User Manual 45 Troubleshooting So these individual slopes are representative of non-linear processes. In the calculation of the general corrosion rate, the B value approximation assumes that the processes are essentially linear for a small applied potential, for example: 10 – 20 mV away from the corrosion potential and only takes into account the first order (linear) processes. The harmonic distortion analysis takes into account the second and third order processes, i.e. it is similar to fitting a polynomial to x3, but we use the higher frequency harmonic components to analyze rather than trying to fit a polynomial – it’s a much better analysis route. SmartCET uses Harmonic Distortion Analysis (HDA) to calculate the ‘true’ B value. With an accurately computed B value, the default B value used in the LPR calculation can be changed thus enabling a more accurate corrosion rate calculation to be made. How does the technology work? A low frequency AC voltage (10 mHz) is applied on the working electrode. The current signals are analyzed at 10, 20 & 30 mHz (harmonics). The response at each harmonic is used to calculate the B value. Figure 9-2 Fundamental Sine Waves and Harmonics Table 9-2 provides analysis on the corrosion mechanism based upon the B value, and typical anodic and cathodic values. Table 9-2 Corrosion Rate and Environment Characterization 46 ba bc B Comments 60mV 60mV 13mV Both processes activation controlled (e.g. sulfide film) 60mV ∞ 26mV Anodic process activation, cathodic diffusion, controlled (e.g. aerated system) 120mV ∞ 52mV Anodic process activation, cathodic diffusion, controlled (anodic slope different) – e.g. multiphase system ∞ ∞ ∞ Severe anodic and cathodic diffusion limiting – e.g. vapor phase. B value indeterminate. SmartCET CET5000 User Manual 11/06 9.4 The Pitting Factor The Pitting Factor is a measure of the overall stability of the corrosion process, and is obtained from a measurement of the intrinsic current noise of the working electrode, and comparing this measurement to the general corrosion current obtained from the LPR measurement (e.g. general corrosion rate calculation). General corrosion processes typically have low levels of intrinsic noise, with the ratio of noise to the general corrosion current typically being ≤1% (Pitting Factor ≤0.01). With the onset of instability (pit initiation), localized corrosion occurrence leads to increasingly higher levels of current noise with respect to the general corrosion current such that the Pitting Factor may reach a value of 1. The Pitting Factor can be viewed as the probability that the corrosion mechanism is localized. Spontaneous changes in the environment may also cause the instantaneous value of the Pitting Factor to approach a value of 1 in the short term; however, for localized corrosion, the Pitting Factor will remain unstable and secondary evidence may be observed in terms of the overall stabilities of both the general corrosion rate estimate and the B value. SmartCET uses electrochemical noise (ECN) to calculate the Pitting Factor. How does the technology work? • No excitation is applied to the electrodes. The electrodes are at rest. • SmartCET ‘listens’ for current noise between the working and counter electrodes. 1. For general corrosion • Zero net current flow occurs between the working and counter electrodes. • 2. • The current signal can be represented by a normal bell curve distribution For localized corrosion • The electrodes exhibit a net current fluctuation • Current distribution will deviate from a standard bell curve. • Standard deviation (e.g. noise is present) of the signal will increase. Of interest is the amplitude of the signal. The generation of current is due to the material naturally corroding in the environment. If the ECN current measurement is the same as the current measured from LPR (100%) then the Pitting Factor equals 1 and pitting corrosion is present. If the ratio is 1% then the Pitting Factor is 0.001 and all corrosion present is due to general corrosion and not pitting. • Final note, the probe electrodes are electrically isolated from the pipe and, hence, the measurement is unaffected by pipe noise. The noise detected is only related to the corrosion on the probe electrodes. A useful analogy to explain the difference between general corrosion and localized corrosion (Pitting Factor) is that of a flashlight with its beam constantly ON (general corrosion) and one that is flickering (localized corrosion). The interpretation of various Pitting Factor values is shown in Table 9-3. Table 9-3 Pitting Factor Values PF Value 11/06 Comments 0.1 or higher Pitting/localized corrosion – initiation (Note: check corrosion rate value; if very low, PF could be misleading). 0.01 to 0.1 Intermediate level; general corrosion but check PF does not increase above 0.1. SmartCET CET5000 User Manual 47 Troubleshooting 0.01 or lower General corrosion. 9.5 The Corrosion Mechanism Indicator The metallic corroding interface is complex and dynamic. The general corrosion rate, the B value, and the Pitting Factor all help to characterize the Faradaic corrosion processes (current flow that is the result of electrochemical process) quite thoroughly. However, in order to be more complete in the analysis of the electrochemical response there is at least one more factor which needs to be taken into account. During the measurement of the low frequency impedance, a reactive, phase shifted component of the current response may be detected. This is a consequence of the physical nature of the metal/environment (electrolyte) interface, and may reflect mechanistic properties such as the presence of films, film formation and surface adsorption processes. The values obtained are likely to be characteristic of a particular system being studied. For example sulfide filming may cause the reactance to become more positive, whereas adsorption processes may cause the values to go negative. The absolute values obtained may provide the corrosion expert with extra knowledge regarding the corrosion behavior of any particular system. Understanding CMI values The CMI is a qualitative indicator of whether a surface film is present or not. If there is no film and only corrosion is present, the CMI will have an intermediate value. Inorganic scale, or thick passive oxide films with little or no conductivity, will show a low CMI value. Analysis of the Corrosion Mechanism Indicator is shown in Table 9-4. Table 9-4 CMI Values CMI Value Comments µA/cm2 > 0.2 Possible redox film, e.g. sulfide 0.02-0.2 Freely corroding system 0-0.02 Passive material, e.g. Al, Zr, Ti Negative Adsorption processes, e.g. some corrosion inhibitors CMI does not provide information on film thickness; however, it can be used to measure changes, for example, decreasing values may indicate that more filming or scaling is occurring. The Corrosion Mechanism Indicator provides the most useful analysis when coupled with other corrosion information and/or process data. It is the combination of process data that provides a more complete view into the corrosion mechanism being measured. 48 SmartCET CET5000 User Manual 11/06 Sales and Service For application assistance, current specifications, pricing, or name of the nearest Authorized Distributor, contact one of the offices below. ARGENTINA HONEYWELL S.A.I.C. BELGRANO 1156 BUENOS AIRES ARGENTINA Tel. : 54 1 383 9290 ASIA PACIFIC HONEYWELL ASIA PACIFIC Inc. Room 3213-3225 Sun Kung Kai Centre N° 30 Harbour Road WANCHAI HONG KONG Tel. : 852 829 82 98 AUSTRALIA HONEYWELL LIMITED 5 Thomas Holt Drive North Ryde Sydney NSW AUSTRALIA 2113 Tel. : 61 2 353 7000 AUSTRIA HONEYWELL AUSTRIA G.m.b.H. Handelskai 388 A1020 VIENNA AUSTRIA Tel. : 43 1 727 800 BELGIUM HONEYWELL S.A. 3 Avenue de Bourget B-1140 BRUSSELS BELGIUM Tel. : 32 2 728 27 11 BRAZIL HONEYWELL DO BRAZIL AND CIA Rua Jose Alves Da Chunha Lima 172 BUTANTA 05360.050 SAO PAULO SP BRAZIL Tel. : 55 11 819 3755 BULGARIA HONEYWELL EOOD 14, Iskarsko Chausse POB 79 BG- 1592 Sofia BULGARIA Tel : 359-791512/ 794027/ 792198 11/06 CANADA HONEYWELL LIMITED THE HONEYWELL CENTRE 300 Yorkland Blvd. NORTH YORK, ONTARIO M2J 1S1 CANADA Tel.: 800 461 0013 Fax:: 416 502 5001 CZECH REPUBLIC HONEYWELL, Spol.s.r.o. Budejovicka 1 140 21 Prague 4 Czech Republic Tel. : 42 2 6112 3434 DENMARK HONEYWELL A/S Automatikvej 1 DK 2860 Soeborg DENMARK Tel. : 45 39 55 56 58 FINLAND HONEYWELL OY Ruukintie 8 FIN-02320 ESPOO 32 FINLAND Tel. : 358 0 3480101 FRANCE HONEYWELL S.A. Bâtiment « le Mercury » Parc Technologique de St Aubin Route de l’Orme (CD 128) 91190 SAINT-AUBIN FRANCE Tel. from France: 01 60 19 80 00 From other countries: 33 1 60 19 80 00 GERMANY HONEYWELL AG Kaiserleistrasse 39 D-63067 OFFENBACH GERMANY Tel. : 49 69 80 64444 HUNGARY HONEYWELL Kft Gogol u 13 H-1133 BUDAPEST HUNGARY Tel. : 36 1 451 43 00 ICELAND HONEYWELL Hataekni .hf Armuli 26 PO Box 8336 128 reykjavik Iceland Tel : 354 588 5000 ITALY HONEYWELL S.p.A. Via P. Gobetti, 2/b 20063 Cernusco Sul Naviglio ITALY Tel. : 39 02 92146 1 MEXICO HONEYWELL S.A. DE CV AV. CONSTITUYENTES 900 COL. LOMAS ALTAS 11950 MEXICO CITY MEXICO Tel : 52 5 259 1966 THE NETHERLANDS HONEYWELL BV Laaderhoogtweg 18 1101 EA AMSTERDAM ZO THE NETHERLANDS Tel : 31 20 56 56 911 NORWAY HONEYWELL A/S Askerveien 61 PO Box 263 N-1371 ASKER NORWAY Tel. : 47 66 76 20 00 POLAND HONEYWELL Sp.z.o.o UI Domainewksa 41 02-672 WARSAW POLAND Tel. : 48 22 606 09 00 PORTUGAL HONEYWELL PORTUGAL LDA Edificio Suecia II Av. do Forte nr 3 - Piso 3 2795 CARNAXIDE PORTUGAL Tel. : 351 1 424 50 00 REPUBLIC OF IRELAND HONEYWELL Unit 1 Robinhood Business Park Robinhood Road DUBLIN 22 Republic of Ireland Tel. : 353 1 4565944 REPUBLIC OF SINGAPORE HONEYWELL PTE LTD BLOCK 750E CHAI CHEE ROAD 06-01 CHAI CHEE IND. PARK 1646 SINGAPORE REP. OF SINGAPORE Tel. : 65 2490 100 REPUBLIC OF SOUTH AFRICA HONEYWELL Southern Africa PO BOX 138 Milnerton 7435 REPUBLIC OF SOUTH AFRICA Tel. : 27 11 805 12 01 ROMANIA HONEYWELL Office Bucharest 147 Aurel Vlaicu Str., Sc.Z., Apt 61/62 R-72921 Bucharest ROMANIA Tel : 40-1 211 00 76/ 211 79 RUSSIA HONEYWELL INC 4 th Floor Administrative Builiding of AO "Luzhniki" Management 24 Luzhniki 119048 Moscow RUSSIA Tel : 7 095 796 98 00/01 SLOVAKIA HONEYWELL Ltd Mlynske nivy 73 PO Box 75 820 07 BRATISLAVA 27 SLOVAKIA Tel. : 421 7 52 47 400/ 425 TURKEY HONEYWELL Otomasyon ve Kontrol Sistemlen San ve Tic A.S. (Honeywell Turkey A.S.) Emirhan Cad No 144 Barbaros Plaza C. Blok Kat 18 Dikilitas 80700 Istanbul TURKEY Tel : 90-212 258 18 30 UNITED KINGDOM HONEYWELL Unit 1,2 &4 Zodiac House Calleva Park Aldermaston Berkshire RG7 8HW UNITED KINGDOM Tel : 44 118 906 2600 U.S.A. HONEYWELL INC. INDUSTRIAL PROCESS CONTROLS 1100 VIRGINIA DRIVE PA 19034-3260 FT. WASHINGTON U.S.A. Tel. : 1-800-343-0228 VENEZUELA HONEYWELL CA APARTADO 61314 1060 CARACAS VENEZUELA Tel. : 58 2 239 0211 SPAIN HONEYWELL S.A Factory Josefa Valcarcel, 24 28027 MADRID SPAIN Tel. : 34 91 31 3 61 00 SWEDEN HONEYWELL A.B. S-127 86 Skarholmen STOCKHOLM SWEDEN Tel. : 46 8 775 55 00 SWITZERLAND HONEYWELL A.G. Hertistrasse 2 8304 WALLISELLEN SWITZERLAND Tel. : 41 1 831 02 71 SmartCET CET5000 User Manual 49 Industrial Measurement and Control Honeywell 1100 Virginia Drive Fort Washington, PA 19034 34-SC-25-01 Rev 3 11 06 Printed in USA www.honeywell.com/imc