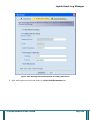
1
Lepide Event Log Manager Users Help Manual Lepide Event Log Manager © Lepide Software Private Limited. Page 1 Lepide Event Log Manager Users Help Manual for Lepide Event Log Manager © Lepide Software Private Limited, All Rights Reserved This User Guide and documentation is copyright of Lepide Software Private Limited, with all rights reserved under the copyright laws. This user guide cannot be reproduced in any form without the prior written permission of Lepide Software Private Limited. No Patent Liability is assumed, however, with respect to the use of the information contained herein. Warranty Disclaimers and Liability Limitation Lepide Event Log Manager, and any and all accompanying software, files, data and materials, are distributed and provided AS IS and with no warranties of any kind, whether expressed or implied. In particular, there is no warranty for any harm, destruction, impairment caused to the system where Lepide Event Log Manager is installed. You acknowledge that good data processing procedure dictates that any program, including Lepide Event Log Manager, must be thoroughly tested with non-critical data before there is any reliance on it, and you hereby assume the entire risk of all use of the copies of Lepide Event Log Manager covered by this License. This disclaimer of warranty constitutes an essential part of this License. In addition, in no event does Lepide Software Private Limited authorize you or anyone else to use Lepide Event Log Manager in applications or systems where Lepide Event Log Manager failure to perform can reasonably be expected to result in a significant physical injury, or in loss of life. Any such use is entirely at your own risk, and you agree to hold Lepide Software Private Limited harmless from any and all claims or losses relating to such unauthorized use. Trademarks Lepide Event Log Manager is a copyright work of Lepide Software Private Limited. Windows 95®, Windows 98®, Windows ME®, Windows NT®, Windows 2000 Server®, Windows 2000 Advanced Server®, Windows 2003 Server®, Windows XP®, Windows Vista, Windows 7, and MS-DOS, are registered trademarks of Microsoft Corporation. Contact Information Email: [email protected] Website: http://www.lepide.com © Lepide Software Private Limited. Page 2 Lepide Event Log Manager Table of Contents 1. About Lepide Event Log Manager _______________________________________________________ 10 1.1 Brief about this User Guide _________________________________________________________________ 10 1.2 Brief about Lepide Event Log Manager _______________________________________________________ 10 1.3 Key Features ____________________________________________________________________________ 11 1.4 How Lepide Event Log Manager Works? ______________________________________________________ 12 1.5 System Requirements _____________________________________________________________________ 14 2. Install and Uninstall __________________________________________________________________ 16 2.1 Install the Software _______________________________________________________________________ 16 2.2 Uninstall the Software ____________________________________________________________________ 16 2.2.1 Uninstall through Windows Start Menu ____________________________________________________________ 16 2.2.2 Uninstall through Control Panel___________________________________________________________________ 17 2.2.3 Activate Lepide Event Log Manager________________________________________________________________ 17 3. Understanding the User Interface _______________________________________________________ 23 3.1 Menu Bar _______________________________________________________________________________ 23 3.2 Buttons Used ____________________________________________________________________________ 28 4. Using Lepide Event Log Manager ________________________________________________________ 29 4.1 Getting Started with Lepide Event Log Manager ________________________________________________ 29 4.1.1. Configuring database to store events ______________________________________________________________ 30 4.1.2. Configuring Mail Server_________________________________________________________________________ 33 4.1.3. Manage Event Collection _______________________________________________________________________ 35 4.1.3. Manage Groups_______________________________________________________________________________ 37 4.1.4. Manage Computers____________________________________________________________________________ 41 4.2 Manage Event Logs _______________________________________________________________________ 60 4.2.1. View Event Logs ______________________________________________________________________________ 61 4.2.2. Manage Event Logs ____________________________________________________________________________ 67 4.2.3. View Reports _________________________________________________________________________________ 82 4.2.4. Manage Reports _____________________________________________________________________________ 101 4.2.5. Manage Queries _____________________________________________________________________________ 117 4.2.6. Manage Alerts _______________________________________________________________________________ 126 5. Download, Purchase and Register ______________________________________________________ 136 5.1 Free Trial Download _____________________________________________________________________ 136 5.2 Purchase and Register ____________________________________________________________________ 136 © Lepide Software Private Limited. Page 3 Lepide Event Log Manager 5.3 Support _______________________________________________________________________________ 136 5.4: Troubleshooting ________________________________________________________________________ 137 6. Legal Notices _______________________________________________________________________ 140 6.1 Copyright Notice ________________________________________________________________________ 140 6.2 Trademarks ____________________________________________________________________________ 140 6.3 Disclaimer _____________________________________________________________________________ 140 6.4 License Agreement ______________________________________________________________________ 140 Table of Figures Figure 1.1: How Lepide Event Log Manager Works? .................................................................. 13 Figure 2.1: Software Main Screen .................................................................................................... 18 Figure 2.2: Activate Software Wizard ............................................................................................. 19 Figure 2.3: Authentication Page of Activate Software Wizard ................................................. 20 Figure 2.4: Entering authentication details in Activate Software Wizard ............................ 21 Figure 2.5: Success Message of Software Activation ................................................................... 22 Figure 3.1: Main Window of the Software ..................................................................................... 23 Figure 4.1: Steps to get started with Lepide Event Log Manager ............................................ 30 Figure 4.2: Main Window of Lepide Event Log Manager ........................................................... 31 Figure 4.3: Entering user authentication to configure database ............................................ 32 Figure 4.4: Database Configuration Success Message ................................................................ 32 Figure 4.5: Software Welcome Screen ............................................................................................ 33 Figure 4.6: Configure Mail Server Wizard ..................................................................................... 34 Figure 4.7: Entering authentication details to configure Mail Server ................................... 35 Figure 4.8: Manage Event Collection dialog .................................................................................. 36 Figure 4.9: Configuring Event Management settings .................................................................. 36 © Lepide Software Private Limited. Page 4 Lepide Event Log Manager Figure 4.10: Screen after selecting Manage Group option ........................................................ 37 Figure 4.12: Enter login credentials for the new group ............................................................. 39 Figure 4.13: Renaming an existing Group ..................................................................................... 40 Figure 4.14: Entering new name for the Group............................................................................ 41 Figure 4.15: Screen appearing after Manage Group option...................................................... 42 Figure 4.16: Selecting Group to add computer ............................................................................. 43 Figure 4.17: Selecting the Group with Manage Group Wizard ................................................. 44 Figure 4.18: Add Computer(s) Manually dialog ........................................................................... 45 Figure 4.19: Entering computer Name in Add Computer(s) Manually dialog ..................... 45 Figure 4.20: Added Computer gets enlisted .................................................................................. 46 Figure 4.21: Setting parameters to the added computer .......................................................... 47 Figure 4.22: Screen showing Computer(s) successfully added ............................................... 48 Figure 4.23: Search and Add Computer(s) Wizard ..................................................................... 49 Figure 4.24: Selected Computer(s) in the Computer list ........................................................... 50 Figure 4.25: Setting parameters for selected Group................................................................... 51 Figure 4.26: Manage Groups Wizard ............................................................................................... 52 Figure 4.27: Selecting computers for deletion ............................................................................. 53 Figure 4.28: Computers listed for deletion ................................................................................... 54 Figure 4.29: Selecting computers for deletion ............................................................................. 55 Figure 2.30: Confirmation message for successful computer deletion ................................. 56 Figure 4.31: Manage Groups Wizard ............................................................................................... 57 Figure 4.32: Screen for moving computer ..................................................................................... 58 Figure 4.33: Selecting Source Group and Target Group ............................................................ 59 © Lepide Software Private Limited. Page 5 Lepide Event Log Manager Figure 4.34: Confirmation message for moving computer ....................................................... 60 Figure 4.35: Screen appearing after selecting Show Windows Events option .................... 62 Figure 4.36: Windows Event logs displayed in Right pane ....................................................... 63 Figure 4.37: Configure W3C Event Collection dialog .................................................................. 64 Figure 4.38: Defining location for W3C event collection ........................................................... 65 Figure 4.39: Screen appearing after selecting Show W3C Events option.............................. 66 Figure 4.40: Screen displaying W3C events .................................................................................. 67 Figure 4.41: Event logs displayed by Lepide Event Log Manager............................................ 68 Figure 4.42: Saving selected event logs .......................................................................................... 69 Figure 4.43: Save Event Log dialog .................................................................................................. 70 Figure 4.44: Selecting location and file format for saving event logs .................................... 70 Figure 4.45: Email Event Log Wizard .............................................................................................. 71 Figure 4.46: Screen appearing after selecting Manage Group option.................................... 73 Figure 4.47: Options that appear after right-clicking computer ............................................. 74 Figure 4.48: Event Processing Rules dialog .................................................................................. 75 Figure 4.49: Entering required information in Event Processing Rules dialog .................. 76 Figure 4.50: Filter Event Log button on the Right Pane ............................................................. 77 Figure 4.51: Filter Windows Events Wizard ................................................................................. 78 Figure 4.52: Entering required information to filter Windows events ................................. 79 Figure 4.53: Screen displaying W3C events .................................................................................. 80 Figure 4.53: Filter W3C events dialog ............................................................................................. 81 Figure 4.53: Defining required fields to filter W3C events ....................................................... 82 Figure 4.54: Screen appearing after selecting Reports option ................................................ 83 © Lepide Software Private Limited. Page 6 Lepide Event Log Manager Figure 4.55: Manage Reports Wizard ............................................................................................. 84 Figure 4.56: Select Event Filter window ........................................................................................ 85 Figure 4.57: Scheduling Report as per desired time period ..................................................... 86 Figure 4.58: Selecting format for saving the report .................................................................... 87 Figure 4.59: Configuring User authentication for creating email report.............................. 88 Figure 4.60: Confirmation message for creation of report ....................................................... 89 Figure 4.61: Displaying Windows Event Reports ........................................................................ 90 Figure 4.62: Screen appearing after selecting Reports tab ...................................................... 91 Figure 4.63: Wizard to create query-based reports ................................................................... 92 Figure 4.64: Scheduling Report Creation ....................................................................................... 93 Figure 4.65: Screen appearing after selecting Reports tab ...................................................... 95 Figure 4.66: Entering Report Name for W3C report ................................................................... 96 Figure 4.67: Selecting event type for generation of W3C reports ........................................... 97 Figure 4.68: Screen showing compliance report ......................................................................... 98 Figure 4.69: Selecting Compliance for creating report .............................................................. 99 Figure 4.70: Enter Report Name for the compliance report .................................................. 100 Figure 4.71: Selecting Report Type for update ......................................................................... 102 Figure 4.72: Selecting Report Type for deletion ....................................................................... 103 Figure 4.73: Selecting Report for emailing ................................................................................. 104 Figure 4.74: Configuring Mail Server Settings to email report ............................................. 105 Figure 4.75: Entering Server Authentication details to set mail server ............................. 106 Figure 4.76: Setting email parameters ........................................................................................ 107 Figure 4.77: Selecting Report emailing query-based report ................................................. 109 © Lepide Software Private Limited. Page 7 Lepide Event Log Manager Figure 4.78: Configuring Mail Server Settings ........................................................................... 110 Figure 4.79: Entering User Server authentication for mail server settings ...................... 111 Figure 4.80: Setting Email Parameters ........................................................................................ 112 Figure 4.81: Selecting report for emailing compliance report ............................................. 114 Figure 4.82: Configuring Mail Server Settings ........................................................................... 115 Figure 4.82: Entering User Authentication for setting mail server ..................................... 116 Figure 4.83: Setting Email Parameters ........................................................................................ 117 Figure 4.84: Screen appearing after selecting the Query tab ................................................ 118 Figure 4.85: Entering information to create Query ................................................................. 119 Figure 4.86: Adding fields to dialog.............................................................................................. 120 Figure 4.87: Newly created query enlisted ................................................................................ 121 Figure 4.88: Screen appearing after selecting Query tab ....................................................... 122 Figure 4.89: Executing the Selected query ................................................................................. 123 Figure 4.90: Updating Selected Query ......................................................................................... 124 Figure 4.91: Query Builder Wizard .............................................................................................. 125 Figure 4.92: Deleting Selected query ........................................................................................... 126 Figure 4.93: Selecting Event type for creating alert ................................................................ 127 Figure 4.94: Entering Alert Name for creating alert ................................................................ 128 Figure 4.95: Selecting Event Type and Source ........................................................................... 129 Figure 4.96: Setting Alert Criteria................................................................................................. 130 Figure 4.97: Adding text for sending Alert Message ................................................................ 131 Figure 4.98: Entering Alert Name ................................................................................................. 132 Figure 4.99: Updating selected alert ............................................................................................ 133 © Lepide Software Private Limited. Page 8 Lepide Event Log Manager Figure 4.100: Updating Alert Details ........................................................................................... 134 © Lepide Software Private Limited. Page 9 Lepide Event Log Manager Users Help Manual for Lepide Event Log Manager 1. About Lepide Event Log Manager Through this section, you will get acquainted to various sections covered in this user help guide for ideal utilization of Lepide Event Log Manager. Also, you will get to know about the purpose of developing Lepide Event Log Manager and how it helps network administrators to collect and manage event logs. Apart from this, Lepide Event Log Manager key features are also provided in this section along with system requirements for proper installation and software utilization. 1.1 Brief about this User Guide Welcome to the user guide of Lepide Event Log Manager- an advanced, professional and result-oriented Event Log Management software. This user guide is devised with the motive of educating network administrators about the various requirements and ways using which they can efficiently use Lepide Event Log Manager. Therefore, we suggest you to carefully read the user guide before using the software. The user guide expands over the following main sections: Brief about Lepide Event Log Manager: Offers a brief about Lepide Event Log Manager software and its key features. This section of the user guide also informs the system requirements for successful installation and execution of the software. Install and Uninstall: Describes the processes to install and uninstall Lepide Event Log Manager Software. Understanding the User Interface: Explores the user interface of Lepide Event Log Manager for its easy and perfect use. Using Lepide Event Log Manager: Informs about processes about initiating Lepide Event Log Manager Software. Through this section, you experience accessing varied options for collection and management of Event Logs. Download Purchase and Register: Provides information about downloading, purchasing, and registering the Lepide Event Log Manager software. Apart from this, the information regarding technical support is also provided in this section. Legal Notices: Provides information about copyright notices, trademarks, disclaimer, and license agreement related to the Lepide Event Log Manager software. 1.2 Brief about Lepide Event Log Manager Lepide Event Log Manager works as a centralized and efficient platform to perform collection and management of Windows and W3C event logs. The tool is devised to ease the event log management process flawless, simple and quick thereby purging the need of moving from computer to computer for log management. © Lepide Software Private Limited. Page 10 Lepide Event Log Manager Network administrators often find it difficult to collect event logs effectively and therefore to attain seamless network administrators, meet international compliance standards and network security standards. Lepide Event Log Manager is an ideal solution for those who are looking forward to ensure the following: Centralized and hassle-free network auditing Adherence to international network security and compliance standards such as HIPAA, SOX, GLBA, and PCI compliance standards Instant troubleshooting for system performance issues Lepide Event Log Manager is devised keeping in mind the needs of corporate houses that strive to adhere to international network security and compliance standards including HIPAA, SOX, GLBA, and PCI. Organizations and system administrators will find Lepide Event Log Manager as a reliable and proficient tool to help them collect and manage Windows and W3C events impeccably. Here are some of the advantages that an organization can benefit from while using Lepide Event Log Manager: Eradication of system performance and security issues Real time event monitoring via alert creation Systematic recording of Windows and W3C events over the entire network Easy event log analysis through log filtration and generated reports Tailor-made event collection and processing Moreover, using this tool you can find and resolve computer performance issues with utmost ease. Lepide Event Log Manager also provides you with a detailed but clear event reports so that you can efficiently find and resolve system issues in a network. 1.3 Key Features Being a professional and quintessential Event Log Management utility, Lepide Event Log Manager serves IT administrators at enterprise level and helps them in performing hassle-free event log management. The software exhibits an array of features that make it an apt choice for network administrators, who wish to perform flawless Event Log Management. Here are the salient features of Lepide Event Log Manager: Centralized platform for effective Event Log Management- Offering a centralized platform for management of Windows and W3C event logs, Lepide Event Log Manager helps you collect and manage event logs generated on every computer over the network. With centralized event log management, network administrator does not need check each and every computer in the network to analyze Event logs to meet network security and compliance standards. © Lepide Software Private Limited. Page 11 Lepide Event Log Manager Adhering to Compliance Standards- Lepide Event Log Manager facilitates the IT administrator to adhere to network security and compliance standards (HIPAA, SOX, GLBA and PCI) with utmost ease whilst providing them with automated Compliance Reports about every computer within a network. Automated Event Log Management- Pertaining to the size and standards set by an organization, number of computers and servers within the company might vary. In such a situation, managing the computer events on all the systems might prove to be tiresome. Lepide Event Log Manager makes the event log management automatic and convenient thereby enabling the network administrator to add multiple computers in varied groups by assigning different Event Processing Rules. This automated event log generation helps the administrator to find and resolve security and compliance issues for every group configured in the software. Filtering Events- At every computer several Windows and W3C events are generated regularly. Checking each and every event so generated might become cumbersome and time-consuming. Lepide Event Log Manager will help you analyze Windows and W3C events by enabling the IT administrator to filter Windows and W3C events based on varied Event log types. Immediate Alert Generation- Lepide Event Log Manager accelerates monitoring, analyzing and troubleshooting computer issues thereby saving substantial amount of time of the IT administrator thereby providing them with immediate alerts about generation of events in a computer or a group of computers. The alerts so generated are delivered to the concerned IT administrator or person in the form of pop-up message or an alert. Event Report Generation- Ability to report real-time event log makes Lepide Event Log Manager professional‟s prime choice because reports play a vital role in finding and resolving issues. The application automatically generates Windows Event reports, W3C Reports and Compliance Reports that help the Event Reports to help find, analyze and troubleshoot network security and compliance issues. View Event Details with Query- Facilitates creation, execution and management of queries that help the IT administrators in collecting detailed information about any particular event generated on a computer or in a workgroup. Interactive and self-descriptive User Interface- Lepide Event Log Manager is designed keeping in mind the ease of performing simple actions to ensure apt collection and management of Windows and W3C events. 1.4 How Lepide Event Log Manager Works? The motive of designing Lepide Event Log Manager is to help the network administrators to stick to network compliance and security standards. Well-managed event logs help the administrator to troubleshoot issues that affect the performance of any computer. © Lepide Software Private Limited. Page 12 Lepide Event Log Manager Figure 1.1: How Lepide Event Log Manager Works? Lepide Event Log Manager facilitates the network administrators and technicians to collect and store Windows and W3C event logs at a configured database to help them meet organization‟s key objective through real time reports, alerts and queries. © Lepide Software Private Limited. Page 13 Lepide Event Log Manager 1.5 System Requirements Before you start installing Lepide Event Log Manager, make sure your computer system fulfills the following system requirements: Basic System Requirements Pentium Class Processor Windows 9x/ME/NT/2000/XP Minimum RAM (where SQL Server is configured) - 1 GB (2 GB Recommended). Minimum RAM (where Software is installed) - 512 MB (1 GB Recommended). Minimum Hard Disk Space (Where software is installed and SQL Server is configured as well) - 1 GB (2 GB Recommended). Supported Platforms Windows 2000 Windows 2003 Windows XP Windows Vista Windows 7 Windows server 2008 Supported SQL Servers: SQL Server 2000 SQL server 2005 SQL Server 2005 (Express Edition) SQL Server 2008 SQL Server 2008 (Express Edition) © Lepide Software Private Limited. Page 14 Lepide Event Log Manager © Lepide Software Private Limited. Page 15 Lepide Event Log Manager 2. Install and Uninstall Now that you are so familiar with the software features and system requirements, let‟s move ahead to install the software. Through this section, you will acquire information about the process to install, uninstall and activate Lepide Event Log Manager. 2.1 Install the Software Before installing Lepide Event Log Manager, make sure that you have downloaded the software installer file. In case, the file is not available on your computer, download the file from our website: http://www.lepide.com/download.html After you have downloaded the installer file, execute the following steps to install the software: 1. First of all check the system requirements and available memory. 2. Download Lepide Event Log Manager Setup.exe from our website 3. Double-click the Setup.exe to run the software 4. Follow the On-Screen instructions. The setup install completion screen will be displayed. 5. Click Finish, main window of Lepide Event Log Manager will be launched. 2.2 Uninstall the Software You can uninstall Lepide Event Log Manager in two ways from your computer system: 1. From the Windows Start menu 2. From the Control Pane Before you start uninstalling Lepide Event Log Manager make sure that the software is not running in the background. 2.2.1 Uninstall through Windows Start Menu To uninstall Lepide Event Log Manager from Windows Start Menu, follow the steps given below: 1. Click the Start button from the Windows menu 2. Click All Programs > Lepide Event Log Manager > Uninstall Lepide Event Log Manager 3. A warning message before un-installing will be displayed on the screen. Click Yes to uninstall the software. © Lepide Software Private Limited. Page 16 Lepide Event Log Manager Lepide Event Log Manager will be successfully uninstalled from your computer system. 2.2.2 Uninstall through Control Panel To uninstall Lepide Event Log Manager from Control Panel, follow the steps given below: 1. Click the Start Menu > Control Panel and then double-click the Add or Remove Programs icon. 2. Select Lepide Event Log Manager and click Remove. 3. A warning message before un-installing the software will be displayed on the screen. Click Yes to un-install the software. Lepide Event Log Manager will be successfully uninstalled from your computer system. 2.2.3 Activate Lepide Event Log Manager After installation of the software, you need to activate it to start with the event log collection and management processes. Follow the steps given below to activate Lepide Event Log Manager: 1. Click the Settings button on Home menu. A screen comprising of four options: Manage Event collection, Manage Database, Configure Mail Server and Activate Software will appear: © Lepide Software Private Limited. Page 17 Lepide Event Log Manager Figure 2.1: Software Main Screen 2. Select Activate Software option on the screen. Activate Software window will appear showing message: "This software is not activated. Click Next to Start the activation process." © Lepide Software Private Limited. Page 18 Lepide Event Log Manager Figure 2.2: Activate Software Wizard 3. Click the Next button. If you do not have the authentication code, then select "I do not have the authentication code" option otherwise simply select “I have authentication code" option and enter your authentication code to activate the software. Again, click the Next button to continue: © Lepide Software Private Limited. Page 19 Lepide Event Log Manager Figure 2.3: Authentication Page of Activate Software Wizard 4. Enter your email ID, order number and No. of clients in relevant fields and click the Next button: © Lepide Software Private Limited. Page 20 Lepide Event Log Manager Figure 2.4: Entering authentication details in Activate Software Wizard 5. A confirmation message regarding generation of registration file at your desktop will appear. Click the Finish button: © Lepide Software Private Limited. Page 21 Lepide Event Log Manager Figure 2.5: Success Message of Software Activation 6. Now email the registration file at [email protected]. You will receive the authentication key. Enter the authentication key and the software will be activated. © Lepide Software Private Limited. Page 22 Lepide Event Log Manager 3. Understanding the User Interface After you get familiar with the process of launching and activating the software, let us have a look on the interface of Lepide Event Log Manager. The software has self-descriptive interface that helps the network administrators to collect, manage and generate reports of Windows and W3C events easily and accurately. Take a look at main window of the software: Figure 3.1: Main Window of the Software In this section, we will take a close look at the software GUI in the following sub-headings: Menu Bar Buttons Used 3.1 Menu Bar The menu bar comprises seven menus divided into several menu items that can be used to perform vital event management tasks. These menus include: Home Menu` Home Menu further includes three sub-menu items: Option © Lepide Software Private Limited. Description Page 23 Lepide Event Log Manager Displays Overview of Database and Event status Displays list of activities. Create, change database backend and email settings Manage Group Menu Manage Group Menu expands over eight sub-menus: Options Description Creates new group of computers Adds, deletes and moves groups and computers Deletes the selected group © Lepide Software Private Limited. Page 24 Lepide Event Log Manager Changes the name of the selected group Adds new computer to the selected group Deletes the selected computer Moves the selected computer from one group to another Opens the "Event Processing Rules" window to set rules for event collection and processing Event logs Menu Event Logs Menu expands over four sub-menus: Options Description Displays Windows event logs for selected computer Displays W3C event logs © Lepide Software Private Limited. Page 25 Lepide Event Log Manager Saves the selected event logs at the defined location E-mails the selected event logs Reports Menu Reports Menu expands over four sub-menus: Options Description Displays Windows event reports Displays W3C reports Displays query based reports Displays compliance reports Query Menu Query Menu expands over four sub-menus: Options © Lepide Software Private Limited. Description Page 26 Lepide Event Log Manager Creates new query Updates the selected query Deletes selected query Executes the selected query Alert Menu Alert Menu expands over three sub-menus: Options Description Creates new alert Updates selected alert Deletes selected alert Help Menu Help Menu expands over two sub-menus: © Lepide Software Private Limited. Page 27 Lepide Event Log Manager Options Description Displays help manual of the software Displays the software version and support related information 3.2 Buttons Used Apart from the options available in the menu bar, here are some of the buttons that are used for performing various essential tasks. Mentioned below are the main buttons used for performing varied tasks with Lepide Event Log Manager: Buttons Description Refreshes events Deletes events from database Adds W3C event collection path Filters event logs Removes filter To go to the first page of the event log To go to the last page of the event log To go to the previous page of the event log To go to the next page of event log © Lepide Software Private Limited. Page 28 Lepide Event Log Manager 4. Using Lepide Event Log Manager Lepide Event Log Manager is a simple, quintessential and business-centric application to meet Event Log collection, management and reporting needs. Using this software, network administrators are able to manage and meet network security standards. Through this section, you will learn about managing events, reports, alerts and queries via the following sub-headings: Getting Started with Lepide Event Log Manager Manage Event Logs View Reports Manage Reports Manage Queries Manage Alerts 4.1 Getting Started with Lepide Event Log Manager If you are running Lepide Event Log Manager for the first time, then just follow some initial steps to get started with the software: © Lepide Software Private Limited. Page 29 Lepide Event Log Manager Figure 4.1: Steps to get started with Lepide Event Log Manager 4.1.1. Configuring database to store events When Lepide Event Log Manager is launched, the first screen appears with four options for getting started. Since configuring database is the first step for working with Lepide Event Log Manager all other options will remain disabled till database configuration. For configuring database you need to follow these steps: Note: To configure database for event collection and processing, the user must have administrative rights © Lepide Software Private Limited. Page 30 Lepide Event Log Manager 1. Launch Lepide Event Log Manager: Figure 4.2: Main Window of Lepide Event Log Manager 2. Click Manage Database, Configure Database dialog appears: © Lepide Software Private Limited. Page 31 Lepide Event Log Manager Figure 4.3: Entering user authentication to configure database Select the required authentication. Enter the computer name, database and click Use Windows NT Authentication or Use SQL Server Authentication option. 3. Click OK and you will see the connection status at the bottom of the dialog box. Once the connecting process is complete, a message “Database configured. Press OK to Restart Lepide Event Log Manager” will appear: Figure 4.4: Database Configuration Success Message 4. Click OK © Lepide Software Private Limited. Page 32 Lepide Event Log Manager 4.1.2. Configuring Mail Server Now that database configuration process is complete and the software has restarted, the first screen will display the overview of the database status. The next steps includes Mail Server configuration. To configure mail server, follow these steps: 1. Click Settings from the Home menu 2. The following screen with four options i.e. Manage Event Collection, Manage Database, Configure Mail Server and Activate Software, appears: Figure 4.5: Software Welcome Screen 3. Click Configure Mail Server, “Configure Mail Server” dialog appears: © Lepide Software Private Limited. Page 33 Lepide Event Log Manager Figure 4.6: Configure Mail Server Wizard 4. Enter the email server name, port number, sender‟s email address and email server authentication details i.e. User Name and Password. © Lepide Software Private Limited. Page 34 Lepide Event Log Manager Figure 4.7: Entering authentication details to configure Mail Server 5. If you want to make your email transaction through secured mode, select Send Message using SSL option 6. Click OK and the Mail Server will be configured 4.1.3. Manage Event Collection Define Event Collection settings, so that software collects events as per to the number of days set by you. To configure event collection days, follow these steps: 1. Click Settings from the Home menu 2. The following screen with four options i.e. Manage Event Collection, Manage Database, Configure Mail Server and Activate Software, appears 3. Click the Manage Event Collection option, „Manage Event Collection‟ dialog appears: © Lepide Software Private Limited. Page 35 Lepide Event Log Manager Figure 4.8: Manage Event Collection dialog 4. Select Update Events information after every option to update event information after defined minutes. 5. Select Collect Events of all dates option to allow the software to collect events of all dates. 6. Select Collect Events of Last option to define the specific number of days for collection of events. Figure 4.9: Configuring Event Management settings 7. Once all event collection settings are defined, click OK If event collection settings are not defined, the software will by default collect events of last seven days. © Lepide Software Private Limited. Page 36 Lepide Event Log Manager 4.1.3. Manage Groups After configuring Database settings, Mail Server settings and event collection settings, manage group of users for event collection and management. Add New Group To add a new group, follow the steps given below: 1. Select Manage Groups from Menu Bar: Figure 4.10: Screen after selecting Manage Group option 2. Click the Create New Group option from the available options, „Manage Group‟ dialog appears: © Lepide Software Private Limited. Page 37 Lepide Event Log Manager Figure 4.11: Entering Name for the New Group 3. Enter Group Name and click the Add button. Group will get displayed in the group list with its name and parent group name. 4. Click the Next button, enter user login credentials for the specified group: © Lepide Software Private Limited. Page 38 Lepide Event Log Manager Figure 4.12: Enter login credentials for the new group 5. Click the Finish button to exit the Manage Group Wizard. Rename Group You can rename an existing group using the Rename Group option. Follow the steps given below: 1. In Manage Group menu, select Rename Group option; „Manage Group‟ dialog appears: © Lepide Software Private Limited. Page 39 Lepide Event Log Manager Figure 4.13: Renaming an existing Group 2. Select existing Group Name from the drop-down and enter the new name for the selected group. © Lepide Software Private Limited. Page 40 Lepide Event Log Manager Figure 4.14: Entering new name for the Group 3. Click the Next button. A confirmation message will appear. Click Rename and the group will be renamed. 4.1.4. Manage Computers After creating groups, you would have to manage computers in those groups to initiate event collection and management process. Add Computer(s) In order to start event log management, adding computers is required. To add computers to a specified group, follow these steps: © Lepide Software Private Limited. Page 41 Lepide Event Log Manager 1. Select Manage Group from Menu Bar 2. Select and right-click group from left panel: Figure 4.15: Screen appearing after Manage Group option 3. Click Add Computer from the available options, „Manage Group‟ dialog appears: © Lepide Software Private Limited. Page 42 Lepide Event Log Manager Figure 4.16: Selecting Group to add computer 4. Select the Group Name in which computer should be added © Lepide Software Private Limited. Page 43 Lepide Event Log Manager Figure 4.17: Selecting the Group with Manage Group Wizard 5. You can add computers with two options i.e. Add Computer(s) Manually and Search and Add Computer(s) Add Computers Manually 1. Select Add Computer(s) Manually option, „Add Computer(s) Manually‟ dialog appears: © Lepide Software Private Limited. Page 44 Lepide Event Log Manager Figure 4.18: Add Computer(s) Manually dialog 2. Enter Computer name in the Enter Computer Name field or add computer names by importing them from a CSV file Figure 4.19: Entering computer Name in Add Computer(s) Manually dialog 3. Select the desired option and click OK. Computer name is displayed in the computer list. Click the Next button © Lepide Software Private Limited. Page 45 Lepide Event Log Manager Figure 4.20: Added Computer gets enlisted 4. Manage Group Wizard will prompt you to set parameters. To configure parameters, you can either select Use Login Credentials of Selected Group option or Use the Different Login Credentials option © Lepide Software Private Limited. Page 46 Lepide Event Log Manager Figure 4.21: Setting parameters to the added computer 5. If you select Use Different Login Credentials option, you need to enter the username and Password of the selected computer. 6. Enter Username and password in the required field and click Add. The computer will get added to the selected group. © Lepide Software Private Limited. Page 47 Lepide Event Log Manager Figure 4.22: Screen showing Computer(s) successfully added 7. Click Finish Searching and Adding Computers 1. Select Search and Add Computer option, the following dialog appears that displays the list of computers available on the network: © Lepide Software Private Limited. Page 48 Lepide Event Log Manager Figure 4.23: Search and Add Computer(s) Wizard 2. Select the computer(s) and click Add. The selected computers get displayed in the computer list: © Lepide Software Private Limited. Page 49 Lepide Event Log Manager Figure 4.24: Selected Computer(s) in the Computer list 3. Click the Next button: © Lepide Software Private Limited. Page 50 Lepide Event Log Manager Figure 4.25: Setting parameters for selected Group Manage Group dialog prompts to set parameters. To set the parameters, you can select from the following two options: Use Login Credentials of Parent Group or Use the Different Login Credentials 4. If you select Use Different Login Credentials option, then you need to enter the username and the password of the selected computer 5. Click the Add button. The selected computer get enlisted in the selected group 6. Click Finish Delete Computer(s) © Lepide Software Private Limited. Page 51 Lepide Event Log Manager You can delete any computer by following these steps: 1. Select Manage Group option from Menu bar 2. Select Manage Groups and Computers from available options, „Manage Group‟ dialog appears: Figure 4.26: Manage Groups Wizard 3. Select Delete Computer(s) option from available options and click Next. Following dialog will appear © Lepide Software Private Limited. Page 52 Lepide Event Log Manager Figure 4.27: Selecting computers for deletion 4. Select the group from Select Group drop-down menu. All computers available in the selected group are displayed: © Lepide Software Private Limited. Page 53 Lepide Event Log Manager Figure 4.28: Computers listed for deletion 5. Select the computers that you wish to delete from the selected group © Lepide Software Private Limited. Page 54 Lepide Event Log Manager Figure 4.29: Selecting computers for deletion 6. Click Next, a confirmation message appears: © Lepide Software Private Limited. Page 55 Lepide Event Log Manager Figure 2.30: Confirmation message for successful computer deletion 7. Click the Delete button to delete all the selected computers Move Computer(s) To move computers from one Group to another, follow these steps: 1. Select Manage Group from Menu bar 2. Select Manage Groups and Computers, Manage Group dialog appears: © Lepide Software Private Limited. Page 56 Lepide Event Log Manager Figure 4.31: Manage Groups Wizard 3. Select Move Computer from available options and click Next, following dialog appears: © Lepide Software Private Limited. Page 57 Lepide Event Log Manager Figure 4.32: Screen for moving computer 4. Select Source Group and Target Group from Select Source Group and Select Target Group drop-down list. Then select the computer that you want to move to the target group: © Lepide Software Private Limited. Page 58 Lepide Event Log Manager Figure 4.33: Selecting Source Group and Target Group 5. Click Next. A confirmation message will appear: © Lepide Software Private Limited. Page 59 Lepide Event Log Manager Figure 4.34: Confirmation message for moving computer 6. Click the Move button to initiate moving the computer 4.2 Manage Event Logs To manage event logs, you need to collect and view the event logs after creating groups and adding computers to them. Through this section, we provide you with guidelines to help you manage event logs through viewing available event logs for added computers and saving and emailing the data for further processes. In order to perform event management functions, you need to click Event Log option from the Menu bar. In order to perform event log management, you need to perform actions with the following sections: © Lepide Software Private Limited. Page 60 Lepide Event Log Manager Left Pane- Displays hierarchical tree of available groups and added computers. This tree comprises of groups that are configured for event log management of selected computers. Right Pane- Displays event logs for the selected computer along with filtration options to view selected event type. Here are the additional buttons available on the Right pane to perform certain functions: o Refresh Button- To refresh events o Delete Button- To delete selected events from the event log list o Add W3C event collection path Button- To configure folder path that contains W3C event logs o Filter Button- To filter event logs o Remove Filter Button- To remove filter 4.2.1. View Event Logs Using Lepide Event Log Manager, you can generate, collect and manage Windows as well as W3C event logs. Here is how you can view desired event logs. View Windows Event Logs In order to view Windows Event Logs, you simply need to perform the following steps: 1. Click Event Logs from Menu bar and then select Show Windows Events option: © Lepide Software Private Limited. Page 61 Lepide Event Log Manager Figure 4.35: Screen appearing after selecting Show Windows Events option 2. Select computer from the Left pane, event logs for the selected computer will be displayed in a list like structure at the right panel. This list contains Computer Name, Group Name, User Name, Event id, Event Source, Event Type, Event Date, Event Time and Event Description for every event. © Lepide Software Private Limited. Page 62 Lepide Event Log Manager Figure 4.36: Windows Event logs displayed in Right pane Filtration options such as Application Events, System Events, Security Events, DNS Events, File Replication Events, Directory Service Events, Windows PowerShell Events and other logs can be used to view the list of any particular event type. View W3C Event Logs To view w3c event logs, you first need to set event collection path. To set event collection path follow the steps given below: Set Event collection path To view W3C events, you first have to set the W3C event collection path. To set the path, follow these steps: 1. Select Show W3C events from Event logs menu. © Lepide Software Private Limited. Page 63 Lepide Event Log Manager 2. Select button to add W3C event collection path. A dialog box "Configure W3C Event Collection" will appear: Figure 4.37: Configure W3C Event Collection dialog 3. Click the Browse button to locate the folder configured for W3C events collection and click Add to list button: © Lepide Software Private Limited. Page 64 Lepide Event Log Manager Figure 4.38: Defining location for W3C event collection 4. Select the added path and click OK View W3C Event Logs Now that you have configured the path for event collection, you can view the W3C event logs by following these steps: 1. Click Show W3C Events option in Event Log section. © Lepide Software Private Limited. Page 65 Lepide Event Log Manager Figure 4.39: Screen appearing after selecting Show W3C Events option 2. Click the Refresh button and all W3C events will get displayed with Event Date and Time, Client IP, Server IP, Server Port No, Requested Method, Requested URL and Requested Status details: © Lepide Software Private Limited. Page 66 Lepide Event Log Manager Figure 4.40: Screen displaying W3C events 4.2.2. Manage Event Logs Once you have the list of event logs for every computer, you can save, email, set processing rules and filter the same for easy management. Here are the options that Lepide Event Log Manager has to offer for easy event log management. Save Selected Event Logs After generating the list of event logs for every desired computer, you can save the same at a desired location by following these steps: 1. Click Event Logs option in the Menu bar and select Show Windows Event Logs or Show W3C Event Logs. © Lepide Software Private Limited. Page 67 Lepide Event Log Manager Figure 4.41: Event logs displayed by Lepide Event Log Manager 2. Select the event log entries that you want to save : © Lepide Software Private Limited. Page 68 Lepide Event Log Manager Figure 4.42: Saving selected event logs 3. Click Save Event Logs from the available options, the following dialog appears: © Lepide Software Private Limited. Page 69 Lepide Event Log Manager Figure 4.43: Save Event Log dialog 4. Type the event log name, define the path for saving and select log file format in which you want to save selected event logs: Figure 4.44: Selecting location and file format for saving event logs 5. Click OK to save the events at the desired location and in the required file format. Email selected Event Logs In order to email selected event logs, you should follow these steps: © Lepide Software Private Limited. Page 70 Lepide Event Log Manager 1. Select event logs that you want to email 2. Click Email Event Logs from the available options, the following dialog appears: Figure 4.45: Email Event Log Wizard 3. Type Event Log name, subject and the name of recipient to configure the email server settings. 4. Select from any of the two options for configuring email server settings i.e. Use Default Mail Server Settings and Use Different Mail Server Settings. Use Default Mail Server Settings © Lepide Software Private Limited. Page 71 Lepide Event Log Manager If you select Use Default Mail Server Settings option, then you are not required to provide the user with any additional information. You only have to type Event Log Name, Subject of the mail and Email address of the recipient. Click OK and the email will be sent to the defined email address. Use Different Mail Server Settings 1. In order to configure varied email server settings, you need to define the following fields: o Event Log Name: Type the name of the event log o Outgoing Mail Server: Type the name of the mail server configured in your computer system o Port No: Type the Port no. o Sender‟s Email Address: Type the email address of the sender o Subject: Type the subject of the email o Email Address of the Recipient: Type the email address of the recipient. 2. Enter user authentication to login to mail server 3. Click OK to configure sending email to the defined email address Set Event Processing Rules Set Event Processing Rules to skip events of any computer that you do not wish to check. Using this option, you can skip selected events of a computer during event collection by setting event processing rules. In order to set event processing rules, follow the steps given below: 1. Click Manage Group from menu bar: © Lepide Software Private Limited. Page 72 Lepide Event Log Manager Figure 4.46: Screen appearing after selecting Manage Group option 2. Select the computer name from Left pane for which you want to set event processing rules. 3. Right-click the selected computer, an option list will appear: © Lepide Software Private Limited. Page 73 Lepide Event Log Manager Figure 4.47: Options that appear after right-clicking computer 4. Select Set Event Processing Rules option from the list, „Event Processing Rules‟ dialog appears: © Lepide Software Private Limited. Page 74 Lepide Event Log Manager Figure 4.48: Event Processing Rules dialog 5. Select Event Logs that you want to skip during event collection 6. Enter Event IR (OR) range of Event ID(s) to skip selected event IDs while the events are collected 7. Enter Event Source that you want to skip © Lepide Software Private Limited. Page 75 Lepide Event Log Manager Figure 4.49: Entering required information in Event Processing Rules dialog 8. Click OK to set event processing rules Filter Events Logs You can filter the events from the Windows Event logs as well as W3C Event logs. To filter event logs take a look at the following sections: Filter Windows Events You can use filtration options to specify Windows events that you want to view. To filter and view specific Windows events, follow these simple steps: 1. Click Filter Event Logs button on the Right pane: © Lepide Software Private Limited. Page 76 Lepide Event Log Manager Figure 4.50: Filter Event Log button on the Right Pane The „Filter Windows Events‟ dialog appears: © Lepide Software Private Limited. Page 77 Lepide Event Log Manager Figure 4.51: Filter Windows Events Wizard 2. Enter Event ID, Event Date, Event Type and Event Description to filter events: © Lepide Software Private Limited. Page 78 Lepide Event Log Manager Figure 4.52: Entering required information to filter Windows events 3. Click Show Records and all events related to the defined criteria will be displayed Filter W3C Events Using available filtration option, you can specify the W3C events for viewing. To filter and view specific W3C events, follow the steps given below: 1. In the Event logs menu, select Show W3C Events 2. Click Filter Event Logs from available options © Lepide Software Private Limited. Page 79 Lepide Event Log Manager Figure 4.53: Screen displaying W3C events “Filter W3C Events” appears: © Lepide Software Private Limited. Page 80 Lepide Event Log Manager Figure 4.53: Filter W3C events dialog 3. Define criteria for filtration by defining fields: Client IP, Event Date and Requested URL. © Lepide Software Private Limited. Page 81 Lepide Event Log Manager Figure 4.53: Defining required fields to filter W3C events 4. Click the Filter button to display the W3C events matching the criteria so defined 4.2.3. View Reports Through View Reports section, you get to know more about creating, updating and viewing reports. Reports are generated when event logs are collected from the configured computers. Generating reports is important as it acts as one of the major tools for effective event log management; reports store vital event logs in easy-to-access format. This section not only includes report creation for Windows and W3C events but it also allows you to view compliance and query-based reports. Now, in order to create, manage and view reports, you need to click the Reports option in the Menu bar. When you select this option, a new screen appears that displays important data in Left and Right Pane: Left Pane- Displays four options which are Create New Report, Update Report, Delete Report and Email report. These options allow you to perform varied functions regarding report creation, updation, deletion and mailing. Right Pane- Displays the overview of all reports that contain details such as computer name, report creation date and time, report name and report schedule. © Lepide Software Private Limited. Page 82 Lepide Event Log Manager View Windows Event Reports Windows Event Reports refer to reports that are created for management of Windows event logs. To view Windows event reports, you need to create Windows event reports. To create Windows event reports, follow these simple steps: 1. Click Reports on Menu bar: Figure 4.54: Screen appearing after selecting Reports option 2. Select Create New Report from the Left Pane, „Manage Report‟ dialog appears: © Lepide Software Private Limited. Page 83 Lepide Event Log Manager Figure 4.55: Manage Reports Wizard 3. Enter the report name and select the computer for which report will be created. 4. Click Next, Manage Reports Wizard prompts you to Select event filter: © Lepide Software Private Limited. Page 84 Lepide Event Log Manager Figure 4.56: Select Event Filter window 5. Select the Event Type and Severity to define event filters for varied event types and 6. Click the Next button, following screen appears: © Lepide Software Private Limited. Page 85 Lepide Event Log Manager Figure 4.57: Scheduling Report as per desired time period Enter the report schedule as per desired time period. 7. Click Next and define the location for saving report. 8. Select the saving format (.TXT or .HTML) in which you want to save the created report: © Lepide Software Private Limited. Page 86 Lepide Event Log Manager Figure 4.58: Selecting format for saving the report 9. Click Next, a new dialog box appears prompting you to set email server settings for mailing the reports: © Lepide Software Private Limited. Page 87 Lepide Event Log Manager Figure 4.59: Configuring User authentication for creating email report 10. There are two options available for configuring email server settings i.e. Use Default Mail Server Settings and Use Different Mail Server Settings. If you select Use Default Mail Server Settings option, then you don‟t need to enter any additional information except Subject of the mail and Recipient‟s Email Address However if you select Use Different Mail Server Settings option, you need to define outgoing mail server, port number, Sender‟s email address, subject and the email address of the recipient. 11. Enter the username and password, if the mail server requires authentication and click the Next button, the following confirmation message appears: © Lepide Software Private Limited. Page 88 Lepide Event Log Manager Figure 4.60: Confirmation message for creation of report 12. Select Generate Report When Create Button is Clicked option to create the report immediately. Click the Create button and the report will be created. View Report After you have created the report, you can view the same for comprehensive analysis of generated event logs. Follow the steps given below: 1. On Reports tab, click Show Windows Event Reports, Windows report is displayed in the right pane © Lepide Software Private Limited. Page 89 Lepide Event Log Manager Figure 4.61: Displaying Windows Event Reports 2. Now click on the Saving Path of the report which you wish to view and analyze. It will display the report saved on the particular location where you have saved the report. Click on the folder WinReports to access the reports. The reports will be in the format as defined by you while creation. View Query Based Reports In order to view query based reports, firstly you need to create a query based report. To create a query based report, follow these steps: 1. On Reports tab, click Show Query Based Reports. 2. Select Create New Report from left panel. © Lepide Software Private Limited. Page 90 Lepide Event Log Manager Figure 4.62: Screen appearing after selecting Reports tab 3. Here a dialog box will appear. Select the query and enter report name. Click Next. © Lepide Software Private Limited. Page 91 Lepide Event Log Manager Figure 4.63: Wizard to create query-based reports You can also create new query by following the steps mentioned in the Create Query section. 4. A dialog box to set report schedule will appear. Here you can set the report schedule on hourly, daily or weekly basis. If you want the report to be generated once in a day, then select Once and define the date and time for report generation. © Lepide Software Private Limited. Page 92 Lepide Event Log Manager Figure 4.64: Scheduling Report Creation 5. Click the Next button and define the location for saving report. Select the saving format (.TXT and .HTML) in which you want to save the created report 6. Click Next and a new dialog box to set email server settings for mailing the report will appear. If you want to mail the report then enable Email report option and configure mail server settings 7. There are two options available for configuring the email server settings i.e. Use Default Mail Server Settings and Use Different Mail Server Settings. 8. When you choose Use Default Mail Server Settings option, you are not required to provide any additional information. You just need to type the Subject of the mail and E-mail Address of the Recipient. © Lepide Software Private Limited. Page 93 Lepide Event Log Manager 9. For configuring different mail server settings, you need to define outgoing mail server, port no., Sender‟s E-Mail Address, Subject and the Email Address of the recipient. 10. If the mail server you are using requires authentication, you will also need to give the username and password. After defining above mentioned fields, click Next. 11. A confirmation message will appear. Click Create and the report will be created. View Report After creation of reports, they can be viewed for thorough analysis of generated event logs. To view the reports, perform the following steps: 1. On Reports tab, click Show Query Based Reports. At the right panel description of the created reports with all its information like Report Schedule Type, Generate Report, Report Format, Saving Path, Email Report to and Include Events of will be displayed. 2. Click on the Saving Path of the report which you want to view and analyze. This opens the location where you have saved the report. Click the folder QueryBasedReports to access the reports. The reports will be in the format selected by you i.e. .TXT or HTML. View W3C Reports W3C events are generated by a wide range of web servers such as Microsoft IIS, Apache, Sun Java System Web Server and Lotus Domino. With these events, reports can be generated and saved for future references. To view the W3C reports, first of all you need to create the reports. To create W3C reports, follow these simple steps: 1. On Reports tab, click Show W3C Reports. 2. Select Create New Report from the left panel. © Lepide Software Private Limited. Page 94 Lepide Event Log Manager Figure 4.65: Screen appearing after selecting Reports tab 3. A dialog box will appear. Enter the report name and click Next. © Lepide Software Private Limited. Page 95 Lepide Event Log Manager Figure 4.66: Entering Report Name for W3C report 4. A dialog box to set report schedule will appear. Here you can set the report schedule on hourly, daily or weekly basis. If you want the report to be generated once in a day, then select Once and define the date and time for report generation. © Lepide Software Private Limited. Page 96 Lepide Event Log Manager Figure 4.67: Selecting event type for generation of W3C reports 5. Click Next and define the location for saving report and select the format (.HTML and.TXT) in which you want to save the created report. 6. Click Next and a new dialog box to set email server settings for mailing the report will appear. If you want to mail the report then enable Email report option and configure mail server settings. 7. There are two options available for configuring the email server settings i.e. Use Default Mail Server Settings and Use Different Mail Server Settings. 8. When you choose Use Default Mail Server Settings option, you are not required to provide any additional information. You just need to type the Subject of the mail and E-mail Address of the Recipient. 9. For configuring different mail server settings, you need to define outgoing mail server, port no., Sender‟s E-Mail Address, Subject and the Email Address of the recipient. 10. If the mail server you are using requires authentication, you will also need to give the username and password. After defining above mentioned fields, click Next. 11. A confirmation message will appear. Click Create and the report will be created. © Lepide Software Private Limited. Page 97 Lepide Event Log Manager View Report To view W3C reports, follow these simple steps: 1. On Reports tab, click Show W3C Reports. At the right panel description of created reports with all its information like Generate Report, Report Format, Saving Path and Email Report to and Include Events of will be displayed. 2. Click on the Saving Path of the report which you want to view and analyze. This opens the location where you have saved the report. Click on the folder W3CReports to access the reports. The reports will be in the format selected by you i.e. .TXT or HTML. View Compliance Reports Compliance Reports are generated to meet varied network compliance standards such as HIPAA, GLBA, SOX and PCI. You can generate report for any of these compliance standards and can view and access it. To view the compliance reports, the very first thing that you need to do is creating a compliance report. To create compliance reports, follow these simple steps: 1. On Reports tab, click Show Compliance Reports. Figure 4.68: Screen showing compliance report © Lepide Software Private Limited. Page 98 Lepide Event Log Manager 2. Select Create New Report from left panel. 3. A dialog box will appear. Select any of the compliance (HIPPA, GLBA, SOX and PCI) and relevant compliance fields for creating the report. Click Next. Figure 4.69: Selecting Compliance for creating report 4. A new dialog box will appear. Enter the report name and select the computer for which you want to create compliance report. © Lepide Software Private Limited. Page 99 Lepide Event Log Manager Figure 4.70: Enter Report Name for the compliance report 5. Click Next. A dialog box to set report schedule will appear. Here you can set the report schedule on hourly, daily or weekly basis. If you want the report to be generated once in a day, then select Once and define the date and time for report generation. 6. Click Next and define the location for saving report. Select the saving format ( .TXT and .HTML ) in which you want to save the created report. 7. Click Next and a new dialog box to set email server settings for mailing the report will appear. If you want to mail the report then enable Email report option and configure mail server settings. 8. There are two options available for configuring the email server settings i.e. Use Default Mail Server Settings and Use Different Mail Server Settings. © Lepide Software Private Limited. Page 100 Lepide Event Log Manager 9. When you choose Use Default Mail Server Settings option, you are not required to provide any additional information. You just need to type the Subject of the mail and E-mail Address of the Recipient. 10. For configuring different mail server settings, you need to define outgoing mail server, port no., Sender‟s E-Mail Address, Subject and the Email Address of the recipient. 11. If the mail server you are using requires authentication, you will also need to give the username and password. After defining above mentioned fields, click Next. 12. A confirmation message will appear. Click Create and the report will be created. View Report For viewing a compliance report follow these steps: 1. On Reports tab, click Show Compliance Reports. You will see that the right panel contains the description of created reports with all its information like Report Schedule Type, Compliance Name, Compliance Fields, Report Format, saving Path and Email Report To. 2. Click Saving Path of the report which you want to view and analyze. This opens the location where you have saved the report. Click the Compliance name folder to access the reports. The reports will be in the .TXT or HTML format as selected by you. 4.2.4. Manage Reports Through this Manage Reports section, you get detailed information regarding report management. Reports can be easily managed with Lepide Event Log Manager, as it allows the administrator to update, delete or email any report without facing any hassles. Therefore this section will offers detailed information on functions such as updation, deletion and emailing any selected report. Manage Windows and W3C Reports Manage Windows and W3C reports option enables you to perform operations such as update and deletion of Windows and W3C reports. Update Existing Report Reports so created can be updated by modifying the same in the settings defined by you at the time of report creation. To update the report, perform the following steps. 1. Select Update Existing Report from the left panel. A new dialog box will appear to select mode for report management: © Lepide Software Private Limited. Page 101 Lepide Event Log Manager Figure 4.71: Selecting Report Type for update 2. Select the report type: Windows Events Reports or W3C Reports as per your requirement. All the existing reports of the particular type will get listed. 3. Select the report which you want to update and click Next. 4. Change settings that you defined at the time of creation and click Finish. Delete Existing Report Deleting an existing report is quite simple and to delete any report, follow these steps given below: © Lepide Software Private Limited. Page 102 Lepide Event Log Manager 1. Select Delete Report from the left panel. A new dialog box will appear to select mode for report management. 2. Select the report type: Windows Events Reports or W3C Reports as per your requirement. All the existing reports of the particular type will get listed. Select the report which you want to delete and click Next. 3. A confirmation message will appear. Click Delete and the report will be deleted. Figure 4.72: Selecting Report Type for deletion Email Selected Windows or W3C report © Lepide Software Private Limited. Page 103 Lepide Event Log Manager To email selected Windows or W3C report, follow the steps given below: 1. Click Reports on menu bar. Select E-Mail Report from the left panel. 2. A dialog box "E-Mail Report" will appear. Select the report you want to email. Figure 4.73: Selecting Report for emailing 3. If you want to use different mail server settings, then click Set Mail Server Settings tab. © Lepide Software Private Limited. Page 104 Lepide Event Log Manager Figure 4.74: Configuring Mail Server Settings to email report 4. Define these fields to use different mail server settings for sending the selected report: Outgoing Mail Server: Type the name of the mail server configured in your computer system Port No: Type the Port no. Sender’s Email Address: Type the email address of the sender 5. If the mail server you are using requires authentication, you will also need to give the username and password. © Lepide Software Private Limited. Page 105 Lepide Event Log Manager Figure 4.75: Entering Server Authentication details to set mail server 6. After defining above mentioned fields, click Set E-Mail Parameters tab: © Lepide Software Private Limited. Page 106 Lepide Event Log Manager Figure 4.76: Setting email parameters 7. Give subject of the mail and email address of the recipient in required fields. Click Send Report and the report will be sent. Manage Query Based Reports Manage Query based reports to help you perform functions such as updating and deletion of query based reports. Update Existing Report You can update any existing query based report thereby making changes in settings that you configured at the time of report creation. To update any query based report, follow these steps: © Lepide Software Private Limited. Page 107 Lepide Event Log Manager 1. Select Update Existing Report from the left pane. A new dialog box will appear to select mode for report management 2. Select the report you want to update and click Next. 3. Change settings that you defined at the time of creation and click Finish. Delete Existing Report In order to delete any query based report, follow the steps given below: 1. Select Delete Report from the left pane. A new dialog box will appear to select mode for report management. 2. Select the report you want to delete and click Next. 3. A confirmation message will appear. Click Delete and the report will be deleted. Email Selected Query Based Report In order to email selected Query based report, you need to follow these steps: 1. Click Reports on menu bar. Select E-Mail Report from the left pane. 2. A dialog box "E-Mail Report" will appear. Select the report you want to email. © Lepide Software Private Limited. Page 108 Lepide Event Log Manager Figure 4.77: Selecting Report emailing query-based report 3. Click Set Mail Server Settings tab to use different mail server settings © Lepide Software Private Limited. Page 109 Lepide Event Log Manager Figure 4.78: Configuring Mail Server Settings 4. Define these fields to use different mail server settings for sending the selected report: Outgoing Mail Server: Type the name of the mail server configured in your computer system Port No: Type the Port no. Sender’s Email Address: Type the email address of the sender 5. Type the username and password if the mail server requires authentication © Lepide Software Private Limited. Page 110 Lepide Event Log Manager Figure 4.79: Entering User Server authentication for mail server settings 6. Click Set Email Parameters tab, after defining above-mentioned fields © Lepide Software Private Limited. Page 111 Lepide Event Log Manager Figure 4.80: Setting Email Parameters 7. Give subject of the mail and email address of the recipient in required fields. Click Send Report and the report will be sent Manage Compliance Reports With Manage Compliance Reports option, compliance reports can be updated and deleted very easily. Update Existing Report In order to update any compliance report, follow these steps: 1. Select Update Existing Report from the left pane. A new dialog box will appear to select mode for report management. © Lepide Software Private Limited. Page 112 Lepide Event Log Manager 2. Select the report you want to update and click Next. 3. Change settings that you defined at the time of creation and click Finish. Delete Existing Report In order to delete any existing report, follow the steps given below: 1. Select Delete Report from the left panel. A new dialog box will appear to select mode for report management. 2. Select the report you want to delete and click Next. 3. A confirmation message will appear. Click Delete and the report will be deleted. Email Selected Compliance Report To email selected compliance report, you will need to follow these steps: 1. Click Reports on menu bar. Select E-Mail Report from the left pane. 2. A dialog box "E-Mail Report" will appear. Select the report you want to email. © Lepide Software Private Limited. Page 113 Lepide Event Log Manager Figure 4.81: Selecting report for emailing compliance report 3. Click Set Mail Server Settings tab to use different mail server settings © Lepide Software Private Limited. Page 114 Lepide Event Log Manager Figure 4.82: Configuring Mail Server Settings 4. Define these fields to use different mail server settings for sending the selected report: Outgoing Mail Server: Type the name of the mail server configured in your computer system Port No: Type the Port no. Sender’s Email Address: Type the email address of the sender 5. Type the username and password if the mail server requires authentication © Lepide Software Private Limited. Page 115 Lepide Event Log Manager Figure 4.82: Entering User Authentication for setting mail server 6. After defining above mentioned fields, click Set E-Mail Parameters tab © Lepide Software Private Limited. Page 116 Lepide Event Log Manager Figure 4.83: Setting Email Parameters 7. Give subject of the mail and email address of the recipient in required fields. Click Send Report and the report will be sent. 4.2.5. Manage Queries Through Manage Queries section, a user creates updates and deletes queries that were used to view any particular event detail. With the help of generated queries, you can generate reports and the user can be able to view the desired entries only. Through this section, you will learn to create new queries, update and delete existing queries and execute a query to view desired event logs and their relevant details. © Lepide Software Private Limited. Page 117 Lepide Event Log Manager Create New Query Creating a new query with Lepide Event Log Manager is very easy. Queries can be easily created by following the steps given below: 1. Click Query from Menu bar: Figure 4.84: Screen appearing after selecting the Query tab 2. Select Create New Query option, “Query Builder” dialog appears © Lepide Software Private Limited. Page 118 Lepide Event Log Manager Figure 4.85: Entering information to create Query 3. Enter the Query Name and select the Event Type (application, system, security, DNS, File Replication Server, Directory Service or Windows Power Shell and other logs) from drop-down list 4. Click Add to add fields to Query, following dialog appears: © Lepide Software Private Limited. Page 119 Lepide Event Log Manager Figure 4.86: Adding fields to dialog 5. Select fields i.e. Event Type, Computer Name, Event Date, Event Time, Event Source, Event ID, and User Name as per your requirement. 6. Select the operator and set the field value as per your Search and click OK 7. Select field, operator and field value that will be added in Query Builder. Click OK to confirm the creation of a Query © Lepide Software Private Limited. Page 120 Lepide Event Log Manager Figure 4.87: Newly created query enlisted Execute Selected Query By executing any query, you can view the number of entries that go with the fields that are defined in that query. To execute any query, you just need to follow these simple steps: 1. Select the query you want to execute. © Lepide Software Private Limited. Page 121 Lepide Event Log Manager Figure 4.88: Screen appearing after selecting Query tab 2. Click Execute Selected Query from available options. The query will be executed and all the records matching to the criteria defined in query will get displayed. © Lepide Software Private Limited. Page 122 Lepide Event Log Manager Figure 4.89: Executing the Selected query Update Selected Query For updating any query follow these steps: 1. Select the query you want to update. 2. Click Update Selected Query from available options. © Lepide Software Private Limited. Page 123 Lepide Event Log Manager Figure 4.90: Updating Selected Query 3. A dialog box „Query Builder‟ will appear which allows you to alter the settings you have defined at the time of query creation. © Lepide Software Private Limited. Page 124 Lepide Event Log Manager Figure 4.91: Query Builder Wizard 4. Once changes are made, click OK and the query will be updated Delete Selected Query Like creation of query, you can delete any created query by following few steps. 1. Select the query you want to delete. 2. Click Delete Selected Query from available options © Lepide Software Private Limited. Page 125 Lepide Event Log Manager Figure 4.92: Deleting Selected query 3. A confirmation message will appear. Click Yes and the query will be deleted. Deleting any query will also delete all reports that are using it. 4.2.6. Manage Alerts This section helps you attain the added advantage of Lepide Event Log Manager, as it guides you about alert creation and updates. These alerts can prove to be an apt mode to get informed about any important event, you can set alerts for events that are concerned with network security standards or are useful for system troubleshooting. Monitoring network events can be made quite easier with alerts, as they instantly inform you about occurrence of the event that you specified at the time of alert creation. Create New Alert Alerts can be created to get informed about events that are essential. Creating alerts is quite easy, just follow these steps and alerts will be created. © Lepide Software Private Limited. Page 126 Lepide Event Log Manager 1. Click Alerts from Menu Bar. 2. Select Create New Alert from available options, „Alerts‟ dialog appears 3. Select Windows Events or W3C Events and click Next. Figure 4.93: Selecting Event type for creating alert 4. If you choose Windows Events, you will need to follow these steps: a. After selecting Windows Events click Next. A dialog box will appear enter the alert name, alert description and the computer(s) for which you want to create alert. © Lepide Software Private Limited. Page 127 Lepide Event Log Manager Figure 4.94: Entering Alert Name for creating alert b. Click Next and a new dialog box will appear. Select the Event Type and Event Source and Click Next. © Lepide Software Private Limited. Page 128 Lepide Event Log Manager Figure 4.95: Selecting Event Type and Source c. Now set Event ID and Event Message for alert generation and click Next. © Lepide Software Private Limited. Page 129 Lepide Event Log Manager Figure 4.96: Setting Alert Criteria d. Here a new dialog box will appear. Type the alert message or select event field(s) you want to display in the pop up or e-mail message and click Next. © Lepide Software Private Limited. Page 130 Lepide Event Log Manager Figure 4.97: Adding text for sending Alert Message e. The next dialog box is for defining alert generation method. Set the desired alert generation method from available options i.e. Popup Message Box or Send Alert Through E-mail. Choose anyone of them. Click Next and the alert will be created. 5. If you choose W3C Events:, you will need to follow these steps: a. After selecting W3C events option click Next. b. A dialog box will appear enter the Alert Name and Alert Description. Click Next. © Lepide Software Private Limited. Page 131 Lepide Event Log Manager Figure 4.98: Entering Alert Name c. In the new dialog box set the criteria for alert generation. Enter Client IP, Server IP, Requested Method, Requested URL, Requested Status as per the alert generation requirement and click Next. d. Here a new dialog box will appear. Type the alert message or select event field(s) you want to display in the pop up or e-mail message and click Next. e. The next dialog box is for defining alert generation method. Set the desired alert generation method from available options i.e. Popup Message or Send through E-mail. Choose anyone of them. Click Next and the alert will be created. Update Selected Alert © Lepide Software Private Limited. Page 132 Lepide Event Log Manager Updating any existing alert can be performed in the following way: 1. Select the alert which you want to update. 2. Click Update Selected Alert option. Figure 4.99: Updating selected alert 3. A dialog box will appear, which allows you to alter the settings you have defined at the time of alert creation. With this you can edit alert name, alert description, and computers selection area. Change fields that you want to update and click Next. © Lepide Software Private Limited. Page 133 Lepide Event Log Manager Figure 4.100: Updating Alert Details 4. A confirmation message will appear. Click Update and the alert will be updated. Delete Selected Alert Any alert can be deleted by following these steps: 1. Select the alert which you want to delete. 2. Click Delete Selected Alert from available options. © Lepide Software Private Limited. Page 134 Lepide Event Log Manager 3. A confirmation message will appear Click YES and the alert will be deleted. © Lepide Software Private Limited. Page 135 Lepide Event Log Manager 5. Download, Purchase and Register 5.1 Free Trial Download Free demo version of Lepide Event Log Manager is available to experience its potential and functions. Demo version allows the user to add one computer and two groups and generate one report, one alert and one query. The demo version of the software can be used for 7 days of trial period after which the user needs to purchase the full version. After the trial period, if you wish to continue enjoying the features of the software then you can purchase the product key of Lepide Event Log Manager. 5.2 Purchase and Register You must purchase Lepide Event Log Manager software in order to meet your organization's compliance and security requirements. You can purchase the software through Lepide Software website: http://www.lepide.com/ (encrypted and secure site) Payment and Delivery Purchase the Lepide Software online with us. After making the purchase transaction, we send you an email which consists of activation details and download link of the full version comprising of activation code. This email is sent to the mail address which you have used while processing the purchase transaction with us. 5.3 Support Lepide Software provides Round the Clock Support to solve the technical and software related issues Telephone Support: Software Help line: +91-9818718513 Indian Help line: +91-9818718513 Email Support: For General Queries: [email protected] For Sales: [email protected] © Lepide Software Private Limited. Page 136 Lepide Event Log Manager For Technical Support: [email protected] 5.4: Troubleshooting Issue: Computer is added but the software is not getting events of that computer or showing access denied. Solution: 1. Make sure that the added computer is switched ON. 2. Check the login credential of computer. Administrative rights of that computer should be provided. 3. Check the network connection. 4. Start Remote Registry service of the computer for which you want to collect events as well as that computer where software is installed. 5. Start Remote Access service of the computer for which you want to collect events as well as that computer where software is installed. 6. Start Remote Procedure Service of the computer for which you want to collect events as well as that computer where software is installed. 7. In case of Windows Vista, Windows 7 and Windows server 2008, uncheck the User Account Control (UAC) option from Control Panel. Issue: Software is not able to configure database on remote computer and shows message “Failed to connect to SQL server". Solution: 1. Make sure that the remote computer is switched ON. 2. Turn off the firewall settings of computer where software installed. 3. Check the Username and Password provided to connect to the remote SQL Server. Issue: List of SQL Servers is not getting displayed in the "Configure Database" window. © Lepide Software Private Limited. Page 137 Lepide Event Log Manager Solution: Refresh list of SQL Servers using Refresh Server List Button. If you are not getting any SQL Server, then check your network connection. If everything is fine and still you are not getting any SQL Server, then you can manually type the name of the SQL Server where you want to configure the database. Issue: Software is not able to send Email. Solution: 1. Check the internet connection. 2. Check the Mail Server Settings such as: mail server name, port number, authentication required or not and SSL is required or not. Issue: Software is not adding W3C path. Solution: If the software is not adding W3C path with computer name, then manually type the IP address instead of computer name. W3C folder should be accessible through shares. Issue: Software is not collecting events as per new rule applied to the selected computer. Solution: If event collection has started for a computer and meanwhile you are setting event processing rule for that computer, then the new rule will be applied when the event collection starts next time for that computer. You can see the current status of event collection from activity log. Issue: Software is running on many computers but it is showing events and reports on only one computer. Solution: © Lepide Software Private Limited. Page 138 Lepide Event Log Manager The database created by software should be accessed from one computer at a time. If software is running on more than one computer and all of them are accessing the same database, then events and reports will be shown on one computer only. © Lepide Software Private Limited. Page 139 Lepide Event Log Manager 6. Legal Notices 6.1 Copyright Notice Lepide Software Private Limited, Lepide, accompanied user manual and documentation are copyright of Lepide Software Private Limited, with all rights reserved under the copyright laws. This user manual cannot be reproduced in any form without the prior written permission of Lepide Software Private Limited. No Patent Liability is assumed, however, with respect to the use of the information contained herein. © Lepide Software Private Limited. All rights reserved. 6.2 Trademarks Lepide Event Log Manager is a copyright work of Lepide Software Private Limited Windows 95®, Windows 98®, Windows ME®, Windows NT®, Windows 2000 Server®, Windows 2000 Advanced Server®, Windows 2003 Server®, Windows XP®, and MS-DOS, are registered trademarks of Microsoft Corporation. All other brand and product names are trademarks or registered trademarks of their respective companies. 6.3 Disclaimer The Information contained in this manual including but not limited to any product specifications is subject to change without notice. Lepide Software Private Limited provides no warranty with regard to this manual or any other information contained herein and here by expressly disclaims any implied warranties of merchantability or fitness for any particular purpose with regard to any of the foregoing. Lepide Software Private Limited assumes no liability for any damages incurred directly or indirectly from any technical or typographical errors or omissions contained herein or for discrepancies between the product and the manual. In no event shall Lepide Software Private Limited be liable for any incidental, consequential special or exemplary damages, whether based on tort, contract or otherwise, arising out of or in connection with this manual or any other information contained herein or the use there of. 6.4 License Agreement Lepide Event Log Manager is Copyright © by Lepide Software Private Limited © Lepide Software Private Limited. Page 140 Lepide Event Log Manager All Rights Reserved Your Agreement to this License You should carefully read the following terms and conditions before using, installing or distributing this software, unless you have a different license agreement signed by Lepide Software Pvt. Ltd. If you do not agree to all of the terms and conditions of this License, then: do not copy, install, distribute or use any copy of Lepide Event Log Manager with which this License is included. The terms and conditions of this License describe the permitted use and users of each Licensed Copy of Lepide Event Log Manager. For purposes of this License, if you have a valid single-copy license, you have the right to use a single Licensed Copy of Lepide Event Log Manager; if you or your organization has a valid multi-user license, then you or your organization have - has the right to use up to a number of Licensed Copies of Lepide Event Log Manager equal to the number of copies indicated in the documents issued by Lepide Software Pvt. Ltd. when granting the license. Scope of the License Each Licensed Copy of Lepide Event Log Manager may either be used by a single person or used nonsimultaneously by multiple people who use the software personally installed on a single workstation. This is not a concurrent use license. All rights of any kind in Lepide Event Log Manager, which are not expressly granted in this License, are entirely and exclusively reserved to and by Lepide Software Pvt. Ltd. You may not rent, lease, modify, translate, reverse engineer, decompile, disassemble, or create derivative works based on, Lepide Event Log Manager, nor permit anyone else to do so. You may not make access to Lepide available to others in connection with a service bureau, application service provider, or similar business, nor permit anyone else to do so. Warranty Disclaimers and Liability Limitations Lepide Event Log Manager, and any and all accompanying software, files, data and materials, are distributed and provided AS IS and with no warranties of any kind, whether expressed or implied. In particular, there is no warranty for any harm, destruction, impairment caused to the system where Lepide Event Log Manager is installed. You acknowledge that good data processing procedure dictates that any program, including Lepide Event Log Manager, must be thoroughly tested with non-critical data before there is any reliance on it, and you hereby assume the entire risk of all use of the copies of Lepide Event Log Manager covered by this License. This disclaimer of warranty constitutes an essential part of this License In addition, in no event does Lepide Software Pvt. Ltd. authorize you or anyone else to use Lepide Event Log Manager in applications or systems where Lepide Event Log Manager's failure to perform can reasonably be expected to result in a significant physical injury, or in loss of life. Any such use is entirely at your own risk, and you agree to hold Lepide Software Pvt. Ltd. harmless from any and all claims or losses relating to such unauthorized use. General This License is the complete statement of the agreement between the parties on the subject matter, and merges and supersedes all other or prior understandings, purchase orders, agreements and © Lepide Software Private Limited. Page 141 Lepide Event Log Manager arrangements. This License shall be governed by the laws of the State of Delhi. Exclusive jurisdiction and venue for all matters relating to this License shall be in courts and for a located in the State of Delhi, and you consent to such jurisdiction and venue. There are no third party beneficiaries of any promises, obligations or representations made by Lepide Software Pvt. Ltd. herein. Any waiver by Lepide Software Pvt. Ltd. of any violation of this License by you shall not constitute, nor contribute to, a waiver by Lepide Software Pvt. Ltd. of any other or future violation of the same provision, or any other provision, of this License. © Lepide Software Private Limited. Page 142