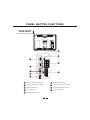
Download TFT-LCD TV USER MANUAL
Transcript
TFT-LCD TV W193D USER MANUAL READ CAREFULLY BEFORE OPERATION W193D IMPORTANT SAFETY INSTRUCTIONS TO PREVENT ELECTRICAL SHOCK. CAUTION RISK OF ELECTRIC SHOCK. DO NOT OPEN. DO NOT REMOVE THIS COVER. NO USER- SERVICEABLE PARTS INSIDE. REFER SERVICING TO QUALIFIED SERVICE PERSONNEL. This symbol indicates dangerous voltage inside the product that presents a risk of electric shock or personal injury. This symbol indicates important instructions accompanying the product. Please read this manual carefully before using this product. Before connecting the AC power cord to the DC adapter outlet ,make sure the voltage designation of the LCD TV corresponds to the local electrical supply . If you are unsure of your power supply , ask your local power company . Never insert anything metallic into the cabinet openings of the LCD TV; otherwise may cause the danger of electric shock. To avoid electric shock, never touch the inside of the LCD TV / adapter. Only a qualified technician should open the case of the LCD TV/adapter. Never use your LCD TV/adapter when the power cord has been damaged . Make sure there is nothing resting on the power cord, and keep the cord away from places where people can trip over it . Be sure to hold the plug, not the cord when disconnecting the adapter from an electric socket. Openings in the LCD TV/adapter cabinet are provided for ventilation. To prevent overheating, these openings should not be blocked or covered. Also, avoid using the LCD TV on a bed ,sofa ,rug, or other soft surface. As this, may block the ventilation openings in the bottom of the cabinet. If you put the LCD TV in a bookcase or some other airless space, be sure to provide adequate ventilation. Do not expose the LCD TV to extreme temperature conditions or to extreme humidity conditions. The apparatus should not be exposed to dripping or splashing and no objects filled with liquids, such as vases, should be placed on the apparatus. IMPORTANT SAFETY INSTRUCTIONS Do not clean the front with keton-type materials (e.g.Acetone ),ethyl alcohol, toluene, ethy lacid, methyl, or chloride-these may damage the panel. Locate your DC adapter near an easily accessible AC outlet. If your LCD TV does not operate normally in particular, if there are any unusual sounds or smells coming from it unplug it immediately and contact an authorized dealer or service center. High temperature can cause problems. Don' t use your LCD TV in direct sunlight, and keep it away from heaters, stoves, fireplaces, and other sources of heat. Unplug the DC adapter when it is going to be left unused for a long time . To reduce the risk of fire or electric shock, and annoying interference, use the recommended accessories only. If the LCD TV is broken, do not try to repair it yourself. Contact qualified service personnel. Unplug your DC adapter from the AC outlet before any service. Be sure the service technician uses authorized replacement parts or their equivalents. Unauthorized parts may cause fire, electrical shock, or other hazards. Following any service or repair, be sure the service technician performs safety checks to certify that your TFT-LCD TV is in a safe operating order. The apparatus with CLASS I construction shall be connected to a MAINS socket outlet with a protective earthing connection. PANEL BUTTON FUNCTIONS PANEL CONTROL 10 11 12 STANDBY SOURCE - CH + - VOL + USB SETUP PCMCIA CARD 4 5 6 7 8 9 MMC/MS/SD CARD POWER 3 13 14 15 16 2 1 Front panel 1 IR sensor window 2 Indicator( Indicator is red when in standby mode, green when working normally. ) Left panel 3 POWER(Turns on or off the power supply). 4 SETUP (Enter or exit setup menu) 5 VOL+/-(Increase or decrease volume) 6 CH+/- (Increase or decrease channel number) 7 SOURCE (Enter to exit source menu) 8 STANDBY (To switch between standby mode and power-on mode) 9 Headphone jack Right panel 10 PCMCIA CARD( Slots for external Conditional Access (CA)-modules). 11 MEDIA CARD socket 12 USB jack 13 Disc in/out door 14 (Eject button) 15 (Stop button) 16 (Play/puase button) 2 PANEL BUTTON FUNCTIONS REAR PANEL COAXIAL HDMI 1 IN VIDEO HDMI 2 IN SCART 9 8 COAXIAL 1 HDMI 1 IN VIDEO 7 HDMI 2 IN 2 3 6 4 5 SCART SCART input terminal 1 HDMI 1/HDMI 2 input terminal 6 2 YPbPr or YCbCr input terminal 7 Composite video/audio input 3 VGA input terminal 8 Coaxial digital audio output 4 PC audio input 9 RF input terminal 5 12V DC input terminal 3 EXTERNAL EQUIPMENT CONNECTING DIAGRAM COAXIAL HDMI 1 IN COAXIAL HDMI 1 IN VIDEO HDMI 2 IN VIDEO HDMI 2 IN SCART SCART R F cable HDMI HDMI L R DVD or VCR player Power amplifier (with coaxial digital audio in) NOTE You should connect the interconnecting cables BEFORE plugging in the power cord. 4 REMOTE CONTROLLER REMOTE BUTTONS 1 EJECT Disc in/out in DVD. [ ] button To play normally or pause playing in DVD . [ ] button To fast-forwards DVD playback in DVD . [ ] button To select the next chapter or track in DVD. Number button To select program number. RETURN To exchange channel between the previous program and the current program in TV/DTV . 2 2 3 4 5 6 7 8 9 1 0 1 2 3 3 4 4 5 6 5 6 7 8 9 7 TUNE/AQT Long press(more than 3 seconds) the button to start auto scan in TV/DTV. 10 FAVORITE/Q-PLAY Display your favorite channel list in DTV; Play DVD directly in DVD . 9 OK button 13 To confirm the selections. 10 Left/Right cursor(menu adjustment ) 14 To move leftward/ rightward or adjust the 15 selected item in the menu, or adjust sound 16 volume (invalid in DVD and DTV). 17 18 11 DTV/DVD SETUP 19 Enter or exit setup menu. 20 21 12 EXIT To exit current menu except MUTE menu. 13 CHANNEL+/To increase or decrease program number in TV/DTV. 14 DVD/USB/CARD To directly switch to DVD source at other sourSUBPAGE/PAGEce or switch between the USB mode, card reaTo display the subpage of the teletext der, and DVD mode in DVD source . in TV; Browse the previous page of 15 LANG/NICAM favorite table in DTV . Switch in NICAM,A2 and mono channel (It is REVEAL/EPG effective in TV signal input with NICAM or A2 Display the hidden teletext information; function); To switch the output language in DVD To display the program guide in DTV. /DTV. 16 HOLD/INFO ZOOM/CYAN To hold teletext on current page in TV; To dispTo zoom in or zoom out the picture in lay the language and sound track in DVD/DTV. DVD; Teletext CYAN button in TV/DTV. 17 INDEX/PAGE+ REPEAT/YELLOW To display main content page when display the To repeat playback in DVD; Teletext teletext in TV; Browse the next page of favorite YELLOW button in TV/DTV. table in DTV. 8 11 12 18 19 20 21 5 REMOTE CONTROLLER 22 STANDBY To switch between standby mode and poweron mode. 23 [ ] button To fast backward playback in DVD. 24 [ ] button To select the previous chapter or track in DVD. 25 [ ] button To stop playing in DVD . 22 26 TWO-DIGIT NUMBER BUTTON To switch between one or two-digit program number. 27 SOURCE To select input source: TV, DTV, DVD, AV, SCART, YPB P R, HDMI1, HDMI2 and VGA. 28 UP/DOWN cursor To select upward/downward in the menu or change the channel in TV/DTV . 29 TV SETUP To display system menu. 30 MUTE Sound mute switch. 24 25 26 1 2 3 4 5 6 7 8 9 0 27 28 29 30 31 Volume +/To increase or decrease sound volume. 32 TV To directly switch to TV source at other sources. 33 DTV To directly switch to DTV source at other sources. 31 34 23 TEXT/MENU To enter or exit from teletext in TV/DTV ; To display DVD Root menu in DVD . 32 33 34 35 36 37 38 39 GOTO/RED To play from a certain time point in DVD ; Teletext RED button in TV/DTV. 39 A-B/GREEN To segment repeat in DVD; Teletext Green button in TV/DTV. 38 35 MIX/SUBT To display TV image and teletext simultaneously;Selects the subtitle language in DVD /DTV. 36 CANCEL/AUDIO To cancel teletext in TV; To change the audio language and sound track in DTV. 37 SIZE/TV/ To magnify teletext page; To switch between TV and Radio modes in DTV . 6 REMOTE CONTROLLER BATTERY INSTALLATION Remove the battery cover. Insert two SUM-4(AAA) batteries matching the -/+ polarities of the battery to the -/+ marks inside the battery compartment, as in the following figure: BATTERY LIFE Generally speaking, the battery may be used for one year, but the battery life is also related to the usage times and remote controller operation. If the remote controller is still not operating when very near to the remote sensor window, please replace the battery. Please use SUM-4(AAA) battery. NOTES Never use rechargeable battery. Never charge, short-circuit, disassemble and heat the battery, or throw it into fire. Pay attention not to fall or knock the remote controller, which may cause damage or function failure to it. Do not use new and old battery together. When not using the remote controller for a long time, please take out the batteries to avoid liquid leakage. Before replacing new batteries, please clean the electrolyte in the remote controller. If electrolyte splashes into body, please clean it with water. CAUTION Please put the battery in a place children cannot access. If swallowed by accident, please contact your local doctor immediately. POWER SUPPLY Please confirm whether the accessories contain the power adapter. Please make sure to use power adapter within the specification range, otherwise it will cause damage. Use the car adapter in the accessories, connect one end to the socket in you car, the other to the DC socket in the TV. The input voltage of the car adapter should be 12Volts. 7 LET'S START After this unit is well fixed on the desk or on the wall, and the cords are well connected for input and output, what you should do next is: Firstly, connect the adapter to the LCD TV, and turn on the power switch then the unit will go into standby mode, you can see the indicator turn red. Secondly, press [STANDBY] key on the left side of the LCD TV or [STANDBY] button on the remote control to make the unit switch into working mode, and you will see the indicator turns green. Now you can enjoy all exciting features of the whole new product. STANDBY SOURCE - CH + - VOL + SETUP Power switch STANDBY STANDBY INDICATOR CHANGE SOURCE OPERATION You can change the input source by using the source Menu. Press [SOURCE] button or [SOURCE] key to show the menu as follows: TV DTV DVD AV SCART YPBPR HDMI1 HDMI2 VGA The current source item is highlighted. Press [ /CH- ] key to select the source you want, Press [ button to confirm your choice . 8 ] button on the remote control or [ CH+ ] button, [VOL+/VOL-] key or [OK] TV MENU SETUP This product can store up to 100-channel programs (0 99). In TV, press [SETUP] button and the setup menu will show as follows: Pressing [ ] button on the remote control, you can select setup menu sections (setup PICTURE menu consists of " PICTURE " , " SOUND " , " TV SETUP ", " OSD SETUP", " FUNCTION ") . Press [ ] or [OK] button to enter this menu section. Press [ ] button on the remote control to select the item, and then press [ ] button to adjust parameters. Press [SETUP] button to return to PICTURE MODE 50 CONTRAST 40 SATURATION 50 SHARPNESS 50 TINT 50 COLOR TONE SELECT main menu sections. USER BRIGHTNESS OK NORMAL ENTER SETUP RETURN PICTURE PICTURE Select " " and menu will show as follows: Press [ ] button to select different items and PICTURE MODE [ ] button to adjust them. USER BRIGHTNESS 50 CONTRAST 40 SATURATION 50 SHARPNESS 50 TINT 50 COLOR TONE SELECT NORMAL ADJUST SETUP RETURN Description Item PICTURE Can be changed between : "USER ", "STANDARD ", " DYNAMIC " and "SOFT ". BRIGHTNESS To adjust brightness. CONTRAST To adjust contrast. SATURATION To adjust color saturation. SHARPNESS To adjust picture sharpness. TINT To adjust picture tint, only valid in N 3.58/N 4.43/PAL60 . COLOR TONE Select color temperature mode : "NORMAL ", " WARM "and "COOL ". 9 TV MENU SETUP NOTE Select "BRIGHTNESS " to adjust it, the sub item will show as follows : press [ ] button to adjust the value of brightness. BRIGHTNESS 50 " CONTRAST " , " TINT " , " SHARPNESS " , " SATURATION " are as the same. If you have adjusted the upper items not at " USER " mode, the adjusted value will automatically overlay the " USER " mode parameters. 10 TV MENU SETUP SOUND Select " "and menu will show as follows: SOUND SOUND MODE USER BALANCE 50 BASS 50 50 TREBLE NICAM SELECT MONO OK ENTER SETUP RETURN Press [ ] button to select different items and press [ following are the descriptions of the sound item. Item ] button to adjust them. The Description SOUND MODE Can be changed between " USER " , "MUSIC" , " FILM " and "NEWS" . BALANCE To adjust balance of left and right sound channels. BASS To adjust bass. TREBLE To adjust treble. NICAM Select NICAM mode( please refer to the notes). NOTES If you can receive Nicam/A2 signal, you can operate as follows to enjoy that. You can select Nicam stereo, mono channel or bilingual through NICAM button or in the upper menu. If Nicam/A2 signal is too weak, it will switch into mono channel automatically. Nicam/A2 function is only valid in TV while current program coming with Nicam/A2 signal. 11 TV MENU SETUP TV SETUP Select " " and TV setup menu will show as follows: TV SETUP CHANNEL 1 COLOR SYSTEM SOUND SYSTEM FINE TUNING AUTO AUTO 40.00MHZ MANUAL SEARCH AUTO SEARCH CHANNEL EDIT SELECT Press [ OK ENTER SETUP RETURN ] button to select different items and press [ ] button to adjust them. Description Item CHANNEL To change the channel number. COLOR SYSTEM Can be changed between: "AUTO ", "PAL " and " SECAM ". SOUND SYSTEM Can be changed between: "AUTO", "BG ", " I " , "DK " and " L ". FINE TUNING Adjust the channel frequency accurately to make the sound and picture effect better. MANUAL SEARCH Only scan program of current channel . AUTO SEARCH Scan all programs and store them automatically. CHANNEL EDIT Enter its submenu and use the correlative functions of the channels. Please refer to the next page. NOTES Which " COLOR SYSTEM" mode and " SOUND SYSTEM" mode to use is related to the local TV broadcasting system. If the local system is SECAM L, the sound system must be selected as L , or else the search result is bad. 12 TV MENU SETUP Select "AUTO SEARCH " , the searching menu will show as follows: AUTO SEARCH 1 2 VHF L 3 2 112.25MHZ PRESS SETUP TO EXIT 1 The number of programs have been found. 2 The current searching frequency. The current searching frequency Band, 3 Bands in total: "VHF L" ,"VHF H"," UHF". 3 Select "CHANNEL EDIT " , the menu will show as follows: CHANNEL EDIT 5 CHANNEL NO SKIP __ SWAP SAVE SELECT Item ? ADJUST SETUP RETURN Description CHANNEL To select current channel here. SKIP To select "YES " or "NO ", you can select "YES " to make current channel unaccessible while using [CH+/-] button to browse channels (but you can access it in the TV SETUP menu or this menu). SWAP Select or directly input the channel number you want to swap with current channel. SAVE Press the [OK] button to confirm the swap operation. 13 TV MENU SETUP OSD SETUP You can adjust the relative parameters of OSD itself here. Select " " item and OSD SETUP menu will show as follows: OSD SETUP ENGLISH LANGUAGE OSD H-POSITION 50 OSD V-POSITION 50 OSD DURATION 25 TRANSPARENCY 25 SELECT Press [ OK ENTER SETUP RETURN ] button to select different items and press [ Item ] button to adjust them. Description LANGUAGE Set OSD language. OSD H-POSITON To adjust OSD horizontal position. OSD V-POSITON To adjust OSD vertical position. OSD DURATION To adjust the main menu display duration time. TRANSPARENCY To adjust transparency of OSD. 14 TV MENU SETUP FUNCTION Select " " item and FUNCTION menu will show as follows: FUNCTION FULL SCALE NOISE REDUCE MID SLEEP OFF OFF FM TRANSMIT TRANSMIT FREQ 93 Mhz RESET SELECT Press [ OK ENTER SETUP RETURN ] button to select different items and press [ Item ] button to adjust them. Description SCALE To switch the video format between "FULL" ,"ZOOM1", "ZOOM2", " NORMAL" and "PANORAMA". NOISE REDUCE To reduce the noise of the image. SLEEP To set the sleep time. FM TRANSMIT To set enable or disable the FM transmit function. TRANSMIT FREQ To set FM transmit frequence(93MHz~100MHz). RESET To reset all parameters to default. 15 TELETEXT FUNCTION Most TV stations provide cost-free teletext information, including the latest news, weather information, TV program list and stock information, etc. You just input the needed teletext page according to the teletext content. TELETEXT DISPLAY Select the channel with teletext signal; Press [TEXT] button; Select the corresponding page according to the colorized buttons on the remote control; Press [TEXT] again and TV screen will display. PAGE SELECTION You can input 3 digital numbers to enter the page you want to watch through number buttons. If the inputted number is invalid, you need to input correct 3 digital numbers again after you finished inputting this 3 digital numbers. You can select to turn pages forward or backward through [CH+/-] button. MIX MODE This function may let you enjoy TV and teletext information at the same time. When a certain teletext page displays, press [MIX] button, TV and teletext information will display on screen at the same time. Press [MIX] button again and only teletext image displays. In mix mode, the disturbance lines on teletext characters are easy to appear, so you are not recommended to select this mode. NOTE: Press [CANCEL] button to cancel teletext. LOCK You can press [HOLD] button to lock teletext page. Press this button again to cancel locking. INDEX Pressing [INDEX] button to display content page. Enter a certain teletext page through inputting number buttons. ZOOM IN TELETEXT When teletext page shows, you may double zoom in to display this teletext page; Press [SIZE] button to zoom in the upper half part of teletext page; Press [SIZE] button again to enter the under half part of teletext page; Press this button for the third time to return to original display mode. DISPLAY MODE Press [REVEAL] button to display the hidden teletext information. Press this button again to cancel teletext information displaying. SUBPAGE User could press [SUBPAGE] button to select to the subpage of teletext. COLORIZED BUTTONS (RED, YELLOW, GREEN, CYAN) Select the corresponding teletext page through colorized buttons. 16 HDMI, AV ,SCART and YPBPR SETUP VIDEO SETTING MENU The menu setup of HDMI/AV/SCART /YPBPR modes is much the same as that of TV mode, except the " " section is invalid and a bit difference in sound mode. It is not repeated here. You can find it in preceding pages. NOTE If no signal input in HDMI,TV, AV, SCART, YPBPR the screen will show a similar signal to the following figure. This unit will go into standby mode automatically with no signal input after 5 minutes. AV NO SIGNAL 4:50 If the input source is SCART, this unit will automatically recognise its RGB and CVBS signal. If RGB is recognised, it will auto switch into RGB mode, or else it will work at CVBS mode. The relative information will be automatically displayed on the right upper of the screen . 17 VGA SETUP With the VGA mode supported up to 1152*864@75Hz, and speakers built in, you can use this unit as a multimedia PC monitor. When this unit works in VGA mode, the following setup can be done. Press [SETUP] button to enter main section. Press [ press [ ] button or [OK] button to enter. ] button to select sections and then PICTURE Press [ ] button to select " ", and press [ /OK] button to enter. PICTURE BRIGHTNESS 50 CONTRAST 40 COLOR TEMPERATURE AUTO CONFIG 1024 X768 7 X 5 HZ SELECT Press [ OK ENTER SETUP RETURN ] button to adjust value of item. Item Description BRIGHTNESS To adjust brightness of picture . CONTRAST To adjust contrast of picture . COLOR TEMPERATURE Enter sub menu to adjust color temperature of picture. Press [ /OK ] button to enter.(details refer to the next page) AUTO CONFIG Auto config horizontal/vertical position, phase and frequency. Press [ /OK] button to activate. STATUS The format of the input signal. 18 VGA SETUP Here shows the color temperature sub menu. COLOR TEMPERATION MODE Press [ NORMAL RED 50 GREEN 50 BLUE 50 ] button to select item and press [ ] button to adjust the value of the item. Description Item MODE Select color temperature mode :"USER", "NORMAL", "WARM" and "COOL". RED Adjust red gain value of color temperature. GREEN Adjust green gain value of color temperature. BLUE Adjust blue gain value of color temperature. NOTE: The adjust value will be stored in " USER " mode. SOUND Press [ ] button to select " " and press [ /OK] button to enter. SOUND USER SOUND MODE BALANCE 50 BASS 50 TREBLE 50 SELECT OK ENTER SETUP RETURN The operation of sound section here is the same as that in TV mode except the NICAM is invalid. Please refer to P11. 19 VGA SETUP MONITOR SETUP Press [ ] button to select " " and press [ /OK] button to enter. MONITOR SETUP H - POSITION 50 V - POSITION 50 FREQUENCE 100 PHASE SELECT 50 OK ENTER SETUP RETURN Description Item H - POSITION To adjust screen horizontal position. V - POSITION To adjust screen vertical position. FREQUENCE To adjust frequency. PHASE To adjust phase. 20 VGA SETUP OSD SETUP Press [ ] button to select " " and press [ /OK] button to enter. OSD SETUP ENGLISH LANGUAGE OSD H-POSITION 50 OSD V-POSITION 50 OSD DURATION 25 TRANSPARENCY 25 SELECT Press [ OK ENTER SETUP RETURN ] button to select different items and press [ Item ] button to adjust . Description LANGUAGE Select OSD language. OSD H-POSITION To adjust OSD horizontal position. OSD V-POSITION To adjust OSD vertical position. TRANSPARENCY Transparency of OSD. NOTE If you use this unit as a PC-monitor: If no signal input ,after 5 minutes, t his unit will go into sleep mode . In this mode, the indicator will turn red, and the screen is turned off. You can wake it up by waking up your PC . If the unit hasn ' t been connected with VGA line to external equipment, the NOT CONNECT menu will automatically display on the screen; and if the input signal is beyond the support scope, the UNSUPPORTED menu will automatically display on the screen. At these two occasion, after 5 minutes, the unit will enter real standby mode(you must use Power button or Power key to power it). 21 VGA NO SIGNAL 1:50 VGA SETUP FUNCTION Press [ ] button to select " ", and press [ /OK] button to enter. FUNCTION FULL SCALE NOISE REDUCE MID SLEEP OFF FM TRANSMIT OFF TRANSMIT FREQ 93 Mhz RESET SELECT Press [ OK ENTER SETUP ] button to select different items and press [ RETURN ] button to adjust . Description Item SCALE To switch the video format between "FULL" ,"CENTER". NOISE REDUCE Invalid in VGA. SLEEP To set the sleep time. FM TRANSMIT To set enable or disable the FM transmit function. TRANSMIT FREQ To set FM transmit frequence(93MHz~100MHz). RESET Reset all parameters default . 22 DVD OPERATION Brief Introduction to DVD DVD is well known for its extraordinarily large capacity and outstanding audio-video effects. Its capacity is as high as 4.7-17 GB (approximately 7-26 times the CD capacity).With 500-line horizontal resolution of picture , it brings a new era to household AV products. Comparison Between DVD and Other Discs DVD Singlesided 1 layer 4.7G Singlesided 2 layers 8.5G Super VCD Analog Digital/MPEG2 Recording Method Capacity LD Doublesided 1 layer 9.4G Digital/MPEG2 Digital/MPEG1 Doublesided 2 layers 17G 1 side 60min. 2 sides 120min. Playback time 133min. 242min. 266min. 484min. Disc Diameter 12cm Horizontal Resolution 500 lines or more 430 lines or more Aspect Ratio Multiple One 30cm/20cm Subtitle 32 types Max. 16 types Audio Dolby Digital Linear PCM FM modulation 48kHz,96kHz/16,20,24bit 44.1kHz/16bit Sound Quality VCD CD CDROM Digital Digital 650MB 650MB 650MB 650MB 45min. 74min. 74min. 12cm 12cm 12cm 12cm 350 lines or more 250 lines or more Linear PCM 44.1kHz 44.1kHz/16bit Function Introduction Multiple languages and subtitles DVD disc can support as many as 8 dubbing languages and 32 subtitle languages. Multiple story plots User can select to play the desired plots (the beginning, development or ending) of the same disc. Multiple aspect ratios Multiple aspect ratios support various TV screens. TV Screen 4:3 Disc Pictures Pan-Scan Letterbox 4:3 16:9 23 16:9 24 DVD OPERATION Compatible Disc Types Types DIGITAL VIDEO Sizes Recorded Contents 12cm CD-DA 12cm VIDEO CD Compressed digital audio+compressed digital video (dynamic picture) 12cm SVCD: Compressed digital audio+compressed digital video (dynamic picture) 12cm DVD: Compressed digital audio+compressed digital video (dynamic picture) Digital audio NOTES Issues related to DVD SVCD MPEG4 VCD CD These icons on the top banner indicate the disc types that the function described in this section applies to. DVD SVCD MPEG4 VCD Applies to DVD disc CD Applies to SVCD disc Applies to VCD disc Applies to CD disc Applies to MPEG4 disc This model does not support the 8cm disc. Do not insert that type of disc into this device to prevent disc jam. 25 DVD OPERATION PLAY/PAUSE PLAYBACK DVD MPEG4 1. Press [ SVCD VCD CD ] button in playback status. Press [ ] button once to pause playback, display on TV screen: 2. To restore playback, press the [ ] button. PLAY 1 2 3 4 5 6 NOTE When you set the screen save mode to ON(see Page 40 for details), the display on TV screen turns to screen saver status after the picture on TV screen keep still for about 2 minutes (in mode such as pause mode, stop mode, menu select, set up menu, no disc mode and so on). INFORMATION DVD SVCD VCD CD 1. Press [INFO] button. Disc information and operation function hint display on TV screen when in operation. Press [INFO] button to display the following function: DVD disc TT XX CH XX X:XX:XX Super VCD, VCD, CD discs: Track XX / XX INFO X:XX:XX DVD MENU PLAYBACK DVD Some DVD discs are made with title menu or chapter menu function. 27 DVD OPERATION 1. Press [MENU] button to display menu on TV screen for selection, operate according to the hint of menu and press number buttons to select. PLAY ROOT MENU 1. ........ 2. ........ 3. ........ Number 2. Press cursor button to select track you desired, then press [ ] button or [OK] button. 1 2 3 4 5 6 7 8 9 0 OK Cursor NOTE Press [MENU] button to return to initial menu. The return location varies with discs. MENU VCD, SVCD MENU PLAYBACK SVCD VCD When playing SVCD, VCD2.0 discs with menu playback function, you may enjoy simple menu playback alternation function. You may set menu playback state in the setup menu and select menu playback or sequence playback. For instance, VCD 2.0 disc menu playback. 1. TV screen displays main menu. 1. 2. Press number buttons to select. For instance, press number button 1 to select main menu 1. 2. OK 1. Cursor 2. 3. 4. 5. ], [ 3 5 6 8 9 0 2. After entering main menu 1, TV screen displays submenu. 3. Press [ 2 4 7 1 Number 1. ] buttons to turn pages. 4. Press number buttons to select submenu content. For instance, press number button 5 and the unit begins to play the fifth track. MENU 1. 2. 3. 4. 5. 5. When playing, pressing [MENU] button to return to the root menu. 28 DVD OPERATION PBC PLAYBACK SVCD VCD Enjoy PBC alternate function when playing Super VCD, VCD2.0 disc with PBC function, For example:playVCD2.0 disc. 1. Main menu displays on TV screen A: 1. ........ 2. ........ Press number button to select. For example: select main menu 1. The TV screen as show in B: 1. ........ 2. ........ 2. Submenu displays on TV screen after enter into main menu 1. 1. ........ 2. ........ 3. ........ 4. ........ 5. ........ 3. Press[ ] or [ ] button to turn to adjacent page. 1 4. Press number buttons to select submenu. For instance, press number5,the player begin playback with track 5. 5. Press [MENU] button to submenu. Press again to return to main menu. Number 2 3 4 5 6 7 8 9 0 OK Cursor 6. Press [MENU] button to shut off the PBC and start the sequence playback function. MENU DIRECT PLAY Direct play is a creative function that very helpful for users to enjoy DVDs. With direct play function, you can play DVD directly, skipping the legal warning, advertisements, chapter selection and other thing that come before the movies start. You can enjoy pure movies without bothering. When the disc is loaded and the legal warning, advertisements, chapter selection message shows, just press [ ] button to activate direct play function and start a pure movies playback. 4 7 5 6 8 9 0 SCAN DIRECT PLAY NOTE When you are enjoying VCD with PBC function, direct play can disable the PBC and VCD will be played in sequence. 29 DVD OPERATION MEMORY DVD 1. This player can save the currently played time point automatically when you leave the current DVD disc playback (switch from DVD signal source to other signal source, enter standby state in DVD mode). 2. When switching to DVD playback state again, this player can automatically search the time point saved last time to continue playing. If you want to play from the beginning, please press [ ] button twice and then press [ ] button. PLAY NOTE 1 2 3 4 5 6 STOP This player may save one DVD disc for one time. The DVD disc played the last time will be saved, and the former saved contents will be cleared by new saved contents. lf power is cut off unexpectedly, the DVD disc played currently will not be saved. SELECT TRACK TO PLAY DIRECTLY BY NUMBER BUTTONS SVCD DVD VCD CD 1. Insert disc, after disc reading and normal playback, press number buttons to select track to play directly. If track number is less than 10, press number buttons 1 to 9 to directly select. For instance, select the seventh track: 7 If track number is more than or equal to 10, press [-/- -] button and then number buttons 0 to 9. 1 + 6 For instance, select the 16th track -/-- 6 If track number is more than or equal to 20, press [-/- -] button twice and then number buttons 0 to 9. The rest can be performed by analog. Number button 1 2 3 4 5 6 7 8 9 0 SELECT LANGUAGE/AUDIO DVD SVCD VCD CD 1. Press [LANG] button. As for DVD discs with multiple languages, you may select the desired language when playing. 30 DVD OPERATION DVD disc: Audio 1/2 Chinese Audio 2/2 French As for VCD, SVCD or CD disc with multiple channels, you may select audio output from left or right channel or select stereo audio output. For VCD disc, left channel records dubbing and right channel records singing, and you may select left channel for dubbing. VCD, SVCD, CD disc: Mono Left Mono Right Stereo Mix-Mono LANGUAGE NOTE Language type varies with disc recording. For VCD story disc with double languages, you may press [LANG] button to select the desired language. When playing some DVD discs, pressing [LANG] button to switch language may result in playing the track from its beginning. REPEAT PLAYBACK DVD MPEG4 SVCD VCD CD The repeat playback function enables a certain title/chapter/track/disc repeated. 1. Press [REPEAT] button. Each press of REPEAT button may realize different repeat functions. DVD DISC: Title Chapter ALL Repeat Off SVCD, VCD, CD discs: To SVCD, VCD2.0 discs, the repeat function is effective in sequence playback mode; to VCD1.1, CD discs, the repeat function may be directly operated. Track ALL Repeat Off To SVCD, VCD2.0 discs, the repeat function cannot be operated in menu playback mode. REPEAT 31 DVD OPERATION REPEAT PLAYBACK OF SELECTED SEGMENT DVD MPEG4 SVCD VCD CD When playing disc, you may press [A-B] button to play your desired segment content repeatedly. 1. In normal playback, press [A-B] button at the beginning point (point A) of the segment that you desire to play repeatedly. TV screen displays: A 2. In normal playback, press [A-B] button at the ending point (point B) of the segment that you desire to play repeatedly. TV screen displays: AB The unit automatically returns to point A and begins to play the selected segment (A-B). 3. Press [A-B] button for the third time. The unit restores to normal playback. NOTE A-B The A-B repeat function may be invalid to some discs. In menu playback mode, the segment can only be selected in the track. FAST PLAYBACK DVD MPEG4 SVCD VCD CD When playing discs, you may select fast forward or fast backward playback to search a certain point. 1. Press [ ] button and the unit begins fast forward playback. Press [ ] button each time and the disc playback speed switches in the following sequence circularly: 2X 4X 8X 32X 16X 2. Press [ ] button and the unit begins fast backward playback. Press [ ] button each time and the disc playback speed switches in the following sequence circularly: 2X 4X 8X 32X 16X 32 DVD OPERATION PLAY FROM THE DESIRED POSITION DVD MPEG4 SVCD VCD CD Play DVD disc Inputting a certain time, title number or chapter number directly may search in the disc fast and then play forward from this position. 1. Search title and chapter. For instance, search the 2nd chapter in title 6. Press [GOTO] button and TV screen displays: Title 03/30 Chapter Press [ /02 ] button to move cursor and lighten the title number, shown in the figure: Title /30 Chapter 01/02 Then press number button 6 to select Title 6, shown in the figure: Title 06 /30 Chapter /02 Finally press number button 2 to select Chapter 2, shown in the figure: Title 06 /30 Chapter 02/02 2. Search title time Press [GOTO] button until TV screen displays the following figure. Then press number buttons to input hour, minute and second. Title 06/30 Time : : 3. Search chapter time Press [GOTO] button until TV screen displays the following figure. Then press number buttons to input hour, minute and second. Play MPEG4 disc Chapter 01/04 Time : : 1. Select track Press [GOTO] button until TV screen displays the following figure. Then press number buttons to input the track. Select 2. Search track time Press [GOTO] button until TV screen displays the following figure. Then press number buttons to input hour, minute and second. Go To -:--:-- Play SVCD, VCD and CD discs 1. Search disc time Press [GOTO] button until TV screen displays the following figure. Then press number buttons to input minute and second. Disc Go To --:-- 2. Search track time Press [GOTO] button until TV screen displays the following figure. Then press number buttons to input minute and second. Track Go To --:-- 33 DVD OPERATION 3. Select the track Press [GOTO] button until TV screen displays the following figure. Press number buttons to input track. Select Track -- /15 GOTO ZOOMING THE DISPLAYED FRAME DVD MPEG4 SVCD VCD Zoom in/out the player frame. 1. When playing a disc, press the [ZOOM] button can open the zoom in/out function, and the TV screen displays( take X2 mode as an example): The frame is magnified to 2 times of the normal size. 2. Press the [ZOOM] button continually, all the magnified/ minified modes display on the screen in turn. The magnified/ minified modes includes:2X,3X,4X,1/2,1/3,1/4. 3. When the mode is on 1/4, press [ZOOM] button to close the zoom in/ out function, and the frame restores normal size. 4. When the fame is magnified, press the [ ] buttons to move the frame. ZOOM MPEG4 AND JPEG FILE PLAYING MPEG4 is the video/audio standard published by MPEG(Moving Pictures Experts Group) in November,1998. As the discrepant parts between frames of the picture only are processed and the same parts are deleted, the data quantity is greatly decreased. The most distinct feature of MPEG4 is the high compression and clear imaging. Furthermore, MPEG4 provides elastic specifications to adjust the stream according to the user requirements. The larger stream can be used when collecting private films; and the small stream can be used in network transferring, which make MPEG4 widely used. JPEG(Joint Photographic Experts Group) is the most widely used picture compression and storage format today. Utilizing high efficiency compression algorithm, JPEG compresses the original picture 15 to 20 times with excellent picture quality. JPEG features small size data, convenient application and is supported by most picture processing software, so it is very suitable to store photos. The strong decoding capability of this unit can decode and play the files with the above formats. In the course of playing, an operation menu will appear and its construction is shown as follows. 34 DVD OPERATION 1 00:00 00:00 004/369 \PIC\ 2 2 .. 3 Du000 Du001 4 Du002 5 State window 4 Display the current state information. 1 DIR window 5 Display the current path. 3 6 Scroll bar window Indicate the current file's position. Preview window JPEG image preview. File window Information window 6 Display the current path's file. Display the current operation prompts. The state information in state window is as follows: 1 00:57 2 03:31 3 4 1 Elapsed playback time 2 Total playback time 3 The audio bit rate (generally the bit rate is 128kbps, sometimes it is VBR). 4 Current playback mode indicator 128 002/073 5 6 5 Track indicator 6 Dynamic frequency spectrum indicator 1. Play MPEG4 file After you put a MPEG4 format file into the unit, it will search disc information and display the operation menu as figure A (The displayed content varies with disc.). A: B: 00:00 00:00 001/004 00:00 00:00 001/369 \ \Du000\ Du000 .. Du001 A/V MP000 Du002 A/V MP001 Du003 A/V MP002 Press [ ] button to select the directory you desired and press [OK] button to confirm. For instance, you select the directory Du000 in Figure A, press [OK] button and TV screen displays as in Figure B. The window returns to the previous directory when you select [ ...] or press [ ] button. In Figure B, press [ ] button to select the MPEG4 format file you desired and press [OK] button to confirm. The unit begins to play MPEG4 format movie. 2. Play JPEG file After you put an JPEG format file into the unit, it will search disc information and display the operation menu as in the following figure. After selecting JPEG file, the preview window will appear this file's preview image to facilitate you to select. After you select the JPEG file you desired and press [OK] \PIC\ .. button to confirm, the picture will display in full screen. 00:00 00:00 004/369 Du000 Du001 Du002 RESOLUTION 640 480 35 DVD OPERATION Other basic operation methods 1. Press [ ],[ ] button may turn to the next or last page. Other functions of JPEG file 1. When playing JPEG file, pressing [ ] button will achieve preview playback function. At the same time, all JPEG files are displayed on TV screen. One page can display up to 12 pictures at most. The remaining ones are shown on the next page. Pressing [ ] button will enter the next page and [ ] button will enter the previous page. You may press number buttons or [ ] button to select the picture you desired and press [OK] button to confirm. 2. When in preview playback, pressing [MENU] button will exit preview playback function. NOTE When buttons are invalid, TV screen displays: OK Cursor buttons Please press effective button again. MENU MPEG4 36 CARD READER AND USB OPERATION USAGE OF USB DEVICE AND 3 -IN-1 CARD READER USB refers to Universal Serial Bus. Most of USB devices on the market are USB1.1 or USB2.0. Here are some common types of USB 1.1 devices: Monitors, Communication devices, Audio Human Input Device(HID), Mass storage drives etc. Most flash memory, USB HDD etc. belongs to Mass Storage Class. Mass Storage Class includes 2 transport manners: 1. USB 1.1 Mass Storage Class Control/Bulk/Interrupt (CBI) Transport 2. USB 1.1 Mass Storage Class Bulk-Only Transport This unit supports USB 1.1 Mass Storage Class Bulk-Only Transport. When using USB 1.1 Mass Storage Class Bulk-Only Transport devices, please note that the file operation system only supports Windows FAT, it does not support FAT32 and NTFS file system. The 3-in-1 card reader of this player can read SD Card (Secure Digital Card), MMC Card (Multi Media Card) MS Card (Memory Stick Card). Important: Before you use the USB or card reader function, you should change the input source of the TV to DVD and press [DVD] button. This unit can only support the USB HDD which has one partition, if you USB HDD has several partitions, error maybe occur. 1. Using USB devices: Please insert USB devices into the USB jack of this unit then press [DVD] button . After correctly reading USB devices data, the screen will display an operation menu. Please refer to the part of "MPEG4 and JPEG FILE PLAYBACK" on page 34 for details. PCMCIA CARD MMC/MS/SD CARD USB MEDIA CARD socket USB jack DVD USB CARD 2. Play 3-in-1 CARD READER PLAY In DVD mode, press [DVD] button thrice, the TV set will detect and read card. If there is a supported card in the card port, after reading card data correctly, an operation menu will be displayed on the screen. DOWN DVD 37 2 3 5 6 7 8 9 0 UP If you want to switch to DVD state, please press [DVD] button to exit USB and card reader state. 1 4 CARD READER AND USB OPERATION NOTES This player can play USB devices and MPEG4 and JPEG files in SD, MMC and MS cards. When reading MPEG files with large size in USB device or media card, pause may appear. If there is no files in USB devices or media card , on-screen appears "Empty Device". If USB devices or media card have a problem, or the operation is incorrect, the screen displays "Device Error". Please check USB device or media card, or else unplug them then insert them again. If a USB device or media card which are unsupported by the machine have been connected, the unit may 'lock-up' and won't respond to commands. In this event please switch off the power, take out USB equipment or media card, and then switch the power back on to reset the machine. This unit does not support USB On The Go (OTG) technology, so any deviceswith OTG data exchange mode may not work correctly. Check this out before operation. When inserting a media card, you should insert it in the right direction: If you are facing the TV screen, make sure you plug-in the card with its connector facing away fromyou. Please take off the USB while it stops playing. Never take off it while it's playing. When the button is invalid, the TV screen displays: Press the effective button again. 38 DVD FUNCTION SETUP Turn on this TV, press [SOURCE] button to change source to DVD, press [SETUP] button, then press [ ] button to choose DVD item, the DVD setup menu will be displayed as follow: GENERAL SETUP General Setup Page TV Display OSD Lang Screen Saver Last Memory Wide ENG On On Go To General Setup Page 1. TV Display: This item is used to set the output picture ratio of this unit. Optional settings: Normal/PS, Normal/LB, Wide, Wide Squeeze; Default: Wide. 2. OSD language: This item is used to set the OSD language . Optional settings: English; Default: English 3. Screen Saver: Open or close the screen saver. Optional settings: On, Off; Default: On 4. Last Memory: This player can save the currently played time point automatically when you leave the current DVD disc playback (switch from DVD signal source to other signal source, enter standby state in DVD mode). Optional settings: On, Off; Default: On NOTE: When switching to DVD playback state again, this player can automatically search the time point saved last time to continue playing. If you want to play from the beginning, please press [ ] button twice and then press [ ] button. AUDIO SETUP Audio Setup Page Down mix SPDIF Setup Dolby Digital Setup Equalizer 3D Processing HDCD STR Go To Audio Setup Page 1. Down mix mode: this item is used to set this unit's DOWN MIX mode to change multi channel audio into 2-channel audio output. Optional settings: LT/RT, Stereo; Default: Stereo 2. SPDIF Setup: Press [OK] or [ ] button to enter the submenu of SPDIF setup. 39 DVD FUNCTION SETUP SDIF Setup Page SPDIF Output RAW LPCM Out 48K SPDIF/RAW SPDIF/PCM Setup SPDIF SPDIF output: This item is used to set the bit stream type of the digital output. Optional settings: SPDIF/RAW, SPDIF/PCM; Default: SPDIF/RAW LPCM output: This item is used to set the output frequency of LPCM audio data to fit for different power amplifiers. Optional settings: 48K, 96K; Default: 48K. NOTE: Only when the SPDIF output is set the SPDIF/PCM, the frequency of LPCM audio data is optional. 3. Dolby Digital Setup: Press [OK] or [ ] button to enter the submenu. Dolby Digital Setup Dual Mono STR Dynamic Stereo L-Mono R-Mono Mix-Mono Dual Mono (1+1) Setup Dual Mono: Optional settings: Stereo, L-Mono, R-Mono, Mix-Mono ;Default: Stereo. Dynamic: Optional settings: Off,1/4,1/2, 3/4, Full; Default: Off. 4. Equalizer : Press [OK] or [ ] button to enter the submenu to adjust the items. Equalizer Page EQ Type Bass Boost Super Bass Treble Boost None Off Off Off None Rock Pop Live Dance Techno Classic Soft Select Equalizer Type EQ Type: Set equalizer type, optional settings: None, Rock, Pop, Live, Dance, Techno, Classic, Soft; Default: None. Bass Boost: Enhance low frequency sound level, optional settings: On, Off; default: Off. Super Bass: Enhance very low frequency sound level, optional settings: On, Off; default: Off. Treble Boost: Enhance high frequency sound level, optional settings: On, Off; default: Off. 5. 3D Processing: Set reverberation mode . Optional settings: Off, Concert, Living Room, Hall, Bathroom, Cave, Arena, Church; Default: Off. 6. HDCD: Set filter mode. Optional settings: Off,1X, 2X; Default: 1X. 40 DVD FUNCTION SETUP VIDEO SETUP Video Quality Setup Sharpness Brightness Contrast Gamma Hue Saturation Med 00 00 None 00 00 Go To Video Setup Page 1. Sharpness: This item is used to set the sharpness of video outputs. Optional settings: High, Medium, Low; Default: Med. 2. Brightness: This item is used to set the brightness of video outputs. 3. Contrast: This item is used to set the contrast of video outputs. 4. Gamma: This item is used to set the color temperature of video output. Optional settings: High, Medium, Low, None ; Default: None 5. Hue: This item is used to set the hue of video outputs. 6. Saturation: This item is used to set the saturation of video outputs. PREFERENCE SETUP Preference Page TV Type PBC Audio Subtitle Disc Menu Parental Country Region Default PAL On ENG ENG ENG Off ENG Go To Preference Page 1. TV Type: To set the output video system of this player. Optional settings: PAL, Auto, NTSC; Default: PAL. 2. PBC: To set the PBC status. When playing SVCD, VCD2.0 discs, if PBC is set On, this unit enters PBC playback mode; if PBC is set Off, the unit plays the disc according to track sequence. Optional settings: On, Off; Default: On 3. Audio: This item is used to set the preference audio language when playing. 4. Subtitle: This item is used to set the preference subtitle language when playing. 5. Disc menu language: This item is used to set the preference disc menu language when playing. Default of disc menu language: English 41 DVD FUNCTION SETUP NOTE Audio, subtitle and disc menu language are only effective in DVD mode. If the disc is not recorded with the language you appointed, the unit will apply the language that the disc appointed to play. Select other languages: press [ ] button to move cursor to "OTHER" item, press [OK] button and then number buttons to input the language code you desired. After input finishes, press [OK] button again. 6. Parental: this item is used to set the parental control ratings to prevent children from watching restricted contents. (In the event the disc supports this function) Optional settings: KID SAFE, G, PG, PG 13, PGR, R, NC17, ADULT, Off; Default: Off NOTE When changing the parental control ratings, a password is needed. Please refer to the following password item for details. 7. Country Region: Set the country region according to your country. 8. Default: This item is used to restore all settings to the default value except "Parental control " and "Password" in the setup menu. PASSWORD SETUP Password : This item is used to set a six digit password to enable you to change the parental control ratings. Password Setup Page Password Mode Password On Go To Password Setup Page Password Mode: To set whether parental control function needs a password, optional setting: On, Off; Default: On. Password : To change the password of the parental control function, default :000000. 42 DTV MENU OPERATION Press the [MENU] button, then the Main Menu will be displayed, you can set your preferences in that, such as search channels, edit the channel list or your favorite list , view Programme Guide Information. It is easy to see that the Main Menu is composed of six parts: General Setting, Channel Install, Channel Manage, Advanced Channel , EPG, System Info. Main Menu General Setting Channel Install Channel Manage Advanced Setting EPG System Info OK Note: Select different item using the[ SETUP EXIT ]button ,and press [OK] or [ ] to enter it. GENERAL SETTING You can set the base environment of the DTV. General Setting Menu Language: Set the default menu language. Menu language English Audio Language: Set the default audio language. Audio language English Subtitle language English Subtitle Language: Set the default subtitle language. Subtitle display Subtitle Display: Set the default subtitle as show or not. Opacity Level Off 100% Off Antenna Power Opacity Level: Set the default menu opacity level. OK SETUP EXIT Antenna power: Set the default antenna power turn on or off. Note: When you connect an active antenna to the " RF input" connector, please turn on the antenna power so that the signal quality could be improved. CHANNEL SEARCH You can select the auto search or manual search. Channel Search Auto Search Manual Search OK 43 ** SETUP EXIT DTV MENU OPERATION Channel Search You can set the search mode as new or add . Channell Search Then press [ OK ] button to confirm it. Installation type Note: If the mode is new, will delete the old channel the current frequency. If the mode is add, do not delete the old channel the current frequency. New OK EXIT Manual Search Manual Search Select the Chanel item you can select the frequency by the [ ] or [ ] button. Channel 21 Frequency 474.000 Then press [ OK ] button to search the channel. Quality OK SETUP EXIT Search Result You can see all TV and Radio channels found while the channel search is in progress. A pop-up will indicate you that the automatic installation is finished. This pop-up will disappear automatically after a few seconds. Search Result TV channels: 0 Radios: 0 No New channel Please wait... Progress: SETUP SETUP 44 DTV MENU OPERATION CHANNEL MANAGE Channel Manage Create a favourite list The Favorite lists menu allows you to create, modify and delete your own favorite lists but not the two default service lists (TV, Radio). Four TV favorite lists and four radio favorite lists can be created. Modeify a favourite list Delete a favourite list OK SETUP EXIT Cerate a favourite list Cerate a favourite list This screen allows you to create a new favorite channels list with selection criteria. The name of the list is set to " FAV x" for TV services and " RFAV x" for Radio. Name RFAV1 Channels Radios OK SETUP EXIT Modifying a Favourite List This screen allows you to modify a favourite list. The current favourite list name is displayed on the top of the screen. All the channels matching the criteria selected at the creation of the favourite list are listed. Each favourite list has its own channel numbering. In case of a favourite list, you can lock or unlock a channel, skip or add some channels or all channels. You can also sort the channels by alphabetical order, by providers or manually. All these action are performed using screen color buttons (RED, GREEN, YELLOW, CYAN). If the list is the default TV and Radio lists, only the " Lock/Unlock " option is available. At the top of the list, the favourite list name and type, the provider name are displayed. The last viewed service is displayed in the video window. Warning : The only modification you can make in the two default TV and Radio lists is to lock or unlock a channel. Modify a favourite list FAV 1 RADIO 1 BBC Radio Wales 2 BBC Radio Cymru TV FTV1 Lock OK SETUP Skip Sort/move Skip/Add All PAG +- EXIT 45 SETUP EXIT DTV MENU OPERATION Default TV/Radio lists On these lists, only the " Lock/unlock " option is available: a press on the [RED] button will lock the highlighted channel if unlock and vice-versa (toggle behavior). TV/Radio favourite lists For all these lists, a few actions are available: Add/Skip: Toggle behavior on the [GREEN] button, in front of the channel list a color icon indicates the status (white for skipped, blue for added). Lock/Unlock: Toggle behavior on the [RED] button, in front of the channel list a color icon indicate the status (red for locked, blue for unlock), this option is only available if channel is added. Sort/Move: Accessed by a press on the [YELLOW] button. Sort can be made in a few different ways, by alphabetical or by provider. In this screen, the selected services will be sorted and placed at the beginning of the list, and the other (not selected) will be sorted and placed at the end of the list. Move actions consist in highlighting the channel to move, pressing the [OK] button to select it, moving the cursor to the destination item and pressing the [OK] button to finalize the move operation. Add All/Skip All: accessed by a press on the [CYAN] button . Allows you to generalize the Add or Skip operations to all channels. Delete a favorite list This screen allows you to delete a favorite list. Delete a favourite list FTV1 FTV2 OK SETUP This pop-up allows you to confirm or not the deletion of a favorite list: You can going to remove the favorite list, press OK to confirm. OK 46 SETUP EXIT EXIT DTV MENU OPERATION ADVANCED SETTING The parental control item allows you to enable or disable the locking management. Advanced Setting Parental control Disabled Channel lock No Maturity level None PIN change OK SETUP EXIT Parental Control If the parental control item is disabled then all the locking are deactivated, If it is enabled then all the locking are applied according to your choice. Channel Lock Allows you to lock a specific service (the PIN code is requested when you zap to the locked services). To lock / unlock a service, see " modify a favorite list " ). Maturity Level A parental rating (between 1 and 18 years) is available. In this case, all services which are not in the age limits become inaccessible unless enter the PIN code. This parental rating depends of the information forwarded or not by the broadcaster. WARNING: If maturity level access control is activated, all access to timer feature request the PIN code. A press on red button allows you to modify the PIN code which will be asked when try to access to a protected part defined just above. This menu is locked PIN Change PIN code New PIN code Enter PIN code Confirm SETUP EXIT SETUP EXIT The menu to modify PIN code is protected by requesting PIN code access. The default DTV PIN code (after the " First Time Installation " or " Factory System Reinstallation " ) is " 0000 " . Then enter the new wanted PIN code, enter it a second time in Confirm item, just to be sure that there is no typing fault. 47 DTV MENU OPERATION ELECTRONIC PROGRAM GUIDE (EPG) By pressing the Guide button, an Electronic Program Guide is displayed. The EPG supplies information, such as program lists, start and end times of all available channels. In addition, In addition, the detailed information about the program is often available in he EPG. (The availability and the amount of program details will vary depending on the broadcaster.) A press on the [ ] buttons allows you to consult all event pages for the days, a press on the [ ] button when last event of the list is highlighted displays the next event page. ] buttons allows you to change to previous/next day of event presentation. A press on the [ The [CH+/-] or [ ] button allows you to change to another channel in the current channel list. By pressing the [TIMER] button, you can set a timer on the highlighted program of the current channel (see add timer description). BBC Radio Wales Tuesdays 30/01 15:25 Lazytown 15:50 The Likeaballs 16:20 Raven: The lsland INFO 15:51 PAG +- 30/01/2007 SETUP EXIT SYSTEM INFO Conditional Access System info You can view the current status of CI module. Select " Conditional Access" using the [ ] button and press the [OK] button, if Common Interface is available, you can view the conditional Access information. Conditional Access System Information Factory Settings OK SETUP EXIT Note1: CAM also called CA-module(CA=Conditional Access)or CI-module (CI=Common Interface). Is used together with a Smart Card to decode and view the content of sertain programm providers. Can be purchased from your dealer or from the programm provider/operator. Note2: Scrambled transmissions: the content or some parts of the content transmitted in the terrestrial network may be scrambled. For this DTV is equipped with PCMCIA CARD slots to connect the de-scrambling modules(Conditional Access Modules). Module, smart-card and subscription may be obtained from your local dealer or directly from the service provider. 48 DTV MENU OPERATION System Information System Information This screen gives you some information about the DTV (Device Version and Software Version). W193D_ICE_ 2007_12_06_V1.0 SETUP EXIT Factory Settings This acknowledge pop-up allows you to erase all the custom parameters. If it is confirmed, all services lists and user preferences are deleted and the DTV restarts as for a " First Time installation " . All private settings and other user data will bu erased. Do you want to proceed? Yes OK SETUP EXIT PROGRAM INFORMATION 4 3 5 1 BBC ONE Wales 6 16:00 8 Lazytown TV TV 1 2 15:40 7 At the end of the first installation or after the validation of a service in the service selector, the DTV turns into viewing mode. This mode is also called " TV/radio mode" according to the selected channel (TV or Radio). After each channel change or after a press on the [INFO] button, a banner is displayed at the bottom of the screen for a few seconds, including service type (1), current list (2), channel number in the list (3), channel name (4), event name (5), current time (6), event duration bargraph with start and stop times (7) as well as specific icons relative to the service properties (8) (from left to right : maturity level, extended event information / teletext presence / service locked /multitrack audio / scrambled program / Subtitle presence). Information about present and following events of the current service are available. By default, the present event is displayed. The following event is displayed by pressing the [ ] buttons (toggle between present and following events). 49 DTV MENU OPERATION The Channel selector is activated by a press on the OK button while in viewing mode. This screen presents the channels of the current default/favourite lists. When selecting a channel of this list with the OK button, the DTV changes the video background accordingly. When you press the OK button on the selected service, the DTV switches to viewing mode and changes the selected channel accordingly. Zapping can also be done by entering channel number using digit keys. TV The channel list is displayed and is automatically 1 BBC ONE Wales removed from the screen after few seconds. 2 BBC 2W The screen bellow corresponds to the TV list. 7 BBC THREE 79 CBBC Channel You can toggle from TV lists to Radio lists using the 80 BBC NEWS 24 ] button and between different TV lists using [ 105 BBCI 800 Teletx.german [FAVORITE] button. FAV PAG +- OK EXIT MHEG5 If your chosen channel has MHEG5 features, you can access them. Teletext services often load automatically shortly after the Digital Teletext window is displayed. In which case, simply follow the given instructions ( press color buttons). 1. Press [TEXT] or [RED] button to access MHEG5 features. B B C NEWS 15:50 30 Jan Newsround 2. Press [TEXT] or [RED] button again to return to normal viewing. 571 'Super-lice' fighting nit shampoo Jonny wilkinson back for England Grey wolf makes amazing comeback 3. Press the [CH+/-] button to exit this service. Elephants stage highway robberies CBBC Press TEXT to exit press 0 for full screen TV McLeish named new Sottland coach More... B B C 50 HOME SHORTCUTS BACK INDEX TROUBLESHOOTING Please check for causes of problems in accordance with the following chart before contacting maintenance personnel. DISPLAY TROUBLESHOOTING Symptom Black screen, power indicator light off Causes and Correction Check whether the power cord is well connected, and whether this unit is powered on Check whether the signal cord of input device is well connected Check whether input device is powered on Check whether the input device signal is in this unit's specification Image display flicker, unstable Check computer output mode: control panel-display-setup If the setup does not accord with this unit's specification, please change the display setup Horizontal scanning frequency: 30kHz ~75kHz Vertical scanning frequency: 50 Hz~75Hz Max display mode: 1152X864@ 75 Hz SOUND AND TV TROUBLESHOOTING Symptom Cannot power on Causes and Correction Please make sure the power cord is correctly connected Please make sure the audio cord is correctly connected No sound Check volume Make sure there is nothing plugged into the headphone jack Check volume Volume too low If volume is still too low when adjusting volume to maximum, please check whether the input device is correctly Snowy picture Please make sure the antenna is well connected Remote control failure Check whether remote control battery is full charged Whether battery installation is correct Whether obstacles exists between remote control and the unit's receiving window Check whether receiving window has strong light Unstable image or abnormal picture color Correct the TV set settings Reset the TV set to default setting 51 TROUBLESHOOTING DVD TROUBLESHOOTING Causes Symptom Correction Not play 1. Condensation on laser head 2. Disc not properly loaded 3. Disc not compatible with the unit 1. Switch on power and wait for 1 to 2 hours 2. Make sure label side of the disc facing up 3. Confirm whether this unit is compatible with the placed disc 1. Too large volume of connected device 2. Sound field mode not suitable for disc 1. Adjust the device volume Sound distortion No sound No image No color 2. Adjust appropriate sound field 1. Disc warped or dirty 1. Clean the disc 2. The unit in mute state 2. Press MUTE button to cancel it. 1. TV not set for proper system 1. Reset AV/TV state of TV 1. TV system not right 1. Reset the TV color 2. TV color not well adjusted 1. Disc warped or dirty No disc reading 2. Disc not correctly placed 3. Condensation on laser head 1. Clean the disc 2. Reload a disc with label side facing up 3. Switch on power, unload disc and leave it for about 1 hour 1. Wait for 5 to 10 seconds to restore to normality automatically 2. Operate again 1. Mal-fabricated disc used Temporary 2. Wrong buttons pressed function failure 3. Static leakage into the unit from outside No subtitle Image rolling 3. Power off for 1 to 2 minutes to power on again 1. No subtitle recorded on disc 1. Disc problem 2. The unit subtitle is turned off 2. Press SUBT button to select it 1. System setup not suitable for disc 1. Adjust system mode If the above methods still cannot solve the problem or the troubles are not listed, please contact local maintenance personnel. 52 VGA SCART YPBPR HDMI 2 CARD Input connector Frequency range (UHF) Channel range(UHF) DVB IEC-Type, IEC 169-2, Female 474MHz ~ 858MHz 8 MHz W H D Because of disc quality and format differences we cannot assure the unit will read all. Some functions cannot utilized on some discs, but this is not a fault with the machine. 53 DISPLAY MODE SUPPORTED PC INPUT MODE Resolution Hor scanning frequency Ver scanning frequency (KHz) (Hz ) Pixel frequency (MHz) Format 640 350 31.5 70.0 25.17 DOS 720 400 31.5 70.0 28.32 DOS 640 480 31.5 60.0 25.18 DOS 640 480 37.9 72.0 31.50 VESA 640 480 37.5 75.0 31.50 VESA 800 600 35.1 56.2 36.00 VESA 800 600 37.9 60.0 40.00 VESA 800 600 48.1 72.0 50.00 VESA 800 600 46.9 75.0 49.50 VESA 1024 768 48.4 60.0 65.00 VESA 1024 768 56.5 70.11 75.00 VESA 1024 768 60.0 75.0 78.75 VESA 1152 864 67.5 75.0 108.00 VESA NOTES This product does not support the display mode not listed above. In order to achieve the best display effect, please select the above-listed 13 display modes input signal. Because of the difference of display card output signal (especially non-standard signal output), the display image may appear little disturbance which can be adjusted through " AUTO CONFIG " in the "PICTURE" menu by users. To prolong this unit's service life, you are suggested to use power management function of computer. 54 
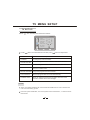
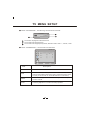
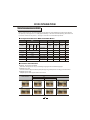
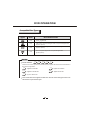
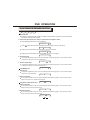
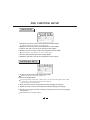
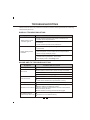
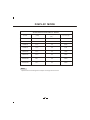
DISPLAY MODE SUPPORTED VIDEO INPUT MODE Format Hor scanning frequency ( KHZ) Ver scanning frequency (HZ) Vert scan type 720X480 31.5 60 480P 720X480 15.6 60 480i 720X576 31.2 50 576P 720X576 15.6 50 576i 1280X720 37.5 50 720P 1280X720 45.0 60 720P 1920X1080 28.1 50 1080 i 1920X1080 33.7 60 1080 i NOTE Specifications and designs are subject to change without notice. 55 ACCESSORIES Please check the following accessories. Operational Manual 9 6 3 5 2 8 0 4 1 7 User manual Remote control and battery Power adaptor Wall Mount Holder Kit (optional) ** ** Kickstand Kit Automotive Power socket adapter AV cord HDMI cord (optional) 5195942 V0.0