1
Meridian 1
Meridian 1 Attendant PC
Software User Guide
Document Number: P0891256
Document Release: Standard 2.00
Date: February 1999
Year Publish FCC TM
© 1997, 1999
All rights reserved
Printed in the United States of America
Information is subject to change without notice. Northern Telecom reserves the right to make changes in design
or components as progress in engineering and manufacturing may warrant. This equipment has been tested
and found to comply with the limits for a Class A digital device pursuant to Part 15 of the FCC rules, and the
radio interference regulations of the Industry Canada. These limits are designed to provide reasonable
protection against harmful interference when the equipment is operated in a commercial environment. This
equipment generates, uses and can radiate radio frequency energy, and if not installed and used in accordance
with the instruction manual, may cause harmful interference to radio communications. Operation of this
equipment in a residential area is likely to cause harmful interference in which case users will be required to
correct the interference at their own expense.
SL-1 and Meridian 1 are trademarks of Northern Telecom. Windows 95 and Windows NT are trademarks of
Microsoft
Meridian 1 Attendant PC Software User Guide
Tell us what you think...
This is your document. Nortel wants it to work well for you.
Please take a few minutes to answer the questions on the other side of this page. Fax it
back to us at the number provided, or mail it to the address below.
Your comments will be used to make improvements.
Thank you. We appreciate your time and consideration.
Nortel Product Training and Documentation
Return mail address:
Documentation User Comments Survey
Nortel Product Training & Documentation
P.O. Box 833858
m/s H300
Richardson, Texas 75083-3858
USA
Meridian 1 Attendant PC Software User Guide
Fax to:
Documentation User Comments Survey
Nortel Product Training and Documentation
1-972-684-8699
Document name __________________________________________________
Document NTP or P0 number (if available) ________________________________
Please circle the most appropriate number on the scale for each question.
1.
Overall, are you satisfied with this document?
Yes
2.
3
2
1
No
7
6
5
4
3
2
1
No
7
6
5
4
3
2
1
No
7
6
5
4
3
2
1
No
Is the information in this document complete for its purpose?
Yes
6.
4
Is this document clearly written?
Yes
5.
5
Have you found the information in this document to be technically accurate?
Yes
4.
6
Is it easy to find information in this document?
Yes
3.
7
7
6
5
4
3
2
1
No
3
2
1
No
Does this document help you do your job?
Yes
7
6
5
4
Comments:
______________________________________________________________________
______________________________________________________________________
______________________________________________________________________
______________________________________________________________________
______________________________________________________________________
Optional:
Your name ____________________________ Fax ____________________
Company _____________________________________________________
P0891256 Standard 2.00
February 1999
Page v of xiv
Contents
Introducing the Meridian 1
Attendant PC . . . . . . . . . . . . . . . . . . . . . . . . . . . . . .
1
About the Attendant PC . . . . . . . . . . . . . . . . . . . . . . . . . . . . . . .
Starting the Attendant PC . . . . . . . . . . . . . . . . . . . . . . . . . . . .
Menus . . . . . . . . . . . . . . . . . . . . . . . . . . . . . . . . . . . . . . . . . . .
Two-line display . . . . . . . . . . . . . . . . . . . . . . . . . . . . . . . . . . .
Position Busy indicator . . . . . . . . . . . . . . . . . . . . . . . . . . . . . .
Fixed keys . . . . . . . . . . . . . . . . . . . . . . . . . . . . . . . . . . . . . . .
Loop keys . . . . . . . . . . . . . . . . . . . . . . . . . . . . . . . . . . . . . . . .
Incoming Call Indicator Keys . . . . . . . . . . . . . . . . . . . . . . . . .
Trunk Group Busy keys . . . . . . . . . . . . . . . . . . . . . . . . . . . . .
1
2
3
3
3
4
4
5
5
Placing a call . . . . . . . . . . . . . . . . . . . . . . . . . . . . . . . . . . . . . . .
6
Using the Attendant PC online help . . . . . . . . . . . . . . . . . . . . . .
Using the Help Index feature . . . . . . . . . . . . . . . . . . . . . . . . .
Exploring the Help Console . . . . . . . . . . . . . . . . . . . . . . . . . .
6
7
8
Working with the Tools menu . . . . . . . . . . . . . . . .
9
Using the Feature List . . . . . . . . . . . . . . . . . . . . . . . . . . . . . . . .
Fixed features . . . . . . . . . . . . . . . . . . . . . . . . . . . . . . . . . . . . .
Flexible features . . . . . . . . . . . . . . . . . . . . . . . . . . . . . . . . . . .
Virtual features . . . . . . . . . . . . . . . . . . . . . . . . . . . . . . . . . . . .
10
11
11
12
Using the ICI List . . . . . . . . . . . . . . . . . . . . . . . . . . . . . . . . . . . .
Adding an ICI key . . . . . . . . . . . . . . . . . . . . . . . . . . . . . . . . . .
Using the ICI Keys page . . . . . . . . . . . . . . . . . . . . . . . . . . . . .
18
19
20
Using the TGB keys . . . . . . . . . . . . . . . . . . . . . . . . . . . . . . . . . .
Adding a TGB key . . . . . . . . . . . . . . . . . . . . . . . . . . . . . . . . .
21
21
Meridian 1 Attendant PC Software User Guide
Page vi of xiv
Contents
Building a ToolBox . . . . . . . . . . . . . . . . . . . . . . . . . . . . . . . . . .
23
Accessing the CPLUS Directory . . . . . . . . . . . . . . . . . . . . . . . .
25
Using the Directory . . . . . . . . . . . . . . . . . . . . . . . . . . . . . . . . . .
Starting the Directory . . . . . . . . . . . . . . . . . . . . . . . . . . . . . .
Creating a Directory entry . . . . . . . . . . . . . . . . . . . . . . . . . . .
Exporting Directory dialing numbers . . . . . . . . . . . . . . . . . . .
Importing Directory dialing numbers . . . . . . . . . . . . . . . . . . .
Changing a directory number (DN) . . . . . . . . . . . . . . . . . . . .
Searching the directory . . . . . . . . . . . . . . . . . . . . . . . . . . . . .
26
27
29
36
37
38
38
Logging off the Attendant PC . . . . . . . . . . . . . . . . . . . . . . . . . .
39
Working with the Config menu . . . . . . . . . . . . . . .
41
Console Configuration . . . . . . . . . . . . . . . . . . . . . . . . . . . . . . . .
The Hotkeys tab . . . . . . . . . . . . . . . . . . . . . . . . . . . . . . . . . .
The Consoles tab . . . . . . . . . . . . . . . . . . . . . . . . . . . . . . . . .
The Attendants tab . . . . . . . . . . . . . . . . . . . . . . . . . . . . . . . .
The Features tab . . . . . . . . . . . . . . . . . . . . . . . . . . . . . . . . . .
The Flex Keys tab . . . . . . . . . . . . . . . . . . . . . . . . . . . . . . . .
The ICI tab . . . . . . . . . . . . . . . . . . . . . . . . . . . . . . . . . . . . . .
The ICI Keys tab . . . . . . . . . . . . . . . . . . . . . . . . . . . . . . . . . .
The TGB tab . . . . . . . . . . . . . . . . . . . . . . . . . . . . . . . . . . . . .
42
44
45
46
47
54
55
57
58
Interface Properties . . . . . . . . . . . . . . . . . . . . . . . . . . . . . . . . . .
The Alerter tab . . . . . . . . . . . . . . . . . . . . . . . . . . . . . . . . . . .
The Call Waiting tab . . . . . . . . . . . . . . . . . . . . . . . . . . . . . . .
The Handset tab . . . . . . . . . . . . . . . . . . . . . . . . . . . . . . . . . .
The Relay tab . . . . . . . . . . . . . . . . . . . . . . . . . . . . . . . . . . . .
The Diagnostics tab . . . . . . . . . . . . . . . . . . . . . . . . . . . . . . .
60
60
61
62
63
64
Configure Port . . . . . . . . . . . . . . . . . . . . . . . . . . . . . . . . . . . . . .
65
Change Password . . . . . . . . . . . . . . . . . . . . . . . . . . . . . . . . . . .
65
Meridian 1 Attendant PC
call processing . . . . . . . . . . . . . . . . . . . . . . . . . . . .
67
Answering a call . . . . . . . . . . . . . . . . . . . . . . . . . . . . . . . . . . . .
67
Extending a call to an idle extension . . . . . . . . . . . . . . . . . . . . .
68
Extending a call to a busy extension (with Camp-on) . . . . . . . .
69
P0891256 Standard 2.00
February 1999
Contents
Page vii of xiv
Extending a call to voice mail . . . . . . . . . . . . . . . . . . . . . . . . . . .
70
Extending a call to a busy extension (with Hold) . . . . . . . . . . . .
71
Holding a call on a loop key . . . . . . . . . . . . . . . . . . . . . . . . . . . .
72
Call Park . . . . . . . . . . . . . . . . . . . . . . . . . . . . . . . . . . . . . . . . . . .
73
Timed recall from an unanswered extended call . . . . . . . . . . . .
74
Timed recall from an unanswered parked call . . . . . . . . . . . . . .
75
Recall from an extension using LINK or ATT RECALL . . . . . . . .
76
Recall from an extension using Transfer . . . . . . . . . . . . . . . . . .
77
Recall from an extension using Conference . . . . . . . . . . . . . . . .
78
Recall to Same Attendant . . . . . . . . . . . . . . . . . . . . . . . . . . . . . .
79
Calling an extension . . . . . . . . . . . . . . . . . . . . . . . . . . . . . . . . . .
80
Calling an outside number . . . . . . . . . . . . . . . . . . . . . . . . . . . . .
81
Trunk-to-trunk call . . . . . . . . . . . . . . . . . . . . . . . . . . . . . . . . . . . .
82
Through-dialing . . . . . . . . . . . . . . . . . . . . . . . . . . . . . . . . . . . . . .
83
Conference . . . . . . . . . . . . . . . . . . . . . . . . . . . . . . . . . . . . . . . . .
84
Calling another attendant . . . . . . . . . . . . . . . . . . . . . . . . . . . . . .
86
Transferring a call to another attendant . . . . . . . . . . . . . . . . . . .
87
Break-in (post-dial) . . . . . . . . . . . . . . . . . . . . . . . . . . . . . . . . . . .
88
Break-in (pre-dial) . . . . . . . . . . . . . . . . . . . . . . . . . . . . . . . . . . . .
90
Break-in (busy verify) . . . . . . . . . . . . . . . . . . . . . . . . . . . . . . . . .
92
Sending a warning tone to an extension in line lockout . . . . . . .
93
Requeueing a call to the next available attendant . . . . . . . . . . .
94
Timed Reminder Recall . . . . . . . . . . . . . . . . . . . . . . . . . . . . . . .
95
Centrex/Exchange Line Switchhook Flash . . . . . . . . . . . . . . . . .
96
Remote Call Forward . . . . . . . . . . . . . . . . . . . . . . . . . . . . . . . . .
97
Call Forward/Hunt Override . . . . . . . . . . . . . . . . . . . . . . . . . . . .
99
Attendant Console Autoline . . . . . . . . . . . . . . . . . . . . . . . . . . . . 100
Individual Attendant Directory Number (IADN) . . . . . . . . . . . . . . 101
Attendant Emergency Codes . . . . . . . . . . . . . . . . . . . . . . . . . . . 101
Recovery on Misoperation of Attendant Console . . . . . . . . . . . . 102
Meridian 1 Attendant PC Software User Guide
Page viii of xiv
Contents
Meridian 1 Attendant PC features . . . . . . . . . . . . . 103
Attendant Blocking of Directory Number . . . . . . . . . . . . . . . . . .
To block a DN . . . . . . . . . . . . . . . . . . . . . . . . . . . . . . . . . . . .
To place an outgoing call for the blocked DN . . . . . . . . . . . .
To release a blocked DN . . . . . . . . . . . . . . . . . . . . . . . . . . .
To notify a blocked DN of an established call . . . . . . . . . . . .
104
104
104
104
104
Attendant Break-in Busy indication and prevention . . . . . . . . . .
105
Attendant Monitor: Monitoring a DN . . . . . . . . . . . . . . . . . . . . .
105
Attendant Monitoring: Monitoring a Trunk . . . . . . . . . . . . . . . . .
106
Auto Dial . . . . . . . . . . . . . . . . . . . . . . . . . . . . . . . . . . . . . . . . . .
Calling an Auto Dial number . . . . . . . . . . . . . . . . . . . . . . . . .
Storing an Auto Dial number . . . . . . . . . . . . . . . . . . . . . . . . .
107
107
108
Automatic Wake Up . . . . . . . . . . . . . . . . . . . . . . . . . . . . . . . . . .
Programming a wake-up call . . . . . . . . . . . . . . . . . . . . . . . .
Canceling a wake-up call . . . . . . . . . . . . . . . . . . . . . . . . . . .
Unanswered wake-up calls . . . . . . . . . . . . . . . . . . . . . . . . . .
Making a VIP wake-up call . . . . . . . . . . . . . . . . . . . . . . . . . .
108
108
109
110
110
Barge-in . . . . . . . . . . . . . . . . . . . . . . . . . . . . . . . . . . . . . . . . . . .
111
Busy verify . . . . . . . . . . . . . . . . . . . . . . . . . . . . . . . . . . . . . . . . .
111
Charge Account . . . . . . . . . . . . . . . . . . . . . . . . . . . . . . . . . . . . .
Entering an account number after dialing a call . . . . . . . . . .
112
112
DID Route Conversion . . . . . . . . . . . . . . . . . . . . . . . . . . . . . . .
113
Do-Not-Disturb . . . . . . . . . . . . . . . . . . . . . . . . . . . . . . . . . . . . .
Setting up Do-Not-Disturb . . . . . . . . . . . . . . . . . . . . . . . . . . .
Using Do-Not-Disturb . . . . . . . . . . . . . . . . . . . . . . . . . . . . . .
Cancelling Do-Not-Disturb . . . . . . . . . . . . . . . . . . . . . . . . . .
Overriding Do-Not-Disturb . . . . . . . . . . . . . . . . . . . . . . . . . .
Testing Do-Not-Disturb . . . . . . . . . . . . . . . . . . . . . . . . . . . . .
114
114
114
115
115
116
End-to-end signaling . . . . . . . . . . . . . . . . . . . . . . . . . . . . . . . . .
116
Enhanced Night Service . . . . . . . . . . . . . . . . . . . . . . . . . . . . . .
Turning Enhanced Night Service on and off . . . . . . . . . . . . .
117
118
Enhanced Secrecy . . . . . . . . . . . . . . . . . . . . . . . . . . . . . . . . . .
118
Malicious Call Trace . . . . . . . . . . . . . . . . . . . . . . . . . . . . . . . . .
119
P0891256 Standard 2.00
February 1999
Contents
Page ix of xiv
Night Service . . . . . . . . . . . . . . . . . . . . . . . . . . . . . . . . . . . . . . . 120
Turning Night Service On and Off . . . . . . . . . . . . . . . . . . . . . 120
Displaying and changing the Night Service option number . . 121
Paging . . . . . . . . . . . . . . . . . . . . . . . . . . . . . . . . . . . . . . . . . . . . 121
Position Busy . . . . . . . . . . . . . . . . . . . . . . . . . . . . . . . . . . . . . . . 121
Radio Paging . . . . . . . . . . . . . . . . . . . . . . . . . . . . . . . . . . . . . . .
Automatic pre-selection . . . . . . . . . . . . . . . . . . . . . . . . . . . . .
Automatic post-selection . . . . . . . . . . . . . . . . . . . . . . . . . . . .
Manual post-selection . . . . . . . . . . . . . . . . . . . . . . . . . . . . . .
Manual pre-selection . . . . . . . . . . . . . . . . . . . . . . . . . . . . . . .
122
122
122
123
123
Semi-Automatic Camp On . . . . . . . . . . . . . . . . . . . . . . . . . . . . . 123
Series Call . . . . . . . . . . . . . . . . . . . . . . . . . . . . . . . . . . . . . . . . . 124
Speaking privately (Splitting) . . . . . . . . . . . . . . . . . . . . . . . . . . . 124
Speed Call . . . . . . . . . . . . . . . . . . . . . . . . . . . . . . . . . . . . . . . . . 125
Calling a Speed Call number . . . . . . . . . . . . . . . . . . . . . . . . . 125
Storing a Speed Call number . . . . . . . . . . . . . . . . . . . . . . . . . 125
Stored Number Redial . . . . . . . . . . . . . . . . . . . . . . . . . . . . . . . .
Redialing a Stored Number . . . . . . . . . . . . . . . . . . . . . . . . . .
Storing a Stored Number Redial number ahead of time . . . .
Storing a Stored Number Redial number during a call . . . . . .
126
126
127
127
System Speed Call . . . . . . . . . . . . . . . . . . . . . . . . . . . . . . . . . . . 128
Meridian 1 Attendant PC network features . . . . . . 129
Centralized Attendant Service . . . . . . . . . . . . . . . . . . . . . . . . . .
Answering a call to a remote console . . . . . . . . . . . . . . . . . . .
Extending a call to an idle extension . . . . . . . . . . . . . . . . . . .
Extending a call to a busy remote extension . . . . . . . . . . . . .
Putting a call on silent hold . . . . . . . . . . . . . . . . . . . . . . . . . . .
Remote recall . . . . . . . . . . . . . . . . . . . . . . . . . . . . . . . . . . . . .
Transferring a recall to another remote extension . . . . . . . . .
129
129
130
131
131
132
132
Network Attendant Service . . . . . . . . . . . . . . . . . . . . . . . . . . . . .
Answering a call from a remote console . . . . . . . . . . . . . . . .
Extending a call to a busy remote extension . . . . . . . . . . . . .
Extending a call to an idle remote extension . . . . . . . . . . . . .
133
133
134
135
Meridian 1 Attendant PC Software User Guide
Page x of xiv
Contents
Remote recall . . . . . . . . . . . . . . . . . . . . . . . . . . . . . . . . . . . .
Transferring a call to another remote extension . . . . . . . . . .
135
136
Networking (ESN, ISDN) features . . . . . . . . . . . . . . . . . . . . . . .
Authorization Code . . . . . . . . . . . . . . . . . . . . . . . . . . . . . . . .
Charge Account . . . . . . . . . . . . . . . . . . . . . . . . . . . . . . . . . .
Expensive Route Warning Tone . . . . . . . . . . . . . . . . . . . . . .
Extending a call—Off-Hook Queueing . . . . . . . . . . . . . . . . .
Network Speed Call . . . . . . . . . . . . . . . . . . . . . . . . . . . . . . .
Routing control . . . . . . . . . . . . . . . . . . . . . . . . . . . . . . . . . . .
136
136
137
137
137
138
138
Using the Meridian 1 Attendant PC
Help Facility . . . . . . . . . . . . . . . . . . . . . . . . . . . . . . 139
About the Help facility . . . . . . . . . . . . . . . . . . . . . . . . . . . . . . . .
139
The Help menu . . . . . . . . . . . . . . . . . . . . . . . . . . . . . . . . . . . . .
139
Console Help F1 . . . . . . . . . . . . . . . . . . . . . . . . . . . . . . . . . . . .
Using the Contents tab . . . . . . . . . . . . . . . . . . . . . . . . . . . . .
Using the Index tab . . . . . . . . . . . . . . . . . . . . . . . . . . . . . . . .
Using the Find tab . . . . . . . . . . . . . . . . . . . . . . . . . . . . . . . . .
140
141
142
143
Using the Options menu . . . . . . . . . . . . . . . . . . . . . . . . . . . . . .
143
Accessing Glossary features . . . . . . . . . . . . . . . . . . . . . . . . . . .
About Meridian 1 Attendant PC software . . . . . . . . . . . . . . .
144
144
List of terms . . . . . . . . . . . . . . . . . . . . . . . . . . . . . . 145
P0891256 Standard 2.00
February 1999
xiv
Page xi of xiv
List of figures
Figure 1
Meridian 1 Attendant PC console display . . . . . . . . . . . . . . . . . .
2
Figure 2
Attendant PC Help Topics . . . . . . . . . . . . . . . . . . . . . . . . . . . . .
6
Figure 3
Attendant PC Help Index . . . . . . . . . . . . . . . . . . . . . . . . . . . . . .
7
Figure 4
Help Console window . . . . . . . . . . . . . . . . . . . . . . . . . . . . . . . .
8
Figure 5
Feature List display window . . . . . . . . . . . . . . . . . . . . . . . . . . . .
10
Figure 6
Virtual List display window . . . . . . . . . . . . . . . . . . . . . . . . . . . . .
17
Figure 7.
ICI specification window . . . . . . . . . . . . . . . . . . . . . . . . . . . . . . .
19
Figure 8
ICI Keys display window. . . . . . . . . . . . . . . . . . . . . . . . . . . . . . .
20
Figure 9
TGB specification window . . . . . . . . . . . . . . . . . . . . . . . . . . . . .
21
Figure 10
TGB Keys display window . . . . . . . . . . . . . . . . . . . . . . . . . . . . .
22
Figure 11
Sample Toolbox window . . . . . . . . . . . . . . . . . . . . . . . . . . . . . . .
24
Figure 12
CPLUS Directory dialog . . . . . . . . . . . . . . . . . . . . . . . . . . . . . . .
25
Meridian 1 Attendant PC Software User Guide
Page xii of xiv
List of figures
Figure 13
CPLUS Directory Look in display . . . . . . . . . . . . . . . . . . . . . . .
25
Figure 14
Directory console display . . . . . . . . . . . . . . . . . . . . . . . . . . . . .
27
Figure 15
Main Properties page . . . . . . . . . . . . . . . . . . . . . . . . . . . . . . . .
28
Figure 16
Directory mini-console and Directory default displays . . . . . . . .
28
Figure 17
Directory display window . . . . . . . . . . . . . . . . . . . . . . . . . . . . . .
29
Figure 18
General and Address tab displays . . . . . . . . . . . . . . . . . . . . . .
30
Figure 19
Columns display window . . . . . . . . . . . . . . . . . . . . . . . . . . . . .
31
Figure 20
User Data display window . . . . . . . . . . . . . . . . . . . . . . . . . . . . .
32
Figure 21
Info display window . . . . . . . . . . . . . . . . . . . . . . . . . . . . . . . . . .
33
Figure 22
Access display window . . . . . . . . . . . . . . . . . . . . . . . . . . . . . . .
34
Figure 23
Status display window . . . . . . . . . . . . . . . . . . . . . . . . . . . . . . . .
35
Figure 24
Export display window . . . . . . . . . . . . . . . . . . . . . . . . . . . . . . . .
36
Figure 25
Export Job display window . . . . . . . . . . . . . . . . . . . . . . . . . . . .
36
Figure 26
Import display window . . . . . . . . . . . . . . . . . . . . . . . . . . . . . . . .
37
Figure 27
Import Job display window. . . . . . . . . . . . . . . . . . . . . . . . . . . . .
37
Figure 28
Change DN display window . . . . . . . . . . . . . . . . . . . . . . . . . . .
38
P0891256 Standard 2.00
February 1999
List of figures
Page xiii of xiv
Figure 29
Search Directory display . . . . . . . . . . . . . . . . . . . . . . . . . . . . . . .
38
Figure 30
General tab display . . . . . . . . . . . . . . . . . . . . . . . . . . . . . . . . . . .
43
Figure 31
Hotkeys tab display . . . . . . . . . . . . . . . . . . . . . . . . . . . . . . . . . .
44
Figure 32
Consoles display windows . . . . . . . . . . . . . . . . . . . . . . . . . . . . .
45
Figure 33
Attendants display window . . . . . . . . . . . . . . . . . . . . . . . . . . . . .
46
Figure 34
Features display window . . . . . . . . . . . . . . . . . . . . . . . . . . . . . . .
48
Figure 35
Flex Keys display window . . . . . . . . . . . . . . . . . . . . . . . . . . . . . .
54
Figure 36
ICIs display window . . . . . . . . . . . . . . . . . . . . . . . . . . . . . . . . . .
55
Figure 37.
ICI specification window . . . . . . . . . . . . . . . . . . . . . . . . . . . . . . .
56
Figure 38
ICI Keys display window. . . . . . . . . . . . . . . . . . . . . . . . . . . . . . .
57
Figure 39
TGBs display window. . . . . . . . . . . . . . . . . . . . . . . . . . . . . . . . .
58
Figure 40
TGB specification window . . . . . . . . . . . . . . . . . . . . . . . . . . . . .
59
Figure 41
TGB Keys display window . . . . . . . . . . . . . . . . . . . . . . . . . . . . .
59
Figure 42
Alerter display window . . . . . . . . . . . . . . . . . . . . . . . . . . . . . . . .
60
Figure 43
Call Waiting display window . . . . . . . . . . . . . . . . . . . . . . . . . . . .
61
Figure 44
Handset display window . . . . . . . . . . . . . . . . . . . . . . . . . . . . . . .
62
Meridian 1 Attendant PC Software User Guide
Page xiv of xiv
List of figures
Figure 45
Relay display window . . . . . . . . . . . . . . . . . . . . . . . . . . . . . . . .
63
Figure 46
Diagnostics display window . . . . . . . . . . . . . . . . . . . . . . . . . . . .
64
Figure 47
COM Port display window . . . . . . . . . . . . . . . . . . . . . . . . . . . . .
65
Figure 48
Change Password display window . . . . . . . . . . . . . . . . . . . . . .
65
Figure 49
Console Help window . . . . . . . . . . . . . . . . . . . . . . . . . . . . . . . .
141
Figure 50
Contents tab window . . . . . . . . . . . . . . . . . . . . . . . . . . . . . . . . .
142
Figure 51
Index tab window . . . . . . . . . . . . . . . . . . . . . . . . . . . . . . . . . . . .
142
Figure 52
Find tab window . . . . . . . . . . . . . . . . . . . . . . . . . . . . . . . . . . . .
143
Figure 53
Glossary window . . . . . . . . . . . . . . . . . . . . . . . . . . . . . . . . . . . .
144
P0891256 Standard 2.00
February 1999
Page 1 of 160
Introducing the Meridian 1
Attendant PC
Welcome to the Meridian 1 Attendant PC software application.
The Attendant PC software allows you to perform attendant
console and call processing functions on a computer workstation
using a mouse pointing device or keyboard within a Windows 95®
or Windows NT® operating system environment.
About the Attendant PC
This user guide describes how to set up the Tools menu, configure
features, use the Attendant PC Help facility, do common call
processing tasks and points you to the exciting new features that
come with the Attendant PC software.
You can access the console functions by using the mouse to
activate:
— Loop keys
— Incoming Call Indicator (ICI) keys
— Trunk Group Busy (TGB) keys
— Fixed keys (Release, Hold, Answer, Rls Dst, CAS)
— Flexible feature keys
— Virtual feature keys
— Hotkeys
Meridian 1 Attendant PC Software User Guide
Page 2 of 160
Introducing the Meridian 1 Attendant PC
Starting the Attendant PC
When your Attendant PC software is installed and a shortcut is
created on your workstation desktop, simply double-click the icon
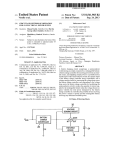
“Shortcut to console.exe” to launch Attendant PC (Figure 1
displays the Attendant PC main screen).
Figure 1
Meridian 1 Attendant PC console display
Program Menus
Mini-keypad
Directory
Two-line display
Status Indicator
Loop Keys
Position
Busy Button
and Lamp
Dialpad
Numbers
Loop keys
Fixed keys
P0891256 Standard 2.00
February 1999
Introducing the Meridian 1 Attendant PC
Page 3 of 160
Menus
Tools
Console
Config
The Attendant PC menus located in the upper left corner provide
access to many Attendant PC features. Each submenu that
follows introduces you to one of the following four menus:
— Tools
— Console
— Config
— Help
Help
Two-line display
There is a two-line display just above the Position Busy and
Attendant PC indicators. The first line displays information about
the source of a call. The second line displays information about the
extended call.
Source of call
Destination of call, trunk or
access codes
Position Busy
button
Release Destination
button
Centralized Attendant
Service button
Status Indicator
lamp
Position Busy indicator
Just above the keypad is a Position Busy indicator. Use this key to
prevent calls from being routed to your console. When you first
launch the Attendant PC, the Position Busy lamp is on. When all
Attendant PC workstations are in Position Busy, the system is
automatically put into Night mode. In Night mode, all incoming
calls are routed to a destination other than the Attendant PC. For
example, incoming calls can be routed to a recorded message.
Meridian 1 Attendant PC Software User Guide
Page 4 of 160
Introducing the Meridian 1 Attendant PC
Fixed keys
The Attendant PC fixed keys are described below:
— Click your mouse on Answer to connect to the current incoming
caller
— Click on Hold to put the current caller on hold so you can answer
another call or perform transferring or conferencing services
— Click on the Release key to disconnect the current calling party.
— Click Rls Dst to release a called party, unanswered ringing, busy
signal or an extension requesting a transfer.
— Click CAS to automatically reroute calls to a centralized
attendant at the main location.
Loop keys
Loop keys allow the attendant to answer and originate calls from
the Attendant PC.
There are six loop keys, numbered 0-5. There are two
half-diamonds next to each pickup key to indicate each loop’s
status for:
— Source: the half-diamond on the left gives status at the call’s
source
— Destination: the half-diamond on the right displays status at the
call’s destination
Lamp
Source
Destination
In either case, the half-diamond may be off, flashing, or steady on:
— Off: no activity is occurring on the line whose half-diamond is off
— Flashing: the caller is waiting to be connected, or their line is on
hold
— Steady on: the caller is connected to another party
— Steady red: the caller is busy
P0891256 Standard 2.00
February 1999
Introducing the Meridian 1 Attendant PC
Page 5 of 160
Incoming Call Indicator Keys
Incoming call indicators (ICI) indicate the type of call coming to
your console. The ICI keys help the attendant to
ICI key
•
identify the type of incoming calls queued
•
prioritize call answering
•
verify how many calls are in queue
•
determine how long calls have been waiting
To answer a call associated with an ICI key, click on the flashing
ICI lamp in the ICI List.
Trunk Group Busy keys
TGB key
Trunk Group Busy Keys (TGB) enable you to deny users access
to trunk groups and have calls to those trunk groups sent to your
console instead. The lamps show the status of each group of
trunks. You can create up to 20 trunk group busy (TGB) keys that
deny users access to one or more trunk groups from 0 to 9. Refer
to “The TGB tab” on page 58 for a detailed description of TGB
keys.The following indications display the status for each trunk
group:
Steady on: you busied out all trunks in the group by pressing the
TGB key.
Off: With the TGB lamp steadily lit, press the TGB key to turn the
indicator off and permit access to the trunk group.
Flashing: All trunks in the group are busy.
Meridian 1 Attendant PC Software User Guide
Page 6 of 160
Introducing the Meridian 1 Attendant PC
Placing a call
The Attendant PC supports four methods to dial in-house or
outside:
Dialpad numbers
— Use your mouse to click on the dialpad numbers shown on the
screen
— Use the numeric keypad on your PC’s
keyboard
Mini-keypad
— Drag and drop a highlighted telephone number into the
mini-keypad near the top left corner of the console display
— Drag and drop highlighted text into the Directory icon near the
top of the console display
Directory
For more information on call processing and feature activation,
refer to “Meridian 1 Attendant PC call processing” on page 67.
Using the Attendant PC online help
Help Menu
The onscreen Help provides information on using Attendant PC
features, configuring the PC console, and reference sections
which contains additional information such as a Glossary and
Troubleshooting.
Figure 2
Attendant PC Help Topics
P0891256 Standard 2.00
February 1999
Introducing the Meridian 1 Attendant PC
Page 7 of 160
This user guide includes many references to Help. Many sections
in the manual contain a table like the one shown below that lists
Help keywords for you to search on in the Help index. This way,
we can provide the details when you need them and where you
need them: while you are administering to the typical operation of
the Attendant PC.
To learn about...
Search the Help Index for...
adding a new operator
new operator
adjusting the sound volume
volume
For more information on using Attendant PC online help, refer to
“Using the Meridian 1 Attendant PC Help Facility” on page 139.
Using the Help Index feature
To locate information quickly, choose Index from the Help menu.
Figure 3
Attendant PC Help Index
Meridian 1 Attendant PC Software User Guide
Page 8 of 160
Introducing the Meridian 1 Attendant PC
Exploring the Help Console
To locate comprehensive console information, use either the Help
Contents, Find, and or Glossary functions.
Figure 4
Help Console window
Click on Glossary for a
list of Meridian 1 console
terms.
Click Help Topics to
display the Help
P0891256 Standard 2.00
February 1999
Page 9 of 160
Working with the Tools menu
The Tools menu represents an important work area on the
Attendant PC desktop as shown in Figure 5. This is where you
transact, administer and set up the fundamental call processing
activities. It is also a unified work area for making decisions on
how to process or route a call.
The Tools menu contains the following eight submenus:
Directory: Contains directory names, telephone numbers, and
other access information for you to use as needed.
Feature List: Lists the features you selected from the Meridian 1
Attendant PC Config menu. These features are accessible to you
because they were programmed in advance on the Meridian 1
switch.
Directory
Feature
List
ICI
List
ICI List: Lists the ICI (Incoming Call Indication) keys that are
available to you because they are programmed on your Meridian
1.
TGB List: Trunk Group Busy keys that are accessible to you.
TGB List
ToolBox
ToolBox: Contains features, ICIs, and TGB keys that you have
customized to administer the PC Attendant console activities.
CPLUS Directory: Enables you to upload CPLUS directory files
from a diskette.
Log off: Logs you out of the Attendant PC console.
Exit: Quits the Meridian 1 Attendant PC software program.
Meridian 1 Attendant PC Software User Guide
Page 10 of 160
Working with the Tools menu
Using the Feature List
The Feature List contains fixed features that are programmed by
your system administrator. To display these features, select
Feature List from the Tools menu. A window displays (Figure 5)
listing the features accessible to your Meridian 1 Attendant PC
console.)
To activate a feature, double-click on the feature in the Feature
List.
Figure 5
Feature List display window
Tip
Use the View menu to
display features as large
or small icons, or in a list
as shown in this figure.
Fixed
Features
Tip
You can also use the
and
fixed feature buttons on the
console to reroute and release
calls.
Fixed
Features
P0891256 Standard 2.00
February 1999
Working with the Tools menu
Page 11 of 160
Fixed features
Fixed features are standard in all Attendant PC workstations and
cannot be edited or removed. The thirteen fixed features shown in
Figure 5 are:
— Alarm
— Centralized Attendant Service
— Call Waiting
— Conferencee
— Exclude Destination
— Exclude Source
— Make Set Busy
— Night Service
— Release
— Release Destination
— Release Source
— Signal Destination
— Signal Source
Flexible features
Flexible features are created when they meet the needs of the
business they serve. A flexible feature is assigned by a system
administrator and given a key label and definition in the Attendant
PC software.
Before a flexible feature may be accessed from the Feature List, it
must be configured under the Flex Keys tab. To configure a
flexible feature to appear in the Feature List:
1 Select Console Configuration from the Configuration menu.
2 Click the Flex Keys tab.
3 Pull-down on one of the available Flex Keys and select the desired
feature.
Meridian 1 Attendant PC Software User Guide
Page 12 of 160
Working with the Tools menu
Virtual features
Virtual feature keys allow you to consolidate multiple key strokes
into one keystroke. Virtual features (Figure 6) are created using
the Features tab in the Console Configuration menu.
For example, today using the M2250 Attendant Console, if you
want to place a call to a pager, several key presses are required:
•
select a loop key
•
dial the pager number
•
pause 2 seconds
•
press End-to-End Signalling key
•
input your return number
•
end with a # key
•
press Release
Creating a Virtual Feature for the above functions allows you to
execute the functions with a single keystroke.
To create a Virtual Feature key:
1 Choose Console Configuration from the Configuration menu.
2 Select the Features tab.
3 Click New.
P0891256 Standard 2.00
February 1999
Working with the Tools menu
Page 13 of 160
4 Complete the following information:
•
Type a description of the feature in the Feature Description text
box.
•
Type the label that is to appear on the console in the Key Label
text box.
•
Select Virtual in the Type group box.
5 Click Processing.
Meridian 1 Attendant PC Software User Guide
Page 14 of 160
Working with the Tools menu
6 Select the steps that make up the virtual feature.
Highlight the appropriate processing steps in the Available
Processing Steps list box and click Add. The steps appear in the
Selected list box. Use the Remove button and the Arrow buttons to edit
the Selected list box.
P0891256 Standard 2.00
February 1999
Working with the Tools menu
Page 15 of 160
7 Define each step in the Selected list box that requires a flexible key,
an ICI key, or a number to be dialed.
• To assign flexible keys for the steps, click Flex Select. For
each step entitled “Press a flexible feature key,” select the
appropriate flexible key from the Key list box. When all flexible
keys have been assigned for the required steps, click OK.
• To assign ICI keys, click ICI Select. For each step entitled
“Press an ICI key,” select the appropriate ICI key from the Key
list box. When all ICI keys have been assigned for the required
steps, click OK.
Meridian 1 Attendant PC Software User Guide
Page 16 of 160
Working with the Tools menu
• To assign phone numbers, click Dial Number. For each step
entitled “Dial a number (Static),” enter the number to be dialed.
When all numbers have been entered for the required steps,
click OK.
8 Click OK.
P0891256 Standard 2.00
February 1999
Working with the Tools menu
Page 17 of 160
To use the Virtual Feature, locate and double-click the light-blue
shaded Virtual Feature from the Feature List.
Note: Definitions for all features, as well as ICI’s (Incoming Call
Indicators) and TGB’s (Trunk Group Busy keys), are provided in
the section “List of Terms” and also in the Glossary and other help
screens on the Console.
Figure 6
Virtual List display window
Virtual
Features
Meridian 1 Attendant PC Software User Guide
Page 18 of 160
Working with the Tools menu
Using the ICI List
The ICI List contains the ICI (Incoming Call Indicator) keys. The
ICI keys will help you to:
Lamp
Source
•
identify the type of incoming calls queued
•
prioritize call answering
•
verify how many calls are in queue
•
determine how long calls have been waiting
To answer a call associated with an ICI key, click on the flashing
ICI lamp in the ICI List.
Destination
ICI Lists
You can answer call using the loop keys, or you can give
preference to a certain type of call, using the ICI keys. For
example, to answer a WATS call before you answer the other
calls, click the WATS ICI key. All other ICI indicators go off, and
the WATS call is established.
Besides telling you the nature of a call, the ICI indicator also gives
you an idea of the number of calls of that type that are queued and
how long the calls have been queued:
Use the ICIs tab in the
Console Configuration
menu to assign a
specific ICI for display in
the ICI list.
ICIs tab
— steady on — One call has been queued for less than 20
seconds.
— flashing — Two or more calls are queued, or one call has been
queued for more than 20 seconds.
ICIs are programmed by the system administrator then assigned
to a key in the console. The software displays this list when you
select the ICI List from the Console Configuration menu.
Note: You can also drag ICI keys from the ICI List and drop them
into your personal Toolbox.
P0891256 Standard 2.00
February 1999
Working with the Tools menu
Page 19 of 160
Adding an ICI key
The following procedure describes how to add an ICI key.
1 Click New to bring up the popup dialog shown in Figure 7.
Figure 7.
ICI specification window
Tip
The path and location
of the default directory
where the target WAV
files reside are shown
as:
Click Help for detailed
information on ICI specifications.
Click the Play button to hear
the selected default sound.
2 Define a new ICI Description, Key Label and path to the location of the
default WAV file designated for audible signalling.
ICIs List
3 Click OK to save the ICI key.
The key label entry you created is now displayed on the ICI list that you
selected from the Tools menu.
4 Now, (while still in the ICIs window) click the ICI Keys tab to associate
a new ICI key with each number (0-19) as described in “The ICI Keys
tab” on page 57.
5 Click OK to save the ICI key.
6 Select the “ICI List” from the Tools Menu to see the new oval-shaped
“button” associated with the ICI key assignment you just made. You
can see a sample “ICI List” in Figure 8 on page 20.
Meridian 1 Attendant PC Software User Guide
Page 20 of 160
Working with the Tools menu
Using the ICI Keys page
ICI Keys tab
Figure 8 displays the ICI Keys window on which you can pair up to
twenty ICI’s with one of the key numbers (just three ICI keys are
defined in this sample window).
To view the “ICI Keys” display bar, click the
key with each number (0-19).
to associate an ICI
Select the “ICI List” from the Tools Menu to see the new
oval-shaped “button” associated with the ICI key assignment you
just made.
Figure 8
ICI Keys display window.
Lists the ICIs that have
been assigned using
the New button.
Click, then select a number choice
to associate an ICI key assignment.
.
Click Help on how to assign ICI Keys
to the ICI Feature List.
P0891256 Standard 2.00
February 1999
Working with the Tools menu
Page 21 of 160
Using the TGB keys
TGBs (Trunk Group Busy) keys allow you to quickly and easily:
•
determine if all trunks in a route or trunk group are busy
•
busy out particular routes to outgoing calls
•
deny certain users direct access to trunk groups
The button lamps in the TGB List show the status of each group of
trunks. To activate a TGB key, click on the TGB lamp in the TGB
List. TGB keys are programmed by the system administrator.
Note: You can also drag TGB keys from the TGB List and drop
them into your personal Toolbox.
Adding a TGB key
1 Click New to bring up the popup dialog shown in Figure 9.
TGBs List
2 Define a new TGB Description and Key Label.
3 Click OK to save the TGB key.
The key label entry you created is now displayed in the TGB list that
you select from the Tools menu.
Figure 9
TGB specification window
Lists the TGBs that
have been assigned
using the New button.
TGB Keys tab
Click Help for detailed
information on TGB specifications.
4 While still in the TGBs window click the TGB Keys tab to associate a
new TGB key with each number (0-19) as described for “TGB keys” on
page 58.
Meridian 1 Attendant PC Software User Guide
Page 22 of 160
Working with the Tools menu
Figure 10
TGB Keys display window
Select a number choice to
associate a TGB key
assignment.
Click Help on how to add TGB Keys.
.
5 Click OK to save the TGB key.
6 Select the “TGBI List” from the Tools Menu to see the new
shaped “button” associated with the TGB key assignment you just
made.
P0891256 Standard 2.00
February 1999
Working with the Tools menu
Page 23 of 160
Building a ToolBox
The Attendant PC ToolBox, allows you to store the features that
you use the most in one window. Once you build a toolbox, you no
longer need to display the ICI and TGB directory windows except
as needed. All features (fixed, flexible, and virtual) are now
available to you in one central display window (Figure 11) instead
of three.
Each attendant’s toolbox is personalized. When an attendant logs
in, no matter which console is being used, the attendant’s toolbox
appears with the appropriate features.
To build your toolbox, you will drag and drop features from the
Feature List, ICI (Incoming Call Indicators) List, and TGB (Trunk
Group Busy) List windows into the Toolbox window.
7 Choose Toolbox from the Tools menu.
An empty Toolbox window is displayed on your desktop.
8 Select Feature List from Tools on the Attendant PC main screen.
The Feature List window appears on your desktop.
9 Select ICI List from Tools on the main screen.
The ICI List window appears on your desktop.
10 Select TGB List from Tools on the main screen.
The TGB List window appears on your desktop.
11 Drag and drop the features you use the most from the Feature List
window to the Toolbox window (see Figure 11 on page 24).
12 Repeat step 3 for the ICI List keys and the TGB List key.
Meridian 1 Attendant PC Software User Guide
Page 24 of 160
Working with the Tools menu
Figure 11
Sample Toolbox window
Tip
TGB List
You can resize or expand
the bottom edge and sides
of the Toolbox window with
the mouse to enlarge it in
order to list more features
and keys.
Feature List
ICI List
P0891256 Standard 2.00
February 1999
Working with the Tools menu
Page 25 of 160
Accessing the CPLUS Directory
The following procedure shows you how to use the CPLUS
Directory function to access CPLUSDIR.BTR directory numbers
from a diskette for uploading into the Meridian 1 Attendant PC
Data folder for transfer to your personal Directory.
1 Select CPLUS Directory from the Tools menu.
A dialog displays prompting you that the CPLUS directory file
CPLUSDIR.BTR cannot be found (Figure 12).
Figure 12
CPLUS Directory dialog
2 Click Yes to locate the CPLUS file.
The CPLUS Directory “Look in” window is displayed (Figure 13).
3 Click the
to display the 31/2 Floppy (A:) drive icon.
Figure 13
CPLUS Directory Look in display
Tip
Click here to access the
drop down devices
window.
Drag and drop a directory
entry to the
icon to
dial a user’s number
4 Select the CPLUSDIR.BTR file and click Open.
automatically.
The CPLUSDIR.BTR file is uploaded to the Meridian 1 Attendant PC
Data folder
Meridian 1 Attendant PC Software User Guide
Page 26 of 160
Working with the Tools menu
Using the Directory
The Directory is a principal component of the Tools menu. All
Attendant PC call processing activity is initiated from this key
resource. The Directory also records individual records for fast
information retrieval.
Overall, the Directory functions as a “mini console” containing a
two-line display, Position Busy, Rls Dst, CAS buttons,
Mini-keypad, and Directory icons and Directory Help facility
(Figure 14). You can also assign “hot keys” to one or more keys to
activate a specific function if you prefer using keyboard shortcuts
(see“The Hotkeys tab” on page 44).
Note: The Directory console functions just like the main console
except there is no global console Help, dialpad numbers or
loopkeys which allow you to assign an outgoing call or answer an
incoming call.
P0891256 Standard 2.00
February 1999
Working with the Tools menu
Page 27 of 160
Figure 14
Directory console display
Mini-keypad
Directory
Use the Rls Dst button to
release a called party,
unanswered ringing, busy
signal or an extension
requesting a transfer.
Position
Busy
Status
indicator
Use the CAS button to
automatically reroute calls
to a centralized attendant at
the main location.
Status Indicator
Position Busy
button
Release Destination
button
Centralized Attendant
Service button
Starting the Directory
You can launch the Directory in two modes—with the mini-console
attached or with the default Directory List only.
The following procedure shows you how to enable the
mini-console option.
1 Select the Tools menu and click Directory.
2 Click the Directory menu and Properties to display the Directory
Properties page (Figure 15).
3 Check the box labelled “Include console functions”.
4 Click OK.
The Directory with attached mini-console is displayed on your
workstation desktop.
Meridian 1 Attendant PC Software User Guide
Page 28 of 160
Working with the Tools menu
Figure 15
Main Properties page
Indicate a
in the box
to “Include console
functions” to launch the
directory console.
Click the Help button to open a book or use
the Index tab to locate information on settin
up the directory display.
Note: Leave the box labelled “Include console functions” unchecked
to display the Directory without the mini-console option
(Figure 15).
Figure 16
Directory mini-console and Directory default displays
Tip
You can assign “hot
keys” to one or more
keys to activate a
specific function if you
prefer using keyboard
shortcuts (see“The
(se).
Hotkeys tab” on
page 44).
Directory with mini-console option
P0891256 Standard 2.00
February 1999
Default Directory
Working with the Tools menu
Page 29 of 160
Creating a Directory entry
A Directory entry or “row” listed in the work area of the Directory
window (Figure 17) relates to a record for that entry. Each record
defines a profile which is contained within the following two tabs:
General tab
— Extension - DN
— Last and First Name and Title
— Access Code
— Status
Address tab
— Street Address
— City
— State
— Postal Code (Zip)
To obtain help at any time on “Getting Started” and “Using the
Directory”, click on Contents in the Directory Help facility.
Note: You can browse a view of the Directory Window by
pressing the F1 key.
The following procedure shows you how to create a directory
entry.
1 Select Directory from the Console’s Tools menu (Figure 17).
Tip
To see additional details
on an entry, double click
the text information in
the entry.
Figure 17
Directory display window
Tip
Double click the
icon or drag
and drop an entry on the
to dial a user’s number
automatically.
icon
Meridian 1 Attendant PC Software User Guide
Page 30 of 160
Working with the Tools menu
2 Click on Directory to select the New page.
Here is where you enter General information for each person you want
listed in your directory (Figure 18).
3 Click the Address tab to provide profile information for each personal
entry.
Figure 18
General and Address tab displays
After supplying the appropriate information for both General and
Address pages:
4 Click Apply and then OK.
The new entry is displayed in the Directory window.
The following procedures shows you how to set the properties for
an entry in the Directory window.
Setting the Directory properties
1 Click Directory to select Properties.
The Directory Properties page displays five tabs that allows you to:
P0891256 Standard 2.00
February 1999
Working with the Tools menu
Page 31 of 160
Specify the columns (Figure 19) that appear on your directory
display screen and in what order they should appear:
2
Tip
Click Columns.
Figure 19
Columns display window
Double click on a column
item to move it quickly
between “not displayed”
to “displayed” areas.
These Help topics
contain green
underlined text. You can
click the green text to see
descriptions for setting,
positioning, and
removing columns.
Click the Help button to see instructions f
setting up the directory display.
The User Data tab (Figure 19) allows you to label custom columns.
Column labels that you type here appear on the Columns tab,
where they can be selected to display in the Directory window.
Note: Custom columns can be used to order the directory. For
example, if you label a column “Site” and display the column in the
Directory window, clicking on the column label for Site arranges
the directory by site in ascending alphabetical order.
The following procedure shows you how to label custom columns
for display in the Directory window:
Meridian 1 Attendant PC Software User Guide
Page 32 of 160
Working with the Tools menu
Labeling Custom Columns
1 Click User Data (Figure 20).
Figure 20
User Data display window
The Directory contains two user
definable columns. Enter a short,
one or two word label for these
columns.
Click the Help button to see information on
labelling custom columns.
2 Click Apply and then OK.
Use the Info tab (Figure 21) to label tabs for storing additional
information on directory entries. You can label from 1-14 tabs. For
each label you enter, a tab appears in the Directory Entry window.
P0891256 Standard 2.00
February 1999
Working with the Tools menu
Page 33 of 160
Labeling tabs for the Directory
The following procedure shows you how to label tabs so they
appear in the Directory entry window:
1 Click Info.
Figure 21
Info display window
Click the Help button to see information on
creating label tabs.
2 Click Apply and then OK.
Meridian 1 Attendant PC Software User Guide
Page 34 of 160
Working with the Tools menu
Access Codes (Figure 22) are one or more digit(s) that are dialed
by a console within the telephone system prior to dialing an
outside call. These codes determine access to features and trunk
facilities so that the Meridian 1 Attendant PC can route calls
correctly.
The following procedure shows how to define the access codes for
dialing outside numbers.
Defining access codes
1 Click Access Codes.
Figure 22
Access display window
If the access number must have Touch
Tone DTMF, include a T immediately
before and after the portion that
requires the tones.
These digits make up the
access code.
Valid characters include:
0-9, T, and comma (,). All
other characters are
ignored.
Click the Help button to see information on
creating label tabs.
Add New Access Code
Prompts you for the new access code
for an entry.
Delete an Access Code
Click the Delete button to remove
a selected access code.
2 Click Apply and then OK.
P0891256 Standard 2.00
February 1999
Working with the Tools menu
Page 35 of 160
Creating a status code
Status Codes (Figure 23) provide information about the user or the
extension. The status codes can be selected for an entry and
displayed in the Directory window.
The following procedure shows how to create status codes for a
selected entry:
1 Click Status Codes.
Figure 23
Status display window
A word or short phrase
that identifies the status
such as Vacation or In.
A brief description that
explains what the status
means.
These Help topics contain green
underlined text. You can click the
green text to see descriptions for
creating and assigning status codes
to a user.
Add New Status Code
Prompts you for the new status code
for an entry.
Delete a Status Code
Click the Delete button to remove
the selected status code.
2 Click Apply and then OK.
Meridian 1 Attendant PC Software User Guide
Page 36 of 160
Working with the Tools menu
Exporting Directory dialing numbers
The following procedure shows you how to export Directory
sources.
1 Click Directory to select Export (Figure 24).
2 Click New to enter a name for the new export job.
Figure 24
Export display window
Click Edit (Figure 24) to modify file
information and columns for the exported
directory job.
Tip
Click the Help button to
see information on
Exporting jobs using the
Contents, Index, and
Find tabs.
Click Delete to remove an export
directory job.
The Export Job window displays (Figure 25).
Figure 25
Export Job display window
Indicate File Information (default is
Comma Separated) and Output File
Name or location of the export job.
Tip
Double click on a
column item to move it
quickly between “not
displayed” to
“displayed” areas.
Select the columns you want
included in the export file.
3 Click OK.
P0891256 Standard 2.00
February 1999
Working with the Tools menu
Page 37 of 160
Importing Directory dialing numbers
The following procedure shows you how to import Directory
sources.
1 Click Directory to select Import (Figure 26).
2 Click New to enter a name for the new import job.
Figure 26
Import display window
Tip
Click Edit (Figure 24) to modify file
information and columns for the imported
directory job.
Click the Help button to
see information on
Importing jobs using
the Contents, Index,
and Find tabs.
Click Delete to remove an import
directory job.
The Import Job window displays (Figure 27).
Figure 27
Import Job display window.
Indicate File Information (default is
Comma Separated) and Output
File Name or location of the import
job.
Tip
Double click on a
column item to move it
quickly between “not
displayed” to
“displayed” areas.
Select the columns you want
included in the import file.
3 Click OK.
Meridian 1 Attendant PC Software User Guide
Page 38 of 160
Working with the Tools menu
Changing a directory number (DN)
The Change DN function enables you to quickly access and
transfer a directory entry to a new directory number as shown in
Figure 28.
The following procedure shows you how to change an existing
directory number.
1 Click Directory to select Change DN.
The Change DN dialog box is displayed (Figure 28).
Figure 28
Change DN display window
Indicate the new DN (dialing number) for a direct
entry. All directory information is transferred
to the new DN.
Click the Help button to see Help Topics on
changing the DN using the Contents, Index,
and Find tabs.
2 Click OK.
Searching the directory
Use the Search Directory function to locate directory entries by
name or directory number (Figure 29).
Figure 29
Search Directory display
Indicate a name, first or last, or
DN and click OK to start the
search process.
P0891256 Standard 2.00
February 1999
Working with the Tools menu
Page 39 of 160
Logging off the Attendant PC
Use the Log off function when you are ready to end your time at
the console. All of your personal console settings such as the
ToolBox, Directory and customized features (lists) are
automatically saved.
For further information on any of the Tools topics discussed in this
section, consult the Help Facility to locate the following tabular
subjects:
To learn about...
Search the Help Index for...
Setting up the directory
display
dial
Ordering entries in the
directory
dialing a number
Searching the directory
column label
Assign a status code
status
Dialing out
dial
Building a Toolbox
toolbox
Meridian 1 Attendant PC Software User Guide
Page 40 of 160
Working with the Tools menu
P0891256 Standard 2.00
February 1999
Page 41 of 160
Working with the Config menu
This section describes how to set up your Meridian 1 Attendant PC
console, discusses considerations that affect how you configure
your console and presents a series of step-by-step procedures
designed to familiarize you with the fundamental aspects of
configuring your console.
The Config menu displays four commands:
— Console Configuration
Lets you set up your Virtual Features, ICI, and TGB keys.
— Interface Properties
Lets you specify voice volume, call waiting, handset, relay and
diagnostic characteristics.
— Configure Port
Enables you to select a COM port for the Meridian 1 Attendant
PC.
— Change Password
Permits you to set passwords for multiple attendants.
Meridian 1 Attendant PC Software User Guide
Page 42 of 160
Working with the Config menu
Console Configuration
When you select Console Configuration, Attendant PC displays
the following tabs:
•
General
• Flex keys
•
ICI
• Hotkeys
•
ICI keys
• Consoles
•
TGB
• Attendants
•
TGB keys
• Features
The General tab
Within the General tab, the system administrator or attendant
must provide a response to each of the following items listed on
the General page (Figure 30). This ensures that your console is
fully configured. All items except the password (optional) must be
supplied:
— Access number for Express Mail
— Click the checkbox if a password is required to operate the
Meridian 1 Attendant PC
— Indicate the location and name of the default WAV file for
audible signaling
Tip
Requires an assigned
access number
assignment before the mail
tool can be displayed on
the main console display.
— Indicate the pause length, in milliseconds; the duration of a
delay that is generated when a comma appears in a typed-in
number for dialing.
Make sure that End-to-End
Signalling (EES) is defined
as a flexible feature.
Select the location and
WAV file for audible
signalling by opening the
folder icon.
P0891256 Standard 2.00
February 1999
Working with the Config menu
Page 43 of 160
Figure 30
General tab display
Click the Play button to hea
the selected default sound.
Tip
Click the Help button to see a lis
general configuration options.
Feature List
The following procedure shows you how to configure the Voice
Mail icon.
1 First, ensure that End-to-End Signaling (EES) is set up as a flexible
feature by verifying it is listed in the Feature List under the Tools menu.
2 Choose Console Configuration... under the Config menu.
3 Select the General tab.
4 Type the access number for Express Mail in the appropriate text box.
Meridian 1 Attendant PC Software User Guide
Page 44 of 160
Working with the Config menu
The Hotkeys tab
Hotkeys allow you to assign shortcut keyboard commands to
commonly performed tasks. To create a hotkey:
1 Select Console Configuration from the Configuration menu.
2 Select the Hotkeys tab.
Hotkeys tab
3 Select a task from the Hotkey Activities window (see Figure 31).
4 Select New Hotkey.
5 Type the new hotkey shortcut. To select a two or three key
combination hotkey press and hold one or more of the Alt, Ctrl, and Shift
keys then press the desired hotkey.
6 Click OK to exit.
Figure 31
Hotkeys tab display
Activities hotkey
List box
P0891256 Standard 2.00
February 1999
Working with the Config menu
Page 45 of 160
Note: There are a few keys that, although valid, are probably not
good choices for hotkey assignments. These would include the F1
key, single key hotkeys that are numbers, and other keys that you
would normally use in the day to day operation of your console. A
two key combination such as Alt+H is always preferable to a single
key such as H.
The Consoles tab
The Consoles tab (Figure 32) is where you register the Attendant
PC console software and define the WAV file used for audible
signalling by entering the following:
— Console’s serial number — Full name of the console
— Name of WAV file designated for audible signalling
Tip
We encourage you to
register your Meridian 1
Attendant PC application
by telephone as soon as
you have installed the
software.
Select the location and
WAV file for audible
signalling by opening the
Figure 32
Consoles display windows
Click the Play button to hear
the selected default sound.
folder icon.
Click Register to display the
Console Registration form.
Click Register to display the Console Registration window. Provide
the registration code and note your company’s name, address,
installation code, and serial number before you telephone the
software manufacturer.
Meridian 1 Attendant PC Software User Guide
Page 46 of 160
Working with the Config menu
The Attendants tab
The Attendants tab (Figure 33) displays a security page that
allows privileges to each person identified by role and full name. A
indicates specific access rights for individual user profiles.
Figure 33
Attendants display window
Tip
Click the Help button to see a list of
Attendant properties and descriptions.
Click each level of access
rights for a new or existing
attendant.
To add an additional
attendant, click New. A
“New Attendant” dialog box
is displayed as shown
below. The user name is
limited to 20 characters.
Add New Attendant
Prompts you for the new attendants name
or user ID.
New Attendant Password
You can assign a password for each new
attendant. Assigning a password is optional.
Delete New Attendant
Click the Delete button to remove an attendant
from the list of identified attendant users.
P0891256 Standard 2.00
February 1999
Working with the Config menu
Page 47 of 160
The Features tab
The Features tab displays the following flexible features that are
programmed in advance by the system administrator:
— Auto Dial
— Automatic Wake-Up
— Barge-In
— Break-In
— Busy Verify
— Call Park
— Calling Party Number
— Charge Account
— Controlled Class of
Service
— DID Route Control
— Display Calls Waiting
— Display Destination
— Display Source
— Do-Not-Disturb
Group/Individual
— Malicious Call Trace
— Message Cancellation
— Message Indication
— Meter
— Paging
— Routing Control
— Speed Call Controller
— System Speed Call Controller
— Stored Number Redial
Adding a flexible feature
1 Make a list of up to twenty features you would like on your Attendant
PC Console.
Note: Every preferred feature must be programmed in
advance on your Meridian 1 for use from your PC workstation
display.
After you have defined
your feature key and
click OK, your new
feature is displayed in
the features list.
2 Select Features to access the Features script page. The Features
page is shown in Figure 34.
3 A page is displayed with blank areas for entering the feature
description, key label, and type (“Virtual” or “Flexible Feature
Key-Meridian 1”).
Meridian 1 Attendant PC Software User Guide
Page 48 of 160
Working with the Config menu
Figure 34
Features display window
Click Edit to modify a flexible
key feature assignment.
Click Remove to delete a flexible
key feature assignment.
Click Help for detailed instructions
on adding a new feature.
4 Click OK. Your feature is now displayed on:
— the Features page of the Console Configuration menu,
shown above in (Figure 34)
— the Flex Keys list, shown in Figure 34.
Note: Many of these features described in later sections of this
guide are defined briefly in the section “List of terms” on page 145.
Creating Virtual feature keys
One of the key benefits of the Attendant PC is the ability to create
Virtual (or customized) Features to consolidate multiple
keystrokes into one keystroke.
P0891256 Standard 2.00
February 1999
Working with the Config menu
Page 49 of 160
For example, today using the M2250 Attendant Console, if you
want to place a call to a pager, several key presses are required:
•
select a loop key
•
dial the pager number
•
pause 2 seconds
•
press End-to-End Signalling key
•
input your return number
•
end with a # key
•
press Release
Creating a Virtual Feature for the above functions allows you to
execute the functions with a single keystroke.
To create a Virtual Feature key:
1 Choose Console Configuration from the Configuration menu.
2 Select the Features tab.
3 Click New.
Meridian 1 Attendant PC Software User Guide
Page 50 of 160
Working with the Config menu
4 Complete the following information:
•
Type a description of the feature in the Feature Description text
box.
•
Type the label that is to appear on the console in the Key Label
text box.
•
Select Virtual in the Type group box.
5 Click Processing.
P0891256 Standard 2.00
February 1999
Working with the Config menu
Page 51 of 160
6 Select the steps that make up the virtual feature.
Highlight the appropriate processing steps in the Available
Processing Steps list box and click Add. The steps appear in the
Selected list box. Use the Remove button and the Arrow buttons to edit
the Selected list box.
Meridian 1 Attendant PC Software User Guide
Page 52 of 160
Working with the Config menu
7 Define each step in the Selected list box that requires a flexible key,
an ICI key, or a number to be dialed.
• To assign flexible keys for the steps, click Flex Select. For
each step entitled “Press a flexible feature key,” select the
appropriate flexible key from the Key list box. When all flexible
keys have been assigned for the required steps, click OK.
• To assign ICI keys, click ICI Select. For each step entitled
“Press an ICI key,” select the appropriate ICI key from the Key
list box. When all ICI keys have been assigned for the required
steps, click OK.
P0891256 Standard 2.00
February 1999
Working with the Config menu
Page 53 of 160
• To assign phone numbers, click Dial Number. For each step
entitled “Dial a number (Static),” enter the number to be dialed.
When all numbers have been entered for the required steps,
click OK.
8 Click OK.
To use the Virtual Feature, locate and double-click the light-blue
shaded Virtual Feature from the Feature List.
Meridian 1 Attendant PC Software User Guide
Page 54 of 160
Working with the Config menu
The Flex Keys tab
You can assign features called “Flexible Features” to Flex Keys
which enable you to access flexible features quickly. An example
of the Flex Keys window is shown in Figure 35.
1 Click the
button to access the pull-down menu that displays one
Flexible Feature chosen by you for each key number.
The Flexible Features defined here have been predefined in advance by
systems staff for the Meridian 1.
Figure 35
Flex Keys display window
Assign a flexible
feature to a flex key
number and click OK.
.
Click Help on how to assign Flex Keys
to the PC console screen.
.
To view the key or lamp that you will use to activate the feature:
2 Select Feature List from the Console screen’s Tools menu
The new feature is displayed as a light blue lamp symbol in the Features List
window (Figure 34).
P0891256 Standard 2.00
February 1999
Working with the Config menu
Page 55 of 160
The ICI tab
Adding an ICI key enables you to create labels and edit some
features of ICIs. ICIs are designated in the Meridian 1 by systems
staff, then assigned to a key in the console. The software displays
this list when you select the ICI’s List from the Console
Configuration menu.The following procedure shows you how to list
the ICI features that are available on your Meridian 1. An example
of an ICIs window is shown below in Figure 36. The available ICI
keys are:
— Dial “0”
— Call Forward No Answer; Call
Forward Busy
— Intercept
— Interpositional Call
— Listed Directory Number — LD0 (local line 0), LD1
— Message Center
— Recall
— TIE, WATS
— Fx (Foreign Exchange)
Figure 36
ICIs display window
Lists the ICIs that have
been created using the
New button.
Click New to create an ICI description,
Key Label and path to the location
of the WAV file designated for audible
signalling.
Click Edit to modify a new or existing
ICI description.
Click Remove to delete an ICI
key description.
.
Click Help on how to assign ICI Keys
to the ICI Feature List.
Note: ICI2 must be defined in your Meridian 1 in order to assign
ICI keys 10-19. For further information regarding ICI2, consult
your system administrator.
Meridian 1 Attendant PC Software User Guide
Page 56 of 160
Working with the Config menu
The following procedure shows you how to add an ICI key.
Adding an ICI key
1 Click New to bring up the popup dialog shown in Figure 37.
Figure 37.
ICI specification window
Tip
The path and location
of the default directory
where the target WAV
files reside are shown
as:
Click Help for detailed
information on ICI specifications.
Click the Play button to hear
the selected default sound.
2 Define a new ICI Description, Key Label and path to the location of the
default WAV file designated for audible signalling.
ICIs List
3 Click OK to save the ICI key.
The key label entry you created is now displayed on the ICI list that you
selected from the Tools menu.
4 Now, (while still in the ICIs window) click the ICI Keys tab to assõciate
a new ICI key with each number (0-19) as described earlier for “Flex keys”
on page 54.
5 Click OK to save the ICI key.
6 Select the “ICI List” from the Tools Menu to see the new oval-shaped
“button” associated wit•the ICI key assignment you just made. You can
see a sample “ICI List” in Figure 38 on page 57.
P0891256 Standard 2.00
February 1999
Working with the Config menu
Page 57 of 160
The ICI Keys tab
Figure 38 displays the ICI Keys window on which you can pair up
to twenty ICI’s with one of the key numbers (just two ICI keys are
defined in this sample window).
To view the “ICI Keys” display bar, click the
key with each number (0-19).
to associate an ICI
Select the “ICI List” from the Tools Menu to see the new
oval-shaped “button” associated with the ICI key assignment you
just made.
Figure 38
ICI Keys display window.
Lists the TGBs that
have been assigned
using the New button.
Click, then select a number choice
to associate an ICI key assignment.
.
Click Help on how to assign ICI Keys
to the ICI Feature List.
Meridian 1 Attendant PC Software User Guide
Page 58 of 160
Working with the Config menu
The TGB tab
TGBs (Trunk Group Busy) keys enable you to deny users access
to trunk groups and have calls to those trunk groups sent to your
console instead. The lamps in the TGB list window show the status
of each group of trunks. You can create up to 10 trunk group busy
(TGB) keys that deny users access to one or more trunk groups
from 0 to 9. An example of the TGBs window is shown below in
Figure 39.
Figure 39
TGBs display window.
Click New to create a TGB description
and Key Label.
Lists the TGBs that
have been created
.
using the New button.
Click Edit to modify a new or existing
TGB description.
Click Remove to delete an TGB
key description.
Click Help on how to add a new TGB
.key to the console.
Note: The customer data block (CDB) must be configured for
ICI2 to use TGB keys.
The following procedure shows you how to add a TGB key.
Adding a TGB key
TGBs List
1 Click New to bring up the popup dialog shown in Figure 40.
2 Define a new TGB Description and Key Label.
3 Click OK to save the TGB key.
The key label entry you created is now displayed in the TGB list that
you select from the Tools menu.
P0891256 Standard 2.00
February 1999
Working with the Config menu
Page 59 of 160
Figure 40
TGB specification window
Click Help for detailed
information on TGB specifications.
4 While still in the TGBs window click the TGB Keys tab to associate a
new TGB key with each number (0-19) as described earlier for “Flex keys”
on page 54.
Figure 41
TGB Keys display window
Select a number choice to
associate an TGB key
assignment.
Lists the TGBs that
have been assigned
using the New button.
Click Help on how to add TGB Keys.
.
TGBs List
5 Click OK to save the TGB key.
6 Select the “TGBI List” from the Tools Menu to see the new
shaped “button” associated with the TGB key assignment you just
made.
Meridian 1 Attendant PC Software User Guide
Page 60 of 160
Working with the Config menu
Interface Properties
The Interface Properties screen displays five tabs, each of which
allows you or your system administrator to perform a different
setup task.
The Alerter tab
The Alerter page shown in Figure 42 allows you to control alert
tone characteristics. The system plays the alert tone for operator
alert conditions, including incoming calls.
Figure 42
Alerter display window
Indicate a
in the
box for enabling of alert
Adjust volume and pitch
with slide settings using
the mouse.
Click Help on how to configure alert
tones for incoming calls.
Note that the above screen provides:
— a check box to indicate that you want alert tones provided
— mouse-operated “slides” on the screen to set volume and pitch
levels
P0891256 Standard 2.00
February 1999
Working with the Config menu
Page 61 of 160
The Call Waiting tab
The Call Waiting tab allows you to notify the system whether you
want a Call Waiting tone via a checkbox (see Figure 43). In
addition, a mouse-operated slide is provided so you can
determine the volume of the Call Waiting tone.
Figure 43
Call Waiting display window
Indicate a
in the
box for enabling of alert
tones.
Adjust volume and pitch
with slide settings using
the mouse.
Click Help on how to configure alert
tones provided by the interface unit
for Call Waiting.
.
To return to the list of
topics, click Help Topics.
Meridian 1 Attendant PC Software User Guide
Page 62 of 160
Working with the Config menu
The Handset tab
You have a choice of connecting any of three receiving units to the
Attendant PC:
— Handset
— Headset 1 (one earpiece)
— Headset 2 (two earpieces)
Click the name of the device you intend on using on the Handset
page shown inFigure 44.
Note: Make sure you plug the headset or handset into the
Attendant PC correctly. If you plug it in upside down, callers will
not be able to hear your voice.
Figure 44
Handset display window
Click Help indicate the type of device
you are using and set the volume for
voice communication.
.
Note: You must make a choice when you are using a headset.
Carbon headsets are not supported.
— Headset 1 - Applies to the Plantronics-type headset.
— Headset 2 - Applies to the Liberation/GN Netcom-type headset.
P0891256 Standard 2.00
February 1999
Working with the Config menu
Page 63 of 160
The Relay tab
The Attendant PC uses relays to configure how a telephone may
be answered when the attendant is not available, such as during
an emergency (fire, earthquake), or off-hours (night or weekend
service). For example, a recording may play during a call, and a
night/weekend call may be transferred to someone in the
company’s security personnel. Each relay triggers the applicable
program from Meridian 1 software. Refer to Figure 45 to see how
you can select the mode you want.
Figure 45
Relay display window
Tip
Indicate a
in
the box for
enabling General
Purpose Relay.
Click Help for information on setting
the General Purpose relay and to view
the current state of the Night Service
.and Emergency relays.
Meridian 1 Attendant PC Software User Guide
Page 64 of 160
Working with the Config menu
The Diagnostics tab
The Diagnostics tab allows you (or the system administrator) to
perform the following actions (see Figure 46):
— Self Test button to initiate a diagnostic self test on the Meridian
1 Attendant PC interface unit.
— Reset button to reset the Meridian 1 Attendant PC interface unit
to its default status.
Note: Performing a Reset could result in loss of current
information.
— Send LoopBack button to check communications between the
Meridian 1 Attendant PC and the Meridian 1.
Figure 46
Diagnostics display window
Click Help for information on running
a diagnostic test on the interface unit
or to reset the interface unit.
.
P0891256 Standard 2.00
February 1999
Working with the Config menu
Page 65 of 160
Configure Port
The Configure Port option listed on the Config menu allows you to
select a COM Port which is required for your Meridian 1 Attendant
PC. Refer to Figure 47.
An open “COM” port permits a connection between your PC
workstation and the Meridian 1 Attendant PC.
Figure 47
COM Port display window
Change Password
The Change Password option listed on the Config menu allows you
to enter a new password and verify the change by re-entering the
password (see Figure 48).
Figure 48
Change Password display window
Meridian 1 Attendant PC Software User Guide
Page 66 of 160
Working with the Config menu
For further information on any of the Console Configuration topics
discussed in this section, consult the Help Facility to locate the
following tabular subjects:
P0891256 Standard 2.00
To learn about...
Search the Help Index for...
Editing general parameters
Requiring a password
Setting up the voice mail icon
General
Attendants
Edit TGBs
TGB List
TGBs
Adding a flexible key to the
PC console screen
Building an attendant’s
toolbox
Creating a virtual feature
Features
Adding an ICI key to the PC
console screen
ICI Keys
editing ICIs
ICIs
February 1999
Page 67 of 160
Meridian 1 Attendant PC
call processing
Answering a call
Calls are queued in order of arrival. All calls are presented to loop
0 if idle. If a call on loop 0 has been placed on hold, the next call
in queue will be presented to loop 1, and so on. A maximum of six
calls may be processed or held on the console.
1 You receive a call. You hear a tone. The Source indicator flashes
2 Click the appropriate loop indicator. The tone stops and the Source
indicator goes on steadily; you are connected to the caller.
Note: To give priority to a certain type of call, answer by clicking
the ICI key rather than an idle loop key. You are connected to the
call regardless of its place in the queue.
Meridian 1 Attendant PC Software User Guide
Page 68 of 160
Meridian 1 Attendant PC call processing
Extending a call to an idle extension
After you have answered a call, you can extend it to the extension
the caller requests.
1 Dial the requested extension.
2 To end your connection before the called party answers, click the
Release button immediately. [If the called party does not answer
within a set time (usually 30 seconds), you are recalled.]
3 Otherwise, wait for an answer and talk to the called party before
releasing. The Destination indicator goes on steadily upon
answer.
4 Click the Release button to connect the caller and called party
and to end your connection in the call.
P0891256 Standard 2.00
February 1999
Meridian 1 Attendant PC call processing
Page 69 of 160
Extending a call to a busy extension (with Camp-on)
After you have answered a call, you can extend it to the extension
the caller requests.
1
Dial the requested extension.
2a
If you do not hear a busy signal and the caller wishes to
wait, you can camp the call onto the busy extension by
clicking the Release button.
The Excl Src indicator goes on during dialing. The
Destination indicator flashes; the extension is busy.
If you do hear a busy signal after dialing the requested
extension, either a call is already camped onto that
extension, or Camp-on is not allowed on that extension.
The Release indicator goes on; you are free to process
other calls.
2b
If you do hear a busy signal after dialing the requested
extension and the caller wishes to call back later, click the
Rls Dst. button, and then the Release button to end your
connection in the call.
The Destination indicator goes off; the called extension is
released from the console. The Release indicator goes
on; you are free to process other calls.
Note: If a camped call is not answered within the set time, it is
returned to you.
Meridian 1 Attendant PC Software User Guide
Page 70 of 160
Meridian 1 Attendant PC call processing
Extending a call to voice mail
If a called party does not answer and/or a call is recalled to the
attendant, you can extend the call to voice mail.
1 Dial the requested extension.
2 If the party does not answer or the call is recalled to the
attendant, drag the number from the display and drop it on the Voice
Mail icon in the toolbar.
You can also drag a number from the Directory and drop it on the
Voice Mail icon in the toolbar.
Note: If the Voice Mail icon does not appear in the toolbar,
contact your system administrator.
P0891256 Standard 2.00
February 1999
Meridian 1 Attendant PC call processing
Page 71 of 160
Extending a call to a busy extension (with Hold)
To extend a call to a busy extension which is not allowed camp-on,
or which already has a call camped onto it, you can place the caller
on hold. You must then reenter the call periodically to see if the
extension is free.
1
Dial the requested extension. The Excl Src indicator in the
Feature List goes on during dialing. You hear a busy
signal and the Destination indicator flashes; the extension
is busy and not allowed camp-on.
2
Click the Rls Dst button.
3a
If the caller wishes to call back later, click the Release
button.
The Destination indicator goes off; the called extension is
released from the console.
The Release indicator goes on; you are free to process
other calls.
3b
If the caller wishes to wait, click the Hold button, then the
Release button to end your connection in the call.
The loop indicator flashes slowly. The Release indicator
goes on; you are free to process other calls.
4
Check periodically to see if the extension is free. To
reenter the call, click the loop key beside the slowly
flashing loop indicator, then dial the extension again.
The loop indicator goes on steadily.
Meridian 1 Attendant PC Software User Guide
Page 72 of 160
Meridian 1 Attendant PC call processing
Holding a call on a loop key
In some cases you may receive a call from someone who wishes
to be transferred to several different extensions in turn. You can
hold the call on a loop key so that the caller remains connected to
your console when the called party hangs up.
1
Dial the requested extension.
2
Click the Hold button before or after the called party
answers.
The Excl Src indicator in the Feature List goes on during
dialing. You hear ringing. The Destination indicator
flashes slowly.
The loop indicator flashes slowly.
3
Click the Release button to free yourself to answer calls
on other loop keys.
The Release indicator goes on.
4
The called party answers.
5
When the called party hangs up, the Destination indicator
goes off. Click the loop key beside the slowly flashing loop
indicator to reenter the call.
The Destination indicator goes on steadily. The loop
indicator continues to flash slowly.
The loop indicator goes on steadily. The Destination
indicator is off; you may extend the call to another party.
Note: When you only wish to put a call on hold, answer it, click
the Hold button, and then Release.
P0891256 Standard 2.00
February 1999
Meridian 1 Attendant PC call processing
Page 73 of 160
Call Park
Call Park enables you to put a call on hold without occupying a
loop key on your console. You can, for example, hold a call on a
Call Park extension while paging a called party.
Feature
List
1
You wish to park a call, perhaps because the caller
requests you to page someone. Click Park from the
Feature List.
The Park indicator in the Feature List goes on.
2a
If a Call Park extension is available, it is assigned to the
call and displayed automatically. Make a note of the call
and the Call Park extension. The Destination indicator
flashes slowly.
2b
Click the Release button. Page the called party and
deliver the Call Park extension. [An unanswered parked
call is returned to your console after a set time.] The
Destination indicator goes off; the call is parked. The
Release indicator goes on.
3
If no Call Park extension is available, nothing is displayed.
Either take a message or place the call on Hold.
The Destination indicator flashes.
Meridian 1 Attendant PC Software User Guide
Page 74 of 160
Meridian 1 Attendant PC call processing
Timed recall from an unanswered extended call
If a called extension does not answer within a set time (usually 30
seconds), the call is automatically returned to your console. The
recall incoming call indicator (ICI) goes on to signal this type of
call.
1
You receive a timed recall from an unanswered extended
call. Click the Loop key beside the flashing Source and
slowly flashing Destination indicators. The tone stops and
the Loop and Source indicators go on steadily; you are
connected to the caller. You hear ringing at the called
extension. The recall ICI is on.
2
Click the Rls Dst button. Ringing at the called extension
stops. The Destination indicator goes off.
3a
If the caller does not wish to wait, click the Release button.
The Release indicator goes on; you are free to process other
calls.
3b
If the caller wishes to wait, dial the extension again. [If the
caller wishes to be transferred to another extension instead
of waiting or calling back later, you can dial a new number
now.] The Excl Src indicator in the Feature List goes on
during dialing. The Destination indicator flashes slowly.
4
Click the Release button to end your connection in the call.
The Release indicator goes on; you are free to process other
calls.
P0891256 Standard 2.00
February 1999
Meridian 1 Attendant PC call processing
Page 75 of 160
Timed recall from an unanswered parked call
A parked call, if unanswered, is returned to you after a set time.
1
You receive a timed recall from an unanswered parked
call. Click the Loop key beside the flashing Source and
slowly flashing Destination indicators. The tone stops and
the Loop and Source indicators go on steadily; you are
connected to the caller.The recall ICI, and call park
indicators are on.
2a
If the caller wishes to remain parked, click the Release
button. The call is parked on the original call-park number.
The Release indicator goes on; you are free to process
other calls.
2b
If the caller wishes to end the call, click Rls Dst, then the
Release button. The call is unparked. The Source
indicator goes off and the Release indicator goes on; you
are free to process other calls.
Meridian 1 Attendant PC Software User Guide
Page 76 of 160
Meridian 1 Attendant PC call processing
Recall from an extension using LINK or ATT RECALL
An extension user, while talking to someone on the phone, may
recall you by clicking ATT RECALL, or by clicking LINK once and
dialing your number, depending on the type of extension. The
recall ICI goes on.
1
You receive a recall. Click the Loop key beside the quickly
flashing Destination indicator. The tone stops and the
Loop and Destination indicators go on steadily; you, the
party originating the call, and the original caller are
connected. The recall ICI and Source indicators go on.
2
Click the Rls Dst button. (if the recaller has not already
released). The Destination indicator goes off; the recaller
is disconnected.
3
If the caller wishes to be transferred, dial the new
extension. The Excl Src indicator goes on during dialing.
The Destination indicator flashes slowly.
4
Click the Release button to end your connection in the
call. The Release indicator goes on; you are free to
process other calls.
Note 1: This recall procedure describes a call that was originally
extended through your console (Source and Destination indicators
both active).
Note 2: If you wish to activate the Secrecy feature, which
excludes the caller until connected to the called party, click Excl
Src before extending the call.
P0891256 Standard 2.00
February 1999
Meridian 1 Attendant PC call processing
Page 77 of 160
Recall from an extension using Transfer
An extension user, while talking to someone on the phone, may
recall you by clicking Transfer and dialing your number. The recall
ICI goes on.
1
You receive a recall. click the Loop key beside the quickly
flashing Source indicator. The tone stops and the Loop
and Source indicators go on steadily; you and the recaller
are connected. The recall ICI is on.
2
When the recaller clicks Transfer again, you and the
original caller are connected. If the caller wishes to be
transferred, dial the new extension. The Excl Src indicator
goes on during dialing. The Destination indicator flashes
slowly.
3
Click the Release button to end your connection in the
call. The Release indicator goes on; you are free to
process other calls.
Meridian 1 Attendant PC Software User Guide
Page 78 of 160
Meridian 1 Attendant PC call processing
Recall from an extension using Conference
An extension user, while talking to someone on the phone, may
recall you by clicking Conference and dialing your number. The “0”
ICI goes on.
1
You receive a recall. click the loop key beside the quickly
flashing Source indicator. The tone stops and the loop and
Source indicators go on steadily; you and the recaller are
connected. The “0” ICI is on.
2
When the recaller clicks Conference again, you, the
recaller, and the original caller are connected. If the
original caller wishes to be transferred, dial the new
extension. The Excl Src indicator goes on during dialing.
The Destination indicator flashes slowly.
3
Click the Release button to end your connection in the
call.
Note: This recall procedure describes a call that was not
originally extended through your console (Source indicator active,
Destination indicator off).
P0891256 Standard 2.00
February 1999
Meridian 1 Attendant PC call processing
Page 79 of 160
Recall to Same Attendant
This feature functions the same way as normal call recall, with an
enhancement. Previously, calls recalled to the first available
attendant. With this feature enabled calls you extended can be
queued to return to you only when you are idle. If you are busy, the
calls remain in queue until you are available. The following types
of calls and recall that can be queued to you for recall are listed
below:
— Interattendant calls
— Meter recalls
— Slow answer recalls
— Park recalls
— Camp-On recalls
— Call Waiting recalls
Meridian 1 Attendant PC Software User Guide
Page 80 of 160
Meridian 1 Attendant PC call processing
Calling an extension
You can place a call to any extension within the system.
1
Click an idle loop key. The loop indicator beside it goes on.
2
Dial the extension. You hear ringing. The Source indicator
flashes slowly. When the called party answers, ringing
stops and the Source indicator goes on steadily.
3
Click the Release button to end the call. The Release
indicator goes on; you are free to process other calls.
P0891256 Standard 2.00
February 1999
Meridian 1 Attendant PC call processing
Page 81 of 160
Calling an outside number
You can place a call to a number outside the system by dialing a
trunk access code followed by the desired number.
1
Click an idle loop key.
2
Dial the required trunk access code. You hear dial
tone.The Source indicator goes on.
3
Dial the outside number. You hear ringing. When the
called party answers, ringing stops.
4
Click the Release button to end the call. The Release
indicator goes on; you are free to process other calls.
The loop indicator beside it goes on.
Meridian 1 Attendant PC Software User Guide
Page 82 of 160
Meridian 1 Attendant PC call processing
Trunk-to-trunk call
A user, while outside the system, may call to request access to an
outgoing trunk.
1
You answer an incoming trunk call and the caller requests
access to an outgoing trunk. Dial the trunk access code,
then dial the requested number. The Excl Src indicator
goes on during dialing. You hear dial tone after dialing the
trunk access code, and ringing after the number. The
Destination indicator goes on steadily.
2
When the called party answers, you may talk privately.
The Destination indicator remains on. The Excl Src
indicator remains on.
3
Click the Release button to connect the calling and called
parties. The Release indicator goes on; you are free to
process calls on other loop keys (see Note).
Note: If neither of the trunks involved in the call has answer
supervision, the call is automatically held on the loop key. When
both parties hang up, the Source and Destination indicators
remain on. Click the loop key and then Rls Src from the Feature
List and Rls Dst and Release again.
P0891256 Standard 2.00
February 1999
Meridian 1 Attendant PC call processing
Page 83 of 160
Through-dialing
Extension or tie line users may request access to numbers or
trunks which they are restricted from accessing themselves. Once
you have accessed the trunk, the user is free to dial out. You can
provide through-dialing to all but fully restricted extensions.
1
You receive a call from a restricted extension or tie trunk.
Click the loop key beside the quickly flashing Source
indicator. The tone stops. The loop key and Source
indicators go on steadily. The appropriate ICI is on.
2
The caller requests access to a trunk. Dial the required
trunk access code and listen for dial tone. The Excl Src
indicator goes on during dialing. The Destination indicator
is on steady.
3a
You can now complete the call by dialing the required
number. Click the Release button to connect the call back
to the restricted user. The Release indicator goes on; you
are free to process other calls.
3b
After hearing dial tone, click the Release button to end
your connection. The user can now dial the number. The
Release indicator goes on; you are free to process other
calls.
Meridian 1 Attendant PC Software User Guide
Page 84 of 160
Meridian 1 Attendant PC call processing
Conference
You can set up a conference call for as many as six people,
including yourself, at the request of either an extension user or an
outside caller. A maximum of two trunks can be in the conference
at one time.
Feature
List
1
Click an idle loop key and dial the number of the first
conference party. The loop indicator goes on. You hear
ringing. The Source indicator flashes slowly. When the
first party answers, the Source indicator goes on steadily.
2
Dial the number of the next conference party. The Excl Src
indicator goes on; the first party is automatically placed on
hold while you dial. The Destination indicator flashes
slowly. When the second party answers, the Destination
indicator goes on steadily.
3
Click Conf [Repeat steps 2 and 3 to add more parties to
the conference.] The Excl Src and Destination indicators
go off; you and the first two conference parties are
connected.
P0891256 Standard 2.00
February 1999
Meridian 1 Attendant PC call processing
Feature
List
Page 85 of 160
4a
If you want to hold the conference at your console, click
the Release button. The loop indicator flashes slowly. The
Source indicator remains on. The Release indicator goes
on; you are free to process other calls.
4b
If you want to release the conference from your console,
click Rls Src, then the Release button. The loop indicators
and Source indicators go off. The Release indicator goes
on; you are free to process other calls.
Note: To reenter a conference that is being held at your console,
click the loop key beside the flashing loop indicator. To end the
conference call, click the loop key beside the flashing loop
indicator, then RLS src., then the Release button. The console
should be in normal mode when setting up a conference.
Meridian 1 Attendant PC Software User Guide
Page 86 of 160
Meridian 1 Attendant PC call processing
Calling another attendant
With this feature, you can call another attendant in your
multiple-console group.
1
Click an idle loop key.
2
Dial the attendant access code.
3
Dial the appropriate attendant code. You hear ringing. The
Source indicator flashes slowly.
4
The called attendant answers. click the Release button
when you wish to end the call. Ringing stops. The Source
indicator goes on steadily. The Release indicator goes on;
you are free to process other calls.
The loop indicator goes on.
Note 1: If you dial an incorrect attendant code, you hear a fast
busy signal and the Source indicator stays off. Click Rls Src.
Note 2: If the called attendant is busy, you hear ringback and the
Source indicator flashes slowly. Continue to wait and your call will
be the next call presented to that attendant.
Note 3: If the called console is in position-busy or night-service
mode, your call cannot be completed. You hear a fast busy signal
and the Source indicator stays off. click the Release button.
P0891256 Standard 2.00
February 1999
Meridian 1 Attendant PC call processing
Page 87 of 160
Transferring a call to another attendant
With this feature, you can transfer a call to another attendant in
your multiple-console group.
1
The person to whom you are speaking wishes to speak to
another attendant. Dial the attendant access code, then
dial the appropriate attendant code. The Excl Src indicator
goes on; the caller is automatically placed on hold. The
Destination indicator flashes slowly. The Loop and Source
indicators are on.
2
When the called attendant answers, click the Loop key.
The Excl Src indicator goes off and the Destination
indicator goes on steadily; you, the called attendant, and
the caller are connected.
3
Click the Release button to end your connection in the
call. The Release indicator goes on; you are free to
process other calls.
Note 1: If you dial an incorrect attendant code, you hear a fast
busy signal and the Destination indicator stays off. Click the Rls
Dst button.
Note 2: If the called attendant is busy, you hear a busy signal and
the Destination indicator continues to flash slowly. Click the
Release button to transfer the call to the attendant’s queue.
Note 3: If the called console is in position-busy, you hear a busy
signal and the Destination indicator flashes slowly. Click the
Release button.
Meridian 1 Attendant PC Software User Guide
Page 88 of 160
Meridian 1 Attendant PC call processing
Break-in (post-dial)
You can interrupt an existing connection in order to offer a call or
relay an important message to one of the parties.
1
Someone calls you and requests that you relay a
message or extend the call to someone already on a call.
Dial the requested extension. The loop key, ICI, and
Source indicators go on steadily. The Destination
indicator flashes, indicating that the extension is busy.
The Excl Src indicator goes on steadily while you are
dialing.
2
Click Break-In from the Feature List to interrupt the
connection. If the extension is idle, the Break-In indicator
goes off, and you hear ringing.
Feature
List
If the break-in is temporarily denied, you hear busy or fast
busy tone, and the Break-In indicator flashes. Click the
Rls Dst key. You can attempt a post-dial break-in after a
few minutes or another pre-dial break-in immediately.
If break-in is denied completely, you hear a fast busy
signal. Click the Rls Dst button.
3
P0891256 Standard 2.00
You are in a three-way connection with the two parties in
the established call. Relay the message, or announce the
incoming call.
February 1999
Meridian 1 Attendant PC call processing
Feature
List
Page 89 of 160
4a
Click Excl Dst to speak privately with the caller without
ending the three-way connection.
4b
Click the Release button to end the three-way connection
and remain connected to the caller.
4c
Click the Release button to end your connection in the
call. The incoming call is camped-on if the called party is
still busy, or extended if the called party’s extension is idle.
The Release indicator goes on; you are free to process
other calls.
Note 1: If the requested extension does not allow camp-on:
— you hear a busy signal when you dial the extension (step 1)
— the Destination indicator continues to flash when you click
Break-In (step 2)
— you cannot extend the call or camp on to the extension (step 4a)
click Rls Dst and redial the extension to extend the call.
Note 2: If the call is from an internal source, you cannot extend
the call or camp on to the extension (step 4b).
Note 3: Click the Rls Dst button and redial the extension to
extend the call or camp on to the extension.
Meridian 1 Attendant PC Software User Guide
Page 90 of 160
Meridian 1 Attendant PC call processing
Break-in (pre-dial)
You can interrupt an existing connection in order to offer a call or
relay an important message to one of the parties. Use break-in
(pre-dial) for extensions that have make set busy, do-not-disturb,
hunting, or call forward activated.
Feature
List
1
Someone calls you and requests that you relay a
message or extend the call to someone already on a call.
Click Break In from the Feature List.
The Loop, Break In, ICI, and Source indicators go on
steadily.
Feature
List
2
Dial the requested extension. The Excl Src indicator goes
on steadily while you are dialing. The Destination Lamp
indicator flashes, indicating that the extension is busy.
3
Click Break In in the Feature List to interrupt the
connection. If the extension is busy, the Break In indicator
goes off, and you hear ringing.
If the break-in is temporarily denied, you hear busy or fast
busy tone, and the Break-In indicator flashes. Click the
Rls Dst key. You can attempt a post-dial break-in after a
few minutes or another pre-dial break-in immediately.
If break-in is denied completely, you hear a fast busy
signal. click the Rls Dst button.
P0891256 Standard 2.00
February 1999
Meridian 1 Attendant PC call processing
Feature
List
Page 91 of 160
4
You are in a three-way connection with the two parties in
the established call. Relay the message, or announce the
incoming call.
5a
Click Excl Dst to speak privately with the caller without
ending the three-way connection.
5b
Click the Release button to end the three-way connection
and remain connected to the caller.
5c
Click the Release button to end your connection in the
call. The incoming call is camped-on if the called party is
still busy, or extended if the called party’s extension is idle.
The Release indicator goes on; you are free to process
other calls.
Meridian 1 Attendant PC Software User Guide
Page 92 of 160
Meridian 1 Attendant PC call processing
Break-in (busy verify)
You can check whether an extension is busy or idle before you
attempt to break in.
1
Someone calls you and requests that you relay a
message or extend the call to someone already on a call.
click an idle loop key.
The loop indicator goes on.
Feature
List
2
Click Break In from the Feature List.
3
Dial the extension you wish to check.
The Break In indicator goes on.
If the DN is idle, you hear ringing, the loop indicator
flashes slowly and the Break-In indicator goes off. Click
Break-In to break in.
If the DN is disabled or unassigned, you hear a fast busy
signal (overflow tone) and the loop key and Break-In
indicators go off.
If the DN is busy, you hear a busy signal and the loop
indicator flashes. Click Break-In to break in.
If the DN is busy, the Break-In and loop indicators are
steadily lit. You hear the intrusion tone.
P0891256 Standard 2.00
February 1999
Meridian 1 Attendant PC call processing
Page 93 of 160
4
You are in a three-way connection with the parties in the
established call. You can speak to the person on the
extension.
5
Click the Release button to end your connection in the
call. The Release indicator goes on; you are free to
process other calls.
Sending a warning tone to an extension in line lockout
When a handset is left off a telephone for an extended period of
time, the telephone goes into a state called “line lockout.”
Feature
List
1
Click an idle loop key. The loop indicator goes on.
2
Click Break In from the Feature List.
3
Dial the extension you wish to check. A fast busy signal
(overflow tone) is heard at the console.
The Break In indicator from the Feature List goes on.
Meridian 1 Attendant PC Software User Guide
Page 94 of 160
Feature
List
Meridian 1 Attendant PC call processing
4
To break in to the extension, click Break In from the
Feature List.
The Break-In indicator from the Feature List goes off.
5
Click the Release button. The warning tone is sent to the
extension.
Note 1: You cannot cancel the warning tone. It stops after a
certain period of time, or when the telephone’s handset is put back
on the hook.
Note 2: You cannot break in to an extension that is already
receiving the warning tone.
Requeueing a call to the next available attendant
You can requeue an incoming call or recall to the next available
attendant.
1
You receive a call.
2
IIf the system is in Night Service, the call is queued to the
next available Night Service number.
P0891256 Standard 2.00
The ICI indicator goes on and the Source indicator
flashes. The call is queued to the next available attendant.
February 1999
Meridian 1 Attendant PC call processing
Page 95 of 160
Timed Reminder Recall
Timed Reminder Recall calls you after a period of time to remind
you that a transferred call has not yet been answered.
1
You receive a call for transfer. Dial the desired extension.
The Destination Lamp winks.
2
Click the Release button before the extension answers.
This starts the recall timer. If the extension answers the
call, the timer stops.
3
If the extension does not answer, you receive a reminder
call. The source lamp flashes and the destination lamp
winks.
4
Click the Source key to connect with the calling party. If
the dialed extension answers while you are on the line, a
conference is established. You can then complete the
transfer. If the called party does not answer, you can
release the source call.
Meridian 1 Attendant PC Software User Guide
Page 96 of 160
Meridian 1 Attendant PC call processing
Centrex/Exchange Line Switchhook Flash
Centrex Switchhook Flash (THF) allows you to signal the Central
Office during an established call to request activation of a Centrex
service such as call transfer or three-way calling.
1
Click the Switchhook Flash key. You hear a special dial
tone.
2
Click the DN before the tone ends. When you hang up, or
click the Release button, the original connection and the
THF message terminate.
P0891256 Standard 2.00
February 1999
Meridian 1 Attendant PC call processing
Page 97 of 160
Remote Call Forward
1
Click an idle loop key followed by Attendant Remote Call
Forward (RFW) in the Feature List.
The RFW key is flashing. The loop key is steadily lit.
2
Dial the DN of the set to be forwarded.
If the password is required, the RFW key is winking, and
the console display shows "PWD". If the console does not
support alpha characters, the attendant display will be
blank.
If the password is not required, the console display will
display the DN of the set to be forwarded followed by the
CFW DN stored on that set. The RFW key lamp will
display the status of the CFW DN. If RFW lamp is
flashing, then CFW is not active; if RFW lamp is steady lit,
then CFW is active. Proceed to step 4.
3
Dial the password required followed by #.
4
The user can now enter a new CFW DN or click the RFW
key to activate or deactivate the stored CFW DN. If a new
CFW DN is entered, it must be preceded by an RFW key
click.
The console display will display the DN of the set to be
forwarded followed by the CFW DN stored on that set.
The RFW key lamp will display the status of the CFW DN.
If RFW lamp is flashing, then CFW is not active; if RFW
lamp is steadily lit, then CFW is active.
The console display will display the DN of the set to be
forwarded followed by the CFW DN. If RFW lamp is
flashing, then CFW is not active; if RFW lamp is steadily
lit, then CFW is active.
Meridian 1 Attendant PC Software User Guide
Page 98 of 160
Meridian 1 Attendant PC call processing
5
When the RCFW operation is in this state, the user has
three options:
a. Click the Release button or the Rls Src key from the
Feature List to complete RCFW operation.
b. Click the RFW key to reverse the CFW status.
C. Enter a new CFW DN to begin task of changing the
CFW DN programmed. The new CFW DN is not active
until the RFW key is clicked again.
6
Click the RFW key again to activate the CFW DN on the
display.
If the DN entered is invalid, you hear overflow tone, and
the FRW key indicator flashes. Reenter a valid DN.
7
P0891256 Standard 2.00
Click the Release button.
This terminates the session. The DN is now forwarded.
February 1999
Meridian 1 Attendant PC call processing
Page 99 of 160
Call Forward/Hunt Override
1
Dial the FFC for Call Forward/Hunt Override and the DN of
the wanted party.
If the telephone is idle, the telephone is rung
If the telephone(s) have displays, the display(s) are
updated.
If the display on the originating telephone is updated when
the call is answered, the Call Forward/Hunt Override FFC
will no longer be displayed.
If the dialed telephone is busy and Hunt is active, the calling
party will terminate on the wanted telephone and will
receive a busy signal.
If the dialed telephone is idle, but does not answer within
the defined number of ringing cycles for Call Forward No
Answer, the call is not forwarded (that is, it continues to
ring).
If the dialed telephone is busy, the attendant can activate
Camp-On, if Camp-On is applicable. In addition, Ring Again
can be placed against a telephone for which Call
Forward/Hunt Override was used and a busy telephone
was encountered.
Meridian 1 Attendant PC Software User Guide
Page 100 of 160
Meridian 1 Attendant PC call processing
Attendant Console Autoline
To place an Autoline call:
Feature
List
1
Click an idle loop key. The loop indicator is lit.
2
Click Autoline from the Feature List. The pre-programmed
Autoline number is automatically dialed. The Source
indicator winks.
The dialed party answers the call, and the Source indicator
is steadily lit.
To extend a currently active call to the Autoline DN:
Feature
List
1
Click Autoline from the Feature List. The pre-programmed
Autoline number is automatically dialed. The Destination
indicator winks.
The dialed party answers the call, and the Destination
indicator is steadily lit.
2
P0891256 Standard 2.00
To complete the transfer, click the Release button.
February 1999
Meridian 1 Attendant PC call processing
Page 101 of 160
Individual Attendant Directory Number (IADN)
To answer an IADN call:
ICI
List
1
Click IADN from the ICI List. The first IADN call in the queue
is answered.
Attendant Emergency Codes
To answer an emergency code call:
ICI
List
For
example:
1
You receive Priority Buzzing. Check the ICI List to see
which type of emergency calls are indicated by lit ICIs.
2
Click the appropriate ICI key which designates the
emergency. The call is answered.
Meridian 1 Attendant PC Software User Guide
Page 102 of 160
Meridian 1 Attendant PC call processing
Recovery on Misoperation of Attendant Console
The Recovery on Misoperation of Attendant Console feature
provides a safeguard on the Meridian 1 to prevent calls from being
inadvertently disconnected.
The following lists the console functions in the event of accidental
misoperation:
Clicking the Release Key or Loop Key is ignored when:
•
Extending a call to a vacant number
•
Extending to a partially dialed number
•
Extending a Network blocked call
•
Extending a call to a restricted station or trunk
•
Extending to a station in the Do Not Disturb (DND) mode
•
Extending to a station in the Make Set Busy (MSB) mode
•
Extending to a maintenance busy station
•
Extending to a station in a line lockout state
•
Illegal call extension due to trunk barring
•
Extending to a busy station with no Camp-on/Call Waiting
•
Illegal call extension due to Trunk-to-Trunk Conference
Restriction
•
Illegal release from a conference connection
Autohold on loop key - the active loop is automatically placed on
hold if the attendant clicks another loop key prior to extending the
active call.
Does not allow the disconnection of a single excluded party or
conference call. If one of the parties on a loop is excluded, the
operation of the corresponding Release Source Key or Release
Destination Key is ignored.
P0891256 Standard 2.00
February 1999
Page 103 of 160
Meridian 1 Attendant PC features
This appendix describes the Attendant PC features that are
available for attendant operations provided they are programmed
in advance on the Meridian 1 switch.
— Attendant Blocking of
Directory Number
— Attendant Break-in Busy
indication and prevention
— Attendant Monitor
— Auto Dial
— Automatic Wake Up
— Barge-In
— Busy Verify
— Charge Account
— DID Route Conversion
— Do-Not-Disturb
— End-to-end signaling
— Enhanced Night Service
— Enhanced Secrecy
— Malicious Call Trace
— Night Service
— Paging
— Position Busy
— Radio Paging
— Semi-Automatic Camp
On
— Series Call
— Speed Call
— Speaking privately (Splitting)
— Stored Number Redial
— System Speed Call
Meridian 1 Attendant PC Software User Guide
Page 104 of 160
Meridian 1 Attendant PC features
Attendant Blocking of Directory Number
To block a DN
1 The attendant clicks an idle loop key.
2 The attendant clicks Semi-automatic Camp-on (SACP) from the
Feature List.
3 The SACP indicator goes on.
4 The attendant dials the source DN that is to be blocked. If the dialed
DN is idle, the DN lamp will have the same state as a call put on hold, but
the DN will not ring. If the DN is busy, the attendant hears busy tone and
the SACP indicator darkens.
If the dialed DN is idle, it is blocked. The DN lamp indicates a call on hold
state, although the DN will not ring (for analog (500/2500 type)
telephones, there is no indication that the DN is blocked.) On the
Attendant Console, the SACP indicator remains lit and the Source
indicator begins blinking.
If the dialed DN is busy, the attendant clicks Release (or Rls Src) to
release the call.
To place an outgoing call for the blocked DN
1 The attendant establishes a call to the desired destination in the
normal way.
2 The attendant clicks SACP (or Sig Src) from the Feature List. The
ringback tone is heard.
3 If the source DN answers, the attendant clicks Release to extend the
call between the destination to the source.
To release a blocked DN
The attendant clicks either SACP or Sig Src from the Feature List
to ring the DN
– or –
The attendant clicks either the Release or Rls Src to release the
source DN, which then becomes idle.
To notify a blocked DN of an established call
The attendant clicks SACP or Sig Src from the Feature List.
P0891256 Standard 2.00
February 1999
Meridian 1 Attendant PC features
Page 105 of 160
Attendant Break-in Busy indication and prevention
If an attendant, during a break-in operation, dials a busy
extension, the Attendant Console display provides one of the
following customer-defined indications:
— three dashes, appended to the end of a digit display (if the busy
station is involved in an external call), or
— a mode-digit, appended to the end of a digit display.
The operator can click on the break-in key either before or after
dialing the destination DN. Break-In operates slightly differently in
these two situations.
Attendant Monitor: Monitoring a DN
The Attendant Monitor feature provides modifications to the Busy
Verify and Barge-In features.
1 Click on an idle loop key. The loop indicator is lit.
2 Click on Busy Verify in the Feature List. The Busy Verify lamp is lit.
3 Click on Busy Verify again to enable Attendant Monitor. The Busy
Verify lamp is in the flashing state indicating that the Attendant Monitor
option is enabled.
4 Dial the extension to be monitored. Attendant Monitor is blocked when:
—
the extension is busy or maintenance disabled.
—
the extension is vacant.
—
the extension is in some transient state (e.g., Conference or
Transfer)
—
the extension is idle, receiving busy tone, or receiving overflow
tone
—
the extension is involved with another attendant
Meridian 1 Attendant PC Software User Guide
Page 106 of 160
Meridian 1 Attendant PC features
—
the extension has activated the Hold key
—
the extension is already involved in a monitored call by another
attendant
Attendant Monitor is active when the extension is busy. The attendant
is able to listen to all connected parties. If the Attendant Monitor
Customer Tone is denied (TOD), there is no indication given to the
connected parties that the attendant is monitoring.
If the Attendant Monitor Customer Tone is allowed (TOA), a burst of
tone is sent to the connected parties every 16 seconds. When the
monitored DN disconnects from the call, Attendant Monitor is
deactivated.
5 Click the Release button to end Attendant Monitor. The Release lamp
is lit, indicating that the attendant is now free to take other calls.
Deactivation occurs due to any one of the following:
—
The Release button on the Attendant PC is clicked.
—
Any DN involved in the monitored call disconnects.
—
Any DN involved in the monitored call at the customer location
activates some form of call modification.
Attendant Monitoring: Monitoring a Trunk
1 Click on an idle loop key. The loop indicator is lit.
2 Click on Barge-in from the Feature List. The Barge-in indicator is lit.
3 Click on Barge-In again to enable the Attendant Monitor. The Barge-In
indicator is in the flashing state indicating that the Attendant Monitor
option is enabled.
4 Dial the trunk access code and route member number, then click on
“#”. One of the following happens:
P0891256 Standard 2.00
—
Attendant Monitor is blocked when the trunk is disabled or idle.
—
Attendant Monitor is blocked when the trunk is already being
monitored by another attendant.
—
Attendant Monitor is active when the trunk is busy. The attendant
is able to listen to all parties on the trunk.
—
If the Attendant Monitor Customer Tone is denied (TOD), there is
no indication given to the connected parties that the attendant is
monitoring.
February 1999
Meridian 1 Attendant PC features
—
Page 107 of 160
If the Attendant Monitor Customer Tone is allowed (TOA), a burst
of tone is sent to the connected parties every 16 seconds.
5 Click the Release button to end Attendant Monitor. The Release
indicator is lit, indicating that the attendant is free to take other calls.
Deactivation occurs due to any one of the following:
—
The Release button on the Attendant PC is clicked.
—
The trunk disconnects.
—
Any party at the customer location performs some form of call
modification or activates hold.
—
Any party at the customer location disconnects.
—
Any trunk involved in the monitored call disconnects.
Auto Dial
Calling an Auto Dial number
After you have stored a number against an Auto Dial key, you can
dial it by clicking on Auto Dial.
1 Click on an idle loop key. The loop indicator goes on.
2 Click on the required Auto Dial key. The Source indicator lights; the
system automatically dials the stored extension.
Note: If you wish to display the extension stored for automatic
dialing, click on Auto Dial, then click on Disp Src
Note: You can store a number of up to 24 digits against an Auto
Dial key. If you need to dial more than 24 digits, you can dial them
after clicking on Auto Dial
Meridian 1 Attendant PC Software User Guide
Page 108 of 160
Meridian 1 Attendant PC features
Storing an Auto Dial number
With Auto Dial, you can store a number (including access codes if
necessary) against an Auto Dial key. You can also change a
number already stored against an Auto Dial key using this
procedure.
1 When all loop indicators are off, click on Auto Dial. The Auto Dial
indicator flashes.
2 Click on Disp Src. The display shows the number already stored for
automatic dialing, if there is one.
3 Dial the number to be stored for automatic dialing. Click on * after
every trunk access code to ensure a pause for dial tone.
4 Click on Auto Dial again. The Auto Dial indicator goes off; the dialed
extension is stored for automatic dialing.
Automatic Wake Up
Programming a wake-up call
With Auto Wake-up, you can instruct the system to provide
automatic wake-up calls at requested times. If extension numbers
are not the same as room numbers, you must translate the room
numbers into the corresponding extension numbers.
1 A hotel guest calls to request a wake-up call. Click Automatic Wake
Up. [If the displayed number is not the number requiring the wake up call,
dial the proper number now.]
The wake up indicator goes on. The ICI, loop, and Source indicators
are on. The current wake-up time, if any, is displayed.
2 Click #
If the wake up indicator remains on steadily, the dialed number is valid.
If it flashes, the number is invalid.
3 If the dialed number is valid, dial the requested wake-up time using a
24-hour format.
If the wake up indicator remains on steadily, the requested wake-up
time is acceptable (see 4). If it flashes, the time is not acceptable. The
next available time is displayed (see 5).
P0891256 Standard 2.00
February 1999
Meridian 1 Attendant PC features
Page 109 of 160
4 If the requested wake-up time is acceptable, click Autotmatic Wake Up
again, then click Release.
The Release indicator goes on; you are free to process other calls.
5 If the initial request was not accepted, the next available time is
displayed. Enter the new time, click Automatic Wake Up, then click
Release.
The Release indicator goes on. You are free to process other calls.
Note: If the requested wake-up time is not acceptable to the
system, the display shows alternative wake-up times in this order:
5 minutes earlier than the requested time; 5 minutes later than the
requested time; the first available 5-minute interval before the
requested time.
Canceling a wake-up call
Use this procedure to cancel a wake-up call that has already been
entered into system memory.
1 A hotel guest calls to request that a wake-up call be cancelled. Click
Automatic Wake Up. [If the displayed number is not the number requiring
cancellation of the wake up call, dial the proper number.]
The Automatic Wake Up indicator goes on.
2 Click #, then click Automatic Wake Up again. [If the indicator flashes
quickly, no wake-up call was found for the dialed number. Click Automatic
Wake Up again.]
The Automatic Wake Up indicator goes off; the wake-up request is
canceled.
3 Click Release to end the procedure.
The Release indicator goes on; you are free to process other calls.
Meridian 1 Attendant PC Software User Guide
Page 110 of 160
Meridian 1 Attendant PC features
Unanswered wake-up calls
If a guest does not respond to the first wake-up call, the system
makes up to two more attempts at 5-minute intervals. If the guest
does not answer after the third call, the system, if set for this
option, notifies you of an unanswered wake-up call.
1 A guest has not responded to three wake-up calls.
You hear a continuous buzz. The Automatic Wake Up indicator flashes
quickly. The extension number of the room that has failed to respond
is displayed.
2 To cancel the notification, click Automatic Wake Up.
The buzz stops. The Automatic Wake Up indicator goes off.
3 Click Release.
The Release indicator goes on; you are free to process other calls.
Note: When you are notified of an unanswered wake-up call, you
may call the room again.
Making a VIP wake-up call
At the requested time, you will provide a personal wake-up call to
a guest with VIP status.
1 A VIP wake-up call comes in to your console.
You hear a buzz and the Automatic Wake Up indicator fast flashes.
The Display shows “VIP.”
2 Click an idle loop key, then click Automatic Wake Up.
You hear ringing, as the VIP’s room DN is dialled automatically. The
Source indicator goes on, and Automatic Wake Up goes off.
3 If the guest does not answer or the DN is busy, click Release.
The system will retry the VIP wake-up call in five minutes.
4 If the guest answers the VIP wake-up call, you deliver a personal
wake-up message to the guest.
You may release the call when you have finished the personal
wake-up message.
P0891256 Standard 2.00
February 1999
Meridian 1 Attendant PC features
Page 111 of 160
Note: After a maximum of three attempts, if the guest still does
not answer the VIP wake-up call, a message prints on the
background terminal stating that the wake-up was tried, but
unsuccessful.
Barge-in
With Barge-In, you can verify that a trunk is in working order, or
check the status—busy or idle—of a trunk.
1 Click on an idle loop key. The loop indicator goes on.
2 Click Barge-In in the Feature List. The barge in indicator goes on.
3 Dial the required trunk access code and route member number, then
click on #. You hear a fast busy signal if the trunk is disabled or not
assigned. You hear a fast busy signal and the Source indicator flashes if
the trunk is blocked in the network. Attempt Barge-In again in a few
minutes.
You are able to speak to all parties and the Source and Destination
indicators go on steadily if the trunk is busy. Parties hear a warning
tone every six seconds.
You hear dial tone, the Source indicator goes on steadily and the barge
in indicator flashes if the trunk is idle.
4 Click the Release button to end the procedure. The Release indicator
goes on, indicating that you can now take other calls.
Note: Barge-in cannot be used to verify the status of release link
trunks (RLTs) used with Centralized Attendant Service (CAS).
Busy verify
With Busy Verify, you can verify that an extension is in working
order, or check the status—busy or idle—of an extension.
1 Click on an idle loop key. The loop indicator goes on.
2 Click Busy Verify in the Feature List. The Busy Verify indicator goes
on.
Meridian 1 Attendant PC Software User Guide
Page 112 of 160
Meridian 1 Attendant PC features
3 Dial the extension you wish to check. You hear a fast busy signal if the
extension is disabled or not assigned.
You are able to speak to all parties and the Source and Destination
indicators go on steadily if the extension is busy. Parties hear a
warning tone every six seconds.
The Source and Busy Verify indicators flash slowly if the extension is
idle. The extension is not rung.
4 To ring the extension, click on signal source. If the called party
answers, the Source and Busy Verify indicators go on steadily.
5 Click Release to end your connection in the call. The Release indicator
goes on, indicating that you are now free to take other calls.
Charge Account
Entering an account number after dialing a call
Use this procedure to assign a Charge Account number to an
outgoing call after you have dialed the call.
1 You have dialed an outgoing call for an extension at your location.
Click Charge.
The Destination indicator flashes; the called party is automatically
placed on hold. The charge indicator goes on.
2 Dial the Charge Account number.
The Destination indicator goes off; the call is automatically
reestablished. The charge indicator goes off.
3 Click Release to end your connection in the call.
The Release indicator goes on; you are free to process other calls.
P0891256 Standard 2.00
February 1999
Meridian 1 Attendant PC features
Page 113 of 160
Note 1: Charge account numbers may consist of up to 23 digits.
The system ignores extra digits.
Note 2: You can also enter Charge Account numbers before
extending incoming calls to extensions.
Note 3: During a Conference call, you can:
•
assign portions of the call to different accounts by entering
charge numbers as you add trunks to the conference
•
assign the entire call to a single charge account number.
DID Route Conversion
Direct inward dialing permits incoming calls from outside lines that
would normally be directed to the console to be routed to a
preselected destination. Incoming DID digit conversion translates
the digits that are actually dialed into digits that correspond to
internal extensions. You can direct calls coming in on DID trunks
to a set of extensions that are programmed as night destinations,
or you can direct them to normal extensions.
1 Click on an idle loop key. The loop indicator goes on.
2 Click on DID Route Conv. The DID Route Conv indicator goes on.
3 Click on # to see the status of all DID routes. The DID Route Conv
indicator goes on steadily to show that all routes are in day mode. The DID
Route Conv indicator flashes to show that some or all routes are in night
mode.
4 Dial the route access code to see the status of a specific DID route.
The DID Route Conv indicator goes on steadily to show that the route is
in day mode. The DID Route Conv. indicator flashes to show that the
route is in night mode.
5 Click the Release button to cancel the change. All indicators go off.
Nothing is changed.
6 Click on DID Route Conv to switch between day and night modes. All
indicators go off. The mode of the DID route is changed.
Note: When you turn on Night Service, all DID routes
automatically go into night mode. You can, however, switch
individual DID routes into day mode.
Meridian 1 Attendant PC Software User Guide
Page 114 of 160
Meridian 1 Attendant PC features
Note: If you want to change all DID routes into night mode, and
only some of the routes are in day mode, You have to first change
all of the routes into day mode.
Note: If the DID route has been changed at a telephone (by the
system administrator), you cannot change it at your console.
Do-Not-Disturb
Setting up Do-Not-Disturb
An extension in Do-Not-Disturb (DND) mode is free to place calls
but appears busy to all incoming calls. You can put one extension
or a predefined group of extensions into Do-Not-Disturb mode.
1 Click on an idle loop key. The loop indicator goes on.
2 Click on Do-Not-Disturb in the Feature List. You can now set up
individual or group DND. The Source indicator goes on. The
Do-Not-Disturb indicator flashes slowly.
3 To set up individual DND, dial the extension requesting DND. To set
up group DND, click on #, then dial the appropriate group identification
code, then click on # again. The Do-Not-Disturb indicator goes off (or
goes on if the extension or group is already in DND mode).
4 Click on Do-Not-Disturb again. The Do-Not-Disturb indicator goes on;
the dialed extension or group is now in DND.
5 Click the Release button to end the procedure. The loop, Source, and
Do-Not-Disturb indicators go off. The Release indicator goes on.
Note: If you have a Do-Not-Disturb-Grp key, the procedure is simpler:
at any point, click on the Do-Not-Disturb-Grp key for the group of
extensions you wish to place in do-not-disturb mode. The
Do-Not-Disturb-Grp indicator flashes briefly, then goes on.
Using Do-Not-Disturb
1 Click on an idle loop key. The loop indicator goes on.
2 To test individual DND, dial the extension previously placed in DND
mode. To test group DND, dial one extension within a group previously
placed in DND. You hear a busy signal. The Source indicator flashes. The
Do-Not-Disturb indicator in the Feature List goes on.
P0891256 Standard 2.00
February 1999
Meridian 1 Attendant PC features
Page 115 of 160
3 Click the Release button. The loop, Source, and Do-Not-Disturb
indicators go off. The Release indicator goes on.
Cancelling Do-Not-Disturb
You can cancel Do-Not-Disturb (DND) for a single extension or for
a predefined group of extensions.
1 Click on an idle loop key. The loop indicator goes on.
2 Click on Do-Not-Disturb in the Feature List. You can now cancel
individual or group DND. The Source indicator goes on. The
Do-Not-Disturb indicator flashes slowly.
3 To cancel individual DND, dial the extension to be removed from DND
mode. To cancel group DND, click on #, dial the appropriate group
identification code, and then click on # again. The Do-Not-Disturb
indicator goes on.
4 Click on Do-Not-Disturb again. The Do-Not-Disturb indicator goes off;
the dialed extension or group is now removed from DND mode.
5 Click the Release button to end the procedure. The loop and Source
indicators go off. The Release indicator goes on.
Note: If you have Do-Not-Disturb-Grp keys, click on the
Do-Not-Disturb-Grp key beside a Do-Not-Disturb-Grp indicator
which is on, to cancel DND for that group. The Do-Not-Disturb-Grp
indicator flashes briefly, then goes off.
Overriding Do-Not-Disturb
A Do-Not-Disturb indicator which is on tells you that you have
dialed an extension in Do-Not-Disturb mode. You can temporarily
override DND for that call using this procedure.
1 Click on an idle loop key. The loop indicator goes on.
2 Dial the extension previously placed in DND mode. You hear a busy
signal. The Source indicator flashes. The Do-Not-Disturb indicator goes
on.
3 Click on Do-Not-Disturb. You hear ringing. The Source indicator
flashes slowly. The Do-Not-Disturb indicator goes off.
Meridian 1 Attendant PC Software User Guide
Page 116 of 160
Meridian 1 Attendant PC features
4 The called party answers. Click the Release button when you wish to
end the call. The Source indicator goes on steadily upon answer. The loop
and Source indicators go off upon release. The Release indicator goes
on.
Note: To override DND for an extension within a group that has
been placed in Do-Not-Disturb, click on an idle loop key, click on
the appropriate dnd. group key, then dial the extension as usual.
Testing Do-Not-Disturb
When the Do-Not-Disturb indicator goes on steadily,
Do-Not-Disturb is functioning properly. Use this procedure to
determine whether DND is working properly for an extension or
group of extensions.
1 Click on an idle loop key. The loop indicator goes on.
2 To test individual DND, dial the extension previously placed in DND
mode. To test group DND, dial one extension within a group previously
placed in DND. You hear a busy signal. The Source indicator flashes. The
dnd. ind. indicator goes on.
3 Click the Release button. The loop, Source, and Do Not Disturb
indicators go off. The Release indicator goes on.
A dnd. group indicator stays on steadily while the extensions
within the group are in Do-Not-Disturb mode.
End-to-end signaling
You can send Dual Tone Multiple Frequency (DTMF) signals from
your console to access devices that require Touch tone signalling,
such as Meridian Mail.
1 You have an active call on either the Source loop or Destination loop.
Click on EES. The EES indicator fast flashes.
2 Dial numbers on the dial pad. The connected party receives DTMF
signals. Your line display may display each number you dial. You may
hear the tones if feedback has been defined in software.
P0891256 Standard 2.00
February 1999
Meridian 1 Attendant PC features
Page 117 of 160
3 Click on EES to end the procedure. The EES indicator goes off.
Note: The console can have only one party connected, either source
or destination. Activating any feature that allows or requires an active
party on the loop key (Hold, Call Park, Charge Account, Release) will
cancel end-to-end signaling.
Enhanced Night Service
This feature modifies the existing Night Service operation by
allowing Public Network (Central Office [CO], Direct Inward Dial
[DID], Foreign Exchange [FEX], and Wide Area Telephone
Service [WATS]) trunks to be assigned to specific Directory
Numbers (DN) during Night Service.
Enhanced Night Service allows you to:
—
address different night answering requirements
—
establish different patterns to satisfy required night, holiday, or
weekend Night Service answering needs
—
modify the assignment when Night Service is not active (a service
change may also perform this modification)
To determine the Night Service setting:
1 Click an idle loop key. The loop key indicator lights steadily.
2 Click the Busy button. The indicator flashes. You hear dial tone, and
the current Night Service Option number is displayed.
3 Click the Release button. The loop and Busy indicators light steadily,
and the display is cleared.
To select a new Night Service
1 Dial a one-digit (0-9) option number. The old Night Service number (X)
is shifted and the new Option number (Y) is displayed. X and Y are
separated by a hyphen, e.g., Y-X.
2 Click the Release button. The Position Busy indicator goes out. The
new Night Service option is stored. The display is cleared.
Meridian 1 Attendant PC Software User Guide
Page 118 of 160
Meridian 1 Attendant PC features
Turning Enhanced Night Service on and off
Enhanced Night Service permits incoming calls that would
normally be directed to the console to be routed to a preselected
destination when the console is unattended. Your console may be
equipped with either regular Night Service, or enhanced Night
Service, but not both. If necessary, ask your System Administrator
which version of Night Service is on your console.
1 To activate enhanced Night Service for a single console, click on the
Busy button. Unplug the handset or headset. The current Night Service
option number is displayed.
2 To cancel enhanced Night Service for a single console, plug in the
handset or headset.
3 To activate enhanced Night Service for multiple consoles, click on the
Busy button at each console. Unplug all headsets and handsets. The
current Night Service option number is displayed.
4 To cancel enhanced Night Service for multiple consoles, plug at least
one handset or headset.
When all consoles but one are in Position Busy mode and the
attendant at the only active console clicks on the Busy key, the
system is automatically placed in Night Service.
Enhanced Secrecy
The Enhanced Secrecy feature ensures that either the caller or
the called party is always excluded from the call when you are
talking to the other party.
1 Dial the requested extension. The Excl Src indicator goes on during
dialing. You hear ringing. The LCD indicator flashes slowly.
2 When the called party answers, the Destination indicator goes on
steadily. The caller cannot hear conversation between you and the called
party. Click on the loop key beside the slowly flashing Source indicator to
establish a three-way connection. You, the caller, and the called party
hear a warning tone.
P0891256 Standard 2.00
February 1999
Meridian 1 Attendant PC features
Page 119 of 160
3 Click the Release button or an idle loop key to release the call from the
console. You cannot reenter the call. The caller and the called party
remain connected. The Release indicator and all other indicators go off.
If you want to be able to reenter the call later, click on the Hold button,
then the Release button. This step will exclude you from the call, but
keep it on hold at the console. The caller and the called party remain
connected. The loop key flashes slowly.
4 To reenter the call, possible only if you follow the process outlined in
the second paragraph of step 3, click on the loop key beside the slowly
flashing Source indicator. You, the caller, and the called party hear a
warning tone.
Note 1: In step 1, click on Excl Dst to talk to the caller while the
called party’s extension is being rung. The called party is excluded
from the connection when the call is answered. The caller hears
ringing if you click on the Release button while the called party is
being rung.
Note 2: In step 2, there is no connection between the caller and
the called party if either has warning-tone-denied Class of Service.
Note 3: To establish yourself, the caller, and the called party in a
connection that allows the called party to make another call, click
on Conference in the Feature List after step 4.
Malicious Call Trace
Malicious Call Trace lets you trace nuisance calls being presented
to your console.
1 Click Call Trace from the Feature List while the call is in progress. The
loop indicator is on. The Source or Destination indicator is on.
Note: A call trace report is printed on the maintenance terminal at
your company. The report identifies the source or destination, or
both.
Meridian 1 Attendant PC Software User Guide
Page 120 of 160
Meridian 1 Attendant PC features
Night Service
Night Service allows you to connect incoming trunks to selected
Night Service extensions. You can assign any number of trunks to
the same Night Service extension.
1 Click on an idle loop key. Click the Busy key. You hear dial tone. The
loop indicator goes on.
2 Dial the desired trunk access code and member number, followed by #
3 Click on Display Source to check the display. If the display is clear, no
night-service extension has been assigned to the trunk. If the display
shows an extension number, it is the night-service extension assigned to
the trunk.
4 To set up a Night Service connection, dial the Night Service extension
number to which the trunk is to be routed, followed by #.
To cancel an existing Night Service connection, dial *, then #. Trunk
answer from any station (TAFAS) is now allowed.
Turning Night Service On and Off
Night Service permits incoming calls that would normally be
directed to the console to be routed to a preselected destination
when the console is unattended. You can turn Night Service on or
off for a single- or multiple-console system.
1 To activate Night Service for a single console, click on the Busy button.
Unplug the handset or headset.
2 To cancel Night Service for a single console, plug in the handset or
headset.
3 To activate Night Service for multiple consoles, click on the Busy
button at any console. Unplug all handsets and headsets.
4 To cancel Night Service for multiple consoles, plug in at least one
handset or headset.
Note: When all consoles but one are in Position Busy mode and
the attendant at the only active console clicks on the Busy key, the
system is automatically placed in night-service mode.
P0891256 Standard 2.00
February 1999
Meridian 1 Attendant PC features
Page 121 of 160
Displaying and changing the Night Service option number
Note: As part of enhanced Night Service, you can display and
change the Night Service option number. The Night Service option
number tells you which night number to which incoming calls will
be directed.
1 To display the current Night Service option number, click on an idle
loop key, then the Busy key. You hear dial tone. The loop indicator goes
on.
2 To change the current Night Service option number, dial a one-digit
option number (0-9). The dial tone stops. The old and new Night Service
option numbers, separated by a hyphen, are displayed. The dial tone
stops. The old and new Night Service option numbers, separated by a
hyphen, are displayed.
3 Click the Release button. The loop indicator goes off.
Paging
You can page someone over your organization’s paging
equipment through your console if the two are connected.
1 Click on an idle loop key. The loop indicator goes on.
2 Click on the Page key and hold it down while you make your
announcement.
3 Click the Release button to end the procedure. The loop indicator goes
off. The Release indicator goes on, indicating that you are now free to
take other calls.
Position Busy
Position Busy allows you to make your console appear busy, thus
preventing incoming calls from reaching you.
1 To activate Position Busy, click the Busy button when your console is
idle (all loop indicators off). You will receive no further calls.
2 To cancel Position Busy, click the Busy button when your console is in
Position Busy mode. You will now receive calls.
Meridian 1 Attendant PC Software User Guide
Page 122 of 160
Meridian 1 Attendant PC features
Note: In a single-console set-up, clicking on Busy places the
system in Night Service. In a multiple-console setup, the system is
placed in Night Service when all consoles are put into Position
Busy.
Radio Paging
Automatic pre-selection
1 Lift handset. Set receives dial tone.
2 Enter the RPAC (FFC) for initiating RPA. Set receives:
— paging tone if FFC is valid
— CTVN treatment if FFC is invalid
—
congestion tone (as configured) if no trunk is available in a single
system
3 Enter the DN of the part to be paged. Set receives:
—
ringback tone, call progress tones or silence (as configured) if
paging was successful
—
no tone from the Meridian 1 if speech path is provided
—
CTVN treatment if DN is invalid.
—
congestion tone if no paging trunk is available
—
busy tone if absence signal is received
Automatic post-selection
1 Lift the handset. Dial tone is heard.
2 Enter the DN of the party to be paged. Set receives ringback or busy
tone if DN is valid. It receives CTVN treatment if DN is invalid.
3 Click on the RPAG key (for RPA). Set receives ringback tone, call
progress tones or silence (as configured) if paging was successful. If the
paging call recalls, the attendant can extend the call again.
P0891256 Standard 2.00
—
Set receives CTVN treatment if FFC or DN is invalid.
—
Set receives congestion tone if no paging trunks are available.
—
Set receives busy tone if absence signal is received.
February 1999
Meridian 1 Attendant PC features
Page 123 of 160
Manual post-selection
1 Lift the handset. Dial tone is heard.
2 Enter the DN of the party to be paged. Set receives ringback or busy
tone if DN is valid. Set receives CTVN treatment if DN is invalid.
3 Click on the RPAG key (for RPA). Set receives:
—
ringback tone, call progress tones or silence (as configured) if
paging was successful
—
CTVN treatment if FFC or DN is invalid
— congestion tone if no paging trunks are available.
Manual pre-selection
1 Lift the handset. Dial tone is heard.
2 Enter the RPAC (FFC) for initiating RPA. Set receives:
— paging tone if FFC is valid
— DTVN treatment if FFC is invalid
— congestion tone (as configured) if no paging trunk is available
3 Enter the DN of party you wish to reach. Set receives ringback or busy
tone if DN is valid. Set receives CTVN treatment if DN is invalid.
4 Enter mode digit.
5 Enter information to be sent.
6 Enter # for end of information. Set receives ringback tone, call
progress tones or silence (as configured) if paging was successful.
Set receives busy tone if absence signal is received.
Semi-Automatic Camp On
When an attendant extends a call to a desired party who is busy,
the attendant can activate Semi-automatic Camp-On as follows:
1 Click Semi-Automatic Camp On in the Feature List.
The call is camped on the desired party.
The display shows the calling party’s DN, and the party to which the
call is camped on (the desired party).
Meridian 1 Attendant PC Software User Guide
Page 124 of 160
Meridian 1 Attendant PC features
2 The desired party becomes idle.
The call is recalled to the attendant.
To ring the desired party after receiving the recall, click
Semi-Automatic Camp On in the Feature List again.
Series Call
The attendant designates the source call as a Series Call by
clicking Series Call (SECL) from the Feature List. Series Call may
be clicked by the attendant while dialing, talking to the destination
party, or while a call is ringing. The associated indicator remains
lit until the Series Call is canceled. If the attendant tries to extend
a call to an external station, the SECL indicator flashes. The
attendant has to click Series Call to cancel the Series Call, and
extend the call as a standard call extension.
Speaking privately (Splitting)
Splitting allows you to talk to a called party without the caller
hearing, or to talk to a caller without the called party hearing.
1 A caller requests an extension. To exclude the caller from the
connection, click on Excl Src in the Feature List. The Excl Src indicator
goes on.
2 Dial the requested extension. The called party answers. Talk privately
with the called party. You hear ringing but the caller does not. The
Destination indicator flashes slowly. Upon answer, ringing stops and the
LCD indicator goes on steadily.
3 To exclude the called party from the connection, click on Excl Dst. You
and the caller are reconnected. Talk privately. The Excl Src indicator goes
off. The Excl Dst indicator goes on.
4 To connect yourself, the caller, and the called party, click on the loop
key. The Excl Dst indicator goes off.
5 To end your connection in the call, click the Release button. The
Release indicator goes on, indicating that you are now free to take other
calls.
P0891256 Standard 2.00
February 1999
Meridian 1 Attendant PC features
Page 125 of 160
Note 1: The Secrecy feature automatically prevents a voice
connection between caller and called party while you are extending a
call.
Note 2: Splitting allows you to talk selectively and privately to caller
and called party while you are extending a call, or while you are
actually connected to a call.
Speed Call
Calling a Speed Call number
If your console is designated a Speed Call user, you can place a
call by dialing a one-, two-, or three-digit access code.
1 Click on an idle loop key. The loop indicator goes on.
2 Click on Speed Call.
3 Dial the one-, two-, or three-digit access code associated with the
desired number. The Speed Call indicator goes off; the system
automatically dials the full number.
Note: After dialing the Speed Call code, you can add extra digits
to the number represented by the code.
Note: If you wish to display the number stored against a
speed-call access code, click on Disp Src after dialing the code.
Storing a Speed Call number
If your console is designated a Speed Call controller, you can
store a number for Speed Call and use the Speed Call codes. Also
use this number-storing procedure to change a number stored
against a Speed Call code.
1 When all loop indicators are off, click on Speed Call. The Speed Call
indicator flashes.
2 Dial the one-, two-, or three-digit code to be associated with the phone
number.
3 To see if a number is already associated with the dialed code, click on
Disp Src from the Feature List. The current speed-call list entry (if any) is
displayed.
Meridian 1 Attendant PC Software User Guide
Page 126 of 160
Meridian 1 Attendant PC features
4 Dial the number to be stored. Click on * after every trunk access code
to ensure a pause for dial tone.
5 Click on Speed Call again. The Speed Call indicator goes off; the
access code and phone number you dialed are stored together for
speed-calling.
Note 1: To cancel a number stored against a code, click Speed
Call, enter the code, and click on *.
Note 2: Regarding Speed Call access codes:
• A one-digit access code (0 through 9) allows a Speed Call list
of up to 10 numbers
• A two-digit access code (00 through 99) allows a Speed Call
slit of up to 100 numbers
• A three-digit access code (000 through 999) allows a Speed
Call list of up too 1000 numbers.
Note 3: The phone numbers assigned to Speed Call access
codes can be 4, 8, 12, 16, 20, 28, 94 31 digits long (including any
asterisks inserted for dial-tone pauses
Stored Number Redial
Redialing a Stored Number
Stored Number Redial can be used when you hear either dial tone
or special dial tone. This means that Stored Number Redial can be
used during established calls to transfer or conference in a call.
1 Click on an idle loop key. The loop indicator goes on.
2 Click on Stored Number Redial to redial the stored number. The stored
digits are automatically dialed.
3 Dial further digits now, if needed.
P0891256 Standard 2.00
February 1999
Meridian 1 Attendant PC features
Page 127 of 160
Storing a Stored Number Redial number ahead of time
With Stored Number Redial (SNR), you can store one number of
up to 31 digits for later use.
1 Click on Stored Number Redial. The Stored Number Redial indicator
flashes.
2 Dial the number to be stored.
3 Click on Stored Number Redial again. The Stored Number Redial
indicator goes off; the previously stored number is erased.
Note 1: If more than 31 digits are entered, you hear a dial tone.
Note 2: If snr. is clicked on and no digits (or more than 31 digits)
are dialed, the Stored Number Redial memory is not changed; the
previously stored number remains unchanged.
Note 3: If snr. is not clicked on a second time, or the Stored
Number Redial sequence is interrupted by clicking on another key,
the new entry is ignored; the previously stored number remains
unchanged.
Storing a Stored Number Redial number during a call
You can use Stored Number Redial while trying to establish a call
(when the other end is ringing or busy), or during an established
call (when you are talking to someone at the other end). If on an
established call, go directly to step 3. (See notes below.)
1 Click on an idle loop key. The loop indicator goes on.
2 Dial the required number.
3 Click on Stored Number Redial from the Feature List. You are on a call.
Meridian 1 Attendant PC Software User Guide
Page 128 of 160
Meridian 1 Attendant PC features
Note 1: When a call is active on the source and destination side,
the destination number is stored. If only the source is active, no
number is stored.
Note 2: For internal calls, the dialed digits must result in a busy
signal or ringing. If insufficient digits or an invalid extension is
dialed, the attempt to store the number is rejected and any
previously stored number is not changed.
Note 3: For external calls, if no trunk is available, all digits dialed
are stored even though some digits may be entered after an
overflow or busy signal.
System Speed Call
To make a System Speed Call from a Meridian 1 proprietary
telephone, or Attendant Console (User):
1 Click an idle loop key, and click System Speed Call from the Feature
List.
2 Dial the Speed Call code.
If the Speed Call number is accepted, the telephone number
represented by the Speed Call code is dialed automatically. No
confirmation tone is given unless Flexible Feature Code (FFC) is
implemented.
If the Speed Call number is not accepted, a fast busy signal indicates
the number was rejected.
P0891256 Standard 2.00
February 1999
Page 129 of 160
Meridian 1 Attendant PC network features
This appendix defines the Meridian 1 Attendant PC network
features that are available for attendant operations. The network
features described in this section are divided into three groups:
— Centralized Attendant Service (CAS)
— Network Attendant Service (NAS)
— Networking (ESN, ISDN)
Centralized Attendant Service
Answering a call to a remote console
With Centralized Attendant Service (CAS), attendant services for multiple
locations can be provided from a single location. As a CAS attendant, you can
handle calls that would normally be handled by the attendants at a remote
location.
1 You receive a call intended for a remote console. Click on the loop key
beside the flashing Source indicator (or remote ICI) to answer the call.
The tone stops and the loop and Source indicators go on steadily; you
hear two beeps before you are connected to the caller. The remote ICI
indicator is on.
2 Respond to the caller’s request. If no further action is needed, click the
Release button to end the call. The Release indicator goes on; you can
now take other calls.
Meridian 1 Attendant PC Software User Guide
Page 130 of 160
Meridian 1 Attendant PC network features
Note 1: Calls from remote locations travel over release line trunks
(RLTs). Call source information consists of an RLT access code and
member number.
Note 2: You can also receive direct calls from extension users and
attendants at the remote location. Handle the same as for indirect calls
outlined above, except that direct calls cannot be placed on silent hold.
If you dial the silent hold code, you hear a fast busy signal.
Extending a call to an idle extension
After answering a call to a remote console, you can extend it to the desired
extension at the remote location.
1 The caller requests an extension at the remote location. Click on the
key that forwards calls from other sites to the main location. You hear dial
tone from the remote location; the caller hears nothing. The remote ICI,
loop, and Source indicators are on.
2 Dial the requested extension. You hear ringing at the remote location.
3 If you wish to release before the called party answers, click the
Release button. [You are recalled if the called party does not answer
within a set time after you release from the call.] The Release indicator
goes on; you can now take other calls.
If you wish to ensure that the called party is present, wait for an answer
before releasing. When answered, ringing stops; you can talk to the
called party.
4 Once you have ensured that the called party is present, click the
Release button to end your connection in the call. The caller and called
party are connected. The Release indicator goes on; you can now take
other calls.
P0891256 Standard 2.00
February 1999
Meridian 1 Attendant PC network features
Page 131 of 160
Extending a call to a busy remote extension
You can route one call to a busy extension at a remote location if camp-on is
allowed at the busy end. If the called extension does not become idle within a
set time, you are automatically recalled by the camped caller.
1 The caller requests an extension at the remote location. Click on the
key that forwards calls from a remote location to the main location. You
hear dial tone from the remote location; the caller hears nothing. The
remote ICI, loop, and Source indicators are on.
2 Dial the requested extension. If the called extension is busy, you hear
a busy signal followed by a beep; you are reconnected to the caller.
3 If the caller does not wish to wait, click the Rls Dst button, then the
Release button to end the call. The Release indicator goes on; you can
take other calls.
If the caller wishes to be camped onto the busy extension, click the
Release button {If recall occurs, either re-extend the call (this
paragraph) or end it (step 3). The Release indicator goes on; you can
take other calls.
Note: If you dial the requested number at the remote location and
hear only a busy signal (with no beep), then a call is already camped
onto that extension. If the caller wishes to wait, put the call on silent
hold. Otherwise, release the call.
Putting a call on silent hold
When one call is already camped onto a busy extension and a
third caller wishes to wait for a connection, you can put the third
caller on silent hold until camp-on becomes possible. You are
automatically recalled by the caller after a set time.
1 The caller wishes to wait for a connection but cannot be camped onto
the busy extension. Click on the key that forwards calls from a remote
location to the main location. You hear dial tone from the remote location;
the caller hears nothing. The remote ICI, loop, and Source indicators are
on.
2 Dial the silent hold code. You hear four to six beeps.
3 Click the Release button to put the call on silent hold. The Release
indicator goes on; you can take other calls.
Meridian 1 Attendant PC Software User Guide
Page 132 of 160
Meridian 1 Attendant PC network features
4 When recall occurs, check if camp-on is possible. If not, either put the
call back on silent hold (steps 2 and 3) or end it by clicking the Rls Dst
button and then the Release button.
Note: When you place a call on silent hold, the release link trunk
(RLT) is held at the remote location. When you use Hold, the RLT is
held at your location.
Remote recall
When you extend a call to an idle extension at a remote location and the called
party does not answer within a set time, you are automatically recalled by the
caller.
1 You receive a recall from a remote location. Click on the loop key
beside the flashing Source indicator (or remote) to answer the call. The
tone stops and the loop and Source indicators go on steadily; you hear a
beep before being connected to the caller. The remote ICI indicator is on.
2 Click the Rls Dst button. Ringing at the called extension stops.
3 If the caller wishes to end the call, click the Release button. The
Release indicator goes on; you can now take other calls.
If the caller wishes to speak to another party, dial the new number,
then click the Release button. The Release indicator goes on; you can
now take other calls.
Note: Recalls from remote locations travel over release link trunks
(RLTs). Call source information consists of an RLT access code and
member number.
Transferring a recall to another remote extension
A called party at a remote location can transfer a call back to you, which you
can then extend to another extension.
1 You receive a recall from a remote location. Click on the loop key
beside the flashing Source indicator (or remote) to answer the call. The
tone stops and the loop and Source indicators go on steadily; you hear
two beeps before you are connected to the called party. The remote ICI
indicator is on.
2 The called party asks to have the caller transferred back to you. Click
the Rls Dst button to release the called party from the call. You are
connected to the caller.
P0891256 Standard 2.00
February 1999
Meridian 1 Attendant PC network features
Page 133 of 160
3 If the caller wishes to end the call, click the Release button. The
Release indicator goes on; you can now take other calls.
If the caller wishes to speak to another party, dial the new number,
then click the Release button. The Release indicator goes on; you can
now take other calls.
Network Attendant Service
The following NAS features are processed the same as for local
calls. You can find these features elsewhere in the guide:
— Attendant Routing
— Break-In
— Call Extension
— Call Waiting
— Camp-On
— Incoming Call Indication
— Night Service
— Off-Hook Queueing
— Timed Reminder Recalls
The next five features apply specifically to NAS situations. Clicking
the NAS key on your screen “console” makes you available for
calls from all locations in the network.
Answering a call from a remote console
With Network Attendant Service (NAS), attendant services for multiple
locations can be provided from a single location. As a NAS attendant, you can
handle calls that would normally be handled by the attendants at a remote
location.
1 You receive a call intended for a remote console. Click on the loop key
beside the flashing remote ICI to answer the call. The tone stops and you
are connected to the caller. The appropriate ICI indicator is on.
2 Respond to the caller’s request. If no further action is needed, click the
Release button to end the call. The Release indicator goes on; you can
now take other calls.
Meridian 1 Attendant PC Software User Guide
Page 134 of 160
Meridian 1 Attendant PC network features
Note 1: Calls from remote locations travel over Integrated Service
Digital Network (ISDN) trunks. Calling Line ID is supplied, to indicate
the source of the call.
Note 2: You can also receive direct calls from extension users and
attendants at the remote location. The procedure is the same as for
indirect calls outline above, except that direct calls cannot be placed
on silent hold. If you dial the silent hold code, you hear a fast busy
signal.
Extending a call to a busy remote extension
You can route a call to a busy extension at a remote location if camp-on is
allowed at the busy end. If the called extension does not become idle within a
set time, you are automatically recalled by the camped caller.
1 You receive a call intended for a remote console. Click on the loop key
beside the flashing ICI key to answer the call. The appropriate ICI
indicator is on.
2 The caller requests an extension at the remote location. Dial the
requested location. The appropriate ICI indicators are on. If the called
extension is busy, you hear a busy signal followed by a beep; you are
reconnected to the caller.
3 If the caller does not wish to wait, click the Rls Dst button, then the
Release button to end the call. The Release indicator goes on; you can
now take other calls.
If the caller wishes to be camped onto the busy extension, click the
Release button. [If recall occurs, either extend the call again (this
paragraph) or end it (step 3). The Release indicator goes on; you can
now take other calls.
Note: If you dial the requested number at the remote location and
hear only a busy signal (with no beep), then a call is already
camped onto that extension. If the caller wishes to wait, put the call
on hold. Otherwise, release the call.
P0891256 Standard 2.00
February 1999
Meridian 1 Attendant PC network features
Page 135 of 160
Extending a call to an idle remote extension
After answering a call to a remote console, you can extend it to the desired
extension at the remote location.
1 You receive a call intended for a remote console. Click on the loop key
beside the flashing ICI key to answer the call. The appropriate ICI
indicator is on.
2 Dial the requested extension. You hear ringing at the remote location.
3 If you wish to release before the called party answers click the Release
button. The Release indicator goes on; you can now take other calls.
To ensure that the called party is present, wait for an answer before
releasing. When call is answered, ringing stops; you can talk to the
called party.
4 Once you have ensured that the called party is present, click the
Release button to end your connection in the call. The caller and called
party are connected. The Release indicator goes on; you can now take
other calls.
Remote recall
When you extend a call to an idle extension at a remote location and the called
party does not answer within a set time, you are automatically recalled by the
caller.
1 You receive a recall from a remote location. Click on the loop key
beside the flashing ICI indicator. The appropriate ICI indicator is on.
2 Click the Rls Dst button. Ringing at the called extension stops.
3 If the caller wishes to end the call, click the Release button. The
Release indicator goes on; you can now take other calls.
If the caller wishes to speak to another party, dial the new number,
then click the Release button. The Release indicator goes on; you can
now take other calls.
Note: Calling Line ID supplies the information regarding the source of
the recall.
Meridian 1 Attendant PC Software User Guide
Page 136 of 160
Meridian 1 Attendant PC network features
Transferring a call to another remote extension
A called party at a remote location can transfer a call back to you, which you
can then extend to another extension.
1 You receive a call from a remote location. Click on the loop key beside
the flashing ICI indicator to answer the call. The appropriate ICI indicator
is on.
2 The called party asks to have the caller transferred back to you. Click
the Rls Dst button to release the called party from the call. You are
connected to the caller.
3 If the caller wishes to end the call, click the Release button. The
Release indicator goes on; you can now take other calls.
If the caller wishes to speak to another party, dial the new number,
then click the Release button. The Release indicator goes on; you can
now take other calls.
Networking (ESN, ISDN) features
Authorization Code
When an extension user requests an ESN location, you may have to enter an
authorization code to override the access restrictions assigned to the user’s
extension. Authorization codes are issued to extension users with special
calling needs.
1 A caller requests an extension at a distant ESN location and provides
an authorization code. Dial the requested number. The Excl Src indicator
goes on. You may hear the authorization-code prompt:
• a recorded message followed by three beeps, or
• ten beeps followed by dial tone
2 Dial the user’s authorization code. The call is completed.
3 Click the Release button to end your connection in the call. The
Release indicator goes on; you can now take other calls.
P0891256 Standard 2.00
February 1999
Meridian 1 Attendant PC network features
Page 137 of 160
Charge Account
If your console has a Charge key, you can assign a charge account number to
a call about to be extended to an ESN location.
1 A caller requests an extension at a distant ESN location and wishes to
charge the call to an account number. Click on Charge. The Charge
indicator goes on. The Destination indicator flashes.
2 Dial the charge account code. The Charge and Destination indicators
go off when the last digit of the charge account code is entered.
3 Dial the call as usual and click the Release button. A charge record is
produced when the trunk is accessed. The Release indicator goes on; you
can now take other calls.
Expensive Route Warning Tone
When an extension user requests an ESN location, you may be signaled that
only an expensive route is available. The caller can accept the expensive route
(direct distance dialing, or DDD) or try again later.
1 A caller requests an extension at a distant ESN location. Dial the
requested number. The excl. source indicator goes on. You hear three
beeps if the only available route is the most expensive one.
2 To accept the extensive route, company policy permitting, stay on the
line. The call is completed.
To reject the expensive route, click the Release button. The Excl Src
indicator goes off; you and the caller are reconnected.
3 Click the Release button to end your connection in the call. The
Release indicator goes on; you can now take other calls.
Extending a call—Off-Hook Queueing
When an extension user requests an ESN location for which a
trunk is not immediately available, you can:
—
wait, off-hook, until a trunk becomes available, or
—
release the connection and allow the caller to wait for the trunk.
1 A caller requests an extension at a distant ESN location. Dial the
requested number. The Excl Src indicator goes on during dialing. you
hear a beep if a route is not immediately available.
2 Inform the caller that there will be a brief wait.
Meridian 1 Attendant PC Software User Guide
Page 138 of 160
Meridian 1 Attendant PC network features
3 Click the Release button to end your connection in the call. The
Release indicator goes on; you can now take other calls.
Network Speed Call
With Network Speed Call, you can extend calls to a selected number at an
ESN location by dialing a one-l, two-, or three-digit code.
1 Click on a loop key. The loop indicator goes on steadily.
2 Dial the network access code, the Network Speed Call list access
number, and the one- to three-digit code for the desired number. The
Source indicator goes on steadily. The number is automatically dialed.
Routing control
You can use ESN routing control to modify extension user’s network access.
When routing control is on, each extension usually has more restrictions.
Turning routing control off restores the Network Class of Service (NCOS)
assigned to each ESN user.
1 To turn routing control on, click on Routing Controls in the Feature List.
The Routing Controls indicator goes on
2 To cancel routing control, click on Routing Controls. The Routing
Controls indicator goes off.
P0891256 Standard 2.00
February 1999
Page 139 of 160
Using the Meridian 1 Attendant PC
Help Facility
Online Help is essential to learning and using the Meridian 1
Attendant PC. There are two kinds of Help: Help about a specific
procedure and Help that gives you information about what you see
on your screen.
About the Help facility
The Help facility provides the following three functions:
— describes the toolbar menu and console keys, such as fixed
keys, loop keys and lamps
— provides definitions of call processing features, such as Barge
In, Call Waiting, Call Park, and Malicious Call Trace
— gives setup instructions for feature keys, trunk group busy keys
(TGB), and incoming call indication (ICI) keys.
The Help menu
This section introduces you to the Help facility and the options you
can access to select Meridian 1 Attendant PC topics of interest
ranging from “Creating a Virtual Feature” to understanding basic
loop key operation. The next section provides examples of object
and topical information contained within the Help facility.
Meridian 1 Attendant PC Software User Guide
Page 140 of 160
Using the Meridian 1 Attendant PC Help Facility
Select a Help menu on your Console screen from the following
options:
You can also access Help for a dialog box object by using any of
the following means:
— Click the right mouse button on a Attendant PC object to display
a “What’s This?” message
— Click the
icon in the dialog box title bar to display a Help
cursor, then click the object
— Press the
— Use the
F1
Esc
key to get Help on the selected object
key to close the current Help window.
Console Help F1
When you press the F1 function key on your keyboard, your
terminal displays the Help Console window shown in Figure 49.
This window contains an image of your console, including its
menu, and also has its own four-item menu bar displayed at the
top:
The Help topics menu bar contains the following selections:
— Help Topics
— Back
— Options
— Glossary
P0891256 Standard 2.00
February 1999
Using the Meridian 1 Attendant PC Help Facility
Page 141 of 160
Figure 49
Console Help window
Help Topics menu bar
Using the Contents tab
Contents
Use the Contents tab from Help Topics to assist you in finding
Meridian 1 Attendant PC information quickly (Figure 50) to provide
step-by-step procedures as well as set up instructions for “Using
the PC console screen”, for example:
— Building an attendant’s toolbox
— Extending a call to voice mail
— Adding an attendant
— Headset and handset operation
— Sizing a PC console screen
Meridian 1 Attendant PC Software User Guide
Page 142 of 160
Using the Meridian 1 Attendant PC Help Facility
Figure 50
Contents tab window
Tip
Some Help topics contain
green underlined text.
You can click the green text
to see a definition of the term.
Represents a category
of topics
Reveals book contents
A page represents
an individual topic
Using the Index tab
Index
Use the Index tab to search console keywords for Help on a
specific topic. The Index serves as a traditional book index, listing
keywords and phrases alphabetically.
Figure 51
Index tab window
Tip
To scroll through the Help
Index, type the first few
letters of the word you want to
search for.
Double click on a console
topic or click the Display
button.
P0891256 Standard 2.00
To return to the list of
topics, click Help Topics.
February 1999
Using the Meridian 1 Attendant PC Help Facility
Page 143 of 160
Using the Find tab
Find
Use the Find tab to initiate a full-text search for any Attendant PC
keyword or phrase in the Help facility.
Figure 52
Find tab window
Type the keyword or phrase
you want to find.
Tip
Double click on a console
topic or click the Display
button.
To return to the list of
topics, click Help Topics.
Using the Options menu
Use the Options menu to access enhanced console Help
functions. The menu contains the following selections:
— Annotate - Allows you to add notes to a topic.
— Copy - Allows you to copy all or some selected topic text.
Annotate
— Print Topic - Allows you to print selected topic.
— Keep Help on Top - Allows the Help window on top, or in a default
position.
Copy
— Font - Allows you to specify small, normal or large font.
— Use System Colors - Allows you to display the Help system using
specified colors.
Meridian 1 Attendant PC Software User Guide
Page 144 of 160
Using the Meridian 1 Attendant PC Help Facility
Accessing Glossary features
The Glossary window (Figure 53) provides a reference for reading
about console features. Click on any Attendant PC entry of
interest to display a popup description for that feature.
Figure 53
Glossary window
About Meridian 1 Attendant PC software
This Help menu displays the current software version of the
Meridian 1 Attendant PC application that you are presently using,
for example; Version 1.1. Copyright ® 1996-1997, Nortel. All rights
reserved.”.
Note: Not every feature is available on every Meridian 1
Attendant PC application. Features available for the release of
software on your Meridian 1 are described in the NTP X11
Software Features Guide (553-3001-305).
P0891256 Standard 2.00
February 1999
Page 145 of 160
List of terms
Alarm
Also called off-hook alarm security. Enables any call to be
intercepted by a customer-defined extension; for example, by
security’s extension.
Auto Dial
A dialing feature available on a programmable feature key in
which the telephone user programs the number into the Auto Dial
key, which will thereafter dial the number whenever the user
presses the key.
Automatic Wake-up
A hospitality flexible feature which allows an overnight guest to
state the time he/she wants to be awakened. The telephone
system will ring the guest at the specified time.
Barge In
This flexible feature key enables you to verify the status (idle or
busy) of any trunk or special service access line.
Break In
A programmable feature key that enables you to enter an existing
connection to offer a call or relay an important message
(international use only).
Busy Verify
A flexible feature key that enables the attendant to verify the status
(idle or busy) or any extension.
Meridian 1 Attendant PC Software User Guide
Page 146 of 160
List of terms
Call Forward Busy
An ICI key that allows a call at a busy extension to be
automatically routed to you because the extension was
programmed this way.
Call Forward No Answer
An ICI key that allows a call to an extension that does not answer
to be automatically routed to you because it was programmed to
do so.
Call Park
A flexible feature key that enables you to place a call on hold
without occupying a loop key on your console.
Call Waiting
This light on the e console indicates the number of calls in queue
to be answered. If no calls are waiting, the light is off. If 1-3 calls
are waiting, the light is green. If more than three calls are waiting,
the light is red, and the number of calls waiting appears beside the
light.
Calling Party Number
A programmable feature key that enables you to record the calling
party number on an incoming collect call or to assign a special
billing code to an incoming collect call.
Camp-on
Routes one additional external call to a busy DN. Applies only to
attendant-extended calls. If the called party is not free within a
specified time, the caller is routed back to the attendant as a recall.
CAS
Centralized Attendant Service. One group of operators or
attendants answers all telephone calls coming into a company’s
branch office within an assigned region. Enables the attendant at
a remote location to automatically reroute calls to a CAS attendant
at the main location. In addition, this feature enables the CAS
attendant at the main location to get a dial tone from a remote
location to extend a call there.
P0891256 Standard 2.00
February 1999
List of terms
Page 147 of 160
Centralized Attendant Service
See CAS.
Charge Account
A flexible feature key that enables you to enter a charge account
number for a call going out through your console. On the Attendant
PC Software User Interface, this feature is activated with a
mouse-click.
Codes
These codes permit you to temporarily override the access
restrictions assigned to an on-site caller’s extension.
Conference
Allows you to establish a conference with up to six parties (on two
trunks), including yourself.
Console
A telephone receiver that can perform operations on incoming and
outgoing calls, such as the large unit used by telephone
attendants.
Controlled COS
Controlled Class of Service. A flexible feature key that enables the
attendant to alter line restrictions for a group of users that all have
the same Class of Service.
Call Waiting Indication
One or more incoming calls are waiting to be answered; a
key/lamp pair and a tone provide a warning. One waiting call can
be answered when current call is released.
Destination
In telephony, the destination of a call is the called party.
DID trunks
Direct Inward Dial trunks; trunks on which outside calls are
presented.
Meridian 1 Attendant PC Software User Guide
Page 148 of 160
List of terms
DID Route Control
A programmable feature key that enables you to direct calls
coming in on DID trunks either to either to a set of extensions
considered to be night destinations, or to normal extensions.
Display Calls Waiting
A flexible feature key that enables you to display the number of
calls waiting to be answered at the console.
Display Destination
A programmable feature key that enables you to display the phone
number of a called party.
Display Source
A programmable feature key that enables you to display stored
numbers associated with Auto Dial, Speed Call, and Night
Service.
Do-Not-Disturb Group
A programmable feature key that enables you to place a
predefined group of extensions in the Do-Not-Disturb mode.
Do-Not-Disturb-Individual
A programmable feature key that enables you to place an
individual extension or a predefined group of extensions in
Do-Not-Disturb mode.
DRC
See DID Route Control.
DTMF
Dual-Tone Multi-Frequency. Tones generated when the keys on a
telephone keypad are struck that enables the switch to signal the
desired telephone that a caller wants to be connected.
Electronic Switched Network
See ESN.
P0891256 Standard 2.00
February 1999
List of terms
Page 149 of 160
Emergency transfer switch
This feature, accessible from your Attendant PC interface unit, will
present incoming calls from selected trunks to preselected
telephones instead of to your console. Use this feature only during
an emergency when these telephones must have direct access to
dedicated trunks.
End-to-End Signaling (EES)
This flexible feature that you program on the “Flex Keys” sheet
from the Config menu, enables voice messaging (Voice Mail) and
paging from the attendant.
ESN
Electronic Switched Network. A telephone system that uses
electronics to perform call switching and associated billing.
Exclude Destination
An attendant presses the “Excl. des.” button on the console so that
he/she can have a private conversation with the calling party
(source).
Exclude Source
An attendant presses the “Excl. src.” button on the console so that
he/she can have a private conversation with the called party
(destination).
Fixed Feature
A fixed feature appears in all installations of the Attendant PC and
cannot be edited or removed. Fixed features include alarm, call
waiting, CAS, conference, night service, position busy, release
destination, release source, signal destination (source), and
exclude destination (source).
Flexible Feature
A console feature assigned in the Meridian 1 by an engineer and
given a key label and definition in the console.
Foreign Exchange
See FX.
Meridian 1 Attendant PC Software User Guide
Page 150 of 160
List of terms
Fully Restricted
A call from a fully restricted extension. A person using this
extension can place calls to and receive calls from other
extensions and the attendant, but is denied access to all incoming
and outgoing trunk lines. Incoming calls for a fully restricted
extension come to the attendant, who then extends them.
FX
Foreign Exchange, type of trunk. “fx” is the label on an ICI key
which receives calls from Foreign Exchange trunks.
ICI
Incoming Call Indicator. A key on the Attendant PC interface unit
that flashes to inform the attendant that an incoming call on a
particular trunk is waiting to be answered. An ICI “key” indicates
the first call; later calls light up the message waiting indication until
the first call is released.
May also refer to the light that identifies the type of call coming to
your console (ICI), such as internal external, WATS, tie trunk,
emergency, and so on. All incoming calls are queued
automatically in the order of arrival, and the appropriate ICI
indicators go on. You can click on a flashing ICI light to answer the
call associated with it. Set up your ICI keys from the ICI keys page
on the Config Console menu.
Incoming Call Indicator
See ICI.
Intercept
The call that activates this button may be from a caller who dialed
the access code for a busy trunk group, or from a caller
encountering equipment or dialing irregularities, such as a caller
who dialed an extension in Do-Not- Disturb mode. Finally, this call
may be from a restricted or semi-restricted extension attempting
to make a call that is not allowed.
Interpositional Call
Interpositional Call. This ICI key indicates an incoming call from
another attendant at your location.
P0891256 Standard 2.00
February 1999
List of terms
Page 151 of 160
LDN
Listed Directory Number. This is an ICI key that indicates a call to
a number for your organization that is found in the public
telephone directory. X11 release 20 and later allows each
authorized user up to six LDNs. When the feature Network
Attendant Services is enabled, the LDNs are recognized across
the network.
Listed Directory Number
See LDN.
Loop
A line that comes into the console, over which the attendant can
assign an outgoing call or answer an incoming call.
Malicious Call Trace
A flexible feature key that enables you to identify an internal
obscene or otherwise objectionable call. This feature can also
trace static on the line.
Message Cancellation
A flexible feature key that enables you to turn off the message
waiting signal at an extension after you have delivered the
message for that extension.
Message Center
This ICI key indicates that a caller wants to leave or retrieve a
message. This indicator appears only on Attendant PCs
programmed to handle message center features.
Message Indication
A flexible feature key that enables you to turn on the message
waiting signal at an extension for which a message has been
taken.
NAS
Network Attendant Services. This feature allows attendant
console positions to be dispersed in multiple locations within the
network. Pressing the NAS key on your console makes you
available for calls from all network locations.
Meridian 1 Attendant PC Software User Guide
Page 152 of 160
List of terms
Night (Service)
The system goes into night service when all consoles are
unattended. Then, all incoming calls are routed to a destination
other than the consoles (such as to a security representative), or
to a Night Service Extension (where callers may hear a recorded
message).
Paging
A programmable feature key that enables you to connect to your
organization’s paging equipment. Press the key for the duration of
your announcement.
Position busy
When an attendant will be leaving the console, he/she presses
this button. As a result, the system transfers all calls incoming to
the departing attendant’s console to other attendants.
Recall
This ICI key indicates the return to you of a call that you have put
through to an extension that is busy or does not answer within a
set time (usually 30 seconds). This ICI can also indicate a call from
an extension user who has activated the Attendant Recall feature.
Release
Mouse-operated key on the right side of the Attendant PC
Software screen display. Enables the attendant to release a
connection from the console.
Release destination
A Fixed Feature key on the console which allows the attendant to
disconnect the called party (destination) from a call.
Release Line Trunk
Telecommunications line used with Centralized Attendant Service
to connect callers from a remote location desiring an attendant at
a main location.
P0891256 Standard 2.00
February 1999
List of terms
Page 153 of 160
Release source
A Fixed Feature key on the console which allows the attendant to
disconnect the calling party (source) from a call.
Remote
A key on systems equipped for CAS (Centralized Attendant
Service) that indicates a call from a remote location, routed over a
release link trunk.
Restricted “0”
Key turns on when a call is from a fully restricted extensions, which
is denied access to all incoming and outgoing trunk lines.
Incoming calls for a fully restricted extension come to the
attendant, who can then extend them.
RLT
See Release Line Trunk.
Route access codes
Directs a call over a certain route to reach a specific destination.
The code may represent a specific line for a call (Tie, WATS, or
public trunk) or an attendant console for placing or transferring a
call.
Signal destination
The attendant pushes a key that signals a called party that he/she
is connected to the attendant.
Signal source
The attendant pushes a key that signals a caller that he/she is
connected to the attendant.
Source
In telephony, the source of a call is the calling party.
Speed Call
A dialing feature available on a programmable feature key that
enables you to dial any number stored by the Speed Call
Controller. As an alternative you can enter the Speed Call SPRE
code, and then enter the code assigned to the desired number.
Meridian 1 Attendant PC Software User Guide
Page 154 of 160
List of terms
Speed Call codes
A feature available on a programmable feature key that uses a
code to dial a programmed number automatically. The Speed Call
Controller assigns codes to the list of telephone numbers for
dialing by the Speed Call feature key.
SPRE codes
Special PREfix code, one to four digits long, that is assigned by
your system administrator. You use the code to operate a feature
for which your console has no dedicated (programmed) feature
key.
Stored number redial
Pressing the correct flexible feature key allows a number to be
stored after it has been dialed, either before or during the
connection, for later automatic dialing.
Supervisory mode
Selecting the Make Set Busy key when your set is idle enables you
to monitor other attendants, call an attendant, transfer a call to
another attendant, and receive a call from another attendant.
System Speed Call Controller
A flexible feature key that can overcome restrictions on individual
telephones via programming so that the users can call out to s
specific set of numbers, such as for emergencies (ambulance, fire
department, 911) or to a company out-of-area branch office, etc.
Through-dialing
Extension or tie-line users may request access to a number which
requires use of a trunk which they are not allowed to access.
Access the trunk for the user. Then the user can then dial out
(except onto fully restricted trunks).
Tie trunk
A dedicated circuit linking two PBX’s.
P0891256 Standard 2.00
February 1999
List of terms
Page 155 of 160
Trunk group
A set of telephone lines of a particular type, such as WATS, Tie,
public, or Foreign exchange.
Trunk group busy (TGB) keys
Your console may have up to ten trunk groups, but only if ICI2 is
provisioned on the Meridian 1. Press a Trunk Group Busy key to
deny users access to that trunk group. Configure TGB keys from
the TGB page from the Console Config choice on the Config
menu.
Trunk-to-trunk call
A user, while outside the system, may call to request access to an
outgoing trunk. You dial the trunk access code, than the requested
number. Press RLS to connect the calling and called parties.
Unanswered wake-up calls
If a hotel/motel guest does not respond to the first wake-up call,
the system makes up to two more attempts at 5-minute intervals.
If the guest does not answer after the third call, the system, if set
for this option, notifies you of an unanswered wake-up call.
Unrestricted or Semi-restricted
Refers to a call from an unrestricted or semi-restricted extension.
An unrestricted extension user can place and receive all types of
calls. A semi-restricted extension user can place calls to other
extensions, and can place calls to the public network with the
assistance of the attendant.
VIP wake-up
A hospitality feature that extends a VIP wake-up call to your
console. Press an idle loop key, followed by the Auto Wake-up
key. If the DN is busy or the guest does not answer, press the RLS
key. If the guest answers, deliver a personal wake-up message to
the guest.
Virtual feature
A console feature created entirely using software commands.
Meridian 1 Attendant PC Software User Guide
Page 156 of 160
List of terms
WATS
Wide Area Telecommunications Service.A discounted
long-distance service provided by all telephone companies. Also,
a label on one or more of your Loop Pickup keys.
P0891256 Standard 2.00
February 1999
160
Page 157 of 160
Index
A
adding a flexible feature, 47
adding an ICI key, 19, 21, 55, 56, 58
Alerter page
Attendant PC Properties sheet, 60
Answer key, 4
answering a call, 67
answering a call to a a remote console, 129
attendant
break-in, busy indication, 105
Attendant Console Autoline, 100
Attendant Emergency Codes, 101
attendant monitoring
a DN, 105
a trunk, 106
Attendant PC Properties sheet
Alerter page, 60
Call Waiting page, 61
Diagnostics page, 64
Handset page, 62
options (pages, tabs), 60
Relay page (diagram), 63
Attendant Recall, 76
authorization code (ESN), 136
Auto Dial, 107
Auto Dial number
storing, 108
Autoline, 100
Automatic Wake Up, 108
break-in
by attendant to busy extension, 105
build the operator Toolbox, 23
busy verify, 111
C
call
answer from a remote console (NAS), 133
extending a call to an idle extension (CAS),
130
extending to busy remote ext. (NAS), 134
extending to busy remote loc. (CAS), 131
extending to idle remote ext. (NAS), 135
extending with off-hook queueing (ESN),
137
putting on silent hold (CAS), 131
transfer to another remote ext. (NAS), 136
Call Park, 73
call park, 73
Call Waiting page (Attendant PC Properties
sheet), 61
Calling
an extension, 80
an outside number, 81
another attendant, 86
calling
an Auto Dial number, 107
Speed Call number, 125
Camp-on, 69
cancelling Do-Not-Disturb, 115
B
barge-in, 111
Meridian 1 Attendant PC Software User Guide
Page 158 of 160
CAS features
answering a call to a remote console, 129
extending a call to an idle extension, 130
extending call to a busy remote ext., 131
putting a call on silent hold, 131
remote recall, 132
transferring recall to remote extension, 132
Centralized Attendant Service features, 129
Centrex Switchhook Flash, 96
Change Password dialog box, 65
Charge Account, 112
charge account (ESN), 137
Conference, 84
conference call, 84
Config menu
submenu list, 41
Console Config sheet
Features page, 47
ICI’s page (diagram), 19, 21, 56, 58
console keys, using, 4
Contents tab, 141
create a Directory entry, 29
creating hotkeys, 44
creating virtual features, 12, 49
customizing keys, 12, 49
D
Diagnostics page (Attendant PC Properties
sheet), 64
dialing, 1, 6
dialog boxes
Change Password, 65
DID Route Conversion, 113
DID routes
controlling, 113
Directory command on Tools menu, 29
displaying, changing Night Service option no.,
121
Do-Not-Disturb, 114
cancelling, 115
overriding, 115
setting up, 114
testing, 116
P0891256 Standard 2.00
February 1999
E
End-to-end signaling feature, 116
Enhanced Night Service, 117
enhanced night service
turning on and off, 118
Enhanced Secrecy feature, 118
ESN
authorization code, 136
charge account, 137
expensive route warning tone, 137
routing control, 138
Exit option, 9
expensive route warning tone (ESN), 137
Extending a call
to a busy extension (with Camp-on), 69
to a busy extension (with Hold), 71
to voicemail, 70
extending a call, 68
off-hook queueing (ESN), 137
to a busy remote extension, 131
to idle remote ext. (NAS), 135
to voice mail, 70
F
Feature List option, 9
features commonly available, 47
Features page, 47
Flex Keys page (Console Config sheet), 54
G
General page (Console Config sheet), 42
H
Handset page (Attendant PC Properties sheet),
62
Page 159 of 160
Help menu, 6, 139
choices, 6
Console Help, 6
Contents selection, 6
Contents tab, 141
Context Help selection, 6
Find tab, 143
Glossary, 144
Index selection, 6
Index tab, 142
Options menu, 143
Hold key, 4
holding a call on a lpk key, 72
hotkeys, 44
I
IADN, 101
ICI keys, how to set up, 55
ICI List option, 9
Incoming Call Indicator keys, 18
Index tab, 142
Individual Attendant Directory Number, 101
K
N
NAS (Network Attendant Service)
answering a call from a remote console,
133
extending a call to a busy remote ext, 134
extending a call to idle remote ext. (NAS),
135
features, 133
remote recall, 135
transferring a call to another remote ext.,
136
network features
Centralized Attendant Service (CAS), 129
ESN, ISDN, 129
Network Attendant Service (NAS), 129
network speed call (ESN), 138
Night Service, 120
displaying, changing option number, 121
enhanced, 118
enhanced feature, 117
turning on and off, 120
O
key operation, 4
online help, 139
overriding Do-Not-Disturb, 115
L
P
loop keys, 4
Paging feature, 121
Position Busy feature, 121
Procedure
Create a Directory Entry, 29
procedures
Adding a flexible feature, 47
Adding an ICI key, 19, 21, 56, 58
Setting up the Voice Mail icon, 43
putting a call on hold, 72
putting a call on silent hold, 131
M
menus
Help, 6
Tools, 9
monitoring by attendant
DN, 105
trunk, 106
Meridian 1 Attendant PC Software User Guide
Page 160 of 160
R
Radio Paging
automatic post-selection, 122
automatic pre-selection, 122
manual post-selection, 123
manual pre-selection, 123
recall
remote (CAS), 132
remote (NAS), 135
transf. to another remote ext., 132
Recalls
from an extension using Conference key,
78
from an extension using LINK or ATT
RECALL, 76
from an extension using Transfer key, 77
from an unanswered extended call, 74, 75
redialing a stored number, 126
Relay page (Attendant PC Properties sheet),
63
Release key, 4
routing control (ESN), 138
S
setting up
console Directory, 29
Do-Not-Disturb, 114
flexible features, 54
ICI keys, 19, 20, 21, 55, 56, 58
TGB keys, 58
Voice Mail icon, 43
speaking privately feature, 124
Speed Call, 125
Speed Call number
storing, 125
speed call number
network (ESN), 138
splitting feature, 124
stored number redial
store number during a call, 127
storing ahead of time, 127
stored number redial, redialing, 126
P0891256 Standard 2.00
February 1999
storing
a Speed Call number, 125
a stored no. redial during a call, 127
a stored number ahead, 127
an Auto Dial number, 108
Supplementary features
Break-in (busy verify), 92
Break-in (pre-dial), 90
System Speed Call, 128
T
testing Do-Not-Disturb, 116
TGB keys, 21
TGB List option, 9
TGB’s page (diagram), 58
through-dialing, 83
Timed recall
from an unanswered extended call, 74
from an unanswered parked call, 75
Toolbox command on Tools menu, 23
Toolbox option, 9
Tools menu, 9
Tools option, 9
tracing a malicious call, 119
Transferring a call
to another attendant, 87
transferring a call
to remote ext. (NAS), 136
Transferring a recall
to another extension, 77
transferring recall to remote ext. (CAS), 132
Trunk Group Busy keys, 21
trunk group busy keys, status, 5
trunk-to-trunk call, 82
turning enhanced night service on and off, 118
turning night service on and off, 120
V
virtual feature keys, 48
voice mail, 70
Family Product Manual Contacts Copyright FCC notice Trademarks
Document number Product release Document release Date Publish
Meridian 1
Meridian 1 Attendant PC
Software User Guide
© 1997, 1999 Northern Telecom
All rights reserved
Information is subject to change without notice.
Northern Telecom reserves the right to make changes
in design or components as progress in engineering
and manufacturing may warrant. This equipment has
been tested and found to comply with the limits for a
Class A digital device pursuant to Part 15 of the FCC
rules, and the radio interference regulations of the
Industry Canada. These limits are designed to provide
reasonable protection against harmful interference
when the equipment is operated in a commercial
environment. This equipment generates, uses and can
radiate radio frequency energy, and if not installed and
used in accordance with the instruction manual, may
cause harmful interference to radio communications.
Operation of this equipment in a residential area is
likely to cause harmful interference in which case
users will be required to correct the interference at
their own expense.
SL-1 and Meridian 1 are trademarks of Northern
Telecom. Windows 95 and Windows NT are
trademarks of Microsoft
Publication number: P0891256
Document release: Standard 2.00
Date: February 1999
Printed in the United States of America