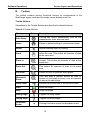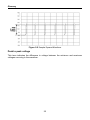
1
Trademarks Autel®, MaxiSys®, MaxiScan®, and MaxiScopeTM are trademarks of Autel Intelligent Technology Corp., Ltd., registered in China, the United States and other countries. All other marks are trademarks or registered trademarks of their respective holders. Copyright Information No part of this manual may be reproduced, stored in a retrieval system or transmitted, in any form or by any means, electronic, mechanical, photocopying, recording, or otherwise, without the prior written permission of Autel. Disclaimer of Warranties and Limitation of Liabilities All information, specifications and illustrations in this manual are based on the latest information available at the time of printing. Autel reserves the right to make changes at any time without notice. While information of this manual has been carefully checked for accuracy, no guarantee is given to the completeness and correctness of the contents, including but not limited to the product specifications, functions, and illustrations. Autel will not be liable for any direct damages or for any special, incidental, or indirect damages or for any economic consequential damages (including lost profits). IMPORTANT: Before operating or maintaining this unit, please read this manual carefully, paying extra attention to the safety warnings and precautions. For Services and Support: http://pro.autel.com www.autel.com 1-855-288-3587/1-855-AUTELUS (North America) 0086-755-86147779 (China) [email protected] For technical assistance in all other markets, please contact your local selling agent. i Safety Information For your own safety and the safety of others, and to prevent possible electrical shock, fire, or damage to the device, your computer or the MaxiSys tablet on which it is applied, it is important that the safety instructions herein presented throughout this manual be read and understood by all persons operating, or coming into contact with, the device. Before using the device, always refer to and follow the safety messages. Read, understand, and follow all safety messages and instructions in this manual. Safety protection built in the device may cease to function if the device is used incorrectly. This could cause damage to your device, or lead to injury to yourself and others. In addition, follow all generally accepted safety practices and procedures for working with and around electricity. Symbols These safety and electrical symbols may appear on the product or in this manual. Symbols Description Direct current. Alternating current. Chassis ground terminal. Device protected throughout by double insulation or reinforced insulation. Possibility of electric shock. Warning. Static awareness. Static discharge can damage parts. EN61010 measurement category. Do not dispose of this product as unsorted municipal waste. Safety Messages Safety messages are provided to help prevent personal injury and equipment damage. All safety messages are introduced by a signal word indicating the hazard level. DANGER: Indicates conditions or practices that could result in death or serious injury to the operator or to bystanders. WARNING: Indicates conditions or practices that could result in damage to the product or equipment to which it is connected. ii Safety Information Safety Instructions The safety messages herein cover situations Autel is aware of. Autel cannot know, evaluate or advise you as to all of the possible hazards. You must be certain that any condition or service procedure encountered do not jeopardize your personal safety. A. Maximum input ranges Observe all terminal ratings and warnings marked on the product. DANGER: To prevent electric shock, operate within the safe input range for the scope, refer to 2.1.3Technical Specifications on page 4. To prevent electric shock, take all necessary safety precautions when working on equipment where voltages above the specified input range may be present. Contact with voltages outside of the specified measuring range presents a risk of electric shock. To prevent injury or death, the oscilloscope must not be directly connected to the mains (line power). To measure mains voltages, use a differential isolating probe specifically rated for mains use. WARNING: B. Operation outside of the safe input range is likely to cause permanent damage to the oscilloscope and other connected equipment. Grounding DANGER: The scope’s ground connection through the USB cable is for measurement purposes only. The oscilloscope does not have a protective safety ground. Do not connect the ground input (chassis) to any electrical power source. To prevent personal injury or death, use a voltmeter to check that there is no significant AC or DC voltage between the oscilloscope ground and the point to which you intend to connect it. WARNING: Applying a voltage to the ground input is likely to cause permanent damage to the oscilloscope, the attached computer, and other equipment. To prevent measurement errors caused by poor grounding, always use the high-quality USB cable supplied with the oscilloscope. iii Safety Information C. External connections DANGER: D. To prevent injury or death, use only the power cord and adaptor supplied with the product. Environment DANGER: To prevent injury or death, do not use in wet or damp conditions, or around explosive gas or vapor. WARNING: E. To prevent damage, always use and store your oscilloscope in appropriate environments. For detailed information on temperature and humidity specifications for both the storage and usage of the oscilloscope, see 2.1.3Technical Specifications on page 4. Product Maintenance The product contains no user-serviceable parts. Repair, servicing and calibration require specialized test equipment and must only be performed by Autel Tech Support or an approved service provider. DANGER: To prevent injury or death, do not use the product if it appears to be damaged in any way, and stop use immediately if you are concerned by any abnormal operations. WARNING: Do not tamper with or disassemble the oscilloscope, connectors or accessories. Internal damage will affect performance. Do not block any of the instrument’s air vents as overheating will cause damage to the oscilloscope. When cleaning the oscilloscope, use wet soft cloth with mild detergent in water. Do not allow water to enter the oscilloscope casing, as this will cause damage to the electronics inside. iv Contents SAFETY INFORMATION ............................................................................................ II CHAPTER 1 USING THIS MANUAL ...................................................................... 1 1.1 CONVENTIONS ............................................................................................... 1 1.1.1 BOLD TEXT ............................................................................................. 1 1.1.2 TERMINOLOGY ........................................................................................ 1 1.1.3 NOTES AND IMPORTANT MESSAGES ............................................................. 1 1.1.4 HYPERLINKS ............................................................................................ 2 1.1.5 PROCEDURES .......................................................................................... 2 CHAPTER 2 GENERAL INTRODUCTION ............................................................... 3 2.1 MP408 SCOPE MODULE ................................................................................. 3 2.1.1 FUNCTIONAL DESCRIPTION ......................................................................... 3 2.1.2 POWER SOURCE ...................................................................................... 4 2.1.3 TECHNICAL SPECIFICATIONS ........................................................................ 4 2.2 ACCESSORY KIT .............................................................................................. 5 2.2.1 Attenuators......................................................................................... 7 CHAPTER 3 3.1 3.2 3.3 3.4 3.5 GETTING STARTED ........................................................................... 8 SYSTEM R EQUIREMENTS ................................................................................... 8 INSTALLING MAXISCOPE SOFTWARE .................................................................... 8 POWERING UP ............................................................................................... 9 POWERING DOWN .......................................................................................... 9 TROUBLESHOOTING ......................................................................................... 9 CHAPTER 4 SOFTWARE OPERATIONS ................................................................10 4.1 SCREEN LAYOUT AND OPERATIONS .....................................................................10 4.1.1 MENU AND TOOLBARS .............................................................................11 4.1.2 MEASUREMENT GRID ..............................................................................17 CHAPTER 5 GLOSSARY ......................................................................................20 CHAPTER 6 PRODUCT SERVICE..........................................................................23 CHAPTER 7 COMPLIANCE INFORMATION..........................................................25 CHAPTER 8 WARRANTY ....................................................................................26 Chapter 1 Using This Manual This manual contains device usage instructions. Some illustrations shown in this manual may contain features and optional equipment that are not included on your system. Contact your sales representative for availability of other features and optional tools or accessories. 1.1 Conventions The following conventions are used. 1.1.1 Bold Text Bold emphasis is used to highlight selectable items such as buttons and menu options. Example: Click OK. 1.1.2 Terminology The term “select” means highlighting a button or menu item and clicking it to confirm the selection. 1.1.3 Notes and Important Messages The following messages are used. Notes A NOTE provides helpful information such as additional explanations, tips, and comments. A “*” or “**” symbol indicates that a related NOTE is written following the specific content. Important IMPORTANT indicates a situation which, if not avoided, may result in damage to the equipment, or the attached computer. 1 Using This Manual Conventions 1.1.4 Hyperlinks Hyperlinks, or links, that take you to other related articles, procedures, and illustrations are available in electronic documents. Blue colored text indicates a selectable hyperlink. 1.1.5 Procedures An arrow icon indicates a procedure. Example: To install the Setup.exe program 1. Insert the CD into the CD-ROM of the computer. The driver installation wizard will load momentarily. 2. Click on Next on the welcome page. 3. Click the Change button, and select a destination folder to install the program, and click Next to continue. Or directly click Next to continue without changing the default installation folder. 4. Click Install and the Setup.exe program will be installed onto the computer. 2 Chapter 2 General Introduction TM The MaxiScope MP408 is a PC based 4-channel automotive oscilloscope. It works in combination with your PC or MaxiSys Tablet, which turns into a powerful diagnostic tool, showing you what is really going on with a vehicle’s electronic circuits. The system can be used to measure and test almost all of the electrical and electronic components and circuits in any modern vehicles. Power for the MaxiScope MP408 Module comes directly from the USB port of the connected PC, so no batteries or power leads are required, making the system very versatile and portable to use. This manual describes the construction and operation of the product and how it works to deliver test results. 2.1 MP408 Scope Module 2.1.1 Functional Description Figure 2-1 Front, Rear, and Top View 1. USB Port Connector 2. Input Channel A/B/C/D 3. LED Breath Light – lights up when powered on, blinks when communicating, and shimmers when error occurs 3 General Introduction MP408 Scope Module 4. Warning Triangle – indicates potential safety hazard that exists on the indicated connections, and appropriate precautions should be taken. Make sure you read through the Safety Information before using. 5. Equipotential Symbol – indicates the outer shells of the indicated BNC connectors are all at the same potential. Therefore, necessary precautions should be taken to avoid applying a potential through the return connections of the indicated BNC terminals, as this may result in a large current flow, causing damage to the product and the connected equipment. 2.1.2 Power Source The MaxiScope MP408 Scope Module is powered directly by the USB port of the connected PC, no batteries or power leads are required, making it suitable for use both for workshop-based and mobile automotive diagnostics. 2.1.3 Technical Specifications Main Features Description Vertical resolution 12 bits Channels 4 Bandwidth 20MHz Accuracy Sensitivity 1% 10mV/div to 20V/div Input Ranges (full scale) ±50mV to ±100V in 11 ranges Input Impedance Input Type Input Coupling Overload Protection Maximum Sampling (Single Shot) 1 or 2 channels in use 3 or 4 channels in use Buffer Memory Waveform Buffer Timebase Ranges Advanced Features 1MΩ in parallel with 22pF Single-ended, BNC connector Software selectable AC/DC ±200V on single input Rate 80MS/s* 20MS/s 32M samples shared among active channels Up to 1000 waveforms 100ns/div to 1000s/div Math channels, Measurements 4 General Introduction Accessory Kit Triggers Description Source Any input channel Basic Triggers Auto, Repeat, Single, None Advanced Triggers Rising edge, Falling edge Environmental Description Operating Temperature Range Storage Temperature Range Storage Humidity Range 0 to 50°C (15 to 40°C for quoted accuracy) -20 to +60°C 5 to 95%RH, Non-condensing Physical Characteristics Dimensions (Protection rubber case included) Weight General PC Interface Power Requirements Compliance Warranty Description 190X115X38mm <0.5kg Description USB 2.0 – cable supplied Powered from USB port FCC (EMC), CE (EMC and LVD), RoHS 1 year NOTE*: Reduced to 20MS/s if channels A and B, or C and D, are enabled. 2.2 Accessory Kit The MaxiScope MP408 Automotive Oscilloscope Kit is available with 2 versions - Basic and Advanced Kit - for your option. The table below gives descriptions of the hardware and accessories supplied with the package. NOTE: B Kit = Basic Kit; A Kit = Advanced Kit Image Description & Quantity Compact Disc (CD) - X1 in B Kit or A Kit Includes the User Manual, MaxiScope Software and Driver Program, etc. 1.5m USB Cable - X1 in B Kit or A Kit Connects the Scope Module to the computer. 5 General Introduction Image Accessory Kit Description & Quantity 3m (10ft) Screened Test Leads - X4 in B Kit or A Kit BNC to 4mm. Connects the Scope Module to a test probe. Screened to keep out electrical interference. Secondary Ignition Pickup - X1 in B Kit; X4 in A Kit For safe probing of HT leads without danger from high voltages. 2-pin Breakout Lead - X1 in B Kit or A Kit For standard 2-pin sensors and actuators. With 4mm plugs to connect to MaxiScope test leads. Attenuators 20:1 - X2 in B Kit; X4 in A Kit Extends the range of the MaxiScope up to ±400V to deal with primary ignition. See more information at 2.2.1 Attenuators on page 7. Large Crocodile Clip Set - X1 Pair in B Kit or A Kit For hands-free probing of wires and small terminals. Small Crocodile Clip Set - X1 Pair in B Kit or A Kit For hands-free probing of wires and small terminals. Acupuncture Probe Set - X1 in B Kit or A Kit For back-probing connectors without cutting or piercing the insulation. Accepts 4mm plugs. Multimeter Probes – X1 Pair in B Kit; X2 pair in A Kit For making voltage measurements. Accepts 4mm plugs. HT306 6-Way Universal Breakout Leads - X1 in A Kit Break into almost any connector up to 6 ways. Accepts 4mm plugs. (4 sizes supplied:0.6mm/1.5mm/2.3mm/2.8mm) 6 General Introduction Image Accessory Kit Description & Quantity 60cm Spark Plug Extension Lead (With Ground Leads) – X4 in A Kit Fits between coil pack and spark plug to give access to the HT lead. Suitable for use with secondary ignition pickup. 65A Current Clamp – X1 in A Kit Screened cable with BNC connector to keep out electrical interference. 650A Current Clamp – X1 in A Kit Screened cable with BNC connector to keep out electrical interference. 60MHz High-speed Probe – X1 in A Kit For accurate measurement of fast signals like CAN bus and FlexRay. Standard BNC plug. Fuse Extension Lead (20A/30A) – X1 Pair in A Kit In both mini and standard sizes. Plug the original fuse into the lead; plug the lead in the fuse socket, then use a current clamp to measure fuse current. 2.2.1 Attenuators The attenuator supplied with the MaxiScope kit is a small adapter, usually connected to the BNC connectors between the Scope Module and the test lead; it is used to scale down the voltage input to the scope module when the measured voltage is likely to exceed 100 volts. Each channel fitted with an attenuator must be configured using the Probes Menu. This ensures that the voltages displayed by MaxiScope are correct. For more information, see Probes Menu on page 15. 7 Chapter 3 Getting Started The MaxiScope MP408 is a PC based automotive oscilloscope. Make sure to install the MaxiScope PC software before connecting the scope module for the first time. Some illustrations shown in this manual may contain options or functions that are not included on your system. Contact your sales representative for availability of these features. 3.1 System Requirements To ensure the MaxiScope operates correctly, use a computer with at least the minimum system requirements as shown in the table below. A more powerful PC will improve the performance of the MaxiScope software. Item Operating System Processor Memory Free disk Space* Ports Minimum Specification Recommended Specification Windows XP (SP3), Windows Vista, Windows 7, and Windows 8. 32-bit (not for Windows RT) 300MHz 1GHz 256MB 512MB 1GB 2GB USB 1.1 Port USB 2.0/3.0 Port NOTE*: The MaxiScope software does not use all the disk space specified in the table. The free space is required to make Windows run efficiently. 3.2 Installing MaxiScope Software The MaxiScope Software is a processing program that runs on the computer, which presents as an operating interface displaying waveforms and menus, allowing you to set the testing options, triggers, probe types and various configurations. The CD provided with the MaxiScope kit contains the MaxiScope software Setup.exe program and a User Manual in PDF format. To install the Setup.exe program 1. 2. Insert the CD into the CD-ROM of the computer. The driver installation wizard will load momentarily. Click on Next on the welcome page. 8 Getting Started Powering Up 3. Click the Change button, and select a destination folder to install the program, and click Next to continue. Or directly click Next to continue without changing the default installation folder. 4. Click Install and the Setup.exe program will be installed onto the computer. 3.3 Powering Up After the software is successfully installed, connect the Scope Module to the computer using the USB cable supplied. The LED breath light on the top of the module will turn on with a steady green light when powered up. When connecting the MaxiScope to the computer for the first time, the New Hardware Found Wizard window will pop up. Follow its instructions onscreen to finish the process, which runs automatically. Select MaxiScope from the Windows Start menu. If the Scope Module has a probe connected, touching the probe tip with a finger will show a small 50Hz or 60Hz signal on the operating interface. 3.4 Powering Down The Scope Module is automatically powered off when disconnected from the computer. To make sure all test results are collected and recorded, always close the MaxiScope Software before disconnecting the Scope Module. 3.5 Troubleshooting This part describes problems you may encounter while using the oscilloscope. PC Communication Error If you cannot communicate the Scope Module to the computer, you need to do the following check-ups: Check if the USB connection is properly connected between the Scope Module and the PC. Check if the LED breath light on the Scope Module is illuminated. If the LED light is shimmering, this indicates that a communication error has occurred. In this case, unplug the Scope Module and re-connect it to the computer. Check if there is any firewall software interfering with the connection port. 9 Software Operations Screen Layout and Operations Chapter 4 Software Operations The MaxiScope software is a signal processing program that displays the shape of electrical signals onscreen as a live graph showing voltage against time. The grid on the screen shows divisions of voltage and time to enable measurements to be made. Units of voltage per division are shown down the side of the scope screen while units of time per division are shown along the bottom. The graph is referred to as a waveform and the scope repeatedly draws the trace across the screen from left to right. 4.1 Screen Layout and Operations After properly connecting the Scope Module to the computer, double click on the MaxiScope software icon on the desktop and the start-up screen is displayed. Figure 4-1 MaxiScope Program Interface Layout 1. Menu and Toolbars – configure various settings and operations of the scope 2. Scrollbar – allows convenient viewing of waveform pages 10 Software Operations Screen Layout and Operations 3. Measurement Grid – displays measurements of voltage against time 4. Connection Status Icon – indicates the connection status between the Scope Module and the computer 4.1.1 Menu and Toolbars The Menu and Toolbars on the top of the screen consist of 3 parts: Top Menu Toolbar Channel Controls A. Top Menu These are dropdown menus with options for operations and configurations of the MaxiScope, the operations of which are described below: Files – contains control options of the program, such as opening and saving data files, exiting the program, and performing firmware update. The Connect Device option allows you to select the Scope Module for connection. Edit – contains options for saving testing files as Bitmap or Txt Measure – allows adding, editing, or deleting lists of measurement statistics displayed at the bottom of the screen, with options for various measurement types. Tool – contains various measurement tools for reference and assessment of data analysis. Car – contains a library of waveforms. Selecting one allows automatic set-up of the scope to capture a waveform of the specific type. Help – contains MaxiScope User Manual and options for various services 11 Software Operations B. Screen Layout and Operations Toolbar The toolbar contains various functional buttons for configurations of the MaxiScope trigger mode and the scope screen display mode, etc. Toolbar Buttons Operations of the Toolbar Buttons are described in the table below: Table 4-1 Toolbar Buttons Name Button Description Auto Setup Clicking this button automatically sets up the measurement scale and time base. Home Resets to default setting of measurement scale. Select Allows selecting items by clicking. Hand Zoom In Zoom Out Allows you to drag the graph to move it around within the view. This moves all channels of data at the same time. Click on the graph to zoom in on a point of interest. This zooms all channels of data at the same time. Click on the graph to zoom out to a wider view. This zooms all channels of data at the same time. Full View Zooms out fully to view the entire graph. Windowed Zoom Click and drag a window around an area of interest on the graph to zoom in on all channels of data at the same time. Undo Zoom Returns the current view to the previous zoom. Start Starts the scope. Stop Stops the scope. Rising Edge Triggers on rising edges.* Falling Edge Triggers on falling edges.* Dropdown Arrow Clicking this button opens the dropdown menu. 12 Software Operations Screen Layout and Operations NOTE*: By selecting the Rising Edge or Falling Edge option when the trigger mode is activated, the trigger is set to occur so that the scope starts to draw the waveform either by a rising or a falling voltage. Time Base Menu The Time Base menu allows users to select an appropriate time per division. The time per division (10 divisions) is displayed along the bottom of the screen. The time base adjustment affects all of the active scope channels at once. See more information at 4.1.2Measurement Grid on page17. Figure 4-2 Time Base Menu Trigger Controls The MaxiScope can be set to start drawing the waveform with a pre-defined threshold voltage level, which is called triggering. 13 Software Operations Screen Layout and Operations To trigger the MaxiScope, open the Trigger Mode menu by clicking the dropdown arrow next to the trigger menu box. 4 trigger modes are available for the MaxiScope. Select the trigger mode from the dropdown menu by clicking the desired option. Auto Mode is most commonly used. Figure 4-3 Trigger Mode Menu A trigger can be assigned to a specific channel of the scope as required by clicking the dropdown arrow beside the Trigger Channel menu. Figure 4-4 Trigger Channel Menu 14 Software Operations C. Screen Layout and Operations Channel Controls The different channels of the MaxiScope are displayed in different colors as follows: Channel A: Red Channel B: Green Channel C: Blue Channel D: Pink Channel A is active by default while the other channels are switched off when the system starts up. Probes Menu The Probes Menu is available for each channel of the MaxiScope. By clicking the relevant channel button, a dropdown menu with a list of optional probes displays. Figure 4-5 Sample Probes Menu 15 Software Operations Screen Layout and Operations Voltage Scale Adjustment Voltage adjustments for the MaxiScope are carried out by options on the dropdown menus. The sample dropdown menu of Channel A for selecting basic voltage measurement scales are shown in the screenshot below: Figure 4-6 Voltage Scale Dropdown Menu The default voltage scale setting for Channel A is Auto. If Channel A is connected to a circuit, MaxiScope automatically selects an appropriate scale to obtain a test reading. Auto can also be selected for each of the other channels. AC/DC Control The AC/DC dropdown menu is available for each channel, which allows users to select AC or DC measurements. See AC/DC Control on page 20. 16 Software Operations Screen Layout and Operations 4.1.2 Measurement Grid The 2 control features - Voltage per division and Time per division – enable the users to adjust the scope settings to suit the particular test measurement. Figure 4-7 Sample Measurement Grid Voltage per division – shown down the side of the screen, referred to as the Y-axis Time per division – shown along the bottom of the screen, referred to as the X-axis Multiple Scope Channels The MaxiScope software features multiple channel display which enables more than one waveform to be displayed at the same time. It is useful for making comparisons among different signals. The voltage per division for each channel is adjusted individually while the time base per division is the same for all channels. 17 Software Operations Screen Layout and Operations Figure 4-8 Sample Multiple Channel Display Adjustment Icons By simply moving the 2 adjustment icons onscreen, users can adjust the Y-axis position and the trigger threshold conveniently: Figure 4-9 Adjustment Icons 1. Double Ended Arrow – Move the mouse pointer to the side of the scope screen and hover the pointer over the voltage units, the mouse pointer changes to this icon. Move the double ended arrow up and down to adjust the Y-axis. 18 Software Operations 2. Screen Layout and Operations Trigger Threshold Marker – Clicking on a specific position within the measurement grid when the trigger mode is activated displays the trigger marker. Adjust the trigger threshold by simply clicking and dragging the trigger marker to the desired position. Reference Box As a quick reference, an instantaneous measurement of voltage and time can be made by clicking at the desired position on the scope screen. A small box appears showing the voltage and time. Figure 4-10 Sample Reference Box 19 Chapter 5 Glossary AC/DC Control Each channel can be set to either AC coupling or DC coupling. With DC coupling, the voltage displayed onscreen is equal to the true voltage of the signal with respect to ground. With AC coupling, any DC component of the signal is filtered out, leaving only the variations in the signal for the AC component. Aliasing When the signal frequency gets higher than half the scope’s maximum sampling rate and exceeds the limit, a distorted waveform appears. This distortion is called aliasing. Analog Bandwidth All oscilloscopes have an upper limit to the range of frequencies at which they can measure accurately. The analog bandwidth of an oscilloscope is defined as the frequency at which a displayed sine wave has half the power of the input sine wave (about 71% of the amplitude). Block Mode A sampling mode in which the computer prompts the oscilloscope to collect a block of data into its internal memory before stopping the oscilloscope and transferring the whole block into computer memory. This mode of operation is effective when the input signal being sampled is high frequency. Buffer Size/Cache Size This term indicates the size of the oscilloscope’s buffer memory. The buffer memory is used by the oscilloscope to temporarily store data. This helps to compensate for the differences in data transfer rate from one device to another. Sampling Rate This term is used to define the number of samples per second captured by the oscilloscope. The faster the sampling rate of the scope, the more frequently it measures the signal voltage, and so the more detailed will be the trace that appears on the scope screen. Streaming Mode This term indicates a sampling mode in which the oscilloscope samples data and returns it to the computer in an unbroken stream. This mode of operation is effective when the input signal being sampled is at low frequency. 20 Glossary Time Base The time base controls the time interval across the scope display. Voltage Range The voltage range is the range between the maximum and minimum voltages that can be accurately captured by the oscilloscope. Sinusoidal Waveform This term describes the waveform characteristics typically found in circuits with large inductance and capacitance, and often referred to as an AC signal. The waveform alternates either side of 0 volts or may rise and fall creating a regular sinusoidal shape: Figure 5-1 Sample Sinusoidal Waveform Amplitude This term indicates the maximum voltage generated from the zero volts line of the oscilloscope. Frequency This term describes the number of signal occurrences per second. Frequency is measured in Hz (hertz). Square Waveform This term describes the waveform characteristics normally generated by signals switching between clearly defined voltage levels, such as a Hal effect sensor signal may create by switching a voltage to ground. A typical digital square waveform is shown below: 21 Glossary Figure 5-2 Sample Square Waveform Peak to peak voltage This term indicates the difference in voltage between the minimum and maximum voltages occurring in the waveform. 22 Chapter 6 Product Service This section introduces information for technical support, repair service, and application for replacement or optional parts. Technical Support If you have any question or problem on the operation of the product, please: Call 1-855-288-3587/1-855-AUTELUS 0086-755-86147779 (China). Contact the local distributor or agent. Visit our website http://pro.autel.com or www.autel.com. (North America), or Repair Service If it becomes necessary to return your device for repair, please download the repair service form from www.autel.com, and fill in the form. The following information must be included: Contact name Return address Telephone number Product name Complete description of the problem Proof-of-purchase for warranty repairs Preferred method of payment for non-warranty repairs NOTE: For non-warranty repairs, payment can be made with Visa, Master Card, or with approved credit terms. Send the device to your local agent, or to the below address: 6th-10th Floor, Building B1, Zhiyuan, Xueyuan Road, Xili, Nanshan, Shenzhen, 518055, China Other Services You can purchase the optional accessories directly from Autel’s authorized tool suppliers, and/or your local distributor or agent. 23 Product Service Your purchase order should include the following information: Contact information Product or part name Item description Purchase quantity 24 Chapter 7 Compliance Information FCC Compliance This equipment has been tested and found to comply with the limits for a Class B digital device, pursuant to Part 15 of the FCC Rules. These limits are designed to provide reasonable protection against harmful interference in a residential installation. This equipment generates uses and can radiate radio frequency energy and, if not installed and used in accordance with the instructions, may cause harmful interference to radio communications. However, there is no guarantee that interference will not occur in a particular installation. If this equipment does cause harmful interference to radio or television reception, which can be determined by turning the equipment off and on, the user is encouraged to try to correct the interference by one or more of the following measures: Reorient or relocate the receiving antenna. Increase the separation between the equipment and receiver. Consult the dealer or an experienced radio/TV technician for help. This device complies with part 15 of the FCC Rules. Operation is subject to the following two conditions: (1) This device may not cause harmful interference, and (2) this device must accept any interference received, including interference that may cause undesired operation. Changes or modifications not expressly approved by the party responsible for compliance could void the user’s authority to operate the equipment. 25 Chapter 8 Warranty 12-Month Limited Warranty Autel Intelligent Technology Corp., Ltd. (the Company) warrants to the original retail purchaser of this MaxiSys Elite Diagnostic Device, that should this product or any part thereof during normal consumer usage and conditions, be proven defective in material or workmanship that results in product failure within twelve (12) months period from the date of delivery, such defect(s) will be repaired, or replaced (with new or rebuilt parts) with Proof of Purchase, at the Company’s option, without charge for parts or labor directly related to the defect(s). The Company shall not be liable for any incidental or consequential damages arising from the use, misuse, or mounting of the device. Some states do not allow limitation on how long an implied warranty lasts, so the above limitations may not apply to you. This warranty does not apply to: a) Products subjected to abnormal use or conditions, accident, mishandling, neglect, unauthorized alteration, misuse, improper installation or repair or improper storage; b) Products whose mechanical serial number or electronic serial number has been removed, altered or defaced; c) Damage from exposure to excessive temperatures or extreme environmental conditions; d) Damage resulting from connection to, or use of any accessory or other product not approved or authorized by the Company; e) Defects in appearance, cosmetic, decorative or structural items such as framing and non operative parts. f) Products damaged from external causes such as fire, dirt, sand, battery leakage, blown fuse, theft or improper usage of any electrical source. IMPORTANT: All contents of the product may be deleted during the process of repair. You should create a back-up copy of any contents of your product before delivering the product for warranty service. 26