1
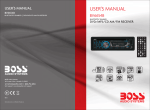
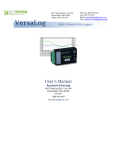
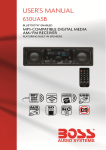
Specification
12V Negative Ground
Max. 7.5A
4x60 ( 240W )
2 STEREO channels
178(W)x108(D)x50(H)mm
FM SECTION
Frequency Range
Effective Sensitivity
Signal to noise
87.5MHz 107.9MHz
AM SECTION
Frequency Range
Effective Sensitivity
Signal to noise
530KHz 1710KHz
RCA LINE OUT
Output
MMC/SD or USB PLAYBACK
System
Frequency Characteristics
Signal to Noise(MMC/SD & USB)
PLMR-20W
3uV.
50dB
40dB.
40dB
INSTRUCTION MANUAL
1000mV@MAX.
MP3 audio system
20Hz-20KHz
55dB (1KHz)
-
PUSH SEL
VOL
SD/USB/MP3 PLAYER
CLK
IR
+
BAND
MODE
LOUD
PTY
TA
AF
RPT RDM EON
TP
SD
GENERAL
Supply VoltageDC
Current Consumption
Power Output
Number of Channels
Unit Dimensions
AUX
RESET
AM/FM Marine Radio
W/ USB/SD/MP3 Playback & 3.5 Aux-In
OPERATING THE UIIT
WIRES CONNECTION
6
4
8
9
17
18
RED
PUSH SEL
VOL
IR
PTY
TA
AF
RPT RDM EON
TP
SD
LOUD
BAND
MODE
AUX
ISO SOCKET
RESET
7
2
1
5
10
11
12
13
14
15
FM1 -> FM2 -> FM3 -> AM1 -> AM2
Press and hold the BND button to activate the auto
storage function. The unit scans and preset the
stations with strongest signal.(18stations in FM and
12 stations in AM )
ANTENNA JACK
CONNECTOR A
1.
2.
3.
4.YELLOW MEMORY +12V
5. BLUE AUTO ANTENNA B+
6.
7. RED POWER B+
8. BLACK GROUND
16
1.- RESET BUTTON
9. - CLOCK BUTTON
The unit must be reset under the following conditions:Press the CLK to show the time. To adjust the time,
A) Prior to using this unit for the first time after
press and hold the CLK until flashing and change
installation.
HOUR or MINUTE by rotate the >>I or I<< button.
B) If the unit fails to operate properly, press the
RESET with a pen tip or other pointed instrument.
10-15. - PRESET STATIONS MEMORY AND >II, INT,
RPT, RDM BUTTONS
2. - SEL & VOL CONTROL BUTTON
A) Radio mode
A) Press the SEL repeatedly to select VOLUME Press the 1-6 buttons to select the preset stations.
BASS - TREBLE - BALANCE - FADER.
Press and hold the 1-6 buttons to store the station that
B) Press and hold the SEL to select EQ(JASS currently listening.
ROCK - POPS - CLASS - OFF) and LOUD(ON/OFF).
B) SD/MMC, and USB mode
Press the >II to pause or resume playing.
3. -POWER ON/OFF AND MUTE
Press the INT to play the first 10 seconds of the tracks.
Press the POWER to turn on this unit. To turn off the
Press again to off this function and the current track
unit, press and hold this button unit it off.
will keep playing.
During playing, press this to mute the sound.
Press the RPT once to repeat plays the current track.
Press the RPT twice to repeat plays the current folder.
4. - LCD DISPLAY
Press the RDM to turn random play on or off.
Press the 5/6 to move up or down 10 tracks at a time
5. - MODE BUTTON
(Note: when the remaining tracks less than 10, this
Press the MODE to select RADIO/CARD(SD/MMC
card inserted)/USB(flash driver inserted)/AUX mode. function is invalid)
SD/MMC, and USB mode
Press and hold this button to activate TRACK SEARCH
16. - AUX INPUT JACK (3.5MM STEREO JACK)
and play the select track automatically.
Press the MODE to select auxiliary input playing mode
when connecting with external audio device.
6&7. - TUNE,SEEK, TRACK, SKIP UP/DOWN
BUTTONS
17. - SD/MMC CARD SLOT
A) Radio mode
When SD/MMC card is inserted, the unit is
Press the>>I or I<< to perform manual seek tuning.
automatically switched to SD/MMC mode.
Press and hold the >>I or I<< to perform automatic
(Note: if both USB storage device and SD/MMC card
tuning.
inserted, the system will switch to the mode of the
The unit will tune to the station with strong signal.
latest connected.)
B) SD/MMC, and USB mode
Press the >>I or I<< to play the next or previous track.
18. - USB PORT
When USB storage device is connected, the unit is
8. - BAND BUTTON
automatically switched to USB mode.
Press the BND to select radio band as follow:
BRAND CAR STEREOS
RCA OUTPUT
FRONT RIGHT SPEAKER JACK
SD/USB/MP3 PLAYER
CLK
+
3
FRONT LEFT SPEAKER JACK
FUSE 7.5 A
-
RCA OUTPUT
WHITE
ISO SOCKET SKETCH
CONNECTOR B
1. VIOLET R.R SP(+)
2. VIOLET BLACK R.R SP(-)
3. GREY F.R SP(+)
4. GREY BLACK F.R SP(-)
5 . WHITE F.L SP(+)
6. WHITE BLACK F.L SP(-)
7. GREEN R.L SP(+)
8. GREEN BLACK R.L SP(-)
INSTALLATION METHOD
METAL
SUPPORT STARP
For optimum anti-skip capability of the unit,
please ensure the metal support strap is
bolted firmly to the car chassis.
Bend the tabs on the metal mounting
sleeve against the DASHBOARD with
a screwdriver.
DASHBOARD
METAL MOUNTING SLEEVE
SOFT PLASTIC TRIM RING
To remove the unit out of the metal mounting sleeve,
insert the two supplied KEYS into the left and right side
slots of the chassis at the same time. Then pull the chassis
out of the metal mounting sleeve as shown in the right
illustration.
CAR AUDIO SYSTEMS