1
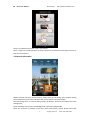
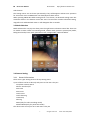
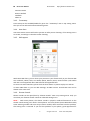
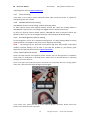
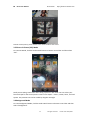
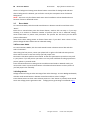
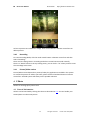
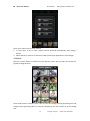
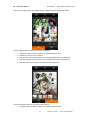
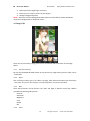
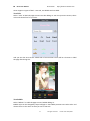
UCam User Manual Version 1.2.0 UCam Team [email protected] 2012.4 UCam Team UCam User Manual http://www.u-camera.com Contents 1 2 3 4 General Information .................................................................................................................. 4 Installing and Upgrading............................................................................................................ 4 2.1 Initial Install ................................................................................................................... 4 2.2 Upgrade ......................................................................................................................... 4 2.3 Shortcuts in Android home ........................................................................................... 4 2.4 Uninstall ........................................................................................................................ 5 UCam ......................................................................................................................................... 5 3.1 GUI Operation information ........................................................................................... 5 3.2 General information ...................................................................................................... 6 3.3 Mode Selection ............................................................................................................. 7 3.4 Camera Setting .............................................................................................................. 7 3.4.1 General Information .......................................................................................... 7 3.4.2 Advanced Setting Menu .................................................................................... 8 3.4.3 Timestamp ........................................................................................................ 9 3.4.4 Auto Save........................................................................................................... 9 3.4.5 SNS support ....................................................................................................... 9 3.4.6 Shutter Sounds .................................................................................................. 9 3.4.7 Touch shooting ................................................................................................ 10 3.4.8 VOLUME KEY function setting ......................................................................... 10 3.4.9 Preview Brightness function setting ................................................................ 10 3.4.10 Camera Direction Revise ................................................................................. 10 3.5 Picture in Picture (PIP) Mode ...................................................................................... 11 3.6 Background Mode ....................................................................................................... 11 3.7 Burst Mode.................................................................................................................. 12 3.8 Panorama Mode .......................................................................................................... 12 3.9 Collage Mode .............................................................................................................. 12 3.10 Recording .................................................................................................................... 13 3.11 Picture/Video review .................................................................................................. 13 UPhoto .................................................................................................................................... 13 4.1 General Information .................................................................................................... 13 4.2 Puzzle .......................................................................................................................... 14 4.3 Image Edit.................................................................................................................... 16 4.3.1 Operation history ........................................................................................... 16 4.3.2 Effect ............................................................................................................... 16 4.3.3 Edit .................................................................................................................. 16 4.3.4 Label ............................................................................................................... 16 4.3.5 Frame .............................................................................................................. 19 4.3.6 Texture ............................................................................................................ 20 4.3.7 Decorate ......................................................................................................... 20 4.3.8 Graffiti ............................................................................................................. 21 2 All rights reserved. UCam Team 2011,2012 5 6 7 8 UCam Team UCam User Manual http://www.u-camera.com 4.4 UPhoto Setting ............................................................................................................ 22 UGif ......................................................................................................................................... 22 5.1 Taking Pictures/Recording for GIF ............................................................................... 23 5.2 Select picture for GIF ................................................................................................... 23 5.3 GIF Editor..................................................................................................................... 24 5.4 GIF Setting ................................................................................................................... 24 USpyCam ................................................................................................................................. 25 6.1 Features ....................................................................................................................... 25 6.1.1 Manual Capture .............................................................................................. 26 6.1.2 Auto Capture / VTDR ..................................................................................... 26 6.1.3 Recording / VTDR .......................................................................................... 26 6.1.4 Camouflage / Power Save .............................................................................. 26 6.2 Setting ......................................................................................................................... 26 UShare ..................................................................................................................................... 27 7.1 General Information .................................................................................................... 28 7.2 Typical UShare Scenario .............................................................................................. 29 7.2.1 Upload Pictures to you PC ............................................................................... 29 7.2.2 Download Music from PC to phone. ............................................................... 31 7.2.3 Text Input......................................................................................................... 31 FAQ .......................................................................................................................................... 33 3 All rights reserved. UCam Team 2011,2012 UCam Team UCam User Manual http://www.u-camera.com 1 General Information UCam is an Android camera related tool-kit with normal camera, image post process (UPhoto) , GIF maker(UGif), spy camera & vehicle traveling data recorder (USpyCam) and file easy share tool (UShare). This document is a user guidance of UCam。 This document is updated with Version1.2.0. If you find some contents mismatch with what you see, please update you UCam to latest version. 2 Installing and Upgrading 2.1 Initial Install Google Play (Android Application Store application) is recommended for UCam install or upgrade. Please refer to UCam website Product Center for detail info. UShare Wndows Client can also be downloaded from Product Center. 2.2 Upgrade Android application market is recommended for UCam update. UCam would prompt you to update once found newer version than yours. You can also update manually by press the “Download Center” button of About UI. There are background mode frame download 、UPhoto decoration download 、Photoframe download, Texture download, label font downloads and puzzle background download in download center. 2.3 Shortcuts in Android home UCam, UShare, UGif, USpyCam and Uphoto shortcuts would be suggested to be created 4 All rights reserved. UCam Team 2011,2012 UCam Team UCam User Manual http://www.u-camera.com when launching UCam. In some system(for example some HTC phones), automatically shortcut creation may failed. Please long press on HOME and then add shortcut manually in the “shortcut” list. 2.4 Uninstall You can find UCam by steps of Setting -> Applications -> Installed. Click “UCam” and then select “uninstall” to uninstall UCam. 3 UCam UCam can be launched by clicking UCam icon in application list or UCam shortcuts in Andorid home screen. 3.1 GUI Operation information 5 All rights reserved. UCam Team 2011,2012 UCam Team UCam User Manual http://www.u-camera.com There is an operation hint with UCam’s first launch. Note – swipe is a normal operation in UCam. Please try vertical/horizontal swipe in all list UI item for more options. 3.2 General information Besides preview, there are 3 main areas in UCam main UI, top setting menu, bottom setting menu and bottom control bar. (Assume that you use phone in portrait mode) The top setting menu is used to setting camera properties. There are sub-menus for some setting items. There is bottom setting menu with Background mode and Collage mode. There are 3 buttons in bottom control bar, photo-view button, shutter button and mode 6 All rights reserved. UCam Team 2011,2012 UCam Team UCam User Manual http://www.u-camera.com select button. The setting menus are not shown permanently. They will disappear without user operation for 10 seconds. Press on MENU KEY can show/depress these menus. When pressing MENU KEY while setting menu is not shown, an advanced setting menu bar would be shown in the bottom control bar area. This menu bar contains advanced setting, magnifier tool and download center. It will disappear after 2 seconds. 3.3 Mode Selection Mode selection bar can pop out when press the right button in bottom control bar. There are 11 modes in UCam. There are recording mode, camera mode, picture in picture (PIP) mode, background mode, burst mode, panorama mode, collage mode, UGif and UShare. 3.4 Camera Setting 3.4.1 General Information There are 2 types setting items in the top setting menu. A part of them can be set directly with press on the item. They are Front/Rear camera switch Shutter sound on/off Auto Save Auto Focus Touch Focus Touch Shooting Timestamp Geo-Tag Mute (Only for video recording mode) Manual Mode (Only for panorama mode) The other items can only be set in sub-menu. They are 7 All rights reserved. UCam Team 2011,2012 UCam Team UCam User Manual http://www.u-camera.com Flash Mode Scene Mode Anti Vibrate Resolution White Balance Timer Split Line Contrast Saturation Brightness Sharpness Metering Anti-banding Color Effect Note:Some of the above setting items need hardware camera sensor support. So you may can’t find some items in your phone. These items are Front/Rear camera switch Flash Mode Scene Mode White Balance Touch Focus Auto Focus Geo-Tag Contrast Saturation Brightness Sharpness Metering Anti-banding Color Effect 3.4.2 Advanced Setting Menu Advanced setting menu can be launched by press the advanced setting button in the control bar which launched by MENU KEY. Some setting items which may be used not frequently can be found here. They are Picture Quality Shutter Sound Frame rate Number of pictures ISO VOLUME KEY function setting Preview Brightness setting Timestamp Style SD Card Storage Picture save path setting 8 All rights reserved. UCam Team 2011,2012 UCam Team UCam User Manual http://www.u-camera.com Direction Revise Reset to Default Feedback About us 3.4.3 Timestamp Time Stamp can be enabled/disabled by press the “Timestamp” item in top setting menu. The style can be selected in advanced setting menu. 3.4.4 Auto Save Auto Save means camera will back to preview UI after picture shooting. If this setting item is set to OFF, it would go to the edit UI after shooting. 3.4.5 SNS support With UCam SNS share, you can share your pictures to your friends easily in your favorite SNS site. Facebook, twitter, flickr, sina weibo, QZone, Renren, Kaixin, tencent weibo ,sohu weibo and mixi are all supported. More SNS sites will be supported later. To enter into UCam SNS share, please click the share button in picture replay UI or edit UI. In UCam SNS share UI, you can add message, set SNS account. Several SNS sites can be shared at the same time. 3.4.6 Shutter Sounds Shutter sounds can be open/close by “Shutter Sounds” item in top setting menu. And, you can select your favorite shutter sounds in advanced setting menu. NOTE - With some phones, the shutter sounds is played in Android framework. So the shutter sounds setting can’t work in these phones. For some phones (some Motorola models, some Samsung models and some Sony Ericsson models) which we know have this problem, this setting item is removed. If you find this problem in your phone, great appreciate for 9 All rights reserved. UCam Team 2011,2012 UCam Team UCam User Manual http://www.u-camera.com reporting these issues to UCam community . 3.4.7 Touch shooting If this item is set to ON, a picture would be shoot when touch the screen. It is great for self-shooting with rear camera. 3.4.8 VOLUME KEY function setting VOLUME KEY function can be setting in advanced setting menu. To those phones which have physical camera shutter key, UCam do nothing default if VOLUME KEY is pressed. You can change it to digital zoom or another shutter key. To those no physical camera shutter phones, VOLUME KEY work as physical shutter key default in UCam. You can set it to digital zoom key or do nothing in advanced setting. 3.4.9 Preview Brightness function setting Preview brightness can be set in advanced setting menu. To some phones/tablets of which camera preview is too bright or too dark, you can adjust by this setting. NOTE - The setting may not work with some phones (eg some HTC models, some Sharp models) if Display Setting is set to auto. If you find this problem in your phone, great appreciate for reporting these issues to UCam community . 3.4.10 Camera Direction Revise Camera preview direction and captured picture direction may be wrong because of hardware sensor layout or modification to Android system. Please enter to “Direction Revise” in advanced setting to revise the direction. There are 2 steps. Preview direction will be revised first. If the preview direction is wrong, please select “No”. And UCam will rotate 90 degree and ask again. If you select “Yes”, UCam will start to revise captured picture’s direction. Please choose the picture as the same direction as preview. 10 All rights reserved. UCam Team 2011,2012 UCam Team UCam User Manual http://www.u-camera.com To dual camera phone, please switch to the camera before start revise. 3.5 Picture in Picture (PIP) Mode To enter PIP Mode, click the mode switch button in bottom control bar and then select “PIP”. Small picture taking UI will show after taking a picture in PIP mode. You can select your favorite shape for the second picture. There are 5 shapes – classic, custom, heart, oval and square. The preview area can be scaled by drag the rectangle. 3.6 Background Mode To enter Background Mode, click the mode switch button in bottom control bar and then select “Background”. 11 All rights reserved. UCam Team 2011,2012 UCam Team UCam User Manual http://www.u-camera.com There is a background setting menu above bottom control bar for background selection. After a background is selected, you can find a view by the transparent area of selected backgournd. NOTE – There are only few frames with UCam initial installation. Please download more fantastic frames in download center. 3.7 Burst Mode To enter Burst Mode, click the mode switch button in bottom control bar and then select “Burst”. Burst shot is started when press the shutter button, another click can stop it. If you stop shooting or it reaches to maximum number of pictures (can be set in advanced setting), UCam would enter to picture save procedure. The process bar will show you the detail process information. UCam burst shoot taking picture as fastest frame rates. If you don’t want it burst so fast, please change the burst frame rates in advanced setting. 3.8 Panorama Mode To enter Panorama Mode, click the mode switch button in bottom control bar and then select “Panorama”. After taking the first picture, rotate your phone left or right to find and take next pictures. There will be arrows or text hint to help you find proper view. Panorama is hardware performance related. So the auto panorama may work not very well in your phone. If you the picture you token is not very well or difficult to taking a panorama picture, please try manual mode. Press manual mode item in setting menu to enable manual mode. In Manual mode, you must touch screen or press shutter button or hardware shutter button to take a picture if you find proper view manually. 3.9 Collage Mode Collage mode can help you take one image from multi shootings. To enter Background Mode, click the mode switch button in bottom control bar and then select “Collage”. Press shutter button to shoot. Once taken 9 pictures or “GO” button is pressed, UCam would enter into collage picture generation GUI. Collage picture generating is introduced in 4.2. 12 All rights reserved. UCam Team 2011,2012 UCam Team UCam User Manual http://www.u-camera.com At least 2 pictures are needed for collage. Click the thumbnail in bottom control bar can delete pictures. 3.10 Recording To enter Recording Mode, click the mode switch button in bottom control bar and then select “Recoding”. There are less setting items in recording mode than normal camera mode normally. There is a “Mute” button in the top setting menu, you can click it “on” when you don’t want the recordings have voices. 3.11 Picture/Video review Picture/Video review depends on pictures/video play applications installed in the system. To review the pictures or Videos you taken, please click the thumbnail button in bottom control bar. Android system will show you the possible selection. 4 UPhoto UPhoto is an Image post-process tool. 4.1 General Information UPhoto can be launched by clicking the shortcuts described in 2.3 . You can handle your existed photo or take a new picture. 13 All rights reserved. UCam Team 2011,2012 UCam Team UCam User Manual http://www.u-camera.com There are 2 others ways to enter UPhoto. 1. If “Auto Save” is set to “OFF”, UPhoto will be launched automatically after taking a picture. 2. Select UPhoto in share list or edit list of other picture play application or file manager. 4.2 Puzzle Click the “Puzzle” button in UPhoto can start pictures select. You can select 2~9 pictures to generate collage pictures. Once some pictures is selected, press “OK” to enter into collage pictures generating GUI. And, collage picture generating GUI can also be launched by the “GO” button in UCam Collage GUI. 14 All rights reserved. UCam Team 2011,2012 UCam Team UCam User Manual http://www.u-camera.com There are 2 collage picture generating modes, collage mode and free puzzle mode. In the Collage mode you can edit the pictures like this: 1. Left/right swipe or shake the phone to switch the puzzle style. 2. Double click one picture to select it. 3. Drag and move the selected picture can change display area in located grid. 4. Hold the selected picture and move it to another grid can switch 2 pictures. 5. Click the zoom in/out button can scale the selected picture. In the Free Puzzle mode you can edit pictures like this 1. Left/right swipe or shake the phone to switch the puzzle style. 15 All rights reserved. UCam Team 2011,2012 UCam Team UCam User Manual http://www.u-camera.com 2. Hold a picture by single finger to move it. 3. Zoom in/out or rotate a picture by two fingers. 4. Change background picture. NOTE – There are only few backgrounds with UCam initial installation. Please download more funny backgrounds in download center. 4.3 Image Edit There are top control bar, image process area and bottom edit control bar in the Image editor. 4.3.1 Operation history By click the backward/forward button of top control bar, image history process steps can be undo/redo. 4.3.2 Effect After selecting an effect type in the “Effect” tab page, detail effected thumbnail will show above control bar. The picture will change to corresponding effect once click a thumbnail. 4.3.3 Edit Some edit processes can be found in the “Edit” tab page of bottom control bar. UPhoto provided the following edit process – Contrast Saturation Brightness Crop Rotate Flip 4.3.4 Label 16 All rights reserved. UCam Team 2011,2012 UCam Team UCam User Manual http://www.u-camera.com UCam support 3 types of label – text title, text bubble and text label. Text Title Select “Title” in label tab page to enter into title adding UI. You can input text content, select color and choose font for your title. And you can also save current edited title as favorite label. There will be a shortcut in label tab page after doing this. Text Bubble Select “Balloon” in Label tab page to enter bubble adding UI. Bubble style can be changed by swipe left/right in the bubble preview area. Select color and choose font is as the same as what you see in Text title. 17 All rights reserved. UCam Team 2011,2012 UCam Team UCam User Manual http://www.u-camera.com Bubble will be added to the image by clicking the OK button. You can drag the bubble and then move it to ideal place. Label Select “Label” in Label tab page to enter to label adding UI. Label style and font can be selected. 18 All rights reserved. UCam Team 2011,2012 UCam Team UCam User Manual http://www.u-camera.com Label will be added to the image by clicking the OK button. You can drag the tag and then move it to ideal place. And also you can scale it by the adjust handler NOTE – There are only few fonts with UCam initial installation. Please download more beautiful fonts in download center. 4.3.5 Frame You can select item in “Frame” tab page of bottom control bar to add frame to your picture. NOTE – There are only few frames with UCam initial installation. Please download more funny frames in download center. 19 All rights reserved. UCam Team 2011,2012 UCam Team UCam User Manual 4.3.6 http://www.u-camera.com Texture You can select item in “Texture” tab page of bottom control bar to add texture into picture. NOTE – There are only few textures with UCam initial installation. Please download more funny textures in download center. 4.3.7 Decorate You can add some small adorning (like hat, tie, glasses…) to your image by the “Decor” tab page in bottom control bar. Click the adorning in the list, corresponding adorning will show in the image. Then you can drag it to ideal place or rotate/scale it by the adjust handler. 20 All rights reserved. UCam Team 2011,2012 UCam Team UCam User Manual http://www.u-camera.com NOTE – There are only few decoration with UCam initial installation. Please download more funny decoration in download center. 4.3.8 Graffiti Select “Graffiti” in UPhoto to start drawing a picture. You can also select “Graffiti” in UPhoto launch UI. When select “Auto”, you can draw with brush of random style. You can custom a brush in detail by “Custom”. Your brush style can saved as regular used brush and listed in Graffiti tab page. 21 All rights reserved. UCam Team 2011,2012 UCam Team UCam User Manual http://www.u-camera.com NOTE – If you want to move the image while the image has been scaled out, please hold the image by two fingers and then move it. 4.4 UPhoto Setting Picture size after process and storage path can be set in UPhoto setting menu . NOTE-If you select large picture size, UPhoto may have problem when processing image caused by memory limitation. Once this happened, please set picture size to smaller. 5 UGif 22 All rights reserved. UCam Team 2011,2012 UCam Team UCam User Manual http://www.u-camera.com UGif is a GIF animation maker. There are 3 ways to create GIF, generate GIF from existed pictures, generate GIF by taking pictures and generate GIF by recording. In the UGif main UI, there are picture select button (in top right area), camera preview area, record control area and bottom control bar. In the record control area, you can switch front/rear camera and select recording or taking picture. The LED display area will show these statuses and the number of frames. There are setting button, shutter button and GIF list button in the bottom control bar. Note – Front/Rear camera switch button will be disabled if your phone doesn’t support front camera. 5.1 Taking Pictures/Recording for GIF Click the shutter button will take a picture or start recording. Once there are 2 frames or more, the GIF List button would be replaced by a “√” button. GIF edit UI will be shown after pressing this confirm button. UGif will enter edit UI once the number of frames reached the set max frames. 5.2 Select picture for GIF Pictures select UI will be launched by click the top-right button. Press “OK” button to enter GIF editor UI after selecting pictures. 23 All rights reserved. UCam Team 2011,2012 UCam Team UCam User Manual http://www.u-camera.com 5.3 GIF Editor There are top control bar , frame list, preview area and bottom control bar in the GIF editor UI. GIF play – click the preview area can start/stop the play of current GIF. Frame order adjustment – long press the frame you want to move, drag it to the target place and release it. More edit functions are in the bottom control bar. There are rotate , flip , effect , speed and play mode. 5.4 GIF Setting 24 All rights reserved. UCam Team 2011,2012 UCam Team UCam User Manual http://www.u-camera.com Click the setting button in bottom control bar can enter into GIF setting UI. You can set GIF resolution and max number of frames. 6 USpyCam USpyCam is used to taking picture or recording in hidden way for security. And it can also be used as a vehicle Traveling Data Recorder (VTDR). 6.1 Features USpyCam can be launched by clicking the shortcut described in 2.3 . 25 All rights reserved. UCam Team 2011,2012 UCam Team UCam User Manual http://www.u-camera.com There are a control bar and a preview window in USpyCam GUI. There are 5 buttons in control bar - screen off button, preview window control button, auto capture button, record button and setting button. The other area is transparent and it will display what the HOME should be. This is for camouflage. The main USpyCam functions are Manual Capture, Auto Capture, Record and Power Save. 6.1.1 Manual Capture Manual Capture is default capture mode after USpyCam is launched. You can shoot a picture by touch screen or press VOLUME key. Click button 1 can shut down the screen display. Click button 2 can close the preview window. These 2 functions are for power save and camouflage. 6.1.2 Auto Capture / VTDR Click button 3 to enter into Auto Capture mode. Screen display and preview window will be off automatically in this mode. And USpyCam would take picture with set capture interval. 6.1.3 Recording / VTDR Click button 4 to start recording. Click button 1 can shutdown screen display while recording. Note - Preview window can’t be closed while recording. If you want to record without preview window, please click button 2 to close preview and then click button 4 start recording. 6.1.4 Camouflage / Power Save Button 1 is used to shutdown screen display. Press BACK, MENU, HOME and POWER key can resume screen display. Note – With some phones (Motorola, Meizu, Samsung…), the screen display can only be darken but can’t shutdown. Button 2 is used to close preview window. 6.2 Setting 26 All rights reserved. UCam Team 2011,2012 UCam Team UCam User Manual http://www.u-camera.com Click button 5 can enter into USpyCam setting GUI. The following setting are supported – Saving Path, shooting notification, fix screen off error, forced shutter off, picture size, timestamp, volume key shutter, auto capture interval, auto capture screen off timeout, recording resolution, max recording clip length, Looping Record and mute recording. Note – 1. With some phones, shutdown the screen off may cause system sleep. If this happen, please enable “Fix Screen Off Error” in setting after waking system. 2. With some phones, the shutter sounds may not be muted. If your USpyCam shoot with shutter sound, please enable “Forced sound off” in setting to mute shutter in force. Picture size can’t be set if this option is enabled. 3. About the Max Video Duration. This is only for each clip piece but not whole recording. Once the recorded clip reach this length, it would be saved automatically and then start a new clip itself. 4. There will be only two saved video clip once “Looping Record” is enabled. It is recommended that enable “Looping Record” when using USpyCam as vehicle traveling data recorder. 7 UShare UShare is mainly for files transfer between phone and PC. Images, videos, music and other files can all be transferred by UShare. UShare also support normal QR Code. NOTE – Please make sure W-LAN is connected when using UShare. Network should work between the phone and your PC. For better experience, keep your phone and PC in one Local Network is recommended. 27 All rights reserved. UCam Team 2011,2012 UCam Team UCam User Manual http://www.u-camera.com 7.1 General Information The UShare main UI contains QR Code scanning area and bottom control bar. QR Code scanning is used to receive files/text information contained in QR Code. You can scan all QR Code you find in any place like UShare Windows client, website, poster, magazine and so on. There are setting button and help button in the control bar. If you drag the control bar up-ward, it will enter to file upload UI. After confirming the files to be uploaded, UShare will enter into QR Code Scanning UI. With setting, you can set default file save path and default action for recognized QR Code. 28 All rights reserved. UCam Team 2011,2012 UCam Team UCam User Manual http://www.u-camera.com 7.2 Typical UShare Scenario Here are some typical UShare use scenarios can bring great convenience to you. 7.2.1 Upload Pictures to you PC The mobile phone camera sensor is more and more powerful day by day. Lots of phone can take high quality pictures as digital camera can do. However, phone is not an ideal picture store place because the limit of memory space. The first choice may be store your pictures in your PC. UShare can help you do this work very easy without cable or USB line. 1. Select “Photo” in the upload local files UI. 2. Select a gallery and then select photos you want to upload. And then click “Confirm” button. 29 All rights reserved. UCam Team 2011,2012 UCam Team UCam User Manual http://www.u-camera.com 3. Open UShare Windows client and select “Receive”. And then scan the QR Code with scanning UI in phone. 4. Selected files will be uploaded to PC. 30 All rights reserved. UCam Team 2011,2012 UCam Team UCam User Manual http://www.u-camera.com 7.2.2 Download Music from PC to phone. Similar with picture upload introduced in 4.2.1, you can download music files from your PC to your phone very easy by UShare. 2. Select “Upload” in USahre Windows Client, and add the music files by “Add File” button. A QR Code will be generated in right side area. 3. Scan the QR Code with your phone UShare scanning UI, the transfer of music files will be started automatically. As introduced in 4.1, you can set default files save path in setting. 7.2.3 Text Input 2. Both UShare Windows client and UCam website have text input area. After entering or selecting some text, a QR Codec will be generated. 31 All rights reserved. UCam Team 2011,2012 UCam Team UCam User Manual http://www.u-camera.com 3. Scan the QR Code generated in step 1, the text will be recognized in your phone. UShare will ask you for the next procedure or handle the text as the default action you set in setting. For example, if you choose “share by SMS” for text, the SMS application would be launched automatically with the text. 32 All rights reserved. UCam Team 2011,2012 UCam Team UCam User Manual http://www.u-camera.com 8 FAQ Please refer to Q&A center of UCam official website for frequent questions and answer. Note – Because only one reply is allowed for an account in AppStore, we can’t answer your questions in Appstore comments. So, if you have any questions or suggestions, please post in UCam official forum so that we can contact to you for more detail information. The issues posted in forum will be solved with highest priority. 33 All rights reserved. UCam Team 2011,2012