1
User’s Manual
NOTICE:
There are corrections in 3.3 Link Directive File on page 23.
RI850V4
Real-Time Operating System
User’s Manual: Analysis
Target Tool
RI850V4
All information contained in these materials, including products and product specifications,
represents information on the product at the time of publication and is subject to change by
Renesas Electronics Corp. without notice. Please review the latest information published by
Renesas Electronics Corp. through various means, including the Renesas Electronics Corp.
website (http://www.renesas.com).
www.renesas.com
Rev.1.00
Apr 2011
Notice
1.
2.
3.
4.
5.
6.
7.
All information included in this document is current as of the date this document is issued. Such information, however, is
subject to change without any prior notice. Before purchasing or using any Renesas Electronics products listed herein, please
confirm the latest product information with a Renesas Electronics sales office. Also, please pay regular and careful attention to
additional and different information to be disclosed by Renesas Electronics such as that disclosed through our website.
Renesas Electronics does not assume any liability for infringement of patents, copyrights, or other intellectual property rights
of third parties by or arising from the use of Renesas Electronics products or technical information described in this document.
No license, express, implied or otherwise, is granted hereby under any patents, copyrights or other intellectual property rights
of Renesas Electronics or others.
You should not alter, modify, copy, or otherwise misappropriate any Renesas Electronics product, whether in whole or in part.
Descriptions of circuits, software and other related information in this document are provided only to illustrate the operation of
semiconductor products and application examples. You are fully responsible for the incorporation of these circuits, software,
and information in the design of your equipment. Renesas Electronics assumes no responsibility for any losses incurred by
you or third parties arising from the use of these circuits, software, or information.
When exporting the products or technology described in this document, you should comply with the applicable export control
laws and regulations and follow the procedures required by such laws and regulations. You should not use Renesas
Electronics products or the technology described in this document for any purpose relating to military applications or use by
the military, including but not limited to the development of weapons of mass destruction. Renesas Electronics products and
technology may not be used for or incorporated into any products or systems whose manufacture, use, or sale is prohibited
under any applicable domestic or foreign laws or regulations.
Renesas Electronics has used reasonable care in preparing the information included in this document, but Renesas Electronics
does not warrant that such information is error free. Renesas Electronics assumes no liability whatsoever for any damages
incurred by you resulting from errors in or omissions from the information included herein.
Renesas Electronics products are classified according to the following three quality grades: “Standard”, “High Quality”, and
“Specific”. The recommended applications for each Renesas Electronics product depends on the product’s quality grade, as
indicated below. You must check the quality grade of each Renesas Electronics product before using it in a particular
application. You may not use any Renesas Electronics product for any application categorized as “Specific” without the prior
written consent of Renesas Electronics. Further, you may not use any Renesas Electronics product for any application for
which it is not intended without the prior written consent of Renesas Electronics. Renesas Electronics shall not be in any way
liable for any damages or losses incurred by you or third parties arising from the use of any Renesas Electronics product for an
application categorized as “Specific” or for which the product is not intended where you have failed to obtain the prior written
consent of Renesas Electronics. The quality grade of each Renesas Electronics product is “Standard” unless otherwise
expressly specified in a Renesas Electronics data sheets or data books, etc.
“Standard”:
8.
9.
10.
11.
12.
Computers; office equipment; communications equipment; test and measurement equipment; audio and visual
equipment; home electronic appliances; machine tools; personal electronic equipment; and industrial robots.
“High Quality”: Transportation equipment (automobiles, trains, ships, etc.); traffic control systems; anti-disaster systems; anticrime systems; safety equipment; and medical equipment not specifically designed for life support.
“Specific”:
Aircraft; aerospace equipment; submersible repeaters; nuclear reactor control systems; medical equipment or
systems for life support (e.g. artificial life support devices or systems), surgical implantations, or healthcare
intervention (e.g. excision, etc.), and any other applications or purposes that pose a direct threat to human life.
You should use the Renesas Electronics products described in this document within the range specified by Renesas Electronics,
especially with respect to the maximum rating, operating supply voltage range, movement power voltage range, heat radiation
characteristics, installation and other product characteristics. Renesas Electronics shall have no liability for malfunctions or
damages arising out of the use of Renesas Electronics products beyond such specified ranges.
Although Renesas Electronics endeavors to improve the quality and reliability of its products, semiconductor products have
specific characteristics such as the occurrence of failure at a certain rate and malfunctions under certain use conditions. Further,
Renesas Electronics products are not subject to radiation resistance design. Please be sure to implement safety measures to
guard them against the possibility of physical injury, and injury or damage caused by fire in the event of the failure of a
Renesas Electronics product, such as safety design for hardware and software including but not limited to redundancy, fire
control and malfunction prevention, appropriate treatment for aging degradation or any other appropriate measures. Because
the evaluation of microcomputer software alone is very difficult, please evaluate the safety of the final products or system
manufactured by you.
Please contact a Renesas Electronics sales office for details as to environmental matters such as the environmental
compatibility of each Renesas Electronics product. Please use Renesas Electronics products in compliance with all applicable
laws and regulations that regulate the inclusion or use of controlled substances, including without limitation, the EU RoHS
Directive. Renesas Electronics assumes no liability for damages or losses occurring as a result of your noncompliance with
applicable laws and regulations.
This document may not be reproduced or duplicated, in any form, in whole or in part, without prior written consent of Renesas
Electronics.
Please contact a Renesas Electronics sales office if you have any questions regarding the information contained in this
document or Renesas Electronics products, or if you have any other inquiries.
(Note 1) “Renesas Electronics” as used in this document means Renesas Electronics Corporation and also includes its majorityowned subsidiaries.
(Note 2) “Renesas Electronics product(s)” means any product developed or manufactured by or for Renesas Electronics.
How to Use This Manual
Readers
This manual is intended for users who design and develop application systems using
V850 microcontroller products.
Purpose
This manual is intended for users to understand the functions of real-time OS
"RI850V4" manufactured by Renesas Electronics, described the organization listed
below.
Organization
This manual consists of the following major sections.
CHAPTER 1 GENERAL
CHAPTER 2 FUNCTIONS
CHAPTER 3 AZ MONITOR
APPENDIX A WINDOW REFERENCE
APPENDIX B MESSAGES
APPENDIX C INDEX
How to read this manual
It is assumed that the readers of this manual have general knowledge in the fields of
electrical engineering, logic circuits, microcontrollers, C language, and assemblers.
To understand the hardware functions of the V850 microcontroller
→ Refer to the User’s Manual of each product.
Conventions
Data significance:
Higher digits on the left and lower digits on the right
Note:
Footnote for item marked with Note in the text
Caution:
Information requiring particular attention
Remark:
Supplementary information
Numerical representation: Binary...XXXX or XXXXB
Decimal...XXXX
Hexadecimal...0xXXXX
Prefixes indicating power of 2 (address space and memory capacity):
K (kilo)
210 = 1024
M (mega)
220 = 10242
Related Documents
Refer to the documents listed below when using this manual.
The related documents indicated in this publication may include preliminary versions.
However, preliminary versions are not marked as such.
Documents related to development tools (User’s Manuals)
Document Name
RI Series
RI78V4
RI850V4
Start
Document No.
R20UT0509E
Message
R20UT0510E
Coding
R20UT0511E
Debug
R20UT0520E
Analysis
R20UT0513E
Internal Structure
R20UT0514E
Coding
R20UT0515E
Debug
R20UT0516E
Analysis
This document
Internal Structure
R20UT0518E
RI850MP
Coding
R20UT0519E
CubeSuite+
Start
R20UT0545E
Integrated Development Environment
78K0 Design
R20UT0546E
78K0R Design
R20UT0547E
Caution
RL78 Design
R20UT0548E
V850 Design
R20UT0549E
R8C Design
R20UT0550E
78K0 Coding
R20UT0551E
RL78,78K0R Coding
R20UT0552E
V850 Coding
R20UT0553E
Coding for CX Compiler
R20UT0554E
R8C Coding
R20UT0576E
78K0 Build
R20UT0555E
RL78,78K0R Build
R20UT0556E
V850 Build
R20UT0557E
Build for CX Compiler
R20UT0558E
R8C Build
R20UT0575E
78K0 Debug
R20UT0559E
78K0R Debug
R20UT0560E
RL78 Debug
R20UT0561E
The related documents listed above are subject to change without notice. Be sure to use the
latest edition of each document when designing.
All trademarks or registered trademarks in this document are the property of their respective
owners.
[MEMO]
[MEMO]
[MEMO]
TABLE OF CONTENTS
CHAPTER 1 GENERAL ... 9
1.1 Overview ... 9
1.2 Features ... 9
CHAPTER 2 FUNCTIONS ... 10
2.1 Trace Form ... 10
2.2 Trace Data ... 10
2.2.1 Collecting positions and collected data ... 10
2.2.2 Timing of clearing ... 12
2.2.3 Time an accuracy ... 12
2.3 Debugging Procedure ... 13
CHAPTER 3 AZ MONITOR ... 20
3.1 Overview ... 20
3.2 User Own Coding Block ... 20
3.2.1 Initializing AZ monitor ... 22
3.3 Link Directive File ... 23
APPENDIX A WINDOW REFERENCE ... 24
A.1 Description ... 24
APPENDIX B MESSAGES ... 81
B.1 Overview ... 81
B.2 Error Messages ... 81
APPENDIX C INDEX ... 84
RI850V4 Ver.1.00.00
CHAPTER 1 GENERAL
CHAPTER 1 GENERAL
The CubeSuite+ is an integrated development environment used to carry out tasks such as design, coding, build and
debug for developing application systems for microcontrollers manufactured by Renesas Electronics.
This manual describes the performance analyzer. This tool is useful for analyzing programs using the "RI850V4" realtime OS functionality within this integrated program-development process.
1.1
Overview
As the performance of microprocessors has increased, application programs have grown in scale and complexity.
With conventional debuggers, theoretical debugging of such application programs is simple, but time-related analysis is
not. It is difficult and takes a very long time, for example, to analyze errors such as those caused by incorrect processing
timing, or to evaluate the performance of the entire system.
To solve these problems, Renesas Electronics Corporation has developed powerful microprocessors such as the
V850. Renesas Electronics Corporation also provides the performance analyzer to support the quantitative performance
analysis of programs.
The performance analyzer is a performance analysis tool for examining the execution transition statuses and the CPU
usage of processing programs that embed the RI850V4 for the V850. Being connected with the CubeSuite+, the performance analyzer achieves a function for collecting data of tracing the event occurrences (issuance of service calls, occurrence of interrupts, etc.) and presenting the trace data graphically.
The performance analyzer therefore allows the user to readily analyze the execution transition statuses and the CPU
usage of processing programs.
1.2
Features
The performance analyzer has the following features:
- Graphical display of the execution transition statuses of processing programs
The graphically displayed the execution transition status of the processing program in which the RI850V4 is
embedded (horizontal axis = time, vertical axis = task name, etc.) permits analysis of execution transition statuses,
such as task switching caused by service call issuance and transferring the control to the interrupt handler caused
by the occurrence of interrupts. Since all accesses to an object (such as semaphore or eventflag) are marked upon
issuance of a service call from a processing program, the usage of objects can also be checked.
- Graphical display of the CPU usage of processing programs
The CPU usage (total execution time, code coverage, etc.) of a processing program executed within a specified
section can be displayed, which enables the quantitative performance analysis for processing programs.
- Statistical analysis of processing time
The time required for a program to execute a certain operation is calculated and the result is displayed as a
histogram. The worst, average, and other values are also displayed.
- Linking with the CubeSuite+
The performance analyzer can open the Editor panel, Disassemble panel, and Memory panel of the CubeSuite+,
which enables quick identification of locations where a problem has occurred.
R20UT0517EJ0100 Rev.1.00
Apr 01, 2011
Page 9 of 88
RI850V4 Ver.1.00.00
CHAPTER 2 FUNCTIONS
CHAPTER 2 FUNCTIONS
This chapter describes main functions of the performance analyzer.
2.1
Trace Form
The performance analyzer supports the following trace form.
- Soft trace form
The soft trace form provides a monitor function on the target system, and collects trace data for the performance
analyzer using the monitor program (AZ monitor). The trace data is collected by linking a program with the monitor
function to the processing program. In the soft trace form, the trace data is stored into the user memory area which
is specified in the AZ Option dialog box.
Remark
The performance analyzer uses the following resources, when collecting the trace data by the soft trace
form.
Resource Name
Required Quantity
Text/data area (section name:.azmon_t) of the AZ monitor.
Appro. 920 bytes
Work area (section name:.azmon_b) of the AZ monitor.
40 bytes
Trace buffer area
4 K to 4 Mbytes
Timer counter
1
- Hard trace form
Using the trace function provided by the debug tool that is connected to the CubeSuite+, the performance analyzer
collects trace data and stores it to the trace memory of the debug tool.
Using this form, trace data can therefore be collected without modifying the processing program code.
Remark
The performance analyzer uses the following resources of the debug tool, when switching the AZ trace
mode to the ON state.
Resource Name
Required Quantity
Point trace event (for write access)
2.2
1
Trace Data
2.2.1
Collecting positions and collected data
The following lists the trace data to be collected and positions where they are collected.
Table 2-1. Collected Trace Data and Collecting Positions
Collecting Positions
Service call entry
Collected Data
Time
Service call function code
ID of object subject to execution by service call
Service call issuance address
R20UT0517EJ0100 Rev.1.00
Apr 01, 2011
Page 10 of 88
RI850V4 Ver.1.00.00
CHAPTER 2 FUNCTIONS
Collecting Positions
Service call exit
Collected Data
Time
Service call return value
Interrupt handler entry
Time
Exception code
Address at which execution returns from interrupt handler
Interrupt handler exit
Time
Occurrence of task switching
Time
ID of a task to which the operation will move (or ID that indicates idle routine is entered)
Task entry
Time
ID of task to be activated
Task activation address
Note that the following items cannot be detected as trace data for the performance analyzer.
- Address at which ext_tsk is issued
- Entry/exit of reset, NMI, exception (software exception, exception trap)
- Entry/exit of maskable interrupts whose interrupt handler has not been registered
- Boot processing entry/exit
- Initialization routine entry/exit
- Cyclic handler entry/exit
- Task exception handling routine entry/exit
Since the RI850V4 assigns the same function code to service call names to which an "i" is prefixed/not prefixed listed
below, the performance analyzer cannot identified them.
The performance analyzer therefore handles these service calls without an "i" being prefixed.
Task management functions
can_act/ican_act, sta_tsk/ista_tsk, chg_pri/ichg_pri, get_pri/iget_pri, ref_tsk/iref_tsk,
ref_tst/iref_tst
Task dependent synchronization
can_wup/ican_wup, sus_tsk/isus_tsk, rsm_tsk/irsm_tsk, frsm_tsk/ifrsm_tsk
functions
Task exception handling functions
ref_tex/iref_tex
Synchronization and
pol_sem/ipol_sem, ref_sem/iref_sem
communication functions
(semaphores)
Synchronization and
clr_flg/iclr_flg, pol_flg/ipol_flg, ref_flg/iref_flg
communication functions
(eventflags)
Synchronization and
prcv_dtq/iprcv_dtq, ref_dtq/iref_dtq
communication functions (data
queues)
Synchronization and
snd_mbx/isnd_mbx, prcv_mbx/iprcv_mbx, ref_mbx/iref_mbx
communication functions
(mailboxes)
Extended synchronization and
ref_mtx/iref_mtx
communication functions
(mutexes)
R20UT0517EJ0100 Rev.1.00
Apr 01, 2011
Page 11 of 88
RI850V4 Ver.1.00.00
Memory pool management func-
CHAPTER 2 FUNCTIONS
pget_mpf/ipget_mpf, rel_mpf/irel_mpf, ref_mpf/iref_mpf
tions (fixed-sized memory pools)
Memory pool management func-
pget_mpl/ipget_mpl, rel_mpl/irel_mpl, ref_mpl/iref_mpl
tions (variable-sized memory
pools)
Time management functions
set_tim/iset_tim, get_tim/iget_tim, sta_cyc/ista_cyc, stp_cyc/istp_cyc, ref_cyc/iref_cyc
Interrupt management functions
chg_ims/ichg_ims, get_ims/iget_ims
Service call management functions
cal_svc/ical_svc
2.2.2
Timing of clearing
The trace buffer area that is used for collecting trace data for the performance analyzer, and the timing of clearing the
area are shown in the table below.
Table 2-2. Timing of Clearing
Trace mode
Soft trace form
Timing of Clearing
- If AZ trace mode is set to on again after AZ trace mode was switched off
- When the CPU is reset
Harf trace form
- Every start of a program
- When the CPU is reset
2.2.3
Time an accuracy
The accuracy of the time information collected as trace data for the performance analyzer differs depending on the
trace form to be used.
- Soft trace form
Because time information is obtained from a timer counter on the target system, the time information of the performance analyzer accords with the operation of the timer counter.
- Hard trace form
The accuracy of the time information depends on the setting of the [Rate of frequency division of trace time tag]
property in the [Trace] category of the [Debug Tool Settings] tab in the Property panel of the CubeSuite+.
Also note that the time information may not be correct when the system clock is set to either STOP mode or IDLE
mode (The task execution time is calculated from the CPU system clock).
Remark
When using the performance analyzer in the hard trace form with the simulator, specify [No] with the
[Accumulate trace time] property in the [Trace] category on the [Debug Tool Settings] tab in the Property panel of the CubeSuite+.
Unless this property is set to [No], the correct time information cannot be obtained.
R20UT0517EJ0100 Rev.1.00
Apr 01, 2011
Page 12 of 88
RI850V4 Ver.1.00.00
2.3
CHAPTER 2 FUNCTIONS
Debugging Procedure
This section describes the procedure for debugging using the performance analyzer.
(1) Stating CubeSuite+
Start the CubeSuite+ and then connect the debug tool to be used to it (select the [Debug] menu >> [Connect to
Debug Tool] in the Main window of the CubeSuite+).
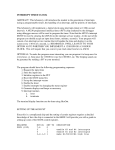
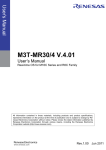
(2) Starting performance analyzer
Start the performance analyzer to be used (select the [View] menu >> [Real-time OS] >> [Performance Analyzer] in
the Main window of the CubeSuite+).
After the performance analyzer is started, the following AZ850V4 window appears.
At this time, make sure that the message "Connected" is displayed on the statusbar (Connection status area) in the
AZ850V4 window.
Figure 2-1. Starting Performance Analyzer
Confirm that "Connected" is displayed
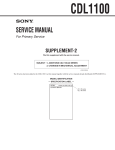
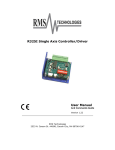
(3) Downloading a load module
Download the load module (select the [Debug] menu >> [Download]) that has been linked with the RI850V4 into
the debug tool.
At this time, make sure that the message “RX + AZ Loaded“ or "RX Loaded" is displayed on the statusbar (Load
module status area) in the AZ850V4 window.
Figure 2-2. Downloading A Load Module
Confirm that “RX + AZ Loaded“ or "RX Loaded" is displayed
R20UT0517EJ0100 Rev.1.00
Apr 01, 2011
Page 13 of 88
RI850V4 Ver.1.00.00
CHAPTER 2 FUNCTIONS
(4) Setting the options
Click the
button in the AZ850V4 window to open the AZ Option dialog box.
Figure 2-3. Open the AZ Option Dialog Box
Set options such as the trace form and the trace level to use the performance analyzer.
Click the [OK] button in the AZ Option dialog box to validate the specified settings.
(5) Switching the AZ trace mode
Click the
button in the AZ850V4 window to turn on AZ trace mode.
At this time, make sure that the message "AZ Trace ON" is displayed on the statusbar (AZ trace mode status area)
in the AZ850V4 window.
Figure 2-4. Switching The AZ Trace Mode
Confirm that "AZ Trace ON" is displayed
R20UT0517EJ0100 Rev.1.00
Apr 01, 2011
Page 14 of 88
RI850V4 Ver.1.00.00
CHAPTER 2 FUNCTIONS
(6) Execution of processing program
Run the processing program on the CubeSuite+.
Collection of trace data then starts.
(7) Stop of processing program
Stop execution of the processing program on the CubeSuite+. If a breakpoint has been set, wait until the processing program breaks.
Collection of trace data then ends.
(8) Loading of trace data
Click the
button in the AZ850V4 window to load trace data collected for the performance analyzer.
(9) Verification in AZ:Analyze window
Click the
button in the AZ850V4 window to open the AZ:Analyze window.
In this window and each of the windows that can be opened from this window, analysis related to time, such as
bugs caused by processing timing and evaluation of entire system performance.
Figure 2-5. Verification in AZ:Analyze Window
Remark
For how to read the execution transition map displayed in this window, refer to "[How to read execution
transition map]" and "[How to verify execution transition map]".
R20UT0517EJ0100 Rev.1.00
Apr 01, 2011
Page 15 of 88
RI850V4 Ver.1.00.00
CHAPTER 2 FUNCTIONS
(10) Selection in Object Select dialog box
Click the
button in the AZ:Analyze window to open the Object Select dialog box.
In this window, the objects to be displayed in execution transition map and modifies the order in which those
objects are displayed can be selected.
Figure 2-6. Selection in Object Select Dialog Box
Remark
For how to select fhe objects to be displayed in execution transition map and modifies the order in
which those objects are displayed, refer to "[Operating method]".
(11) Verification in Pattern Search dialog box
Click the
button in the AZ:Analyze window to open the Pattern Search dialog box.
In this window, the point at which a specific event occurred can be searched for, based on the execution transition
map displayed in the AZ:Analyze window.
Figure 2-7. Verification in Pattern Search Dialog Box
Remark
For how to search for the point at which a specific event occurred, refer to "[How to search]".
R20UT0517EJ0100 Rev.1.00
Apr 01, 2011
Page 16 of 88
RI850V4 Ver.1.00.00
CHAPTER 2 FUNCTIONS
(12) Verification in AZ:Cpu window
Click the
button in the AZ:Analyze window to open the AZ:Cpu window.
In this window, the CPU usage in a section between the up cursor and down cursor in the AZ:Analyze window can
be checked.
Figure 2-8. Verification in AZ:Cpu Window
Remark
For how to count the CPU usage, refer to "[Count method]".
(13) Verification in AZ:Pattern window
Click the
button in the AZ:Analyze window to open the Pattern Set dialog box.
Figure 2-9. Open the AZ Option Dialog Box
R20UT0517EJ0100 Rev.1.00
Apr 01, 2011
Page 17 of 88
RI850V4 Ver.1.00.00
CHAPTER 2 FUNCTIONS
Set pattern to be displayed in the AZ:Pattern window.
Click the [OK] button in the Pattern Set dialog box to open the AZ:Pattern window.
In this window, the histogram representing the number of times the specified pattern appears for given execution
duration in the execution transition map can be checked.
Figure 2-10. Verification in AZ:Pattern Window
Remark
For how to count the histogram representing the number of times the specified pattern appears for
given execution duration in the execution transition map, refer to "AZ:Pattern window".
(14) Verification in AZ:Trace View window
Click the
button in the AZ:Analyze window to open the AZ:Trace View window.
In this window, information obtained from the execution transition map in the AZ:Analyze window can be viewed in
list form.
Figure 2-11. Verification in AZ:Trace View Window
Remark
For how to read the list displayed in this window, refer to "[How to read the list]".
R20UT0517EJ0100 Rev.1.00
Apr 01, 2011
Page 18 of 88
RI850V4 Ver.1.00.00
CHAPTER 2 FUNCTIONS
(15) Verification in Trace Search dialog box
Click the [View] menu >> [Find...] in the AZ:Trace View window to open the Trace Search dialog box.
In this window, specific information (trace data) can be searched for from the list displayed in the AZ:Trace View
window.
Figure 2-12. Verification in Trace Search Dialog Box
Remark
For how to search for specific information (trace data), refer to "[How to search]".
R20UT0517EJ0100 Rev.1.00
Apr 01, 2011
Page 19 of 88
RI850V4 Ver.1.00.00
CHAPTER 3 AZ MONITOR
CHAPTER 3 AZ MONITOR
This chapter describes how to create the AZ monitor (monitor program) that is necessary for using the performance
analyzer in the soft trace form.
3.1
Overview
AZ monitor is a monitor program which consists of the user own coding block (azusr_xxx.s: [CA850] [CX],
azusr_xxx.850: [GHS]) and the core block (azcorec.o), that collects trace data when the performance analyzer is used in
the soft trace form.
Therefore, the user own coding block that controls the timer counter must be created to complete creation of the AZ
monitor.
- azusr_xxx.s: [CA850] [CX], azusr_xxx.850: [GHS]
This is a file, which is extracted as the target-dependent module (control block of the timer counter) from AZ monitr.
file is the AZ monitor main processing.
Remark
AZ monitor acquires the time information necessary for trace data by using the timer counter of the
user's target device.
- azcorec.o
This is a file, which is extracted as the AZ monitor main processing.
3.2
User Own Coding Block
Code the control block of the timer counter of the target to be used.
The following shows the data and functions nessary for the user own coding block.
Table 3-1. List of User Own Coding Block
Name
Type
Description
__AZMON_MaxCount
Data
Specify the maximum number of timer counts.
__AZMON_CountMode
Data
Specify the timer count mode.
0x0 : Up counter
0x1 : Down counter
__AZMON_TimePerCount
Data
Specify the time per count in microsecond units.
__AZMON_InitTimer
Function
Specify the timer initialization processing.
Input register : lp (return address)
Output register : None
Destructive register : Depends on C language calling restrictions
__AZMON_GetCounter
Function
Specify the processing for acquiring the timer count value.
Input register : lp (return address)
Output register : r10 (count value)
Destructive register : r1, r11
R20UT0517EJ0100 Rev.1.00
Apr 01, 2011
Page 20 of 88
RI850V4 Ver.1.00.00
CHAPTER 3 AZ MONITOR
The following shows a example of user own coding block.
Figure 3-1. Example of User Own Coding Block
.globl
__AZMON_MaxCount
.globl
__AZMON_CountMode
.globl
__AZMON_TimePerCount
.globl
__AZMON_InitTimer
.globl
__AZMON_GetCounter
.section
".azmon_t", text
.align
4
__AZMON_MaxCount:
.word
MaxCount
.section
".azmon_t", text
.align
4
/* Maximum number of timer counts */
__AZMON_CountMode:
.byte
CountMode
.section
".azmon_t", text
.align
4
/* Timer count mode */
__AZMON_TimePerCount:
.float
TimePerCount
.section
".azmon_t", text
.align
4
__AZMON_InitTimer:
.........
/* Timer per count */
/* Timer initialization processing */
.........
jmp
[lp]
.section
".azmon_t", text
.align
4
__AZMON_GetCounter:
.........
/* Processing for acquiring timer counter value */
.........
jmp
Remark
[lp]
If the "ld.h" instruction is used to acquire the timer counter value (__AZMON_GetCounter), the r10 value is
signextended to 4-byte value.
Therefore, this value must be masked as the example show below.
ld.h
0x0[r1], r10
andi
0xffff, r10, r10
R20UT0517EJ0100 Rev.1.00
Apr 01, 2011
Page 21 of 88
RI850V4 Ver.1.00.00
3.2.1
CHAPTER 3 AZ MONITOR
Initializing AZ monitor
The AZ monitor must be initialized before it is operated.
AzInit that is a initialization routine for AZ monitor is prepared in AZ monitor. Call AzInit within the initialization routine of
the RI850V4 (inirtn).
AzInit initializes the timer counter and trace control.
AzInit is the void type function without arguments.
The following shows a example of description for initialization of the AZ monitor
Figure 3-2. Example of AZ Monitor Initialization Description
#include <kernel.h>
void
inirtn (VP_INT exinf) {
.........
.........
AzInit ();
/* Initialize AZ monitor */
return;
}
R20UT0517EJ0100 Rev.1.00
Apr 01, 2011
Page 22 of 88
RI850V4 Ver.1.00.00
3.3
CHAPTER 3 AZ MONITOR
Link Directive File
The following shows the list of sections for AZ monitor.
Table 3-2. List of Sections
Section Name
Attribute
Type
Description
.azmon_t
AZ
PROGBITS
Text/data area of AZ monitor
.azmon_b
AW
PROGBITS
Work area of AZ monitor
NOBITS
The following shows a example of link directive file.
Figure 3-3. Example of Link Directive File
.........
.........
TEXT:
!LOAD
?RX
V0x00001000 {
.........
.........
.azmon_t
= $PROGBITS ?AX .azmon_t;
};
.........
.........
DATA:
!LOAD
?RW
V0xfffc000 {
.........
.........
.azmon_b = $NOBITS ?AW .azmon_b;
.azmon_b
= $PROGBITS ?AW .azmon_b;
};
.........
.........
R20UT0517EJ0100 Rev.1.00
Apr 01, 2011
Page 23 of 88
RI850V4 Ver.1.00.00
APPENDIX A WINDOW REFERENCE
APPENDIX A WINDOW REFERENCE
This appendix provides detailed explanations of windows and dialog boxes used for analyzing with the performance
analyzer.
A.1
Description
The following shows the list of windows and dialog boxes of the performance analyzer.
Table A-1. List of Windows and Dialog Boxes
Window/Dialog Box Name
Function
AZ850V4 window
Central window for using the functions provided by the performance analyzer.
AZ Option dialog box
Sets options such as the trace form and the trace level to use the performance analyzer.
Open/Save As dialog box
Specifies the file name when loading a file that contains information to be displayed in
the AZ:Analyze window, AZ:Cpu window and AZ:Pattern window, or when saving
information displayed in the AZ:Analyze window, AZ:Cpu window, AZ:Pattern window
and AZ:Trace View window as a file.
AZ:Analyze window
Displays information obtained from the trace data loaded into the AZ850V4 window, in
the form of an execution transition map.
Object Select dialog box
Selects the objects to be displayed in execution transition map and modifies the order
in which those objects are displayed.
Pattern Search dialog box
Searches for the point at which a specific event occurred, based on the execution transition map displayed in the AZ:Analyze window.
AZ:Cpu window
Displays the CPU usage in a section between the up cursor and down cursor in the
AZ:Analyze window.
Pattern Set dialog box
Sets the pattern to be displayed in the AZ:Pattern window.
AZ:Pattern window
Displays the histogram representing the number of times the specified pattern appears
for given execution duration in the execution transition map.
AZ:Trace View window
Lists information obtained from the execution transition map in the AZ:Analyze window.
Trace Search dialog box
Searches for specific information (trace data) based on the list displayed in the
AZ:Trace View window.
About dialog box
Displays the version information of the performance analyzer.
AZ:Error dialog box
Displays the error information of the performance analyzer.
R20UT0517EJ0100 Rev.1.00
Apr 01, 2011
Page 24 of 88
RI850V4 Ver.1.00.00
APPENDIX A WINDOW REFERENCE
AZ850V4 window
Central window for using the functions provided by the performance analyzer.
Figure A-1. AZ850V4 Window
(1)
(2)
(3)
The following items are explained here.
- [How to open]
- [Description of each area]
- [Caution]
[How to open]
- In the menubar of the main window, select [Realtime OS] >> [Performance Analyzer] from the [View] menu.
[Description of each area]
(1) Menubar
This bar consists of the following menu items.
(a) [File] menu
Exit
Terminates the performance analyzer.
The function of this item is same as that of the
button.
(b) [Option] menu
Tool Bar
Switches displaying and hiding the Toolbar (default: displayed).
Status Bar
Switches displaying and hiding the Statusbar(default: displayed).
AZ Option...
Opens the AZ Option dialog box.
In this dialog box, trace options for the performance analyzer are specified.
The function of this item is same as that of the
button.
(c) [Operation] menu
AZ Trace ON
Turns on the AZ trace mode.
Trace data is collected into the trace memory of the debug tool by running a
processing program while the AZ trace mode is ON.
The function of this item is same as that of the
R20UT0517EJ0100 Rev.1.00
Apr 01, 2011
button.
Page 25 of 88
RI850V4 Ver.1.00.00
AZ Trace OFF
APPENDIX A WINDOW REFERENCE
Turns off the AZ trace mode.
Trace data is not collected into the trace memory of the debug tool if a processing program is executed while the AZ trace mode is OFF.
The function of this item is same as that of the
Upload
button.
Loads trace data stored in the trace memory.
The AZ trace mode is automatically turned off when loading of trace data is finished.
This menu is unavailable if trace data has not been collected.
The function of this item is same as that of the
button.
(d) [Browse] menu
Analyze...
Opens the AZ:Analyze window in Active mode.
If loading of trace data has been finished in this window, the execution transition map is displayed in the corresponding window.
The function of this item is same as that of the
button.
(e) [Window] menu
Close All
Closes windows and dialog boxes other than this window.
(f) [Help] menu
This Window
Displays the help widnow for this window.
Help Topics
Opens the online help, with the [Search] tab displayed.
About...
Opens the About dialog box.
The version information of the performance analyzer is displayed.
(2) Toolbar
This bar consists of the following buttons.
Opens the AZ Option dialog box.
In this dialog box, trace options for the performance analyzer are specified.
The function of this item is the same as that of [AZ Option...] int the [Option] menu.
Switches the AZ trace mode.
Trace data is collected into the trace memory of the debug tool by running a processing program while the AZ trace mode is ON.
Trace data is not collected into the trace memory of the debug tool if a processing
program is executed while the AZ trace mode is OFF.
The function of this item is the same as that of [AZ Trace ON] or [AZ Trace OFF] int
the [Operation] menu.
Loads trace data stored in the trace memory.
The AZ trace mode is automatically turned off when loading of trace data is finished.
This button is unavailable if trace data has not been collected.
The function of this item is the same as that of [Upload] int the [Operation] menu.
R20UT0517EJ0100 Rev.1.00
Apr 01, 2011
Page 26 of 88
RI850V4 Ver.1.00.00
APPENDIX A WINDOW REFERENCE
Opens the AZ:Analyze window in Active mode.
If loading of trace data has been finished in this window, the execution transition
map is displayed in the corresponding window.
The function of this item is the same as that of [Analyze...] int the [Browse] menu.
(3) Statusbar
This bar consists of the following areas.
Figure A-2. Statusbar (AZ850V4 Window)
(a)
(b)
(c)
(d)
(a) Connection status area
This area indicates the status of connection with the CubeSuite+.
Connected
Connected to the CubeSuite+.
Not Connected
Not connected to the CubeSuite+.
(b) Load module status area
This area indicates the state of the load module to be loaded onto the debug tool.
This area is not displayed if the performance analyzer is not connected to the CubeSuite+.
RX + AZ Loaded
Both of the RI850V4 and AZ monitor are loaded.
RX + AZ None
Both or either of the RI850V4 and AZ monitor is not loaded.
RX Loaded
A load module linked with the RI850V4 has been downloaded.
RX None
No load modules linked with the RI850V4 have been downloaded.
(c) Load module execution status area
This area indicates the state of the program execution.
This area is not displayed if the performance analyzer is not connected to the CubeSuite+.
Running
Status of program being execution.
Breaked
Status of program operation undergoing break.
(d) AZ trace mode status area
This area indicates the current state of AZ trace mode.
This area is not displayed when the performance analyzer is not connected with the CubeSuite+, or if no load
modules linked with the RI850V4 have been downloaded.
R20UT0517EJ0100 Rev.1.00
Apr 01, 2011
Page 27 of 88
RI850V4 Ver.1.00.00
APPENDIX A WINDOW REFERENCE
AZ Trace ON
Status where AZ trace ON has been set.
AZ Trace OFF
Status where AZ trace OFF has been set.
[Caution]
- When switching the AZ trace mode to the ON state, a load module linked with the RI850V4 must already be downloaded to the debug tool ([RX + AZ Loaded] or [RX Loaded] is displayed in the statusbar).
- Event setting for the debug tool is performed when the AZ trace mode is switched to the ON state.
Refer to "2.1 Trace Form" for details on events on the debug tool side, which are required for switching the AZ
trace mode.
R20UT0517EJ0100 Rev.1.00
Apr 01, 2011
Page 28 of 88
RI850V4 Ver.1.00.00
APPENDIX A WINDOW REFERENCE
AZ Option dialog box
Sets options such as the trace form and the trace level to use the performance analyzer.
Figure A-3. AZ Option Dialog Box
(1)
(2)
(3)
(4)
(5)
The following items are explained here.
- [How to open]
- [Description of each area]
- [Function buttons]
[How to open]
- In the menubar of the AZ850V4 window, select [AZ Option...] from the [Option] menu.
- In the toolbar of the AZ850V4 window, click the
button.
- In the AZ850V4 window, press the [Alt], [P] and [O] keys in that order.
- In the AZ850V4 window, press the [Ctrl] + [O] keys at the same time.
[Description of each area]
(1) [Address Mask] area
This area is used to specify the maximum physical address of miclocontroller to be used.
Select an appropriate item from the drop-down list, or enter an appropriate value in hexadecimal from the keyboard.
R20UT0517EJ0100 Rev.1.00
Apr 01, 2011
Page 29 of 88
RI850V4 Ver.1.00.00
APPENDIX A WINDOW REFERENCE
For details on the maximum physical address of the miclocontroller, refer to the user's manual of miclocontroller to
be used.
(2) [RTOS Select] area
This area is used to specify the real-time OS that has been linked into the downloaded load module.
Note that you can select only [RX850V4] in the current version.
(3) [Trace Form] area
This area is used to specify the trace form of the performance analyzer.
Select the option button corresponding to the operating environment.
Soft Form
The performance analyzer is used in the soft trace form.
Select this button when a monitor function is provided on the target system, and the
monitor program collects trace data for the performance analyzer.
Hard Form
The performance analyzer is used in the hard trace form (default).
Select this button when trace data for the performance analyzer is collected using
the trace function of a debug tool that is connected to the CubeSuite+.
(4) [Soft Form Buffer Type] area
This area is used to specify the trace buffer type.
Select the option button corresponding to the operating environment.
Fixed Buffer
The trace buffer is fixed type buffer.
The trace data is collected until the trace buffer is filled. Therefore, all the trace data
up to the point where the program stops is not always collected.
Ring Buffer
The trace buffer is ring type buffer.
The oldest trace data is overwritten when the trace buffer is filled.
Remark
This area is invalid when "Hard Form" is selected in the [Trace Form] area.
(5) [Soft Form Buffer Region] area
This area is used to specify the trace buffer area when [Soft Form] is selected with the [Trace Form] area.
Directly enter the start address and end address for the trace buffer in hexadecimal number.
In the soft trace form, the trace data collected by the performance analyzer is acquired into the target memory
once. This means that it is necessary to specify the unused memory area of the target memory as the trace buffer
area.
Remarks 1.
2.
This area is invalid when "Hard Form" is selected in the [Trace Form] area.
Specify the unused memory area in the range of 64K bytes to 1M bytes.
[Function buttons]
Button
Function
OK
Validates the specified settings.
Cancel
Closes this dialog box.
The function of this item is same as that of the
Help
R20UT0517EJ0100 Rev.1.00
Apr 01, 2011
button.
Displays the help widnow for this dialog box.
Page 30 of 88
RI850V4 Ver.1.00.00
APPENDIX A WINDOW REFERENCE
Open/Save As dialog box
Specifies the file name when loading a file that contains information to be displayed in the AZ:Analyze window, AZ:Cpu
window and AZ:Pattern window, or when saving information displayed in the AZ:Analyze window, AZ:Cpu window,
AZ:Pattern window and AZ:Trace View window as a file.
Figure A-4. Open/Save As Dialog Box (When Loading)
(1)
(2)
(3)
(4)
Figure A-5. Open/Save As Dialog Box (When Saving)
(1)
(2)
(3)
(4)
The following items are explained here.
- [How to open]
- [Description of each area]
- [Function buttons]
- [Restored file information]
[How to open]
[When loading]
- In the menubar of the AZ:Analyze window, AZ:Cpu window or AZ:Pattern window, select [Open...] from the [File]
menu.
R20UT0517EJ0100 Rev.1.00
Apr 01, 2011
Page 31 of 88
RI850V4 Ver.1.00.00
APPENDIX A WINDOW REFERENCE
- In the toolbar of the AZ:Analyze window, AZ:Cpu window or AZ:Pattern window, click the
button.
- In the AZ:Analyze window, AZ:Cpu window or AZ:Pattern window, press the [Alt], [F] and [O] keys in that order.
- In the AZ:Analyze window, AZ:Cpu window or AZ:Pattern window, press the [Ctrl] + [O] keys at the same time.
[When saving]
- In the menubar of the AZ:Analyze window, AZ:Cpu window, AZ:Pattern window or AZ:Trace View window, select
[Save...] from the [File] menu.
- In the toolbar of the AZ:Analyze window, AZ:Cpu window or AZ:Pattern window, click the
button.
- In the AZ:Analyze window, AZ:Cpu window, AZ:Pattern window or AZ:Trace View window, press the [Alt], [F] and
[S] keys in that order.
- In the AZ:Analyze window, AZ:Cpu window, AZ:Pattern window or AZ:Trace View window, press the [Ctrl] + [S]
keys at the same time.
[Description of each area]
(1) [Look in]/[Save in] area
This area is used to select the folder where a target file is stored or is to be stored.
(2) File list area
This area lists the files that match the conditions selected in the file location area and file type area.
(3) [File name] area
This area is used to specify the name of a target file.
(4) [Files of type]/[Save as type] area
This area is used to select the type of files to be displayed in the file list area.
The default type displayed in this area varies depending on the window from which the file is called, as shown
below.
Window Name
File of Type
AZ:Analyze window
Analyze File (*.AZ)
AZ:Cpu window
Cpu File (*.AZC)
AZ:Pattern window
Pattern File (*.AZP)
AZ:Trace View window
Trace View File (*.AZT)
[Function buttons]
Button
Open/Save
Function
Loads the file that matches the conditions specified in this dialog box.
Saves the information displayed in the window into the file that matches the conditions
specified in this dialog box.
Cancel
Closes this dialog box.
The function of this item is same as that of the
Help
R20UT0517EJ0100 Rev.1.00
Apr 01, 2011
button.
Displays the help widnow for this dialog box.
Page 32 of 88
RI850V4 Ver.1.00.00
APPENDIX A WINDOW REFERENCE
[Restored file information]
Handling of files loaded in this dialog box varies depending on the window from which the file is called, as shown below.
- AZ:Analyze window
Information of the file loaded into the AZ:Analyze window, which called the file, will be restored. To maintain the
previous information, switch to the Hold mode the AZ:Analyze window that has information to be maintained, open
another AZ:Analyze window, and then load the file from the window in the Hold mode.
- AZ:Cpu window
A new AZ:Cpu window opens, and information of the file loaded into the window is restored. The AZ:Cpu window
that called the file therefore maintains the previous information.
- AZ:Pattern window
A new AZ:Pattern window opens, and information of the file loaded into the window is restored. The AZ:Pattern
window that called the file therefore maintains the previous information.
R20UT0517EJ0100 Rev.1.00
Apr 01, 2011
Page 33 of 88
RI850V4 Ver.1.00.00
APPENDIX A WINDOW REFERENCE
AZ:Analyze window
Displays information obtained from the trace data loaded into the AZ850V4 window, in the form of an execution transition map.
Figure A-6. AZ:Analyze Window
(1)
(2)
(3)
The following items are explained here.
- [How to open]
- [Description of each area]
- [Object button display format]
- [How to read execution transition map]
- [How to verify execution transition map]
[How to open]
- In the menubar of the AZ850V4 window, select [Analyze...] from the [Browse] menu.
- In the toolbar of the AZ850V4 window, click the
button.
- In the AZ850V4 window, press the [Alt], [B] and [A] keys in that order.
- In the AZ850V4 window, press the [Ctrl] + [A] keys at the same time.
[Description of each area]
(1) Menubar
This bar consists of the following menu items.
R20UT0517EJ0100 Rev.1.00
Apr 01, 2011
Page 34 of 88
RI850V4 Ver.1.00.00
APPENDIX A WINDOW REFERENCE
(a) [File] menu
Open...
Opens the Open/Save As dialog box.
Loads the file that contains information to be displayed in this window (extension: .AZ).
The function of this item is same as that of the
Save...
button.
Opens the Open/Save As dialog box.
Specifies the name of the file into which information displayed in this window is
saved (extension: .AZ).
The function of this item is same as that of the
Close
button.
Closes this widnow.
The function of this item is same as that of the
button.
(b) [View] menu
Grid mode
Specifies whether to display gridlines in the execution transition map.
Grid
Displays gridlines (default).
Ungrid
Does not display gridlines.
View mode
Simple
Specifies the execution transition map display mode.
Displays the execution transition map in Simple mode.
The function of this item is same as that of the
Standard
Displays the execution transition map in Standard mode.
The function of this item is same as that of the
Detail
button.
Displays the execution transition map in Equal mode.
The function of this item is same as that of the
Small
button.
Displays the execution transition map in Detail mode (default).
The function of this item is same as that of the
Equal
button.
button.
Shrinks the execution transition map display to 1/2.
The effect is the same as selecting "x 1/2" in the Display scale change area.
Large
Magnifies the execution transition map display by 2.
The effect is the same as selecting "x 2" in the Display scale change area.
Find...
Opens the Pattern Search dialog box.
Searches for the point at which a specific event occurred, based on the execution transition map displayed in this window.
The function of this item is same as that of the
Sort object
button.
Specifies the Object buttons display order.
Appear
Displays trace data in the order of detection (default).
Name
Displays the objects in the order of ASCII code.
ID
Displays the objects in the ID order.
Priority
Displays the objects in the priority order (valid for tasks only).
Select Object...
Opens the Object Select dialog box.
Selects the objects to be displayed in execution transition map and modifies the
order in which those objects are displayed.
The function of this item is same as that of the
R20UT0517EJ0100 Rev.1.00
Apr 01, 2011
button.
Page 35 of 88
RI850V4 Ver.1.00.00
APPENDIX A WINDOW REFERENCE
(c) [Operation] menu
Active
Switches this window to the Active mode.
This window is in the Active mode when opened. This window opens automatically when the performance analyzer is started.
Hold
Switches this window to the Hold mode.
(d) [Browse] menu
CPU...
Opens the AZ:Cpu window in Active mode.
Information later than the position pointed to by the Up temporary cursor in the
execution transition map is displayed in the window.
If the AZ:Cpu window has already been opened in the Active mode, information
displayed in the window is updated.
The function of this item is same as that of the
Pattern...
button.
Opens the Pattern Set dialog box.
Setting pattern conditions using this dialog box opens the AZ:Pattern window.
While the AZ:Pattern window is already opened and active, the contents of the
window is updated.
The function of this item is same as that of the
Trace View...
button.
Opens the AZ:Trace View window in Active mode.
Information later than the position pointed to by the Up temporary cursor in the
execution transition map is displayed in the window.
If the AZ:Trace View window has already been opened in the Active mode,
information displayed in the window is updated.
The function of this item is same as that of the
button.
(e) [Jump] menu
Source Text...
Opens the Editor panel of CubeSuite+.
Information later than the position pointed to by the Up temporary cursor in the
execution transition map is displayed in the panel.
If the Editor panel has already been opened in the Active mode, information
displayed in the panel is updated.
The function of this item is same as that of the
Assemble...
button.
Opens the Disassemble panel of CubeSuite+.
Information later than the position pointed to by the Up temporary cursor in the
execution transition map is displayed in the panel.
If the Disassemble panel has already been opened in the Active mode, information displayed in the panel is updated.
The function of this item is same as that of the
Memory...
button.
Opens the Memory panel of the CubeSuite+.
Information later than the position pointed to by the Up temporary cursor in the
execution transition map is displayed in the panel.
If the Memory panel has already been opened in the Active mode, information
displayed in the panel is updated.
The function of this item is same as that of the
R20UT0517EJ0100 Rev.1.00
Apr 01, 2011
button.
Page 36 of 88
RI850V4 Ver.1.00.00
APPENDIX A WINDOW REFERENCE
(f) [Help] menu
This Window
Displays the help widnow for this window.
Help Topics
Opens the online help, with the [Search] tab displayed.
(2) Toolbar
This bar consists of the following buttons.
Opens the Open/Save As dialog box.
Loads the file that contains information to be displayed in this window (extension:
.AZ).
The function of this item is the same as that of [Open...] int the [File] menu.
Opens the Open/Save As dialog box.
Specifies the name of the file into which information displayed in this window is
saved (extension: .AZ).
The function of this item is the same as that of [Save...] int the [File] menu.
Specifies whether to display gridlines in the execution transition map (default: Displays gridlines).
Displays the execution transition map in Simple mode.
The function of this item is the same as that of [View mode] >> [Simple] int the [View]
menu.
Displays the execution transition map in Standard mode
The function of this item is the same as that of [View mode] >> [Standard] int the
[View] menu.
Displays the execution transition map in Detail mode (default).
The function of this item is the same as that of [View mode] >> [Detail] int the [View]
menu.
Displays the execution transition map in Equal mode.
The function of this item is the same as that of [View mode] >> [Equal] int the [View]
menu.
Opens the Object Select dialog box.
Selects the objects to be displayed in execution transition map and modifies the
order in which those objects are displayed.
The function of this item is the same as that of [Select Object...] int the [View] menu.
Opens the Pattern Search dialog box.
Searches for the point at which a specific event occurred, based on the execution
transition map displayed in this window.
The function of this item is the same as that of [Find...] int the [View] menu.
Opens the AZ:Cpu window in Active mode.
Information later than the position pointed to by the Up temporary cursor in the execution transition map is displayed in the window.
If the AZ:Cpu window has already been opened in the Active mode, information displayed in the window is updated.
The function of this item is the same as that of [CPU...] int the [Browse] menu.
R20UT0517EJ0100 Rev.1.00
Apr 01, 2011
Page 37 of 88
RI850V4 Ver.1.00.00
APPENDIX A WINDOW REFERENCE
Opens the Pattern Set dialog box.
Setting pattern conditions using this dialog box opens the AZ:Pattern window.
While the AZ:Pattern window is already opened and active, the contents of the
window is updated.
The function of this item is the same as that of [Trace View...] int the [Browse] menu.
Opens the AZ:Trace View window in Active mode.
Information later than the position pointed to by the Up temporary cursor in the execution transition map is displayed in the window.
If the AZ:Trace View window has already been opened in the Active mode, information displayed in the window is updated.
The function of this item is the same as that of [Pattern...] int the [Browse] menu.
Opens the Editor panel of CubeSuite+.
Information later than the position pointed to by the Up temporary cursor in the execution transition map is displayed in the panel.
If the Editor panel has already been opened in the Active mode, information displayed in the panel is updated.
The function of this item is the same as that of [Source Text...] int the [Jump] menu.
Opens the Disassemble panel of CubeSuite+.
Information later than the position pointed to by the Up temporary cursor in the execution transition map is displayed in the panel.
If the Disassemble panel has already been opened in the Active mode, information
displayed in the panel is updated.
The function of this item is the same as that of [Assemble...] int the [Jump] menu.
Opens the Memory panel of the CubeSuite+.
Information later than the position pointed to by the Up temporary cursor in the execution transition map is displayed in the panel.
If the Memory panel has already been opened in the Active mode, information displayed in the panel is updated.
The function of this item is the same as that of [Memory...] int the [Jump] menu.
R20UT0517EJ0100 Rev.1.00
Apr 01, 2011
Page 38 of 88
RI850V4 Ver.1.00.00
APPENDIX A WINDOW REFERENCE
(3) Information area
This area consists of the following informations.
Figure A-7. Information Area (AZ:Analyze Window)
(a)
(c)
(f)
(b)
(i)
(h)
(g)
(d)
(l)
(p)
(j)
(m)
(e)
(k)
(q)
(o)
(n)
(a) Time up to count start point
This area displays the time up to the CPU usage counting start point.
The time up to the count start point is a relative time from when trace processing starts until the execution
reaches the Up cursor position (unit: ms).
(b) Time up to count end point
This area displays the time up to the CPU usage counting end point.
The time up to the count end point is a relative time from when trace processing starts until the execution
reaches the Down cursor position (unit: ms).
(c) Total time
This area displays the total time of the CPU usage.
The total time is a relative time indicated from the Up cursor position to the Down cursor position (unit: ms).
R20UT0517EJ0100 Rev.1.00
Apr 01, 2011
Page 39 of 88
RI850V4 Ver.1.00.00
APPENDIX A WINDOW REFERENCE
(d) Time up to the point subject to mainpulation
This area displays the times up to when various types of manipulation (such as opening of the panels of the
CubeSuite+, and execution of simple search) are performed.
The time up to the point subject to manipulation is an absolute time from when trace processing starts until the
execution reaches the Up temporary cursor (unit: ms).
(e) Trace time
The trace time is a relative time from the start to the end of trace processing (unit: ms).
(f) Sort buttons
This button is used to change the Object buttons display order.
This area consists of the following buttons.
Button
Function
Appr
Displays trace data in the order of detection (default).
Name
Displays the objects in the order of ASCII code.
ID
Displays the objects in the ID order.
Pri
Displays the objects in the priority order (valid for tasks only).
(g) Object buttons
These buttons display the objects (interrupt handlers, tasks, idle routines, or etc.) detected as trace data.
Remark
For details on the object button display format, refer to "[Object button display format]".
(h) Display scale change area
This area is used to change the display scale of the execution transition map.
The drop-down list consists of the following items.
xn
Magnifies the execution transition map by n.
x 1/n
Shrinks the execution transition map to 1/n.
(i) Up cursor
This cursor specifies the point from which the CPU usage is counted.
This cursor can be moved by clicking it with the SHIFT key being pressed in the execution transition map.
(j) Up temporary cursor
This cursor specifies the point from which a manipulation (such as opening of the panels of the CubeSuite+,
and execution of simple search) is performed.
This cursor can be moved by dragging it with the SHIFT key being pressed in the execution transition map.
Remark
When the Up cursor is moved, this cursor also moves to the same position.
(k) Down cursor
This cursor specifies the point at which counting of the CPU usage ends.
This cursor can be moved by clicking it with the CTRL key being pressed in the execution transition map.
R20UT0517EJ0100 Rev.1.00
Apr 01, 2011
Page 40 of 88
RI850V4 Ver.1.00.00
APPENDIX A WINDOW REFERENCE
(l) Simple search buttons
These buttons are displayed when an Object buttons is clicked, and used to perform the following manipulations.
These buttons are hidden when the Object buttons is clicked again.
Button
Function
Searches for the point at which an event related to the relevant object occurred,
from the search start point toward the reverse direction to the time axis.
The Up temporary cursor shows the detected point.
A beep is generated if no events have occurred at any location.
Searches for the point at which an event related to the relevant object occurred,
from the search start point toward the time axis direction.
The Up temporary cursor shows the detected point.
A beep is generated if no events have occurred at any location.
(m) Execution transition map
This area displays the processing program analysis result.
Remarks 1.
Refer to "[How to read execution transition map]" for details on marks shown in the execution
transition map.
2.
If the number of OS resources subject to display exceeds 1,000, this area may not be displayed correctly.
(n) Pop-up area
The following information related to the position pointed to by the mouse pointer pops up.
Mouse Pointer
Meaning
Object buttons
Object name
Black vertical line
The following information related to processing program switching
- Time taken to generate processing program switching (unit: ms)
- Name of processing program before switching
- Name of processing program after switching
Orange horizontal line
The following information related to service calls
- Time taken to issue a service call (unit: ms)
- Time taken to return from a service call (unit: ms)
- Service call processing time (unit: ms)
- Service call name
- Name of object subject to manipulation by service call
Orange horizontal line
The following information related to interrupts
- Time taken to generate an interrupt (unit: ms)
- Time taken to finish interrupt handler processing (unit: ms)
- Interrupt handler processing time (unit: ms)
Bule triangle
The following information related to interrupts
- Time taken to generate an interrupt (unit: ms)
Bule inverted triangle
The following information related to interrupts
- Time taken to finish interrupt handler processing (unit: ms)
R20UT0517EJ0100 Rev.1.00
Apr 01, 2011
Page 41 of 88
RI850V4 Ver.1.00.00
Light-bule/green line
/
APPENDIX A WINDOW REFERENCE
The following information related to object access status
- Time taken to issue a service call (unit: ms)
- Time taken to return from a service call (unit: ms)
- Name of processing program that issued a service call
- Service call name
- Name of object subject to manipulation by service call
Red × mark
The following information related to service calls
- Time taken to return from a service call (unit: ms)
- Value returned from service call
(o) Time area
This area displays the guide for generation interval of events displayed in the execution transition map.
The display unit is shown at the right end of this area.
Remark
In Equal mode, this area displays the guide for the number of events displayed in the execution
transition map.
(p) Dump to beginning button
This button moves the Up cursor to the top of trace data.
(q) Dump to end button
This button moves the Down cursor to the end of trace data.
R20UT0517EJ0100 Rev.1.00
Apr 01, 2011
Page 42 of 88
RI850V4 Ver.1.00.00
APPENDIX A WINDOW REFERENCE
[Object button display format]
Object buttons are displayed as explained below.
A too-long object name is abbreviated, but its real name pops up if the relevant button is pointed to by the mouse
pointer.
Object Button
Meaning
Int (Exception code)
Interrupt handler
Task name
Task
Task name defined in system configuration file.
Tsk (????)
Unknown processing program
If execution of starts in the middle of a processing program, the performance analyzer
cannot identify whether the processing program is an interrupt handler, task, or idle routine. The performance analyzer therefore handles the processing program as an
unknown processing program.
Idle
Idle routine
The button name is fixed to "Idle".
Semaphore name
Semaphore
Semaphore name defined in system configuration file.
Eventflag name
Eventflag
Eventflag name defined in system configuration file.
Data queue name
Data queue
Data queue name defined in system configuration file.
Mailbox name
Mailbox
Mailbox name defined in system configuration file.
Mutex name
Mutex
Mutex name defined in system configuration file.
Fixed-sized memory pool name
Fixed-sized memory pool
Fixed-sized memory pool name defined in system configuration file.
Variable-sized memory pool name
Variable-sized memory pool
Variable-sized memory pool name defined in system configuration file.
Etc.
Object hidden by right-clicking the object button
(1) Object button display order
The object button display order can be changed by clicking a Sort buttons, or by dragging the corresponding object
button.
(2) Hiding object buttons
Object buttons can be hidden by right-clicking the button corresponding to the object.
R20UT0517EJ0100 Rev.1.00
Apr 01, 2011
Page 43 of 88
RI850V4 Ver.1.00.00
APPENDIX A WINDOW REFERENCE
[How to read execution transition map]
The three types of basic display modes: Simple mode, Standard mode and Detail mode, are available for displaying the
execution transition map. In addition to them, the Equal mode can be specified for each basic mode.
These modes can be selected by selecting the [View] menu >> [View mode].
(1) Simple mode
Displays the CPU usage with horizontal lines.
Figure A-8. Simple Mode (AZ:Analyze Window)
Mark
Meaning
Brown horizontal line
Task or idle routine
Orange horizontal line
Interrupt handler or RI850V4 internal processing
Bule tiangle
Start of interrupt handler processing
Bule inverted triangle
End of interrupt handler processing
R20UT0517EJ0100 Rev.1.00
Apr 01, 2011
Page 44 of 88
RI850V4 Ver.1.00.00
APPENDIX A WINDOW REFERENCE
(2) Standard mode
Displays the processing program switching status, with vertical lines being combined with information displayed in
the Simple mode.
Figure A-9. Standard Mode (AZ:Analyze Window)
Mark
Meaning
Brown horizontal line
Task or idle routine
Orange horizontal line
Interrupt handler or RI850V4 internal processing
Bule tiangle
Start of interrupt handler processing
Bule inverted triangle
End of interrupt handler processing
Black vertical line
Processing program switching status
R20UT0517EJ0100 Rev.1.00
Apr 01, 2011
Page 45 of 88
RI850V4 Ver.1.00.00
APPENDIX A WINDOW REFERENCE
(3) Detail mode
Displays the service call issuance status, in addition to information displayed in the Standard mode.
Figure A-10. Detail Mode (AZ:Analyze Window)
Mark
Meaning
Brown horizontal line
Task or idle routine
Orange horizontal line
Interrupt handler or RI850V4 internal processing
Bule tiangle
Start of interrupt handler processing
Bule inverted triangle
End of interrupt handler processing
Black vertical line
Processing program switching status
R20UT0517EJ0100 Rev.1.00
Apr 01, 2011
Page 46 of 88
RI850V4 Ver.1.00.00
Light-bule line
APPENDIX A WINDOW REFERENCE
[If a semaphore is subject to manipulation]
- Issuance of wai_sem, pol_sem or twai_sem
[If an eventflag is subject to manipulation]
- Issuance of wai_flg, pol_flg or twai_flg
[If a mailbox is subject to manipulation]
- Issuance of rcv_mbx, prcv_mbx or trcv_mbx
[If a fixed-sized memory pool is subject to manipulation]
- Issuance of get_mpf, pget_mpf or tget_mpf
Green line
[If a semaphore is subject to manipulation]
- Issuance of sig_sem or isig_sem
[If an eventflag is subject to manipulation]
- Issuance of set_flg or iset_flg/clr_flg
[If a mailbox is subject to manipulation]
- Issuance of snd_mbx
[If a fixed-sized memory pool is subject to manipulation]
- Issuance of rel_mpf
Red × mark
A service call abnormally ended
Timeout mark
A service call timed out
Remark
If a service call that moves to the WAITING state is issued in an Unknown processing program, "Tsk
(????)", the performance analyzer cannot recognize the WAITING state being released. The light-blue
horizontal lines will therefore be drawn up to the end of the trace data counting.
R20UT0517EJ0100 Rev.1.00
Apr 01, 2011
Page 47 of 88
RI850V4 Ver.1.00.00
APPENDIX A WINDOW REFERENCE
(4) Equal mode
In the default state (in which the Equal mode is not specified), the brown/orange horizontal lines that show the CPU
usage are displayed in proportion to the execution time taken by each processing program (see Figure A-11.).
Figure A-11. When Equal Mode Is Not Specified (AZ:Analyze Window)
R20UT0517EJ0100 Rev.1.00
Apr 01, 2011
Page 48 of 88
RI850V4 Ver.1.00.00
APPENDIX A WINDOW REFERENCE
In the state in which the Equal mode is specified, in contrast, the brown/orange horizontal lines that show the CPU
usage are displayed with a fixed length (see Figure A-12.).
The horizontal lines between events such as task switching are also displayed in a fixed interval, not proportional to
the CPU processing time.
Figure A-12. When Equal Mode Is Specified (AZ:Analyze Window)
R20UT0517EJ0100 Rev.1.00
Apr 01, 2011
Page 49 of 88
RI850V4 Ver.1.00.00
APPENDIX A WINDOW REFERENCE
[How to verify execution transition map]
The execution transition map displayed in this window can be verified using either of the following two methods.
(1) Searching using Simple search buttons
The simple search buttons (
) can be used for searching for the location where an event related to the spec-
ified object occurred.
The following explains the procedure for searching event occurrence location, by using simple search buttons.
(a) Specification of search start point
Move the Up temporary cursor to the search start point.
If the Up temporary cursor is not displayed, move the Up cursor to the search start point.
(b) Displaying simple search buttons
Click the Object buttons corresponding to the object subject to search, to display the simple search buttons.
(c) Clicking simple search buttons
- When the
is clicked
The point at which an event related to the object selected in (b) occurred is searched for, from the search
start point toward the reverse direction to the time axis, and the detected point is shown by the Up temporary cursor.
A beep is generated if no events have occurred at any location.
- When the
is clicked
The point at which an event related to the object selected in (b) occurred is searched for, from the search
start point toward the time axis direction, and the detected point is shown by the Up temporary cursor.
A beep is generated if no events have occurred at any location.
(2) Searching in Pattern Search dialog box
The point at which a specific event occurred can be searched for in the Pattern Search dialog box.
Refer to "[How to search]" for searching for the point at which a specific event occurred, in the Pattern Search dialog box.
R20UT0517EJ0100 Rev.1.00
Apr 01, 2011
Page 50 of 88
RI850V4 Ver.1.00.00
APPENDIX A WINDOW REFERENCE
Object Select dialog box
Selects the objects to be displayed in execution transition map and modifies the order in which those objects are displayed.
Figure A-13. Object Select Dialog Box
(1)
(2)
(3)
The following items are explained here.
- [How to open]
- [Description of each area]
- [Function buttons]
- [Operating method]
[How to open]
- In the menubar of the AZ:Analyze window, select [Select Object...] from the [View] menu.
- In the toolbar of the AZ:Analyze window, click the
button.
- In the AZ:Analyze window, press the [Alt], [V] and [O] keys in that order.
[Description of each area]
(1) [Hide objects] area
This area is used to display a list of those objects, from among trace data, that are not to be displayed on the
execution transition map.
(2) [Show objects] area
This area is used to display a list of those objects that are to be displayed on the execution transition map.
(3) [Sort mode] area
This area is used to specify the order into which the objects in the [Hide objects] area or [Show objects] area will be
sorted.
The following sort modes can be select:
R20UT0517EJ0100 Rev.1.00
Apr 01, 2011
Page 51 of 88
RI850V4 Ver.1.00.00
APPENDIX A WINDOW REFERENCE
Sort Mode
Description
None
No-sort mode
Appear
In the order in which trace data is detected
Name
According to ASCII code, within each object class
ID
According to ID, within each object class
Priority
According to priority (valid only when tasks are to be displayed)
[Function buttons]
Button
Function
Show >>
Moves those objects selected in the [Hide objects] area to the [Show objects] area.
<< Hide
Moves those objects selected in the [Show objects] area to the [Hide objects] area.
OK
Updates the execution transition map based on the objects listed in the [Show objects]
area.
Cancel
Closes this dialog box.
The function of this item is same as that of the
Help
button.
Displays the help widnow for this dialog box.
[Operating method]
(1) Restricting the objects to be displayed
The objects to be displayed in the execution transition map can be restricted by the following method.
(a) [Show objects] area
From the list displayed in this area, select those objects that need not be displayed in the execution transition
map.
(b) [<< Hide] button
Click the [<< Hide] button. The selected object is moved to the [Hide objects] area.
Remark
If the destination has already been specifyed, the object is inseted immediately ahead of the
specified position. If the destination has not been specified, the object is inseted at the end of the
list.
(c) [OK] button
Click the [OK] button to update the execution transition map.
(2) Adding objects to be displayed
The objects to be displayed in the execution transition map can be added by the following method.
(a) [Hide objects] area
From those objects listed in this area, select objects that need to add to the execution transition map.
(b) [Show >>] button
Click the [Show >>] button. The selected objects are moved into the [Show objects] area.
R20UT0517EJ0100 Rev.1.00
Apr 01, 2011
Page 52 of 88
RI850V4 Ver.1.00.00
Remark
APPENDIX A WINDOW REFERENCE
If the destination has already been specified, the object is inserted immediately ahead of the
specified position. If the destination has not been specified, the object is inseted at the end of the
list.
(c) [OK] button
Click the [OK] button to update the execution transition map.
R20UT0517EJ0100 Rev.1.00
Apr 01, 2011
Page 53 of 88
RI850V4 Ver.1.00.00
APPENDIX A WINDOW REFERENCE
Pattern Search dialog box
Searches for the point at which a specific event occurred, based on the execution transition map displayed in the
AZ:Analyze window.
Figure A-14. Pattern Search Dialog Box
(1)
(2)
The following items are explained here.
- [How to open]
- [Description of each area]
- [Function buttons]
- [How to search]
[How to open]
- In the menubar of the AZ:Analyze window, select [Find...] from the [View] menu.
- In the toolbar of the AZ:Analyze window, click the
button.
- In the AZ:Analyze window, press the [Alt], [V] and [F] keys in that order.
- In the AZ:Analyze window, press the [Ctrl] + [F] keys at the same time.
[Description of each area]
(1) [Search Mode] area
This area is used to select a event to be searched for (the type of an event to be searched for from the execution
transition map displayed in the AZ:Analyze window) as search mode.
The following items can be selected as the search mode.
Select Mode
Meaning
Task Switch
Switching of processing programs
Service Call (Call)
Issuance of service call
Service Call (Return)
Returning from a service call
Service Call (Error)
Errors returned from a service call
(2) Search condition setting area
This area is used to select the conditions for searching for the selected search mode.
The items displayed in this area vary depending on the selected search mode.
R20UT0517EJ0100 Rev.1.00
Apr 01, 2011
Page 54 of 88
RI850V4 Ver.1.00.00
APPENDIX A WINDOW REFERENCE
- When "Task Switch" is selected
Item
Meaning
Task (upper)
Select a processing program before switching.
Select [name of the target task] for task switching, [Interrupt] for interrupt handler switching, or [* ANY *] for any processing program switching.
Task (lower)
Select a processing program after switching.
Select [name of the target task] for task switching, [Interrupt] for interrupt handler switching, or [* ANY *] for any processing program switching.
Interrupt
If [* ANY *] is selected for Task (upper) or Task (lower), select whether to
include the location where switching to/from an interrupt handler occurred, into
the search targets.
Select [Valid] to include the location, or [Invalid] not to include the location.
Remark
The search target varies depending on which of the items, [Valid] and [Invalid], is selected in the
Interrupt list, as shown below.
The following figure assumes that switching from a "processing program [* ANY *]" to "processing
program [Task2]" is included into the search targets.
Figure A-15. Difference in Search Targets
Interrupt
Task1
Task2
(b)
(a)
(c)
Valid
Invalid
- Switching point (a)
Valid
Switching from [Task1] to [Task2] is included into the search targets.
Invalid
Switching from [Task1] to [Task2] is included into the search targets.
- Switching point (b)
Valid
Switching from [Interrupt] to [Task2] is included into the search targets.
Invalid
Switching from [Interrupt] to [Task2] is ignored, and switching from
[Task1] to [Task2] is included into the search targets.
- Switching point (c)
Valid
Switching from [Interrupt] to [Task2] is included into the search targets.
Invalid
Switching from [Interrupt] to [Task2] is ignored, and switching from
[Task1] to [Task2] is included into the search targets.
R20UT0517EJ0100 Rev.1.00
Apr 01, 2011
Page 55 of 88
RI850V4 Ver.1.00.00
APPENDIX A WINDOW REFERENCE
- When "Service Call (xxx)" is selected
Item
Meaning
Task
Select the processing program that issued the service call.
Select [name of the target task] for task switching, [Interrupt] for interrupt handler switching, or [* ANY *] for any processing program switching.
Service Call
Select the service call name.
Select [* ANY *] for any service call.
Object
Select the name of an object subject to manipulation by the service call.
Select [* ANY *] for any object.
[Function buttons]
Button
Search(Fore)
Function
Searches for the locations that match the conditions selected in this dialog box, from the
search start point toward the time axis direction.
The up temporary cursor in the AZ:Analyze window shows the locations that match the
specified conditions.
A beep is generated if no locations match the specified conditions.
Search(Back)
Searches for the locations that match the conditions selected in this dialog box, from the
search start point toward the reverse direction to the time axis.
The up temporary cursor in the AZ:Analyze window shows the locations that match the
specified conditions.
A beep is generated if no locations match the specified conditions.
Close
Closes this dialog box.
The function of this item is same as that of the
Help
button.
Displays the help widnow for this dialog box.
[How to search]
Using the following procedure, the point at which a specific event occurred to be searched for, based on the execution
transition map displayed in the AZ:Analyze window.
(1) Specification of search start point
Move the up temporary cursor to the search start point in the AZ:Analyze window.
If the up temporary cursor is not displayed, move the up cursor to the search start point.
(2) How to open this dialog box
Select the [View] menu >> [Find...] in the AZ:Analyze window.
(3) Selection of search mode and search conditions
Select the search mode and search conditions in the [Search Mode] area and Search condition setting area in this
dialog box.
R20UT0517EJ0100 Rev.1.00
Apr 01, 2011
Page 56 of 88
RI850V4 Ver.1.00.00
APPENDIX A WINDOW REFERENCE
(4) Clocking function buttons
- When the [Search (Fore)] button is clicked
Points that match the conditions selected in this dialog box are searched for from the search start point toward
the time axis direction, the up temporary cursor in the AZ:Analyze window shows the locations that match the
specified conditions.
- When the [Search (Back)] button is clicked
Points that match the conditions selected in this dialog box are searched for from the search start point toward
the reverse direction to the time axis. The up temporary cursor in the AZ:Analyze window shows the locations
that match the specified conditions.
A beep is generated if no locations match the specified conditions.
R20UT0517EJ0100 Rev.1.00
Apr 01, 2011
Page 57 of 88
RI850V4 Ver.1.00.00
APPENDIX A WINDOW REFERENCE
AZ:Cpu window
Displays the CPU usage in a section between the up cursor and down cursor in the AZ:Analyze window.
Figure A-16. AZ:Cpu Window
(1)
(2)
(3)
The following items are explained here.
- [How to open]
- [Description of each area]
- [Count method]
[How to open]
- In the menubar of the AZ:Analyze window, select [CPU...] from the [Browse] menu.
- In the toolbar of the AZ:Analyze window, click the
button.
- In the AZ:Analyze window, press the [Alt], [B] and [C] keys in that order.
- In the AZ:Analyze window, press the [Ctrl] + [C] keys at the same time.
Remark
Closing the AZ:Analyze window also closes this window.
[Description of each area]
(1) Menubar
This bar consists of the following menu items.
(a) [File] menu
Open...
Opens the Open/Save As dialog box.
Loads the file that contains information to be displayed in this window (extension: .AZC).
The function of this item is same as that of the
R20UT0517EJ0100 Rev.1.00
Apr 01, 2011
button.
Page 58 of 88
RI850V4 Ver.1.00.00
Save...
APPENDIX A WINDOW REFERENCE
Opens the Open/Save As dialog box.
Specifies the name of the file into which information displayed in this window is
saved (extension: .AZC).
The function of this item is same as that of the
Close
button.
Closes this window.
The function of this item is same as that of the
button.
(b) [View] menu
Sort Appear
Displays the bar graphs in the order of detection in trace data.
The function of this item is same as that of the
Sort Name
button.
Displays the bar graphs in the alphabetical order of the processing program
names.
The function of this item is same as that of the
Sort Time
Displays the bar graphs in the order of longer total execution time (default).
The function of this item is same as that of the
Sort Analyze
button.
button.
Displays the bar graphs in the same order as those displayed in the execution
transition map.
The function of this item is same as that of the
button.
(c) [Operation] menu
Active
Switches this window to the Active mode.
This window is in the Active mode when opened.
Hold
Switches this window to the Hold mode.
(d) [Jump] menu
Pattern...
Opens the AZ:Pattern window.
The function of this item is same as that of the
button.
(e) [Help] menu
This Window
Displays the help widnow for this window.
Help Topics
Opens the online help, with the [Search] tab displayed.
(2) Toolbar
This bar consists of the following buttons.
Opens the Open/Save As dialog box.
Loads the file that contains information to be displayed in this window (extension:
.AZC).
The function of this item is the same as that of [Open...] int the [File] menu.
Opens the Open/Save As dialog box.
Specifies the name of the file into which information displayed in this window is
saved (extension: .AZC).
The function of this item is the same as that of [Save...] int the [File] menu.
R20UT0517EJ0100 Rev.1.00
Apr 01, 2011
Page 59 of 88
RI850V4 Ver.1.00.00
APPENDIX A WINDOW REFERENCE
Displays the bar graphs in the order of detection in trace data.
The function of this item is the same as that of [Sort Appear] int the [View] menu.
Displays the bar graphs in the alphabetical order of the processing program names.
The function of this item is the same as that of [Sort Name] int the [View] menu.
Displays the bar graphs in the order of longer total execution time (default).
The function of this item is the same as that of [Sort Time] int the [View] menu.
Displays the bar graphs in the same order as those displayed in the execution transition map.
The function of this item is the same as that of [Sort Analyze] int the [View] menu.
Opens the AZ:Pattern window.
The function of this item is the same as that of [Pattern...] int the [Jump] menu.
(3) Information area
This area consists of the following informations.
Figure A-17. Information Area (AZ:Cpu Window)
(a)
(b)
(c)
(g)
(d)
(h)
(f)
(e)
(a) Time up to count start point
This area displays the time up to the CPU usage counting start point.
The time up to the count start point is a relative time from when trace processing starts until the execution
reaches the up cursor position (unit: ms).
(b) Time up to count end point
This area displays the time up to the CPU usage counting end point.
The time up to the count end point is a relative time from when trace processing starts until the execution
reaches the down cursor position (unit: ms).
R20UT0517EJ0100 Rev.1.00
Apr 01, 2011
Page 60 of 88
RI850V4 Ver.1.00.00
APPENDIX A WINDOW REFERENCE
(c) Total time
This area displays the total time of the CPU usage.
The total time is a relative time indicated from the up cursor position to the down cursor position (unit: ms).
(d) Processing program name
This area lists the processing programs executed within the total time.
The following types of processing programs are displayed.
Processing Program Name
Meaning
Int (Exception code)
Interrupt handler
Task name
Task
Tsk (????)
Unknown processing program
Idle
Idle routine
(e) Total execution time of processing program
This area displays the total execution time of the processing program within the total time (unit: ms).
(f) CPU usage
This area displays the bar graphs for indicating the percentage of the total time occupied by the execution time
of processing programs.
The bar graphs distinguish user processing and system processing with different colors.
Color
Meaning
Brown
User processing (task, idle routine)
Orange
System processing (interrupt handler, RI850V4 internal processing)
Remark
Service calls issued in a task or interrupt handler are handled as the RI850V4 internal processing.
(g) User processing code coverage
This area displays the percentage of the total time occupied by the user processing (task, idle routine) execution time.
(h) System processing code coverage
This area displays the percentage of the total time occupied by the system processing (interrupt hander,
RI850V4 internal processing) execution time.
[Count method]
Using the following procedure, the CPU usage in a section between the up cursor and down cursor in the AZ:Analyze
window can be checked.
(1) Specification of count start point
Move the up cursor to the count start position in the AZ:Analyze window.
(2) Specification of count end point
Move the down cursor to the count end position in the AZ:Analyze window.
R20UT0517EJ0100 Rev.1.00
Apr 01, 2011
Page 61 of 88
RI850V4 Ver.1.00.00
APPENDIX A WINDOW REFERENCE
(3) How to open this window
On the AZ:Analyze window, select [CPU...] from the [Browse] menu.
When this window is opened, information corresponding to the count section specified in (1) and (2) is displayed.
Remark
When this window is in the Active mode, information displayed in this window is also updated
automatically along with moving of the up/down cursor in the AZ:Analyze window and information
corresponding to the move destination of the up/down cursor is displayed.
R20UT0517EJ0100 Rev.1.00
Apr 01, 2011
Page 62 of 88
RI850V4 Ver.1.00.00
APPENDIX A WINDOW REFERENCE
Pattern Set dialog box
Sets the pattern to be displayed in the AZ:Pattern window.
Figure A-18. Pattern Set Dialog Box
(1)
(2)
The following items are explained here.
- [How to open]
- [Description of each area]
- [Function buttons]
- [Setting method]
[How to open]
- In the menubar of the AZ:Analyze window, select [Pattern...] from the [Browse] menu.
- In the toolbar of the AZ:Analyze window, click the
button.
- In the AZ:Analyze window, press the [Alt], [B] and [P] keys in that order.
- In the AZ:Analyze window, press the [Ctrl] + [P] keys at the same time.
- In the menubar of the AZ:Pattern window, select [Pattern Set...] from the [Option] menu.
- In the toolbar of the AZ:Pattern window, click the
button.
- In the AZ:Pattern window, press the [Alt], [P] and [S] keys in that order.
- In the AZ:Pattern window, press the [Ctrl] + [P] keys at the same time.
[Description of each area]
(1) [From:]/[To:] area
This area is is used to select the pattern mode.
Select the type of the event that is to act as the start and end points of the pattern displayed in the AZ:Pattern window, from the followinf:
Pattern Mode
R20UT0517EJ0100 Rev.1.00
Apr 01, 2011
Description
Page 63 of 88
RI850V4 Ver.1.00.00
APPENDIX A WINDOW REFERENCE
Task Switch
Task switching positions are used as the start/end point.
Service Call (Call)
Those positions where a service call was called are used as the start/end point.
Service Call (Return)
Those positions where a service call was returned are used as the start/end point.
Service Call (Error)
Those positions where an error was returned in response to a service call are used
as the start/end point.
(2) [Task Switch]/[Service Call (xxx)] area
This area is used to specify the pattern conditions corresponding to the pattern modes specified with the [From:]/
[To:] area.
The items to be set depend on the specified pattern modes.
Select the pattern condition for each item from the drop-down list.
The following search conditions are available:
[When [Task Switch] is selected]
Item
Description
Task (upper)
Specify the pre-switching task name or interrupt source name.
When the specification of the task or interrupt is not critical, specify [*ANY*].
Task (lower)
Specify the pre-switching task name or interrupt source name.
When the specification of the task or interrupt is not critical, specify [*ANY*].
Interrupt
Specify whether switching to (or from) an interrupt is to be included in the search
object.
Specifying [Valid] causes the interrupt transition to be used as a search object.
When [Invalid] is specified, the interrupt transition is not used as a search object.
Remark
The position for which a search is made vary with the specification of [Valid]/[Invalid] for the interrupt
item, as follows:
Pattern conditions:
<From> : [*ANY*] -> [_task2]
<To> : [_task2] -> [*ANY*]
Figure A-19. Difference between [Valid] and [Invalid]
INTTP0CC0
Task1
Task2
(a)
(b)
(c)
Valid
Invalid
- When [Valid] is specified
Interrupts are detected as switching objects, so that (a) and (b) are detected as the pattern.
- When [Invalid] is specified
Interrupts are not detected as switching objects, so that (c) is detected as the pattern.
R20UT0517EJ0100 Rev.1.00
Apr 01, 2011
Page 64 of 88
RI850V4 Ver.1.00.00
APPENDIX A WINDOW REFERENCE
In this case, the item at the exit of the interrupt is assumed as the pattern start/end time, and the
calculated time required for executing the pattern will include the time required for handling the
interrupt.
[When [Service Call (xxx)] is selected]
Item
Task
Description
Specify task name or interrupt source name that issues a service call.
When the specification of the task or interrupt is not critical, specify [*ANY*].
Service Call
Specify the name of the service call.
When the specification of the service call is not critical, specify [*ANY*].
Object
Specify the target object name of the service call.
When the specification of the object is not critical, specify [*ANY*].
[Function buttons]
Button
OK
Function
Opens the AZ:Pattern window.
Cancel
Closes this dialog box.
The function of this item is same as that of the
Help
button.
Displays the help widnow for this dialog box.
[Setting method]
Examples of setting typical patterns are shown below.
(1) Analyzing the interrupt handling time
Analyzing the interrupt source "Interrupt1".
Area
Pattern Mode
Pattern Condition
From
Task Switch
[*ANY*] -> [Interrupt1] ; [Valid]
To
Task Switch
[Interrupt1] -> [*ANT*] ; [Valid]
(2) Analyzing the time required for processing a service call
Analyzing the processing time between "Task1" issuing a wai_sem service call and "Semaphore1" being acquired.
Area
Pattern Mode
Pattern Condition
From
Service Call (Call)
[Task1] -> [wai_sem] ; [Semaphore1]
To
Service Call (Return)
[Task1] -> [wai_sem] ; [Semaphore1]
(3) Analyzing the processing time between a service call being issued and another task being woken up
Analyzing the processing time between "Task1" issuing a wai_tsk service call and processing being passed to
"Task2".
Area
From
R20UT0517EJ0100 Rev.1.00
Apr 01, 2011
Pattern Mode
Service Call (Call)
Pattern Condition
[Task1] -> [wai_tsk]
Page 65 of 88
RI850V4 Ver.1.00.00
To
APPENDIX A WINDOW REFERENCE
Task Switch
[*ANY*] -> [Task2]
(4) Analyzing the interval between error returns
Analyzing the interval between the locations from which an error is returned, by "Task1".
Area
Pattern Mode
Pattern Condition
From
Service Call (Error)
[Task1] -> [*ANY*] ; [*ANY*]
To
Service Call (Error)
[Task1] -> [*ANT*] ; [*ANY*]
R20UT0517EJ0100 Rev.1.00
Apr 01, 2011
Page 66 of 88
RI850V4 Ver.1.00.00
APPENDIX A WINDOW REFERENCE
AZ:Pattern window
Displays the histogram representing the number of times the specified pattern appears for given execution duration in
the execution transition map.
Figure A-20. AZ:Pattern Window
(1)
(2)
(3)
The following items are explained here.
- [How to open]
- [Description of each area]
- [Count method]
[How to open]
- In the menubar of the AZ:Cpu window, select [Pattern...] from the [Jump] menu, and specify the pattern conditions.
- In the toolbar of the AZ:Cpu window, click the
button, and specify the pattern conditions.
- In the AZ:Cpu window, press the [Alt], [J] and [P] keys in that order, and specify the pattern conditions.
- In the AZ:Cpu window, press the [Ctrl] + [P] keys at the same time, and specify the pattern conditions.
- In the Pattern Set dialog box, click the [OK] button.
Remark
Closing the AZ:Analyze window also closes this window.
[Description of each area]
(1) Menubar
This bar consists of the following menu items.
R20UT0517EJ0100 Rev.1.00
Apr 01, 2011
Page 67 of 88
RI850V4 Ver.1.00.00
APPENDIX A WINDOW REFERENCE
(a) [File] menu
Open...
Opens the Open/Save As dialog box.
Loads the file that contains information to be displayed in this window (extension: .AZP).
The function of this item is same as that of the
Save...
button.
Opens the Open/Save As dialog box.
Specifies the name of the file into which information displayed in this window is
saved (extension: .AZP).
The function of this item is same as that of the
Close
button.
Closes this window.
The function of this item is same as that of the
button.
(b) [View] menu
Divide (+)
Increases the number of histgram divisions by 1.
Divide (-)
Reduces the number of histogram divisions by 1.
(c) [Option] menu
Pattern Set...
Opens the Pattern Set dialog box.
The function of this item is same as that of the
button.
(d) [Operation] menu
Active
Switches this window from the hold status to the active status.
Hold
Switches this window from the active status to the hold status.
Search (Min)
Indicates, on the execution transition map, the location where the execution
duration for the specified pattern is minimum.
The up temporary cursor is moved to the identified pattern start point, while the
down temporary cursor is moved to the identified pattern end point.
The function of this item is same as that of the
Search (Max)
button.
Indicates, on the execution transition map, the location where the execution
duration for the specified pattern is maximum.
The up temporary cursor is moved to the identified pattern start point, while the
down temporary cursor is moved to the identified pattern end point.
The function of this item is same as that of the
Search (Fore)
button.
Searches for the location where the execution duration for the pattern is the
smallest, after that identified by the previous search.
The up temporary cursor is moved to the identified pattern start point, while the
down temporary cursor is moved to the identified pattern end point.
The function of this item is same as that of the
Search (Back)
button.
Searches for the location where the execution duration for the pattern is the
largest, after that identified by the previous search.
The up temporary cursor is moved to the identified pattern start point, while the
down temporary cursor is moved to the identified pattern end point.
The function of this item is same as that of the
R20UT0517EJ0100 Rev.1.00
Apr 01, 2011
button.
Page 68 of 88
RI850V4 Ver.1.00.00
APPENDIX A WINDOW REFERENCE
(e) [Help] menu
This Window
Displays the help widnow for this window.
Help Topics
Opens the online help, with the [Search] tab displayed.
(2) Toolbar
This bar consists of the following buttons.
Opens the Open/Save As dialog box.
Loads the file that contains information to be displayed in this window (extension:
.AZP).
The function of this item is the same as that of [Open...] int the [File] menu.
Opens the Open/Save As dialog box.
Specifies the name of the file into which information displayed in this window is
saved (extension: .AZP).
The function of this item is the same as that of [Save...] int the [File] menu.
Opens the Pattern Set dialog box.
The function of this item is the same as that of [Pattern Set...] int the [Option] menu.
Indicates, on the execution transition map, the location where the execution duration
for the specified pattern is minimum.
The up temporary cursor is moved to the identified pattern start point, while the
down temporary cursor is moved to the identified pattern end point.
The function of this item is the same as that of [Search (Min)] int the [Operation]
menu.
Searches for the location where the execution duration for the pattern is the largest,
after that identified by the previous search.
The up temporary cursor is moved to the identified pattern start point, while the
down temporary cursor is moved to the identified pattern end point.
The function of this item is the same as that of [Search (Back)] int the [Operation]
menu.
Searches for the location where the execution duration for the pattern is the
smallest, after that identified by the previous search.
The up temporary cursor is moved to the identified pattern start point, while the
down temporary cursor is moved to the identified pattern end point.
The function of this item is the same as that of [Search (Fore)] int the [Operation]
menu.
Indicates, on the execution transition map, the location where the execution duration
for the specified pattern is maximum.
The up temporary cursor is moved to the identified pattern start point, while the
down temporary cursor is moved to the identified pattern end point.
The function of this item is the same as that of [Search (Max)] int the [Operation]
menu.
R20UT0517EJ0100 Rev.1.00
Apr 01, 2011
Page 69 of 88
RI850V4 Ver.1.00.00
APPENDIX A WINDOW REFERENCE
(3) Information area
This area consists of the following informations.
Figure A-21. Information Area (AZ:Pattern Window)
(a)
(b)
(g)
(c)
(e)
(d)
(h)
(f)
(a) Time up to count start point
This box indicates the time at which calculation of the pattern distribution started.
After the start of trace data collection, the relative time that has elapsed is indicated by the position of the up
cursor on the execution transition map. The units are milliseconds (ms).
This area displays the time up to the CPU usage counting start point.
(b) Time of down cursor position
This box indicates the time at which calculation of the pattern distribution ended.
After the start of trace data collection, the relative time that has elapsed is indicated by the position of the down
cursor on the execution transition map. The units are milliseconds (ms).
(c) Total time
This box indicates the duration for which the pattern distribution was calculated.
The duration is indicated by the distance between the up and down cursors. The units are milliseconds (ms).
(d) Average value
This area is used to display the average time required to execute the set pattern. The units are milliseconds
(ms).
(e) Set pattern conditions
This area is used to display the contents of the pattern conditions set with the Pattern Set dialog box.
Putting the mouse pointer on this area displays pop-up window that shows the name of the object (if the object
name is too long, however, part of it is omitted).
R20UT0517EJ0100 Rev.1.00
Apr 01, 2011
Page 70 of 88
RI850V4 Ver.1.00.00
APPENDIX A WINDOW REFERENCE
(f) Number of histogram divisions
This area is used to display the number of histogram divisions.
By clicking the button on the right, the number of divisions can be changed to any value between 1 and 100.
(g) Processing time
This area is used to display the duration in which the set pattern is processed.
When the number of the histogram divisions is changed, the time width is also changed.
(h) Pattern distribution
This area is used to display a histogram of the obtained processing times for the set pattern that specified with
the up cursor and down cursor of the execution transition map.
[Count method]
By the following method, the distribution of a pattern is displayed within the specified range.
(1) Setting the up and down cursors
The distribution of a pattern is calculated within the period specified with the up cursor and down cursor on the
execution transition map in the AZ:Analyze window.
Specify the range for which pattern distribution is to be calculated, using the up cursor and down cursor.
(2) Setting the pattern
Click the
button on the AZ:Analyze window to open the Pattern Set dialog box.
In this dialog box, specify the pattern modes and the pattern conditions corresponding to the start/end point of the
pattern to be calculated (refer to the Pattern Set dialog box for details on setting method).
(3) Open the AZ:Pattern window
Click the [OK] button on the Pattern Set dialog box to open this window.
Remark
If the Pattern Window is left open and either the up cursor or down cursor is repositioned in the execution
transition map, the displayed distribution of the pattern is automatically updated.
R20UT0517EJ0100 Rev.1.00
Apr 01, 2011
Page 71 of 88
RI850V4 Ver.1.00.00
APPENDIX A WINDOW REFERENCE
AZ:Trace View window
Lists information obtained from the execution transition map in the AZ:Analyze window.
Figure A-22. AZ:Trace View Window
(1)
(2)
The following items are explained here.
- [How to open]
- [Description of each area]
- [How to display]
- [How to read the list]
- [Caution]
[How to open]
- In the menubar of the AZ:Analyze window, select [Trace View...] from the [Browse] menu.
- In the toolbar of the AZ:Analyze window, click the
button.
- In the AZ:Analyze window, press the [Alt], [B] and [T] keys in that order.
- In the AZ:Analyze window, press the [Ctrl] + [T] keys at the same time.
Remark
Closing the AZ:Analyze window also closes this window.
[Description of each area]
(1) Menubar
This bar consists of the following menu items.
(a) [File] menu
Save...
Opens the Open/Save As dialog box.
Specifies the name of the file into which information displayed in this window is
saved (extension: .AZT).
Close
Closes this window.
The function of this item is same as that of the
R20UT0517EJ0100 Rev.1.00
Apr 01, 2011
button.
Page 72 of 88
RI850V4 Ver.1.00.00
APPENDIX A WINDOW REFERENCE
(b) [View] menu
Find...
Opens the Trace Search dialog box.
Searches for specific information (trace data) based on the list displayed in this
window.
This menu is unavailable when this window is in the Hold mode.
Time
Selects [Show] or [Hide] of the [Time] area (default: Show).
Address
Selects [Show] or [Hide] of the [Address] area (default: Show).
Task
Selects [Show] or [Hide] of the [Task] area (default: Show).
Event
Selects [Show] or [Hide] of the [Event] area (default: Show).
Parameter
Selects [Show] or [Hide] of the [Parameter] area (default: Show).
Return
Selects [Show] or [Hide] of the [Return] area (default: Show).
(c) [Operation] menu
Active
Switches this window to the Active mode.
This window is in the Active mode when opened.
Hold
Switches this window to the Hold mode.
(d) [Help] menu
This Window
Displays the help widnow for this window.
Help Topics
Opens the online help, with the [Search] tab displayed.
(2) Information area
This area consists of the following informations.
(a) [Time] area
This area displays a relative time from when trace processing starts until the target event occurs (unit: ms).
(b) [Address] area
This area displays the execution address at which the target event occurred.
(c) [Task] area
This area displays the name of the processing program in which the target event occurred.
The following types of processing programs are displayed.
Processing Program Name
Int (Exception code)
Meaning
Issuance of service call, returning from a service call, start of interrupt handler
processing, end of interrupt handler processing
Task name
Issuance of service call, returning from a service call, start of task processing
Tsk (????)
Issuance of service call, returning from a service call, end of unknown processing program processing
Idle
R20UT0517EJ0100 Rev.1.00
Apr 01, 2011
Start of idle routine processing
Page 73 of 88
RI850V4 Ver.1.00.00
APPENDIX A WINDOW REFERENCE
(d) [Event] area
This area displays the types of the target events.
The following types of events are displayed.
Event Name
ServCall (xxx_xxx)
Meaning
Issuance of service call "xxx_xxx"
xxx_xxx is displayed a service call name.
ServRet (xxx_xxx)
Returning from a service call "xxx_xxx"
xxx_xxx is displayed a service call name.
The inside of the parentheses is left blank if the event that issued the service
call does not exist in the trace memory.
Int (Int (xxx))
Start of interrupt handler processing
xxx is displayed an exception code.
IntRet
End of interrupt handler processing
TaskStart
Start of task processing
Idle
Start of idle routine processing
(e) [Parameter] area
If the event type is "ServCall(xxx_xxx)" or "ServRet(xxx_xxx)", this area displays the name of the object to be
manipulated by the service call (such as task name, semaphore name, or eventflag name).
(f) [Return] area
If the event type is "ServRet(xxx_xxx)", this area displays the values returned from the service call.
[How to display]
Using the following procedure, information obtained from the execution transition map displayed in the AZ:Analyze window can be listed.
(1) Specification of display start position
Move the up temporary cursor to the display start position in the AZ:Analyze window.
If the up temporary cursor is not displayed, the display start position is the top of the trace data.
(2) How to open this window
Select the [Browse] menu >> [Trace View...] in the AZ:Analyze window.
When this window is opened, information corresponding to the display start point specified in (1) is displayed in the
first line.
Remark
When this window is in the Active mode, information displayed in this window is also updated automatically along with moving of the up/down cursor in the AZ:Analyze window, and information corresponding to the move destination of the up/down cursor is displayed in the first line.
R20UT0517EJ0100 Rev.1.00
Apr 01, 2011
Page 74 of 88
RI850V4 Ver.1.00.00
APPENDIX A WINDOW REFERENCE
[How to read the list]
The following explains how to read the list displayed in this window, using Figure A-23. as an example.
The execution address in the above (1) and (2) means the address at which the relevant service call was issued.
Figure A-23. How to Read the List
(1)
(2)
(1) When 0.399 ms have elapsed after trace processing has started, processing program ID_TASK4 issues
service call get_mpf to fixed-sized memory pool ID_MPF1.
(2) When 0.424 ms have elapsed after trace processing has started, service call get_mpf that was issued in (1)
returns E_OK.
[Caution]
- If an interrupt occurs during idle routine processing, information related to "IntRet", which indicates the end of the
interrupt handler processing, will not be displayed.
R20UT0517EJ0100 Rev.1.00
Apr 01, 2011
Page 75 of 88
RI850V4 Ver.1.00.00
APPENDIX A WINDOW REFERENCE
Trace Search dialog box
Searches for specific information (trace data) based on the list displayed in the AZ:Trace View window.
Figure A-24. Trace Search Dialog Box
(1)
(2)
The following items are explained here.
- [How to open]
- [Description of each area]
- [Function buttons]
- [How to search]
[How to open]
- In the menubar of the AZ:Trace View window, select [Find...] from the [View] menu.
- In the AZ:Trace View window, press the [Alt], [V] and [F] keys in that order.
- In the AZ:Trace View window, press the [Ctrl] + [F] keys at the same time.
[Description of each area]
(1) Searched item area
This area is used to specify the items to be searched for (from the list displayed in the AZ:Trace View window).
Multiple items in the following table can be selected as the items to be searched for.
Task
Searches for information from the Task area in the list displayed in the AZ:Trace
View window.
Event
Searches for information from the Event area in the list displayed in the AZ:Trace
View window.
Parameter
Searches for information from the Parameter area in the list displayed in the
AZ:Trace View window.
(2) Search condition area
This area is used to select the conditions for searching for items specified in the Searched item area.
The following items can be selected as the search conditions.
- Processing program name (task name, Interrupt, Idle)
- Event type (service call name)
R20UT0517EJ0100 Rev.1.00
Apr 01, 2011
Page 76 of 88
RI850V4 Ver.1.00.00
APPENDIX A WINDOW REFERENCE
- Name of object subject to manipulation by service call such as task name, semaphore name, or eventflag
name)
[Function buttons]
Button
Function
Search (Fore)
Searches for information that matches the conditions specified in this dialog box, from
the older trace data.
Condition match information is displayed in the first line of the AZ:Trace View window.
A beep is generated if condition match information does not exist in the relevant list.
Search (Back)
Searches for information that matches the conditions specified in this dialog box, from
the newer trace data.
Condition match information is displayed in the first line of the AZ:Trace View window.
A beep is generated if condition match information does not exist in the relevant list.
Cancel
Closes this dialog box.
The function of this item is same as that of the
Help
button.
Displays the help widnow for this dialog box.
[How to search]
Using the following procedure, specific information can be searched for, based on the list displayed in the AZ:Trace
View window.
(1) Switching to Active mode
Select the [Operation] menu >> [Active] in the AZ:Trace View window to switch the target window to the Active
mode.
(2) How to open this dialog box
On the AZ:Trace View window, select [Find...] from the [View] menu.
(3) Specification of items to be searched for and search conditions
Specify the items to be searched for and search conditions in the searched item area and search condition area in
this dialog box.
Figure A-25. Specification Example 1 (Search for Interrupt)
R20UT0517EJ0100 Rev.1.00
Apr 01, 2011
Page 77 of 88
RI850V4 Ver.1.00.00
APPENDIX A WINDOW REFERENCE
Figure A-26. Specification Example 1 (Search for Location at Which rel_mpf Was Issued)
Figure A-27. Specification Example 1 (Search for Location at Which Searvice Call Was Issued for ID_MPF1)
(4) Clicking function buttons
- [Search (Fore)] button
Information that matches the conditions specified in this dialog box is searched for from the newer trace data,
and condition match information is displayed in the first line of the AZ:Trace View window.
A beep is generated if condition match information does not exist.
- [Search (Back)] button
Information that matches the conditions specified in this dialog box is searched for from the newer trace data,
and condition match information is displayed in the first line of the AZ:Trace View window.
A beep is generated if condition match information does not exist.
R20UT0517EJ0100 Rev.1.00
Apr 01, 2011
Page 78 of 88
RI850V4 Ver.1.00.00
APPENDIX A WINDOW REFERENCE
About dialog box
Displays the version information of the performance analyzer.
Figure A-28. About Dialog Box
(1)
The following items are explained here.
- [How to open]
- [Description of each area]
- [Function buttons]
[How to open]
- In the menubar of the AZ850V4 window, select [About...] from the [Help] menu.
- In the AZ850V4 window, press the [Alt], [H] and [A] keys in that order.
- In the AZ850V4 window, press the [Ctrl] + [A] keys at the same time.
[Description of each area]
(1) Version information area
This area is used to display "product name, version number, date of product build and copyright".
[Function buttons]
Button
OK
Function
Closes this dialog box.
The function of this item is same as that of the
R20UT0517EJ0100 Rev.1.00
Apr 01, 2011
button.
Page 79 of 88
RI850V4 Ver.1.00.00
APPENDIX A WINDOW REFERENCE
AZ:Error dialog box
Displays the error information of the performance analyzer.
Figure A-29. AZ:Error Dialog Box
(1)
The following items are explained here.
- [How to open]
- [Description of each area]
- [Function buttons]
[How to open]
This dialog box opens automatically when an invalid operation is performed in a window or a dialog box.
[Description of each area]
(1) Error information area
This area is used to display "error number and error message".
For details of the error information, see "B.2 Error Messages".
[Function buttons]
Button
OK
Function
Closes this dialog box.
The function of this item is same as that of the
Help
R20UT0517EJ0100 Rev.1.00
Apr 01, 2011
button.
Displays the help topic corresponding to error information.
Page 80 of 88
RI850V4 Ver.1.00.00
APPENDIX B MESSAGES
APPENDIX B MESSAGES
This appendix provides the error information output from the performance analyzer.
B.1
Overview
If an error occurs during an operation in a window/dialog box, the following AZ:Error dialog box that displays the error
information is displayed.
Figure B-1. Error Information Output Format
Error message
Error number
B.2
Error Messages
The performance analyzer error information is shown below.
Table B-1. Error Information List
Error Number
1000
Description
Message
Cause
Not enough memory.
The memory required for the performance analyzer operation is
insufficient.
Action by User
Close unnecessary application software and then restart the performance analyzer.
1001
Message
Cause
Internal error.
An error has occurred in the performance analyzer internal processing.
1010
Action by User
Restart the performance analyzer.
Message
The active window already exists.
Cause
A window in the Active mode is open.
Action by User
In the performance analyzer, multiple windows of the same type
cannot be open in the Active mode at the same time. Implement
either of the following measures.
- Change the mode of the window from Active to Hold.
- Close the window in the Active mode.
1021
Message
Cause
The file does not exist.
No relevant files exist in the folder selected in the Open/Save As
dialog box.
Action by User
R20UT0517EJ0100 Rev.1.00
Apr 01, 2011
Specify an existing file.
Page 81 of 88
RI850V4 Ver.1.00.00
APPENDIX B MESSAGES
Error Number
1022
Description
Message
Cause
Fail to write the file.
The memory for writing to the file is insufficient, or the file subject
to write is write-prohibited.
Action by User
Implement either of the following measures.
- Delete unnecessary files.
- Specify another partition for writing.
- Change the attribute of the target file so as to enable writing.
- Specify a write-enabled file as the file subject to write.
1023
Message
Cause
The file format is illegal.
A file of an invalid format was selected in the Open/Save As dialog box.
Action by User
In the performance analyzer, the format of loadable files varies
depending on the window through which the Open/Save As dialog
box is opened.
AZ:Analyze window : Analyze File (*.AZ)
AZ:Cpu window : CPU File (*.AZC)
AZ:Pattern window : PatternFile (*.AZP)
1031
1032
1100
1110
Message
The RX850 (uITRON3.0) is downloaded.
Cause
The RI850V4 is not embedded into the load module.
Action by User
Embed the RI850V4 into the load module.
Message
The RX850 Pro (uITRON3.0) is downloaded.
Cause
The RI850V4 is not embedded into the load module.
Action by User
Embed the RI850V4 into the load module.
Message
The debugger does not support AZ interface.
Cause
The CubeSuite+ does not support AZ Interface.
Action by User
Confirm that the CubeSuite+ supports AZ Interface.
Message
Fail to switch AZ trace mode.
Cause
The performance analyzer failed communication with the CubeSuite+.
1118
1120
Action by User
Restart the performance analyzer and CubeSuite+.
Message
The buffer region not specified.
Cause
AZ Trace ON was set without a trace buffer area being specified.
Action by User
Specify the AZ Option dialog box, and then set AZ Trace ON.
Message
Fail to load the trace data.
Cause
The performance analyzer failed communication with the CubeSuite+.
Action by User
R20UT0517EJ0100 Rev.1.00
Apr 01, 2011
Restart the performance analyzer and CubeSuite+.
Page 82 of 88
RI850V4 Ver.1.00.00
APPENDIX B MESSAGES
Error Number
1121
Description
Message
Cause
The trace data does not exist.
No information that should be stored in the trace memory exists in
the trace data collect section.
Action by User
Expand the trace data collect section and retry collection of trace
data.
1122
1128
1210
1220
Message
The trace data is illegal.
Cause
The time tag in the trace data may not be correct.
Action by User
Check if the user own coding block is correctly coded.
Message
Task level data not included.
Cause
Task-level trace data was not included in the collected trace data.
Message
The trace buffer address is illegal.
Cause
The address range specified for the trace buffer is incorrect.
Action by User
Specify a correct address range in the AZ Option dialog box.
Message
The address mask is illegal.
Cause
An illegal value that cannot be handled as a mask value was input
for the address mask specification in the AZ Option dialog box.
1400
Action by User
Specify a hexadecimal number in the AZ Option dialog box.
Message
The pattern does not exist.
Cause
The specified pattern dose not exist in the trace data between the
up cursor and the down cursor.
Action by User
Expand the interval between the up cursor and the down cursor,
and perform the operation again. If this error occurs even with the
maximum interval, the specified pattern does not exist in the trace
data.
1700
Message
Cause
The specified file has an invalid RX type.
An attempt was made to read an AZ file whose real-time OS differs form the real-time OS specified (RI850V4).
Action by User
Check if the appropriate real-time OS (RI850V4) is specified in the
AZ Option dialog box.
R20UT0517EJ0100 Rev.1.00
Apr 01, 2011
Page 83 of 88
RI850V4 Ver.1.00.00
APPENDIX C INDEX
APPENDIX C INDEX
A
window reference ... 24
About dialog box ... 79
AZ850V4 window ... 25
S
AZ:Analyze window ... 34
soft trace form ... 10
AZ:Cpu window ... 58
AZ:Error dialog box ... 80
AZ monitor ... 20
AZ Option dialog box ... 29
T
trace data ... 10
trace form ... 10
hard trace form ... 10
AZ:Pattern window ... 67
soft trace form ... 10
AZ:Trace View window ... 72
Trace Search dialog box ... 76
D
debugging procedure ... 13
W
window reference ... 24
F
About dialog box ... 79
features ... 9
AZ850V4 window ... 25
functions ... 10
AZ:Analyze window ... 34
AZ:Cpu window ... 58
H
AZ Option dialog box ... 29
hard trace form ... 10
AZ:Pattern window ... 67
AZ:Trace View window ... 72
M
Object Select dialog box ... 51
messages ... 81
Open/Save As dialog box ... 31
Pattern Search dialog box ... 54
O
Pattern Set dialog box ... 63
Object Select dialog box ... 51
Open/Save As dialog box ... 31
Trace Search dialog box ... 76
AZ:Error dialog box ... 80
P
Pattern Search dialog box ... 54
Pattern Set dialog box ... 63
performance analyzer ... 9
AZ monitor ... 20
debugging procedure ... 13
features ... 9
functions ... 10
messages ... 81
trace data ... 10
trace form ... 10
R20UT0517EJ0100 Rev.1.00
Apr 01, 2011
Page 84 of 88
Revision Record
Description
Rev.
Date
Page
1.00
Apr 01, 2011
-
Summary
First Edition issued
RI850V4
User’s Manual: Analysis
Publication Date:
Rev.1.00
Apr 01, 2011
Published by:
Renesas Electronics Corporation
http://www.renesas.com
SALES OFFICES
Refer to "http://www.renesas.com/" for the latest and detailed information.
Renesas Electronics America Inc.
2880 Scott Boulevard Santa Clara, CA 95050-2554, U.S.A.
Tel: +1-408-588-6000, Fax: +1-408-588-6130
Renesas Electronics Canada Limited
1101 Nicholson Road, Newmarket, Ontario L3Y 9C3, Canada
Tel: +1-905-898-5441, Fax: +1-905-898-3220
Renesas Electronics Europe Limited
Dukes Meadow, Millboard Road, Bourne End, Buckinghamshire, SL8 5FH, U.K
Tel: +44-1628-585-100, Fax: +44-1628-585-900
Renesas Electronics Europe GmbH
Arcadiastrasse 10, 40472 Düsseldorf, Germany
Tel: +49-211-65030, Fax: +49-211-6503-1327
Renesas Electronics (China) Co., Ltd.
7th Floor, Quantum Plaza, No.27 ZhiChunLu Haidian District, Beijing 100083, P.R.China
Tel: +86-10-8235-1155, Fax: +86-10-8235-7679
Renesas Electronics (Shanghai) Co., Ltd.
Unit 204, 205, AZIA Center, No.1233 Lujiazui Ring Rd., Pudong District, Shanghai 200120, China
Tel: +86-21-5877-1818, Fax: +86-21-6887-7858 / -7898
Renesas Electronics Hong Kong Limited
Unit 1601-1613, 16/F., Tower 2, Grand Century Place, 193 Prince Edward Road West, Mongkok, Kowloon, Hong Kong
Tel: +852-2886-9318, Fax: +852 2886-9022/9044
Renesas Electronics Taiwan Co., Ltd.
7F, No. 363 Fu Shing North Road Taipei, Taiwan
Tel: +886-2-8175-9600, Fax: +886 2-8175-9670
Renesas Electronics Singapore Pte. Ltd.
1 harbourFront Avenue, #06-10, keppel Bay Tower, Singapore 098632
Tel: +65-6213-0200, Fax: +65-6278-8001
Renesas Electronics Malaysia Sdn.Bhd.
Unit 906, Block B, Menara Amcorp, Amcorp Trade Centre, No. 18, Jln Persiaran Barat, 46050 Petaling Jaya, Selangor Darul Ehsan, Malaysia
Tel: +60-3-7955-9390, Fax: +60-3-7955-9510
Renesas Electronics Korea Co., Ltd.
11F., Samik Lavied' or Bldg., 720-2 Yeoksam-Dong, Kangnam-Ku, Seoul 135-080, Korea
Tel: +82-2-558-3737, Fax: +82-2-558-5141
© 2011 Renesas Electronics Corporation. All rights reserved.
Colophon 1.0
RI850V4
R20UT0517EJ0100