1
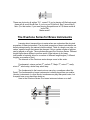
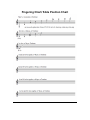
GYSO Brass Band Handbook, Practice Guide, Road Map, Tips by Dr. Tom Gibson Ph: 770-714-0393 Email: [email protected] First of all…..CONGRATULATIONS and welcome to the wonderful world of Brass Banding! I have prepared this guide so that this experience can be an enriching and rewarding one for all of us. I hope you’re excited about this maiden voyage we are undertaking. I would like for us all to pause for a moment to think about the people to whom we owe a tremendous debt of gratitude: supportive parents, encouraging teachers, trusted friends and peers, the highly energized and talented staff of the Dozier Centre, and the altruistic, philanthropic, generous spirit of Mr. Don Dozier. To all of the above…Thanks! Let’s make a commitment, shall we, to not waste this opportunity. Brass banding is, as you will soon come to realize, a unique and very special variety in the musical spectrum. It’s roots spring from the blue-collared tradition of the Industrial Revolution. Originally, these bands were formed to quiet restless workers with new-found political clout and legitimate concerns about their work environments. Management in the factories and mines wisely decided to use the most powerful art form to ease the rising tensions: MUSIC was their answer. The fact that they chose music as an outlet for the workers was really a no-brainer. Most of the workers were amateur musicians (as was a great percentage of the populace before radio, TV, and Internet spoon fed us the entertainment we thought we craved). The managers needed only to supply some instruments and sheet music and the workers saw to it that the art form took flight. Through some very tough times, this music has soothed many souls and quieted many discontented hearts. It has stirred patriotism, spawned ferocious competition, inspired romance, bonded communities, and it has built a solid and longstanding tradition. My personal goal for each of us is that we gain a thorough appreciation of this tradition and carry the art form forward as we respectfully look behind us through a colorful, rich history. As a matter of fact, The Salvation Army uses this artistic genre to deliver its message of hope to the less fortunate. Whether or not you accept their religious leanings, it cannot be denied that this organization has done exhaustive work in alleviating the suffering of the poor and neglected people around the globe. They accentuate their work with Brass band music. They are experts in the art and are responsible for the publishing of many thousands of great Brass band works! We are very fortunate to have a strong relationship with the Georgia Brass Band, too! This is one of the finest Brass bands in all the land and they will be a resident ensemble right here at the Dozier Centre. I can’t tell you what a boon that could be for you, as a newcomer to this genre. I would expect to see all of your smiling faces at every GBB concert at the Dozier Centre. We also will tap into their expertise by hiring many of these players to coach the GYSO Brass Band. It is in the works, too, that we’ll share the bill on a concert each year with the GBB. These are great friends of mine and can be a terrific source of knowledge and inspiration for each of you. They set a great example in terms of artistry and professionalism. They are set to rehearse each Tuesday evening at the Dozier Centre. Every member of the GYSO Brass band is invited and encouraged to attend their rehearsals/performances. In this guide, I will list resources such as books, web sites, recordings, dvd’s, etc. The more you delve into researching this brass band business, the more you will gain from the GYSO experience. Avail yourselves of the resources that lie before you: great coaches, a great facility, great repertoire, great colleagues, a great mentoring ensemble, and great instruments. Soak it all in and give it your very best effort. This means in your daily practice, of course, but I’m thinking of more wide-ranging efforts….. I would like each and every one of us to be experts in the art of Brass Band. We’ll know its history, we’ll immerse ourselves in its rich palette of SOUND, we’ll know a bit about the instruments in the ensemble (as you may have gathered, they are somewhat atypical for American brass players), we will seek to learn more every time we get together. Why do I think that’s important? Music is our most powerful art form and most potent form of human communication. As young musicians you may already have a very clear sense of this. Think of the role that music plays in your own life, then think of the role it plays in the life of a society. Amazing. We hear it when we go to war, we hear it when we go to church, we hear it when we drive our cars, when we shop in malls, when we start a ballgame, when we receive diplomas, when we wed, when we hang out with friends, when we mourn, when we watch movies, when our phones ring, and on and on and on. It is an essential element to a wellbalanced and well-lived life. What makes Brass Band music so important, in my opinion, is its uncanny ability to connect with the masses. I have had the privilege of performing many styles of music. I have never encountered a style as delicious as Brass band. For performer and listener alike, I just have never seen a more intimate, natural, easy connection made between people and music. In my mind, it’s magical. I am tremendously excited at the opportunity to explore it further. I hope that some of my excitement transfers and that you, too, get swept up in Brass band. You won’t be sorry, I can assure you at least of that. As you may have surmised, I have faith in this music. I have no doubt that if you simply listen and allow your musical sensibilities to rule, you will discover many hidden fruits in this genre. Many of the world’s finest composers have exploited the palette of colors available to Brass band. If you couple the tremendous force of this music with research, inquiry, and curiosity, you will find for yourself a veritable feast of the senses. I encourage you to do this! Go ahead and try to nurture a passion for Brass band. Be passionate as you study it, be passionate as you speak to others about it, be passionate as you listen to it………but above all be passionate when you are lucky enough to PLAY it! So…..where to start? Here are some books, web sites, and bands that you should check out: Movies about Brass Band: Brassed Off! (a terrific film that accentuates the spirit behind the music. VERY highly recommended) British National Brass Band Finals (the annual competition from Royal Albert Hall are made available each year now on DVD. These bands are the best of the best!) Books about Brass bands: The British Brass Band: A Musical and Social History edited by Trevor Herbert The World Of Brass Bands, by Violet Brand Web Sites: The Brass Band Bibliography: http://www.harrogate.co.uk/Harrogateband/books.htm The Brass Band Portal: http://www.bandsman.co.uk/ 4 Bars Rest: http://www.4barsrest.com/default.asp Brass Band World: http://www.brassbandworld.com/ Bands to listen to: Georgia Brass Band Black Dyke Flowers Brass Band River City Brass Band Brass Band of Battle Creek That ought to be enough to get you started! Follow your curiosity, please, and use your Google The Instruments Typical instrumentation for a Brass Band is this: 1 E-flat Soprano Cornet 9 B-flat Cornets 1 B-flat Flugelhorn 3 E-flat Alto horns (referred to often as Tenor Horns in England) 2 B-flat Baritones 2 B-flat Euphoniums 3 B-flat Tenor trombones 1 B-flat Bass trombone 2 E-flat tubas 2 B-flat tubas 1 Drum Kit 2 percussion In the GYSO Brass Band, we have allowed for 10 Cornets, 4 Altos horns, and 4 Tenor trombones. A few things might strike you as you look at this list. First of all, no trumpets? How many of you know the difference between a trumpet and a cornet? Secondly, baritones AND euphoniums? How many of you were under the common assumption that they were one and the same? A third observation might be, “hmmm……all the instruments are pitched in either B-flat or E-flat.” Do you understand what it means when we say that an instrument is pitched in a certain key? Alright then, why no trumpets? Trumpets differ from Cornets in their characteristic sound. This is due to their shape, since the length of both is precisely the same. A trumpet’s bore (the diameter of the tube measured from the inside) is mostly CYLINDRICAL. Think of a cylinder….the diameter for the most part is constant throughout the length of the tube, right? Although the trumpet flares as we approach the bell, this is basically true. It is considered to be a cylindrical brass instrument. What are the other cylindrical instruments in the Brass Band? Baritones and Trombones. A cornet, on the other hand, is thought to be a CONICAL instrument. Think of a cone. It tapers from one end to the other. In other words, the bore size is constantly increasing. Because of its conical shape, it prefers a conical mouthpiece. IMPORTANT: cornet players, you must NOT use your trumpet mouthpiece in the cornet. While I agree that you can “make it work”, it will not achieve the proper sound and you will struggle mightily with intonation. I have met one person in my life that uses the same mouthpiece in his trumpet as he does in the cornet with tremendous success. His name is Allan Dean and he is an extraordinary artist. Until your ears grow as big as his and your artistry develops to his level, you will struggle to achieve a pleasing Cornet timbre with a cup-shaped trumpet mouthpiece. So, please, give it up. The trumpet makes a wonderful, brilliant, focused, bright, and penetrating sound. It heralds the great events of the day. That is not the desired tone color for Brass Band. The conical Cornet has a more round, mellow, less brilliant sound. That’s what we want. Back in the day, great wind band music and orchestral music called for both trumpets and cornets. Composers obviously appreciated the difference and exploited the difference. One of our greatest challenges in this band will be to appreciate this difference, too. When American Brass Bands play alongside their British counterparts, the most noticeable difference is the Cornet sound. Since we are weaned on trumpet here in the U.S., it’s challenging to “switch gears” and achieve the more covered, dark, sweet tone of Cornet. The GYSO Brass Band will embrace this challenge and we will indeed master the Cornet sound! Your high range will be more difficult due to the funnelshaped mouthpiece. Your pitch centers will feel different than trumpet. You will at first over blow and distort the sound of the cornet, expecting that “brilliant” feedback you are used to on trumpet. All of these issues will arise in your daily practice and you may grow discouraged. Don’t EXPECT the cornet to behave like a trumpet! They are different animals entirely. Think of a golfer: he/she has many different clubs in the bag to achieve different results. They don’t expect the driver to behave like a 5-wood or 3-iron. Their swing is fundamentally the same, but they EXPECT differing trajectories and distances. They also have the golfer’s prayer, which says: “Lord, give me the strength to hit it easy”. I think that’s a good analogy to Brass playing, too! As issues occur to you on the cornet, you will compensate with airspeed, airflow, and a serious LACK of air pressure, OK? Perhaps the best habit would be to listen to great cornet players and let their sound sink into the deepest recesses of your sub-conscious. Check out recordings by David Daws, Phil Smith, Roger Webster. Use your Google The physical and timbral differences between Trumpet and Cornet are exactly analogous to Baritone and Euphonium. Baritones and Euphoniums are both pitched in B-flat, right? That means they are the SAME length. They are, however, shaped quite differently as you can readily see. The Euphonium looks much bigger…..and it is. The bore-size is greater than Baritone and it is CONICAL, whereas the Baritone is CYLINDRICAL. What are the differences in tone we might expect? How might we expect their mouthpieces to differ? IMPORTANT: Baritone players, you are not allowed to use your big euphonium mouthpieces in the Baritone. “But it works”, you say, “if I just use a small-shank version of my Euph mouthpiece”. I disagree Take a closer look at the mouthpiece that came with the baritone. The wise folks at Yamaha know what they are doing and with each of these instruments, they have a shipped an appropriate mouthpiece. The baritone mouthpiece is smaller than the euph. It is shallower, less funnel-shaped (on the INSIDE, where it matters), and the rim is noticeably narrower. All by design to achieve a characteristic sound, I assure you! IMPORTANT: what bothers me most when I hear amateur American Brass Bands is the fact that the players don’t seem to be striving to make a CHARACTERISTIC sound on their particular instrument. Cornet players are really trumpet players and don’t strive to play any differently. Baritone players are really Euphonium players and have little appreciation for the difference. American low brass players often sacrifice clarity, transparency, and cleanliness in an effort to play dark, broad, and heavy. ARGH! LET”S NOT DO THIS! Let us understand fully the many different timbres in the band and let’s each play our role to perfection, OK? Listening will be the key. Refer to my list of great bands and start checking them out on a regular basis. See if you can hear what I’m talking about. IMPORTANT: all of you playing on these lovely new Yamaha instruments will use the mouthpiece provided……cornets, altos, baritones. To allow each of you to find a mouthpiece that initially feels more “comfortable” or “more like I’m used to” will wreak total havoc on the overall sound and pitch of the band. I cannot allow it. With proper concepts and diligent practice, you will grow into the new set-up and the band’s sound will be glorious. I promise. I need you all to be open-minded, committed to improving, and selfless in your pursuit of excellence. You must accept that our band’s sound will be shaped from the podium and I will do my utmost to guide you towards a homogenous sound like you’ve never heard. Trust, diligence, and patience, please On the other hand, those of you playing your “native” instruments and feeling quite at home right off the bat, you will show sympathy and support for your peers who are bravely accepting the challenge of learning a new instrument. If I sense that you are not showing such support, I reserve the right to move YOU to a new instrument Empathy is stronger than sympathy, after all. Transpositions in Brass Band This is an essential element to Brass Banding and might be a new concept to many of us. Please read and re-read this section until you have a firm grasp: We’ve already noted that every instrument in the ensemble is pitched either in E-flat or B-flat. With the exception of Bass Trombone, everyone in the band will be reading a Treble-clef part in either E-flat or B-flat (it will tell you which in the upper left-hand corner). This will be a challenge for all of us initially, so let me try to explain a few things……. Why do they pitch these instruments as they do and why have 2 different transpositions (actually, 3 including the Bass trombone bass-clef part)? The answer is one of practicality. The availability of B-flat and E-flat instruments made them an obvious choice. The presence of two different “pitch families” allows for a more diverse and colorful range of sound. Why not allow for C cornets, F horns, C tubas, etc. in addition to B-flat and E-flat instruments? Obviously, pitch center and unification of sound is a challenge when everyone has a different tonal center on their horn. But why limit it to just two, B-flat and E-flat? Think of the Brass Band tradition and the earliest days of the art form: factory workers, miners, and hard laborers. Situations in the mines and factories were intense and extremely dangerous. Injuries (even death) were not at all uncommon. Often, people wouldn’t make it to band rehearsal because of a particularly tough day at work. It was crucial that every player be flexible enough to cover the vacant part. The tradition has moved away from this requirement of flexibility, mostly because blue-collar work scenarios have improved dramatically. We can all be thankful of that. Get this (it’s ingenious): if you’re playing a B-flat instrument and reading a B-flat part, the fingerings are exactly the same if you pick up an E-flat instrument and read from an E-flat part! The only challenge is the different mouthpiece, but reading brass band music is the same for every part…..the fingerings never change! Amazing system and cleverly designed as a matter of necessity. Fingering charts are included in this Guide, and they are the same for each instrument. One simply needs to pick up an E-flat instrument to play an Eflat part, or a B-flat instrument to play a B-flat part. In theory, we should all be able to move about the band and cover all parts. This was very frequently done “back in the day”. The exception is Bass Trombone. In England during the 19th century, bass trombones were pitched in G more often than not. They had no valves. Players were trained to read Bass clef. It must have proved difficult to re-train the players and the availability of bass bones with valves was nil. I guess that was the one vacant chair that proved hard to fill. (Consider yourself special, Bass Bone player). IMPORTANT: Tenor trombonists, you will be reading from a B-flat Treble clef part. This is not as difficult as it seems. If you can read tenor clef (and every trombonist should, right?), the B-flat transposition is quite simple: READ THE PART IN TENOR CLEF BUT ADD 2 FLATS TO THE KEY SIGNATURE. Adding 2 flats is equivalent to SUBTRACTING 2 sharps, right? What happens when the key signature has 1 sharp? Adding two flats will cancel that one sharp and leave one flat remaining. Thus, you are in the key of F, with one flat. This will very quickly become second nature, but you will occasionally be burned by a written C-flat It would translate as a sounding B-double-flat, wouldn’t it? IMPORTANT: although our parts will look the same whether we play E-flat or B-flat instruments, they obviously will not sound the same. For instance, when a B-flat player plays a written “C”, the resulting sound is a concert B-flat. When an E-flat player plays that same written “C”, what do you suppose comes out the bell? A concert E-flat. These are obviously all written “C’s”, correct? If you’re playing a B-flat instrument, these will all sound like B-flats. If you’re on an E-flat horn, they’ll sound like Eflats. (For that matter, if you were playing flumpelshnozz in F#, these would all sound F#.) Make sense? The Overtone Series for Brass Instruments Learning about transpositions is easier when we understand the physical properties of brass instruments. The physical properties of brass instruments are entirely determined by the natural overtone series. Think of a bugle: one tube, no valves, specific length that cannot be changed. Only a certain number of pitches can be played on a bugle. Those pitches represent the Overtone Series. Different length bugles have different overtone series. What valves do for brass instruments is basically allow for a number of different length bugles (7 different lengths, as a matter of fact). The intervals of the Overtone series always come in this order: Fundamental, octave, perfect 5th, perfect 4th, Major 3rd, minor 3rd, really minor 3rd, whole step, whole step, whole step The fundamental is the lowest note we can play, sometimes called the Pedal. The fundamental on larger instruments is easier played than on smaller (shorter) instruments. In other words, trombones can play their pedal notes, but trumpets have a very hard time doing so. Here is the Overtone Series for a brass instrument shown on a staff: The lowest note is the Fundamental. If this happens to sound like a “C”, we can assume that this instrument is pitched in C. If the Fundamental sounds like a Bflat, we would say this instrument is pitched in B-flat. It makes no difference what the sounding pitch of the Fundamental happens to be, the array of pitches we could play above the Fundamental with that particular length of tube will always follow the order shown above (octave, P5, P4, M3, m3, etc.) Thinking of it another way, what you see illustrated above are all the “open” notes for your instrument. If you are playing the Alto horn, for instance, these are the notes for which you would press NO valves. What would these notes sound like? Well, all the written “C’s” would sound like E-flat. QUESTION: what would the 2nd line G sound like on Alto horn? ANSWER: B-flat How did I figure that out? Well, if the written middle-C sounds like an E-flat on Alto horn, the written G is a Perfect 5th above that……must be a sounding Bflat. QUESTION: what would the written E (top space on staff) sound like on an E-flat tuba? ANSWER: It would sound a G. Why? On E-flat tuba, all written “C’s” sound like E-flat, right? The written E is a Major 3rd above the written C. What is a Major 3rd above a sounding E-flat? The answer is G. QUESTION: what would the written G sound like on a B-flat tuba? ANSWER: ______ QUESTION: what would the written C sound like on Tenor trombone (remember, the tenor trombone is a B-flat instrument)? ANSWER: ______ If we didn’t have valves or slides (trombones), we could never change the length of our tube, right? Thus, we would only have one Overtone Series to worry about. Just like a simple bugle. Some ingenious people, however, came up with ways to vary the length of our tube and thus allow us many more Overtone series. That’s what the valves and slides do. Essentially, the valves and slides of our instruments provide us with 7 discreet lengths of tubing. So, to learn all the fingerings or positions for notes on our instrument, we need to know 7 different Overtone Series. These 7 Overtone Series allow us to play every note in the chromatic style. Before we had the means to vary the length of tubing, we were stuck with one set of notes. If we are thoroughly acquainted with all the Open notes on our instrument (trombonists, “open” equates to 1st position for you), we can easily determine the 7 different Overtone Series, and thus figure out every fingering. Valves always function in the following manner: Open (1st position on trombone): this is the length of our tube with no valves pushed. This determines the pitch of our horn (B-flat cornet, E-flat alto horn, etc.) and gives a specific array of pitches known as the Overtone Series 2nd valve (2nd position on trombone): lowers the Open Overtone Series by a half-step 1st valve (3rd position on trombone): lowers the Open Overtone Series by a Whole step 1st AND 2nd valves together (4th position on trombone): lowers Open Overtone Series by a minor 3rd 2nd and 3rd valves together (5th position on trombone): lowers Open Overtone Series by a Major 3rd 1st and 3rd valves together (6th position on trombone): lowers Open Overtone Series by a Perfect 4th 1st, 2nd, and 3rd valves together (7th position on trombone): lowers Open Overtone Series by a Tri-tone (a.k.a. Diminished 5th, Augmented 4th) Whew! There you have it…..the physics of Brass in a nutshell. Study this until you understand it implicitly. It will help you get a handle on fingerings and transpositions very quickly. For example, if you know the Open Overtone Series for any given instrument, can you not draw a complete fingering chart for that instrument using the above information? Yes, you can…..and here goes: In the following pages, I will start you with an Open Overtone Series and then a portion of the Series for 2nd valve (2nd position trombones). Complete the chart, please. We will show the Overtone Series from the Fundamental to the 10th Partial, or 10th note of the Series. It is very rare that we are called upon to play higher than our 10th partial. You may wish to notate common “enharmonic equivalents” (C# versus Dflat, F# versus G-flat, etc.) It’s OK to use the 8vb /8va symbols to avoid a jungle of leger lines above and below the staves. They simply mean “down/up an octave”, respectively. Fingering Chart/ Slide Position Chart Rehearsal Guidelines 1) Please be punctual for all rehearsals and performances. Typically, that means 30 minutes prior to the report time. 2) We respect each other as we respect this outstanding facility, our instruments, our sheet music, and this art form. 3) Have a pencil handy at all times. I’m a huge proponent of marking your music, but do so lightly in pencil please. 4) Come warmed-up. Be ready to play. Do a Breathing Routine every single day of your lives, but especially before rehearsals and performances. 5) No matter who is on the podium, STOP when they do! 6) Talking is very distracting to the conductor. Make it a habit that you simply don’t talk while rehearsing. With that being said, if you are very sincerely trying to solve a problem with your stand mate or section mates, please do so quickly and quietly. If a musical discrepancy is apparent, raise your hand! 7) Be open-minded, adventurous, and take wellconceived musical chances at all times. Nothing’s worse than a bored musical rendition. Let’s never do that. If you cross the line, I’ll let you know. If you never approach the line, you’re completely missing the point. 8) Ask lots of questions and respect others that do so. 9) LISTEN like CRAZY. Try to hear the Melody always, and gauge how your part is to portray it, enhance it, color it, embolden it. 10) Please have fun. Breathing Routine I’ve been playing a Brass Instrument of one sort or another professionally for a long time now. I cannot stress strongly enough the benefits of a good breathing routine. You’ll feel better, you’ll sound better……..you’ll even look better A very thorough routine is listed below. It’s from my website and can be found at this URL: http://trombonelessons.com/breathing.html I am also a huge fan of “The Breathing Gym” by Patrick Sheridan and Sam Pilafian. You should check it out: http://www.breathinggym.com/site/index.cfm Here is my Routine and I hope you do it every day: This routine may very well be the MOST important part of your Daily Practice. You don't even need a horn to do it. Once we've coached our bodies to blow a relaxed, steady FLOW of air through the instrument, albeit at different rates of speed, ALL other aspects of making music become easier and more consistent. Do not take these exercises lightly and do not fail to do them every day. You'll notice a difference in your playing almost immediately. I must thank my student Eric Dotson for developing this particular regiment. It is an elaboration of a Breathing Routine I have all my students do......and I must say it's a very good one. Thanks, Eric. First, you'll need to set a metronome to 60. Leave it on through the entire exercise. Stand up. Imagine a cable suspending you by the top of your head. This should put your body in a tall, wide, relaxed position. Once you've learned these exercises, apply them to your music. Breathe in rhythm, always, and never lock the throat. In, then out....no pauses or disruptions to the cycle. If dizziness sets in at any point (and it probably will), sit down and rest until you feel normal again PART ONE: Opening Up For 4 counts, inhale smoothly as you gradually raise your arms above your head, touching your palms together. Then, WITHOUT LOCKING THE THROAT (you may wish to use a 'breathing tube'- 35mm film canister with bottom cut out, inserted partially into the mouth to prevent throat locking): Hold breath for 4 counts as you gradually lower your arms. Note the big, open feeling in your chest. Remember this 'puffed up' chest feeling and mimic it when you play. I like to imagine a resonating cavity behind my breastplate about the size of a basketball. Exhale evenly for 4 beats. Rest for 4 beats. Then, inhale for 6 beats as you raise the arms. Hold Breath for 6 beats as you gently lower the arms, exhale for 6 beats, rest for 6 beats. Inhale for 8 beats, hold for 8, exhale for 8, rest. PART TWO: Paper Airplane Use your incredibly vivid imagination and make a paper airplane. For 4 beats, 'wind up' to throw the airplane, and for 4 beats, let it fly with a beautifully steady tailwind. Watch it soar out of sight. IMPORTANT: You must evenly pace your inhale and exhale over the course of 4 beats. Don't be full before 4 beats, nor empty before 4 beats. At the 'top' of the cycle, do NOT stop the air and do NOT lock the throat. Gently let the airflow reverse direction. Air's always moving, in or out. Always. Also, do NOT cram more into your lungs than is comfortable. Do NOT try to get that last 5% to fit. This will be air under great pressure and will come out as such. This doesn't lend itself to making a good, easy, full sound. I call this 'over-breathing' and it's what causes many players to suffer in the high range and at louder dynamics. They have the mistaken idea that they need more air PRESSURE up high, so they take HUGE inhales and blow really hard. They don't understand that as far as volume of air is concerned, you need almost NONE up high. You need a small quantity of air flowing very quickly and very freely. They may very well feel like they're blowing as hard as they can, when in actuality almost no air is flowing past the lips. If they'd pull the mouthpiece away, they'd immediately see that this is indeed the case. And when it's time to play loud, they cram air in and wonder why it doesn't flow freely on the exhale. AIR going IN under pressure will COME OUT under pressure! Conversely, air flowing freely IN will flow freely OUT. Remember that. By not over-breathing in these exercises, you stand a good chance of correcting this all-too-common problem. Use the natural lung capacity you were blessed with and use it steadily and efficiently. NEVER lock the throat and don't try to cram '20 pounds of stuff into a 4 pound bag'. Do 4 repetitions of these '4-count paper airplanes'. Feel the cycle of air as a gentle, natural, relaxing sensation. Then, do 4 repetitions of a '6-count' paper airplane. (6 beats in, 6 beats out) Then, do 4 repetitions of an '8-count' paper airplane. (8 beats in, 8 beats out) PART THREE: Bow-n-Arrow Again, use your wildly creative imagination and assume a posture as if you were going to shoot a bow-n-arrow. A really big bow, in fact. Pick a very specific target somewhere out in space, at least 10 feet from where you stand. Draw the string back evenly over 4 beats, feeling the incredible tension on the string. Time the inhale just perfectly so at the end of 4 beats, you LET THE ARROW FLY for 2 beats. Watch it hit the target. Do 4 repetitions. PART FOUR: Dart You're in a fine English Pub and you're ready to throw a dart. Intensely study the bullseye. Inhale for 2 beats as you prepare to throw, then 1 beat exhale as you watch the dart hit the center of the board. Congratulations! Good darts, as they say:-) REMINDER: you're NOT locking the throat, right? You're simply letting the cycle be faster than the paper airplane. Good. Do 4 repetitions. PART FIVE: Rifle Fill up comfortably for 1 beat, then FIRE for 1 beat. 4 repetitions. PART SIX: The Cycle Put the Airplane, Bow-n-Arrow, Dart, and Rifle in a cycle like so: 4-beat Airplane (4 in, 4 out), Bow-n-Arrow (4 in, 2 out), rest two beats, Dart (2 in, 1 out), rest one beat, 2 Rifles (1 in, 1 out, do it twice) Repeat 4 times (or more if you'd like.)