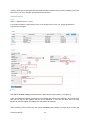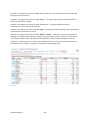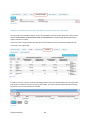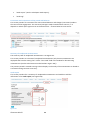
1
E-dok User Manual for Engagement Software Version (EE 2): 27.04.2015 Version (EN 1): 26 May 2015 © 2015 E-dok OÜ 1 E-DOK OÜ CONTENTS CONTENTS ............................................................................................................................................... 2 INTRODUCTION ....................................................................................................................................... 6 LOGGING INTO THE E-DOK SOFTWARE ................................................................................................... 9 Logging into the software in online mode .......................................................................................... 9 Login address ................................................................................................................................... 9 What is needed before logging into the software?......................................................................... 9 How to log into the demo version? ................................................................................................. 9 Logging into the software in online mode ...................................................................................... 9 Logging into the software’s offline version ................................................................................... 10 MENU .................................................................................................................................................... 11 Menu ................................................................................................................................................. 11 Exiting the software........................................................................................................................... 11 SETTINGS ............................................................................................................................................... 12 My settings ........................................................................................................................................ 12 Administration ................................................................................................................................... 13 Users .............................................................................................................................................. 13 Generating a user’s security certificate......................................................................................... 14 Roles .............................................................................................................................................. 14 Classificators .................................................................................................................................. 14 Templates ...................................................................................................................................... 15 CLIENT REGISTER ................................................................................................................................... 24 Registering a client (creating a client profile).................................................................................... 24 Client list ........................................................................................................................................ 24 Adding a client ............................................................................................................................... 24 Related contacts ............................................................................................................................ 26 Saving the data .............................................................................................................................. 26 Client information view ..................................................................................................................... 27 © 2015 E-dok OÜ 2 Changing the client’s information ..................................................................................................... 28 Archiving a client ............................................................................................................................... 29 Deleting a client ................................................................................................................................. 29 Administration of client-related files ................................................................................................ 29 ENGAGEMENT REGISTER ....................................................................................................................... 30 Engagements ..................................................................................................................................... 30 Creating an engagement ................................................................................................................... 30 Creating an engagement ............................................................................................................... 30 Ways to add an engagement......................................................................................................... 31 Creating an engagement from scratch .......................................................................................... 32 Creating an engagement from an archived engagement ............................................................. 38 Creating an engagement from an engagement template............................................................. 40 ENGAGEMENT WORK VIEW AND PROJECT MANAGEMENT TOOLS...................................................... 42 Empty engagement work view .......................................................................................................... 42 Engagement view - explanations ...................................................................................................... 42 PERFORMING AND DOCUMENTING AN ENGAGEMENT ....................................................................... 50 Storing client information ................................................................................................................. 50 Creating an engagement ................................................................................................................... 50 Importing an FS ................................................................................................................................. 50 Introduction ................................................................................................................................... 50 Tab “Report data”.......................................................................................................................... 50 Importing account balances .......................................................................................................... 51 Importing FS entries ...................................................................................................................... 52 Importing an XBRL ......................................................................................................................... 53 Imported report sub-pages (screens)................................................................................................ 54 Introduction ................................................................................................................................... 54 Accounts ........................................................................................................................................ 54 FS entries ....................................................................................................................................... 55 XBRL ............................................................................................................................................... 55 Relating imported report indicators to tasks .................................................................................... 56 Determining materiality .................................................................................................................... 59 © 2015 E-dok OÜ 3 Related part of the manual ........................................................................................................... 59 Materiality formulas ...................................................................................................................... 59 Materiality ..................................................................................................................................... 60 Risk analysis ....................................................................................................................................... 61 Introduction ................................................................................................................................... 61 Risks ............................................................................................................................................... 61 Analysis of assertion level risks ..................................................................................................... 64 Tasks .................................................................................................................................................. 67 Introduction ................................................................................................................................... 67 List, structure and searching of tasks ............................................................................................ 67 Adding a task ................................................................................................................................. 70 General information of a task ....................................................................................................... 71 Changing a task.............................................................................................................................. 74 Deleting a task ............................................................................................................................... 75 Relating a task to an engagement screen page............................................................................. 75 Files related to a task..................................................................................................................... 77 Risks related to a task .................................................................................................................... 77 Documenting the misstatements identified while performing a task .......................................... 78 Documenting the memo points made while performing a task ................................................... 82 Marking a task’s time cost ............................................................................................................. 83 Relating account balances, FS entries and XBRL FS entries to a task; the related tabs ................ 84 Questions and answers related to a task ...................................................................................... 85 Changing a task’s status ................................................................................................................ 86 Overview of tasks .......................................................................................................................... 86 Misstatements ................................................................................................................................... 87 Memo points ..................................................................................................................................... 87 Tab “Summary” ................................................................................................................................. 87 Introduction ................................................................................................................................... 87 Corrections and comparisons of the period end balances............................................................ 88 Summary of unadjusted misstatements ....................................................................................... 88 Audit report ................................................................................................................................... 88 © 2015 E-dok OÜ 4 Archiving ........................................................................................................................................ 89 REPORTS ................................................................................................................................................ 91 WORK WITH FILES ................................................................................................................................. 92 Introduction....................................................................................................................................... 92 Adding a file ....................................................................................................................................... 92 Changing a file ................................................................................................................................... 93 Deleting a file..................................................................................................................................... 93 An engagement’s files ....................................................................................................................... 94 Deleted files....................................................................................................................................... 95 Document templates ......................................................................................................................... 95 Introduction ................................................................................................................................... 95 Document templates in MS Word format ..................................................................................... 95 Document templates in MS Excel format...................................................................................... 97 ONLINE / OFFLINE WORK MODES ......................................................................................................... 98 Introduction....................................................................................................................................... 98 Installing the offline version .............................................................................................................. 98 Generating a user’s security certificate........................................................................................... 100 Working in the offline version ......................................................................................................... 101 FREQUENTLY ASKED QUESTIONS ........................................................................................................ 103 REFERENCES TO IMPORTANT KEYWORDS .......................................................................................... 107 © 2015 E-dok OÜ 5 INTRODUCTION To increase the efficiency and quality of the work of auditors in their professional services, E-dok was developed and completed by autumn 2014. E-dok is software intended specifically to manage and document auditor engagements. This user manual is written to make it easier for users to use the software. It takes into account the experience gathered from trainings organised for members of the Estonian Auditor’s Association to facilitate the use of the software, and from the consultations of users thus far. Shortly about the software’s features As a rule, an auditor’s work is confidential. In this light, the software’s security features should be stressed above all. Regardless of the possible risks accompanying the modern work environment, like hard disk failure, computer theft or unsecure work environment, an auditor can now be sure that his or her work and documents are preserved in a secure server, thanks to the E-dok software – the software housing service is provided to E-dok OÜ by the Centre of Registries and Information Systems. The contract includes daily and weekly data backups. Logging into the software takes place only with an ID-card or Mobile-ID, so it is certain that only authorised persons can access the information. Second, E-dok is more than just documentation software: its biggest advantage is its project management functions. Every auditor engagement is by its nature a project. The larger the project, the more important it is to have successful project management and the specific professional knowledge of each individual team member becomes more of a background. Among the software’s project management tools, the ones especially worthy of highlighting are assigning user roles at the organisation and engagement level, individual and multiple assignment of tasks for both performance and review, risk, engagement and other templates, icons for task status, general view of tasks enabling to quickly move to the needed file, risk, memo point made or misstatement identified, using hyperlinks, and also the possibility to gather all memo points into an overview of memo points and all identified misstatements into an overview of misstatements. In conclusion, it can be said that those tools make an auditing team’s work more co-ordinated and it becomes ever more certain that no important aspect will be left out of view. The third advantage to be highlighted is the possibility of smooth and well-considered documentation of the work, starting with importing the data to be audited, relating the data to materiality calculations, risk analysis and other subsequent tasks and to later auditor’s report so that relations are quickly comprehended and documentation is professionally executed. Moreover, the audit firm retains the option to set the program and the definitions used in the work process according to their habitual methods. We can say from experience that a large share of the program’s functions is intuitive for the user (usable without looking at the instructions). This is probably so because the leading role in the software’s development was held precisely by auditors. Other userfriendly features that could be highlighted here are possibilities to reference files, open and save work documents online, and use so-called “smart files”. Here, smart files are MS Excel and MS Word files that the program has enhanced by adding certain metadata to automate the work of auditors; the possibilities of combining that metadata to prepare work documents are almost limitless. The fourth advantage is indeed that an auditor does not have to change his or her habitual work methods. There is no need to change your structure of tasks and subtasks, their names and indexing. You also have lots of freedom in how to calculate the materiality, use the assertions you like, etc. The Estonian Auditors’ Association does provide users with predefined templates for audits, reviews and © 2015 E-dok OÜ 6 inspection of package reporting along with a list of example procedures, but users can freely customise and re-index them. Our future plans are also to duplicate our templates in English and Russian. Another point worth mentioning is that the software can be used in both online and offline mode. So if you know in advance that the party being audited has no internet connection for some reason, you can still work in offline mode and synchronise the data later. As a result of all the foregoing, we can be sure that users of the software will attain efficiency in documenting their work without compromising the quality, especially if knowing how to best use the various templates (forms, document prefabs) – risk, engagement, document and materiality templates. To make sure that the software’s user manual is as user-friendly as possible and that every user can find the answer they need in the way that suits them, we have divided this manual into the following sections: LOGGING INTO THE E-DOK SOFTWARE, MENU, SETTINGS, CLIENT REGISTER, ENGAGEMENT REGISTER, ENGAGEMENT WORK VIEW AND PROJECT MANAGEMENT TOOLS, PERFORMING AND DOCUMENTING AN ENGAGEMENT, WORK WITH FILES, ONLINE / OFFLINE WORK MODES, FREQUENTLY ASKED QUESTIONS, REFERENCES TO IMPORTANT KEYWORDS. References and cross-references The manual includes hyperlinked references (e.g. see Figure 100, see the subchapter How to log into the demo version?), so the manual’s user can quickly open the referenced topic with a simple mouse click. Frequently asked questions The last-but-one chapter of the manual is frequently asked questions, based on our training and consultation experience thus far. Keywords – the manual ends with the chapter “References to important keywords”, listing keywords with page numbers. In text, those keywords are marked with bold style when first explained. - “Tips”: this symbol is used in the manual to denote places where the E-dok team has considered it necessary to recommend something. Conclusion In conclusion, it can be said that the Estonian community of auditors has received a really highquality tool to document their work with, helping increase the efficiency and quality of their work in the entire sector. Yet, although the software significantly eases the workload of auditors, merely © 2015 E-dok OÜ 7 using the software does not ensure the high quality of an auditor’s work – he or she will still need the critical thinking and professional skills required for auditor engagements. We wish you success in using the software. The E-dok team © 2015 E-dok OÜ 8 LOGGING INTO THE E-DOK SOFTWARE Logging into the software in online mode Login address A contractual client logs into the software via the web address: https://e-dok.rik.ee. A demo version of the software can be logged into at the web address: https://demo-aud.inversion.ee. What is needed before logging into the software? Logging into the software requires a user account and a username. Organisation manager’s user account is created according to the conditions agreed when signing a contract between the audit firm (or other company) related to the user and E-dok OÜ. The organisation manager can add other user accounts. When creating a user account, the user gets a username. The username is set by the specific audit firm’s organisation manager or the information system’s administrator. Regarding usernames, it must be kept in mind that usernames are case-sensitive, i.e. usernames MICHAEL and Michael refer to different users. How to log into the demo version? Logging into the demo version also requires a user account. To apply for the right to log into the demo version, send a free-text e-mail to the address [email protected]. Logging into the software in online mode To log into the software in online mode, you must authenticate yourself with your ID-card or MobilID valid in your country. Alternatively, Estonian e-Residency authentication could be used (see: https://e-estonia.com/e-residents/about/ ). After you have selected the appropriate web address for logging into the software (see: Login address), the following view appears (see Figure 1): © 2015 E-dok OÜ 9 Figure 1 You can choose the interface language by clicking the blue text at top right. Estonian is automatically set as the default language. The language can also be changed after login, in user settings (see the chapter SETTINGS, the subchapter My settings). Enter your username into the username field and click the button for ID-card or Mobile-ID. When logging in with your ID-card, make sure that the relevant ID-card software is installed into your computer and that your ID-card is valid and inserted correctly into the ID-card reader. When clicking the ID-card button, the processing software asks for your PIN1 authentication code. After entering the correct PIN1 code, you will be in the software’s engagements list view within a few seconds. To log in with a Mobile-ID, the user’s Mobile-ID must be entered beforehand into the Mobile-ID number field when creating the user account and entering the required user data (see the chapter SETTINGS, the subchapter My settings). When clicking the Mobile-ID button, the Mobile-ID authentication process starts, sending an SMS to your Mobile-ID number. Upon receiving it, make sure the code is the same as the code on the computer screen and then enter the PIN1 authentication code. After entering the correct PIN1 code, the user is directed to the list of open engagements related to him or her (see the chapter MENU, the subchapter Menu, the figure; this view is more comprehensively explained in the chapter ENGAGEMENT REGISTER, the subchapter Engagements). Logging into the software’s offline version For more information about installing and using (incl. logging into) the software’s offline version, see the chapter ONLINE / OFFLINE WORK MODES. © 2015 E-dok OÜ 10 MENU Menu Figure 2 There is a menu button at the top left corner of the view (see Figure 2), when clicking it, a submenu opens to make various settings and choose options. These are described in more detail in their respective parts of this manual. Exiting the software Menu > Logout Figure 3 Figure 1 After finishing your work, it is commended to log out of the software (see Figure 3). If an ID-card was used for login then we recommend closing all web browser windows as well, for security purposes. © 2015 E-dok OÜ 11 SETTINGS My settings Menu -> My settings This module enables to set the user’s personal data and preferences. Figure 4 If you wish to change the language of the user interface, you can do so by selecting a suitable language from the drop-down list “Interface language” (see the selection marked as 1 in Figure 4). The user’s personal code (see marking 2 in Figure 4) is used for granting the user access to template databases – you will need to forward your personal code to the (relevant company’s) contact person who wishes to grant you access to their engagement template(s) (read more in the chapter SETTINGS, the subchapter Templates, Engagement templates). A security certificate (see marking 3 in Figure 4) is generated for a user by the organisation manager and it is used for user authentication in offline mode. The security certificate can be downloaded by clicking the link “Download security certificate” (read more in the chapter ONLINE / OFFLINE WORK MODES, the subchapter Generating a user’s security certificate). In the bottom part of the “My settings” page, the section “Related accounts” (see marking 4 in Figure 4) displays the entire information about user accounts related to the user’s personal ID code, incl. in various companies. This list is not displayed if the user has only one account. If the user’s Mobil-ID number is entered in the personal data section (see marking 5 in Figure 4) then this user can log into the software with his or her Mobile-ID. If the user has set a password (see marking 6 in Figure 4) for him or her then the user will be able to © 2015 E-dok OÜ 12 work by opening and saving MS Word and MS Excel documents online, without needing to save the files in his or her own computer and upload them from there. Administration Users Menu -> Administration -> Users This module enables to administrate users at the organisation’s level, incl. assigning additional organisation managers. Figure 5 The blue button “Add new user” (see ) at the top right opens the form for adding a new user (see Error! Reference source not found.). The hyperlink “Edit” to update the user data opens the form for changing an existing user. Figure 6 Fields marked with a red asterisk (see Error! Reference source not found.) are mandatory. The user’s location country is selected from a drop-down list (see marking 1 in Figure 6). If the user’s Mobil-ID number is entered in the personal data section (see marking 2 in Figure 6) then this user can log into the software with his or her Mobile-ID. A user can also enter his or her own Mobile-ID (see the chapter SETTINGS, the subchapter My settings). When creating a user account, the user gets a username (see marking 3 in Figure 6). It is set for the © 2015 E-dok OÜ 13 user by the specific audit firm’s organisation manager or the information system’s chief administrator. Regarding usernames, it must be kept in mind that usernames are case-sensitive, i.e. usernames MICHAEL and Michael refer to different users. The correct status must be set for a username – if a user is marked as inactive, that user cannot do anything in the software. Employee type (see marking 4 in Figure 6) must be set correctly. If an employee is marked as the audit firm’s external user, that employee has only the limited rights of an observer. A password can be set for a user (see marking 5 in Figure 6). The user can change his or her password under personal data (see the chapter SETTINGS, the subchapter My settings). A password is necessary if the user wants to work by opening and saving MS Word and MS Excel documents online (without needing to save the files in his or her own computer and upload them from there). Read more about working with files in the chapter WORK WITH FILES. A user’s organisational roles (see marking 6 in Figure 6) – this sets the role that the user has in the organisation. Depending on the organisational role, the user also needs to be added to the specific engagement where he or she has to participate. Adding a user to an engagement and setting his or her role and rights in a specific engagement can be set in Menu -> Engagements under the administration of engagement users (see the chapter SETTINGS, the subchapter Administration, Users). NB: user rights stem from the role set for the user. Generating a user’s security certificate See the chapter ONLINE / OFFLINE WORK MODES, the subchapter Generating a user’s security certificate. Roles This module enables to administrate user roles. A role is a set of rights. Rights are predefined and only the information system’s administrator has access to this module. Figure 7 Roles can be added with the button “Add new role” (see Figure 7) and an existing role can be changed by clicking its name. Classificators Menu -> Administration -> Classificators This module enables to administrate classificators predefined in the system. A classificator is a comprehensive ordered system of precisely described categories marked with unique alphanumerical codes, used in the database contained in the information system. Only an organisation manager or an information system’s administrator has access to this module. An information system’s administrator can change the default values that are copied to the audit firm’s list © 2015 E-dok OÜ 14 of classificators (see Figure 8) if a new audit firm is created. To simplify the user’s work, the Estonian Auditors’s Association has predefine the majority of classificators’ values but an organisation manager can change the existing values or add new ones according to the organisation’s needs. NB! It is recommended to think through and change classificators’ values before the creating of engagements because a change in classificators’ values changes them in all opened engagements that are not archived yet. No changes will happen in archived engagements. Figure 8 Fixed classificator sorting enables to change the order of displaying classificators’ values (see Figure 9). Figure 9 To change the order, bring the mouse cursor to an arrow in the first column (the mouse cursor becomes a ), hold the left mouse button and drag the line up or down (see Figure 9). Templates Menu -> Administration -> ...templates Templates are primarily predefined examples of frequently repeating engagements, tasks, risks or documents, having the purpose of making an auditor’s work smoother. Templates also enable better efficiency (by saving time). © 2015 E-dok OÜ 15 Materiality templates Menu -> Administration -> Materiality templates This module enables to predefine materiality entries (types), materiality percentages and their abbreviations displayed at top right on the engagement’s view. When creating a new engagement, these parameters are imported into the engagement’s information. Figure 10 The button to add a new entry for calculation of specific materiality is marked with 1 in the figure (see Figure 10). If an entry needs deleting, it is done using the small buttons marked with 2 in the figure (see Figure 10). In the table marked with 3 (see Figure 10), the typically used materiality percentages and the percentage calculation ranges permitted by the audit firm’s methods are set. In the fields marked with 4 (see Figure 10), the abbreviations used in the audit firm can be set. Materiality can also be determined individually at the engagement’s level, without setting up a materiality template. Moreover, materiality indicators can be changed at the level of an individual engagement regardless of the predefined calculation templates. After a materiality is set for an engagement, the abbreviations and relevant materiality indicators will be constantly shown at top left of every screen. See also the chapter PERFORMING AND DOCUMENTING AN ENGAGEMENT, the subchapter Determining materiality. Engagement templates Menu -> Administration -> Engagement templates Creating an engagement template and defining its tasks are similar to creating engagements and defining their tasks (see the chapter PERFORMING AND DOCUMENTING AN ENGAGEMENT, the subchapter General information of a task). The main difference is perhaps that creating individual © 2015 E-dok OÜ 16 engagements and defining their tasks every time would take considerably more time than using engagement templates. Figure 11 By clicking the tab of shared engagement templates (marked with 1 in the figure (see Figure 11)), the user can access engagement templates made accessible for his or her company by others. For a user to get access to the engagement templates of another organisation, the user needs to send his or her personal code (see the chapter SETTINGS, the subchapter My settings) to the preparer of the shared engagement template. This tab also provides access to the Estonian and English engagement templates examples (audit, review and packaging materials’ report attestation engagement) prepared by the Estonian Auditors’ Association (without having to send the personal code to the Estonian Auditors’ Association). The Estonian Auditors’ Association and E-dok OÜ stress that those templates are intended solely as examples to facilitate taking into use the software and that they will not accept any responsibility for risks entailed in using them. An engagement template may be for instance “ISA (EE) Audit”, “ISRE (EE) 2400 Review”, ISAE (EE) 3000 “Packaging materials report attestation”, etc. Moreover, if an audit firm has many clients in the same sector (e.g. retail banking), the audit firm may consider it necessary to create sector-based engagement template(s). To create a new engagement template, click the blue button “Add new”, marked with 2 in the figure (see Figure 11). The following view appears (see Figure 12): Figure 12 The fields marked with a red asterisk (see Figure 12) are mandatory. After filling in and saving the data fields, tasks can be defined for the freshly created engagement template. © 2015 E-dok OÜ 17 NB! As long as the radio button of the choice “Public” is set to “No” (see Figure 12), other users will not see the engagement template and cannot use the engagement template for creating new engagements. Figure 13 When saving the general information of an engagement template, two new tabs are created in addition to the general information: these are “Rights” and “Tasks” (see Figure 13). By clicking on the rights tab, you can enable access to the engagement template for user(s) outside the organisation. This requires the user’s personal code to be entered on the “Rights” screen. After that, the external user having obtained the rights can import this template into his or her template database (see the chapter SETTINGS, the subchapter Engagement templates, the tab “Shared engagement templates”). - Tip: when creating tasks in an engagement template, the tasks cannot be imported from an existing engagement project – they can be created from scratch, then copied from tasks and re-indexed and renamed or imported from other engagement templates. © 2015 E-dok OÜ 18 Figure 14 © 2015 E-dok OÜ 19 Both when adding a task to an engagement and when adding it to an engagement template, the window for setting the task’s parameters opens. It is important to keep in mind the following: The fields marked with a red asterisk (see Figure 14) are mandatory. Reference (marked with 1 in the figure (see Figure 14)) must be unique, i.e. the program will not allow entering the same reference (index) repeatedly. For files added when documenting the works, the software will add a dot and an additional number to the task’s reference, so it can be referenced in the file adding menu or textual part of other tasks. An audit firm can also use its habitual referencing system. Top level (marked with 2 in the figure (see Figure 14)) is the (main) level to which the task is added. The level “Top” means the highest level, i.e. a task created with this choice has the highest level in the engagement or engagement template (tasks can have up to 5 possible levels and the software displays references to the first three of them in different colours). The structure of tasks can be changed later by dragging tasks from one level to another with the mouse. Depending on the task’s specifics, the user can mark what information tab(s) would be useful to add to the task (see the section “Task tabs” marked with 3 in Figure 14). Tabs can also be added later in the course of work, for instance if a memo point has to be noted about a shortcoming of the internal audit system but the relevant tab was not added to the task when setting it up. In that case during the work, click the task’s reference (alternatively click on the task’s textual part and then click the blue button “Edit” in the right pane) and then mark the checkbox for the relevant tab in the section “Task tabs”. With the above example, the checkbox for the task tab “Memo points” would be marked. This change must be saved. Files can be added to tasks in engagement templates; these files can be e.g. predefined document templates – if the use or adding of files is foreseen for a task, it would be useful to mark the checkbox for “Files” in the list of task tabs (see the section “Task tabs” marked with 3 in Figure 14). The added files are imported together with the engagement template when importing the latter into a created engagement – the left pane will display a tree of the task structure for the engagement (see Figure 100). The choices marked with 4 in the figure (see Figure 14) are there when adding a task to an engagement template but not when adding a task to a created engagement. These are intended for relevant filtering when importing an engagement from an engagement template. - Tip: although the window “Conclusion of work done” (see Figure 14) is visible when defining a task for an engagement template, its content will not be imported into the engagement. Risk templates Menu -> Administration -> Risk templates - The use of risk templates when performing an engagement can provide significant time savings for an auditor – instead of describing a frequently occurring risk anew every time, the auditor can import a standard risk description from the risk template into the engagement if necessary and then modify it as needed for the engagement. © 2015 E-dok OÜ 20 Figure 15 This module enables to create new risk templates i.e. standard risks (see the blue button “Add new” marked with 1 in the figure (Figure 15)). Before starting to describe risk templates, the risk category and sub-categories should be set up (see the table part marked with 2 in the figure (see Figure 15)). Read more about setting up classificators in the chapter SETTINGS, the subchapter Classificators. The filtering section is marked with 3 (see Figure 15). Unfortunately, only filtering by assertion(s) is currently working. To change the existing risk templates, click the blue text (see the hyperlinked risk descriptions marked with 4 in Figure 15). Risk templates can be exported as an MS Excel file (see the blue button “Download – Excel” marked with 5 in Figure 15). To import a risk template into the risk register of an existing engagement (the tab “Risks”), click the blue button “Import from templates” (see Figure 16). Figure 16 In the window that opens (see Figure 17), mark the relevant checkbox in the area marked with red, to choose the risk template to import; then click the blue button “Import”. © 2015 E-dok OÜ 21 Figure 17 After that the risk analysis can be completed and the risk can also be connected to the task where the auditor’s answers to the risk(s) are documented (see Figure 18). Figure 18 The fields marked with a red asterisk (see Figure 18) are mandatory. Source reference (marked with 1 in Figure 18) is the task, in the course of which the risk was identified. It can be selected by clicking the blue text. FS entry (marked with 2 in Figure 18) is the FS entry to which the risk being analysed is related. It can be selected by clicking the blue text. © 2015 E-dok OÜ 22 The risk analysis section (marked with 3 in Figure 18). Probability, possible impact and total impact can be predefined in the classificators menu (see the chapter SETTINGS, the subchapter Administration, Classificators). Assigned to task (see Figure 18): this is the task with the performance of which the auditor answers to the risk. It can be selected by clicking the blue text. After the risk analysis has been performed, click the blue button “Save” (see Figure 18). Document templates Menu -> Administration -> Document templates See the chapter WORK WITH FILES, the subchapter Document templates. Task templates (task tabs) Task templates are lists of screen tabs to be added to tasks (see Figure 19) so that they are displayed on the task’s detailed view (see the chapter SETTINGS, the subchapter Templates, Engagement templates, bottom section of the task’s detailed view). Figure 19 To change the order of templates (see Figure 19), bring the mouse cursor to an arrow in the first column (the mouse cursor becomes a to where you want it to be. © 2015 E-dok OÜ ), hold the left mouse button and drag the line up or down 23 CLIENT REGISTER Registering a client (creating a client profile) This module is intended for registering the audit firm’s clients and managing the client profiles. The module is visible in the menu if the user is an organisation manager. Figure 20 Client list Menu -> Clients The client list view displays a list of the entered client companies. By default, clients with an active client relationship are displayed. Clients can be searched by legal name and registry code (see Figure 21). To do so, enter the search word (part of a name or a registry code) into the relevant field and click the button “Search”. To find the company called “OÜ SUMSUM”, entering “sum” in the legal name field is enough. Search by word is not case-sensitive. Figure 21 Adding a client To add a new client, click the button “Add new” near the right end of the search bar (see marking 1 in Figure 22 Figure 22 © 2015 E-dok OÜ 24 ). Figure 22 The view for adding a client opens (see Figure 23): Figure 23 Mandatory fields (see marking 1 in Figure 23) are marked with an asterisk (*). Administrative unit (see marking 3 in Figure 23) can be set only if the country is set to “Estonia” (marked with 2 in the figure (see Figure 23)). To select the administrative unit, enter at least 2 characters s into the field (see marking 3 in Figure 23), contained in the administrative unit searched for. NB! The selection of administrative units is currently working in the Estonian user interface only. Figure 24 A drop-down list opens, displaying the administrative units found. Click on an administrative unit to select it. The field is replaced by the selected administrative unit’s name and a cross in a red box appears at the end of the name (see Figure 25). The selection can be cancelled by clicking on the cross in a red box or on the name itself. © 2015 E-dok OÜ 25 Figure 25 Related contacts On the client view, an unlimited number of related contacts can be added. To add a contact, click the button “Add new” in the subsection “Contacts” (see marking 4 in Figure 23). Every click of the button creates a new contact line where the data of a new contact can be entered. Figure 26 NB! A contact is saved only if at least one of the contact data fields is filled in (e.g. Position, Name, Telephone, E-mail) – see Figure 26. The "Delete” button (see Figure 27) on a contact line removes the line. If a contact has been entered onto that line (see “Error! Reference source not found.”), the “Delete” button marks the line as eleted. Figure 27 Clicking the “Restore” button on a deleted contact’s line (see Figure 27) changes the contact’s status back to not deleted. If a contact line (data) was added and the client’s information was not saved yet, the “Delete” button fully removes the line. The contact is permanently removed from the client’s card when the client’s information is saved (see marking 5 in Figure 23). Saving the data The client’s information and the data of the related contacts are saved in the software when the user clicks the button “Save” (see Figure 24 (5)). If an error appears when saving the data, the relevant warning message is displayed at the top of the page. An error message related to contacts is displayed above the relevant contact. © 2015 E-dok OÜ 26 Example (see Figure 28): Figure 28 If the data were successfully saved, the system opens the “Client information view” page (see the chapter CLIENT REGISTER, Client information view). Cancelling To cancel the adding of the client’s information, click the button “Back to the list” (see Figure 23 (6)) or the title “Companies” (see Figure 23 (7)). Both open the client list. Client information view Menu -> Clients To view a client’s information, click the client’s legal name (see the hyperlink marked with a red box and 1 in Figure 29) or “General information” on the same line (see the hyperlink marked with a red box and 2 in Figure 29). Figure 29 © 2015 E-dok OÜ 27 The client information view opens (see Figure 30): Figure 30 Client information is divided into the following tabs: “Client’s general information” – contains the client’s main data; “Related files”; “Related engagements” – links to an engagement search page with a pre-filled client name field. If the user has the relevant rights, the “Edit” button is displayed that enables to change the client information. Changing the client’s information Changing the client’s information starts on the client information view (see Figure 30, the subchapter Client information view). To open that, click the “Edit” button. The client information changing page opens. The layout of fields and the logic of entering the information are similar to adding a client (see the subchapter Adding a client). Still, the choice of actions at the end of the client information form is different (if the user has the relevant rights). Figure 31 The “Back” button opens the page “Client information view”. The “Delete” button initiates the deletion process (see the subchapter Deleting a client). © 2015 E-dok OÜ 28 Archiving a client A client can be archived by changing the value of the field “Active” on the client information changing page (see the subchapter Changing the client’s information) to be “Inactive”. By default, inactive clients are not displayed when viewing the client list and when choosing clients for a new engagement (see “Adding an engagement”). Deleting a client A client can be deleted on the client information changing page (see the subchapter Changing the client’s information). To initiate a deletion, click the button “Delete”. Then click “OK” in the pop-up window displayed (see Figure 32). Figure 32 - The system will allow deletion of information only if there are no items (files, engagements, etc.) related to the client. Administration of client-related files Files can be related to any client. File administration takes place in the “Related files” tab (see Figure 33) of the client information view. Figure 33 Read more about adding and changing files in the chapter WORK WITH FILES, the subchapter Adding a file and subchapter Changing a file. © 2015 E-dok OÜ 29 ENGAGEMENT REGISTER Engagements This module is intended for administration of engagements of audit firms. To stress that this is primarily project management software related to auditor activities, the first view that opens after logging into the software is the general view of engagements (see Figure 34). Figure 34 Clicking on the hyperlink “Engagements” from any place (see marking 1 in Figure 34) opens the main page (the engagements view) displaying all engagements related to the user. To add new engagement(s), click the blue button “Add new” (see marking 2 in Figure 34). Engagements can be filtered (see the filtering button marked with 3 in the figure (Figure 34)). On the general view of engagements, the user sees the status of tasks related to the user, by legend icons and by quantities (see marking 6 in Figure 34). The status icons are explained in the section of the figure marked with 4 (see Figure 34). By clicking the hyperlinked (blue) engagement name (see marking 5 in Figure 34), the specific engagement can be opened. Creating an engagement Creating an engagement Menu -> Engagements The add a new engagement, click the button “Add new”. - Before adding an engagement, client information related to the client concerning whom the engagement is created must be added to the client module (see the chapter CLIENT REGISTER, the subchapter Registering a client (creating a client profile)). © 2015 E-dok OÜ 30 Figure 35 Ways to add an engagement By clicking the button to add a new engagement, the first step of adding an engagement opens (see Figure 36): Figure 36 As seen in the figure (see Figure 36), there are three ways to create a new engagement: 1. An engagement is created from scratch (e.g. for an engagement to be documented in this software for the first time or if there is no suitable engagement template). NB! An empty engagement created here can be imported as a whole or as tasks into an engagement template. 2. An engagement is created from the same client’s previously archived engagement (e.g. creating client X’s 2015 audit engagement on the basis of client X’s 2014 engagement). If creating an engagement this way, the planning work and risk analysis from the earlier periods is included in the new engagement, making the engagement’s planning more efficient. 3. An engagement is created from a predefined engagement template (see the chapter SETTINGS, the subchapter Templates, Engagement templates)). This is purposeful if there is no earlier client engagement of a similar character but there is an engagement template with a similar profile (e.g. used for companies in a similar sector). © 2015 E-dok OÜ 31 Creating an engagement from scratch Creating an engagement Menu -> Engagements Figure 37 The window to add an engagement opens (see Figure 38). Figure 38 To create a new engagement from scratch, click the blue button “Next” (marked with 1 in the figure); the screen to add / change the engagement’s main information opens (Figure 39): © 2015 E-dok OÜ 32 Figure 39 Fields marked with red asterisks (*) are mandatory. - Alternatively, a new engagement can be initiated in the Clients module (Menu -> Clients, select the client by clicking on it (blue text) and then under the third tab titled “Related engagements” the window to create a new engagement opens (with three blue buttons: “Next”, “Search an engagement ->” and “Search an engagement template ->” (see the figure before the last). Adding client information to engagement information Select the client in the “Client” field of the engagement’s main information adding / changing screen (see marking 1 in Figure 39). The client must be registered beforehand (see the chapter CLIENT REGISTER, the subchapter Registering a client (creating a client profile)) and must have the status “Accepted”. In this module, clients can be searched from a list (by name). The list appears when clicking an empty data field (see Figure 40). Figure 40 © 2015 E-dok OÜ 33 When selecting a client, the information of the client and the related contacts is copied into the engagement’s information. - If the client’s information is changed in the course of changing the engagement’s information, the client register data will remain unchanged (this enables to preserve in the engagement’s general information the client’s business name and contact data as they were at the time of performing the engagement). Selecting the administrative unit The administrative unit (see marking 4 in Figure 39) can be selected only if the selection in the Country drop-down list (see marking 3 in Figure 39) is “Estonia”. To select the administrative unit, enter at least 2 characters in the field (see marking 4 in Figure 39, Figure 41), contained in the administrative unit searched for. Figure 41 A drop-down list opens, displaying a list of administrative units (see Figure 41) that contain the entered combination of characters in their name. Click on an administrative unit to select it. The field is replaced by the selected administrative unit’s name and a cross in a red box appears at the end of the name. The selection can be cancelled by clicking on the cross in a red box or on the name itself. Figure 42 Adding the data of a client’s contact persons In the section of related contacts, an unlimited number of (key) contact persons related to the client can be entered. To add a contact, click the button “Add new” in the subsection “Contacts” (on the engagement’s main information adding / changing screen, marked with 5 in the figure (see Figure 39)). Every click of the button creates a new contact line where the data of a contact person can be entered. © 2015 E-dok OÜ 34 Figure 43 A contact is saved only if at least one of the contact data fields is filled in (e.g. Position, Name, Telephone, E-mail). The engagement’s users and setting their rights: (see Setting the engagement user’s rights). Saving the engagement’s general information The saving process is initiated with a click of the “Save” button. If an error appears when saving, the relevant warning message is displayed on the page (see Figure 44). An error message related to contacts is displayed in the relevant contact’s subsection (see the bottom part of Figure 44). Figure 44 After the information is successfully saved, the system opens the “Engagement information view” page. Cancelling the adding of an engagement’s general information To cancel the adding of an engagement’s general information, click the button “Back to the list” (on the engagement’s main information adding / changing screen, marked with 6 in the figure (see Figure 39)) or the title “Engagements”. Both open the engagement list. Engagement’s data source When adding an engagement, attention must be paid to the data source (see Figure 45). © 2015 E-dok OÜ 35 - Contrary to other general information, the data source cannot be changed later! Figure 45 - Data source determines the data with which the engagement’s various parts, for example “Assertion level risks”, “Risks”, “Misstatements” can be related. - An account-based data source (may be in Estonian: “Kontopõhine”) enables to relate objects to account report entries, an FS-based data source – to predefined FS entries (may be in Estonian: Aruandepõhine”). - Data source must be set even for those types of engagements where FS data (incl. account reports) are not imported. Setting the engagement user’s rights In this section, users can be added to the engagement and their rights in the engagement can be set (organisation level users are added in the module “Users” (see the chapter SETTINGS, the subchapter Administration, Users)). User rights determine the actions that a user can perform (e.g. adding files, changing the engagement’s structure, deleting tasks, etc.). The user rights that are set can be viewed on the engagement’s general information page. Menu -> Engagements -> subsection “Engagement users”. To set a user for the engagement, click the button “Add user” (see Figure 46). Figure 46 The detailed view for adding a user opens (see Figure 47): © 2015 E-dok OÜ 36 Figure 47 To add a user to the engagement: Select the user from the list in the left pane (marked with 1 in the figure (see Figure 47)). Set the user’s role (marked with 2 in the figure (see Figure 47)). NB! User roles are descriptive and informative designations, not setting any rights in the software. Set the level of rights (marked with 3 in the figure (see Figure 47)). NB! A user can perform actions in the engagement according to his or her level of rights (Level 1, Level 2, Level 3, Observer). Click the button “Save”. After saving, the selected users with the selected rights will be displayed in the engagement’s list of users. A user with the rights of the engagement’s administrator (Level 1) can change the role and rights of every user in the list. After the users are saved, save the engagement’s general information (see the blue button “Save” in Figure 48). The choice of actions at the end of the engagement information form can be different (if the user has the relevant rights). Figure 48 Tips An engagement created from scratch is the probable choice if there is no opportunity to create an engagement on the basis of a similar archived engagement or if the user prefers not to import tasks from an engagement template immediately upon creating an engagement. © 2015 E-dok OÜ 37 Fields marked with an asterisk are mandatory (see Figure 44). If classificators are changed, the information related to them will change in all opened (unfinished) engagements (see the chapter SETTINGS, the subchapter Classificators). Once the data source is set for an engagement, it cannot be changed anymore in that engagement. The setting of data source determines the level of detail of the analysis of assertion level risks (see the chapter PERFORMING AND DOCUMENTING AN ENGAGEMENT, the subchapter Importing an FS). The more fields of the client information and engagement information are filled in, the more registered information from the so-called “smart files” (see the chapter PERFORMING AND DOCUMENTING AN ENGAGEMENT, the subchapter Importing an FS) can be used automatically. Creating an engagement from an archived engagement Menu -> Engagements Creating an engagement – see Figure 37 (chapter ENGAGEMENT REGISTER, the subchapter Creating an engagement). The window to add an engagement opens (see Figure 38). To create an engagement from an existing engagement, click the blue button “Search an engagement” (marked with 2 in Figure 38). Figure 49 A list of archived engagements opens (see Figure 49). Select a similar archived engagement of the same client from the previous period and confirm the selection (see Figure 50). © 2015 E-dok OÜ 38 Figure 50 After selecting the tasks and files to be imported (see Figure 51), click the blue button “Next”. Figure 51 Further actions with the engagement are similar to the description above (see the chapter ENGAGEMENT REGISTER, the subchapter Creating an engagement from scratch). © 2015 E-dok OÜ 39 Tips When creating an engagement from an archived engagement, majority of the client information and engagement information, the marked files, users, risk analysis information, summaries of memo points and misstatements are automatically transferred to the new engagement. The data (except “Data source”) can be changed. Creating an engagement from an engagement template Menu -> Engagements Creating an engagement – see Figure 37 (chapter ENGAGEMENT REGISTER, the subchapter Creating an engagement). The window to add an engagement opens (see Figure 38). To create an engagement from an engagement template, click the blue button “Search an engagement template” (marked with 3). The following view of existing engagement templates opens (see Figure 52): Figure 52 Select an engagement template to be imported, then enter the engagement information (see Figure 39) and select the tasks to be imported (see the selection buttons marked with 2 in Figure 53). The section of filterable parameters is marked with 1. © 2015 E-dok OÜ 40 Figure 53 Tip If you do not want to immediately import tasks from the engagement template when creating an engagement in the manner described above and instead wish to do it later, you can create an engagement from scratch and import tasks or the entire engagement from engagement templates later, for example on the tasks view (see the chapter PERFORMING AND DOCUMENTING AN ENGAGEMENT, the subchapter Adding a task) or when performing an analysis of assertion level risks (see the chapter PERFORMING AND DOCUMENTING AN ENGAGEMENT, the subchapter Analysis of assertion level risks). The latter is a good option because in that case, the predefined options (assertions, approach, etc.) of an example task are automatically imported from the engagement template upon importing the task(s). © 2015 E-dok OÜ 41 ENGAGEMENT WORK VIEW AND PROJECT MANAGEMENT TOOLS Empty engagement work view Figure 54 Engagement view - explanations The following regions are marked with numbers (see Figure 54): 1 Screen tabs. Screens can be related to one of the tasks in the region marked with 6 (see Figure 56). For example, we want to relate the task “Materiality calculation” to the screen “Materiality” (it can be opened by clicking the tab “Materiality”). The view of the screen not related to the task is as follows: see Figure 55. © 2015 E-dok OÜ 42 Figure 55 To relate a task, bring the mouse cursor to the task’s reference and click once or bring it to the task’s name and click and then click the blue button “Edit” in the right pane. After that, a full editing view opens in the right pane (see Figure 56) where the screen to be related to the task can be selected from a drop-down list. Then click the blue button “Save”. After saving, the task and the screen are related to each other and the task’s reference is displayed at the top right of the screen (see Figure 57), providing a way to quickly open the view of the related task by clicking on the reference. © 2015 E-dok OÜ 43 Figure 56 © 2015 E-dok OÜ 44 Figure 57 The order of the screens can be changed (every user can change the order of an engagement’s tabs to his or her liking). To do so, bring the mouse cursor to the region of the red box in the figure (see Figure 58) and wait for about one second, until a padlock appears. By clicking on the padlock, it opens. With the padlock open, the tabs of screens can be dragged to an alternative order while the padlock is unlocked (see Figure 58). To save the new order of tabs, click the padlock again. Figure 58 2 The buttons for creating tasks (“Add new”, “Copy”) and for the overview. The overview is a good tool to manage engagements, enabling to get a quick picture of project management related information and to administrate it (see Figure 59). The information can be filtered by columns – to do so, click the column’s heading. By clicking on the numbers of files, risks, questions and answers, misstatements and memo points, you can quickly go to the relevant item. © 2015 E-dok OÜ 45 Figure 59 3 The button to open and close a filter. The filtered view: see Figure 60. Figure 60 On the view of the list of engagements related to the user, the default is to display unfinished engagements related to the user. Engagements can be filtered by various parameters. To filter them, click on the grey button with double down arrow (see the button marked with a red box in Figure 61), fill in the required fields and click the blue button “Search”. Figure 61 The fields for search criteria open (see Figure 62). Figure 62 The filtered view of engagements opens (see Figure 63). © 2015 E-dok OÜ 46 Figure 63 The double down arrow becomes a double up arrow (by clicking on it, the filter closes). Figure 64 4 A legend of the task status icons (see Figure 65). The status icon is also displayed beside a task, both in the left pane of the engagements view (see Figure 66) and on the overview of tasks (see Figure 59). Figure 65 Figure 66 © 2015 E-dok OÜ 47 A task’s status can be changed in the right pane (on the task’s detailed view) by clicking on the status icon (see the little square marked with 1 in Figure 67) or the text (see the text marked with 2 in Figure 67). Figure 67 A locked task can be unlocked by clicking the blue button “Edit” at the task tab “General information” (see Figure 68) and then clicking the button “Save” on the task’s detailed view. Figure 68 The engagement’s users with Level 1 rights can also see an overview of changes to task statuses on a task’s detailed view (see Figure 69). Figure 69 © 2015 E-dok OÜ 48 5 Actions button (see Figure 70). Figure 70 Under the Actions button, an overview is available about files and deleted files related to the engagement, tasks can be imported from templates, an overview is available about closed tasks, and multiple assignment can be used to assign performers and reviewers of tasks. 6 The pane for tasks and their structure (see Figure 71). Tasks can be created (with the button “Add new” in the region marked with 2), copied from another (with the button “Copy” in the region marked with 2) and imported from engagement templates (with the button “Actions” in the region marked with 5, selection “Import from templates”). Tasks can be created and structured as needed, but a task’s reference must be unique i.e. it cannot be repeated. Figure 71 7 A task’s detailed view (see Figure 56). The use of those elements is described in more detail in the following chapter (PERFORMING AND DOCUMENTING AN ENGAGEMENT). . © 2015 E-dok OÜ 49 PERFORMING AND DOCUMENTING AN ENGAGEMENT Storing client information See the chapter CLIENT REGISTER, the subchapter Registering a client (creating a client profile). Creating an engagement See the chapter ENGAGEMENT REGISTER, the subchapter Creating an engagement. Importing an FS Introduction “Report data” is the section where an engagement’s FS information is set up for further work – charts of accounts, FS entries and annual reports in XBRL format can be uploaded here, relating them to further risk analysis and specific tasks. Also, materiality formulas can be designed. Upon importing the data, the user can set whether the existing data are overwritten or left unchanged, whether the file contains a header and whether the entries for “Assertion level risks” should be created automatically. E-dok provides three options for importing an FS information: Importing a report of account balances with 1) a predefined structure, and 2) as an MS Excel file (extension .xlsx); Importing a used designed FS entries report with 1) a predefined structure, and 2) as an MS Excel file (extension .xlsx) (e.g. the first FS entry may be the balance sheet’s first entry and the last entry may be the income statement’s last entry); Importing an annual report in XBRL format (currently available only in Estonia; must be downloaded from the Estonian Centre of Registres and Information Systems’ reporting environment beforehand). Note, that it is not absolutely required to import all three report types (although it is preferable). To have any use from the section “Report data” and the screen “Assertion level risks”, at least one set of reports should be imported. Tab “Report data” Menu -> Engagements Bring the mouse cursor to the engagement’s name (blue text) on the list of engagements page and after the view opens, click the tab “Report data”. The tabs of the report data screen are shown in Figure 72. Figure 72 © 2015 E-dok OÜ 50 Importing account balances This module can be accessed by the engagement’s users with Level 1 and Level 2 rights only. Click the tab “Import account balances” (see Figure 73). Figure 73 Figure 74 Period (see the drop-down list marked with 1 in Figure 74). Select “Start of engagement” for the first import and “End of engagement” for each subsequent import. Select the file (see the button marked with 2 in Figure 74). This opens the mode of searching for the file to be imported. Overwrite existing (omitted by default) (see the box marked with 3 in Figure 74). This sets whether the entries or figures already imported will be overwritten at the next import. The file’s first line is a header (see the box marked with 4 in Figure 74). Mark the checkbox if the file’s first line is a header line, not a data line. Number 5 (see Figure 74) marks the mandatory structure of the file to be imported. If the file structure is not proper or the file has repeating account numbers then import is not performed and the software gives a warning message. © 2015 E-dok OÜ 51 NB! If the data source was chosen as “Accounts” when creating the engagement then this screen also includes the option “Add assertion level risks automatically”. In such case, that checkbox should be marked for the first import, otherwise the assertion analysis entries are not automatically created for the screen “Assertion level risks” (see marking 4 in Figure 76). After importing, the report data are displayed on the screen “Accounts”. Read more about the imported account balances screen “Accounts” in the subchapter Accounts. Importing FS entries This module can be accessed by the engagement’s users with Level 1 and Level 2 rights only. Click the tab “Import a report” (see Figure 75). Figure 75 Figure 76 Period (see the drop-down list marked with 1 in Figure 76). Select “Start of engagement” for the first import and “End of engagement” (recommended) for each subsequent import. Select the file (see the button marked with 2 in Figure 76). This opens the mode of searching for the file to be imported. Overwrite existing (omitted by default), - overwrite only amounts (see the first two boxes marked with 3 in Figure 76). This sets whether the whole entries or amounts only that were already imported will be overwritten at the next import. The file’s first line is a header (see the last i.e. the checked checkbox marked with 3 in Figure 76). Mark the checkbox if the file’s first line is a header line, not a data line. © 2015 E-dok OÜ 52 The line marked with 4 (see Figure 76) is visible on the screen if the data source was chosen as “Report” when creating the engagement. If the data source was chosen as “Accounts” when creating the engagement then this line together with its selection option is visible on the screen “Import account balances”. Its checkbox should be marked for the first import, otherwise the assertion analysis entries are not automatically created for the screen “Assertion level risks” (see the subchapter Analysis of assertion level risks). Number 5 (see Figure 76) marks the mandatory structure of the file to be imported. If the file structure is not proper then import is not performed and the software gives a warning message. Number 6 (see Figure 76) marks the displayed import log. This is informative only. Number 7 (see Figure 76) marks the button “Delete all entries” and the accompanying warning. The use of this button ensures the deletion of imported data. After importing, the report data are displayed on the screen “FS entries”. Read more about the imported FS entries screen “FS entries” in the subchapter FS entr. Importing an XBRL This module can be accessed by the engagement’s users with Level 1 and Level 2 rights only. The software enables to import (upload) a report in the standard XBRL format. NB! This works with Estonian taxonomy reports. Read more about the XBRL file format and taxonomies on the website: http://xbrl.eesti.ee/ To import, a container of XBRL report files (in .zip format) must be downloaded from the reporting environment to the users’ computer beforehand. Files in the container (a .zip archive) contain information about the report and its related taxonomy. Example of an archive (see Figure 77): Figure 77 Click the tab “XBRL import” (see Figure 78). Figure 78 © 2015 E-dok OÜ 53 Select the file to be imported and click the blue button “Import” (see Figure 79). Importing takes a few moments. Figure 79 After importing, the report data are displayed on the screen “XBRL” (see the subchapter XBRL). Imported report sub-pages (screens) Introduction The tabs “FS entries”, “Accounts”, “XBRL” and “Report structure” are mainly list-style views where the user can see the data previously imported and if necessary then export (download) them in MS Excel format for processing. If needed, the processed files can imported again via the relevant screens (see the chapter PERFORMING AND DOCUMENTING AN ENGAGEMENT, the subchapter Importing an FS)). Accounts This screen provides an overview of accounts and their balances (see Figure 80). Figure 80 If the final account balances were also imported at the final stage of the engagement, the column “Change” displays the differences between the initial and the final import by lines. Figure 81 © 2015 E-dok OÜ 54 Settings related to accounts can be changed by clicking the “Settings” button (see the blue button “Settings” marked with 1 in Figure 81). The section for changing the account settings can be accessed by the engagement’s users with Level 1 and Level 2 rights only. Further administration of account balances (relating them) takes place on the screen “Report structure” (see the chapter PERFORMING AND DOCUMENTING AN ENGAGEMENT, the subchapter Relating imported report indicators to tasks). FS entries The imported FS entries are visible after clicking the tab “FS entries”. An overview opens (see Figure 82) about the imported FS entries, balances, related tasks and if set then also the so-called account types of entries (Assets, Liabilities, Revenue, Expenditure). If needed, the data can be downloaded as MS Excel files and after processing, imported into the software again (see the screen “Import a report”). Figure 82 Further administration of FS entries (relating them) takes place on the screen “Report structure” (see the chapter PERFORMING AND DOCUMENTING AN ENGAGEMENT, the subchapter Relating imported report indicators to tasks). XBRL Imported XBRL reports are displayed after clicking the tab “XBRL”. By clicking on the blue entries, the relevant report tables or annexes open (see Figure 83). Figure 83 © 2015 E-dok OÜ 55 Further administration of XBRL entries (relating them) takes place on the screen “Report structure” (see the chapter PERFORMING AND DOCUMENTING AN ENGAGEMENT, the subchapter Relating imported report indicators to tasks). Relating imported report indicators to tasks Engagements -> Reports -> FS structure On the screen “FS structure”, the imported FS entries, accounts and XBRL elements of an annual report can be related to tasks. This module can be accessed by the engagement’s users with Level 1 and Level 2 rights only. By clicking the screen tab “FS structure”, the following view opens (see Figure 84): Figure 84 Number 1 marks the button for adding a new entry (“Add new”). The order of entries can be changed – click in the region marked with 2 (see Figure 84) and drag the entry to a suitable place. If the entry is related to the task, the task reference is blue; if the entry is not related to the task, the task reference is grey (see the region marked with 3 in Figure 84). Task references can be added in freeform because the task may not exist yet at the time of adding the FS entry. The FS entries related to a task are displayed on the screen “FS entries”. If the task reference is blue, the task can easily be viewed by clicking on its reference. The column of related XBRL entries is marked with 4 (see Figure 84). The column of related account report entries is marked with 5 (see Figure 84). An overview of accounts not yet related can be viewed on the “Accounts” part of the “Reports” screen if marking the checkbox “Display only unrelated accounts” (see Figure 80). A report can be exported (downloaded) in MS Excel file format. The file can be processed and if needed then re-imported on the screen “Import a report” (see the subchapter Importing FS entries). The exporting button is marked with 6 (see Figure 84). By clicking the blue name of an FS entry, the following view opens (see Figure 85): © 2015 E-dok OÜ 56 Figure 85 The entry name marked with 1 in the figure (see Figure 85) (designated with a red asterisk) is mandatory. NB! The name “Retained earnings” can be set for only one entry – this entry is used by the software for calculations of the view “Summary of unadjusted misstatements” because without that, the software would not know what entry is related to retained earnings. A task reference can be typed in with keyboard or selected from the search window (see Figure 86) opening when clicking the text “Select task” (see the text marked with 2 in Figure 85). It can also be predefined in the imported report table in MS Excel format (see the order of columns in the imported file, marked with 5 in Figure 76). © 2015 E-dok OÜ 57 Figure 86 In the field marked with 3, the type of the FS entry (Asset, Liabilities, Revenue, Expenditure) can be set. This can also be predefined in the imported report table in MS Excel format (see the order of columns in the imported file, marked with 5 in Figure 76). In the boxes marked with 4 (see Figure 85), relating to imported account entries takes place. By clicking the entry’s name in the left box, the entry is moved to the right box and vice versa. The relation can also be predefined in the imported report table in MS Excel format (see the order of columns in the imported file, marked with 5 in Figure 76). In the boxes marked with 5 (see Figure 85), relating to an XBRL element takes place. Select the correct reportable from a drop-down list (Balance sheet, Consolidated balance sheet, etc.) and then by clicking the entry’s name in the left box, the entry is moved to the right box and vice versa. The relation can also be predefined in the imported report table in MS Excel format (see the order of columns in the imported file, marked with 5 in Figure 76). NB! A relation once formed can be used for the same client’s engagements in subsequent years: the report structure can be downloaded (see the button “Download” marked with 6 in Figure 84), changed and then re-uploaded (see the chapter PERFORMING AND DOCUMENTING AN ENGAGEMENT, the subchapter Importing FS entries, Figure 76). © 2015 E-dok OÜ 58 Determining materiality Related part of the manual Materiality templates (see the chapter SETTINGS, the subchapter Templates, Materiality template). Materiality formulas Menu -> Engagements -> Report data -> Materiality formulas This screen can be accessed by the engagement’s users with Level 1 and Level 2 rights only. Formula entries can be related to the engagement’s annual report elements, FS entries or accounts. This means that at least one of those reports should be imported. NB! The actions described here can in principle be performed also on the engagement project’s page (screen) “Materiality”, therefore the screen named here is not mandatory to be used (see the subchapter Materiality). Figure 87 An entry can be added by clicking on button “Add new” (see the blue button marked with 1 in Figure 87). “Import from templates” (see the blue button marked with 2 in Figure 87) adds entries of predefined risk templates. When importing, existing entries with the same name already in the engagement are not added as doubles. When adding a new engagement, materiality formulas are automatically imported from predefined materiality templates. Figure 88 © 2015 E-dok OÜ 59 The addition or subtraction operation on related elements in a formula can be changed by clicking on the operation sign (marked with 1 in Figure 88). Materiality Menu -> Engagements -> Materiality This screen enables to determine and calculate the main materiality indicators. The screen can be accessed by the engagement’s users with Level 1 and Level 2 rights only. Figure 89 Materiality entry is added by clicking the button “Add new” (see Figure 89). An overview of the existing entries and formulas is displayed on the screen “Materiality formulas” (see Figure 87). If the column “Manual sum” is filled in, calculation(s) of materiality indicators are based on the column “Manual sum”, otherwise the value in the column “Auto sum” is used. The choices made in “Use” (see the column marked with 2 in Figure 89) determine whether or not the entry is used in calculations of indicators. Indicators are saved by clicking the button “Save” (see the blue button “Save” marked with 3 in Figure 89). The three main materiality indicators – FS level materiality, performance materiality and misstatement detection threshold – are displayed at top right in every view of the engagement, if they are above zero (see the region marked with 1 in Figure 89). The abbreviations of materiality indicators displayed can be changed in the menu choice “Materiality templates”. Materiality screens can be related to a specific task (see the chapter ENGAGEMENT WORK VIEW AND PROJECT MANAGEMENT TOOLS, the subchapter Engagement view - ). In that case, if the related task is marked as done, that screen cannot be changed anymore and the so-called task reference on the screen (see Figure 57) will be accompanied by the status icon “Done” (violet padlock). © 2015 E-dok OÜ 60 Risk analysis Introduction Depending on the engagement’s specifics, a need may occur in practice to register identified risks before reaching the import of reports and the screen of assertion level risk analysis. Therefore, the screen “Risks” is described earlier here than the screen “Assertion level risks”. Yet the auditor may also need to return to the screen “Risks” when performing the analysis of assertion level risks, in order to complete the documentation of risk analysis there. Risks Risks identified in the course of performing an engagement are gathered into risk register on the screen “Risks”. It provides both an overview of identified and documented risks (see Figure 90) and their statuses, and a way to continue the risk analysis (see Figure 92). Figure 90 In order to register (document) an identified risk at an engagement stage other than analysis of assertion level risks, click the blue button “Add new” (if the risk still needs to be described) or “Import from templates” (if the risk has a repeated nature and a similar risk was already added to a risk template (selections marked with 1 in Figure 90)). Read more about risk templates in the chapter Administration, the subchapter Templates, Risk templates. When clicking on a source reference (see marking 2 in Figure 90) or the relevant task reference (see marking 5 in Figure 90), the work view of the related task opens on the screen “Tasks”. Read more about that in the subchapter “Tasks”. When adding a reference of an assigned task, the additional screen “Risks” is added to the task (see Figure 91). Further task-level work with an identified and documented risk having an assigned task reference can be continued on the task level – there will be no need to return to the screen “Risks” anymore. © 2015 E-dok OÜ 61 Figure 91 By clicking on the blue hyperlinked description (see Figure 91 (or the region marked with 3 in Figure 90)), you can perform (or continue an unfinished) risk analysis (see Figure 92). NB! Risks are also automatically added to this register when marking a risk as significant (red) upon analysis of assertion level risks, which is why you should return to this screen to complete the unfinished wording of the risk and to relate it to the task being the answer to the risk (the so-called “Assigned task”). © 2015 E-dok OÜ 62 Figure 92 The source reference, the FS entry and the assigned task can be selected from the relevant dialogue window (see an example: Figure 93) after clicking the blue hyperlinked text (choices marked with 1 in Figure 92). Figure 93 “Risk description” and “Related assertions” are mandatory fields (areas marked with 2 in Figure 92). © 2015 E-dok OÜ 63 The scales of risk probability, possible impact and a risk’s total impact as a function of those two (sections marked with 4 in Figure 90 and marked with 3 in Figure 91) can be defined in the classificators module (see the chapter SETTINGS, the subchapter Classificators). Analysis of assertion level risks Figure 94 An FS entry can be added for an analysis of assertion level risks both manually and automatically. Manual adding takes place on the same page by clicking the button “Add new” (see the blue button “Add new” marked with 1 in Figure 94). FS entries are automatically added in the course of importing an account or FS entries – all entries/accounts with a selected balance are added automatically. For that, the checkbox “Add "Assertion level risks" automatically” should be checked on the relevant “FS entries” screen depending on the selected data source (“Import account balances”, “Import a report”) when importing data for the first time (see the region marked with 4 in Figure 76). NB! If that checkbox is not marked then the analysis view like shown in the figure (see Figure 94) will not be displayed. In the task references region marked with 2 (see Figure 94), you can click on the pen icon to enter a task reference manually or to find the correct task by scrolling the dialogue window that opens and then selecting it by clicking on it. Blue marks an already functional task reference, grey marks a task reference still without a related task in the engagement (e.g. it has not yet been imported from a template) and “N/A” refers to an entry still without a task reference (e.g. it was considered irrelevant due to insignificant balances). In the region marked with 3 (see Figure 94), you can set manually or automatically which entries are significant. For automatic setting, click the menu choice “Mark as material (based on performance materiality)” after clicking the button “Actions” (see the button “Actions” marked with 5 in Figure 94). Entries can be filtered based on materiality – to do so, mark the checkbox in the header. © 2015 E-dok OÜ 64 The legend of statuses for the analysis of assertion level risks is displayed in the region marked with 4 (see Figure 94). By hovering the mouse cursor on letters designating assertions, explanations are displayed for the letters. By clicking the relevant box at the crossing of an assertion and an entry, the status in the box changes with every click (“assertion marked” (checkmark on black background) should be chosen if the entry is material and related to an assertion but the risk is not considered significant, “risk” (red box) should be chosen if there is a risk with a specific assertion related to the entry, and another click on a choice empties it). If the choice made is red and the analysis results are saved by clicking the button “Save” marked with 8 (see Figure 94), the relations and changes made on the page are saved into the software and will be visible on the screen “Risks” where you can continue describing the risks added (named “Automatically added risk”) and analysing their probability and possible impact (see Figure 92). Example (marking a tangible fixed asset value risk red and saving it (see Figure 95): Figure 95 Upon saving, the risk marked with red is added to the risk register similarly to other risks marked with red on the screen “Risks” (see Figure 96): Figure 96 By clicking on the blue description “Automatically added risk” (see Figure 96), the risk analysis dialogue window opens (see Figure 92). The approach is defined in the region marked with 6 (see Figure 94). By hovering the mouse cursor on letters, explanations are displayed for the letters. You can delete (immaterial) entries (with the button “Delete”) or restore the entries marked for deletion (with the button “Restore”) in the region marked with 7 (see Figure 94), if you have not yet clicked the button “Save”. Table data in MS Excel format can be downloaded by clicking the menu choice “Download - Excel” after clicking the button “Actions” (see the button “Actions” marked with 5 in Figure 94). Automatic creation of tasks for significant risks takes place if clicking the menu choice “Create tasks” after clicking the button “Actions” (see the button “Actions” marked with 5 in Figure 94). Still, if there is already a template for a similar engagement, it would be more purposeful to import an existing task from the template. To import a task related to the risk from a template (templates), click the menu choice “Import from templates” after clicking the button “Actions”. The advantage of this is that the typical provisions of assertions and the approach already set in the template will be © 2015 E-dok OÜ 65 imported into the existing analysis of assertion level risks where they can be modified as needed (see Figure 92). Example: The user wants to import the task with reference 221-6 related to the entry “Property investments” from an engagement template (see Figure 94). Select “Actions” / “Import from templates” and the following list of engagement templates opens (Figure 97): Figure 97 Select the relevant engagement template (containing the intended task) and the next view opens, with the task to be imported (221-6) already selected (see Figure 98) so the user can import it into the engagement (together with the task’s so-called top level task(s)): Figure 98 The latter step is possible because the task is defined in the template as “Related to the numeric data” (filter choices in Figure 98). © 2015 E-dok OÜ 66 NB! If the checkmark does not appear as a default choice then the tasks is not related to numeric data, but it can still be marked and imported. The next view is the view after importing (see Figure 99) where the user can continue the clientcentred analysis of assertion level risks and set a more specific approach: Figure 99 - With this kind of task import, the assertions on the screen of analysis of assertion level risks and on the screen of the imported task will correlate. - Tasks can also be imported from an engagement template (see the chapter ENGAGEMENT REGISTER, the subchapter Creating an engagement from an engagement template) or by using the “Actions” button on the tasks screen (see Figure 100) but in that case there will be no correspondence yet and the analysis of assertion level risks and the task assertions must be made to conform manually. - It is recommended to import the tasks not related to the analysis of assertion level risks already when creating the engagement. This way you can avoid losing the structure of tasks and needing to restructure them after later import. Tasks Introduction Tasks are one of the most important components of an engagement. A task (or a lower level task) can be an action or a procedure that may be related to a screen (e.g. “Materiality”, “Report data”, “Risks”, “Assertion level risks”) and require a click on the relevant screen tab to move to, a specific questionnaire, a file, a list of questions and answers, memo points, etc. On the engagement’s work view, a structured view of tasks is displayed in the left pane. The right pane houses the screen intended for documenting task-related details (detailed task view). A task can be created from scratch, copied from another task, creating a new engagement from an archived engagement or importing from engagement templates. All this is detailed below. List, structure and searching of tasks The tasks view (see Figure 100) opens when clicking an engagement name or the “Tasks” hyperlink on the engagements list view or clicking the “Tasks” tab on the engagement’s general information view. © 2015 E-dok OÜ 67 Figure 100 The screen that opens consists of the following main parts: The button for adding a new task (see the button marked with 1 in Figure 100). To add a new task, the user must have the relevant rights in the engagement. Search filter (see the symbol marked with 2 in Figure 100). To open the search filter (see Figure 101), click the symbol . When filling in the search criteria and clicking the button “Search”, only tasks corresponding to the search criteria are displayed on the task structure view (see the left pane marked with 3 in Figure 100). Figure 101 NB! If all fields are left empty, all tasks of the engagement are displayed. The task structure (task tree) - (see the left pane marked with 3 in Figure 100). Tasks can be displayed as a multileveled hierarchical structure (see the so-called task tree view). To move up/down in the structure (see Figure 102), the keyboard’s arrow keys can be used as well. The tree displays a unique task reference, the task’s name, a small field with the initials of the person assigned as the task’s performer (if no performed was assigned, “–” is displayed instead of initials), and the completion level status icon(s) for every task. A legend for the status icons (explanations for the icons) is displayed at top right of the tasks screen (see the region above the “Actions” button in Figure 100). © 2015 E-dok OÜ 68 If the task has lower-level tasks, that task is considered a task category. References of the tasks are shown in coloured boxes where references to tasks at the first three levels are displayed with different colours (a reference of the main category is blue, the next is green and the third is orange (all tasks of lower levels than that are also displayed with orange)). By default, the first two levels are expanded in the tree. Figure 102 Arrow symbols ( , ) in front of task names indicate that the tasks have subtasks. To open and close those, click the relevant arrow: - to open, Example (see Figure 103): Figure 103 It opens as follows (see Figure 104): Figure 104 © 2015 E-dok OÜ 69 - to close. The engagement’s users with Level 1 and Level 2 rights (see the subchapter Setting the engagement user’s rights) can change the location of tasks in the task structure by mouse-dragging them in the structure up or down or onto a task that should have the dragged task as its subtask. The task structure is refreshed when clicking engagement’s “Tasks” tab. Detailed task view (see the right pane marked with 4 in Figure 100). Tasks and objects related to them (tabs, files, etc.) are managed in the right pane; the details of the specific task are displayed there if clicking the task’s name (textual part) in the structure tree (see the left pane marked with 3 in Figure 100). A task’s information is divides into various tabs. The default tab displayed is “General information”. NB! Task-related details can be viewed and changed on the task information view only if the user has the relevant rights and the task status is not “Done” or “Reviewed”. With the latter two statuses, the data are locked. To unlock the data, the status has to be changed. This can be done on the task changing view or directly in the general information tab (see Figure 106). Figure 105 The stats can be changed directly on the detailed view by clicking the status icon (see the icon marked with 1 in Figure 105) or the status text (see the text part marked with 2 in Figure 105). Adding a task To add a new task, left click the button “Add new” (the button marked with 1) on the tasks view (see Figure 100). The button is visible only if the user has been granted the relevant rights (see the subchapter Setting the engagement user’s rights). This opens the full form of task details, i.e. “General information” (see Figure 106) for adding a task. It is generally similar to the engagement template’s form for adding a task, but the latter has two more detail lines at the bottom (“Mandatory (always copied)”, “Related to the numeric data”) (see the lines marked with 4 in Figure 14). © 2015 E-dok OÜ 70 General information of a task Figure 106 © 2015 E-dok OÜ 71 NB! If a task already exists, this form can always be opened by left clicking a task reference or alternatively clicking once on the task name and then clicking the button “Edit” on the task’s general information view. Mandatory fields are marked with an asterisk (*) – see Figure 106. Task reference (see the first line marked with an asterisk (*) in Figure 106) is a unique task code (a reference cannot be used twice in the same engagement). Task name (see the first line marked with an asterisk (*) in Figure 106) – can be as needed. Performer and reviewer can be assigned from a drop-down list of users added to the engagement (see the chapter ENGAGEMENT REGISTER, the subchapter Setting the engagement user’s rights). The performer and the reviewer can also be assigned by multiple assignment, clicking the button “Actions” and choosing “Multiple assignment” (see Figure 65 in the chapter ENGAGEMENT WORK VIEW AND PROJECT MANAGEMENT TOOLS, the subchapter Engagement view - ). NB! If the performer and the reviewer are not assigned (this is reasonable for e.g. a single auditor working alone), the data of the performer and the reviewer appear when the task is marked as done (locking the task). Status (see Figure 106) – this is “unfinished”, “question unanswered”, “done”. When adding a task, its status is automatically marked as unfinished. Objective (see Figure 106) – the task’s objective is set in this field. The objective may be e.g. to reach an opinion on whether the transactions being the basis for the presented costs took place in reality and were performed by the company (assertion: taking place). It is enough to click on the pen icon on the task’s short view to write or modify an objective. Assertions (see Figure 106) – letters designating the assertions related to the tasks are marked here (e.g. in the previous example, the letter designating the assertion “Taking place”). Reminder: full name of the assertion appears if hovering the mouse cursor on the letters designating the assertions. Approach (see Figure 106) – letters designating the approach related to the task are marked here. Reminder: full name of the approach appears if hovering the mouse cursor on the letters designating the approaches. NB! If the task was imported from an engagement template where assertions and an approach were predefined (the letters designating the assertions and the approach are marked) then make sure they correspond to those marked in the course of the risk analysis. If tasks are imported as explained in the chapter PERFORMING AND DOCUMENTING AN ENGAGEMENT, the subchapter Analysis of assertion level risks then the correspondence is there; if importing the tasks directly from a template upon creating an engagement, the correspondence of assertions and the approach is currently not automatically ensured. © 2015 E-dok OÜ 72 Description of work done / being performed (see Figure 106) – this field enables the use of not only text but also colours and other styles as well as hyperlinks to files (see Figure 107). It is enough to click on the pen icon on the task’s short view to write or modify a description of work done. Figure 107 Conclusion of work done (see Figure 106) – the conclusion of the work done should be added in this field, describing whether and how the task’s objective was achieved. It is enough to click on the pen icon on the task’s short view to write or modify a conclusion of work done. NB! If an important memo point is made, it should preferably be documented in the task’s additional tab “Memo points” (see the subchapter Memo points). This way, the memo points made in the course of the audit are gathered on the “Memo points” screen where they can be exported into MS Excel as well as MS Word format, to be issued as a memo letter or for any other purpose (see Figure 126). NB! If a significant misstatement is identified, it should preferably be documented in the task’s additional tab “Misstatements” (see the subchapter Misstatements). This way, the corrected and unadjusted misstatements identified in the course of the audit are gathered on the “Misstatements” screen and a summary table of unadjusted misstatements is generated on the subpage “Summary of unadjusted misstatements” of the page “Wrap-up”; the table can be exported into MS Excel as well as MS Word format (see Figure 122). A summary table of unadjusted misstatements is also generated on the subpage “Audit report” of the page “Wrap-up”, to help the auditor issue a correct audit report (see Figure 123). Other information (see Figure 106) – various other information can be added here. Related engagement page (see Figure 106) – one engagement screen (e.g. “Numeric data”, “Materiality”, “Wrap-up”, etc.) can be related to the task, but keep in mind that while an engagement screen is related to a task, it cannot be related to any other task before the previous relation is cancelled. Time budget (h) (see Figure 106) – estimated time to be spent on the task can be entered here. Number of linked standard / paragraph number and Link to standard (see Figure 106) – a link to the related standard can be created here (if the standard is in .pdf format) or even to a specific paragraph in the standard (if the standard is in .html format). © 2015 E-dok OÜ 73 Task tabs (see Figure 106, Figure 108) – choose here what screens for documenting the actions related to the task (tabs) are necessary for documenting the task. If something extra is marked, it can be removed here and if something is missing, it can be added here at any time. Figure 108 After the task’s details are set, they must be saved. Errors encountered upon saving are displayed in the form’s top part (see Figure 109). Figure 109 To copy a task, click on the name of the task to be copied as it is displayed in the task structure and then click the button “Copy” (see the button “Copy” marked with 5 in Figure 100). Changing a task A task can only be changed if the user has the relevant rights. A user with Level 3 rights can change a task only if its status is not “Reviewed“. To change the task, click on the button “Edit” (see the button marked with 1 in Figure 110). © 2015 E-dok OÜ 74 Figure 110 Deleting a task A task can be deleted on the task changing view. The button “Delete” is located at the form’s end. Relating a task to an engagement screen page A task can be related to an engagement screen (Risks, Misstatements, Memo points, etc.). NB! Only one task can be related to any one engagement screen. Relating takes place on the task changing view (see Figure 111). Figure 111 On the related screen, the related task’s reference number and status are displayed in the screen’s name row (top right corner) (see Figure 112 and Figure 113). © 2015 E-dok OÜ Figure 112 75 Figure 113 © 2015 E-dok OÜ 76 Files related to a task Every task can have related files. File administration takes place in the task tab “Files” of the detailed view in the right pane (see the tab outlined with red and marked with 1 in Figure 114). Read more about files: the chapter WORK WITH FILES. Read more about document templates: the chapter SETTINGS, the subchapter Templates, Document templates. Figure 114 Risks related to a task Every task can be defined as a risk source (“Source”) or as a task where the auditor’s risk answer must be formed for a risk identified and documented in risk analysis (“Recommended task“) to hedge the risk. Risk administration at the task level takes place in the task tab “Risks” (see the tab outlined with red and marked with 1 in Figure 115). Figure 115 A risk is listed (see Figure 116) only if the task is defined as the risk’s “Recommended task” (see the selection area marked with 4 in Figure 18). © 2015 E-dok OÜ 77 Figure 116 A risk can be added without leaving the task, by clicking the button “Add new” (see Figure 115 or Figure 116). To view and change a risk’s detailed information, bring the mouse cursor to the relevant risk description linked with blue font and left click it, so the risk analysis dialogue window opens (see Figure 18). The risk can also be deleted there if necessary, assuming it is irrelevant. Documenting the misstatements identified while performing a task Misstatements identified in the course of a task are documented in the tab “Misstatements” (see the tab outlined with red and marked with 1 in Figure 117). If the tab “Misstatements” is not activated, it must be activated in order to document a misstatement (see the last section “Task tabs:” in Figure 106). Figure 117 A table of misstatements registered at a task’s level looks like this (see Figure 118): Figure 118 A misstatement’s detailed information can be seen, changed and deleted by clicking the name of the relevant misstatement in the column “Name” (blue text as a hyperlink) (see Figure 118). A misstatement can be added with the button “Add new”. A window for documenting a misstatement opens: © 2015 E-dok OÜ 78 Figure 119 © 2015 E-dok OÜ 79 Number 1 (see Figure 119) marks the field “Source reference” (the reference and name of the task being the source reference). Number 2 (see Figure 119) marks the field “Name” – an empty textbox where the misstatement’s short name should be entered. Number 3 (see Figure 119) marks the field “Explanation” – an empty textbox where the misstatement’s content should be entered. Number 4 (see Figure 119) marks the field “Type” – decide and mark here whether the misstatement is quantitative or qualitative in nature. Number 5 (see Figure 119) marks the field “Debit” / “Credit” – mark here the FS entries where the debiting or crediting change must be recorded. Using that option creates a summary in the column “Corrections” of the screen “Corrections and comparisons of the period end balances” (the tab “Wrap-up”), showing which corrections are considered necessary. If the corrections were entered, the relevant entry’s column “Comparison” would show 0 (see Figure 120). Figure 120 © 2015 E-dok OÜ 80 Number 6 (see Figure 119) marks the field “Sum” where you can enter the monetary amount of a quantitative misstatement. Number 7 (see Figure 119) marks the field “Group name” where misstatements can be grouped for sorting purposes (not mandatory). Number 8 (see Figure 119) marks the field “Corrected” – mark here whether the misstatement is corrected (“Yes”) or unadjusted (“No”). This determines in which summary tables the misstatement’s information does or does not appear (see Figure 122, Figure 123). Number 9 (see Figure 119) marks the field “Type” – choose here whether the misstatement is factbased (“Fact-based”) or assessment-based (“Assessment-based”). Number 10 (see Figure 119) marks the region where a radio button should be used to mark whether the misstatement is material (“Material”), pervasive (“Pervasive”) or a fraud indication (“Fraud indication”). Number 11 (see Figure 119) marks the region where you should document why the management does not consider corrections necessary (if the choice in the region marked with 8 is “Corrected”, this field is not necessary to be filled in). Number 12 (see Figure 119) marks the region “Previous period’s misstatement” where a radio button should be used to mark whether it is a previous period’s misstatement (“Yes”) or the current period’s misstatement (“No”). Number 13 (see Figure 119) marks the region with the buttons for saving ( “Save”), closing without saving ( “Close”) and deleting a misstatement (“Delete”). After registering a misstatement, it is reflected at the task level (see Figure 118), at the project page level (the tab “Misstatements”) (see Figure 121) as a summary of unadjusted misstatements (see Figure 121), at the project page’s “Summary” sub-page “Summary of unadjusted misstatements” (tab “Summary”, sub-tab “Summary of unadjusted misstatements”) where the relevant table can be exported as an MS Excel or MS Word file if necessary (see Figure 122), and on the project’s page “Summary” sub-page “Audit report” (tab “Summary”, sub-tab “Audit report”) as a so-called reminder table to help decide the right type of audit report (see Figure 123). Figure 121 © 2015 E-dok OÜ 81 Figure 122 Figure 123 Documenting the memo points made while performing a task Memo points (findings) made in the course of any task can be documented at the task level so that the memo points are gathered on the screen “Memo points”. For that, the tab “Memo points” must be activated (see the last section “Task tabs” in Figure 106”). Memo points (findings) are documented, supplemented or deleted in the tab “Memo points” (see Figure 124). Figure 124 A memo point is added by clicking the button “Add new”, after which the window for documenting a memo point opens (see Figure 125); the memo point is documented similarly to the previous description of documenting a misstatement. Memo point types can be predefined when defining classificators (see the chapter SETTINGS, the sub-chapter Classificators). © 2015 E-dok OÜ 82 Figure 125 After registering memo point(s) (findings), the registration is reflected at the task level (see Figure 118) and at the project work page level (the tab “Memo points”) as a summary table “Memo points” (see Figure 126) that can be exported as an MS Excel or MS Word file if necessary. Figure 126 Marking a task’s time cost The time spent on the task can be documented on the page “Time spent on task” (see Figure 127). Figure 127 To add the time spent, click the button “Add new”. To change or delete the time spent, use the changing view (by clicking the blue hyperlinked text “Edit” (see Figure 128)). © 2015 E-dok OÜ 83 Figure 128 Relating account balances, FS entries and XBRL FS entries to a task; the related tabs An imported account balance report, FS entries and XBRL FS entries can be related to a task (see the chapter PERFORMING AND DOCUMENTING AN ENGAGEMENT, the subchapter Relating imported report indicators to tasks). The list of entries related to the task and their account balances can be viewed by clicking the tab “Accounts” (see Figure 129). Figure 129 To add an account, click the account searching field (see the entry field marked with 1 in Figure 130) and choose a suitable account from the list that opens. The list can be narrowed down by entering keywords or an account number in the field. Figure 130 © 2015 E-dok OÜ 84 NB! If the list will not open or is empty, it means that no accounts were imported. Changes made in the list (additions or deletions) are saved only after clicking the button “Save”. The tabs “FS entries” and “XBRL” are added to the task in a similar fashion. By clicking the relevant tab, the FS entries related to the tab are displayed (see e.g. Figure 131). Figure 131 Questions and answers related to a task In the course of reviewing a task, the reviewer can pose questions to the task’s performer. The questions must be answered or deleted, otherwise the task cannot be marked as done. Questions in the task can be posed and answered in the tab “Questions and answers”. If the tab “Questions and answers” is not active, it must be activated to document questions and answers (see the last section “Task tabs:” in Figure 106). Figure 132 A new question can be added by clicking the button “Add new” (see the button marked with 1 in Figure 132). While the question is unanswered, the user sees a red flag and the text “No answer”, as shown in the previous figure. © 2015 E-dok OÜ 85 To answer or to view the existing answers, first click on the question’s title; this opens the question. The up/down arrow (see the symbol marked with 2) indicates whether or not the question is open. By clicking the button “Answer” (see the blue button marked with 3 in Figure 132), answers can be entered (see Figure 133). To change or delete existing answers (comments), use the buttons “Edit” or “Delete” displayed at the relevant comment (see Figure 133). A user can change or delete only his or her own answers (comments). Figure 133 Changing a task’s status The engagement’s users with Level 1 rights can also see an information page related to changes of task statuses, by clicking the relevant tab on a task’s detailed view (see Figure 134). Figure 134 Overview of tasks The overview of tasks provides an overview of tasks, their statuses, persons related to the tasks (the performer and the reviewer), and the number of their related elements (files, risks, questions and answers, misstatements). By clicking a number, the relevant element (file, risk, etc.) can be opened quickly). The overview (see Figure 130) is opened by clicking the button “Overview” on the tasks view (see Figure 135). Figure 135 © 2015 E-dok OÜ 86 Figure 136 The columns in the overview table (see Figure 136) can be sorted by clicking on their header. The second click on the same header sorts the column in reverse (descending or ascending order). To select several columns at once, hold the keyboard’s “Shift” key. Figure 137 Misstatements The screen “Misstatements” contains a summary of corrected and unadjusted misstatements identified while documenting tasks (see Figure 121). Misstatements are documented at the task level (see the chapter PERFORMING AND DOCUMENTING AN ENGAGEMENT, the subchapter Documenting the misstatements identified while performing a task). Memo points The screen “Memo points” contains a summary of memo points made while documenting tasks (see Figure 126). Memo points are documented at the task level (see the chapter PERFORMING AND DOCUMENTING AN ENGAGEMENT, the subchapter Documenting the memo points made while performing a task). Tab “Summary” Introduction The wrap-up work page (tab “Summary”) has the following sub work pages (screens): “Corrections and comparisons of the period end balances” (see the subchapter Corrections and comparisons of the period end balances); “Summary of unadjusted misstatements” (see the subchapter Summary of unadjusted misstatements); © 2015 E-dok OÜ 87 “Audit report” (see the subchapter Audit report); “Archiving”. Corrections and comparisons of the period end balances This screen provides an overview of the start and end balances and changes (corrections) made in the course of the engagement. The overview (see Figure 138) is based on data sources, i.e. it depends on which report type was set as the data source – account balances or FS entries. Figure 138 Summary of unadjusted misstatements The summary view of unadjusted misstatements: see Figure 122. This screen provides an overview of unadjusted misstatements (only those misstatements are displayed that have the setting “No” in their “Corrected” field in the window for documenting misstatements (see the radio buttons marked with 8 in Figure 119)). The previous period’s retained earnings column displays a value only if the misstatement is related to a retained earnings account or FS entry. Audit report This screen provides first a summary of unadjusted misstatements and enables to add the information of an audit report (see Figure 139). Figure 139 © 2015 E-dok OÜ 88 Choose the type of audit report in the field marked with 1 (see Figure 139). The region marked with 2 (see Figure 139) enables to set (if applicable) whether a paragraph highlighting a fact, a paragraph of other facts or a paragraph of other requirements is added to the audit report. According to the choices made, the relevant editing buttons (pen icons) become active (see the region marked with 3 in Figure 139). By clicking on a pen, the user can change the content of the activated field. The region marked with 4 (see Figure 139) enables the user to add relevant dates and the name of the auditor issuing the audit report. Archiving On this engagement project’s sub-page, a completed engagement can be archived . It also provides the user with an overview of the engagement’s history of archiving and de-archiving and enables to download archived files if needed (see Figure 140). Figure 140 To archive an engagement, all its tasks considered relevant must be reviewed/done (locked). If even one task is not done, the engagement cannot be archived – the archiving button remains hidden. The status of an archived engagement is “Archived”; by default, archived engagements are not displayed in the engagements list and must be found by using a filter (see Figure 141). © 2015 E-dok OÜ 89 Figure 141 © 2015 E-dok OÜ 90 REPORTS Menu -> Reports This set of reports is intended for the company’s management staff, to obtain an overview of works done and to prepare internal reports for audit firm’s management purpose. To use the module, the user must have the relevant rights in the system (depending on the report type). Figure 142 The reports give the user an excerpt of the data as an MS Excel file according to the selected period and other inputs. © 2015 E-dok OÜ 91 WORK WITH FILES Introduction The software enables to add files to various objects. Files can be added to the following objects: Client (see the chapter CLIENT REGISTER, the subchapter Administration of client-related files); Engagement (see the chapter ENGAGEMENT WORK VIEW AND PROJECT MANAGEMENT TOOLS, the subchapter Engagement view - , button “Actions” (see Figure 70); Task (see the chapter PERFORMING AND DOCUMENTING AN ENGAGEMENT, the subchapter Files related to a task). Adding a file To add a file, click the button “Add new” on the relevant page of the relevant object (a client, an engagement, a task). The pop-up window for file adding opens (see Figure 143). Figure 143 File type (see the choices as radio buttons marked with 1 in Figure 143). When adding a file, you must select the type of file. The file type affects its downloading. If the file type “Ordinary file” is selected (this can be any file format), the software will not modify the file’s contents. © 2015 E-dok OÜ 92 Files of the type “Document template” can be work files with extension “.xlsx” (Microsoft Excel Workbook) or “.docx” (Microsoft Word) (MS Excel and MS Word files with extensions “.xls” and “.doc” can be used as well, but the software does not support modifying their data). Read more about document templates in the subchapter Document templates. The file type “Paper document” is used for referring to documents on paper. The software also has a maximum file upload size of 50MB. For files exceeding 50MB, reduce the file or refer to it as a “Paper document”. File name (see the field marked with 2 in Figure 143) is mandatory. If this field is empty and a file is selected (see the button “Select file” marked with 3 in Figure 143), the field is automatically filled with the filename. The name can be modified in the field. Clicking on the button “Select file” (see the button “Select file” marked with 3 in Figure 143) opens the file browser’s search window so that the intended file can be selected from the user’s computer. The button “Add/Save” (see the buttons marked with 4 in Figure 143) starts the process of uploading the file into the software’s server. Possible error messages are then displayed at the start of the popup window. Changing a file To change a file, click the link “Edit” on the entry of the file to be changed, in the list of files titled “Related files” displayed on the relevant object’s (client’s, engagement’s, task’s) page (see the blue hyperlinked word “Edit” outlined with red and marked with 1 in Figure 144). An example of the page of a client’s files: Figure 144 A pop-up window opens. The layout of the fields and the logic of data entry are similar to those for adding a file (see Figure 143). Deleting a file To delete a file, start with changing the file (see Figure 144). In the pop-up window that opens, click the button “Delete” (see the button marked with 1 in Figure 145). © 2015 E-dok OÜ 93 Figure 145 Deleted engagements / tasks can be viewed and restored. An engagement’s files Engagements-> Engagement -> Tasks -> Actions -> Engagement’s files This provides an overview of all files related to an engagement’s tasks (the module can be accessed by the engagement’s users with Level 1 and Level 2 rights only). The list of files is accessible through the “Actions” menu, by clicking on “Engagement’s files” (see Figure 146). Figure 146 The list of files opens (see Figure 147). Figure 147 © 2015 E-dok OÜ 94 Deleted files Engagements-> Engagement -> Tasks -> Actions -> Deleted files This provides an overview of all deleted files related to an engagement’s tasks (the module can be accessed by the engagement’s users with Level 1 and Level 2 rights only). The list of files is accessible through the “Actions” menu, by clicking on “Deleted files” (see Error! eference source not found.). Figure 148 To restore files, select the suitable files and click the button “Restore the selected files” (see Figure 148). The filenames of restored files get an addition of “taastatud” (“restored”) and the time of restoration (see Error! Reference source not found.). Figure 149 With archiving, the deleted files are permanently deleted and cannot be restored anymore. Document templates Introduction Document templates are pre-designed MS Word files (file extension “.docx”) or MS Excel files (file extension “.xlsx”) (the so-called “smart files”), which contain metadata added by the software (information about clients, engagements and tasks); their use can enhance the efficiency of documenting engagements. Document templates can be kept in the document templates database or added to the relevant task of an engagement template (in that case the document template can be imported into engagements when importing an engagement template or its individual task) (see the chapter SETTINGS, the subchapter Templates, Engagement templates). Document templates in MS Word format To use a document template, its file extension must be “.docx”. Variables are not added automatically to files in old format (extension “.doc”). The variables are automatically refreshed every time the file is opened in the software. To add a link to a new variable into a document, click the selection “Quick Parts” in the “INSERT” menu and then click “Field” in its submenu”: © 2015 E-dok OÜ 95 Figure 150 In the dialogue window that opens, click the selection “DocProperty” in the block “Field names”. After that, a list of all variables described in the document is displayed in the block “Field properties”. For the client’s name, select e.g. “projects__companies_name”. You can see the list of all variables and descriptions in the auditor software by navigating to Engagement -> Tasks -> Actions -> Engagement’s files -> the link Variables in the file’s row. NB! MS Word does not automatically update variables in a document when opening the document. Because of that, it is recommended to always update all variables in the document when starting working with it. To do so, press Ctrl-A on the keyboard (selecting all text in the document), right click on the selected text and select the command “Update Field” from the opening pop-up menu (the right click and the action following it can be substituted by a press of the F9 key, so the combination becomes Ctrl-A and F9). © 2015 E-dok OÜ 96 Figure 151 Document templates in MS Excel format To use a document template, its file extension must be “.xlsx”. Variables are not added automatically to files in old format (extension “.xls”). The variables are automatically refreshed every time the file is opened in the software. Variables are saved to the last four sheets in Excel files; the sheets are added automatically if necessary: “var” – data of the engagement and the task; “acc” – data of task-related accounts; “rep” – data of task-related FS entries; “chk” – data of the task’s checklist. New variables are always added to the end of the list, i.e. the positions of existing variables in the worksheet do not change, so they can be linked positionally from other worksheets. To link to a variable, the standard cross-reference functionality of MS Excel can be used, either by selecting the linked field with a mouse click or by using a formula, e.g. “=var!C28” – the field’s value is taken from the field C28 in the worksheet “var”. © 2015 E-dok OÜ 97 ONLINE / OFFLINE WORK MODES Introduction The software can also be used offline, albeit with some specifics. The online mode is the version of the software available via the subdomain e-dok.rik.ee; it can be used if there is an Internet connection. The offline mode is the version of the software installed into the user’s computer; it can be used if there is no Internet connection. This version enables users to download engagement data from the online mode (e-dok.rik.ee) and to process those data in their computer regardless of having no internet connection. The user can later use an Internet connection to synchronise the work done. There are functional limits in this mode (e.g. new clients cannot be added and new engagements cannot be created). The limitations are described in more detail in user instructions. To work in offline version, it has to be installed into the user’s computer and the engagement needed for the work must be created beforehand in the online version and then synchronised to the offline version. The offline version supports the following Windows operation systems: Windows XP (SP2); Windows Vista 32/64 bit; Windows 7 32/64 bit; Windows 8 32/64 bit. NB! Mac OS is not supported. Users of Apple Macintosh computers can use the software in offline mode in a Windows virtual machine. Installing the offline version To install the offline version, select “Offline version” in the menu (see Figure 152). Figure 152 © 2015 E-dok OÜ 98 The following view opens (see Figure 153). Click the link “Download”: Figure 153 The downloaded file container must be unpacked into a suitable folder on the hard disk, so a file list similar to the following view is displayed (see Figure 154): Figure 154 The software is launched with the file e-dok.exe; after that, the following login window opens (see Figure 155): © 2015 E-dok OÜ 99 Figure 155 NB! The user should already have a password and should also have the security certificate downloaded into his or her computer before the software is launched. Generating a user’s security certificate To use the software’s offline version, the system administrator or the organisation manager must create a security certificate for the user. To do so, open the user data changing form where the user’s security certificate data are displayed (if already generated) besides other data. Figure 156 By clicking the link “Generate new security certificate” (see the light blue link “Generate new security certificate” at the bottom of Figure 156), a new security certificate is created for the user. NB! If a security certificate has already been issued for the user, the previous certificate is revoked and the user cannot use the old certificate anymore to communicate with the server. When creating a security certificate for a user, an automatically generated password is set for the certificate and must be sent to the user (the user can change the password from the menu (via the menu selection “My settings”). The password and the security certificate’s private key that only the user can download via the menu selection “My settings” make up the pair of security measures required to use the software’s offline version. NB! The administrator can download the public part of the user’s security certificate by clicking the link “Download security certificate”, but this download does not contain the private key and thus it cannot be used for authentication to launch the offline version. © 2015 E-dok OÜ 100 Working in the offline version Working offline module is currently in Estonian language interface only (but works even if online version’s interface is in English or Russian). English and Russian versions will be ready by the end of June 2015. Thus the figures showing the functionality are in Estonian. Login takes place as described earlier: double click the file named e-dok.exe; after that, the login window opens (see Figure 155). Then choose the location of the security certificate (its file) and enter the valid user password. After this is done and the certificate and the user password are validated, the next view opens (see Figure 157): Figure 157 A red plug icon is displayed in the region marked with 1 (see Figure 157), outlined with red in the figure; this icon is a reminder that the software is in offline mode. An additional menu characteristic of the offline version is displayed in the region marked with 2 (see Figure 157). A reminder of the time of the last synchronisation is displayed in the region marked with 3 (see Figure 157), outlined with red in the figure. The synchronisation menu includes the choices “Synchronise” and “Select engagements” (see Figure 158). Figure 158 After clicking on “Select engagements”, the following dialogue window opens (see Figure 159): © 2015 E-dok OÜ 101 Figure 159 Choose the work mode most suitable for offline work: Load unlocked (Estonian: “Lae lukustamata”) o (i.e. the engagement’s other users can also modify the engagement and the latest modifications are those that get saved); Lock the entire engagement (Estonian “Lukusta terve projekt”) o (i.e. the engagement’s other users cannot modify the engagement); Lock my tasks (Estonian: “Lukusta minu ülesanded”) o (i.e. only the locker’s tasks are locked by modification restrictions for other users; the engagement’s other users cannot modify those tasks but they can change other tasks); Load for viewing (Estonian: “Lae tutvumiseks”). The menu has limited selections (“Clients”, “Engagements”, “My data”). The rest of the work is done using the ordinary menu and the usual procedures. © 2015 E-dok OÜ 102 FREQUENTLY ASKED QUESTIONS How can I link an existing file so I don’t have to upload one and the same file for several tasks? Click “Add” in the files tab of the task’s view, then “Add reference” (see Figure 160) and then select the task containing the file to be linked (see Figure 161); click the file’s name (in blue lettering) or the word “select” (in blue lettering) (see Figure 162). After that, the file is displayed in the list of files (see Figure 163). Figure 160 Figure 161 Figure 162 © 2015 E-dok OÜ 103 Figure 163 How can I link to an existing file in a task’s short view? On the task’s short view, click the pen icon to enter text. Then enter the text and if you want to link to a file then you need to know the file’s index (reference). Adding a hashtag (#) before and after the reference creates link to the file when saving (see Figure 164). Figure 164 When clicking the link, the files tab of the relevant task opens (see Figure 165). Figure 165 © 2015 E-dok OÜ 104 Is it possible to link to an existing file or its part within a document (file)? No, it is currently not possible. How can I open a task that is already locked? You can do it, but you need Level 1 or Level 2 user rights. Click the blue button “Edit” on the task’s general information view (see Figure 68) and then save again the task’s detailed view. Status changes leave traces on the task’s status page (see the chapter PERFORMING AND DOCUMENTING AN ENGAGEMENT, Changing a task’s status). How can I delete an engagement? An engagement can be deleted in the mode of changing the engagement’s general information. To start the deletion, click the button “Delete”. A pop-up window opens (see Figure 166), asking “Are you sure you want to delete?”; click “Ok” to delete the engagement. Figure 166 NB! The software allows deleting an engagement’s information only if no objects (files, risks, assertion level risk entries, tasks, etc.) are related to the engagement. Can the offline version be used without an Internet connection? Yes. But the necessary engagements should be synchronised from the online version to the offline version beforehand. They can be synchronised back later. © 2015 E-dok OÜ 105 Is it mandatory to install the offline version? No. If you prefer working with the online version and you have no need for working without an Internet connection then there is essentially no need to install the offline version in your computer. Can representatives of the Ministry of Finance, the Estonian Auditors’ Association or E-dok OÜ or any other organisation access my information? No. The software is located securely in a server of the Estonian Centre of Registries and Information Systems and the user information in it can be accessed only by that user. Confidentiality agreements have been signed with the Estonian Centre of Registries and Information Systems, the IT administrator and the software developer. I performed a review on an audit template of the Estonian Auditors’ Association. Now I need to remove the tabs “Risks” and “Assertion level risks” and save the result as a review template. This is where my knowledge ends. Can you help me? An existing engagement cannot be saved as a template. You need to design a template separately. Concerning the deletion of the “Risks” tab: it is apparently not supposed to be deleted. Risks must be analysed in a review as well, albeit to a markedly smaller extent. Having tried performing an audit with the E-dok software, the following question was encountered: “How to fulfil the requirement of ISA 315 (EE), § 26 in the risk assessment table?” The aforementioned standard requires that the auditor should “assess the misstatement’s probability” and “whether the possible misstatement is of a level of seriousness corresponding to a material misstatement”. The ISA usage manual for small and medium enterprises, volume 2, example 9.3-1 has separate columns for probability of occurrence and for impact, but the audit software lacks those columns. How is it even theoretically possible to abandon such an important requirement, or am I failing to see the picture somehow? When marking an assertion level risk (red), the risk is automatically added to the risk register on the screen “Risks”; in that register, the user can assess the risk’s impact, probability and total impact on the objective (incl. whether it is significant, whether there are any related controls, etc.) and then the risk can be related to the task where the risk will be subsequently handled (by forming and executing risk answers). © 2015 E-dok OÜ 106 REFERENCES TO IMPORTANT KEYWORDS document templates, 95 normal file, 92 paper document, or electronic file exceeding 50MB, 93 referencing, 103 referencing from text, task, 104 type, 92 A Archiving, 89 Audit report (independent auditor’s report), 88 C I Case sensitive, 9 Classificator, 15 Clients adding the client information, 25 administrative unit, 26 changing the information, 29 client list, 25 deleting, 30 file administation, 30 related contacts, 27 related engagements, 29 status, 30 view client’s information, 28 Information system administator, 9 Interface default language, 10 interface language, 12 language, 10 M Materiality determing, 60 Mode online, 98 My settings Related user accounts, 12 security certificate, 12 D Demo version log in, 9 O E Online mode log in, 9 Organisation manager, 9 Organisation manager’s user account, 9 Employee external user having permission of the audit firm (non-employee), 14 observer’s rights, 14 type, 14 Engagements account-based, 37 adding new, 31 administrative unit, 35 creating from scratch, 32 data source, 37 FS-based, 37 general overview, 31 general overview, 31 opening the new one from the archived engagement, 32 opening the new one from the engagement template, 32 task status, 31 user rights, 37 R Report data FS import, 53 FS structure, 57 import, 51 import account balances, 52 import XBRL, 54 relating to tasks, 57 Režiim offline, 98 Risk assigned to task, 24 category, 22 documentation of risk analysis, 23 export of risk templates into MS Excel, 22 import of risk template into engagement project, 22 possible impact, 24 probability, 24 related FS entry, 24 risk template, 21 F Files adding, 92 document template, 93 © 2015 E-dok OÜ 107 risk template, typical risk, 22 source reference, 23 sub-category, 22 total risk impact assessment, 24 Risks assertion level risk analysis, 62 automatically added risk(s), 66 related assertions, 64 risk analysis, 62 risk description, 64 status legends, 48 structure,, 50 structure, category, 70 task tabs, 73 task worksheet, task tab, 21 top level, 21 Template definition, 16 engagement template, 17 giving rights to the person(s) from outside of organisation, 18 Materiality templates, 16 personal code, 17 shared engagement templates, 17 S Security certificate download, 12 generating for the user, 100 private key, 100 Settings My settings, 12 U User country list, 13 personal code, 12 role, 14 role and rights in an engagement, 14 role in organisation, 14 setting the password, 13 user name, 14 User account, 9 Username, 9 case sensitive, 14 T Task actions, 50 detailed task view, 71 documending discovered misstatements, 78 documenting findings (memo points), 82 level "Top", 21 overview, 86 reference, 21 related engagement page, 73 related files, 77 related risks, 77 relating to an engangement screen page, 75 status, 72 © 2015 E-dok OÜ W Web address demo version, 9 online version, 9 108