1
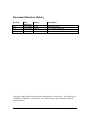
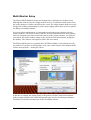
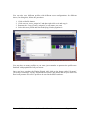
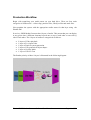
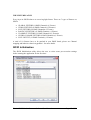
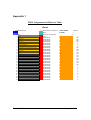
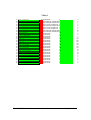
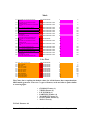
SD3D Media Generator Software User Manual Version: Draft 0.20 Table of Contents SD3D Media Generator Software....................................................................................... 1 User Manual........................................................................................................................ 1 Table of Contents ................................................................................................................ 2 Document Revision History................................................................................................ 3 Introduction to SD3D Media Generator ............................................................................. 4 System Overview ................................................................................................................ 5 Installation Requirements ................................................................................................... 6 Setup and Installation.......................................................................................................... 7 Window Names................................................................................................................... 8 Multi-Monitor Setup ........................................................................................................... 9 Digital Media Assets and Elation AM (Asset Manager) .................................................. 11 Production Workflow........................................................................................................ 16 SD3D Initialization ........................................................................................................... 17 SD3D Main Program ........................................................................................................ 18 Creating Presets in SD3D ................................................................................................. 30 Test Setup and Tutorial..................................................................................................... 31 Specifications.................................................................................................................... 33 Troubleshooting ................................................................................................................ 34 Appendix 1........................................................................................................................ 35 Glossary ............................................................................................................................ 50 Video......................................................................................................................... 50 Digital Video Formats............................................................................................... 50 Digital Still Image Formats....................................................................................... 52 Digital Data Rates..................................................................................................... 52 Index .……………………………………………………………………………………53 Elation SD3D Media Generator Software User Manual Page 2 of 53 Document Revision History Revision 0.10 0.20 Date Author mm/dd/yy 11/26/2006 Brash 12/29/2006 Elation Description Initial document Copy Edit & Additions Copyright 2006 Elation Professional Inc. and Brash Live Systems Inc. The Brash logo is a trademark of Brash Live Systems Inc. The Elation Logo is the trademark of Elation Professional Inc. Elation SD3D Media Generator Software User Manual Page 3 of 53 Introduction to SD3D Media Generator The SD3D Media Generator is a software package designed to allow generation and manipulation of video effects in a real-time environment. It can be used in several areas of application where real-time generation of video effects is required which does not typically lend itself to traditional linear-based methods. In complex live show environments, events can be very spontaneous. The visualist needs to react very quickly to changing events. The right tools are required to create seemingly unique and complex visual effects at a moments notice. The SD3D Media Generator addresses these needs by providing a system that allows the visualist to access a full complement of media attributes using the Elation Professional Series of DMX consoles. Unlike other traditional VJ software or media software packages, SD3D exposes every parameter via a DMX channel so users can take advantage of the DMX program features of the Elation Professional Show Designer series of control desks and apply them to their compositions. Elation SD3D Media Generator Software User Manual Page 4 of 53 System Overview The SD3D Media Generator System is comprised of the following components: Suite of software programs which includes the Digital Asset Manager, the SD3D Media Generator Main Program and the Configuration Utility. A Library of Digital content which includes videos, 3D objects, Particles, and Masks A DMX USB Hardware Adapter that interfaces an Elation Show Designer DMX console to the computer and a USB Cable. A USB Dongle Key which allows users to use the System on multiple machines (at any one time). The SD3D Media Generator Main Program is the run-time software that allows the user to manipulate and generate video effects under the control of the Elation Professional Show Designer series of DMX Controller Consoles. Before using the Main Program, the digital media assets need to be assigned, organized and managed using the Digital Asset Manager before they are available for use by the Main Program. The Configuration Utility is used to set up the initial operating state of the system before first use. Elation SD3D Media Generator Software User Manual Page 5 of 53 Installation Requirements MINIMUM SYSTEM REQUIREMENTS For SD3D to run properly, your computer must meet the following specifications: OPERATING SYSTEM Microsoft Windows XP Home Edition or Microsoft Windo ws XP Professional Edition PROCESSOR AMD Athlon™ 64 (Socket 939) Processors 3.0 Ghz or better OR optional AMD Athlon™ 64 X2 Dual-Core Processor OR Intel Pentium 4 - 3 Ghz or better OR Intel Duo Core or Dual Core 2 at 2.0 Ghz. 1 GHz system bus with 2000MT/s Hyper- Transport link. MEMORY Dual-channel DDR 400/333 (2) DIMM slots (1 to 2GB) MOTHERBOARD NVIDIA nForce™4 SLI recommended 1GHz (2000MT/s) HyperTransport™ enhanced System Bus (2) x1 PCI-E slot or compatible GRAPHICS NVIDIA® GeForce™ 7900 GT or later model AUDIO Stereo output STORAGE Serial ATA 150 minimum storage recommended 100 Gb You MUST have Windows XP (or XP derivatives – Home or Media Center) or better to run the Elation SD3D System. Elation SD3D Media Generator Software User Manual Page 6 of 53 Setup and Installation PACKAGE CONTENTS 1. 2. 3. 4. 5. (1) Installation / Content Library CD (1) USB Security Dongle (1) DMX-USB Interface (1) USB Cable (1) User Manual INSTALLATION PROCEDURE 1. Insert the Installation CD in your CD drive. To install the SD3D Software, go to the CD drive and double-click the file “Installation CD”. Follow the steps on the installation process. DO NOT change the default installation directory to anything other then C:\Elation. 2. Insert your USB security dongle into one of your USB ports. When Windows XP ask for drivers select the drivers from the location: C:\Elation\ElationSecurity\XP_2K_9X 3. Connect the DMX-USB Interface using the USB cable, and when prompted for drivers, find the drivers in the installation CD folder: “DMX INTERFACE DRIVER”. TIP: Copy this folder into your computer so whenever you connect your DMX interface into a different USB port, you won’t require the Installation CD. 4. Copy all the “Content Library” files and folders from the CD into one of the drives in your computer. These are the media files that are included with the software. You may add your personal files as well. We recommend you organize and categorize the media into separate folders. This makes it easier in the future to search for media content in a show environment. 5. Connect the Elation Professional Show Designer Intelligent DMX Console to the DMX-USB interface using a 3-pin DMX Cable (not included). . Elation SD3D Media Generator Software User Manual Page 7 of 53 Once the installation has been finalized, you will find two new icons on your desktop: “ELATION SD3D” and “ELATION AM”. To test the setup, we recommend you start by adding a minimum number of media assets to the system using the Elation AM software. Window Names There are two primary (floating) windows in the Elation AM system. The “Main” window is the window that displays the various layers in a tab dialog format. The “Preview” window is a Windows Media Player that is used to preview video clips and some digital stills. There are several (floating) windows in the Elation SD3D Media Generator Main Program system. The “Render” window is the output window that displays the final video output of the generated visual effects. This is the window that is generally connected to the external projection system during a show performance. The “Control” window or main GUI is the main control interface. It is the user interface from which to control the behavior of the SD3D. The “Virtual Console” window is the virtual DMX console window. It is a window that is activated by pressing the icon. This window can be moved around anywhere on the desktop. The “Operating Graphical Modes” window is used to set the window sizes and positions of the windows for different monitor and operating modes. The “Watch Parameters” window is used to provide the descriptions for the DMX/Virtual Console channels for each individual layer. Elation SD3D Media Generator Software User Manual Page 8 of 53 Multi-Monitor Setup The Elation SD3D Media Generator was designed for a minimum two monitor setup. Although the software runs in a single monitor mode, it is somewhat cumbersome to use due to the number of windows that fill up the screen. The single monitor mode was really designed for offline programming of scenes using a laptop where there are fewer options for adding a secondary monitor. In a two monitor configuration, it is important to assign the proper monitor to be the primary monitor. The reason for this is that the 3D acceleration built-in to most graphics cards are designed to provide accelerated features on the primary monitor. As a general convention, the render window (output video) will be the left-most monitor assigned to the desktop. The software is designed to follow this convention. The Elation SD3D software is optimized for NVIDIA Graphics Cards with built-in 3D acceleration. If you have an ATI graphics card, some of the features of the Elation SD3D will not work properly – namely the videos. In the above example, the laptop display is the primary monitor which means that the render window should reside within the laptop display area for maximum performance. The Main GUI window should reside on the Secondary monitor. Elation SD3D Media Generator Software User Manual Page 9 of 53 In a show situation, this is not a practical setup because the primary monitor should be the external monitor (and it should also be the monitor located on the left side) so that it can be connected to the external projector. The laptop display should be the secondary display. Unfortunately, many laptops cannot be configured in a way that it is optimal for show use. However, they are great for offsite programming. Some laptops can be configured in a way that they can be used for live show performances. We will be test a range of laptops and qualify them for use in live show applications. We will release documentation as we proceed with the qualification process. Elation SD3D Media Generator Software User Manual Page 10 of 53 Digital Media Assets and Elation AM (Asset Manager) Media files and clips are the foundation for your work in the SD3D Media Generator System. Media files are the raw materials you use to create your final real-time rendered visual effects. Media files on your hard drive are not automatically useable by the SD3D system. They need to be imported to the layer that you want to have them available in the Main Program. This is accomplished using the Elation AM (Asset Manager). ASSET MANAGER PROFILES Typically, you create a profile for each show you plan to work on. A profile is like a project – it defines the media assets for each of the layers you plan to use for the show. The file for the default profile is asset_assign.ini. The Elation AM program always defaults to this when it starts up. Your shows should be based on the default profile. To create a new profile, go to ”Profile” in “Profile Mngmt” on the upper left quadrant of the Elation AM screen. Elation SD3D Media Generator Software User Manual Page 11 of 53 You can also save different profiles with different asset configurations for different shows, for doing this, follow the procedure: 1. 2. 3. 4. Click on Profile button. Click once on “asset_assign.ini” and then right click on it and copy it. Rename the “Copy of asset_assign.ini” to any name you want Select this new profile and start modifying it and repopulate it. You may have as many profiles as you want, just remember to promote the profile once finalized with population of all your assets. Once you have populate the Elation Digital AM, click on the button called “Promote” you will get a message saying “Promotion Successful” this means that all your asset files have been promote it as active profile to be used in the SD3D software. Elation SD3D Media Generator Software User Manual Page 12 of 53 CREATING MEDIA ASSETS Media assets are created from different sources. The SD3D System relies mostly on other Media creation software or capture devices to provide the raw media assets. Graphical files (png, tga, jpg, bmp and pcx) can be created using a good graphics editor like Adobe Photoshop, Paintshop Pro or Microsoft Paint. 3D objects can be created using 3D Studio Max, Lightwave 3D or TrueSpace. Video files are created using a variety of video capture devices such as video cameras. Libraries of videos can be purchased through publishers of custom video content. The Elation SD3D System can import a variety of industry standard media asset formats. IMPORTING ASSETS INTO SYSTEM Every tab in the top represents every layer, and the correspondent type of files associated with it. In the first tab you have Video1 which is the first layer. By clicking on “Retrieve Video Asset” button, you can browse your computer and find any video files that you may want SD3D to playback. You can also click on “Search Video Asset” to find specific files containing part of the filename. There is also an optional search for text within files for those files with embedded text descriptions. Some video files have text descriptions embedded in files. Elation SD3D Media Generator Software User Manual Page 13 of 53 The supported file formats for video are: .avi, .mpeg, .mpg, .mov and .wmv . You may add as many files as you want per layer to a theoretical maximum of 65536 files per layer. The types of files associated per layer are; VIDEO LAYER: .avi, .mpeg, .mpg, .mov and .wmv . LIVE LAYER: N/A PARTICLE LAYER: .png, .tga, jpg, .bmp, .pcx, .avi (cinepack codec only) 3D OBJECT: .3DS, .X and .NMO TEXTURES: .png, .tga, jpg, .bmp, .pcx, .avi (cinepack codec only) OVERLAY MASK: .png, .tga, jpg, .bmp, .pcx Elation SD3D Media Generator Software User Manual Page 14 of 53 PREVIEWING IMPORTED ASSETS You can play or view the imported assets by selecting the thumbnail and hitting the “view” button. Or you can double-click the thumbnail. INSERTING AND DELETING IMPORTED ASSETS You can insert new assets into an existing asset palette by selecting the thumbnail previous to the insertion point. If you wish to append new assets to the end, select the last thumbnail. Selecting the thumbnail is just a matter of left-clicking the mouse over the thumbnail. You can also delete a single asset by selecting the thumbnail of asset and hitting the “Delete” button. If you wish to delete more than one asset, use the Windows convention for selection multiple assets (CTRL+left mouse click or SHIFT+left mouse click) and then press the “Delete” button. Elation SD3D Media Generator Software User Manual Page 15 of 53 Production Workflow Begin with organizing your media assets on your hard drive. There are four main categories of media assets – videos clips, particles files, 3D object files and mask files. Next populate the system with the appropriate media assets for that layer using the Elation AM. In review, SD3D Media Generator has 9 layers of media. This means that you can display at any given time 9 different elements layered one on top of each other or one side by side of each other. The 9 layers of media are categorized as follows: 2 layers of Video playback 1 layer of Live input video 1 layer of Particle system generation 3 layers of 3D geometrical object shapes 1 layer of Overlay Mask 1 Layer of 3D live Text The Render priority of these 9 layers is illustrated in the following diagram: Elation SD3D Media Generator Software User Manual Page 16 of 53 THE FIXTURE PATCH Every layer in SD3D behaves as a moving light fixture. There are 7 types of fixtures on SD3D: GLOBAL FIXTURE (8 DMX Channels) (1 Fixture) VIDEO FIXTURE (30 DMX Channels) (2 Fixtures) LIVE FIXTURE (24 DMX Channels) (1 Fixture) PARTICLE FIXTURE (25 DMX Channels) (1 Fixture) 3D OBJECT FIXTURE (32 DMX Channels) (3 Fixtures) OVERLAY MASK FIXTURE (9 DMX Channels) (1 Fixture) LIVE 3D TEXT (12 DMX Channels) (1 Fixture) A total of 10 fixtures have to be patched in your DMX board, please see Channel mapping and behavior chart in Appendix 1 for more details. SD3D Initialization The SD3D Initialization utility allows the user to select some pre-execution settings before starting the application for the first time Elation SD3D Media Generator Software User Manual Page 17 of 53 These settings refer to the screen size and resolution and multiple screen setup, DMX hardware used as DMX interface and the configuration for triggering internal scenes with DMX channels. You must run this application before running SD3D for the first time. SD3D Main Program The Elation SD3D Media Generator is the main operating software for manipulating and rendering visual effects in real-time. This program is started by double-clicking the Elation SD3D Icon on the desktop. When started, two windows will appear on the screen as follows: The main GUI screen is the control screen. Elation SD3D Media Generator Software User Manual Page 18 of 53 Visual effects are generated to the Render Window. The default Render Window size and the placement of windows, in general, are determined when you first configured the SD3D System using the Elation SD3D Initialization utility. UNDERSTANDING THE INTERFACE: Elation SD3D Media Generator Software User Manual Page 19 of 53 SCREEN AREAS: The SD3D software is divided into 4 main areas. The SD3D Toolbar located across the top allows users to access the secondary functions available on the system. These functions include the following: Video Configuration DMX Configuration Virtual DMX Console Selecting Operating Graphics Mode Attribute Description Viewer Asset Sync Windows Position Save Refresh Render Window CHANNEL A OUTPUT The upper-right area is the “Channel A Output” area. This area encloses several options that are related to the Channel A video output. The main feature of this area is the Media Asset Palette. The thumbnail content of the palette represents the current media assets available for use in the selected layer. The contents of the palette changes according to the current operating layer selected. To select or change the current operating layer, use the drop down combo box located above palette window. Changing the current operating layer in the drop down box on the Virtual Console screen also affects the Media Asset Palette. The “Blackout ON/Off” button toggles between Video ON and Video OFF. The “SAVE as” button saves the current Visual Effect as a Preset. A file dialog will appear on the screen. You can enter any file name you want with a “.sef” file extension. The Visual Effect Preset represented as a thumbnail will appear in the Effects Preset screen area. The “3DText” button opens a dialog that allows the user to enter text. Use the “Text1” to output to “Channel A” Video Channel. Text2 is for future use to “Channel B”. IMAGE VIEWER Located on the upper-left area of the main SD3D GUI is the “Image Viewer” area. This is basically a magnified view of the selected thumbnail in the Media Asset Palette. Elation SD3D Media Generator Software User Manual Page 20 of 53 EFFECTS PRESETS Located on the lower area of the main SD3D GUI is the “Effects Presets” area. This area shows through thumbnails, the user defined Video Presets. The “View” button executes the selected Preset. To select, click the thumbnail you want to execute. You can also double-click the thumbnail to execute the preset. The “Delete” button deletes the Preset from the Preset palette. THE ICONS IN THE TOP (TOOLBAR): Virtual Console: Allows the user to interact with SD3D via virtual faders, or to monitor DMX activity in the channels. Layer Description: Shows every layer and its attributes per channel. DMX configuration: Allows the user to set up the DMX map channels and customize it. DO NOT change the dmx mapping unless you are qualified to do so. In the future, there will be a published document on how to re-map the DMX channel assignment to allow for customized virtual and physical consoles. Render Screen Recall: If the render screen window has been closed, this button recalls the screen. Screen Configuration: Allows the user to select the screen configuration and render output resolution. Save GUI configuration: Allows the user to save the current window configuration and window positioning on the screen. Elation SD3D Media Generator Software User Manual Page 21 of 53 Re-synchronize assets: Allows the user to update the database of assets that has been added and promoted in the Digital Asset Manager. If both the Elation AM and SD3D software are running simultaneously, it is possible to modify the media assets of each layer and have them updated in SD3D by pressing this button. If media assets have been updated to replace other assets, the Presets or the scrolling position of the assets within the layer may change. i.e. if asset 5 has changed, scrolling to position value 5 will no longer display replaced asset 5. Objects DO NOT get updated using resynchronize assets, they will be synchronized the next time you run the application. Screen output configuration: Future Development “3D TEXT” BUTTON: allows the user to access the dialogue box to broadcast a 3D text message on the screen. (Please note that Intensity on Fixture Live Text has to be full on for this to work) “SAVE AS” BUTTON: Allows the user to save internally presets effects that can be recall by simply double click on their thumbnail, or click once and then click on “view” button. “BLACK OUT” BUTTON: Allows the user to black out the scene and stop output momentarily. Elation SD3D Media Generator Software User Manual Page 22 of 53 DOCK and FLOATING WINDOWS Most of the windows in the system are floating or docked (but can be floated) windows. Sometimes this can be a problem when your screen real estate is small and the floating windows end up behind each other. The system has been designed to work with many screen options which can span from one to up to three screens. There are many combinations of screen configurations that the user can set the system to operate under. Unfortunately, this means it is easy to get some windows behind other windows. They basically disappear and unless you know the Windows XP system well, it may be difficult to get back to a point where you have full access to all the operating windows within your screen real estate. If you ever get into a situation where you have a full screen render window covering the whole of your single screen, it may appear that the computer has crashed. Try pressing Alt-F4 on your keyboard. This will close the render window. You can then re-arrange or move your main GUI to another location or change the size of the render window to accommodate your screen real estate. You can recall your render screen by pressing the icon. VIRTUAL CONSOLE The Virtual Console which is invoked by pressing the icon on the tool bar. The Virtual Console allows the user to interact with SD3D via virtual faders or to monitor DMX activity in the channels. The Virtual Console is designed to reflect the fader functionality of the attached Elation Show Designer Intelligent DMX Console. If you are using the software on a laptop away from the Elation Console you can use the system and program presets using the Virtual Console. The drop down combo box located on the top of the Virtual Console window allows you to change the current working media asset layer. The fader functionality and/or their DMX channel views will change according to the layer selected. For layers with media asset content, the Media Asset Palette Window and Media Asset Viewer will change accordingly to reflect the layer you are currently operating on. As you scroll through the media content of the working layer, the Media Asset Viewer will reflect the asset selection. Elation SD3D Media Generator Software User Manual Page 23 of 53 CREATING VISUAL EFFECTS Creating complex visual effects is achieved through manipulating each of the nine (9) media asset layers. The best way to learn how to create effects is to play with the attributes of each layer as they are applied to the media assets and observe the outcome. Through experience, you will be able to create the desired effect quickly and cued to the show performance you are at. LAYER CONTROL Master (Global) Layer: The 12 Channels of Master layer. 1 and 2: MAPPED TO NULL: These two channels are for further development. 3, 4 and 5: RED, GREEN and BLUE: These are the master RGB that affects the 3D Scene and the tint of the 3D lighting on the 3D objects. 6, 7 and 8: RED, GREEN and BLUE in the BACKGROUND: These channels control the tint on the background environment. 9 and 10: LIGHTS: These are 3D lights that affect the 3D environment. You can see the effect that these produce on the 3D entities such as 3D objects. 11 and 12: Field of View (FOV): This works as a zoom in or zoom out camera action, but it changes the optical lens that the virtual camera is using in the scene. Video Layer: This applies to both Video 1 and Video 2 layers. The 30 attributes or called parameters of the Video Layer fixture behave in the following way: 1: INTENSITY: Controls the Intensity of the video layer, 0=100% transparent (invisible) , 255=100% Solid (fully visible) please note that Intensity doesn’t start or load the video, video can be running even if the intensity is at full or cannot be running even if the intensity is at 255 or 100%. 2 and 3: FILE COARSE AND FINE: Controls the file location correspondent to the location assign in the Digital Asset Manager. The combination of these 2 DMX channels generates the position. i.e. File# 586 would be in File Coarse= 3, File Fine= 74. File # 30 would be in File Coarse=0, File Fine=30. 4: FILE GO: This channel controls the play or stop of the video clip. When is beyond 50% it plays the file that has been selected when is below 50% it stops the playback of the video. NOTE: for efficiency purposes make sure that in any cue that you are not using Elation SD3D Media Generator Software User Manual Page 24 of 53 the video layer, your “File Go” channel is below 50% or at 0. Remember that even if the Intensity is at 0% video can still be playing on the background. 5: AUDIO GAIN: This channel controls the gain of the audio in the video file if the Video file has audio associated with it. 6 and 7: VIDEO IN/OUT: Controls the position of the video for start and end. Values 0 to 255 will control the starting and end point and will loop the video between those two positions. 8: VIDEO SPEED: The values 0 to 255 controls the speed of the video, where 64 or 25% correspond as the native speed of the video clip played and 255 corresponds 4 times the native speed of the video clip while value=0 pause the video. 9: FX1: This channel creates 4 different effects on the video. They are selected by reaching range values as 0 to 25%, 26 to 50%, 51 to 75%, 76 to 100%. 10: FX2: Corresponds to Mosaic effect where the image multiplies on the screen. 11, 12 and 13: CHROMA DELT, HUE AND LUMINANCE: These channels control the amount of “Chroma” key applied to the video layer and if applied will overwrite the FX1 channel. 14, 15 and 16: RED, GREEN AND BLUE: This 3 channels change the Tint of the video layer with RGB parameters. 17, 18, 19 and 20: POSITION X and POSITION Y: These channels control the position of the video layer in the scene. The center is defined by values of 128 in each of these channels; please note that these channels are 16bit DMX channels which means that the combination of channel 17 and 18 actually produce the position X, while 19 and 20 produce position Y, so this allows the user to have 65536 units of positioning in every axis. 21, 22, 23 and 24: SCALE X and SCALE Y: These channels control the size of the video. They work in a similar way as the positioning with consequently coarse and fine channels, which means 16bit DMX. 25,26, 27,28, 29 and 30: ROTATION X,Y and Z: These channels control the rotation in every access of the video plane allowing changes on the perspective. Elation SD3D Media Generator Software User Manual Page 25 of 53 Live Layer: This applies to Layer 3 which is the “Live” layer. The 24 attributes or called parameters of the Live Layer fixture behave in the following way: 1: INTENSITY: Controls the Intensity of the Live layer, 0=100% transparent (invisible) , 255=100% Solid (fully visible) please note that Intensity doesn’t start or load the video, video can be running even if the intensity is at full or cannot be running even if the intensity is at 255 or 100%. 2: INPUT SELECTOR: Selects camera to stream. 3: FX1: This channel creates 4 different effects on the Live Video, they are selected by reaching range values as 0 to 25%, 26 to 50%, 51 to 75%, 76 to 100%. 4: FX2: Corresponds to Mosaic effect where the image multiplies on the screen. 5, 6 and 7: CHROMA DELT, HUE AND LUMINANCE: These channels control the amount of “Chroma” key applied to the video layer and if applied will overwrite the FX1 channel. 8, 9 and 10: RED, GREEN AND BLUE: This 3 channels change the Tint of the video layer with RGB parameters. 11, 12, 13 and 24: POSITION X and POSITION Y: These channels control the position of the video layer in the scene. The center is defined by values of 128 in each of these channels; please note that these channels are 16bit DMX channels which means that the combination of channel 17 and 18 actually produce the position X, while 19 and 20 produce position Y, so this allows the user to have 65536 units of positioning in every axis. 15, 16, 17 and 18: SCALE X and SCALE Y: These channels control the size of the video. They work in a similar way as the positioning with consequently coarse and fine channels, which means 16bit DMX. 19, 20, 21, 22, 23 and 24: ROTATION X, Y and Z: These channels control the rotation in every access of the video plane allowing changes on the perspective. Particle Layer: This applies to Particle Layer 1. The 30 attributes or called parameters of the Particle Layer fixture behave in the following way: 1: INTENSITY: Controls the Intensity of the video layer, 0=100% transparent (invisible) , 255=100% Solid (fully visible) please note that Intensity doesn’t start or load the video, video can be running even if the intensity is at full or cannot be running even if the intensity is at 255 or 100%. Elation SD3D Media Generator Software User Manual Page 26 of 53 2 and 3: FILE COARSE AND FINE: Controls the file location correspondent to the location assign in the Digital Asset Manager. The combination of these 2 DMX channels generates the position. i.e. File# 586 would be in File Coarse= 3, File Fine= 74. File # 30 would be in File Coarse=0, File Fine=30. 4: PARTICLE MODE: Determine what type of particle generation will be used. There are 4 types of particle modes, and they are separated every 25% in the value of this channel. 5: PARTICLE SPEED: Speed of the particle. 6: ANGULAR SPEED: Speed of rotation of the particle in its own axis 7: PARTICLE LIFE TIME: Determine the life of the particle. It the particle is a video clip it also affects the speed of the video clip. The short is the life time the faster the video would play. Video format accepted is .avi cinepack codec. 8: PARTICLE GRAVITY: Affects gravity on the particle making it float or drop. Value at 50% Gravity is at 0 which means will just stay weightless. 9: SCALE INITIAL: Sets the initial size of the particle sprite when it’s generated 10: SCALE END: Sets the end size of the particle when it dies. 11,12, and 13: RED GREEN AND BLUE INITIAL: Sets the initial color of the particle sprite when it’s generated 14, 15, 16: RED GREEN AND BLUE END: Sets the end color of the particle when it dies. 17, 18, 19: POSITION X, Y and Z: Positions the particle generator in 3D space. 20, 21, 22: SCALE X, Y and Z: Scales the Particle generator in 3D space. 23, 24, 25: ROTATE X, Y and Z: Rotates the particle generator in 3D space. 3D Object Layer: This applies to layers Object 1, Object 2 and Object 3. The 32 attributes or called parameters of the Object Layer fixture behave in the following way: 1: INTENSITY: Controls the level of transparency of the 3D object. If you have a transparency layer in your textures depending on your levels of intensity these transparency properties will become more noticeable. 2: 3D Entity Selector: Browses through the 3D files that you may have loaded in the Asset Manager. These files could be .3DS, .X or .NMO 3, 4, 5 and 6: TEXTURE 1 and TEXTURE 2 Coarse and Fine: These are the two layers of textures that the 3D entity has. While the first texture layer applies skin to the object, the second layer applies bump mapping and transparency. 7, 8 and 9: RED, GREEN AND BLUE: Controls the tint on the 3D shape. And the tint of the texture mapped around it. 10: ANIMATION STEP: If the 3D object has a morph animation, this channel allows you to go through the steps of the animation and select a particular stage of that animation. Elation SD3D Media Generator Software User Manual Page 27 of 53 11: ANIMATION SPEED: If the 3D Object has a morph animation, this channel allows the user to control the speed the animation. 0=paused, 255=400% speed. 12, 13 and 14: AUTO ROTATE: This function allows the user to put an autorotation into the 3D object. It can rotate in both senses and any axis. 15, 16, 17, 18, 19, 20: POSITION X, Y AND Z (COARSE AND FINE): Positions the 3D Object in the 3D space. Center is exactly at 50% of the channels values. Please note these are 16bit DMX channels. 21, 22, 23, 24, 25, 26: SCALE X, Y AND Z (COARSE AND FINE): Scale the 3D Object in the 3D space. Natural Size is exactly at 25% of the channels values. Please note these are 16bit DMX channels. 26, 27, 28, 29, 30, 31, 32: ROTATE X, Y, and Z (COARSE AND FINE): Set the orientation of the 3D Object in the 3D space. Native Orientation is exactly at 0% of the channels values. Please note these are 16bit DMX channels. Mask Layer: This applies to Mask Layer. The 30 attributes or called parameters of the Mask Layer fixture behave in the following way: 1: INTENSITY: Controls the Intensity of the video layer, 0=100% transparent (invisible) , 255=100% Solid (fully visible) please note that Intensity doesn’t start or load the video, video can be running even if the intensity is at full or cannot be running even if the intensity is at 255 or 100%. 2 and 3: FILE COARSE AND FINE: Controls the file location correspondent to the location assign in the Digital Asset Manager. The combination of these 2 DMX channels generates the position. i.e. File# 586 would be in File Coarse= 3, File Fine= 74. File # 30 would be in File Coarse=0, File Fine=30. 4,5, 6 and 7: POSITION X and Y COARSE AND FINE: Positions the Overlay Mask in 2D space. These are 16 bit DMX channels. 8: SCROLLING: Controls the speed of the scrolling and sense. 9: VERTICAL OR HORIZONTAL: Determines if the scrolling is vertical or horizontal. Text Layer: This applies to the Text Layer. The 30 attributes or called parameters of the Video Layer fixture behave in the following way: 1: INTENSITY: Controls the Intensity of the video layer, 0=100% transparent (invisible) , 255=100% Solid (fully visible) please note that Intensity doesn’t start or load the video, video can be running even if the intensity is at full or cannot be running even if the intensity is at 255 or 100%. Elation SD3D Media Generator Software User Manual Page 28 of 53 2 and 3: FILE COARSE AND FINE: Controls the file location correspondent to the location assign in the Digital Asset Manager. The combination of these 2 DMX channels generates the position. i.e. File# 586 would be in File Coarse= 3, File Fine= 74. File # 30 would be in File Coarse=0, File Fine=30. 4, 5 and 6: RED, GREN AND BLUE: Controls the tint on the 3D shape. And the tint of the texture mapped around it. 7, 8 and 9: Scale X, Y and Z: Scales the text in these 3 axis. Please note that these channels are 8 bit DMX resolution. 10, 11 and 12: AUTO ROTATE: This function allows the user to put an autorotation into the 3D text. It can rotate in both senses and any axis. SETTING UP CAMERA FOR LIVE VIDEO: You may have up to 8 cameras connected to your equipment. This could be through a capture device, or USB cameras, or fire wire. Please make sure that the device is being recognized by windows system first. When using with SD3D, no other software or programs can be using the cameras or the capture devices. To select the camera you want to use, use camera selector channel. The selection is made by percentages. Each camera is located in threshold of 12.5% each Elation SD3D Media Generator Software User Manual Page 29 of 53 Creating Presets in SD3D 1. Make sure you have populated and promoted your assets in all different layers in your Digital Asset Manager. 2. Once you have put all your assets in the Digital Asset Manager, open the SD3D software, it will take some time to load so please wait until you get the message on screen that says “System Ready” 3. Once the software is fully running, please click on Virtual Console Icon. 4. If you are not using a DMX controller you may use the virtual console that SD3D has. The software loads with the defaults values. 5. Select Video 1 Layer then select the desired video that you want to play by moving the File Coarse and Fine channels. The Coarse and Fine channels work as a combination of both channels to allocate a maximum of 65536 files or 256 virtual locations of 256 sub-locations each. i.e. to select video file =1 (File Coarse=0, File Fine=0) or to select video file =257 (File Coarse=1, File Fine=0) and so on... 6. Once selected the video that you want to play, please move File Go channel beyond 50% this will automatically make the video layer playback that file. 7. You may add more layers or effects just by selecting them and going through the procedure of adjust the parameters. Once you have created your look, click on the button “SAVE AS” and save your preset. A thumbnail will be generated and a message saying that Preset has been saved will pop up on the screen. 8. You can save as unlimited presets as possible and recall them by either double click or click once and then the “view” button. Elation SD3D Media Generator Software User Manual Page 30 of 53 Test Setup and Tutorial Just to get better acquainted with and at the same time test the functionality of the system, we will walk through the process of installing software, importing media assets into the system and then rendering video effects in real-time. 1. Install System by executing SD3DInstall from the CD Installation Disk. 2. Install Library Of Media Content. 3. Connect DMX console to DMX-USB adapter. Connect DMX-USB adapter to computer. 4. Install drivers as requested by Windows XP. 5. Plug in USB Key. Install drivers as requested by Windows XP. Directory of drivers is in c:\Elation\ElationSecurity. 6. Start Elation AM (Digital Asset Manager). 7. Create a custom profile from the default profile by using “Profile” button in the “Profile Mngmt” area. 8. Populate each layer with minimum media content. Let’s say 4 items per layer. So do 7 layers (Video 1, Video 2, Particle 1, Object 1, Object 2, Object 3 and Mask). And apply 4 textures to Text1 and 4 textures to Text2 for each of the 3 Object layers) 9. Promote the profile so the SD3D system can use your custom profile. 10. At this time you can close your Elation AM software if you want. You can also minimize it and come back to it to add more medias assets later on. 11. Open the main SD3D software by double-clicking on Elation SD3D. The boot up time can take up to one minute. 12. It is a wise move to set the startup render mode as the first Preset by going to “SAVE as” button and saving this as “default.sef”. 13. If you have an Elation Show Designer DMX console, configure it to match the channel attributes of the SD3D system. Elation SD3D Media Generator Software User Manual Page 31 of 53 14. Check to see if the SD3D is receiving DMX data from the console by playing with channels 6, 7 and 8 of the Master Layer. Sliding channel 8 for Master Layer of the Elation Show Designer to 255 should change the Render Screen red. If it does not, make sure all the connections between the console and computer are secure. Ensure the DMX console is programmed according to the DMX assignment as described in Appendix 1. If the connections are correct, the faders on the Virtual Console should move in unison with the faders you are moving on the Elation Show Designer. 15. The Video Output Media Asset Palette should have the 4 thumbnails you defined in the Elation AM. If they do not appear, perhaps you forgot to promote the media assets. 16. Go to either the Virtual Console or Elation Show Designer Console and navigate to Video 1 Layer. Move channel 1 (intensity) to value 255. Move channel 4 (file go) to value 255. Move channel 3 (file fine select) to value 1. You should be able to see video asset 1 on the render window. Move channel 1 (intensity) back to 0. 17. Go through all the other 7 layers - Video 2, Live Camera (only if connected), Particle 1, Object 1, Object 2, Object 3, Mask and Text. The layers other than Video only require the intensity to be increased to make them visible. Experiment with the other parameters to see how they affect the video output. 18. Try to save some visual effects as Presets. And recalling them. 19. Have Fun! Elation SD3D Media Generator Software User Manual Page 32 of 53 Specifications Supported Operating System: Windows XP, Windows XP Media Edition or Windows XP Home Number of Media Asset Layers : 9 Media Layers: 2 Video, 1 Live, 1 Particle, 3 3D Object, 1 Mask and 1 Text. Graphical File Formats Supported: png, tga, jpg and bmp Video Formats Supported: avi, mpeg1, mpeg2, mpeg4, mov and wmv. 3D Object File Formats: 3DS, X and NMO Video Effects: Luminance, Chromakey, RGB, X,Y,Z translation, XYZ Rotation, Mosaic Supported DMX Consoles: Elation Show Designer1, 2CF and 3 Number of DMX Channels: 0 to 450 Number of DMX Universes needed: 1 Elation SD3D Media Generator Software User Manual Page 33 of 53 Troubleshooting DMX INIT ERROR- Drivers for DMX-USB adapter not installed. NOT RECEIVING DMX DATA- Check cable between Elation Show Designer DMX console and the DMX-USB adapter. Check cable between DMX-USB adapter and computer. PREVIEWING IMPORTED ASSET DOES NOT WORK- System does not support file format if some assets can be previewed, whist others can’t. If none can be previewed, be sure you have Microsoft Windows Media Player 10 for Windows XP. ALL LAYERS HAVE SAME BEHAVIOR- This is caused by the application NOT installed into the default directory. 3D OBJECTS, MASKS AND PARTICLES APPEAR ON RENDER WINDOW, BUT VIDEOS DO NOT- Make sure you have an NVIDIA graphics card. Elation SD3D Media Generator Software User Manual Page 34 of 53 Appendix 1 DMX Assignment and Behavior Table Global DMX DESCRIPTION CH -1 0 NULL 1 NULL 2 MASTER 3 R GLOBAL 4 G GLOBAL 5 B GLOBAL 6 R BACKGROUND 7 G BACKGROUND 8 B BACKGROUND 9 BACKGROUND LIGHT SELECTOR 10 FOREGROUND LIGHT SELECTOR 2 11 FOV course 12 FOV fine 13 NULL 14 NULL 15 NULL 16 NULL 17 NULL 18 NULL 19 NULL 20 NULL 21 NULL 22 NULL 23 NULL 24 NULL 25 NULL 26 NULL 27 NULL 28 NULL 29 NULL 30 NULL DMX CHA NNEL 1 2 3 4 5 6 7 8 9 10 11 12 13 14 15 16 17 18 19 20 21 22 23 24 25 26 27 28 29 30 31 BEHAVIOR IN A CONTROL DESK DMX CHANNEL FIXTURE MAPPED TO NOTHING NULL CROSSFADE CROSSFADE CROSSFADE CROSSFADE CROSSFADE CROSSFADE CROSSFADE CROSSFADE CROSSFADE CROSSFADE CROSSFADE CROSSFADE CROSSFADE CROSSFADE CROSSFADE CROSSFADE CROSSFADE CROSSFADE CROSSFADE CROSSFADE CROSSFADE CROSSFADE CROSSFADE CROSSFADE CROSSFADE CROSSFADE CROSSFADE CROSSFADE CROSSFADE 1 2 3 4 5 6 7 8 9 10 11 12 13 14 15 16 17 18 19 20 21 22 23 24 25 26 27 28 29 30 Elation SD3D Media Generator Software User Manual DEFAUL T 0 0 255 255 255 255 0 0 0 255 255 128 128 128 128 128 128 128 128 128 128 0 0 0 0 0 0 0 0 0 0 Page 35 of 53 Video 1 31 VIDEO 1 INTENSITY 32 VIDEO 1 FILE COARSE 33 VIDEO 1 FILE FINE 34 VIDEO 1 FILE GO 35 VIDEO 1 PRELOAD 36 VIDEO 1 IN 37 VIDEO 1 OUT 38 VIDEO 1 SPEED 39 VIDEO 1 EFFECT 1 40 VIDEO 1 EFFECT 2 41 VIDEO 1 CHROMA DELTA 42 VIDEO 1 CHROMA HSL 43 VIDEO 1 CHROMA LUMINANCE 44 VIDEO 1 R 45 VIDEO 1 G 46 VIDEO 1 B 47 VIDEO1 X POS COARSE 48 VIDEO 1 X POS FINE 49 VIDEO 1 Y POS COARSE 50 VIDEO 1 Y POS FINE 51 VIDEO 1 X SCALE COARSE 52 VIDEO 1 X SCALE FINE 53 VIDEO 1 Y SCALE COARSE 54 VIDEO 1 Y SCALE FINE 55 VIDEO 1 X ROT COARSE 56 VIDEO 1 X ROT FINE 57 VIDEO 1 Y ROT COARSE 58 VIDEO 1 Y ROT FINE 59 VIDEO 1 Z ROT COARSE 60 VIDEO 1 Z ROT FINE 32 33 34 35 36 37 38 39 40 41 42 43 44 45 46 47 48 49 50 51 52 53 54 55 56 57 58 59 60 61 CROSSFADE SNAP BEFORE CROSSFADE SNAP BEFORE CROSSFADE SNAP AFTER CROSSFADE SNAP BEFORE CROSSFADE SNAP AFTER CROSSFADE SNAP AFTER CROSSFADE SNAP BEFORE CROSSFADE SNAP BEFORE CROSSFADE CROSSFADE CROSSFADE CROSSFADE CROSSFADE CROSSFADE CROSSFADE CROSSFADE CROSSFADE CROSSFADE CROSSFADE CROSSFADE CROSSFADE CROSSFADE CROSSFADE CROSSFADE CROSSFADE CROSSFADE CROSSFADE CROSSFADE CROSSFADE CROSSFADE Elation SD3D Media Generator Software User Manual 1 2 3 4 5 6 7 8 9 10 11 12 13 14 15 16 17 18 19 20 21 22 23 24 25 26 27 28 29 30 0 0 0 0 0 0 0 64 0 0 0 0 0 255 255 255 128 128 128 128 32 32 32 32 0 0 0 0 0 0 Page 36 of 53 Video 2 61 VIDEO 2 INTENSITY 62 VIDEO 2 FILE COARSE 63 VIDEO 2 FILE FINE 64 VIDEO 2 FILE GO 65 VIDEO 2 STOP/PLAY 66 VIDEO 2 IN 67 VIDEO 2 OUT 68 VIDEO 2 SPEED 69 VIDEO 2 EFFECT 1 70 VIDEO 2 EFFECT 2 71 VIDEO 2 CHROMA DELTA 72 VIDEO 2 CHROMA HSL 73 VIDEO 2 CHROMA LUMINANCE 74 VIDEO 2 R 75 VIDEO 2 G 76 VIDEO 2 B 77 VIDEO 2 X POS COARSE 78 VIDEO 2 X POS FINE 79 VIDEO 2 Y POS COARSE 80 VIDEO 2 Y POS FINE 81 VIDEO 2 X SCALE COARSE 82 VIDEO 2 X SCALE FINE 83 VIDEO 2 Y SCALE COARSE 84 VIDEO 2 Y SCALE FINE 85 VIDEO 2 X ROT COARSE 86 VIDEO 2 X ROT FINE 87 VIDEO 2 Y ROT COARSE 88 VIDEO 2 Y ROT FINE 89 VIDEO 2 Z ROT COARSE 90 VIDEO 2 Z ROT FINE 62 63 64 65 66 67 68 69 70 71 72 73 74 75 76 77 78 79 80 81 82 83 84 85 86 87 88 89 90 91 CROSSFADE SNAP BEFORE CROSSFADE SNAP BEFORE CROSSFADE SNAP AFTER CROSSFADE SNAP BEFORE CROSSFADE SNAP AFTER CROSSFADE SNAP AFTER CROSSFADE SNAP BEFORE CROSSFADE SNAP BEFORE CROSSFADE CROSSFADE CROSSFADE CROSSFADE CROSSFADE CROSSFADE CROSSFADE CROSSFADE CROSSFADE CROSSFADE CROSSFADE CROSSFADE CROSSFADE CROSSFADE CROSSFADE CROSSFADE CROSSFADE CROSSFADE CROSSFADE CROSSFADE CROSSFADE CROSSFADE Elation SD3D Media Generator Software User Manual 1 2 3 4 5 6 7 8 9 10 11 12 13 14 15 16 17 18 19 20 21 22 23 24 25 26 27 28 29 30 0 0 0 0 0 0 0 64 0 0 0 0 0 255 255 255 128 128 128 128 32 32 32 32 0 0 0 0 0 0 Page 37 of 53 Video 3 (Future Development) 91 NULL 92 NULL 93 NULL 94 NULL 95 NULL 96 NULL 97 NULL 98 NULL 99 NULL 100 NULL 101 NULL 102 NULL 103 NULL 104 NULL 105 NULL 106 NULL 107 NULL 108 NULL 109 NULL 110 NULL 111 NULL 112 NULL 113 NULL 114 NULL 115 NULL 116 NULL 117 NULL 118 NULL 119 NULL 120 NULL 92 93 94 95 96 97 98 99 100 101 102 103 104 105 106 107 108 109 110 111 112 113 114 115 116 117 118 119 120 121 CROSSFADE SNAP BEFORE CROSSFADE SNAP BEFORE CROSSFADE SNAP AFTER CROSSFADE SNAP BEFORE CROSSFADE SNAP AFTER CROSSFADE SNAP AFTER CROSSFADE SNAP BEFORE CROSSFADE SNAP BEFORE CROSSFADE CROSSFADE CROSSFADE CROSSFADE CROSSFADE CROSSFADE CROSSFADE CROSSFADE CROSSFADE CROSSFADE CROSSFADE CROSSFADE CROSSFADE CROSSFADE CROSSFADE CROSSFADE CROSSFADE CROSSFADE CROSSFADE CROSSFADE CROSSFADE CROSSFADE Elation SD3D Media Generator Software User Manual 1 2 3 4 5 6 7 8 9 10 11 12 13 14 15 16 17 18 19 20 21 22 23 24 25 26 27 28 29 30 Page 38 of 53 Live Camera 1 121 122 123 124 125 126 127 128 129 130 131 132 133 134 135 136 137 138 139 140 141 142 143 144 LIVE 1 INTENSITY CAMERA SEL LIVE 1 EFFECT 1 LIVE 1 EFFECT 2 LIVE 1 CHROMA DELTA LIVE 1 CHROMA HSL LIVE 1 CHROMA LUMINANCE LIVE 1 R LIVE 1 G LIVE 1 B LIVE 1 X POS COARSE LIVE 1 X POS FINE LIVE 1 Y POS COARSE LIVE 1 Y POS FINE LIVE 1 X SCALE COARSE LIVE 1 X SCALE FINE LIVE 1 Y SCALE COARSE LIVE 1 Y SCALE FINE LIVE 1 X ROT COARSE LIVE 1 X ROT FINE LIVE 1 Y ROT COARSE LIVE 1 Y ROT FINE LIVE 1 Z ROT COARSE LIVE 1 Z ROT FINE 122 123 124 125 126 127 128 129 130 131 132 133 134 135 136 137 138 139 140 141 142 143 144 145 CROSSFADE SNAP BEFORE FADE SNAP BEFORE CROSSFADE SNAP BEFORE CROSSFADE CROSSFADE CROSSFADE CROSSFADE CROSSFADE CROSSFADE CROSSFADE CROSSFADE CROSSFADE CROSSFADE CROSSFADE CROSSFADE CROSSFADE CROSSFADE CROSSFADE CROSSFADE CROSSFADE CROSSFADE CROSSFADE CROSSFADE CROSSFADE Elation SD3D Media Generator Software User Manual 1 2 3 4 5 6 7 8 9 10 11 12 13 14 15 16 17 18 19 20 21 22 23 24 0 32 0 0 0 0 0 255 255 255 128 128 128 128 32 32 32 32 0 0 0 0 0 0 Page 39 of 53 Live Camera 2 (Future Development) 145 146 147 148 149 150 151 152 153 154 155 156 157 158 159 160 161 162 163 164 165 166 167 168 NULL NULL NULL NULL NULL NULL NULL NULL NULL NULL NULL NULL NULL NULL NULL NULL NULL NULL NULL NULL NULL NULL NULL NULL 146 147 148 149 150 151 152 153 154 155 156 157 158 159 160 161 162 163 164 165 166 167 168 169 CROSSFADE SNAP BEFORE CROSSFADE SNAP BEFORE CROSSFADE SNAP BEFORE CROSSFADE CROSSFADE CROSSFADE CROSSFADE CROSSFADE CROSSFADE CROSSFADE CROSSFADE CROSSFADE CROSSFADE CROSSFADE CROSSFADE CROSSFADE CROSSFADE CROSSFADE CROSSFADE CROSSFADE CROSSFADE CROSSFADE CROSSFADE CROSSFADE Elation SD3D Media Generator Software User Manual 1 2 3 4 5 6 7 8 9 10 11 12 13 14 15 16 17 18 19 20 21 22 23 24 Page 40 of 53 Particle 1 169 PARTICLE 1 INTENSITY 170 PARTICLE 1 TEXTURE SELECTOR COARSE 171 PARTICLE 1 TEXTURE SELECTOR FINE 172 PARTICLE 1 MODE SELECTOR 173 174 175 176 177 178 179 180 181 182 183 184 185 186 187 188 189 190 191 192 193 PARTICLE 1 LINEAR SPEED PARTICLE 1 ANGULAR SPEED PARTICLE 1 LIFE TIME PARTICLE 1 GRAVITY PARTICLE 1 SCALE INITIAL PARTICLE 1 SCALE ENDING PARTICLE 1 R INITIAL PARTICLE 1 G INITIAL PARTICLE 1 B INITIAL PARTICLE 1 R END PARTICLE 1 G END PARTICLE 1 B END PARTICLE 1 X POS COARSE PARTICLE 1 Y POS COARSE PARTICLE 1 Z POS COARSE PARTICLE 1 X SCALE COARSE PARTICLE 1 Y SCALE COARSE PARTICLE 1 Z SCALE COARSE PARTICLE 1 X ROT COARSE PARTICLE 1 Y ROT COARSE PARTICLE 1 Z ROT COARSE 170 CROSSFADE 1 171 SNAP BEFORE CROSSFADE 2 0 0 172 SNAP BEFORE CROSSFADE 3 0 173 SNAP BEFORE CROSSFADE 0%, 25% 50%, 75% 100% 174 CROSSFADE 175 CROSSFADE 176 CROSSFADE 177 CROSSFADE 178 CROSSFADE 179 CROSSFADE 180 CROSSFADE 181 CROSSFADE 182 CROSSFADE 183 CROSSFADE 184 CROSSFADE 185 CROSSFADE 186 CROSSFADE 187 CROSSFADE 188 CROSSFADE 189 CROSSFADE 190 CROSSFADE 191 CROSSFADE 192 CROSSFADE 193 CROSSFADE 194 CROSSFADE 0 Elation SD3D Media Generator Software User Manual 4 5 6 7 8 9 10 11 12 13 14 15 16 17 18 19 20 21 22 23 24 25 32 0 64 128 64 64 255 255 255 255 255 255 128 128 128 128 128 128 0 0 0 Page 41 of 53 Particle 2 (Future Development) 194 195 196 197 NULL NULL NULL NULL 195 196 197 198 198 NULL 199 NULL 200 NULL 201 NULL 202 NULL 203 NULL 204 NULL 205 NULL 206 NULL 207 NULL 208 NULL 209 NULL 210 NULL 211 NULL 212 NULL 213 NULL 214 NULL 215 NULL 216 NULL 217 NULL 218 NULL 199 200 201 202 203 204 205 206 207 208 209 210 211 212 213 214 215 216 217 218 219 CROSSFADE SNAP BEFORE CROSSFADE SNAP BEFORE CROSSFADE SNAP BEFORE CROSSFADE 0%, 25% 50%, 75% 100% CROSSFADE CROSSFADE CROSSFADE CROSSFADE CROSSFADE CROSSFADE CROSSFADE CROSSFADE CROSSFADE CROSSFADE CROSSFADE CROSSFADE CROSSFADE CROSSFADE CROSSFADE CROSSFADE CROSSFADE CROSSFADE CROSSFADE CROSSFADE CROSSFADE Elation SD3D Media Generator Software User Manual 1 2 3 4 0 0 0 0 5 6 7 8 9 10 11 12 13 14 15 16 17 18 19 20 21 22 23 24 25 32 0 64 128 64 64 255 255 255 255 255 255 128 128 128 128 128 128 0 0 0 Page 42 of 53 Object 1 219 OBJECT INTENSITY 220 OBJECT 3D ENTITY SELECTOR 221 OBJECT TEXTURE SELECTOR COARSE 1 222 OBJECT TEXTURE SELECTOR FINE 1 223 OBJECT TEXTURE SELECTOR COURSE 2 224 OBJECT TEXTURE SELECTOR FINE 2 225 OBJECT R 226 OBJECT G 227 OBJECT B 228 OBJECT ANIMATION STEP 229 OBJECT ANIMATION SPEED 230 AUTO ROTATE X 231 AUTO ROTATE Y 232 AUTO ROTATE Z 233 OBJECT X POS COARSE 234 OBJECT X POS FINE 235 OBJECT Y POS COARSE 236 OBJECT Y POS FINE 237 OBJECT Z POS COARSE 238 OBJECT Z POS FINE 239 OBJECT X SCALE COARSE 240 OBJECT X SCALE FINE 241 OBJECT Y SCALE COARSE 242 OBJECT Y SCALE FINE 243 OBJECT Z SCALE COARSE 244 OBJECT Z SCALE FINE 245 OBJECT X ROT COARSE 246 OBJECT X ROT FINE 247 OBJECT Y ROT COARSE 248 OBJECT Y ROT FINE 249 OBJECT Z ROT COARSE 250 OBJECT Z ROT FINE 220 CROSSFADE 1 221 SNAP AFTER CROSSFADE 2 222 SNAP BEFORE CROSSFADE 3 0 0 0 223 SNAP BEFORE CROSSFADE 4 224 SNAP BEFORE CROSSFADE 5 0 0 225 226 227 228 229 230 231 232 233 234 235 236 237 238 239 240 241 242 243 244 245 246 247 248 249 250 251 SNAP BEFORE CROSSFADE CROSSFADE CROSSFADE CROSSFADE SNAP AFTER CROSSFADE SNAP AFTER CROSSFADE SNAP BEFORE CROSSFADE SNAP BEFORE CROSSFADE SNAP BEFORE CROSSFADE CROSSFADE CROSSFADE CROSSFADE CROSSFADE CROSSFADE CROSSFADE CROSSFADE CROSSFADE CROSSFADE CROSSFADE CROSSFADE CROSSFADE SNAP BEFORE FADE SNAP BEFORE FADE SNAP BEFORE FADE SNAP BEFORE FADE SNAP BEFORE FADE SNAP BEFORE FADE Elation SD3D Media Generator Software User Manual 6 7 8 9 10 11 12 13 14 15 16 17 18 19 20 21 22 23 24 25 26 27 28 29 30 31 32 0 255 255 255 0 128 0 0 0 128 128 128 128 128 128 64 64 64 64 64 64 0 0 0 0 0 0 Page 43 of 53 Object 2 251 OBJECT INTENSITY 252 OBJECT 3D ENTITY SELECTOR 253 OBJECT TEXTURE SELECTOR COARSE 1 254 OBJECT TEXTURE SELECTOR FINE 1 255 OBJECT TEXTURE SELECTOR COURSE 2 256 OBJECT TEXTURE SELECTOR FINE 2 257 OBJECT R 258 OBJECT G 259 OBJECT B 260 OBJECT ANIMATION STEP 261 OBJECT ANIMATION SPEED 262 AUTO ROTATE X 263 AUTO ROTATE Y 264 AUTO ROTATE Z 265 OBJECT X POS COARSE 266 OBJECT X POS FINE 267 OBJECT Y POS COARSE 268 OBJECT Y POS FINE 269 OBJECT Z POS COARSE 270 OBJECT Z POS FINE 271 OBJECT X SCALE COARSE 272 OBJECT X SCALE FINE 273 OBJECT Y SCALE COARSE 274 OBJECT Y SCALE FINE 275 OBJECT Z SCALE COARSE 276 OBJECT Z SCALE FINE 277 OBJECT X ROT COARSE 278 OBJECT X ROT FINE 279 OBJECT Y ROT COARSE 280 OBJECT Y ROT FINE 281 OBJECT Z ROT COARSE 282 OBJECT Z ROT FINE 252 CROSSFADE 1 253 SNAP AFTER CROSSFADE 2 254 SNAP BEFORE CROSSFADE 3 0 0 0 255 SNAP BEFORE CROSSFADE 4 256 SNAP BEFORE CROSSFADE 5 0 0 257 258 259 260 261 262 263 264 265 266 267 268 269 270 271 272 273 274 275 276 277 278 279 280 281 282 283 SNAP BEFORE CROSSFADE CROSSFADE CROSSFADE CROSSFADE SNAP AFTER CROSSFADE SNAP AFTER CROSSFADE SNAP BEFORE CROSSFADE SNAP BEFORE CROSSFADE SNAP BEFORE CROSSFADE CROSSFADE CROSSFADE CROSSFADE CROSSFADE CROSSFADE CROSSFADE CROSSFADE CROSSFADE CROSSFADE CROSSFADE CROSSFADE CROSSFADE SNAP BEFORE FADE SNAP BEFORE FADE SNAP BEFORE FADE SNAP BEFORE FADE SNAP BEFORE FADE SNAP BEFORE FADE Elation SD3D Media Generator Software User Manual 6 7 8 9 10 11 12 13 14 15 16 17 18 19 20 21 22 23 24 25 26 27 28 29 30 31 32 0 255 255 255 0 128 0 0 0 128 128 128 128 128 128 64 64 64 64 64 64 0 0 0 0 0 0 Page 44 of 53 Object 3 283 OBJECT INTENSITY 284 OBJECT 3D ENTITY SELECTOR 285 OBJECT TEXTURE SELECTOR COARSE 1 286 OBJECT TEXTURE SELECTOR FINE 1 287 OBJECT TEXTURE SELECTOR COARSE 2 288 OBJECT TEXTURE SELECTOR FINE 2 289 OBJECT R 290 OBJECT G 291 OBJECT B 292 OBJECT ANIMATION STEP 293 OBJECT ANIMATION SPEED 294 AUTO ROTATE X 295 AUTO ROTATE Y 296 AUTO ROTATE Z 297 OBJECT X POS COARSE 298 OBJECT X POS FINE 299 OBJECT Y POS COARSE 300 OBJECT Y POS FINE 301 OBJECT Z POS COARSE 302 OBJECT Z POS FINE 303 OBJECT X SCALE COARSE 304 OBJECT X SCALE FINE 305 OBJECT Y SCALE COARSE 306 OBJECT Y SCALE FINE 307 OBJECT Z SCALE COARSE 308 OBJECT Z SCALE FINE 309 OBJECT X ROT COARSE 310 OBJECT X ROT FINE 311 OBJECT Y ROT COARSE 312 OBJECT Y ROT FINE 313 OBJECT Z ROT COARSE 314 OBJECT Z ROT FINE 284 CROSSFADE 1 285 SNAP AFTER CROSSFADE 2 286 SNAP BEFORE CROSSFADE 3 0 0 0 287 SNAP BEFORE CROSSFADE 4 288 SNAP BEFORE CROSSFADE 5 0 0 289 290 291 292 293 294 295 296 297 298 299 300 301 302 303 304 305 306 307 308 309 310 311 312 313 314 315 SNAP BEFORE CROSSFADE CROSSFADE CROSSFADE CROSSFADE SNAP AFTER CROSSFADE SNAP AFTER CROSSFADE SNAP BEFORE CROSSFADE SNAP BEFORE CROSSFADE SNAP BEFORE CROSSFADE CROSSFADE CROSSFADE CROSSFADE CROSSFADE CROSSFADE CROSSFADE CROSSFADE CROSSFADE CROSSFADE CROSSFADE CROSSFADE CROSSFADE SNAP BEFORE FADE SNAP BEFORE FADE SNAP BEFORE FADE SNAP BEFORE FADE SNAP BEFORE FADE SNAP BEFORE FADE Elation SD3D Media Generator Software User Manual 6 7 8 9 10 11 12 13 14 15 16 17 18 19 20 21 22 23 24 25 26 27 28 29 30 31 32 0 255 255 255 0 128 0 0 0 128 128 128 128 128 128 64 64 64 64 64 64 0 0 0 0 0 0 Page 45 of 53 Objects 4, 5 & 6 (Future Development) 315 NULL 316 NULL 317 NULL 318 NULL 319 NULL 320 NULL 321 NULL 322 NULL 323 NULL 324 NULL 325 NULL 326 NULL 327 NULL 328 NULL 329 NULL 330 NULL 331 NULL 332 NULL 333 NULL 334 NULL 335 NULL 336 NULL 337 NULL 338 NULL 339 NULL 340 NULL 341 NULL 342 NULL 343 NULL 344 NULL 345 NULL 346 NULL 347 NULL 348 NULL 349 NULL 350 NULL 351 NULL 352 NULL 353 NULL 354 NULL 355 NULL 356 NULL 357 NULL 358 NULL 359 NULL 360 NULL 361 NULL 362 NULL 363 NULL 364 NULL 365 NULL 366 NULL 367 NULL 368 NULL 369 NULL 370 NULL 371 NULL 372 NULL 373 NULL 374 NULL 375 NULL 376 NULL 377 NULL 378 NULL 379 NULL 380 NULL 316 317 318 319 320 321 322 323 324 325 326 327 328 329 330 331 332 333 334 335 336 337 338 339 340 341 342 343 344 345 346 347 348 349 350 351 352 353 354 355 356 357 358 359 360 361 362 363 364 365 366 367 368 369 370 371 372 373 374 375 376 377 378 379 380 381 CROSSFADE SNAP AFTER CROSSFADE SNAP BEFORE CROSSFADE SNAP BEFORE CROSSFADE SNAP BEFORE CROSSFADE SNAP BEFORE CROSSFADE CROSSFADE CROSSFADE CROSSFADE SNAP AFTER CROSSFADE SNAP AFTER CROSSFADE SNAP BEFORE CROSSFADE SNAP BEFORE CROSSFADE SNAP BEFORE CROSSFADE CROSSFADE CROSSFADE CROSSFADE CROSSFADE CROSSFADE CROSSFADE CROSSFADE CROSSFADE CROSSFADE CROSSFADE CROSSFADE CROSSFADE SNAP BEFORE FADE SNAP BEFORE FADE SNAP BEFORE FADE SNAP BEFORE FADE SNAP BEFORE FADE SNAP BEFORE FADE CROSSFADE SNAP AFTER CROSSFADE SNAP BEFORE CROSSFADE SNAP BEFORE CROSSFADE SNAP BEFORE CROSSFADE SNAP BEFORE CROSSFADE CROSSFADE CROSSFADE CROSSFADE SNAP AFTER CROSSFADE SNAP AFTER CROSSFADE SNAP BEFORE CROSSFADE SNAP BEFORE CROSSFADE SNAP BEFORE CROSSFADE CROSSFADE CROSSFADE CROSSFADE CROSSFADE CROSSFADE CROSSFADE CROSSFADE CROSSFADE CROSSFADE CROSSFADE CROSSFADE CROSSFADE SNAP BEFORE FADE SNAP BEFORE FADE SNAP BEFORE FADE SNAP BEFORE FADE SNAP BEFORE FADE SNAP BEFORE FADE CROSSFADE SNAP AFTER CROSSFADE Elation SD3D Media Generator Software User Manual 1 2 3 4 5 6 7 8 9 10 11 12 13 14 15 16 17 18 19 20 21 22 23 24 25 26 27 28 29 30 31 32 1 2 3 4 5 6 7 8 9 10 11 12 13 14 15 16 17 18 19 20 21 22 23 24 25 26 27 28 29 30 31 32 1 2 Page 46 of 53 381 382 383 384 385 386 387 388 389 390 391 392 393 394 395 396 397 398 399 400 401 402 403 404 405 406 407 408 409 410 NULL NULL NULL NULL NULL NULL NULL NULL NULL NULL NULL NULL NULL NULL NULL NULL NULL NULL NULL NULL NULL NULL NULL NULL NULL NULL NULL NULL NULL NULL 382 383 384 385 386 387 388 389 390 391 392 393 394 395 396 397 398 399 400 401 402 403 404 405 406 407 408 409 410 411 SNAP BEFORE CROSSFADE SNAP BEFORE CROSSFADE SNAP BEFORE CROSSFADE SNAP BEFORE CROSSFADE CROSSFADE CROSSFADE CROSSFADE SNAP AFTER CROSSFADE SNAP AFTER CROSSFADE SNAP BEFORE CROSSFADE SNAP BEFORE CROSSFADE SNAP BEFORE CROSSFADE CROSSFADE CROSSFADE CROSSFADE CROSSFADE CROSSFADE CROSSFADE CROSSFADE CROSSFADE CROSSFADE CROSSFADE CROSSFADE CROSSFADE SNAP BEFORE FADE SNAP BEFORE FADE SNAP BEFORE FADE SNAP BEFORE FADE SNAP BEFORE FADE SNAP BEFORE FADE Elation SD3D Media Generator Software User Manual 3 4 5 6 7 8 9 10 11 12 13 14 15 16 17 18 19 20 21 22 23 24 25 26 27 28 29 30 31 32 Page 47 of 53 Mask 411 2D OVERLAY MASK INTENSITY FRONT 1 412 2D OVERLAY MASK SELECTOR COARSE FRONT 413 2D OVERLAY MASK SELECTOR FINE FRONT 414 LIVE 1 X POS COURSE FRONT 415 LIVE 1 X POS FINE FRONT 416 LIVE 1 Y POS COURSE FRONT 417 LIVE 1 Y POS FINE FRONT 418 2D OVERLAY MASK VERT/HOR SCROLLING 419 2D OVERLAY MASK FRECUENCY/SENSE SCROLLING 420 2D OVERLAY MASK INTENSITY BACK 1 421 2D OVERLAY MASK SELECTOR COARSE BACK 422 2D OVERLAY MASK SELECTOR FINE BACK 423 LIVE 1 X POS COURSE BACK 424 LIVE 1 X POS FINE BACK 425 LIVE 1 Y POS COURSE BACK 426 LIVE 1 Y POS FINE BACK 427 2D OVERLAY MASK VERT/HOR SCROLLING 428 2D OVERLAY MASK FRECUENCY/SENSE SCROLLING 412 CROSSFADE 1 0 413 SNAP BEFORE FADE 2 0 414 SNAP BEFORE FADE 3 0 415 416 417 418 419 SNAP BEFORE FADE SNAP BEFORE FADE SNAP BEFORE FADE SNAP BEFORE FADE SNAP BEFORE FADE 4 5 6 7 8 128 128 128 128 128 420 SNAP BEFORE FADE 9 128 421 CROSSFADE 10 0 422 SNAP BEFORE FADE 11 0 423 SNAP BEFORE FADE 12 0 424 425 426 427 428 SNAP BEFORE FADE SNAP BEFORE FADE SNAP BEFORE FADE SNAP BEFORE FADE SNAP BEFORE FADE 13 14 15 16 17 128 128 128 128 128 429 SNAP BEFORE FADE 18 128 1 2 3 4 5 6 7 8 9 10 11 12 0 0 0 255 255 255 128 128 128 0 0 0 Live Text 429 430 431 432 433 434 435 436 437 438 439 440 430 431 432 433 434 435 436 437 438 439 440 441 LIVE TEXT INTENSITY FILE COARSE FILE FINE TEXT R COLOR TEXT G COLOR TEXT B COLOR TEXT SCALE X TEXT SCALE Y TEXT SCALE Z AUTO ROTATE X AUTO ROTATE Y AUTO ROTATE Z CROSSFADE CROSSFADE CROSSFADE CROSSFADE CROSSFADE CROSSFADE CROSSFADE CROSSFADE CROSSFADE CROSSFADE CROSSFADE CROSSFADE The Chart above explains the default values for all 10 fixtures that comprehend the SD3D media generator. There are 7 types of fixtures; each one behaves quite similar to a moving light: GLOBAL Fixture (1) VIDEO Fixture (2) LIVE VIDEO (1) PARTICLE Fixture (1) 3D OBJECT Fixture (3) Overlay Mask Fixture (1) 3D Live Text (1) TOTAL Fixtures: 10 Elation SD3D Media Generator Software User Manual Page 48 of 53 The NULL channels represented in grey color are for future development. Please note the DMX address for every fixture as: GLOBAL: DMX Channel address 2 VIDEO 1: DMX Channel address 32 VIDEO 2: DMX Channel address 62 LIVE VIDEO: DMX Channel address 122 PARTICLE 1: DMX Channel address 170 3D OBJECT 1: DMX Channel address 220 3D OBJECT 2: DMX Channel address 252 3D OBJECT 3: DMX Channel address 284 OVERLAY MASK: DMX Channel address 412 3D LIVE TEXT: DMX Channel address 430 Elation SD3D Media Generator Software User Manual Page 49 of 53 Glossary Video analog media -- Audio sources, such as audio cassettes and microphones, and video sources, such as VHS and 8mm VCRs and camcorders that must be digitized and converted into digital format for processing by a computer. Newer digital formats such as DV and DVD have higher resolution and quality than older consumer formats like VHS, and also do not degrade in quality when they are copied from one generation to the next. See also component video, composite video, digital media. digital media -- Audio and video sources such as audio CD, DV, miniDV, Digital8 camcorders, and DVD that store the audio and video in digital format. As a result, the data can be imported and processed directly by a computer, and copied without any loss from one generation to the next. See also analog media, DV. composite video -- A video signal that combines the brightness (luminance or luma) and the color (chrominance or chroma) video information into one signal. Because the signal is not modulated, composite video provides higher quality than RF video. Requires a separate audio signal and connector. Also called Baseband video. See also component video, DV, RF video, S-Video. component video -- A video signal that separates the video signal into three separate signals (and three separate wires) to avoid any quality loss from mixing signals. The components can be RGB (red, green, and blue); luma (Y) and two chroma signals, such as Y, Y-R, Y-B; or other formats including YUV, YCbCr, or Y Pr Pb. Requires a separate audio signal and connector. See also composite video, DV, RF video, S-Video. luminance -- The intensity or brightness of a video signal, usually represented by the letter Y. Video signals are split into separate luma and chroma (color) components for higher-quality and more efficient transmission and encoding. In YUV color format, for example, the color information stored in U and V (the color difference signals). chrominance -- The color of a video signal. Video signals are split into separate luma and chroma (color) components for higher-quality and more efficient transmission and encoding. The chroma signal is typically split into two components or color difference signals, such as YUV format. See also luminance. RGB -- Acronym for Red, Green, Blue. Full-color video signal format, consisting of three elements. See also YUV. YUV -- Full-color video signal format, consisting of three elements: Y (luminance), and U and V (chrominance). See also RGB. frames -- The individual video images that make up a moving sequence. Video formats and individual clips are typically described in terms of the resolution of the individual frames, and the frame rate at which they are played. See also frame rate, field. frame rate -- Playback speed as determined in frames per second (fps). See also sample rate. frame (or 3 and then 2). Both terms are often used interchangeably to describe the effect. Digital Video Formats FireWire -- A digital data interface standard that provides a high-speed Plug-and-Play interface for personal computers. Used for connecting DV camcorders to computers, as well as to hard disk drives and DVD drives. Supports up to 480 Mbps data rate. Also known as IEEE 1394 and Sony iLink. See also USB. Elation SD3D Media Generator Software User Manual Page 50 of 53 FireWire connector -- A roughly rectangular, hot-pluggable connector used for FireWire/IEEE 1394 digital connections, especially digital video signals such as from DV camcorders. The connectors can vary in size: full-size (6pin) for connecting to a computer or hub, and smaller (4-pin) for connecting to equipment such as DV camcorders. See also BNC connector, DV, F connector, RCA connector, S-Video connector. USB (Universal Serial Bus) -- A digital data interface standard providing a Plug-and-Play interface for personal computers. Typically used for lower-speed peripherals such as mice, keyboards, printers, and scanners. Also used for interfacing to digital cameras. The existing USB 1 standard provides up to 12Mbps (million bits per second) data rate. The new USB 2 standard supports up to 480Mbps data rate. See also FireWire. AVI -- Acronym for Audio Video Interleave. The old multimedia file format used under Windows for interleaved video and audio streams. See also Video for Windows, Windows Media. Video for Windows -- The media file format used with Microsoft Windows (.AVI). Supports many different video and audio compression formats (codecs). See also Windows Media. Windows Media -- The multimedia platform built into Microsoft Windows, and a series of formats for storing and transmitting video and audio. Uses ASF, WMA, and WMF file types. See also Video for Windows, Windows Media Audio and Windows Media Video. Windows Media Video (WMV) -- The Microsoft Windows Media format for compressed video and audio files on CD and DVD discs. See also Windows Media Audio. QuickTime -- Multiplatform, multimedia Movie file format from Apple Computers (.MOV). MPEG -- A family of popular multimedia file formats and associated compression schemes defined by the Moving Pictures Expert Group. MPEG-1 video was designed for use on CD-ROMs and provides picture quality somewhat comparable to VHS. MPEG-2 video was designed for consumer video and is used on DVD, and can provide highquality full-screen full-rate video with smaller file sizes. MPEG-4 video is designed for a broad range of multimedia applications, and is used for web and wireless streaming video. MP3 is a commonly-used audio compression format, especially for web downloads and portable music players. MPEG-1 -- An older digital video compression format developed in the early 1990s by the Moving Picture Experts Group. MPEG-1 video was designed for lower-resolution video played from CD-ROM and provides picture quality somewhat comparable to VHS (typically 352x240 resolution). Used for Video CD discs. MPEG-2 -- A TV-quality digital video compression format developed in the mid-1990s by the Moving Picture Experts Group. MPEG-2 video provides high-quality full-screen full-rate video (720x480 resolution for NTSC) with smaller file sizes than MPEG-1. Used for DVD discs, and also scales to high-definition resolution and bitrates. MPEG-4 -- A digital multimedia compression format developed in the late 1990s by the Moving Picture Experts Group, that includes video, audio, and interactivity. MPEG-4 video is designed for interactive multimedia across networks, and works well for web and wireless streaming video. CBR -- Acronym for Constant Bit Rate. A compression scheme in which each unit of input material is always compressed to the same output size. For MPEG-2 video, for example, this means that the compressed data always has the same data rate (that is, bytes per second), even when the input material is very easy to encode. See also VBR. VBR -- Acronym for Variable Bit Rate. A compression scheme in which each unit of input material can be compressed to different sizes. For MPEG-2 video, for example, this means that "easier" sequences (that is, with no motion) can compress to very small sizes, whereas "hard" sequences (with lots of motion and scene cuts) can compress to much larger sizes. VBR compression can take better advantage of the overall available bandwidth of a video transmission or DVD player by allocating the available bits intelligently to the difficult parts of a sequence. See also CBR. Elation SD3D Media Generator Software User Manual Page 51 of 53 Digital Still Image Formats BMP -- The standard Windows bitmap still image file format. Bitmap files are not compressed, and are therefore significantly larger than the same image stored in formats such as GIF and JPEG. GIF -- Acronym for Graphics Interchange Format. A still image file format commonly used on web pages for simple illustrations and animations. Use the JPEG format for photographic images. JPEG -- A still image file format developed by the Joint Photographic Experts Group that can compress photographic images into much smaller file sizes while sacrificing only a little image quality. Commonly used for photographs on web pages and in e-mail. See also GIF. PICT -- The standard Apple Macintosh still image Picture file format. TIFF -- A lossless image file format designed for photographic images that compresses the image size while preserving all the image quality. The resulting files are therefore larger than those with JPEG compression, which sacrifices some detail in order to significantly reduce the image size. Digital Data Rates data rate -- The speed at which data is transferred, as in bytes per second. Also called bit rate. For example, the speed to download or stream a video file over the Internet, or the speed at which the file must play from a hard disk. When you create a video or audio file, you can specify the target bit rate at which the file will be played. Also called bit rate. bitstream -- A collection of data, as in video or audio data compressed to a file or transmitted between devices. bit -- A binary digit. The fundamental element of computer logic and numbers. Represents one of two values: zero or one, off or on, false or true. See also byte. byte -- A data element containing eight bits, or 256 distinct values. Commonly used to store a single text character. Computer data transfer rates are traditionally measured in bits, as in Mb for Megabits (millions of bits, with a lowercase "b"); whereas computer data storage is traditionally measured in bytes, as in MB, for megabytes (millions of bytes, with an upper-case "B"). See also bit, GB, KB, MB. MB -- Megabytes (millions of bytes). In computer use, a megabyte actually represents the closest binary power of 2 to a million, or 1024 squared. See also byte, GB, KB. GB -- Gigabytes (billions of bytes). In computer use, a gigabyte actually represents the closest binary power of 2 to a billion, or 1024 cubed. In general use in advertising DVD disc capacity, however, the number of "GB" is actually used to specify a different value, a billion decimal. See also byte, KB, MB. Elation SD3D Media Generator Software User Manual Page 52 of 53 Index 3D Object Layer, 27 Appendix 1, 35 CHANNEL A OUTPUT, 20 CREATING MEDIA ASSETS, 13 Creating Presets in SD3D, 30 CREATING VISUAL EFFECTS, 23 DMX-USB Interface, 7 DOCK and FLOATING WINDOWS, 23 EFFECTS PRESETS, 20 FIXTURE PATCH, 16 IMAGE VIEWER, 20 IMPORTING ASSETS INTO SYSTEM, 13 INSERTING AND DELETING IMPORTED ASSETS, 15 INSTALLATION PROCEDURE, 7 LAYER CONTROL, 24 Live Layer, 25 Mask Layer, 28 Master (Global) Layer, 24 PACKAGE CONTENTS, 7 Particle Layer, 26 PREVIEWING IMPORTED ASSETS, 15 Production Workflow, 16 PROFILES, 11 SCREEN AREAS, 19 SD3D Initialization, 17 Search Video Asset, 14 SETTING UP CAMERA FOR LIVE VIDEO, 29 Specifications, 33 Test Setup and Tutorial, 31 Text Layer, 28 TOOLBAR, 21 Troubleshooting, 34 UNDERSTANDING THE INTERFACE, 19 Video Layer, 24 VIRTUAL CONSOLE, 23 Elation SD3D Media Generator Software User Manual Page 53 of 53