1
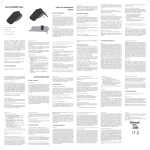
User guide
Table of contents
Before you
begin
.........................................................................................................................4
Software
.........................................................................................................................................................4
updates
Warnings
.........................................................................................................................................................4
Steering
.........................................................................................................................................................4
wheel control interface
Installation
.........................................................................................................................5
Safety
.........................................................................................................................................................5
instructions
Before
.........................................................................................................................................................5
you begin
Installing
.........................................................................................................................................................6
the car stereo
Final
.........................................................................................................................................................7
check
Installing
.........................................................................................................................................................7
the cables
Installing
.........................................................................................................................................................8
the microphone
Installing
.........................................................................................................................................................9
the GPS antenna
Basic
.........................................................................................................................................................9
operations
Getting started
.........................................................................................................................10
Navigating
.........................................................................................................................................................10
through the menus
Turning
.........................................................................................................................................................10
the Parrot ASTEROID Classic on / off
Customizing
.........................................................................................................................................................11
the main menu
Using
.........................................................................................................................................................11
the virtual keyboard
Connecting
.........................................................................................................................................................11
a phone to the Parrot ASTEROID Classic
Connecting
.........................................................................................................................................................13
two phones
Synchronising
.........................................................................................................................................................14
the phonebook
Phone .........................................................................................................................15
Receiving
.........................................................................................................................................................15
a call
Making
.........................................................................................................................................................15
a call
Using
.........................................................................................................................................................17
the Parrot ASTEROID Classic while on a call
Music
.........................................................................................................................19
Using
.........................................................................................................................................................19
the voice recognition function
Radio
.........................................................................................................................................................19
iPod
.........................................................................................................................................................21
USB
.........................................................................................................................................................22
storage device
SD .........................................................................................................................................................23
card
Analogue
.........................................................................................................................................................24
audio player
Audio
.........................................................................................................................................................24
player connected via Bluetooth
Internet .........................................................................................................................26
Connecting
.........................................................................................................................................................26
the Parrot ASTEROID Classic to the internet
Using
.........................................................................................................................................................28
the ASTEROID Market
Settings .........................................................................................................................31
Clock
.........................................................................................................................................................31
Phone
.........................................................................................................................................................31
Network
.........................................................................................................................................................32
Audio
.........................................................................................................................................................32
Music
.........................................................................................................................................................35
Display
.........................................................................................................................................................36
Troubleshooting
.........................................................................................................................36
Before
.........................................................................................................................................................36
you begin
Problems
.........................................................................................................................................................37
while using the phone function
Problems
.........................................................................................................................................................37
while using the music function
For.........................................................................................................................................................37
more information
General information
.........................................................................................................................38
Before you begin
Software updates
Download the latest update for free (and consult the update procedure) on the Parrot
ASTEROID Classic support page on our website www.parrot.com. These updates will
enable you to receive new features and improve the product’s compatibility.
Warnings
All functions requiring an increased attention should only be used while the vehicle
is stationary. Your safety and the one of the other road users prevails over phone
calls, music and navigation instructions. Be responsible: drive carefully and pay full
attention to your surrounding. Parrot denies any liability should you choose not to
respect this warning.
Use the Parrot ASTEROID Classic with a reasonable volume level so that you can
hear all external noises while driving.
The Parrot ASTEROID Classic includes NdFeB magnets which can damage objects
sensitive to magnetic fields (pacemakers, credit cards, mechanical clocks…).
Steering wheel control interface
A steering wheel control interface can be used to connect your vehicle’s steering wheel
controls to your Parrot car stereo. With this interface, you will be able to make phone
calls via the steering wheel controls while keeping your hands on the wheel. Refer to
our website www.parrot.com for more information.
4
Installation
N ote: We advise our custom ers to have the Parrot ASTEROID C lassic fitted by a
professional.
Safety instructions
Turn the ignition off before installing the Parrot ASTEROID Classic.
Install the Parrot ASTEROID Classic only on vehicles with a 12 V battery.
Place all cables away from hot places (heater outlet) and moving parts (gear shift,
seat rails...).
Before you begin
Remove your car stereo from your vehicle. You may need release keys to do so.
Try to connect the audio and power connectors of the Parrot ASTEROID Classic to
the connectors of your vehicle. If this connection is impossible, you have to obtain
an ISO adapter before installing the Parrot ASTEROID Classic.
Parrot ASTEROID Classic antenna connector
Before you begin
5
Example of antenna adaptor -DIN / Fakra (not provided)
Compare the Parrot ASTEROID Classic antenna connector to the antenna
connector of your vehicle. If an adapter is necessary, contact your local car audio
specialist. Make sure you also supply power to your antenna if it is amplified. Power
to the antenna can be supplied using the Parrot ASTEROID Classic ISO cable.
Installing the car stereo
1. Insert the cage and fix it into the dashboard using the bracket mounting tab.
2. Pull audio and power cables of the vehicle to the outside of the dashboard,
through the mounting bracket.
3. Connect the audio and power connectors of the Parrot ASTEROID Classic to the
ones of your vehicle.
4. Check the wiring (as explained in the Final check section).
5. Install the audio cables (as explained in the Installing the cables section).
6. Install the double microphone (as explained in the Installing the m icrophone
section)
7. Slide the car stereo into the Parrot ASTEROID Classic cage and install the
faceplate.
6
Installation
Final check
Once all the connections are made, turn the ignition on then off to perform the
installation test. The "Goodbye" message must be displayed.
If it is not the case, it is necessary to swap the positions of the red and yellow wires.
Indeed, the red wire of the power cable must be connected to the 12V ignition, the
yellow wire to the permanent 12V and the black wire to the ground. This can be
done simply by reversing both fuse holders located on the Parrot wiring.
Installing the cables
Connect the iPod / iPhone®, USB, Jack cables and the GPS Antenna to the Parrot
ASTEROID Classic. We recommend you connect all audio cables to the Parrot
ASTEROID Classic even if you do not plan on using them. Route the audio cables
to a suitable location in your vehicle such as the glove box or arm rest
compartment. It may be necessary to drill a hole in your dashboard to do so. Avoid
using USB extension cables.
Make sure you connect the iPod / iPhone cable to its specific USB port. "iPod" is
written above it.
Use the double-sided tape to stick the GPS Antenna to your dashboard. Once you
have stuck the dongle to the dashboard, wait for approximately 2 hours to make
sure the adhesive tape adheres well.
To guarantee an optimal reception quality we recommend you do not connect your
internet USB key 3G on the Parrot ASTEROID Classic directly : use the USB cable
to install your device on the dashboard (or any other open area).
Use the provided cable ties to make sure the cables are well fixed to the car stereo.
Insert one of the cable ties into the slot in the top left of the back of the car stereo
(refer to the diagram).
Installation
7
Installing the microphone
We recommend that you slide the cable into the
groove behind the door seal.
If the cable runs above the pedals, ensure that it is
properly secured.
Wa rning: Do not run the m icrophone cable through the heating, ventilation or air
conditioning system s or in front of the side airbags.
Make sure the microphone is installed as close to the mouth of the user as possible.
The ideal distance is 60 cm. The best possible location for the microphone is near
the rear-view mirror.
The microphone needs to be pointed towards the user.
8
Installation
Installing the GPS antenna
Install the GPS Antenna in an unobstructed area.
Clean the dashboard, then use the adhesive located on the back of the GPS
Antenna to attach it to the dashboard. Then wait for approximately 2 hours
without handling the dongle to ensure that it adheres properly.
Athermic windshields and windows with a built-in antenna can interfere with GPS
reception and reduce the reliability of information from navigation applications.
Basic operations
To remove the faceplate, press the eject button on its left. Place the faceplate into
the provided carrying case in order to protect it from scratches and dust.
To attach the faceplate, put it on the right side of the car stereo. Once the
faceplate and the car stereo magnets connect, press the left side.
To remove the car stereo from the dashboard, insert the provided extraction key
until they click into place.
Installation
9
Getting started
Navigating through the menus
Press the
button to access the main menu.
Browse through the menus by turning the wheel and confirm by pressing the wheel.
Press the button to get back to previous menu.
Press the
button to access the pop-up menu corresponding to the current
application. The pop-up menu allows you to change several settings or browse
more easily through the content of your audio source or phonebook.
Press the
button to get to the track list if a song is currently being played. While
navigating through the menus, press the SOURCE button to get to the Now
Playing screen.
Press the
button for 2 seconds to display the last 6 applications used or currently
in use.
Press the SOURCE button to select the source of your audio files.
N ote: With the exception of the Line Input source, audio sources that you use with the
Parrot ASTEROID C lassic only appear in the SOU RC E m enu when they are connected. You
have the possibility of deactivating display of the Line Input in the source m enu.
Turning the Parrot ASTEROID Classic on / off
Press the
button for 2 seconds to turn the Parrot ASTEROID Classic on / off.
N ote: You can reboot your Parrot ASTEROID C lassic. To do so, press Settings > Advanced
settings > Reboot.
10
Installation
Customizing the main menu
To ease your navigation, you have the possibility to select the displayed elements of
the main menu by removing an audio source you do not have or by adding an
application you regularly use. To do so :
1. While browsing the main menu, press the
button.
2. Select the menu elements by checking /
unchecking
the
corresponding
checkboxes.
Using the virtual keyboard
The digital keyboard appears when you are asked to enter the PIN
code of your 3G key or when you would like to enter a number or a
DTMF.
The alphanumeric keyboard appears when you enter your login info, which is required
when using Internet applications.
Use the knob to select letters / numbers. Push the knob to confirm. Push the knob for
2 seconds to display the accented characters that correspond to the selected letter.
The
button displays special numbers and characters on the alphanumeric
keyboard.
To validate your entry, select OK.
If your entry contains an error, select
.
Connecting a phone to the Parrot ASTEROID Classic
Compatibility
Refer to the compatibility section of our website to check if your phone is compatible
with the Parrot ASTEROID Classic.
Adjusting the Parrot ASTEROID Classic visibility
Getting started
11
Before pairing your phone with the Parrot ASTEROID Classic, make sure that it is
visible by all Bluetooth devices. To do so, select Settings > Telephony > Visibility
then make sure the option is checked. If it is not the case, check it by pressing the
jogwheel.
N ote: The Parrot ASTEROID C lassic is visible by default.
Pairing a phone
Prior to using the Parrot ASTEROID Classic with your phone for the very first time,
you must initially pair both devices. To do so:
1. From your phone, search for Bluetooth® peripherals and select “Parrot
ASTEROID Classic ".
2. The pairing procedure depends on which telephone model you have:
- If the phone asks you to enter the Bluetooth PIN code, enter “0000”.
- If the Parrot ASTEROID Classic and your telephone display two codes, verify
that the codes are identical, then either confirm or invalidate.
> The Parrot ASTEROID Classic screen will display “Pairing successful”.
N ote: Pairing procedures for the m ost com m on phones are available on the
com patibility section of our website.
Automatic connection
Once your telephone is paired with the Parrot ASTEROID Classic, the 2 devices will
automatically connect when they are turned on and in proximity of each other.
N ote: Depending on the m odel of your phone, you m ay have to authorize the connection
to the Parrot ASTEROID C lassic to allow the autom atic connection.Refer to your phone
user guide for m ore inform ation.
Defining a phone as preferred phone
The phone which you will define as Preferred is the one whose connection with the
Parrot ASTEROID Classic will take priority. This option may be useful if several phones
paired with the Parrot ASTEROID Classic are simultaneously in the vehicle. To define a
phone as preferred :
12
Getting started
1. Select Settings > Telephony > Paired devices.
2. Select the phone you want to define as Preferred.
3. Check the Preferred phone option.
Disconnecting a phone
1. Select Settings > Telephony > Paired devices.
2. Select the phone you want to disconnect from the Parrot ASTEROID Classic.
3. Select Disconnect.
Deleting a phone from the paired devices list
1. Select Settings > Telephony > Paired devices.
2. Select the phone you want to delete.
3. Select Delete.
Managing the "Memory full" problem
You can pair up to 10 devices with the Parrot ASTEROID Classic. If you attempt to
pair an 11th phone, you will get the « Memory full » message. You must then delete
a phone from the paired devices list. To do so:
1. Select Settings > Telephony > Paired devices.
2. Select the phone then select Delete.
N ote: The problem of full m em ory m ay also be related to an installation problem :
inversion of ignition 12V and perm anent 12V or absence of after-contact 12V.
Connecting two phones
To activate Dual Mode (multipoint) and connect two phones :
1. Tap Settings > Bluetooth.
2. Activate the Dual Mode option.
When the Parrot ASTEROID Classic is switched on, it attempts to connect to all paired
phones in the vehicle. If there are more than two paired phones in the vehicle, the
device connects to the two phones with the oldest pairing.
Getting started
13
When two phones are connected to the Parrot ASTEROID Classic, one of them
becomes the main phone and the other is the secondary phone. By default, the main
phone is the one with the oldest pairing to the Parrot ASTEROID Classic.
You can receive calls to the main or secondary phones.
Only the phonebook for your main phone may be accessed through the Parrot
ASTEROID Classic. You can only make calls using the main phone. However, you can
easily switch between the connected phones. To do so :
1. Tap Settings > Telephone > Connect phone.
2. Select the main phone.
You can also switch between the connected phones from the main menu by tapping
Synchronising the phonebook
Automatic synchronisation
With most of the Bluetooth phones, the phonebook is automatically synchronized in
the system’s memory.
Wa rning: Only the contacts stored in the phone m em ory are synchronized. If your contacts
are stored in your SIM card m em ory, transfer them onto your phone m em ory.
The automatic synchronization is limited to 2000 contacts for each paired phone
and to 8000 contacts for all paired phones.
Each time you change your directory, synchronisation will start automatically the
next time it is connected.
14
Getting started
Phone
Receiving a call
An incoming call is indicated by a ringtone. The name of the caller is announced if his
number is recorded in the phonebook of the phone connected to the Parrot
ASTEROID Classic.
- If you want to answer the call, press the
button. Then press the
button to
end the call.
- If you want to refuse this call, press the
button.
Making a call
Making a call via voice recognition
N ote : You can m ake a call using voice recognition directly after autom atic synchronization
or Object Push process. The Parrot ASTEROID C lassic will autom atically recognize the
contact you wish to call.
To make a call via voice recognition:
1. Press the
button to launch the voice recognition feature.
> The Parrot ASTEROID Classic asks you the name of the contact you want to
call.
2. Say the name of the contact and the type of number («Work», «Cellphone»...)
if there are several numbers associated to your contact.
> The call is automatically launched if the voice tag is correctly understood. If it
is not the case, a confirmation message is asked. Confirm by saying «Yes» or
«Call».
N ote: At any tim e, press the
button to exit voice recognition m ode.
Getting started
15
If there are several phone numbers associated to the contact you want to call, you
can specify the type of number:
- Home
- At home
- Work
- At work
- Office
- At office
- At the office
- Mobile
- Other
- Cellular
- General
- Cell
- Default
- On mobile
- Preferred
- On cellular
- On cell
- On mobile phone
- On cellular phone
- On cell phone
- Mobile phone
- Cellular phone
- Cell phone
You can combine several words from the list above to make a call. For instance, «
call ‘Paul’», « call ‘Paul’ on mobile phone », or just « Paul cellphone».
Calling a contact from the phonebook
To make a call manually:
1. Select Phonebook.
2. Select the contact.
N ote : To browse your phonebook m ore easily, press the
button and select the first
letter of the contact you want to call.
3. Press the
to call this contact or use the jog wheel to choose between
different numbers of the same contact.
Bringing up the last dialled number
16
Phone
Hold down the
button to redial the last dialled number.
Dialling a number
To dial a number:
1. Select Phonebook.
2. Press the
button and select Dial.
3. Select a number using the jogwheel and press the jogwheel to confirm.
4. Select OK to make the call.
Using the Parrot ASTEROID Classic while on a call
Adjusting the volume
Use the jog wheel during a call to adjust the communication volume. The volume
setting is saved for subsequent calls.
N ote : You can also change this setting by selecting Settings > Audio > Volum e.
Transfering a call to the phone
During a call, if you want to continue the conversation on your phone (private
conversation), press the
button.
> The call is automatically transferred to the phone.
If you want to switch back to the kit, press the
button.
The call is automatically transferred to your phone:
- when the faceplate is removed ;
- after a 30 minutes communication if the ignition is turned off.
Muting a call
If you want to deactivate the microphone during a call, press the
button: you will
still hear your caller but your caller will not be able to hear you.
Press the
button to reactivate it.
Phone
17
Managing voice mail
The Parrot ASTEROID Classic allows you to send DTMF while on call. To do so,
press the jogwheel.Then select the numbers using the jogwheel.
N ote: DTM F is a m echanism for navigating voice user interfaces using the phone's num eric
keypad. This signal allows you to m anage your voice m ail using the Parrot ASTEROID
C lassic.
Managing a second call
During a call, you can receive another call if your phone supports this functionality.
Press the
button to accept the second incoming call.
> The first call is automatically put on hold.
Press the
button to decline the second incoming call. You can also hang up
directly from your phone.
Press the
18
Phone
button to switch from a call to another.
Music
Using the voice recognition function
The voice recognition function allows you to select the artist / album you want to
hear via voice recognition. This function is only available if you are using the Parrot
ASTEROID Classic with a USB / SD / iPod peripheral.
N ote : Several m inutes of loading m ay be necessary when connecting your audio peripheral
(U SB / SD / iPod) to the Parrot ASTEROID C lassic for the first tim e, particularly if you are
using audio peripheral with a large capacity or containing m any audio files. This loading
tim e will allow your audio files to be accessible via voice recognition.
Press the
button then say the name of the artist / album.
Check the albums and artists names in the metadatas of your music files. These
names may be different from the ones displayed on your music files titles.
The list of audio sources connected to the Parrot ASTEROID Classic which contain
the artist / album that you selected will appear.
Radio
Display
1 Clock
2 Band (AM or FM)
3 Manual or Preset mode
4 Activated options (Traffic alert / RDS scan)
5 Station name
6 Station frequency
7 Radiotext (text sent via RDS signal)
Selecting a frequency
Phone
19
To select a frequency:
1. Press the SOURCE button until the Radio source is selected.
2. Press briefly the
down the
buttons to change manually the radio station. Hold
buttons to tune to the next available radio station.
Launch a frequencies search
To get the list of all available stations:
1. Press the SOURCE button until the Radio source is selected.
2. Press the
button and select Fullscan.
N ote: A Fullscan is proposed while using the Parrot ASTEROID C lassic for the 1st tim e. If so,
select Yes.
At any time you can refresh the list of available stations. To do so, press the
button and select Refresh.
Memorizing a station
To memorize a station:
1. Press the SOURCE button until the Radio source is selected.
2. Select the frequency manually or in Fullscan mode.
3. Press the
button then select Add to presets.
> To select a stored station, select the Presets mode.
N ote: You can store as m any stations as you want.
Mute / Unmute
Press the
button to mute / unmute the system.
Modifying the radio parameters
Press the SOURCE button until the Radio source is selected then press the
and select Settings.
20
Music
button
Traffic alert
The Traffic alert option allows the Radio source to be automatically
activated and selected when the current station starts broadcasting
traffic informations.
RDS scan
This option allows you to activate / deactivate the RDS scan which
allows to change automatically the frequency of the current radio
station when the signal becomes too weak
Activate AM
This option allows you to activate / deactivate the AM frequencies.
FM step
This option allows you to select the FM step (50 or 100 kHz).
iPod
N ote : Several m inutes of loading m ay be necessary when connecting your audio peripheral
(U SB / SD / iPod) to the Parrot ASTEROID C lassic for the first tim e, particularly if you are
using audio peripheral with a large capacity or containing m any audio files. This loading
tim e will allow your audio files to be accessible via voice recognition.
Compatibility
If you are using the Parrot ASTEROID Classic with the iPod Mini, iPod Photo, iPod
3G and iPod Shuffle, then connect your iPod to the Parrot ASTEROID Classic using
the Jack / Jack cable.
If you encounter a problem while using your iPod with the Parrot ASTEROID
Classic, refer to the iPod compatibility table available on the Parrot ASTEROID
Classic support page.
Playing a music file
If you iPod / iPhone is connected to the Parrot ASTEROID via the iPod connector:
Music
21
1. Press the
button until the iPod source is selected.
2. Select one of the classification criteria (artist, album, songs, genres, playlist)
and press the jogwheel.
N ote : To browse m ore easily through the content of your iPod, press the
button and
select the first letter of your track / album / artist.
3. Select the track and press the jogwheel.
USB storage device
N ote : Several m inutes of loading m ay be necessary when connecting your audio peripheral
(U SB / SD / iPod) to the Parrot ASTEROID C lassic for the first tim e, particularly if you are
using audio peripheral with a large capacity or containing m any audio files. This loading
tim e will allow your audio files to be accessible via voice recognition.
Compatibility
The Parrot ASTEROID Classic is compatible with the majority of USB keys / MP3
audio player / external hard drive.
There is no restriction in terms of capacity of USB keys.
Only MP3 (Mpeg 1 Layer3), AAC or WMA formats are supported.
Playing a music file
1. Connect your USB storage device to the Parrot ASTEROID Classic using the
USB cable or the USB connectors on the back of the car stereo
2. Press the
button until the USB source is selected.
3. If the tags of your audio files are correctly defined, select one of the
classification features (artist, album, songs, genres, playlist) and press the jog
wheel. If the tags of your audio files are not defined, select Directories or Flat
directories.
N ote : To browse m ore easily through the content of your U SB device, press the
and select the first letter of the artist / album / track you want to hear.
22
Music
button
SD card
Compatibility
N ote : Several m inutes of loading m ay be necessary when connecting your audio peripheral
(U SB / SD / iPod) to the Parrot ASTEROID C lassic for the first tim e, particularly if you are
using audio peripheral with a large capacity or containing m any audio files. This loading
tim e will allow your audio files to be accessible via voice recognition.
You can use the following SD cards with the Parrot ASTEROID Classic:
- SD, micro SD (with adapter), mini SD (with adapter)
- SDHC (class 2, 4, 6), mini SDHC (with adapter), micro SDHC (with
adapter)
There is no restriction in terms of capacity of SD cards.
Only MP3 (Mpeg 1 Layer3), AAC or WMA formats are supported.
Playing a music file
1. Remove the Parrot ASTEROID Classic faceplate.
2. Insert the SD card into the appropriate slot with the contact surface facing
down.
3. Reattach the faceplate.
4. Press the
button until the SD source is selected.
5. If the tags of your audio files are correctly defined, select one of the
classification features (artist, album, songs, genres, playlist) and press the jog
wheel. If the tags of your audio files are not defined, select Directories or Flat
directories.
N ote : To browse m ore easily through the content of your SD card, press the
button
and select the first letter of the artist / album / track you want to hear.
Music
23
Analogue audio player
Compatibility
Use a Jack / Jack cable to connect an analogue audio player (ex CD player) to the
Parrot ASTEROID Classic.
Playing a music file
1. Connect the audio player using the Jack connector.
2. Press the
button until the Line in source is selected.
3. Start playing a song on your audio player.
Deactivating the Line in source
Every audio player is only displayed in the source menu only if it is connected to the
Parrot ASTEROID Classic except the Line in source. To hide the Line in source and
avoid a useless step while selecting your audio source:
1. Select Settings > Audio.
2. Check the Activate Line in option.
Mute / unmute
Press the
button to mute / unmute the Parrot ASTEROID Classic.
Audio player connected via Bluetooth
N ote : The Parrot ASTEROID C lassic allows you to use the telephone and audio
stream ing functions from 2 different phones without having to disconnect one of them .
Compatibility
You can use the Parrot ASTEROID Classic to listen to songs stored on your mobile
phone or Bluetooth audio device. To do so, your phone / audio device must support
the Bluetooth A2DP profile (Advanced Audio Distribution Profile). To make sure
the phone connected to the Parrot ASTEROID Classic supports the A2DP profile:
1. Select Settings > Telephony > Paired devices.
24
Music
2. Select your phone then select Supported Bluetooth profiles.
> If Bluetooth audio reception is displayed, then you can use this phone with
the Parrot ASTEROID Classic via Bluetooth.
Playing a music file
If you are using a Bluetooth audio player for the first time, you have to pair both
devices.
If both devices are already paired:
1. Press the
button until the Bluetooth Audio source is selected.
2. Start playing a song on your audio player.
Music
25
Internet
Connecting the Parrot ASTEROID Classic to the internet
Compatibility
Please refer to our website to see the list of 3G keys and telephones that are
compatible with the Parrot ASTEROID Classic.
Connection with a 3G key
Wa rning: Internet connection via a 3G key requires a subscription offer with a telephone
operator. U sing this service can result in significant roam ing charges. C heck the conditions
of your subscription and consum ption tracking with your operator. Parrot disclaim s any
liability for associated costs.
N ote: To ensure optim um reception quality, do not connect your 3G key to the back of the
Parrot ASTEROID C lassic: use a U SB cable to install the accessory on the dashboard (or
any other unobstructed area).
1. Connect a 3G key to the Parrot ASTEROID Classic with a USB cable.
> A pop-up will appear.
2. Activate the 3G connection by selecting
.
> A pop-up Status of 3G connection will appear, followed by another pop-up,
which will ask for your PIN code.
3. Enter your PIN code using the knob, then select OK. Check the Memorise PIN
code option if you would like your PIN code to be stored each time you turn on
the Parrot ASTEROID Classic.
N ote: You will be able to change this setting by selecting Settings > Network > 3G Key.
26
Music
4. Select your APN (Access Point Name) from the suggested list. This information
is available in the documentation provided with your 3G key. If your APN is not
in the list, you can add it by selecting Settings > Network > 3G Key >
Configuration > New access point.
> The message "3G key configured" appears.
5. Wait approximately 30 seconds until the connection is established. You can
also press the
button and browse the menus while the connection is being
established.
Connection via Bluetooth
If you have a telephone that supports the Bluetooth profile, DUN (Dial-Up
Networking) or PAN (Personal Area Network), the Bluetooth connecting your
telephone to the Parrot ASTEROID Classic will allow for sharing of the telephone's
3G connection.
1. Connect your telephone to the Parrot ASTEROID Classic via Bluetooth.
2. On the Parrot ASTEROID Classic, select Settings > Network > Bluetooth >
Configuration.
3. Select your APN (Access Point Name) from the suggested list, then check
Select .
4. Press the button and select Connect.
5. Allow connection sharing on your telephone. This procedure will vary according
to your telephone model. Please refer to the compatibility page of the Parrot
ASTEROID Classic for more information.
Connexion via USB
If your phone supports 3G connection sharing via USB, connect your phone to the
Parrot ASTEROID Classic using the USB cable/micro-USB provided with your
phone.
Internet
27
1. Make sure that your phone’s keypad is unlocked, then connect the phone to the
Parrot ASTEROID Classic using the USB cable/micro-USB provided with your
phone. You can also connect the phone using the USB extension cable
provided with the Parrot ASTEROID Classic. This connection also enables you
to recharge your phone’s battery.
N ote: Do not use the white iPod U SB port to connect your phone to the Parrot ASTEROID
C lassic.
2. Select your APN (Access Point Name) from the suggested list, then check the
option Select. You can then modify this setting by selecting Configuration >
Network > USB.
> A pop-up window indicating that USB connection sharing has been activated
will appear.
Check connection status
To check connection status, select Settings > Network > Information > Status.
Using the ASTEROID Market
Several types of applications are available with the ASTEROID Market : music,
geolocation, driver assistance...
All applications may not be available in all countries. The use of some applications may
need prior subscription.
The Parrot ASTEROID Classic is a multitasking device: several applications can run
simultaneously. For example, you can listen to a Webradio station and use a driver
assistance application at the same time.
For more information about installing and using the available applications, refer to the
ASTEROID Market web page : www.parrotasteroid.com.
28
Internet
Creating an ASTEROID Market account
1. Via your computer or your smartphone, connect to :
https://www.parrotasteroid.com/asteroidmarket.
2. Click on Create an account.
3. Follow the instructions on screen.
Wa rning : Once an account has been created, the U ser nam e and C ountry fields can no
longer be m odified. The applications available on ASTEROID M arket will depend on the
country selected.
The confirmation code is a four-digit code. You will be asked to enter this code for
each paid transaction on ASTEROID Market.
Linking an ASTEROID to an ASTEROID Market account
1. On your Parrot ASTEROID Classic, launch the ASTEROID Market application.
2. Enter your identifiers, then press Connect.
Downloading and installing an application
Before starting, you must create your account onASTEROID Market and link this
account with your Parrot ASTEROID Classic (see previous sections).
You can download an application from your Parrot ASTEROID Classic on the Asteroid
market site.
N ote: To reduce data consum ption, we recom m end you download your applications from
the site https://www.parrotasteroid.com /asteroidm arket.
To download an application from the ASTEROID Market site:
1. On your computer, log on to https://www.parrotasteroid.com/asteroidmarket.
2. Insert an SD card on your computer into the appropriate slot or by using a USB/
SD adapter.
N ote: Ensure you have at least twice the size of the application you want to download free
on your SD card. If not, the application will not be downloaded and installed.
3. Select an application and then click Download.
> The download of a file with the extension .ppk starts.
4. Once the download has finished, move this file to your SD card.
Internet
29
Wa rning: Do not renam e the downloaded file.
5. Connect the SD card to your Parrot ASTEROID Classic.
To download and install an application from your Parrot ASTEROID Classic :
1. Start the ASTEROID Market application and then select the class type.
2. Select an application and then press Download.
3. Select the application and then press Install.
Closing an application
Exiting from an application on Parrot ASTEROID Classic without closing it does
not necessarily stop your consumption of 3D data:
- Certain applications can operate in background mode.
- When you exit a music application, the buffer memory continues to load the
current track.
N ote: Buffer m em ory size depends on the capacity of the SD card that is inserted into
Parrot ASTEROID C lassic. Data download stops when the buffer m em ory is full.
To ensure that you do not continue to use 3G data, you must close the application.
To do this, press the
button and select Close.
Uninstalling an application
1. Select Asteroid Market > My applications.
> The list of applications installed on the Parrot ASTEROID Classic is displayed.
2. Select the application.
3. Select Uninstall.
30
Internet
Settings
Clock
You will be asked to set the time and date the first time you use the Parrot ASTEROID
Classic.
Automatic update
The Parrot ASTEROID Classic time can be updated automatically via the RDS signal.
To activate automatic updating of time, select Settings > Date / time > Automatic
update.
Manual adjusting
To manually change the time and date:
1. Select Settings > Date / time.
2. Use the knob to make adjustments.
3. Push the knob to confirm.
Phone
Deactivating announce caller
When you receive an incoming call,the contact name is announced if the number for
this contact is stored in the telephone directory connected to the Parrot ASTEROID
Classic. To deactivate announcing of contact name, select Settings > Telephony and
uncheck the Say calling party name option.
Reversing last name / first name order
You have the possibility of reversing the "last name / first name" or "first name / last
name" order of the directory. This option can be useful if problems occur when using
the voice recognition function.
1. Select Contacts.
Internet
31
2. Press the
button and select Sorting order.
3. Make your adjustment and push the knob to confirm.
N ote: Depending on the m odel of your telephone, it m ay be im possible to reverse the last
nam e / first nam e order.
Setting the ring tone
To change the ring tone for incoming calls, select Settings > Audio > Ring tones.
Network
Enabling GPS location
The option GPS position allows Parrot ASTEROID Classic to determine your exact
position. This information is required when you use geolocation or driving assistance
applications.
You can enable/disable this option when your Parrot ASTEROID Classic connects to
the Internet. You can also activate this option by selecting Settings > Advanced
settings > GPS position.
Sending crash reports
The option Send crash reports is enabled by default. To disable it, select Settings >
Advanced settings > Error reports.
Disable the option Full crash reports so that certain items which may contain names
from the memory or files used by the process which caused the error are not sent.
Audio
Adjusting the volume
To adjust the volume level, select Settings > Audio > Volume. Select the volume type
that you would like to change, then use the knob to make your adjustments.
- Select Player to change the volume of the music mode.
- Select Telephone to change the volume of your communication.
- Select Microphone to change the listening volume of your communication.
- Select Audio message to change the volume of menus and messages read
aloud by the Parrot ASTEROID Classic.
32
Settings
- Select Line input to change the volume when you use the Parrot ASTEROID
Classic with an audio player connected via the Jack / Jack cable.
Using the Virtual Super Bass effect
The Virtual Super Bass effect amplifies bass frequencies psychoacoustically.
To activate or deactivate the Virtual Super Bass effect, select AudioFX > Virtual
Super Bass > Activate.
To change the characteristics of this effect, select AudioFX > Virtual Super Bass >
Settings.
The setting Cutoff frequency allows you to select the
bass cutoff frequency for the speakers (the lowest
frequency that the speakers can generate naturally).
The Virtual Super Bass will reproduce the frequencies
that are lower than this cutoff frequency.
The setting Effect intensity allows you to adjust the level of bass frequencies
generated by the Virtual Super Bass effect.
Using the equalizer
The equalizer allows you to adjust low, medium and high frequencies to your
preferences. To use the equalizer, select AudioFX > Equalizer.
Select Off to deactivate the
equalizer.
Select one of the 7 default
presets to adjust frequencies to
your preferences.
You can also adjust the frequencies manually. To do this:
1. Select the Customise option.
2. Use the knob to select the frequency band, then push the knob to confirm.
3. Use the knob to change the gain, then push the knob to confirm.
4. Press the button when you have finished making your adjustments.
Settings
33
Changing the balance
You can change the sound balance in the passenger cell to achieve optimal listening
comfort for all occupied seats in your vehicle. To do this:
1. Select AudioFX > Balance.
2. Use the knob to adjust the balance (right / left) and press the knob to confirm.
3. Use the knob to adjust the fade (right / left) and press the knob to confirm.
Using the Loudness function
The Loudness function is a dynamic adjustment of bass and treble based on
listening volume. This function compensates for the human ear's loss of sensitivity
to bass and treble frequencies when the volume is low.
To use the Loudness function, select AudioFX >
Loudness. Adjust Loudness to medium or high if
you generally listen to music at a low volume.
Using the automatic volume control function
The Automatic volume control function automatically adjusts the volume of your
music to the surrounding noise level. If the Automatic volume control option is
activated, the music volume will increase or decrease along with the surrounding
noise level.
To activate / deactivate the Automatic volume control function, select AudioFX >
Automatic volume control > Activate.
To change the sensitivity of this function, select AudioFX > Automatic volume
control > Amplitude.
34
Settings
Using the subwoofer
The Subwoofer function allows you to activate and adjust the subwoofer output.
To activate or deactivate it, select AudioFX > Subwoofer > Activate.
To adjust it, select AudioFX > Subwoofer > Settings. The setting Cutoff frequency
allows you to select the maximum frequency sent to the subwoofer output. The
setting Amplitude allows you to adjust its level.
N ote: The subwoofer output m ust be connected to an external am plifier or an am plified
subwoofer.
Music
Displaying album covers
You have the possibility of displaying album covers while the album is playing if it is
included in the tags (metadata) of your audio file.
Linking an image to an album
If there are no images included in the tags of your audio files, you can add an image in
.jpg format to the corresponding folder. If there are several images in the folder, the
Parrot ASTEROID Classic will display the image entitled cover.jpg by preference.
N ote: The im age size m ust be less than 1 M B.
Activating / deactivating album cover display
If you would like to deactivate album cover display, press the
button and check /
uncheck the Album cover option.
Using the Random Play option
To activate / deactivate random play of music files, press the
button while music is
playing, then check / uncheck the option Random play.
Using the Repeat option
To activate / deactivate the repeat option for music files:
1. While music is playing, press the
button and select Repeat.
2. Select Deactivate, Repeat song or Repeat all then push the knob to confirm.
Settings
35
Display
Adjusting brightness
1. Select Settings > Display > Brightness.
2. Use the knob to adjust the screen brightness.
3. Push the knob to confirm.
4. Use the knob to adjust the facade brightness.
5. Push the knob to confirm.
Switching from day / night mode
The day / night mode adapts the screen brightness to exterior brightness conditions.
To switch from day / night mode, select Settings > Display > Night mode.
N ote: You can also push the knob for 2 seconds to switch from day / night m ode.
Troubleshooting
Before you begin
Make sure the “Goodbye” message is displayed on the Parrot ASTEROID Classic
screen when you turn the ignition off. Refer to the Checking the wiring section for
more information.
Reset the Parrot ASTEROID Classic. To do so, remove the faceplate then use a
paper clip to press the Reset button. Hold down the Reset button for 3 seconds.
Make sure you have the latest software update on your Parrot ASTEROID Classic.
To do so, select Settings > About > Version. Compare this number with the one on
our website, Downloads section.
36
Settings
Problems while using the phone function
Make sure your phone is compatible with the Parrot ASTEROID Classic. To do so,
refer to the compatibility list of the Parrot ASTEROID Classic.
If your phone is compatible with the Parrot ASTEROID Classic and if you already
have the latest software update:
1. Erase the memory of the Parrot ASTEROID Classic. To do so, select Settings >
Advanced settings > Factory settings.
2. On your telephone, erase the Parrot system from the list of Bluetooth peripherals
(or reboot your iPhone®).
3. Repeat the pairing procedure for the 2 devices.
Problems while using the music function
Several minutes of loading may be necessary when connecting your audio
peripheral (USB / SD / iPod) to the Parrot ASTEROID Classic for the first time,
particularly if you are using audio peripheral with a large capacity or containing
many audio files. This loading time will allow your audio files to be accessible via
voice recognition.
Reboot your iPod / iPhone before connecting it to the Parrot ASTEROID Classic.
To reboot your iPod / iPhone (this procedure will not erase any of your data) :
- iPod: press Menu and the centre button simultaneously until the iPod reboots.
- iPhone: Press the On/Off button and the Home button simultaneously until the
iPhone reboots. Do not touch the screen when the message “Slide to shutdown”
appears.
Some problems may occur if the iPod / SD card / USB device is already connected to
the Parrot ASTEROID Classic before you turn on the ignition. Connect the iPod /
SD card / USB device once the ignition is turned on.
For more information
Refer to our online troubleshooting page.
Troubleshooting
37
General information
Warranty
Without prejudice of legal warranty, Parrot products are warranted during 1 year from
the date of purchase for defects in materials and workmanship, provided that no
deterioration to the product has been made, and upon presentation of proof of
purchase (invoice) to the retailer. Warranty does not cover: upgrading of the software
items of the Parrot products with Bluetooth cell phones for compatibility purpose, data
recovery, deterioration of the external aspect due to normal wear of the product, any
damage caused by accident, misuse, misapplication, or non-Parrot products. Parrot is
not responsible for storage, loss or damaged to data during transit or repair. Any
product wrongfully declared to be defective will be returned to sender and inspection,
process and carriage costs will be invoiced to him.
Correct disposal of This Product (Waste Electrical & Electronic Equipment)
This marking shown on the product or its literature, indicates that it should not be
disposed with other household wastes at the end of its working life. To prevent
possible harm to the environment or human health from uncontrolled waste disposal,
please separate this from other types of wastes and recycle it responsibly to promote
the sustainable reuse of material resources.
Household users should contact either the retailer where they purchased this product,
or their local government office, for details of where and how they can take this item for
environmentally safe recycling. Business users should contract their supplier and the
terms and conditions of the purchase contract. This product should not be mixed with
other commercial wastes for disposal.
Modifications
The explanations and specifications in this guide are given for information purposes
only and may be modified without prior notice. They are deemed to be correct at time
38
Troubleshooting
of going to press. The utmost care has been taken when writing this guide,as part of the
aim to provide you with accurate information. However, Parrot shall not be held
responsible for any consequences arising from any errors or omissions in the guide, nor
for any damage or accidental loss of data resulting directly or indirectly from the use of
the information herein. Parrot reserves the right to amend or improve the product
design or user guide without any restrictions and without any obligation to notify users.
As part of our ongoing concern to upgrade and improve our products, the product that
you have purchased may differ slightly from the model described in this guide. If so, a
later version of this guide might be available in electronic format at Parrot’s website at
www.parrot.com.
FCC Compliance Statement
This device complies with part 15 of the FC C rules. Operation is subject to the
following two conditions:
(1). this device may not cause harmful interference, and
(2). this device must accept any interference received, including interference that may
cause undesired operation.
Note: The manufacturer is not responsible for any radio or tv interference caused by
unauthorized modifications to this equipment. Such modifications could void the
user’s authority to operate the equipment.
Canada Class B statement: This Class B digital apparatus complies with Canadian
ICES-003
Copyrights
Copyright © 2011 Parrot. All Rights Reserved
General information
39
Declaration of Conformity
We, Parrot S.A. 174 quai de Jemmapes, 75010 Paris, France, declare under
our sole responsibility that our product, the Parrot ASTEROID Classic to
which this declaration relates is in conformity with appropriate standards
EN 60065 :2002/A1 :2006/A11 :2008, EN 50371 (2002), EN 300328 v1.7.1
and EN 301 489-17 v1.3.2 following the provision of Radio Equipment and
Telecommunication
Equipment
directive
1999/5/EC
R&TTE
and
2004/104/CE Automotive directive amended by the 2009/19/CE directive.
http://www.parrot.com/fr/support/guidesdaideenligne/parrot-asteroid/
asteroid_ce_conformity_declaration.pdf
40
General information