1
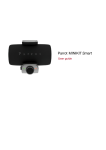
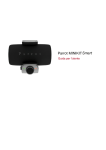
Parrot MINIKIT Smart
User guide
Parrot MINIKIT Smart
Before you begin
................................................................................................................0
Installation ................................................................................................................4
Installing the Parrot MINIKIT Smart
..................................................................................................................................................................4
Installing the phone
..................................................................................................................................................................6
Charging the Parrot MINIKIT Smart
..................................................................................................................................................................6
Charging the phone
..................................................................................................................................................................7
Getting started
................................................................................................................8
Turning the Parrot MINIKIT Smart on / off
..................................................................................................................................................................8
Accessing the Parrot MINIKIT Smart menu
..................................................................................................................................................................8
Connecting a phone by Bluetooth
..................................................................................................................................................................8
Synchronising the phonebook
..................................................................................................................................................................9
Recording voice tags
..................................................................................................................................................................9
Phone
................................................................................................................10
Receiving a call
..................................................................................................................................................................10
Making a call
..................................................................................................................................................................10
Using the Parrot MINIKIT Smart while on a call
..................................................................................................................................................................11
Troubleshooting
................................................................................................................13
The kit says «Memory full»
..................................................................................................................................................................13
The kit seems to be frozen
..................................................................................................................................................................13
The kit does not seem to work with my phone
..................................................................................................................................................................13
General information
................................................................................................................14
Before you begin
All functions requiring an increased attention should only be used while the vehicle is stationary. Your
safety and the one of the other road users prevails over your phone call or the GPS instructions.
The quality of your GPS signal may be decreased if your vehicle has an athermic windscreen.
3
Installation
Installing the Parrot MINIKIT Smart
Warning: Avoid any installation which could hinder the use of any important command or hinder the
driver's visibility. Do not install the Parrot MINIKIT Smart in the airbag deployment area or in a possible
head impact area. Make sure it is not exposed to the air stream from air vents.
Clean the area with an appropriate cleaning product then mount the craddle on the windscreen. To do
so, press the suction cup against the windscreen and lift the locking lever until the mounting kit is
correctly fixed.
If you want to install the Parrot MINIKIT Smart on your dashboard, first stick the provided circular part on
your dashboard. This support is necessary to affix the suction cup. Once you have stuck the support on
the dashboard, wait for approximately 2 hours to make sure the adhesive tape adheres well.
The cooling and heating cycle inside your vehicle may cause the suction cup to detach from the
windscreen. Make sure the suction cup is properly affixed to the windscreen each time you use the
Parrot MINIKIT Smart. If it is not the case, the device may fall whilst driving. Reinstall the suction cup if
necessary.
Install the Parrot MINIKIT Smart on the mounting kit. Make sure that the Parrot MINIKIT Smart is correctly
secured to the mount by checking the connection on both sides of the magnetic part.
4
Installation
In order to prevent the device from moving while driving, lock the mount in place using the included
Allen wrench. Conversely, if you feel that the MINIKIT Smart's magnets and its mount are inverted
(repulsion rather than attraction), use the Allen key to unlock the mount's position and pivot its end.
To release the Parrot MINIKIT Smart, press the release buttons on the craddle.
Extract the microphone from the Parrot MINIKIT Smart and use the provided clips to install it on the
sunvisor or on the dashboard.
Installation
5
Note: Removing the microphone is necessary in particular during highway driving or when the noise level is
high. Under normal ambient noise conditions, you may leave it on the Parrot MINIKIT Smart.
Installing the phone
Install your phone on the Parrot MINIKIT Smart by inserting its upper side first.
If your phone supports the GPS feature, install it in an easily accessible and visible location.
Charging the Parrot MINIKIT Smart
The Parrot MINIKIT Smart must be charged before being used for the first time. To do so, plug the
charger into your vehicle’s cigar lighter or connect the Parrot MINIKIT Smart to your computer using a
USB/mini-USB cable.
6
Installation
The LED located next to the mini-USB port turns on to indicate that the battery is being charged. The
LED turns off once the Parrot MINIKIT Smart is fully charged. It takes around 2 hours to charge the Parrot
MINIKIT Smart.
When the battery level is low, the Parrot MINIKIT Smart emits a series of beeps. The Parrot MINIKIT
Smart will turn off approximately 15 minutes later.
Charging the phone
If your phone can be charged via USB, you can use the Parrot MINIKIT Smart to charge it (refer to your
phone user manual for more information). Use the cable provided with your phone if necessary.
Note: The Parrot MINIKIT Smart USB port will also allow you to install the software updates of the kit.
Charging your phone is only possible if the Parrot MINIKIT Smart is connected to the cigar lighter
charger.
Installation
7
Getting started
Turning the Parrot MINIKIT Smart on / off
Hold down the red button for 3 seconds to turn on / off the Parrot MINIKIT Smart.
Accessing the Parrot MINIKIT Smart menu
Press the jog wheel to access the main menu.
Browse through the menus by turning the jog wheel and confirm with the green button or by pressing the
jog wheel.
To exit the menu, press the red button or wait for a few seconds.
Connecting a phone by Bluetooth
Checking the compatibility of a phone
Refer to the compatibility section of our website to check if your phone is compatible with the Parrot
MINIKIT Smart.
Pairing a phone
Before using the Parrot MINIKIT Smart with your phone, you first have to pair both devices. The pairing
process is only required once.
1. From your Bluetooth® phone, search for Bluetooth peripherals.
2. Select «Parrot MINIKIT Smart».
3. Enter the « 0000 » PIN code if prompted to do so.
> The Parrot MINIKIT Smart says « Pairing successful ».
Note: Pairing procedures for the most common phones are available on the compatibility section of our
website.
Automatic connection
Once your phone is paired to the Parrot MINIKIT Smart, the connection between both devices will be
automatically established each time you turn on the Parrot MINIKIT Smart. Depending on the model of your
phone, you may have to authorize the connection to the Parrot MINIKIT Smart to allow the automatic
connection.
Note: If several phones paired with the Parrot MINIKIT Smart are in the vehicle, the Parrot MINIKIT Smart
automatically connects itself to the last phone you used with it.
8
Getting started
Managing the “Memory full” problem
You can pair up to ten devices. If you attempt to pair an eleventh phone, the kit says «memory full». You
must clear the memory by holding down both the red button and the jogwheel for three seconds. Doing so
also clears all the contacts.
Synchronising the phonebook
Note: Only the contacts stored in the phone memory are synchronized. If your contacts are stored in the
SIM card memory, transfer them into the phone memory.
With some Bluetooth phones, the phonebook is automatically synchronized in the kit’s memory.
Notes:
- The automatic synchronization is limited to 2 000 contacts for each paired phone and to 20 000
contacts for all paired phones.
- The synchronisation will relaunch itself each time your phonebook has been modified.
If your phone doesn’t support automatic synchronization, you can also send contacts manually from
your mobile to the car kit via Bluetooth. To do so, select Receive contacts. Refer to your phones’ user
guide for more information about sending contacts (via Object Push).
Recording voice tags
All your contacts, after automatic synchronization or Object Push process, are directly provided with a
voice tag in the Parrot MINIKIT Smart. Consequently, you don’t have to record your own voice tag on
each contact to make a call via the voice recognition process.
However, if the Parrot MINIKIT Smart doesn’t understand the name of one of your contacts or if a voice
tag is too long, you can record a new one. To do so, select Add voice tags and then select the contact
and record your voice.
Getting started
9
Phone
Receiving a call
An incoming call is indicated by a vocal message. The name of the caller is announced if their number is
recorded in the phonebook of the phone connected to the Parrot MINIKIT Smart.
If you want to answer the call, press the green button.
If you want to refuse the call, press the red button.
Making a call
Making a call via voice recognition
1. To start the voice recognition feature, press the green button.
> The Parrot MINIKIT Smart asks you the name of the contact you want to call.
2. Say the name of the contact and the type of number («Work», «Cellphone»...) if there are several
numbers associated to your contact.
> The call is automatically launched if the voice tag is correctly understood.
> If it is not the case, a confirmation message is asked by the kit. Confirm by saying «Yes» or
«Call».
Note: At any time, press the red key to exit voice recognition mode.
Calling a contact with several phone numbers
If there are several phone numbers associated to the contact you want to call, you can specify the type of
number. To do so, the following vocal commands are available:
- Home
- Work
- Mobile / on mobile
- Other
- At home
- At work
- Cellular / on cellular
- General
- Office / At office
- Cell / on cell
- Default
- At the office
- Mobile phone / on
- Preferred
mobile phone
- Cellular phone / on
cellular phone
- Cell phone / on cell
phone
10
Phone
Calling a contact in the phonebook
If the contact you want to call is in the phonebook of the phone connected to the Parrot MINIKIT Smart:
1. Press the jog wheel to enter the main menu and select Phonebook.
2. Select a letter and press the jog wheel.
> Once the desired contact chosen:
-
Press the green button to call this contact.
Or use the jog wheel to choose between different numbers of the same contact.
Bringing up the last dialled number
Hold down the green key of the Parrot MINIKIT Smart for two seconds to redial the last dialled number.
Using the Parrot MINIKIT Smart while on a call
Note: Navigation instructions are not played by the Parrot MINIKIT Smart during a call.
Adjusting the volume
Use the jog wheel during a call to adjust the communication volume.
> The volume setting is saved for subsequent calls.
Transfering a call to the phone
During a call, if you want to continue the conversation on your phone (private conversation), press the
green button of the Parrot MINIKIT Smart.
> The call is automatically transferred to the phone.
If you want to switch back to the kit, press the green button again.
Managing a second call
During a call, you can receive another call if your phone supports this functionality.
- Press the green button to accept the second incoming call.
> The first call is automatically put on hold.
- Press the red button to decline the second incoming call.
You can also hang up directly from your phone.
- Press the green button to switch from a call to another.
Managing voice mail
During a call, the Parrot MINIKIT Smart allows you to send DTMFs to manage your voice mail for example. To
do so :
1. Press the jog wheel to access the DTMF menu.
> « 0 » is heard from the kit.
2. Use the jog wheel to select your DTMF between the following possibilities : 0,1,2,3,4,5,6,7,8,9,# or
*.
3. Press the jog wheel to send this DTMF to your phone.
Phone
11
Ending a call
Press the red button to end a call.
12
Phone
Troubleshooting
The kit says «Memory full»
You can pair up to ten devices. If you attempt to pair an eleventh phone, the kit says «memory full». You
must clear the memory by holding down both the red button and the jogwheel for three seconds. Doing so
also clears all the contacts.
The kit seems to be frozen
In case of malfunction, you can reboot the Parrot MINIKIT Smart. To do so, press the Reset button.
The kit does not seem to work with my phone
Make sure your phone is compatible with the Parrot MINIKIT Smart. To do so, refer to the compatibility list
of the Parrot MINIKIT Smart available on our website www.parrot.com, in the Support & Downloads
section.
If your phone is compatible with the Parrot MINIKIT Smart, make sure you have the latest software version
on your Parrot MINIKIT Smart. This update and the update procedure are available on our website www.
parrot.com, in the Support & Downloads section.
Troubleshooting
13
General information
Warranty
Without prejudice of legal warranty, Parrot products are warranted during 1 year from the date of purchase
for defects in materials and workmanship, provided that no deterioration to the product has been made, and
upon presentation of proof of purchase (date of purchase, location of sale and product serial number) to the
retailer. Warranty does not cover: upgrading of the software items of the Parrot products with Bluetooth cell
phones for compatibility purpose, data recovery, deterioration of the external aspect due to normal use of
the product, any damage caused by accident, misuse, misapplication, or non-Parrot products. Parrot is not
responsible for storage, loss or damaged to data during transit or repair. Any product wrongfully declared to
be defective will be returned to sender and inspection, process and carriage costs will be invoiced to him.
Information relating to the battery and to the charger
Only use the cigar-lighter adaptable charger provided. Never use a damaged charger. Use only the provided
USB cable with the cigar lighter charger.
Remember to charge the device before storing for a long period of time.
Do not leave your device in hot or cold areas (car in direct sunlight or parked in a garage in winter). Always
store in area where temperatures remain stable.
The charger and the device can become hot during charging. Do not cover.
Do not disassemble the device. In the event of battery leakage, avoid contact of the liquid with skin and
eyes. If contact occurs, rinse affected areas with plenty of water and contact a doctor.
If the battery is not used for a long period of time, its charge level diminishes of its own accord.
When the battery is entirely charged, disconnect it from the charger. Overcharge may reduce the battery’s
lifespan.
Do not leave the cigar-lighter adaptable charger connected when it is not in use.
Very low or very high temperatures may affect the battery charge capacity and battery lifespan.
You must dispose of your product in accordance with the laws and regulations in force. Since the device
contains electronic components and a battery, it must not be disposed of with household waste. Contact
your local authority to find out more about disposal options and recycling.
Correct disposal of This Product (Waste Electrical & Electronic Equipment)
This marking shown on the product or its literature, indicates that it should not be disposed with other
household wastes at the end of its working life. To prevent possible harm to the environment or human
health from uncontrolled waste disposal, please separate this from other types of wastes and recycle it
responsibly to promote the sustainable reuse of material resources.
Household users should contact either the retailer where they purchased this product, or their local
government office, for details of where and how they can take this item for environmentally safe recycling.
14
General information
Business users should contract their supplier and the terms and conditions of the purchase contract. This
product should not be mixed with other commercial wastes for disposal.
Modifications
The explanations and specifications in this guide are given for information purposes only and may be
modified without prior notice. They are deemed to be correct at time of going to press. The utmost care has
been taken when writing this guide,as part of the aim to provide you with accurate information. However,
Parrot shall not be held responsible for any consequences arising from any errors or omissions in the guide,
nor for any damage or accidental loss of data resulting directly or indirectly from the use of the information
herein. Parrot reserves the right to amend or improve the product design or user guide without any
restrictions and without any obligation to notify users. As part of our ongoing concern to upgrade and improve
our products, the product that you have purchased may differ slightly from the model described in this
guide. If so, a later version of this guide might be available in electronic format at Parrot’s website at www.
parrot.com.
FCC Compliance Statement
This device complies with part 15 of the FCC rules. Operation is subject to the following two conditions: (1).
this device may not cause harmful interference, and (2). this device must accept any interference received,
including interference that may cause undesired operation.
Note: The manufacturer is not responsible for any radio or tv interference caused by unauthorized
modifications to this equipment. Such modifications could void the user’s authority to operate the
equipment.
FCC §15.105 statement: This equipment has been tested and found to comply with the limits for a Class B
digital device, pursuant to part 15 of the FCC Rules. These limits are designed to provide reasonable
protection against harmful interference in a residential installation.
This equipment generates, uses and can radiate radio frequency energy and, if not installed and used in
accordance with the instructions, may cause harmful interference to radio communications. However, there
is no guarantee that interference will not occur in a particular installation. If this equipment does cause
harmful interference to radio or television reception, which can be determined by turning the equipment off
and on, the user is encouraged to try to correct the interference by one or more of the following measures:
- Reorient or relocate the receiving antenna.
- Increase the separation between the equipment and receiver.
- Connect the equipment into an outlet on a circuit different from that to which the receiver is connected.
- Consult the dealer or an experienced radio/TV technician for help.
Canada Class B statement: This Class B digital apparatus complies with Canadian ICES-003
Declaration of Conformity
We, Parrot S.A. of 174 quai de Jemmapes, 75010 Paris, France, declare under our sole
responsibility that our product, the Parrot MINIKIT Smart to which this declaration relates in
conformity with appropriate standards EN300328, EN301489-17, EN60950 following the
General information
15
provision of Radio Equipment and Telecommunication Equipment directive (1999/5/EC
R&TTE), with requirements covering EMC directive 2004/108/EC, Low Voltage directive 73/23/
EEC and automotive directive 72/245/EEC amended by 2006/28/EC directive.
Identification N. 394 149 496 R.C.S. PARIS - Parrot S.A.
Copyrights
Copyright © 2010 Parrot.
Licences
The Bluetooth word mark and logos are owned by the Bluetooth SIG, Inc. and any use of such marks by
Parrot S.A. is under license.
Bluetooth QDID : B016898, B013838, B012423
Parrot, Parrot Minikit and the Parrot logo are registered trademarks of PARROT SA.
Other trademarks and trade names are those of their respective owners.
16
General information