1
CAN DIEN TU TAN HIEP THANH
DI - 80 / 80SS User Manual
Issue
Date
Software Version
01
April 2002
V1.27
TERAOKA WEIGH-SYSTEM PTE LTD
3A, Tuas Avenue 8
Singapore 639218
TEL: (65) 6861 3911
FAX: (65) 6861 2242
URL: www.teraoka.com.sg
www.tanhiepthanh.com.vn
-1DI-80 USER MANUAL
CONTENT
CAN DIEN
TU TAN HIEP
1. REGISTRATION
MODE
THANH
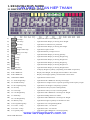
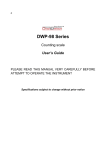
1.1 DISPLAY UNIT INDICATORS ........................................................................................................ 4
1.2 KEY SHEET LAYOUT AND KEYS FUNCTION .......................................................................... 5
1.2.1 DI-80 and DI-80SS Key Sheet Layout ......................................................................................... 5
1.2.2 Keys Functions............................................................................................................................... 6
1. 3 REGISTRATION MODE DESCRIPTION ..................................................................................... 8
1.3.1 Weight Mode.................................................................................................................................. 8
1.3.2 Counting Mode Type 1.................................................................................................................. 8
1.3.3 Counting Mode Type 2.................................................................................................................. 8
1.4 SEGMENT CHECK & STAND-BY-STATUS ................................................................................. 9
1.5 TARE OPERATION ......................................................................................................................... 10
1.5.1 Tare Setting At Registration Mode............................................................................................ 10
1.5.2 Tare Value Exchange .................................................................................................................. 12
1.5.3 Tare Override .............................................................................................................................. 15
1.6 NET/GROSS OPERATION ............................................................................................................. 16
1.7 PLU CALL UP ................................................................................................................................... 17
1.7.1 Call Up PLU by Digits Numeric Number.................................................................................. 17
1.7.2 Call Up PLU by Teraoka Code / ASCII Code .......................................................................... 18
1.8 SET NEW ITEM CODE IN REGISTRATION MODE ................................................................ 19
1.9 MANUAL PRINT .............................................................................................................................. 20
1.9.1 Weighing Mode............................................................................................................................ 20
1.9.2 Counting Mode ............................................................................................................................ 21
1.10 ACCUMULATION AND SUBTRACTION ................................................................................. 22
1.10.1 Single Item Transaction............................................................................................................ 22
1.10.2 Multiple Items Transaction ...................................................................................................... 26
1.11 SWITCHING PLATFORM ........................................................................................................... 32
1.12 UNIT WEIGHT OPERATION ...................................................................................................... 34
1.12.1 Unit Weight Setting in Registration Mode.............................................................................. 34
1.12.2 Clearing Unit Weight ................................................................................................................ 36
1.12.3 Re-computing Unit Weight in Memory................................................................................... 37
1.13 GENERAL SET POINT SETTING............................................................................................... 38
1.14 CHECKER OUTPUT ..................................................................................................................... 39
1.14.1 Weighing Mode.......................................................................................................................... 39
1.14.2 Counting Mode .......................................................................................................................... 40
www.tanhiepthanh.com.vn
-2DI-80 USER MANUAL
1.15 HOLDING FUNCTION.................................................................................................................. 41
CAN DIEN TU TAN HIEP THANH
1.15.1 Weighing Mode.......................................................................................................................... 41
1.15.2 Counting Mode .......................................................................................................................... 42
1.16 INVENTORY OPERATION.......................................................................................................... 43
1.16.1 Manual Transaction .................................................................................................................. 43
1.16.2 Total Transaction ...................................................................................................................... 44
1.17 WEIGHT UNIT SWITCHING ...................................................................................................... 46
www.tanhiepthanh.com.vn
-3DI-80 USER MANUAL
1. REGISTRATION MODE
CAN
DIEN
TU TAN
1.1 DISPLAY
UNIT
INDICATORS
HIEP THANH
1)
Zero lamp
:
Lights when scale is at the ZERO point.
2)
Gross lamp
:
Light when Main Display is showing Gross Weight.
3)
Tare lamp
:
Light when tare subtraction is performed.
4)
Net lamp
:
Light when Main Display is showing Net Weight.
5)
Weight Stable lamp
:
Light when weight is stable.
6)
Battery Low lamp
:
Light when Battery Voltage runs low.
7)
Pcs lamp
:
Light when Main Display is showing Quantity.
8)
kg lamp
:
Light when Main Display is showing Weight in kg.
9)
lb lamp
:
Light when Main Display is showing Weight in lb.
10)
g lamp
:
Light when Main Display is showing Weight in g.
11)
oz lamp
:
Light when Main Display is showing Weight in oz.
12)
dwt lamp
:
Light when Main Display is showing Weight in dwt.
13)
MAIN DISPLAY
:
To display Weight or Quantity. (Depending on the Mode of operation)
14)
SUB-1 DISPLAY
:
Display Total Weight, Unit Weight, Set Point Data or PLU Name.
15)
SUB-2 DISPLAY
:
Display Unit Weight, Quantity, Set Point Data or PLU Name.
16)
CHECKER LAMPS
:
Light when Set Point in used.
17)
L1: Total Weight lamp
:
Light when SUB-1 DISPLAY showing Unit Weight.
18)
L2: Insufficient lamp
:
Light when Net weight is below a specific percentage of the capacity weight.
19)
L3: Re-computing lamp
:
Light when Unit Weight re-computing is possible.
20)
L4: IN lamp
:
Light when Inventory IN (For Counting Mode)
21)
L5: OUT lamp
:
Light when Inventory OUT (For Counting Mode)
22)
L6: Unit Weight lamp
:
Light when SUB-1 DISPLAY is showing Unit Weight.
23)
L7: Hold lamp
:
Light when Holding function is enables.
24)
L8: Unit Weight lamp
:
Light when SUB-2 DISPLAY is showing Unit Weight.
25)
L9: Memory lamp
:
Light when Weight or Quantity accumulation is done.
26)
L10: Programming lamp
:
Light when User in Programming Mode.
27)
L11: Scale - 1 lamp
:
Light when Scale - 1 is selected.
28)
L12: Scale - 2 lamp
:
Light when Scale - 2 is selected.
29)
L13: Quantity lamp
:
Light when SUB-2 DISPLAY is showing Quantity.
DI-80 USER MANUAL
www.tanhiepthanh.com.vn
-4-
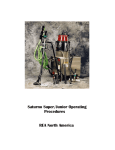
1.2 KEY SHEET LAYOUT AND KEYS FUNCTION
CAN DIEN TU TAN HIEP THANH
1.2.1 DI-80 and DI-80SS Key Sheet Layout
DI-80 Key Sheet Layout
DI - 80SS Key Sheet Layout
www.tanhiepthanh.com.vn
-5DI-80 USER MANUAL
1.2.2 Keys Functions
CAN DIEN TU TAN HIEP THANH
ON / OFF KEY (DISPLAY)
Turn display ON or OFF.
NUMERIC KEY
Enter numeric value.
to
MODE KEY
To switching between Weight Mode and Counting Mode.
TARE KEY
To setting or clearing tare weight.
CLEAR KEY
To clear numeric data or PLU Data.
Exit from Add. Mode.
Escape from General Set-Point programming mode.
RE-ZERO KEY
Reset Weight display to zero.
PCS KEY
To computing unit weight by sampling.
SCALE KEY
To switching between Scale 1 & 2.
UNIT WEIGHT KEY
To enter Unit Weight.
Up date re-computing Unit Weight or Tare weight to PLU file.
PLUS KEY
Accumulate the Total Weight or Quantity.
To issue receipt (Build-in Printer) or sending data to PC or Barcode printer.
MINUS KEY
To void the Total Weight or Quantity.
To issue receipt (Build-in Printer) or sending data to PC or Barcode printer.
PRINT KEY
To issue receipt (Build-in Printer) or sending data to PC or Barcode printer.
www.tanhiepthanh.com.vn
-6DI-80 USER MANUAL
CODE KEY
CAN DIEN
TU
TAN HIEP THANH
Call up
PLU data.
To select Inventory IN or OUT for individual item in Counting Mode.
NET/GROSS KEY
To switching between NET and GROSS display.
To view the Inventory of the individual item.
DOT KEY
To enter Decimal point.
To entry Teraoka or ASCII code for call up PLU data.
SET POINT KEY
To program or view General Set point data.
To change or view individual PLU Set point data.
FEED KEY
Feed receipt paper (For Build-in Printer)
HOLD KEY
To enable or disable Holding function.
UNIT SWITCHING KEY
To switching Weight Unit between kg & lb or oz, g & dwt.
www.tanhiepthanh.com.vn
-7DI-80 USER MANUAL
1. 3 REGISTRATION MODE DESCRIPTION
CAN DIEN TU TAN HIEP THANH
DI-80 / DI-80SS has two modes (Weight Mode and Counting Mode) can be switched alternatively by pressing [MODE] key on
keypad and there are two type of Counting Mode will depending on SPEC 00 bit 3 setting.
1.3.1 Weight Mode
When DI-80 is powered up, it will go to Weight Mode, where the Main Display show the Weight and the Sub- Display will
showing Set point 1 & Set point 2 or PLU Name is depending on SPEC 00 bit 0 setting.
Weight Mode
1.3.2 Counting Mode Type 1
Main Display showing the Total Weight and Sub-Display will show the Unit Weight and Quantity (SPEC 00 bit set to "0").
Counting Mode - Type 1
1.3.3 Counting Mode Type 2
Main Display showing the Quantity and Sub-Display will show Weight and Unit Weight (SPEC 00 bit set to "1").
Counting Mode - Type 2
www.tanhiepthanh.com.vn
-8DI-80 USER MANUAL
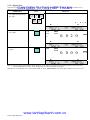
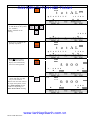
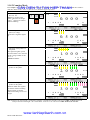
1.4 SEGMENT CHECK & STAND-BY-STATUS
KEY
DISPLAY
CAN
DIEN
TU
TAN
HIEP
THANH
1. Connect to AC plug supply
OPERATION
and check if anything is on
the platforms. If so, remove
the item and then press
[ON/OFF] to start segment
check.
The Model (di 80SS or di
80) and Software Version
Number will appear on the
LCD.
2. After finish segment check,
scale on Stand - By - Status
of Weighing Mode.
d i
8 0 S S
V E R S I O N
1
.
¼0»
NET
0. 0 0 0
T
Note 1: If there is anything on the Platforms and it exceeds
scale start range, following error message will
appear:
T
E r r
S T A R T
U P
www.tanhiepthanh.com.vn
-9DI-80 USER MANUAL
2 7
E R R
kg
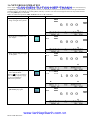
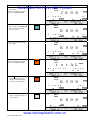
1.5 TARE OPERATION
CAN DIEN TU TAN HIEP THANH
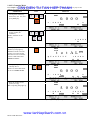
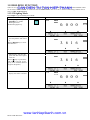
1.5.1 Tare Setting At Registration Mode
There are two ways to set Tare Weight in Weighing Mode or Counting Mode, One Touch Tare and Digital Tare setting. The
limit of Tare Weight is depending on SPEC 27 bit 1 & bit 0 setting. The following operation examples show two ways of
subtracting the Tare Weight of a 20g tray.
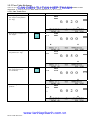
1.5.1.1 One Touch Tare
This function is to weight the actual weight of the tare then subtract its weight to get the tare value for all of PLU's.
OPERATION
KEY
DISPLAY
¼0»
NET
0. 0 0 0
Stand-by-Status
(Weighing Mode)
T
1. Place a tare weight on the
platform (Ex. 20g)
kg
T
NET
0. 0 2 0
kg
T
2. Press [T] key to subtract the
tare weight.
¼T»
NET
0. 0 0 0
T
3. Remove the tare weight (Ex.
20g) from platform.
T
¼0»
¼T»
NET
-
0. 0 2 0
T
4. Press [T] key to clear the tare
weight.
kg
kg
T
¼0»
NET
0. 0 0 0
T
kg
T
Note 1: After One Touch Tare and called up a PLU, if tare value is set in PLU File in advance, the PLU Tare value will override
the One Touch Tare value, if not, the One Touch Tare value will remain for the PLU.
www.tanhiepthanh.com.vn
- 10 DI-80 USER MANUAL
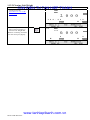
1.5.1.2 Digital Tare
This function can be used when tare weight is decided in advance. The knowing tare value can be entering by numeric keys.
Note: To enable this function, SPEC 27 bit 2 must set to "1" in advance.
OPERATION
KEY
DISPLAY
CAN DIEN TU TAN HIEP THANH
1. At Weighing Mode, enter the
tare weight by numeric key
(Ex. 20g)
0
T
2. Press [T] key to subtract the
tare weight.
0 2
¼0»
¼T»
NET
0. 0 2 0
T
kg
T
¼0»
NET
0. 0 0 0
T
T
Note 1: After set Digital Tare and then called up a PLU, if tare value is set in PLU File in advance, the PLU Tare value will
override the Digital tare value, if not, the Digital Tare value will remain for the PLU.
Note 2: If you want Digital Tare when Weight loaded on platter, SPEC 38 bit 2 must set to "0" in advance. If not, set to "1".
www.tanhiepthanh.com.vn
- 11 DI-80 USER MANUAL
0
T
3. Press [T] key to clear the tare
weight.
.
kg
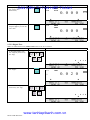
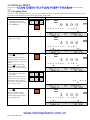
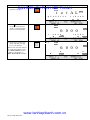
1.5.2 Tare Value Exchange
CAN DIEN TU TAN HIEP THANH
There are two ways to subtract tare weight exchange in Weighing Mode and Counting Mode, Tare Accumulation and Tare
Subtraction. To enable this function, SPEC 29 bit 1 and bit 0must set to "0" in advance.
1.5.2.1 One Touch Tare
OPERATION
KEY
DISPLAY
1. At Weighing Mode, place a
tare weight on the platform
(Ex. 20g)
NET
0. 0 2 0
kg
T
2. Press [T] key to subtract the
tare weight.
¼T»
NET
0. 0 0 0
T
3. Place another tare weight on
the platform (Ex. 50g)
¼T»
kg
T
NET
0. 0 5 0
kg
T
4. Press [T] key to subtract the
tare weight again (Tare
Accumulation).
¼T»
NET
0. 0 0 0
T
5. Remove 20g from the
platform.
¼T»
T
NET
-
0. 0 2 0
T
www.tanhiepthanh.com.vn
- 12 DI-80 USER MANUAL
kg
T
kg
OPERATION
KEY
DISPLAY
CAN DIEN TU TAN HIEP THANH
6. Press [T] key to subtract the
tare weight (Tare
Subtraction).
¼T»
NET
0. 0 0 0
T
7. Remove 50g form platform
and press [T] key to clear the
Tare value.
kg
T
¼0»
NET
kg
0. 0 0 0
T
T
1.5.2.2 Digital Tare
Note: To enable this function, SPEC 27 bit 2 must set to "1" in advance.
OPERATION
KEY
DISPLAY
1. At Weighing Mode, enter
tare weight by numeric key
(Ex. 20g).
0
.
0
2 0
T
2. Press [T] key to subtract the
tare weight.
¼0»
¼T»
NET
-
kg
0. 0 2 0
T
T
3. Enter the tare weight by
numeric key (Ex. 50g).
0
.
T
www.tanhiepthanh.com.vn
- 13 DI-80 USER MANUAL
0
5 0
OPERATION
KEY
DISPLAY
¼0»
CAN DIEN TU TAN HIEP THANH
4. Press [T] key to subtract the
tare weight (Tare
Accumulation).
Total tare value will change
from 20g to 50g.
¼T»
NET
-
kg
0. 0 5 0
T
T
5. Enter tare value by numeric
key (Ex. 30g).
0
.
0
3 0
T
6. Press [T] key to subtract the
tare weight (Tare
Subtraction).
Total tare value will change
from 50g to 30g.
¼0»
¼T»
NET
-
0. 0 3 0
T
7. Press [T] key to clear the
Tare value.
T
¼0»
NET
0. 0 0 0
T
www.tanhiepthanh.com.vn
- 14 DI-80 USER MANUAL
kg
T
kg
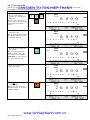
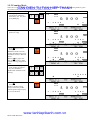
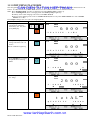
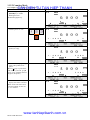
1.5.3 Tare Override
CAN DIEN TU TAN HIEP THANH
This function is to change the tare value or set a new tare when PLU is called up in Weighing Mode and Counting Mode.
For example: Call up PLU in WEIGHING MODE.
OPERATION
KEY
DISPLAY
1. At Weighing Mode, call up
PLU by enters the PLU
Number (Ex. 123) and press
[PLU] key.
If tare value is set in PLU
File in advance, the tare weight
will be displayed on Main
Display.
¼0»
NET
0. 0 0 0
S T
E A
T I
T E
-
C
3 H
kg
5
T
2. Place a tare weight on the
platter (Ex. 50g).
If you knowing the tare value,
enter the tare value by numeric
key and press [T] key.
NET
0. 0 5 0
S T
E A
T I
T E
-
C
3 H
kg
5
T
3. Press [T] key to subtract the
tare weight.
If you want the tare value
update to the PLU File, after
tare subtracted press [UNIT
WEIGHT] key to save the new
tare value to the PLU File.
4. Place the product on the
platter (Ex. 20kg)
¼T»
NET
0. 0 0 0
S T
E A
T I
T E
-
C
3 H
5
T
¼T»
NET
2 0. 0 0 0
S T
E A
T I
T E
-
C
3 H
¼T»
T
NET
2 0. 0 0 0
S T
E A
T I
T E
-
T
www.tanhiepthanh.com.vn
- 15 DI-80 USER MANUAL
kg
5
T
5. Press [¾] key to issue a
receipt or label.
Print Tare value on receipt
(Build-in Printer) can be select
at SPEC 14 bit 2.
kg
C
3 H
5
T
kg
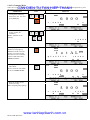
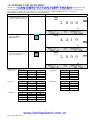
1.6 NET/GROSS OPERATION
CAN DIEN TU TAN HIEP THANH
Gross weight displays are available in both Weighing Mode and Counting Mode. In Weighing Mode, allow user use numeric key
and [PRINT] key to perform printing operation. PLU are not allowed to call up in Gross Mode, but allow call up in NET mode
and then switch to Gross Mode. In Counting Mode, This key is used to view the Gross Weight for the item only and all numeric
keys and [PRINT] key are disabled.
Note: To enable this operation, SPEC 25 bit 0 must set to "0" in advance.
OPERATION
KEY
DISPLAY
1. At Weighing Mode, place
500g of weight on the platter.
NET
0. 5 0 0
kg
T
2. Press [T] key to subtract the
tare weight.
¼T»
NET
0. 0 0 0
kg
T
3. Place another 500g of weight
on the platter.
¼T»
NET
0. 5 0 0
kg
T
4. Press [NET/ B/G] key to
enter GROSS Mode.
Press [¾] key if you want to
issue a receipt or press [+] / [-]
key for Accumulation /
Subtraction operation.
B/G
¼T»
NET
1. 0 0 0
T
5. Back to NET Mode, press
[NET/ B/G] key again.
¼T»
T
NET
0. 5 0 0
T
www.tanhiepthanh.com.vn
- 16 DI-80 USER MANUAL
kg
kg
1.7 PLU CALL UP
CAN DIEN TU TAN HIEP THANH
There are two different type of PLU Code, Digits Numeric Number and Teraoka Code / ASCII Code to call up the programmed
PLUs in Weighing Mode or Counting Mode.
¾ By press the [PLU] key after entering desired Digits Numeric Number of the PLU Code.
¾ By press the [.] key to entry Teraoka or ASCII Code mode to enter Teraoka Code / ASCII Code of the PLU Code.
Note: The machines beeps and following error message "PLU NOT FOUND" appear on the display if enter not existing PLU
Number. Press [C] key to clear the message and then check the PLU Number and try again.
1.7.1 Call Up PLU by Digits Numeric Number
For example: Call up PLU in WEIGHING MODE.
OPERATION
KEY
DISPLAY
1. At Weighing Mode, enter the
existing PLU Number by
numeric key (Ex. 123).
1 2
3
T
2. Press [PLU] key (The PLU
data will appear on the
display).
Insufficient indicator will
light up if Unit Weight for the
Item is set to 0.
Refer to Note 1.
3. Press [C] key to clear the
PLU and display return to
Weighing Mode.
¼0»
NET
0. 0 0 0
S T
E A
T I
T E
-
C
3 H
5
T
¼0»
NET
0. 0 0 0
T
Note 1: If the PLU with Individual PLU Set-Point setting
and SPEC 00 bit 0 is set to "1" and SPEC 07:
SET POINT TYPE (bit 1 & 0) must set to %
WEIGHT or WEIGHT, after display the
Commodity Name for a second, the Set Point data
will appear on Sub-Displays.
kg
T
¼0»
NET
0. 0 0 0
1 .
0 0 0 >
< 2 .
0 0 0
T
www.tanhiepthanh.com.vn
- 17 DI-80 USER MANUAL
kg
kg
1.7.2 Call Up PLU by Teraoka Code / ASCII Code
CAN DIEN TU TAN HIEP THANH
DISPLAY
For example: Call up PLU in Counting Mode.
OPERATION
KEY
1. At Counting Mode, press [.]
key to enter ASCII Code
entry mode.
Using ASCII Code or
Teraoka Code is depending on
SPEC 14 bit 3 setting, 0:
Teraoka Code & 1: ASCII
Code.
2. Enter PLU Code by ASCII
Code (Ex. A12).
Manual or Auto Shift to next
position after enters ASCII
Code or Teraoka Code is
depending on SPEC 06 bit 0
setting.
Refer to Note 1.
3. Press [PLU] key (The PLU
data will appear on the
display).
The Commodity Name will
appear for a second on SubDisplay column.
¼0»
NET
A 0 0
0 0
T
T
¼T»
A 0 3
0 0
kg
A 1 2 T
T
Pcs
¼0»
NET
0. 0 0 0
2
.
0 0 0 0
kg
0
Pcs
¼0»
NET
0. 0 0 0
0
T
Note 1: Press [+] key to next position and [-] key back to previous position.
www.tanhiepthanh.com.vn
- 18 DI-80 USER MANUAL
Pcs
NET
T
4. Press [C] key to clear the
PLU and display return to
Counting Mode.
kg
T
kg
0
Pcs
1.8 SET NEW ITEM CODE IN REGISTRATION MODE
CAN DIEN TU TAN HIEP THANH
This function is used to program a New PLU Code in Registration Mode (Weighing Mode or Counting Mode) and update to
PLU Files. To enable this function, SPEC 04 bit 3 must set to "0" in advance.
For example: Set New PLU Code 246 in Counting Mode.
OPERATION
KEY
DISPLAY
1. At Counting Mode, enter
new PLU Code (Ex. 246) by
numeric key.
2 4
6
T
2. Press [PLU] key
The machine beeps and
following message will appears.
If you don't want the error
buzzer sound and error message
appear, SPEC 19 bit 3 must set
to "1" in advance.
3. Press [PLU] key to store the
New PLU Code in PLU
Files.
P L U
N O T
F O U N D
¼0»
NET
0. 0 0 0
0
T
4. Enter Unit Weight by
numeric key (Ex. 2.0000) and
press [UNIT WEIGHT] key.
Insufficient indicator OFF
after set the Unit Weight.
T
0
Pcs
¼0»
NET
0. 0 0 0
2
.
0 0 0 0
T
5. Update new Unit Weight to
the PLU 246, press [UNIT
WEIGHT] key.
The display will show ----and back to previous display.
kg
kg
0
Pcs
¼0»
NET
0. 0 0 0
2
.
0 0 0 0
T
kg
0
Pcs
Note 1: If you don't want the new PLU Code update to PLU Files but for temporally printing, SPEC 04 bit 3 must set to "1" in
advance or at step 2, press [C] key to cancel.
Note 2: If you want set new Tare value and update to PLU, after set the tare value and then press [UNIT WEIGHT] key to
store.
www.tanhiepthanh.com.vn
- 19 DI-80 USER MANUAL
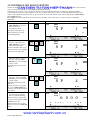
1.9 MANUAL PRINT
CAN DIEN TU TAN HIEP THANH
This section explains about the operation for single transaction and issues a receipt or label in Weighing Mode and Counting
Mode.
1.9.1 Weighing Mode
There has to ways for Single transaction to issue receipt (Build-in Printer) or label (Barcode Printer) in Weighing Mode, by place
the product on the platter or by enter the knowing weight of the product.
OPERATION
KEY
DISPLAY
1. At Weighing Mode, enter the
existing PLU Number by
numeric key (Ex. 123) and
press [PLU] key.
¼0»
NET
kg
0. 0 0 0
S T
E A
T I
T E
-
C
3 H
5
T
2. Place the product on the
platter (Ex. 5. 5kg).
NET
kg
5. 5 0 0
S T
E A
T I
T E
-
C
3 H
5
T
3. Press [¾] key to issue a
receipt.
Build-in Printer will start
printing and label also be issue
if machine connect to Barcode
Printer.
Press [¾] key again will
issue another receipt or label
without removing weight from
platter.
4. Enter the knowing weight of
the product by numeric key
(Ex. 55kg).
Maximum 6 digits and one
decimal point can be entering
(The decimal point position
must same as the Decimal Point
position of the Scale).
5. Press [¾] key to issue a
receipt.
After complete issuing
receipt, remove the product
from the platter and press [C]
key to clear the PLU.
T
NET
5. 5 0 0
S T
E A
T I
T E
-
C
3 H
5
T
T
5 5
.
0 0
0
T
NET
5. 5 0 0
S T
E A
T I
T E
-
T
www.tanhiepthanh.com.vn
- 20 DI-80 USER MANUAL
kg
C
3 H
5
T
kg
1.9.2 Counting Mode
CAN DIEN TU TAN HIEP THANH
There has to ways for Single transaction to issue receipt (Build-in Printer) or label (Barcode Printer) in Counting Mode, by place
the product on the platter or by enter the knowing quantity of the product.
OPERATION
KEY
DISPLAY
1. At Weighing Mode, enter the
existing PLU Number by
numeric key (Ex. 123) and
press [PLU] key.
¼0»
NET
kg
0. 0 0 0
2
.
0 0 0 0
T
2. Place the product on the
platter (Ex. 5kg).
0
Pcs
NET
5. 0 0 0
2 .
0 0 0 0
T
3. Press [¾] key to issue a
receipt.
Build-in Printer will start
printing and label also be issue
if machine connect to Barcode
Printer.
Press [¾] key again will
issue another receipt or label
without removing weight from
platter.
4. Enter the knowing quantity
of the product by numeric
key (Ex.100000Pcs).
Maximum 9999999 can be
entering.
2 5 0 0
Pcs
T
NET
5. 0 0 0
2 .
0 0 0 0
T
T
0
T
NET
5. 0 0 0
2
.
0 0 0 0
www.tanhiepthanh.com.vn
- 21 DI-80 USER MANUAL
kg
2 5 0 0
Pcs
T
1 0 0 0 0
5. Press [¾] key to issue a
receipt.
After complete issuing
receipt, remove the product
from the platter and press [C]
key to clear the PLU.
kg
kg
2 5 0 0
Pcs
T
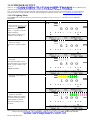
1.10 ACCUMULATION AND SUBTRACTION
CAN DIEN TU TAN HIEP THANH
1.10.1 Single Item Transaction
This section explains about the operation for individual product to print Total Weight or Total Quantity on receipt or label in
Weighing Mode or Counting Mode.
1.10.1.1 Weighing Mode
There has to ways for individual product to issue receipt (Build-in Printer) or label (Barcode Printer) in Weighing Mode, by
place the product on the platter or by enter the knowing weight of the product.
OPERATION
KEY
DISPLAY
1. At Weighing Mode, enter the
existing PLU Number by
numeric key (Ex. 123) and
press [PLU] key.
¼0»
NET
kg
0. 0 0 0
S T
E A
T I
T E
-
C
3 H
5
T
2. Enter knowing weight for the
product by numeric key (Ex.
1.25kg).
1 .
2 5
0
T
3. Press [+] key.
Memory lamp light up.
Build-in Printer will start
printing if it connected and
label also be issue if machine
connect to Barcode Printer.
Refer to Note 1.
4. Press [C] key to exit from
Add. Mode.
Auto exit from Add. Mode
can be set at SPEC 32 bit 1.
NET
kg
t o t A L
W E I G H T
1 .
T
2 5
0
T
¼0»
NET
0. 0 0 0
S T
E A
T I
T E
-
C
3 H
5
T
5. Place the product on the
platter (Ex. 5. 5kg).
kg
T
NET
5. 5 0 0
S T
E A
T I
T E
-
T
C
3 H
T
kg
5
T
Note 1: Label issue from Barcode Printer or Data send to PC only when [PRINT] key is depressed can be set at SPEC 19 bit 0.
www.tanhiepthanh.com.vn
- 22 DI-80 USER MANUAL
OPERATION
KEY
DISPLAY
CAN DIEN TU TAN HIEP THANH
6. Press [+] key.
Auto exit from Add. Mode
can be set at SPEC 32 bit 1.
NET
kg
t o t A L
W E I G H T
6 .
T
7 5
0
2 0
0
T
7. Enter knowing weight on
Add. Mode for the product
by numeric key (Ex. 0.2kg).
0 .
T
8. Press [-] key to deducts the
0.2kg of product.
NET
kg
t o t A L
W E I G H T
6 .
T
9. Press [¾] key to issue a
receipt or total label and
display will automatically
return to Weighting Mode.
T
5. 5 0 0
E A
T I
T E
-
T
C
3 H
kg
5
T
NET
0. 0 0 0
T
www.tanhiepthanh.com.vn
- 23 DI-80 USER MANUAL
0
NET
S T
10. Remove the product from
platter and then press [C]
key to clear the PLU.
PLU Auto Clear after
remove all weight from platter,
can be set at SPEC 28 bit 0 and
the condition is depending on
SPEC 28 bit 2 & bit 1 setting.
5 5
T
kg
1.10.1.2 Counting Mode
There has to ways for individual product to issue receipt (Build-in Printer) or label (Barcode Printer) in Counting Mode, by place
the product on the platter or by enter the knowing quantity of the product.
OPERATION
KEY
DISPLAY
CAN DIEN TU TAN HIEP THANH
1. At Counting Mode, enter the
existing PLU Number by
numeric key (Ex. 123) and
press [PLU] key.
¼0»
NET
kg
0. 0 0 0
2
.
0 0 0 0
0
Pcs
T
2. Enter the knowing Quantity
for the product (Ex.
10000Pcs).
Max. 9999999 can be
entering.
1 0 0 0
0
T
3. Press [+] key.
Memory lamp light up.
Build-in Printer will start
printing if it connected and
label also be issue if machine
connect to Barcode Printer.
Refer to Note 1.
4. Press [C] key to exit from
Add. Mode.
Auto exit from Add. Mode
can be set at SPEC 32 bit 1.
NET
t o t A L
Q U A N T
I T
Y
1
T
Pcs
0 0 0 0
T
¼0»
NET
0. 0 0 0
2
.
0 0 0 0
T
5. Place the product on the
platter (Ex. 5kg).
Re-computing lamp light up.
T
kg
0
Pcs
NET
5. 0 0 0
2
.
0 0 0 0
T
kg
2 5 0 0
Pcs
T
T
Note 1: Label issue for Barcode Printer or Data send to PC only when [PRINT] key is depressed can be set at SPEC 19 bit 0.
www.tanhiepthanh.com.vn
- 24 DI-80 USER MANUAL
OPERATION
6. Press [+] key.
KEY
DISPLAY
CAN DIEN TU TAN HIEP THANH
NET
t o t A L
Q U A N T
I T
Y
T
Pcs
1 2 5 0 0
T
T
7. Enter the knowing Quantity
at Add. Mode for the product
(Ex. 5000Pcs).
Max. 9999999 can be
entering.
5 0 0
T
8. Press [-] key to deducts the
Quantity of product.
T
NET
t o t A L
Q U A N T
I T Y
T
9. Press [¾] key to issue a
receipt or total label and
display will automatically
return to Counting Mode.
7 5 0 0
T
T
5. 0 0 0
.
0 0 0 0
T
T
kg
0
Pcs
¼0»
NET
0. 0 0 0
0
T
www.tanhiepthanh.com.vn
- 25 DI-80 USER MANUAL
Pcs
NET
2
10. Remove the product from
platter and then press [C]
key to clear the PLU.
PLU auto clear after remove
all weight from platter, can be
set at SPEC 28 bit 0 and the
condition is depending on
SPEC 28 bit 2 & bit 1 setting
0
kg
2 5 0 0
Pcs
T
1.10.2 Multiple Items Transaction
CAN DIEN TU TAN HIEP THANH
Following operation is examples showing how to operate two or more items for accumulate or subtract to issuing a receipt or
total label in Weighing Mode or Counting Mode. To enable this function, SPEC 13 bit 0: ALLOW PLU CALLING WHEN
MEMORY FLAG SET MUST set to "1" in advance.
1.10.2.1 Weighing Mode
For example: Accumulate 50kg of PLU 123 by key-in, 20kg of PLU 5 by weighing, 35.5kg of PLU 1 by key-in and deducts 5kg
of PLU 5 by Weighing.
OPERATION
KEY
DISPLAY
1. At Weighing Mode, enter the
existing PLU Number by
numeric key (Ex. 123) and
press [PLU] key.
¼0»
NET
kg
0. 0 0 0
S T
E A
T I
T E
-
C
3 H
5
T
2. Enter knowing weight for the
product by numeric key (Ex.
50kg).
5
0 .
0 0
0
T
3. Press [+] key.
Memory lamp light up.
Build-in Printer will start
printing if it connected and
label also be issue if machine
connect to Barcode Printer.
Refer to Note 1.
4. Press [5] and [PLU] key to
called up PLU 5.
Auto exit from Add. Mode
can be set at SPEC 32 bit 1.
NET
kg
t o t A L
W E I G H T
5
T
0 .
0 0
0
T
¼0»
NET
kg
0. 0 0 0
S E M
B
( S
U S )
M 9 x
T
5. Place the product on the
platter (Ex. 20kg).
1
T
NET
kg
2 0. 0 0 0
S E M
B
( S
U S )
T
M 9 x
T
1
T
Note 1: Label issue from Barcode Printer or Data send to PC only when [PRINT] key is depressed can be set at SPEC 19 bit 0.
www.tanhiepthanh.com.vn
- 26 DI-80 USER MANUAL
OPERATION
KEY
DISPLAY
CAN DIEN TU TAN HIEP THANH
6. Press [+] key.
Auto exit from Add. Mode
can be set at SPEC 32 bit 1.
NET
t o t A L
W E I G H T
7
T
7. Remove the product from
platter and press [1] and
[PLU] key to call up PLU
No. 1.
Auto exit from Add. Mode
can be set at SPEC 32 bit 1.
kg
0 .
0 0
0
T
¼0»
NET
kg
0. 0 0 0
F U S E
H O L D E R
T
T
8. Enter knowing weight for the
product by numeric key (Ex.
35.5kg).
3
5 .
5 0
0
T
9. Press [+] key.
Auto exit from Add. Mode
can be set at SPEC 32 bit 1.
NET
t o t A L
W E I G H T
1 0
T
10.Call up PLU 5 again by
press [5] and [PLU] key.
Auto exit from Add. Mode
can be set at SPEC 32 bit 1.
kg
T
5 .
5 0
T
¼0»
NET
kg
0. 0 0 0
S E M
B
( S
U S )
M 9 x
T
11. Place 5kg of the product on
the platter.
1
T
NET
kg
5. 0 0 0
S E M
B
( S
U S )
T
www.tanhiepthanh.com.vn
- 27 DI-80 USER MANUAL
0
M 9 x
T
1
OPERATION
KEY
DISPLAY
CAN DIEN TU TAN HIEP THANH
12. Press [-] key to deducts the
Weight of product.
NET
kg
t o t A L
W E I G H T
1 0
T
13. Press [¾] key to issue a
receipt or total label and
display will automatically
return to Weighting Mode.
T
0
T
kg
5. 0 0 0
B
( S
U S )
T
M 9 x
1
T
¼0»
NET
0. 0 0 0
T
www.tanhiepthanh.com.vn
- 28 DI-80 USER MANUAL
5 0
NET
S E M
14. Remove the product from
platter and press [C] key to
clear the PLU.
PLU auto clear after remove
all weight from platter, can be
set at SPEC 28 bit 0 and the
condition is depending on
SPEC 28 bit 2 & bit 1 setting.
0 .
T
kg
1.10.2.2 Counting Mode
For example: Accumulate 10000pcs of PLU 123 by key-in, 5kg of PLU 5 by weighing, 60000pcs of PLU 1 by key-in and
deducts 1kg of PLU 5 by Weighing.
OPERATION
KEY
DISPLAY
CAN DIEN TU TAN HIEP THANH
1. At Counting Mode, enter the
existing PLU Number by
numeric key (Ex. 123) and
press [PLU] key.
¼0»
NET
kg
0. 0 0 0
2
.
0 0 0 0
0
Pcs
T
2. Enter the knowing Quantity
for the product (Ex.
10000Pcs).
Max. 9999999 can be
entering.
1 0 0 0
0
T
3. Press [+] key.
Memory lamp light up.
Build-in Printer will start
printing if it connected and
label also be issue if machine
connect to Barcode Printer.
Refer to Note 1.
4. Press [5] and [PLU] key to
called up PLU 5.
Auto exit from Add. Mode
can be set at SPEC 32 bit 1.
NET
t o t A L
Q U A N T
I T
Y
1
T
Pcs
0 0 0 0
T
¼0»
NET
0. 0 0 0
0
.
1 0 0 0
T
5. Place the product on the
platter (Ex. 5kg).
Re-computing lamp light up.
T
kg
0
Pcs
NET
5. 0 0 0
2
.
0 0 0 0
T
kg
5 0 0 0 0
Pcs
T
T
Note 1: Label issue for Barcode Printer or Data send to PC only when [PRINT] key is depressed can be set at SPEC 19 bit 0.
www.tanhiepthanh.com.vn
- 29 DI-80 USER MANUAL
OPERATION
6. Press [+] key.
KEY
DISPLAY
CAN DIEN TU TAN HIEP THANH
NET
t o t A L
Q U A N T
I T
Y
T
7. Remove the product from
platter and press [1] and
[PLU] key to call up PLU 1.
Note: Auto exit from Add.
Mode can be set at SPEC 32
bit 1.
Pcs
6 0 0 0 0
T
T
¼0»
NET
kg
0. 0 0 0
1 .
0 0 0 0
T
T
0
Pcs
T
8. Enter the knowing Quantity
for the product (Ex.
60000Pcs).
Max. 9999999 can be
entering.
6 0 0 0
0
T
9. Press [+] key.
Note: Auto exit from Add.
Mode can be set at SPEC 32
bit 1.
NET
t o t A L
Q U A N T
I T
Y
1 2 0 0 0 0
T
10.Call up PLU 5 again by
press [5] and [PLU] key.
Note: Auto exit from Add.
Mode can be set at SPEC 32
bit 1.
T
¼0»
NET
0. 0 0 0
0
.
1 0 0 0
T
11. Place 1kg of the product on
the platter.
T
kg
0
Pcs
NET
1. 0 0 0
0
.
1 0 0 0
T
www.tanhiepthanh.com.vn
- 30 DI-80 USER MANUAL
Pcs
kg
1 0 0 0 0
Pcs
T
T
OPERATION
KEY
DISPLAY
CAN DIEN TU TAN HIEP THANH
12. Press [-] key to deducts the
Quantity of product.
NET
t o t A L
Q U A N T
I T
Y
T
13. Press [¾] key to issue a
receipt or total label and
display will automatically
return to Counting Mode.
T
T
0. 0 0 0
0 0 0 0
T
1
kg
0 0 0 0
Pcs
T
¼0»
NET
0. 0 0 0
0
T
www.tanhiepthanh.com.vn
- 31 DI-80 USER MANUAL
1 1 0 0 0 0
NET
1 .
14. Remove the product from
platter and then press [C]
key to clear the PLU.
PLU auto clear after remove
all weight from platter, can be
set at SPEC 28 bit 0 and the
condition is depending on
SPEC 28 bit 2 & bit 1 setting.
Pcs
T
kg
0
Pcs
1.11 SWITCHING PLATFORM
CAN DIEN TU TAN HIEP THANH
Switching platform is available in both Weighing Mode and Counting by press the [SWITCH] key to switch between Scale 1 &
Scale 2. To enable this function, SPEC 25 bit 1 must set to "1" and both scales must be calibrated in advance.
Note: For Weighing Mode, not allow to changing scale when Memory lamp is lighter up.
For Counting Mode, allow to changing scale when Memory lamp is lighter up.
Stability check when changing scale can be set at SPEC 38 bit 0.
Re-zero when changing scale can be set at SPEC 39 bit 0 (Effective only when SPEC 38 bit 0 set to "0" and SPEC
00 bit 2 set to "0").
For example: Change scale 1 to scale 2 in Weighing Mode.
OPERATION
KEY
DISPLAY
1. At Weighing Mode, enter the
existing PLU Number by
numeric key (Ex. 123) and
press [PLU] key.
¼0»
NET
kg
0. 0 0 0
S T
E A
T I
T E
-
C
3 H
5
T
2. Press [SWITCH] key to
change scale form scale 1 to
scale 2.
Scale 2 Indicator lighter up.
¼0»
NET
kg
0. 0 0
S T
E A
T I
T E
-
C
3 H
5
T
3. Press [MODE] key to change
Weight Mode to Counting
Mode.
¼0»
NET
kg
0. 0 0
2 .
0 0 0 0
4. Place the product on Scale 2
(Ex. 20kg).
0
T Pcs
NET
kg
2 0. 0 0
2 .
0 0 0 0
1
T
0 0 0 0
T Pcs
5. Press [+] key.
t o t A L
Q U A N
T I
T Y
T
www.tanhiepthanh.com.vn
- 32 DI-80 USER MANUAL
1
T
Pcs
0 0 0 0
T
OPERATION
KEY
DISPLAY
CAN DIEN TU TAN HIEP THANH
6. Press [C] key to exit from
Add. Mode.
Auto exit from Add. Mode
can be set at SPEC 32 bit 1.
NET
2 0. 0 0
2 .
0 0 0 0
T
7. Remove the product from
Scale 2 and press [SWITCH]
key to change scale form
scale 2 to scale 1.
kg
0
T Pcs
T
¼0»
NET
kg
0. 0 0 0
2 .
0 0 0 0
T
8. Place the product on Scale 1
(Ex. 500g).
0
Pcs
T
NET
kg
0. 5 0 0
2 .
0 0 0 0
T
9. Press [+] key.
Auto exit from Add. Mode
can be set at SPEC 32 bit 1.
T
NET
t o t A L
Q U A N
T I
T Y
T
10. Press [¾] key to issue a
receipt or total label and
display will automatically
return to Counting Mode.
T
0 2 5 0
T
0. 5 0 0
0 0 0 0
T
kg
2 5 0
Pcs
T
¼0»
NET
0. 0 0 0
T
www.tanhiepthanh.com.vn
- 33 DI-80 USER MANUAL
1
Pcs
NET
2 .
11. Remove the product from
Scale 1 and press [C] key to
clear the PLU.
2 5 0
Pcs
T
T
kg
Pcs
1.12 UNIT WEIGHT OPERATION
CAN DIEN TU TAN HIEP THANH
1.12.1 Unit Weight Setting in Registration Mode.
Unit Weight only will show at Counting Mode, user can set new unit weight by sampling the product or enter the knowing unit
weight by numeric keys.
1.12.1.1 By Sampling
OPERATION
KEY
DISPLAY
1. At Counting Mode, Place the
product on platter (Ex. 1kg).
Refer to Note 1.
NET
kg
1. 0 0 0
0
0
Pcs
T
2. Enter the Quantity of the
product (Ex. 500pcs).
5 0
0
T
3. Press [Pcs] key to sampling.
For product quantity of
10pcs, skip step 2 and press
[Pcs] key to sampling.
Display Accuracy of Unit
Weight is depending on SPEC
06 bit 3 setting.
4. After a few seconds for the
computation.
The Unit Weight window
(Sub-1 Display) displays the
unit weight of the samples
(2.0026 / 1000 pieces) and the
sampling Quantity will shows
on Sub-2 display.
5. Press [¾] key to issue a
receipt.
To print next receipt, press
[¾] key again, if not, remove
the product from platter and
then press [C] key to clear the
Unit Weight.
- - - - - - -
-
-
-
-
-
-
-
-
-
-
-
-
T
NET
1. 0 0 0
2
.
0 0 2 6
T
5 0 0
Pcs
T
NET
1. 0 0 0
2
.
0 0 2 6
T
www.tanhiepthanh.com.vn
- 34 -
kg
5 0 0
Pcs
T
Note 1: When the samples are placed on the platter, if the Insufficient lamp is "ON" then add few more samples until
Insufficient lamp is "OFF". Then enter the samples quantity by numeric key and press [Pcs] key. [For example: Put
10pcs of product on the platter but the Insufficient lamp is "ON", so add few pieces product (Ex. 3pcs) on the platter
until Insufficient lamp is "OFF". Enter [1] [3] and then press [Pcs] key to compute the unit weight of the samples].
DI-80 USER MANUAL
kg
1.12.1.2 By Numeric Key
KEY
DISPLAY
CAN
DIEN
TU
TAN
HIEP
THANH
1. At Counting Mode, enter the
OPERATION
knowing unit weight by
numeric key (Ex. 200.00) for
Non-PLU item.
You also allow calling up a
PLU and changing the Unit
Weight by numeric key.
2. Press [UNIT WEIGHT]
key.
2 0
T
¼0»
NET
0. 0 0 0
2 0 0 .
0 0
T
3. Place the product on the
platter (Ex. 2kg).
2 0 0 .
0 0
0
Pcs
kg
1 0
Pcs
T
NET
2. 0 0 0
2 0
0
.
0 0
www.tanhiepthanh.com.vn
- 35 DI-80 USER MANUAL
kg
NET
2. 0 0 0
4. Press [¾] key to issue a
receipt.
To print next receipt, press
[¾] key again, if not, remove
the product from platter and
then press [C] key to clear the
Unit Weight.
0
kg
1 0
Pcs
T
1.12.2 Clearing Unit Weight
KEY
DISPLAY
CAN
DIEN
TU
TAN
HIEP
THANH
1. Continued from the
OPERATION
procedure 4 on 1.12.1.2 By
Numeric Key
NET
2. 0 0 0
2 0 0
2. Remove the product from
platter and press [C] key to
clear the Unit Weight data.
If PLU is called up, PLU data
will clear when press [C] key.
.
0 0
1 0
Pcs
T
¼0»
NET
0. 0 0 0
0
T
www.tanhiepthanh.com.vn
- 36 DI-80 USER MANUAL
kg
T
kg
0
Pcs
1.12.3 Re-computing Unit Weight in Memory
CAN DIEN TU TAN HIEP THANH
This function is used to set new Unit Weight by sampling and update to PLU File in Counting Mode.
OPERATION
KEY
DISPLAY
1. At Counting Mode, call up a
existing PLU (Ex. PLU No.
123)
¼0»
NET
0. 0 0 0
2 .
0 0 0 0
T
2. Place the product on the
platter until the indicator of
RECOMPUTING lighter up
(Ex.20g).
0. 0 2 0
0 0 0 0
T
4. To update the new Unit
Weight to PLU File, press
[UNIT WEIGHT] key. If
not, press [C] key.
The display will show ----for a second.
kg
1 0
Pcs
T
NET
2. 0 0 0
2
.
0 1 6 0
kg
1 0
Pcs
T
NET
0. 0 2 0
2
.
5. Recall up the PLU No. 123.
The Unit Weight will change
from 2.0000 to 2.0160.
0 1 6 0
kg
1 0
Pcs
T
NET
0. 0 2 0
2
.
0 1 6 0
T
www.tanhiepthanh.com.vn
- 37 DI-80 USER MANUAL
0
Pcs
NET
2 .
3. Press [PCS] key for recomputing.
The display will show ----for a second.
Display Accuracy of Unit
Weight is depending on SPEC
06 bit 3 setting.
kg
kg
1 0
Pcs
T
1.13 GENERAL SET POINT SETTING
CAN DIEN TU TAN HIEP THANH
General Set Point setting is used for Non-PLU item to program Set Point data in Weight Mode or Counting Mode. The Set Point
work in with mode is depending on the SPEC 07 bit 1 & bit 0 setting.
This function also used to view or changes the Set Point setting temporally when PLU is called up in Weighing Mode or
Counting Mode. If the PLU called up again or call up a new PLU, this function will be cancelled and the Set Point data will
return to the original setting in PLU File. Up to 4 Set Point can be set and Number of Set Point is depending on SPEC 18 bit 2,
bit 1 and bit 0 setting.
For example: Set the General Set Point for Non-PLU item (SPEC 07 bit 1 & 0 set to "1" (Set Point Type is WEIGHT/
WEIGHT)).
OPERATION
KEY
DISPLAY
1. At Weighing Mode, press
[SET POINT] key to enter
General Set Point
Programming Mode.
Program lamp lighter up.
Press [C] key to exit the
Programming Mode.
¼0»
2. Enter SP-1 data by numeric
key (Ex. 0.5kg) and press
[SET POINT] key to store
the data and go to SP-2.
After enter SP-2 data, if you
want back to SP-1, press [C][C]
key without save SP-2 data.
¼0»
3. Enter SP-2 data by numeric
key (Ex. 1kg) press [SET
POINT] key to store the data
and go to SP-3.
The SP-2 data must greater
than SP-1.
¼0»
NET
S P
1
0
T
T T
NET
S P
kg
2
0
T
T T
NET
S P
3
T
4. Enter SP-3 data by numeric
key (Ex. 1.5kg) press [SET
POINT] key to store the data
and go to SP-4.
The SP-3 data must greater
than SP-2.
If not necessary to program
SP-3, press [SET POINT] key
2 times to save the data without
SP 3 & Sp 4.
¼0»
5. Press [SET POINT] key to
save the General Set Point
data (1st segment blinking).
If necessary to program SP4, enter the data and press [SET
POINT] key to save.
Set Point not show on Sub Displays can be set at SPEC 00
bit 0.
¼0»
kg
T T
NET
S P
4
T
kg
T T
NET
0. 0 0 0
0 .
5 0 0 >
T
www.tanhiepthanh.com.vn
- 38 DI-80 USER MANUAL
kg
< 1 .
0 0 0
T
kg
1.14 CHECKER OUTPUT
CAN DIEN TU TAN HIEP THANH
There are 15 segments of Checker output on the scale. The 1st five falls in the YELLOW range, the 2nd five falls in GREEN range
while the last five segments falls in RED range which indicate "LOWER", "WITH IN" and 'HIGHER".
User can use the indicator as Weight Checker in Weighing Mode or Quantity Checker in Counting Mode. To use this function,
General Set Point or Individual PLU Set Point must be program in advance. (Please refer to 1.13 General Set Point Setting).
1.14.1 Weighing Mode
For example: Set the General Set Point for Non-PLU items (SPEC 07 bit 1 & 0 set to "1" (Set Point Type is WEIGHT/
WEIGHT)).
OPERATION
KEY
DISPLAY
¼0»
Continued from procedure 5 of
1.13 General Set Point Setting.
When no weight on the
platter, 1st segment of Checker
indicator blinking.
Note: Checker Output is not
available in Gross Mode.
NET
0. 0 0 0
0 .
5 0 0 >
< 1 .
T
1. Place the product on the
platter (Ex. 200g).
The first 3 segments lighter
up.
kg
0 0 0
T
NET
0. 2 0 0
0 .
5 0 0 >
< 1 .
kg
0 0 0
T
2. Add 300g of the product on
the platter.
6 segments lighter up and
Set Point Buzzer "On" when hit
the SP-1 range if SPEC 07 bit
set to "1".
Refer to Note 1.
NET
0. 5 0 0
0 .
5 0 0 >
< 1 .
kg
0 0 0
T
3. Add 500g of the product on
the platter.
NET
1. 0 0 0
0 .
5 0 0 >
< 1 .
kg
0 0 0
T
4. Add another 500g of the
product on the platter.
Buzzer Off & last segment
of Checker indicator blinking.
All segment of Checker
indicators blinking if scale
Overflow.
NET
1. 0 0 0
0 .
5 0 0 >
< 1 .
0 0 0
T
Note 1: Buzzer On when weight is within SP-1 and SP-2 or outside SP-1 and SP-2 can be set at SPEC 17 bit 2. Buzzer On
Delay Function when weight < SP-1 when SPEC 17 bit set to "1" can be set at SPEC 02 bit 3, bit 2 & bit 1.
- 39 DI-80 USER MANUAL
www.tanhiepthanh.com.vn
kg
1.14.2 Counting Mode
CAN DIEN TU TAN HIEP THANH
For example: Call up PLU No. 123 with individual Set Point setting in PLU File (SP-1: 1000 Pcs , SP-2: 2000 Pcs and SP-3:
3000 Pcs. SPEC 07 bit 1 set to "1" & 0 set to "0" (Set Point Type is Qty/Qty)).
OPERATION
KEY
DISPLAY
1. At Counting Mode, call up
PLU No. 123.
When no weight on the
platter and with Unit Weight
value, 1st segment of Checker
indicator blinking.
¼0»
NET
0. 0 0 0
1
.
0 0 0
0
T
2. Place the product on the
platter (Ex. 500g).
The first 3 segments lighter
up.
0. 5 0 0
.
0 0 0
0
T
kg
5 0 0
Pcs
T
NET
1. 0 0 0
1
.
0 0 0
0
T
4. Add another 1kg of the
product on the platter.
kg
1 0 0 0
Pcs
T
NET
2. 0 0 0
1
.
0 0 0
0
T
5. Add another 1kg of the
product on the platter.
Buzzer Off & last segment
of Checker indicator blinking.
All segment of Checker
indicators blinking if scale over
weight.
kg
2 0 0 0
Pcs
T
NET
3. 0 0 0
1
.
0 0 0
0
T
www.tanhiepthanh.com.vn
- 40 -
kg
3 0 0 0
Pcs
T
Note 1: Buzzer On when weight is within SP-1 and SP-2 or outside SP-1 and SP-2 can be set at SPEC 17 bit 2. Buzzer On
Delay Function when weight < SP-1 when SPEC 17 bit set to "1" can be set at SPEC 02 bit 3, bit 2 & bit 1.
DI-80 USER MANUAL
0
Pcs
NET
1
3. Add 500g of the product on
the platter.
6 segments lighter up and
Set Point Buzzer "On" when hit
the SP-1 range if SPEC 07 bit
set to "1".
Refer to Note 1.
kg
1.15 HOLDING FUNCTION
CAN DIEN TU TAN HIEP THANH
There are two types of Holding Functions are available in Weighing Mode or Counting Mode, PEAK Hold and NORMAL Hold
can be select at SPEC 15 bit 0. To enable this function SPEC 15 bit 1 must set to "1" in advance and holding condition can be
select at SPEC 28 bit 2 & bit 1.
1.15.1 Weighing Mode
For example: Type of Holding set to PEAK.
OPERATION
KEY
1. At Weighting Mode, press
[HOLD] key to enable
Holding function.
Hold lamp lighter up.
DISPLAY
¼0»
NET
0. 0 0 0
T
2. Asserted a sudden weight
onto the platform and remove
it.
Press [HOLD] key to cancel
Hold Function.
T
T
NET
3. 6 1 6
T
3. Main Display will show the
peak value after the weight is
removed.
Press [¾] key to printout the
peak value if you want ([+] or
[-] key is not available when no
weight on the platter).
4. After about 10 seconds,
display will return to normal.
kg
T
NET
3. 6 1 6
T
kg
T
¼0»
NET
0. 0 0 0
T
T
www.tanhiepthanh.com.vn
- 41 DI-80 USER MANUAL
kg
T
kg
1.15.2 Counting Mode
CAN DIEN TU TAN HIEP THANH
DISPLAY
For example: Type of Holding set to NORMAL.
OPERATION
KEY
1. At Counting Mode, press
[HOLD] key to enable
Holding function.
Hold lamp lighter up.
¼0»
NET
0. 0 0 0
0
T
T
2. Called up PLU No. 123.
T
kg
0
Pcs
¼0»
NET
0. 0 0 0
1 .
0 0 0 0
T
3. Place the product on the
platter (Ex. 5kg).
T
1
.
0 0 0 0
T
5. After about 10 seconds,
display will return to normal.
PLU Auto Clear after return
to normal if SPEC 28 bit 0 set
to "1" in advance.
T
kg
5 0 0 0
Pcs
T
NET
5. 0 0 0
1
.
0 0 0 0
T
T
kg
5 0 0 0
Pcs
T
¼0»
NET
0. 0 0 0
1
.
0 0 0 0
T
www.tanhiepthanh.com.vn
- 42 DI-80 USER MANUAL
0
Pcs
NET
5. 0 0 0
4. After Stable lamp lighter up,
remove the product from
platter.
Press [¾] key to printout the
peak value if you want ([+] &
[-] key is not available when no
weight on the platter)
kg
kg
0 0
Pcs
T
1.16 INVENTORY OPERATION
CAN DIEN TU TAN HIEP THANH
This function is available in Counting Mode to store the Quantity IN or OUT of the product in PLU File. Inventory operation
only available after call up a PLU by pressing [PLU] to select IN or OUT. There are two types to store the Quantity data to
Inventory file of the item, Manual Transaction and Total Mode Transaction of the Individual Item only. (Inventory Operation is
not available for Multiple Items Transaction).
Note: If SPEC 02 bit 0 set to "1", allow to view the Quantity of the Inventory by press [GROSS] key after called up the PLU
in Counting Mode or Weighing Mode.
1.16.1 Manual Transaction
For example: Store 5kg of Item (Ex. PLU No. 123) to Inventory IN.
OPERATION
KEY
1. At Counting Mode, Called up
PLU No. 123.
To view the Inventory of the
item, press [GROSS] key, if
SPEC 02 bit 0 set to "1".
DISPLAY
¼0»
NET
0. 0 0 0
1 .
0 0 0 0
T
2. Place the product on the
platter (Ex. 5kg).
NET
1 .
0 0 0 0
T
4. To store the Quantity to
Inventory IN press [¾] key.
The display will show ----for a second.
If you knowing Quantity of
the product, enter the quantity
and press [¾] key to store the
data to Inventory IN.
5. Remove the product from
platter and press [C] key to
clear the PLU.
IN lamp will automatically
clear.
kg
5 0 0 0
Pcs
T
NET
5. 0 0 0
1
.
0 0 0 0
T T
kg
5 0 0 0
Pcs
T
NET
5. 0 0 0
1
.
0 0 0 0
T T
kg
5 0 0 0
Pcs
T
¼0»
NET
0. 0 0 0
0
T
www.tanhiepthanh.com.vn
- 43 DI-80 USER MANUAL
0
Pcs
¼0»
5. 0 0 0
3. Press [PLU] key to select
Inventory IN.
IN lamp lighter up.
To select Inventory OUT,
press [PLU] key again and to
clear the Inventory Operation,
press again [PLU] key.
kg
T
kg
0
Pcs
1.16.2 Total Transaction
CAN DIEN TU TAN HIEP THANH
For example: Two packs (5kg & 10kg each pack) and one pack with knowing quantity (Ex.10000Pcs) of Item (Ex. PLU No.
123) for Inventory OUT.
OPERATION
KEY
DISPLAY
1. At Counting Mode, Called up
PLU No. 123.
To view the Inventory of the
item, press [GROSS] key, if
SPEC 02 bit 0 set to "1".
¼0»
NET
kg
0. 0 0 0
1 .
0 0 0 0
0
Pcs
T
2. Place the 1st pack of the
product on the platter (Ex.
5kg).
¼0»
NET
kg
5. 0 0 0
1 .
0 0 0 0
5 0 0 0
Pcs
T
T
3. Press [PLU] key to select
Inventory OUT.
IN lamp lighter up.
NET
kg
5. 0 0 0
1
.
0 0 0 0
T
5 0 0 0
Pcs
T
T
4. Press [+] key.
NET
t o t A L
Q U A N T I T Y
T
5. Press [C] key to exit from
Total Mode.
Auto exit from Add. Mode
can be set at SPEC 32 bit 1.
T
5 0 0 0
T
T
¼0»
NET
5. 0 0 0
1
.
0 0 0 0
T
T
www.tanhiepthanh.com.vn
- 44 DI-80 USER MANUAL
Pcs
kg
5 0 0 0
Pcs
T
T
OPERATION
KEY
DISPLAY
CAN DIEN TU TAN HIEP THANH
6. Remove the product from
platter and then place 2nd
pack of the product on the
platter (Ex. 10kg).
NET
kg
1 0. 0 0 0
1 .
0 0 0 0
T
T
1
0 0 0 0
Pcs
T
T
7. Press [+] key.
NET
kg
t o t A L
Q U A N T I T Y
T
T
1 5 0 0 0
T
T
8. Enter knowing quantity (Ex.
10000Pcs) by numeric key.
1 0 0 0
T
T
0
T
9. Press [+] key.
NET
t o t A L
Q U A N T I T Y
T
10. To store the Quantity to
Inventory OUT press [¾]
key.
The display will show ----for a second.
T
2 5 0 0 0
T
T
NET
1 0. 0 0 0
1
.
0 0 0 0
T
11. Remove the product from
platter and press [C] key to
clear the PLU.
OUT lamp will automatically
clear.
T
kg
1 0 0 0 0
Pcs
T
¼0»
NET
0. 0 0 0
0
T
www.tanhiepthanh.com.vn
- 45 DI-80 USER MANUAL
Pcs
T
kg
0
Pcs
1.17 WEIGHT UNIT SWITCHING
CAN DIEN TU TAN HIEP THANH
This function is used to change the Weight Unit between kg and lb or oz, g and dwt in Weighing Mode or Counting Mode. Only
in Counting Mode, allow changing the weight unit when memory flag is lighter up. The changing Weight Unit will use for all
PLU until main or display switch is turned OFF. To enable this function, SPEC 12 bit 0 must set to "1" In advance.
For example: Change Weight Unit from kg to lb in Weighing Mode.
OPERATION
KEY
DISPLAY
1. At Weighing Mode, place the
product on platter (Ex. 2kg).
NET
2. 0 0 0
kg
T
2. Change weight unit from kg
to lb, press [UNIT
SWITCH] key.
NET
4. 4 1 0
lb
T
3. Press [UNIT SWITCH] key
again to switch back the
previous weight unit.
NET
2. 0 0 0
T
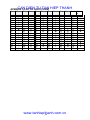
Note: Increment conversion
1) dwt Scale
dwt
1
2
5
10
g
1
2
5
10
oz
1
1
1
1
4) kg Scale
kg
1
2
5
10
lb
2
5
10
20
5) lb Scale
lb
1
2
5
10
kg
1
1
2
5
2) g Scale
g
1
2
5
10
oz
1
1
1
1
dwt
1
2
5
10
3) oz Scale
oz
1
2
5
10
dwt
20
50
100
200
g
20
50
100
200
www.tanhiepthanh.com.vn
- 46 DI-80 USER MANUAL
kg
PROGRAM
MODE
CAN DIEN
TU TAN HIEP THANH
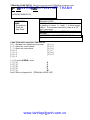
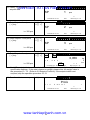
Item Memory
DI-80 series has 1000 item memory (can be expanded to 2000 item memory as factory
option). Item code consists of the following data.
Parameter
Character
Data Length
Item Code
Numeric or
12 or 16 letters
Note: *1)
Alphanumeric
Parts No.
Numeric or
12 or 16 letters
Note: *1)
Alphanumeric
Parts Name
Alphanumeric
20 letters
Tare Weight
Numeric
5 digits
Unit Weight
Numeric
5 digits
Setpoint
Numeric
8 digits
Inventory quantity
Numeric
8 digits
Note: * 1) The maximum length and the programmable character can be set by
specification.
ITEM CODE
Item code is used as a reference code to call up item data.
PARTS NO
Parts No will be printed on label and transmitted to PC when connecting bar-code
printer and PC. If bar-code printer nor PC is not used, you may skip to program parts
No.
PARTS NAME
Parts No will be printed on label and transmitted to PC when connecting bar-code
printer and PC. When calling item code in operation mode, the parts name will be
displayed in the 2nd display.
TARE WEIGHT
Maximum length of data depends on the scale capacity and interval of your system. If
several tare container will be used to one item code, you may skip to store tare data to
item memory.
UNIT WEIGHT
Unit weight can be registered by sampling or numeric data entry in program mode. If an
item is used in weighing mode only, you may skip to store unit weight data to item
memory.
INVENTORY QUANTITY
Inventory quantity will be up-dated automatically after IN/OUT operation in counting
mode. If an item is used in weighing mode only, you may skip to store inventory data to
item memory.
SETPOINTS
Maximum 4 setpoints can be programmed to each item code. The character of setpoint
data can be selected from weight base or quantity base.
www.tanhiepthanh.com.vn
27
CAN DIEN TU TAN HIEP THANH
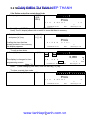
5.1a Alphanumeric Data Entry
Alphanumeric data can be programmed to Item no., parts no, parts name. You may
select the data entry by ASCII code or TERAOKA entry (two digit numeric data) by
internal spec selection.
ASCII CODE ENTRY by ASCII code
P 16
A00
SCREW:CROMATE23_
ASCII DISPLAY: Shows that entry is by ASCII.
PARAMETER
NAME:
P: Parts Name
n: Parts No
I : Item Code
POSITION OF CURSOR: These two digits shows
the position of cursor. [ + ] and [ - ], to move cursor
position. The example shows the cursor is at 16th
digit in part name.
ASCII DATA: Entered ASCII code data is
displayed.
CONVERTED ALPHANUMERIC DATA: The
alphanumeric data is displayed.
FUNCTION KEYS IN ASCII CODE ENTRY
[ C ] = Escape from Alphanumeric screen
[ + ] = Move the cursor ahead
[ - ] = Move the cursor back
[WEIGHT UNIT CHANGE] = A
[Pieces]
=B
[SCALE CHANGE]
=C
[UNIT WEIGHT]
=D
[SETPOINT]
=E
[FEED]
=F
[0]=0
[1]=1
[2]=2
[3]=3
[4]=4
[5]=5
[6]=6
[7]=7
[8]=8
[9]=9
i.e.) To enter SCREW:, enter
[ 5 ], [ 3 ]
S
[ 4 ], [ 3 ]
C
[ 5 ], [ 2 ]
R
[ 4 ], [ 5 ]
E
[ 5 ], [ 7 ]
W
[ 3 ], [ A ]
:
Note ) Refer to Appendix I (ASCII CODE LIST)
www.tanhiepthanh.com.vn
28
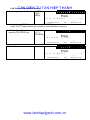
TERAOKA CODE ENTRY Data can be entered by TERAOKA character code.
CAN DIEN
P 16
t00TU TAN HIEP THANH
SCREW:CROMATE23_
PARAMETER
NAME:
P: Parts Name
n: Parts No
I : Item Code
TERAOKA DISPLAY: Shows that entry is by
TERAOKA CODE.
POSITION OF CURSOR: These two digits shows
the position of cursor. [ + ] and [ - ], to move cursor
position. The example shows the cursor is at 16th
digit in part name.
TERAOKA DATA: Entered TERAOKA code data is
displayed.
CONVERTED ALPHANUMERIC DATA: The
alphanumeric data is displayed.
FUNCTION KEYS IN ASCII CODE ENTRY
[ C ] = Escape from Alphanumeric screen
[ + ] = Move the cursor ahead
[ - ] = Move the cursor back
[0]=0
[1]=1
[2]=2
[3]=3
[4]=4
[5]=5
[6]=6
[7]=7
[8]=8
[9]=9
i.e.) To enter SCREW:, enter
[ 1 ], [ 9 ]
S
[ 0 ], [ 3 ]
C
[ 1 ], [ 8 ]
R
[ 0 ], [ 5 ]
E
[ 2 ], [ 3 ]
W
Note ) Refer to Appendix II (TERAOKA CODE LIST)
www.tanhiepthanh.com.vn
29
CAN DIEN TU TAN HIEP THANH
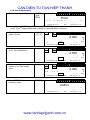
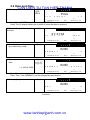
5.1b Item Programming
1. Go to program mode.
[MODE]
+ [REZERO]
ProG
P L U
C
O U
N T
0
u
Insuff Recom In Out
Hold
Mem Prog S 1 S2
Note) Press [MODE] key while pressing [RE-ZERO] key.
Note) The 2nd display shows the number of items that exist in memory.
2. Enter Item Code number and
press [ # ] key.
[ 1 ], [ 0 ],
[ 0 ], [ # ]
∼
NET
Î0Í
u
Pcs
Insuff Recom In Out
Pcs
Insuff Recom In Out
1 8
,
6 8
Mem Prog S 1 S2
Hold
0,500
kg
u u
8
Pcs
Mem Prog S 1 S2
0,056
kg
u u
8
Pcs
0
Pcs
Insuff Recom In Out
4. Press [GROSS] key to enter
inventory value.
u u
8
Pcs
∼
NET
Î0Í
ÎTÍ
3. Enter unit weight value by any
means of 4.1 Unit weight
entry.
kg
∼
NET
Î0Í
ÎTÍ
3. Enter tare value by any means
of 3.1 Tare Subtraction.
Hold
0,000
Hold
Mem Prog S 1 S2
[GROSS]
InvEnt
0
u
Insuff Recom In Out
Hold
www.tanhiepthanh.com.vn
30
Mem Prog S 1 S2
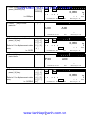
5. Enter inventory quantity and
press [GROSS] key.
∼
[ 1 ], [ 5 ], Î0Í
[ 0 ], [ 0 ], ÎTÍ
[GROSS]
CAN DIEN TU TAN HIEP
THANH
NET
1 8
,
6 8
Pcs
i.e.1500pcs
Insuff Recom In Out
6. Press [ - ] key to enter
parts no.
0,056
kg
u u
8
Pcs
0
Hold
Mem Prog S 1 S2
[-]
n 00
A00
u
Insuff Recom In Out
7. Enter data to parts No and
press [ # ] key.
Refer to 5.1a Alphanumeric data [ 5 ], [ 2 ],
entry.
[4]
i.e. 5ATR
8. Press [ # ] key to enter
parts name.
Mem Prog S 1 S2
∼
NET
[ 3 ], [ 5 ], Î0Í
[ 4 ], [ 0 ], ÎTÍ
[ 5 ], [ 4 ],
1 8
Hold
,
6 8
0,056
kg
u u
8
Pcs
0
Pcs
Insuff Recom In Out
Hold
Mem Prog S 1 S2
[#]
P 00
A00
u
Insuff Recom In Out
9. Enter parts name and
press [ # ] key.
1 8
Mem Prog S 1 S2
∼
NET
[ 5 ], [ 3 ], Î0Í
[ 4 ], [ 3 ], ÎTÍ
[ 5 ], [ 2 ],
Refer to 5.1a Alphanumeric data [ 4 ], [ 5 ],
entry.
[ 5 ], [ 7 ],
i.e. SCREW [ # ]
Hold
,
6 8
0,056
kg
u u
8
Pcs
0
Pcs
Insuff Recom In Out
Hold
www.tanhiepthanh.com.vn
31
Mem Prog S 1 S2
10. Press [ + ] key to enter
setpoint data.
[+]
CAN DIEN TU TAN HIEP THANH
SP
1
pcs
u
Insuff Recom In Out
11. Enter Setpoint 1 and press
[ + ] key.
Hold
Mem Prog S 1 S2
[ 3 ], [ 5 ],
[ 0 ], [ + ],
SP
2
pcs
u
i.e. 350 pcs
Insuff Recom In Out
12. Enter Setpoint 2 and press
[ + ] key.
Hold
[ 4 ], [ 0 ],
[ 0 ], [ + ],
SP
3
pcs
u
i.e. 400 pcs
Insuff Recom In Out
13. Enter Setpoint 3 and press
[ + ] key.
Mem Prog S 1 S2
Mem Prog S 1 S2
∼
NET
[ 5 ], [ 0 ], Î0Í
[ 0 ], [ + ], ÎTÍ
1 8
Hold
,
6 8
0,056
kg
u u
8
Pcs
0
Pcs
i.e. 500 pcs
Insuff Recom In Out
Hold
Mem Prog S 1 S2
Note) The setpoint data can be selected from weight base or quantity base by internal
specification settings. If the data is based on weight, please enter the weight value in
the procedure 10 - 13. (Refer to 3.8 Setpoint Function) If the setpoint data is not
required, skip the operation procedure 10-13.
14. Save the data to memory.
[4]
ProG
P L U
C
O U
N T
1
u
Insuff Recom In Out
Hold
www.tanhiepthanh.com.vn
32
Mem Prog S 1 S2
5.2 Memory
Edition TU
and TAN
Deletion
CAN DIEN
HIEP
THANH
5.2a Delete and edit a certain Item Code
1. Go to program mode.
[MODE]
+ [REZERO]
ProG
P L U
C
O U
N T
1
0
u
Insuff Recom In Out
Hold
Mem Prog S 1 S2
Note) Press [MODE] key while pressing [RE-ZERO] key.
Note) The 2nd display shows the number of items that exist in memory.
2. Enter Item Code to delete
and press [ # ] key.
[ 1 ], [ 0 ],
[ 0 ], [ # ]
ProG
C L E A
If calling the item that has
already existed in item memory,
this display appears.
To edit an item data.
3. Press [ # ] key.
R
P L U ?
u
Insuff Recom In Out
[#]
Î0Í
ÎTÍ
Hold
Mem Prog S 1 S2
∼
NET
1 8 , 6 8 0
The display is changed to item
Pcs
programming screen.
Insuff
Recom
In
Out
Note: * 1)
Note: * 1) After changing item data, save the data by [ 4 ] key.
Hold
0,056
kg
u u
8
Pcs
Mem Prog S 1 S2
To clear a certain item code.
3. Clear the data by [ C ] key.
[C]
ProG
P L U
C
O U
N T
9
u
Insuff Recom In Out
Hold
www.tanhiepthanh.com.vn
33
Mem Prog S 1 S2
CAN DIEN TU TAN HIEP THANH
5.2b Erase all Item data in memory
1. Go to program mode.
[MODE]
+ [REZERO]
ProG
P L U
C
O U
N T
1
0
u
Insuff Recom In Out
Hold
Mem Prog S 1 S2
Note) Press [MODE] key while pressing [RE-ZERO] key.
Note) The 2nd display shows the number of items that exist in memory.
2. Enter [ • ], [ • ], [ 0 ], while
pressing [ RE-ZERO] key.
[ • ], [ • ],
[ 0 ], +
[RE-ZERO]
ProG
C L E A
R
P L U ?
u
Insuff Recom In Out
3. Clear all item data.
Hold
Mem Prog S 1 S2
[C]
ProG
P L U
C
O U
N T
0
u
Insuff Recom In Out
Hold
www.tanhiepthanh.com.vn
34
Mem Prog S 1 S2
5.3 Review Item Code already in Memory
CAN DIEN[MODE]
TU TAN HIEP THANH
1. Go to program mode.
+ [REZERO]
ProG
P L U
C
O U
N T
1
0
u
Insuff Recom In Out
Hold
Mem Prog S 1 S2
Note) Press [MODE] key while pressing [RE-ZERO] key.
Note) The 2nd display shows the number of items that exist in memory.
2. Press [ # ] key.
[#]
CH
A 2 0
1
0
u
Insuff Recom In Out
3. Check other item codes with
[ - ] and [ + ] key.
Hold
Mem Prog S 1 S2
[C]
CH
A 3 0
2
0
u
Insuff Recom In Out
Hold
Mem Prog S 1 S2
Note) [ + ] key works to move to the next item code. [ - ] key works to be back to the
previous item.
4. Back to the initial screen of
program mode.
[MODE]
+ [REZERO]
ProG
P L U
C
O U
N T
1
0
u
Insuff Recom In Out
Hold
www.tanhiepthanh.com.vn
35
Mem Prog S 1 S2
5.4 Date and Time
CAN DIEN[MODE]
TU TAN HIEP THANH
1. Go to program mode.
+ [REZERO]
ProG
P L U
C
O U
N T
1
0
u
Insuff Recom In Out
Hold
Mem Prog S 1 S2
Note) Press [MODE] key while pressing [RE-ZERO] key.
Note) The 2nd display shows the number of items that exist in memory.
2. Press [ - ] key to display date
and time.
[-]
21: 31:34
1 4
-
0 2
- 0
Insuff Recom In Out
3. Press [ - ] key and again to
go to date entry mode.
0
M O N
u
Hold
Mem Prog S 1 S2
[-]
EntEr
D D M M Y
Y
0
u
Insuff Recom In Out
4. Enter date, month, and year
data.
[ 1 ], [ 8 ],
[ 0 ], [ 2 ],
[ 0 ], [ 0 ]
Mem Prog S 1 S2
EntEr
D D M M Y
i.e. 18 Feb 2000
Hold
Y
Insuff Recom In Out
1 8
Hold
0 2 0
u
0
Mem Prog S 1 S2
Note) Each of two digit numeric data represents date, month, and year. The order of
Date, Time, Year (DDMMYY) can be changed by specification.
5. Press [ - ] key.
[-]
EntEr
D A Y
0
u
Insuff Recom In Out
Hold
- Continue -
www.tanhiepthanh.com.vn
36
Mem Prog S 1 S2
6. Enter the day of the week.
[4]
CAN DIEN TU TAN HIEP THANH
EntEr
D A Y
i.e. Friday
4
u
Insuff Recom In Out
Hold
Mem Prog S 1 S2
Note) one digit numeric data represents the day of the week as following table.
Number
Day of Week
Number Day of Week
0
Monday
4
Friday
1
Tuesday
5
Saturday
2
Wednesday
6
Sunday
3
Thursday
7. Press [ - ] key.
[-]
EntEr
H H M M
0
u
Insuff Recom In Out
8. Enter the current time.
Hold
Mem Prog S 1 S2
[ 2 ], [ 0 ],
[ 5 ], [ 3 ]
EntEr
D A Y
i.e. 20: 53
2 0 5
u
Insuff Recom In Out
Hold
3
Mem Prog S 1 S2
Note) Each of two digit numeric data represents hour and minute.
9. Store the data.
[4]
ProG
P L U
C
O U
N T
1
0
u
Insuff Recom In Out
Hold
Mem Prog S 1 S2
Note) When pressing [ 4 ] key, the internal clock starts to move from 00 second.
www.tanhiepthanh.com.vn
37
CAN DIEN TU TAN HIEP THANH
Reset Sequence Number to 0
1. Go to program mode.
[MODE]
+ [REZERO]
ProG
P L U
C O UN T
1 0
u
Insuff Recom In Out
Hold
Mem Prog S 1 S2
Note) Press [MODE] key while pressing [RE-ZERO] key.
Note) The 2nd display shows the number of items that exist in memory.
2. Press [ + ] key
[+]
SEq no
4
u
Insuff Recom In Out
Hold
Mem Prog S 1 S2
Note) The 2nd display shows the existing sequence number in memory.
3. Reset Sequence No by
pressing [ 0 ] key
[0]
SEq no
0
u
Insuff Recom In Out
Hold
www.tanhiepthanh.com.vn
38
Mem Prog S 1 S2
CAN
DIEN
TU CODE)
TAN
APENDIX
I (LIST
OF ASCII
HIEP THANH
Code Chara. Code Chara. Code Chara. Code Chara. Code Chara Code Char
.
a.
20
Space 30
40
50
60
70
0
@
P
`
p
21
31
41
51
61
71
!
1
A
Q
a
q
22
32
42
52
62
72
“
2
B
R
b
r
23
33
43
53
63
73
#
3
C
S
c
s
24
34
44
54
64
74
$
4
D
T
d
t
25
35
45
55
65
75
%
5
E
U
e
u
26
36
46
56
66
76
&
6
F
V
f
v
27
37
47
57
67
77
’
7
G
W
g
w
28
38
48
58
68
78
(
8
H
X
h
x
29
39
49
59
69
79
)
9
I
Y
I
y
2A
3A
4A
5A
6A
7A
*
:
J
Z
j
z
2B
3B
4B
5B
6B
7B
K
+
;
[
k
{
2C
3C
4C
5C
6C
7C
L
,
<
\
l
|
2D
3D
4D
5D
6D
7D
M
=
]
m
}
2E
3E
4E
5E
6E
7E
N
.
>
^
n
∼
2F
3F
4F
5F
6F
7F
O
/
?
_
o
www.tanhiepthanh.com.vn
39
APENDIX II (LIST OF TERAOKA CODE)
Code
00
01
02
03
04
05
06
07
08
09
10
11
12
13
14
15
16
17
18
19
Chara. Code
Chara. Code
Chara. Code
Chara. Code
CAN
DIEN
TU
TAN
HIEP
THANH
Space 20
40
60
80
T
@
A
B
C
D
E
F
G
H
I
J
K
L
M
N
O
P
Q
R
S
21
22
23
24
25
26
27
28
29
30
31
32
33
34
35
36
37
38
39
U
V
W
X
Y
Z
,
.
0
1
2
3
4
5
6
7
8
9
41
42
43
44
45
46
47
48
49
50
51
52
53
54
55
56
57
58
59
!
“
#
$
%
&
/
(
)
‘
Æ
Ä
Ø
Ö
Ã
Ê
Á
61
62
63
64
65
66
67
68
69
70
71
72
73
74
75
76
77
78
79
www.tanhiepthanh.com.vn
40
81
82
83
84
85
86
87
88
89
90
91
92
93
94
95
96
97
98
99
Chara.
CR