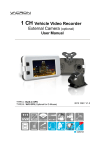
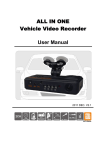
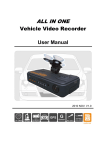
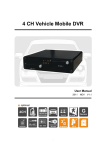
1
2-Channel Mobile Video Recorder User Manual 2013 MAR. V1.1 2-Channel Mobile Video Recorder User Manual Disclaimer This document is deemed accurate at time of writing. Due to continuous hardware and software improvement, images and software screenshots depicted here may be different from the actual products. Improper installation or use may cause hazard such as electrical shock and fire. The user and installer are advised to read this manual carefully. The manufacturer provides no warranty against any damage, loss, or claim arising from negligence, improper installation or use, or transportation accidents. The performance of GPS may be affected by external factors out of control of the device. Such factors may include weather, satellite signal strength, installation location of the GPS antenna, and other unforeseeable factors. The manufacturer provides no warranty for LCD pixel defect. Caution This manual provides general guidance to installing the device on vehicles. However, as the actual electrical wiring may vary from vehicle to vehicle, the user and installer are advised to follow safety advices from the vehicle manufacturers. Please seek help from professional technician in installing the product. 1 2-Channel Mobile Video Recorder User Manual Table of Contents A. Key Features .................................................................................. 3 B. Specifications ................................................................................. 4 C. Product Description ........................................................................ 5 D. Memory Disk................................................................................... 6 E. Cables ............................................................................................ 7 F. Vehicle Installation.......................................................................... 8 G. Remote Controller .......................................................................... 9 H. Recording ..................................................................................... 10 I. GPS .............................................................................................. 11 J. Live Display .................................................................................. 12 K. Player Software on PC ................................................................. 14 L. File Backup ................................................................................... 16 M. Configuring the Memory Disk ....................................................... 18 N. Video Playback ............................................................................. 21 O. Image Snapshot ........................................................................... 23 P. Formatting the Memory Disk ........................................................ 23 Q. Player Language Setting .............................................................. 25 2 2-Channel Mobile Video Recorder User Manual A. Key Features Suitable for motorcycle and small vehicle. Durable, water resistant all-aluminum casting. Up to 2 channel video cameras input. Simultaneous recording of video and audio (with external microphone) Built-in 3 inch TFT LCD screen for convenient camera viewing angle adjustment and video footage playback. Advanced MPEG4/AVC (H.264) compression for ultra small file size. Adjustable G-sensor sensitivity according to road condition and vehicle type. On detection of strong shock, the device automatically starts emergency recording. In emergency recording, the device saves data including 1~3 minutes before and after the event for complete record. The footage is not subject to rewrite from continuous recording. Low power consumption and excellent heat radiation. Lithium battery is not used to eliminate risks of overheating and "explosion". Automatically starts recording at ignition. If GPS receiver is installed, the recorded route will display on video playback on computer with support of GOOGLE map. 3 2-Channel Mobile Video Recorder User Manual B. Specifications Items Video input Frame Size Power Supply Operating Temperature Storage Recording Recording Content Playback Audio input Time setup G-Sensor Description 2 Channel NTSC: 30 fps (D1); PAL: 25 fps (D1) DC12V, 250mA -15°C~ 50°C SD card, 4G or above, class 10 or better. (SanDisk and Transcend recommended) Automatically starts continuous recording when powered on Date, time, video, audio, G-sensor data and GPS data (only when GPS receiver is installed). Software player (on computer) and remote controller (directly from unit) External microphone (optional) Automatic calibration by GPS signals. If GPS signal is unavailable, internal clock will be used. Internal 3-axis accelerometer Accessories (1) Standard: (a) 2.5 M Power Cable (c) Remote Controller (e) Quick Guide (2) Optional: (b) SD Card Reader (d) Driver CD (f) Velcro Tape (a) SD card, 4GB or above, class 10 or above (b) External GPS Receiver (c) Microphone (no waterproof, need to be installed in a appropriate position) (d) Bracket (two type) bracket (FE30E0900000) bracket (FE30E0900001) 4 2-Channel Mobile Video Recorder User Manual C. Product Description Panel Power IR Receiver Recording Screw GPS Protective cover SD card slot Dimension (mm) 5 2-Channel Mobile Video Recorder User Manual D. Memory Disk Plug the memory disk to recorder: (1) Loose the screw in counterclockwise rotation, and open the protective cover to insert/remove SD card. (2) Tightly close the cover afterward. SD Card NOTE: The memory disk need to be purchased separately Accessing the memory disk from computer (1) Insert the memory disk to the USB reader. (2) Plug the reader to the USB port of your computer. (3) Launch the player software from the included CD See also: Player Software on PC (p14) File Backup (p16) Configuring the Memory (p18) Playback on Computer (p22) Note (1) SD card from SanDisk or Transcend is recommended. (class 10, 4GB above) (2) Before using the memory disk, please format the disk first using the software player in the CD-ROM. If not, device will automatically erase all data in the memory disk before recording. (3) To ensure recording quality, please do not use adapter card with Micro SD card. Doing so may lead to bad connection due to shock and vibration. (4) All memory disks have limited lifespan. Please regularly watch videos on PC and check the memory disk to ensure proper functioning. 6 2-Channel Mobile Video Recorder User Manual E. Cables Cables (1) Power connecter, male (2) Channel 1 Video Input* (3) Channel 2 Video Input* (4) External microphone input (5) External GPS antenna input NOTE: Use this device with compatible vehicle cameras Power Cable (1). Power Adapter - Female connector. (2). Live Wire: Wire to ACC power or the positive pole of Engine Starter. (+) (3). Earth Wire: Wire to Negative Pole. (-) (4). Null Line: Wire to earth wire. Covered with heat-shrinkable tube to avoid short with motorcycle body. 7 2-Channel Mobile Video Recorder User Manual F. Vehicle Installation Warning (1) Please install this device with the help of professional technician to avoid damaging your vehicle. (2) For installation by none-technician, please use tapes instead of boring tools to avoid damaging the electrical and gasoline system. (3) For safety, switch off ignition before installation, and please keep away from gasoline pipeline and tank. (4) Before inserting wires through holes, temporarily wrap the terminal with tape to prevent bad connection from accumulated dirt or debris. (5) Tightly seal all electrical connection with tape to prevent loose connection or leak leaking to the connection. (6) Connect the power behind the key ignition and fuse (not directly to the vehicle battery) to avoid depleting the battery. (7) The device should be fixed to the vehicle. Tumbling inside the storage trunk will damage the device. Example Installation 8 2-Channel Mobile Video Recorder User Manual G. Remote Controller Playback Manual Recording Split Screen Switch Function Function + Audio Recording On/Off Speaker On/Off Menu Up, Down, Left, Right Enter Rewind Fast Forward Video Playback Stop playback / Stop playback mode Pause Icon Function Description Split Screen Switch Full screen / split screen switch Manual Recording Open the playback list and switch to playback mode Saves video from 1~3 minutes before and after press of the button as emergency recording. Function + Lighten the screen Function - Darken the screen Microphone On/Off Turn on or off audio recording Playback Mode 9 2-Channel Mobile Video Recorder User Manual H. Recording There are two modes of recording: Continuous After the device is powered up, it automatically starts recording continuously until it is powered off. Emergency In the event of emergency, the device saves data from 1~3 minutes before and after the event. The footage is not subject to rewrite from continuous recording. Emergency recording may be activated manually or by G-sensor. Power Recording GPS In continuous recording, the recording indicator (red) will flash at normal speed. In emergency recording, the recording indicator will flash at fast speed. Continuous Recording When the device is powered on, the LCD screen will show a splash screen and then the firmware version. The device needs around one minute to boot. During boot-up, the power indicator (green) will flash. Then the recording indicator (red) will flash to indicate that recording is in progress 10 Splash Screen 2-Channel Mobile Video Recorder User Manual Manual Recording To start manual recording, press the button on the remote controller. The recording indicator (red) will flash at quicken speed to indicate that emergency recording is in progress. G-Sensor Recording When the internal G-sensor detects abnormal shock, the device automatically switches to emergency recording. To set G-sensor sensitivity, please refer to “Configuring the Memory ” (page 18) I. GPS Power Recording GPS Flashing GPS indicator (blue) means the system is either searching for GPS signal or calculating location. Continuous GPS indicator light means GPS positioning is ready. NOTE: The time for the device to determine coordinate may be influenced by external factors such as location of the GPS receiver, weather, and satellite signal strength. 11 2-Channel Mobile Video Recorder J. Live Display User Manual Event Mode GPS Camera 1 Microphone Camera 2 Energy Saving Video 1 Video 2 GPS Information on top right, it means that both channel 1 (1) If the screen shows icon indicates that (left) and channel 2 (right) have video signal. A one channel has no video input. Note: Even if there is no video input, the device still record that channel (as long as there is power and SD card has no error). The channel screen will display a blue background icon indicates normal (continuous) recording. A (2) Event Mode: a icon manual recording. A icon indicates emergency recording activated by the G-sensor. See “Recording” (page 10) 12 2-Channel Mobile Video Recorder User Manual (3) Press on the remote controller to switch between CH1 full screen, CH2 full screen and 2-split screen display (see below) CH1 full screen (4) Press version CH2 full screen 2-split screen Image on the remote controller in LIVE mode to show firmware (5) Press on the remote controller to turn off audio recording ( will icon indicates that audio recording is on. show on the screen). A (6) A icon means either that the device is calculating coordinate or that there is no satellite signal. A icon means that GPS is ready. (7) You can use the player software to configure the display brightness on indicates daylight mode, and indicates night mode. the SD card. or on the remote controller to adjust (8) LCD brightness: Press the screen brightness. The screen will show something like below: 13 2-Channel Mobile Video Recorder User Manual K. Player Software on PC Run the player software (included in the CD). NOTE: The software requires Direct X version 9.0 or above. Channel 2 Channel 1 Google Map Video seek bar Vehicle speed Control bar Coordinate G-Sensor Audio Volume NOTE: GPS coordinates, speed and map data are only available if GPS receiver is connected to the device. Play the video / file Seek Bar Play Speed Seek Bar Drag the car icon to quick search video. Play Speed Change playback speed (2x or 4x faster, normal, or -2x or -4x slower) 14 2-Channel Mobile Video Recorder User Manual G-sensor Display vehicle vibration as recorded by internal accelerometer. X Left and right movement Y Front and rear movement Z Vertical movement Control bar Previous File Stop Previous Frame Play Play Backward Next Frame Pause Next File Video backup. Configuration View map in a separate window Open video (from file or memory disk) Snapshot Memory disk format and language setting Google Map If GPS data is available (a GPS antenna is attached to the device at the time of recording), the screen will show the vehicle route using Google Map To open the Google Map in a separate window, select 15 2-Channel Mobile Video Recorder User Manual L. File Backup On the player software, select and the following window will open. 1 3 2 4 5 To backup video: (1) Select the path of the memory disk 16 2-Channel Mobile Video Recorder User Manual (2) Select the footage that you want to backup (3) Select the Backup Format: (a) Raw file (.sd) Backup all footage information (video, audio, and GPS data). This player software is needed to open the file (b) AVI File (*.avi) Backup video and audio to a format that other media player can open. GPS data will be lost. chn01 indicates channel 1 footage chn02 indicates channel 2 footage (4) Step 4: Select the destination folder of the file. (5) Step 5: Select Backup to start. 17 2-Channel Mobile Video Recorder User Manual M. Configuring the Memory Disk Before using the memory disk, you need to firstly format and configure the disk. For disk formatting, please refer to “Formatting the Memory ” on page 23. To configure the memory disk: (1) Plug the memory disk to your computer (see page 6). (2) Run the player software (3) Select (included in the CD). to open the configuration window Video Quality Select the video quality: High/ Normal / Low 18 2-Channel Mobile Video Recorder User Manual Set the number of frames per second. NTSC: 5, 10, 15, 20, 30 PAL: 5, 10, 15, 20, 25 Video Frame Rate Set the frame size D1 720 x 480 (NTSC) 720 x 288 (PAL) CIF 360 x 240 (NTSC) 360 x 288 (PAL) Enter information such as the driver’s name or license plate number to help identifying memory disks when the device is used in a fleet. This function can encrypt the data and prevent unauthorized access. Maximum letters. Password can contain maximum 15 letters. Video Format Car Information NOTE: Password is case-sensitive. Always keep passwords in secure location. Password After passwords are setup, you will need to enter the password to access the disk (video playback, configuration, formatting, etc.) Time zone Set the time zone. Unit of Speed Set the unit of speed. Km/h: kilometer per hour Mile/h: mile per hour Knot:knot per hour Set the G-sensor threshold to activate emergency recording. G-Sensor Sensitivity Five options are available: OFF, very low, low, normal, high, very high 19 2-Channel Mobile Video Recorder User Manual Daylight Saving Time Turn on/off daylight saving. If this option is enabled, the device’s LCD screen will show “DST” after the time stamp. Audio Recording Turn on/off audio recording. Set when to turn off the screen to save energy: Always On Never turn the screen off Intelligent Turns the screen of after a certain time period of inactivity. Intelligent GPS Turn the screen off when the vehicle reaches certain speed for a certain time period Screen Energy Saving NOTE: Pressing any button on the remote controller will turn on the LCD screen. The screen will turn off again after a period of inactivity. NOTE: Intelligent GPS is only active is a GPS antenna is attached to the device. 20 2-Channel Mobile Video Recorder User Manual N. Video Playback You may play recorded video 1) on the built-in screen or 2) on computer On-Screen Playback Press either or button on the remote controller, and the system will switch to playback mode (see below). The device stops recording in the playback mode. Manual recording G-Sensor recording (1) Press the or button to select the footage in the list (2) Press the footage.S or button to select the previous or next page of (3) After the desired footage is selected, press (4) To pause video, press to play the video. . To resume playing, press (5) To stop playing and return to the playback list, press (6) To stop playback and return to live recording mode, press 21 again 2-Channel Mobile Video Recorder User Manual Playback on Computer On the software player, select and the following window will appear: 1 2 (1) Select the path of the memory disk or a backup file on the hard disk. (2) Double click the desired footage to play the file. 22 2-Channel Mobile Video Recorder User Manual O. Image Snapshot While playing a footage on the software player, you may take a snapshot of . The player will save the file to *.bmp the current frame by selecting format and open the destination folder: P. Formatting the Memory Disk Important Formatting/restoring the memory disk will erase all data in the disk. Formatting the disk Before using a newly purchased memory disk, or when repurposing an used disk for the device, the memory disk must be formatted first. Restoring Disk Capacity If you want to repurpose the memory disk for other uses (e.g. for computer or digital camera), you need to restore the disk. All recorded data will be erased from the disk. Formatting/Restoring To format/restore the memory disk: (1) Plug the memory disk to your computer (see page 6). 23 2-Channel Mobile Video Recorder (2) Run the player software (3) Select User Manual (included in the CD). to open the disk format window. (4) Select the memory disk (5) Select the Format or Restore button. Troubleshooting (1) Before formatting or restoring, make sure the disk is not locked. Unlock Lock (2) If you are still unable to format/restore the memory disk, close the software player, and then re-open the player as administrator: (3) If you still cannot format/restore the memory disk, log out of Windows and re-log in as administrator. 24 2-Channel Mobile Video Recorder User Manual Q. Player Language Setting The software player supports multiple language interface (11 languages at time of writing). To change the user interface language of the software player: (1) Run the player software (2) Select (included in the CD). to open the tool window. (3) Select the language setting and then close the window. (4) You need to close and re-open the player for the effect to 25