1
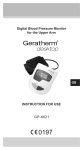
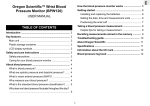
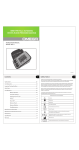
Digital Blood Pressure Monitor
for the upper arm
GB
INSTRUCTION MANUAL
GT-5907
Contents
Information you should know before
operating the unit ................................................ 25
About the unit
Function description........................................... 26
Explanation of displays ...................................... 27
Preparation for use
Installing/Replacing batteries ............................. 28
Attaching the pressure cuff ............................... 29
Posture during measurement ............................ 30
GB
Operations
Setting the clock and date .................................
Measuring blood pressure ................................
WHO classification of blood pressure
for adults ............................................................
Recalling memories ...........................................
Erasing memories .............................................
35
36
36
Care and maintenance .........................................
Error messages ...................................................
Specifications .......................................................
Quality standard ..................................................
37
39
41
42
31
33
Caution
1. Consult your physician to verify your blood pressure
range before measuring it at home with this unit.
2. If the cuff causes any discomfort during measurement, press the start/stop button to turn off the unit
immediately.
3. If the pressure is over 300mmHg and the cuff does
not deflate automatically, pull off the velcro strap to
detach the arm cuff.
Blood pressure measurements obtained with this unit
are equivalent to those obtained by a trained person
using the cuff/ stethoscope auscultation method.
WARRANTY:
Three years from the date of purchase.
24
Information you should know before
operating the unit
What is blood pressure?
A force is created by the heart as the ventricleforcibly
ejects blood into the blood vessels and through the
vascular system. Another force is created by the arteries as they resist the blood flow. Blood pressure is the
result of these two forces.
What are systolic and diastolic pressures?
Systolic pressure is the highest pressure at the height
of the heart`s contraction. Diastolic pressure is the lowest pressure when the heart is resting.
Is my blood pressure normal?
See the blood pressure classification chart released
by the WHO (World Health Organization) on page 35
for evaluation of your blood pressure level.
What about low blood pressure?
In general, a lower blood pressure reading is better unless it causes unpleasant symptoms such as fainting
and/or lightheadedness.
Fluctuation and variation in blood pressure
The following chart shows possible blood pressure
fluctuations during a 24-hour period.
25
GB
Information you should know before
operating the unit
mmHg
The following factors will influence blood pressure
measurement results and cause variations.
• Bathing
• Breathing
• Conversation
• Drinking alcohol
• Exercise
• Moving
• Mental tension
• Eating
• Temperature change
• Thoughts
• Smoking etc.
GB
About the Unit
Function description
Based on oscillometric method and silicon integrate
pressure sensor technology, blood pressure and heart
rate can be measured automatically and non-invasively which helps to ease the operation. The Geratherm
med control have 2 x 99 memories with date and time
display, a big LCD screen and arrhythmia detection.
The RCC (radio controlled clock) function can automatically receive the German radio clock signal (DCF77)
to adjust the clock accurately. And the colour LED for
indicates the class according to WHO of your blood
pressure. Also the monitor has the function of averaging the latest three records.
26
About the unit
M EM
STA
RT
LCD Display
cuff
On/Off Button
Memory
The cuff is designed to fit arm sizes between 22 and
30cm (8.7 to 11.81 inches.)
Explanation of displays
Date/
Time
GB
RCC Low Batterie
Systolic
WHO
classification
Diastolic
Pulse
Group
Memory
Irregular Heart Beat
(IHB)
27
Preparation for use
Installing/ Replacing batteries
1. Insert the batteries into the battery compartment
matching correct polarities “+” and “-”.
2. Replace all batteries if the low battery indicator appears.
3. Remove the batteries if the unit will not be used for
a long period of time.
4. REMOVE all of the BATTERIES when utilizing the
optional AC adapter.
Note:
It is recommended that the same type of alkaline batteries be used to avoid incompatibility. Rechargeable
batteries with a voltage of 1.2V are not suitable for this
product.
GB
Please dispose of defective appliances and used batteries in compliance with statutory regulations (disposal in general household waste is prohibited!).
28
Preparation for Use
Attaching the pressure cuff
1. Wrap the cuff around the left arm. The arm should
be bare.
2. Fasten the cuff. Don‘t pull it too strong or make the
cuff too tight. The edge of the cuff should be approximately 1 inch from the crease of your elbow.
GB
3. Attach the cuff on the right arm as shown in the figure if it is not possible to measure on the left arm.
29
Preparation for Use
Posture during measurement
1. Sit upright and ensure that the cuff is at heart level.
Relax and retain a natural posture during measurement.
2. Measure and record blood pressure at the same
time every day to establish your blood pressure
pattern.
GB
AC Adapter
It is possible to use a stabilized AC adapter (output 6 V
DC/800 mA) to operate the device.
Note:
1. No power is taken from the batteries while the AC
adapter is connected to the device.
2. If AC adapter power is interrupted during measurement, the device must be reset by disconnecting
the AC adapter from the device.
3. Please consult an appropriate dealer if you have
questions relating to the adapter.
Power source
4 alkaline type “AA” batteries (1.5 V) or
stabilized AC/DC adapter
6 V DC 800 mA
30
Operations
Setting the clock and date
1. Clock Mode
Once you install the batteries, with two “beep”, the
LCD will display the time and date by turns. At the
same time, the machine enters the Radio Controlled Clock Mode with the RCC symbol
twinkling.
After the RCC receiving, the machine enters the
Clock Mode and the LCD displays the time and
date by turns. And the COLOUR CHANGE LED will
twinkle with the colour changed in random turn.
2. Radio Controlled Clock(RCC) Receiving
a. Initial receiving:
Once you install the battery, the machine enters the
RCC Receiving Mode. The RCC symbol twinkles
during the receiving process. If clock data received,
the time and date will be adjusted automatically.
And then enter the Clock Mode. If no clock data received, the machine enters Clock Mode and keeps
the time and date unchanged.
When the machine is in the RCC Mode, you can
skip RCC receiving and enter the Clock Mode by
pressing “START” button.
b. Forced RCC Receiving
When the machine is in Clock Mode, keep on pressing both the button “START” and “MEM” at the
same time for two seconds, you will enter forced
RCC mode and the RCC symbol is twinkling. If clock data received, the time and date will be adjusted
automatically. And then enter the Clock Mode with
two “beep”. If no clock data received, the machine
enters Clock Mode with long beep and keeps the
time and date unchanged.
You can skip forced RCC Mode by pressing the button “START”. Then the machine enters the Manual
Clock Adjusting mode.
31
GB
Operations
c. Periodical receiving
The machine will automatically receive the RCC
signal at the time 2:05 and 14:05 every day. You
can skip the receiving process by press the button
“START” to enter clock mode.
3. Manual Clock Adjusting
Normally, the time and date can be adjusted by
RCC signal automatically. But you also can try
manual clock adjusting if no RCC signal or weak
signal.
a. When the machine is in Clock Mode, press the
“START” and “MEM” button at the same time (abt. 2
sec.), the machine enters Forced RCC Receiving
mode, then press “START” button, the machine enters manual Clock Adjusting Mode.
GB
b. The number of year will twinkle first (picture 4).
Press “START” button continuously, the numbers
of month, day, hour and minute will twinkle in turn.
While the number is twinkling, press “MEM” button
to increase the corresponding number. Keep on
pressing the button “MEM”, the number will increase fast.
c. You can exit the Clock Adjusting Mode by pressing
button “START” when the number of minute is twinkling, then enter the Clock Mode.
d. When you change the batteries, the clock will be
reset. You can readjust clock or let the monitor modifying the clock by RCC automatically.
32
Operations
Measuring blood pressure
a. After your body is in a comfortable position, press
the “START” button. After a long “beep”, BPM will
verify itself with LCD display all automatically, and
the COLOUR CHANGE LED will lighten with 3 colours by turn (picture 1).
pict. 1
b. Then the LCD twinkle the current group sign and
show the total of memories in this group. Now you
can modify the current group number by pressing
the “START” button, and confirm the current group
by pressing the “MEM” button.
c. Once you choose the group, and if it already has
memory, LCD will show the latest result with the
LED indicator (picture 2). If machine does not have
memory before, the LCD will show six “0”.
pict. 2
d. One second later, LCD shows a single “0”. While
the “down arrow” does not twinkle until the air pressure is stable, and then it begins to measure automatically.
33
GB
Operations
e. Then the monitor begins to pressurize
automatically.
During the measurement, the current pressure will
display on the LCD, and the bars will automatically
rise up or fall down with the current pressure in the
cuff. The heart sign will glimmer with the heartbeat
during the pressure are falling down.
f. After measurement, the result of systolic, diastolic
and pulse rate will all display on LCD. And irregular
heartbeat symbol and blood pressure classification
indicator will twinkle (picture 3). The result will be
automatically memorized by itself. And the COLOUR CHANGE LED will also indicate the blood
pressure classification.
GB
pict. 3
g. During the measurement, you can turn off the monitor by press the “START” button.
h. Pressing “START” button after measuring, machine
will be turn off, or it will be automatically shut down
after 1 minutes of none use.
Note:
If the symbol “
” appears, it means the unit has
detected irregular pulse during measurement. If the
symbol appears regularly please consult a qualified
physician for professional advice.
34
Operations
WHO classification of blood pressure for adults
Severe hypertension (Grade 3)
Moderate Hypertension (Grade 2)
Mild Hypertension (Grade 1)
Boarderline
Normal
Optimal
Blood pressure classification
Systolic
BP mm
HG
Diastolic
BP mm
Hg
Color
indicator
Optimal
< 120
< 80
Green
Normal
120 – 129
80 – 84
Green
High – Normal
130 – 139
85 – 89
Yellow
Stage 1
Hypertension
140 – 159
90 – 99
Red
Stage 2 Hypertension
160 – 179
100 – 109
Red
Stage 3 Hypertension
>= 180
>= 110
Red
Please note that other risk factors (e.g. diabetes, obesity, smoking, etc.) need to be taken into consideration
and may affect these figures. Consult with your physician for accurate assessment.
35
GB
Operations
Recalling memories
a. Under the clock-displaying mode, press button
“MEM” will enter the mode of recalling memories.
LCD will show how many results it has in the current
group. Now you can modify the current group number by pressing the “START” button, and confirm the
current group by pressing the “MEM” button.
b. When the group is selected, the average of last
three records will be displayed. If machine does not
have memory before, the LCD will show four “0”.
c. After that the latest result will be displayed, which is
01 for memory number. The time which you measured will also be displayed. Continuously press
the “MEM” button, previously memories will show
by turns.
d. All memories have the WHO classification and the
COLOUR CHANGE LED will also indicate the blood
pressure classification.
GB
e. If it has no memory (or all memories have been deleted), then LCD will show “0” for systolic, diastolic,
and show “00” for the numbers of memory, heart
rate.
f. Press “MEM” button again after the last memory, the
machine will power off. Under the memory-displaying mode, it will be automatically power off after 1
minute of none use. Or you can press “START” button to shut down the machine.
Erasing memories
When it displays one memory (no matter which memory), holding on pressing “MEM” button for three seconds, all memories will be deleted with three “beep”.
LCD will show the “- -” before you release the button,
then it comes to the mode without memory.
36
Care and maintenance
Do not drop the unit. It
is not shock-proof.
Do not modify or
disassemble the unit
or the arm cuff.
Do not twist the arm
cuff.
GB
Use a cloth moistened
with water or neutral
detergent to
clean the body of the
unit and then wipe
it dry.
37
Care and maintenance
Avoid thinning agents,
benzine, and other
harsh cleaners.
Keep the unit in a
suitable place.
Avoid high temperatures, direct sunlight,
high humidity level,
and dust.
GB
Remove the batteries
if the unit will not be
used for a long time.
Do not press the
POWER button if the
cuff has not been
properly wrapped
around the arm.
38
Error messages
Abnormality
Reason
Checkout
LCD
shows low
battery
symbol
Batteries low
Change the
batteries
LCD
shows
“Er 0”
Pressure system
is unstable before
measurement.
LCD
shows
“Er 1”
Systolic pressure
detect fail
LCD
shows
“Er 2”
Diastolic pressure detect fail
LCD
shows
“Er 3”
Pneumatic
system blocked
or cuff is too tight
during inflation
LCD
shows
“Er 4”
Pneumatic system leakage or
cuff is too loose
during inflation
39
Don’t move
and try again.
Place the cuff
correctly and
try again
GB
Error messages
GB
Abnormality
Reason
Checkout
LCD
shows
“Er 5”
Inflation above
300mmHg
LCD
shows
“Er 6”
Pressure is over
15 mmHg for longer than 3 min.
At the start of
measurement the
pressure reading
must be below 15
mmHg.
LCD
shows
“Er 7”
EEPROM accessing error
LCD twinkling all
Device parameter check error
LCD
shows
“Er 9”
MCU self-verity
error
LCD
shows “Er
A”
Span error
LCD
shows
“Er b”
EEPROM backup
error
BPM no
response
when you
press button. BPM
hang
Incorrect operation
40
Measure
again after
5 minutes. If
the monitor is
still abnormal,
please
contact the
local distributor or the
factory.
Take out batteries for five
minutes, and
then reinstall
all batteries.
Specifications
Display System
Liquid Crystal Display
Measuring Method
oscillometric method,
automatic air inflation and
measurement
Power Source
4 alkaline “AA“ type batteries
(1.5V) or AC/DC adapter
(optional)
Measuring Range
blood pressure measuring
range: 0-295mmHg
Heart pulse rate range
40-180 pulse beats/min
Accuracy
±3mmHg (blood pressure)
±5% (pulse beats per minute)
Memory
2 x 99 memories with time
and date displaying
Low Battery Indicator
yes
Auto Power-Off
after 1 minute
Battery Life
Approx.200 measurements
Operating Environment
+5°C - +40°C; RH<80%
Storage Environment
-20°C - +55°C; RH<95%
Dimensions
160mm x 115mm x 69mm
Weight
364 g (monitor) +90 g
(batteries)
Specifications are subject to change without notice
for purposes of product improvement.
It is recommended that the unit be calibrated by an
authorised laboratory every two years.
41
GB
Quality standard
The unit meets the requirements of Council Directive
93/42/EEC concerning medical devices. A Quality
Management system, certified according to EN ISO
13485, guarantees that the product complies with the
required quality criteria.
The blood pressure monitor conforms to EN 1060-1
(Non invasive sphygmomanometers part 1: General
requirements) and EN 1060-3 (Non invasive sphygmomanometers part 3: Supplementary requirements
for electromechanical blood pressure measuring systems).
GB
42