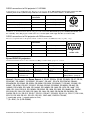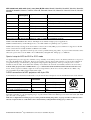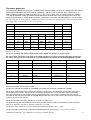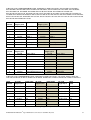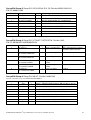
1
Jed Micro PTY LTD T460/T461/T462 manual: V3.84Part B
Specific setups for various projector/screen families
Table of Contents
ACER ......................................................................................................................................................................................... 2
Barco projectors: ........................................................................................................................................................................ 3
BenQ LCD ................................................................................................................................................................................. 3
BenQ projectors: ........................................................................................................................................................................ 4
BenQ SP820 see: Optoma: EP771/772/774 ............................................................................................................................... 4
Canon Generic 1: ........................................................................................................................................................................ 8
Casio XJ-M, XJ-H (and possibly XJ-A) series projectors (LED/Laser) .................................................................................... 9
Christie projectors: ................................................................................................................................................................... 10
CommBox LCD panels: ........................................................................................................................................................... 10
DELL projectors:...................................................................................................................................................................... 11
Eiki projectors .......................................................................................................................................................................... 12
Epson ESCVP/21 projectors .................................................................................................................................................... 13
Fujitsu plasmas: ........................................................................................................................................................................ 16
Hitachi / 3M / Viewsonic projectors (with 12 or 13 byte codes) .............................................................................................. 16
Hitachi Plasma screens: ............................................................................................................................................................ 17
InFocus/ASK series drivers ...................................................................................................................................................... 18
LG LCD, LG Plasma and Zenith Plasma flat screens .............................................................................................................. 19
Mimio (generic) One model quoted is 1865050 ...................................................................................................................... 21
Mitsubishi projector group 1: ................................................................................................................................................... 21
NEC LCD (old codes Mitsubishi projector style codes, e.g. “00_r1<CR>”): .......................................................................... 23
NEC LCD (new codes e.g. “SOH,0A0E0A,STX,00600003,ETX,Cksum, <CR>” ): .............................................................. 23
NEC LCD (E-series): ............................................................................................................................................................... 23
NEC Plasma: ............................................................................................................................................................................ 24
NEC projectors (new multi-byte codes) : ................................................................................................................................. 26
Optoma (Inc. BenQ, Planar, Promethean, Vivitech) Note: many prefixes to numbers ............................................................ 28
Panasonic projectors ................................................................................................................................................................. 33
Panasonic LCD ......................................................................................................................................................................... 36
Panasonic plasma ..................................................................................................................................................................... 36
Philips BDL series LCD ........................................................................................................................................................... 38
Pioneer plasma ......................................................................................................................................................................... 39
Planar PR5020 projector: see Optoma EP771/772 ................................................................................................................... 40
Plus projectors: ......................................................................................................................................................................... 40
Projection Design … ASCII and Binary code sets ................................................................................................................... 42
Promethean: (Electronic WhiteBoard manufacturer also selling projectors) ........................................................................... 43
Proxima projector: .................................................................................................................................................................... 43
Samsung LCD panel ................................................................................................................................................................. 43
Samsung Generic1: .................................................................................................................................................................. 43
Sanyo LCD: .............................................................................................................................................................................. 44
Sanyo projector: (Inc. some Eiki, Christie, Philips, Promethean) ............................................................................................ 45
Sharp projectors: (Inc some Eiki EIP family) .......................................................................................................................... 53
Sharp LCD screens: .................................................................................................................................................................. 54
Smart LCD ............................................................................................................................................................................... 57
Smart projector ......................................................................................................................................................................... 57
Sony projector (old A5/5A codes):........................................................................................................................................... 57
Sony projector (newer A9-9A codes): ...................................................................................................................................... 58
Sony LCD panels ..................................................................................................................................................................... 58
Taxan-Kaga-Plus projector families: ........................................................................................................................................ 61
TEAC Plasma: .......................................................................................................................................................................... 62
Toshiba projectors .................................................................................................................................................................... 63
2-Touch / CTOUCH LCD touch panel. ................................................................................................................................... 65
Viewsonic projector (non-Hitachi models): ............................................................................................................................. 66
Vivitek: See Optoma group 5 for Vivitek Generic 1, 2, 3. ....................................................................................................... 68
T460/461/T462 Manual 9th Sept 2015 Part B 3.84 release © Jed Micro Pty Ltd
1
Projector details by family
For ASK/Proxima, see also InFocus, Eiki, Christie and Proxima projectors.
For Eiki EIP-200/1000/1600/2500/3000/3500/4500, see Sharp, else Sanyo for all others.
For Christie DS30, PLUS-26, PLUS-26, MATRIX-1500, else see Sanyo for all others covered.
For 3M, Acer, see Hitachi or Optoma. For Viewsonic: see Hitachi
ACER
PD727, P1165, P1265, P5270, P5280, P5370, Generic Acer (use for unlisted models)
(for ACER 755C see Hitachi) (Acer PD523 deleted at rev 2.78. Order prior version from archive if needed again.)
T460
Channel
TX code
Input name in manual
Function as identified on screen
1
* 0 IR 015<0Dh>
D-SUB RGB 1
(Pic. of 15-pin connector) D-SUB
2
* 0 IR 016<0Dh>
DSUB2 RGB or Digital RGB on DVI
(Pic. of DVI connector), DVI (some only)
3
* 0 IR 019<0Dh>
Composite Video
(Pic. of RCA) Composite
4
* 0 IR 018<0Dh>
S-video
(Pic. of DIN 4) S-video
5
* 0 IR 020<0Dh>
DVI-D/Component
(Pic. of DVI connector) Component
6
* 0 IR 017<0Dh>
YPbPr for D-sub
(Pic. of 15-pin connector) Component
7
* 0 IR 028<0Dh>
Analog RGB for DVI Port
(Pic. of DVI connector), DVI
8
* 0 IR 050<0Dh>
HDMI via adaptor cable
(Pic. of HDMI connector), DVI
Don’t forget to set all unused T460 channels to “Skip” to jump over blank/unused inputs.
Note: There appears to be some confusion as to whether the second analog RGB is available on the DVI socket with the code
we allocate to Channel 2. The generic Acer manual says it is, but the projector tested by JED, a P1265, does not allow it.
Some of this family do support wireless and HDMI channels, but we have been unable to get control strings for these. HDMI
does work on the P1265 via a HDMI to DVI cable, using the code we allocate to Channel 8.
Note: You must turn ON source lock in the third menu, “Management” so that a channel can still be selected if there is
no current input to that channel.
Mute and Freeze functions are provided so all keyboards work fine. These functions are “toggle” mode, so no “two yellow key
mute” is available.
The audio level control works OK via the T460 remote to the small internal speaker. There are one or two audio inputs
(common audio input for all sources), but only some have an audio output jack to drive external speakers/PA. It is suggested a
T461 be used to provide proper audio control.
Aspect ratio set-up is supported for 4:3 small, 4:3 reg and 16:9 reg. Aspect ratio is included in the Acer units. Use source
names: “Set reg 4:3” and “Set reg 16:9”.
RS232 connections to 3-Pin DIN Acer projectors.
Mini-DIN 3 socket on projector. Coms at: 9600 DP8N1 (Note: Rev 2.80 + is needed as previous releases had wrong speed.)
Function/Direction
T460 “projector”
Connection
Acer Serial Port
Connector
Ground
Ground
Mini-DIN 3 pin 3 (Gnd)
Data from T460 to projector
Tx
Mini-DIN 3 pin 2 (RXD)
Reply data from projector to T460
Rx
Mini-DIN 3 pin 1 (TXD)
1
2
3
Mini-DIN 3
solder side
After installation wiring of any projector to a T460, use a multimeter to check voltages on BOTH TX and RX pins.
T460/461/T462 Manual 9th Sept 2015 Part B 3.84 release © Jed Micro Pty Ltd
2
Barco projectors:
BR6300 (and friends)
Barco have a wide range of CRT three-gun projectors and more recently the 6300 model, which is LCD, and a range of DLP
units as well. The manual R5975236_08 is the same for all these. They all seem to have identical control RS232 codes, so
probably most Barco units will work with the T460 driver by selecting Barco 6300 in the projector setting menu.
Projectors with same codes mentioned in the file R5975236_08 are BD2100, BD3000, BD3100, BD3200, BD3300,
BD5000, BD5100, BD8000, BD8100, BG8200, BG9200.
(Some models do not appear to have audio facilities in the projector, although the tested BR6300 does.)
What connections are made to inputs depends on input boards plugged into slots in the front of the projector, and when that
slot is functional, a box on the projected image identifies the input card and slot number quite clearly. Unused slots are also
indicated when selected. So when setting up, run through the available channels and name them appropriately in the “source”
selection setup screen.
Communications runs at 9600 8N1.
th
T460 Channel
Code, 4 byte
Slot
Screen display
Channel 1
01h
1
Depends on plug-in
Channel 2
02h
2
Depends on plug-in
Channel 3
03h
3
Depends on plug-in
Channel 4
04h
4
Depends on plug-in
Channel 5
05h
5
Depends on plug-in
Channel 6
05h
6
Depends on plug-in
Channel 7
07h
7
Depends on plug-in
Channel 8
08h
8
Depends on plug-in
Don’t forget to set all unused T460 channels to “Skip” to jump over blank/unused inputs in all the above tables.
RS232 Connection for Barco
We don’t have a specific connection diagram for these Barco projectors, but one tested projector has a DB9 Male on the
projector. Only TX, RX and Ground were used for the test. (CTS was NOT needed). We assume this is the same for other
models. Use a multimeter to determine the TX connection (-9 volts) and connect to the RX in of the T460 (J6 Pin 3). Use
multimeter with the projector OFF in “resistance” mode and look for another line with approximately 5k ohm to ground, and
assume this is the projector RS232 input and connect to J6 pin 2 of the T460.
BenQ LCD: RP550+, RP551+, RP650+, RP651+, RP700+, RP840G
T460 Channel
Code string
Connector
Screen display
Channel 1
'801s', 22H, '000', 00DH
DB15
VGA
Channel 2
'801s', 22H, '006', 00DH
DVI
DVI
Channel 3
'801s', 22H, '003', 00DH
Video
AV
Channel 4
'801s', 22H, '001', 00DH
HDMI
HDMI 1
Channel 5
'801s', 22H, '002', 00DH
HDMI
HDMI 2
Channel 6
'801s', 22H, '007', 00DH
DisplayPort
DisplayPort
Channel 7
'801s', 22H, '008', 00DH (if FLAGJ=0)
USB-A
MultiMedia
Channel 7
'801s', 22H, '009', 00DH (if FLAGJ=1)
BNC
SPI
Channel 8
'801s', 22H, '010', 00DH
RJ45
NETWORK
Don’t forget to set all unused T460 channels to “Skip” to jump over blank/unused inputs in all the above tables.
T460/461/T462 Manual 9th Sept 2015 Part B 3.84 release © Jed Micro Pty Ltd
3
There is no Picture Mute, but Sound Mute is provided.
It is necessary to set the following in the “Tools” menu (4th):
•
Control setting -> RS232;
•
Monitor ID -> 1;
•
Power save -> Off
There is no volume level indication on the LCD image, so the level shown on the T460R is the only available indication.
RS232 connections to BenQ with DB9 male on the LCD
The reply signal from the LCD screen is disabled between transmitted messages, so the usual test with a multimeter can give
confusing results, as BOTH the LCD Rx (line into the Rx input) and Tx (reply line from the LCD) measure approximately zero
volts and both show a DC resistance of about 5K to ground. The LCD Tx line only outputs a +/- 5 volts waveform when a
message is replied to, and then goes back to zero.
These use a 9-pin-D9 male on the LCD, female on the cable. Comms is at 9600 8N1.
Function/Direction
T460R “Projector”
Connection
BenQ LCD port
Connector
Ground
Ground
9-pin D-sub pin 5
Data from T460 to projector
Tx
9-pin D-sub pin 2 (RXD)
Reply data from projector to T460
Rx
9-pin D-sub pin 3 (TXD)
Plus 9 volt CTS/DTR to projector
N/C
N/C
1
2
6
3
7
4
8
5
9
D-sub 9 female
solder side
BenQ projectors:
BenQ SP820 see: Optoma: EP771/772/774
BenQ projectors: SH960
(This model does not have <CR> before and after commands)
T460 Channel
Code string
Connector
Screen display
Channel 1
*sour=RGB#
DB15
PC
Channel 2
*sour=RGB2#
RCA
Component 2
Channel 3
*sour=vid#
Video
Video
Channel 4
*sour=svid#
S-Video
S-Video
Channel 5
*sour=ypbr#
DB15
Component 1
Channel 6
*sour=hdmi#
HDMI
HDMI
Don’t forget to set all unused T460 channels to “Skip” to jump over blank/unused inputs in all the above tables.
•
Reply mode not available;
•
In System Setup: “Auto Power Off” -> “Disable, “Sleep Time” -> Disable, “Quick Auto Search” -> Off;
•
In Advanced Setup: In Lan Control Settings -> Control by RS232;
•
In Advanced Setup: In Baud rate -> 19200;
•
In Advanced Setup: Direct Power On -> Set OFF, Direct Power Off -> Set OFF;
•
Audio functions are limited to one audio input and no output. Use a T441/T461 if audio control is needed;
•
Absolute Mute, Blank and Freeze are available.
T460/461/T462 Manual 9th Sept 2015 Part B 3.84 release © Jed Micro Pty Ltd
4
BenQ projectors: “BenQ Generic 1” has the standard set of current drivers applicable to all current
releases from BenQ. Use this as first preference. It uses the second channel allocation in the table below,
but has HDMI2 as channel 7 and network as channel 8.
BenQ projectors: MP512, MP513, MP515, MP515ST. MP522(c, st), MP525, MP525P, MP525ST,
MP575, MP576, MP623/MP624, MP626, MP670, MP724/MP727/MP735, MP772st, MP776, MP776st,
MP777, MS614, MW811ST, MW714ST, MX615, MX660P, MX670, MX671, MX712UST / MX880UST,
MX710, MX711, MX713ST / MX810ST, MX716 / MX717, MX762ST / MX812ST, MX763, MX764,
SP840, W600, W1060, W1070, W7000+
T460 Channel
Code string (Second codes, MP724/727/735 only)
Connector
Screen display
DB15
Analog RGB (1) /YPbPr (1)
DVI
DVI-A OR RGB2
Channel 1
<CR>*sour=RGB#<CR>
Channel 2
<CR>*sour=dviA#<CR> or
<CR>*sour=RGB2#,<CR>
Channel 3
<CR>*sour=vid#<CR>
Video
Video
Channel 4
<CR>*sour=svid#<CR>
S-Video
S-Video
Channel 5
<CR>*sour= ypbr #,<CR> or
<CR>*sour=RGB#<CR>
DB15
Analog RGB/YPbPr (some)
Channel 6
<CR>*sour=hdmi#,<CR>
HDMI
HDMI (some only)
Channel 7
<CR>*sour=dvid#,<CR> or
<CR>*sour= hdmi 2#<CR> (SP840, W600)
DVI
DVI-D (some only)
or HDMI 2
Channel 8
<CR>*sour=RGB2#,<CR> or
<CR>*sour=dviA#<CR>
DB15
Analog RGB (2) /YPbPr (2)
(some only) or DVIA
Don’t forget to set all unused T460 channels to “Skip” to jump over blank/unused inputs in all the above tables.
Note: Reply mode is available for this group. Use of “Reply mode” allows read-back of audio volume, and this is presented on
the LCD screen as if it was an absolute volume setting (even though the projector only has “incremental” volume in 10 steps.)
Note: Aspect ratio setting is supported with dummy channels: “Set reg 4:3” and “Set reg 16:9” (some only, not on HDMI).
Note: You must set baud rate to 19200 in the appropriate setup screen and turn off (quick) auto-search.
Note: In “System Setup: Advanced” | Standby Settings | press Enter, then set “Network” to ON to enable RS232 coms.
MP724/MP727/MP735 have limited audio, with 2 RCA sockets (L/R) shared by all of: Video/S-Video/DB15-YPbPr, and a
3.5 mm stereo socket shared by: DB-15 PC, DVI-A and DVI-D channels. The HDMI channel has its own audio.
These projectors do control audio, with 10 levels, to the output socket for all inputs. However, and there is no level
indication. Use a T461 (4 channel) or T441 (2 channels) for 0->20 audio range and indicated volume on the T460 screen.
MP626/MP670, MP772st, MP776, MP776st, MP777, MX710/711 have limited audio, with 2 RCA sockets (L/R) shared by
all of: Video/S-Video and a 3.5 mm stereo socket shared by: DB-15 PC1, 2, DVI-A and DVI-D channels, (and sometimes
DB15(1&2)-YPbPr(1&2)) The HDMI channel has its own audio (sometimes). These projectors do control audio, with 10
levels, to the output socket for all inputs. However, level out is low, and there is no level indication. (Audio level readback (0->10) to the T460 screen has been added in “reply” mode, set in the “Set Projector” menu in T460 setup. Use a
T461 (4 channel) or T441 (2 channels) controller for 0->20 audio range and indicated volume on the T460 screen.
2-button-mute mode: Projector Audio mute does not work on some, because of interaction with Picture Blank command
(Picture blank is OK, but only in “Reply” mode). If a T461 is used for audio, audio mutes and picture blanks OK.
Freeze/mute and mute keyboards are supported, with absolute state shown on the T460 screen only in “Reply” mode.
MP512, MP513, MP515, MP515ST, MP522, MP525, MP525P, MP525ST, MP623, MP624: No audio out, only limited
audio control or no audio at all, so volume control keys not supported. Freeze and mute keyboards are supported. Use JED
T461 for audio. 2-yellow-button picture mute with a T461 is supported. The T461 audio output is also muted appropriately.
T460/461/T462 Manual 9th Sept 2015 Part B 3.84 release © Jed Micro Pty Ltd
5
RS232 connections to BenQ with DB9 male on projector Comms is at 19200 8N1.
Function/Direction
T460 “projector”
Connection
BenQ RS232 port
Connector
Ground
Ground
9-pin D-sub pin 5
Data from T460 to projector
Tx
9-pin D-sub pin 2 (RXD)
Reply data from projector to T460
Rx
9-pin D-sub pin 3 (TXD)
Plus 9 volt CTS/DTR to projector
N/C
N/C
1
2
6
3
4
8
7
5
9
D-sub 9 female
solder side
RS232 connections to BenQ, MP512/MP513/MP522, MP623/MP624
These use a 9-pin-D9 female on the projector, male on the cable. Comms is at 19200 8N1.
Function/Direction
T460 “projector”
Connection
Projector Connector
(Male on cable)
Ground
Ground
9-pin D-sub pin 5
Data from T460 to projector
Tx
9-pin D-sub pin 2 (RXD)
Reply data from projector to T460
Rx
9-pin D-sub pin 3 (TXD)
Plus 9 volt CTS/DTR to projector
N/C
N/C
5
4
9
3
8
2
7
1
6
D-sub 9 male
solder side
After installation wiring of any projector to a T460, use a multimeter to check voltages of –9 on BOTH TX and RX pins in any
installation, as described in the troubleshooting part of this manual.
BenQ projectors: PB8140/8240/8250/8253/8260/8263
BenQ projectors: PB7100/7200/7220 (and DX850), LG RD-JT50/51/52
th
T460 Channel
Code, 17 byte
Connector
Screen display
Channel 1
00h
PC1
RGB1
Channel 2
01h
PC2
RGB2
Channel 3
02h
Video YPbPr
Video YPbPr
Channel 4
04h
S-Video
S-Video
Channel 5
05h
Video
Video
Don’t forget to set all unused T460 channels to “Skip” to jump over blank/unused inputs in all the above tables.
BenQ projectors: PB8140/8240/8250/8253/8260/8263
th
T460 Channel
Code, 17 byte
Connector
Screen display
Channel 1
00h
D-Sub/Comp. In
Analog RGB
Channel 2
01h
DVI-I
DVI-A
Channel 3
02h
VDI-I
VDI-D
Channel 4
04h
D-Sub/Comp. In
Analog YPbPr
Channel 5
06h
S-Video
S-Video
Channel 6
07h
Video
Composite Video
Don’t forget to set all unused T460 channels to “Skip” to jump over blank/unused inputs in all the above tables.
T460/461/T462 Manual 9th Sept 2015 Part B 3.84 release © Jed Micro Pty Ltd
6
BenQ projectors: SP830/831
T460 Channel
Code,
Connector
Screen display
Channel 1
X133X
D-Sub In
Analog RGB
Channel 2
X149X
DVI-I
DVI-A
Channel 3
X131X
Video RCA
Video
Channel 4
X132X
S-Video
S-Video
Channel 5
X135X
Component 3 x RCA
Component
Channel 6
X139X
DVI-I
DVI-D
Channel 7
X140X
RJ-45
RJ-45
Don’t forget to set all unused T460 channels to “Skip” to jump over blank/unused inputs in all the above tables.
Note: You must turn off “Auto Off” and “Auto Source Search” in the “System Setup” menu.
The SP830/831 projector was fixed at 115,200 baud, and so needed to 460B baud rate converter. Code release 2.76A
allows for a new release of software (1.25 or later) in the projector to allow baud rate to be changed via the serial port.
You will need to connect to the projector via a D9 to 8-pin DIN connector cable and run HyperTerminal (or similar comms.
program) at115,200 baud. Type the command “X072X” (without the quotes). Then switch HyperTerminal to 19200, turn the
projector on manually, and verify that the command “X001X” turns the projector OFF.
The projector lamp hours function and the Freeze functions do not work in the projector (with the current software), so the
Mute/Freeze keyboard is not supported. (This will be rechecked with the 1.25 release ... Ed)
The projector audio system, while it provides an audio input for each source, has control only of the internal speakers. There is
an audio output connector, but this is locked to ONLY the audio connectors associated with the D-SUB, at a fixed level. If
audio facilities are needed in an installation the T461 audio system MUST be used.
Aspect ratio setting is supported with dummy channels: “Set small4:3”, “Set reg 4:3” and “Set reg 16:9”.
BenQ, LG projectors: RS232 Connection
(Communications runs at 19200 8N1. Projectors use a male 8-pin mini-DIN on the cable
Function
T460 “projector”
Connection
BenQ, LG RD-JT50/52,
SP830/831, MP722,
MP723, MP771, SP870
DIN 8-pin
LG RD-JT51
Ground
Pin 1
Pin 4
Pin 4
Serial TX out to projector
Pin 2
Pin 1
Pin 7
Serial RX into T460 from proj.
Pin 3
Pin 7
Pin 3
CTS out to projector
Pin 4
Not used
Not used
1
2
3
4
6
7
5
8
Mini-DIN 8
solder side
Note: Even though the BenQ manual shows a D sub 9 connector, in fact the tested projector has a mini-DIN 8-pin socket.
Note: The BenQ PB8140/8240/8250 models seem to load the RS232 cable with some sort of diode clamping to ground
and to +5 volt. This means that when plugged into the projector the RS232 lines will have a voltage range of only –0.8 to
+5.2 volts measurable on them, rather than the normal +/- 9 volts.
However, the projector seems to run OK with this limited voltage range, and the signal from the T460 is safely current
limited, so can cope with this weird behaviour! The output from the projector is also this voltage range, which the T460
handles OK. When not plugged in, the T460 output will have normal +/- 9 volt signals.
T460/461/T462 Manual 9th Sept 2015 Part B 3.84 release © Jed Micro Pty Ltd
7
Canon Generic 1:
Includes: WUX4000/WUX5000, SX6000/WX6000, SX80 Mk II, SX800, WUX10 Mk II
T460 Channel
Message
Projector support
Connector / function
Channel 1
Screen display
'INPUT=A-RGB1',00DH
SX/WX6000
SX800
DB15
Analog PC-1
Channel 1
'INPUT=A-RGB1',00DH
SX80 Mk II
WUX10 Mk II
DVI-I
Analog PC-1
Channel 2
'INPUT=A-RGB2',00DH
SX/WX6000
DVI-I
Analog PC-2
Channel 2
'INPUT=A-RGB2',00DH
SX80 Mk II
SX800
WUX10 Mk II
DB15
Analog PC-2
Channel 3
'INPUT=VIDEO',00DH
SX80 Mk II
SX800
RCA
Video
Channel 4
'INPUT=S-VIDEO',00DH
SX80 Mk II
DIN-4
S-Video
Channel 5
'INPUT=COMP',00DH
WUX4000/5000
SX/WX6000
SX80 Mk II
SX800
WUX10 Mk II
DB15
Component
Channel 6
'INPUT=A-RGB',00DH
WUX4000/5000
DB15
Analog PC
Channel 7
'INPUT=D-RGB',00DH
WUX4000/5000
DVI-D
DVI-D
Channel 7
'INPUT=D-RGB',00DH
SX/WX6000
SX80 Mk II
WUX10 Mk II
DVI-I
Digital-PC
Channel 8
'INPUT=HDMI',00DH
WUX4000/5000
SX/WX6000
SX80 Mk II
WUX10 Mk II
HDMI
HDMI
Don’t forget to set all unused T460 channels to “Skip” to jump over blank/unused inputs in the above table.
•
Set “Direct Power On” to “Off”.
•
Set “Power management mode” to “Off”
•
Supports Mute On/Mute Off keyboard but NOT Freeze On/Off. Supports “reply” mode.
•
These typically have one audio, one audio output, but no commands for RS232 control of it.
•
Supports aspect ratios: use source names: “Set reg 4:3” and “Set reg 16:9”
RS232 connections are shown in the user manuals.
T460/461/T462 Manual 9th Sept 2015 Part B 3.84 release © Jed Micro Pty Ltd
8
Casio XJ-M, XJ-H (and possibly XJ-A) series projectors (LED/Laser)
Includes XJ-M140/XJ-M145, XJ-M240/XJ-M245, XJ-M150/XJ-M155, XJ-M250/XJ-M255
(We note Casio XJ-A have same codes, so assuming timing is similar, would work as well, possibly only
needing a variation of warm-up/cool-down times.)
These typically have one PC audio, one Video audio and one HDMI audio input. Audio volume control from the T460 (or the
set-top menu) controls audio to the internal 2” speaker. However, the audio output from the line-output connector is NOT
controlled. For audio level control, use a JED T441 (2-channel) or a T461 (4-channel) audio system. (You must select Audio
to “Line” in the “Option Settings 2”, then “Audio Out” menus.)
Set “Direct Power On” to “Off”.
Supports Mute On/Mute Off keyboard but NOT Freeze On/Off. Supports “reply” mode.
Supports aspect ratios: use source names: “Set reg 4:3” and “Set reg 16:9”
Casio XJ-M (and possibly XJ-A)
T460 Channel
Message
Connector / function
Screen display
Channel 1
(SRC0)
DB15
RGB
Channel 2
(SRC7)
HDMI
HDMI
Channel 3
(SRC2)
RCA
VIDEO
Channel 4
(SRC9)
DIN-4
S-VIDEO
Channel 5
(SRC1)
DB15
COMPONENT
Channel 6
(SRC6)
DB15
AUTO (RGB/COMPONENT)
Channel 7
(SRC5)
USB
USB
Don’t forget to set all unused T460 channels to “Skip” to jump over blank/unused inputs in the above table.
Casio XJ-H series: (has 2 RGB ports) XJ-H1600, XJ-H1650
T460 Channel
Message
Connector / function
Screen display
Channel 1
(SRC0)
DB15 1
RGB 1
Channel 2
(SRC3)
DB15 2
RGB 2
Channel 3
(SRC2)
RCA
VIDEO
Channel 4
(SRC9)
DIN-4
S-VIDEO
Channel 5
(SRC1)
DB15 1
COMPONENT 1
Channel 6
(SRC4)
DB15 2
COMPONENT 2
Channel 7
(SRC7)
HDMI
HDMI
Channel 7
(SRC5)
USB
USB
Don’t forget to set all unused T460 channels to “Skip” to jump over blank/unused inputs in the above table.
RS232 connections to Casio XJ-M, XJ-H series
These use a 9-pin-D9 male on the projector, female on cable. Comms is at 19200 8N1.
Function/Direction
T460 “projector”
Connection
Epson ESC-VP21 Control &
Service Port Connector
Ground
Ground
9-pin D-sub pin 5
Data from T460 to projector
Tx
9-pin D-sub pin 2 (RXD)
Reply data from projector to T460
Rx
9-pin D-sub pin 3 (TXD)
Plus 9 volt CTS/DTR to projector
N/C
N/C
1
2
6
3
7
4
8
5
9
D-sub 9 female
solder side
After installation wiring of any projector to a T460, use a multimeter to check voltages of –9 on BOTH TX and RX pins in any
installation, as described in the troubleshooting part of this manual.
T460/461/T462 Manual 9th Sept 2015 Part B 3.84 release © Jed Micro Pty Ltd
9
Christie projectors:
DS30, PLUS-25, PLUS-26, MATRIX-1500 See ProjectionDesign
____________________________________________________
Christie Generic E,G:
E series: DHD675-E, DWU675-E, DHD775-E, DWU775-E,
G series: DHD550-G, DWU550-G, DWX600-G, DHD600-G, DWU600-G
This group of large-venue projectors has no audio, so use the two right-hand buttons on the T460 as Mute On / Mute Off,
setting flag 3 as necessary for the matching message to your keyboard.
The baud rate must be pre-set to 9600 before use in the “Configuration | Communication | Serial Port Baud rate” menu
T460 Channel
Message
Connector / function
Channel 1
(SIN1) VGA
Channel 2
(SIN5) DVI-D
DVI-D
Channel 3
(SIN9) Composite
Video
Channel 4
(SIN4) HDMI
Channel 5
(SIN6) DisplayPort
DisplayPort
Channel 6
(SIN7) Component
Component
Channel 7
(SIN3) HDMI 1
HDMI 1 on E series
Channel 8
(SIN4) HDMI 2
HDMI 2 on E series
PC
HDMI on G series
Don’t forget to set all unused T460 channels to “Skip” to jump over blank/unused inputs in the above table.
RS232 connections to Christie projectors
These use a 9-pin-D9 male on the projector, female on cable. Comms is at 9600 8N1.
Function/Direction
T460 “projector”
Connection
Epson ESC-VP21 “Control”
Port Connector
Ground
Ground
9-pin D-sub pin 5
Data from T460 to projector
Tx
9-pin D-sub pin 2 (RXD)
Reply data from projector to T460
Rx
9-pin D-sub pin 3 (TXD)
Plus 9 volt CTS/DTR to projector
N/C
N/C
T460/461/T462 Manual 9th Sept 2015 Part B 3.84 release © Jed Micro Pty Ltd
1
2
6
3
7
4
8
5
9
D-sub 9 female
solder side
10
CommBox LCD panels:
These are now supported via a specially programmed version of a T462, which can send IR-like codes via a 3.5mm connector
into the back of the panel. A document describing this is available from JED on request.
DELL projectors:
1200MP, 1201MP, 1800MP, 2400MP, 4100MP, 5100MP
th
T460 Channel
12 byte
Connector / function
Channel 1
19h
D-sub 15 VGA 1 Analog
Channel 2
1Ch
M1 Analog (1800MP only)
Channel 3
23h
Video Composite on RCA single
Channel 4
22h
S-Video
Channel 5
50H
HDMI (5100MP only)
Channel 6
1EH
M1 Component (4100MP, 5100MP only)
Channel 7
20H
3 x RCA Component
(4100MP, 5100MP only)
Channel 8
25H
Wireless (4100MP only)
1AH : VGA 1 Component
(1200MP, 1201MP only)
Don’t forget to set all unused T460 channels to “Skip” to jump over blank/unused inputs in the above table.
Note: These models have only a “Toggle” function for the “Picture Mute” command, and the “Freeze” function does NOT
work via RS232 (EVEN THOUGH IT’S IN THE BOOK!). So only use Vol Up/Dn or Mute On/Mute Off keyboards.
DELL: 1209S, 1409X, 1509X, 1609WX, 1610HD, 4210X, 4220, 4310WX, 4320, 4610X, 7609WU,
S300/W/WI, S500/W/WI
th
T460 Channel
12 byte
Connector / function
Channel 1
19h
D-sub 15 VGA 1 Analog
Channel 2
69h
D-sub 15 VGA 2 Analog
Channel 3
23h
Video Composite on RCA single
Channel 4
22h
S-Video
Channel 5
50H
HDMI 1
Channel 6
6BH
HDMI 2 (7609MP only)
Channel 7
20H
3 x RCA Component (7609WU only)
Channel 8
8BH
Wireless (4610X only)
Don’t forget to set all unused T460 channels to “Skip” to jump over blank/unused inputs in the above table.
Note: These models have absolute picture and sound muting, but no “Freeze” function. Audio is absolute 0 -> 20.
There is NO “Projector Coms OK” message, as there is no ability to access status when OFF. Lamp hours are given after
warmup. Aspect ratio control: This family supports aspect ratio control via the dummy channel, say, Ch 8, to “4:3/16:9/Zm.”.
(DELL 2300MP not supported as there are no absolute power on and separate power off commands
T460/461/T462 Manual 9th Sept 2015 Part B 3.84 release © Jed Micro Pty Ltd
11
RS232 connections to DELL projectors
To connect the T460 to these projectors use a mini-DIN 6 male on the cable: Communication is at 19200 8N1
Function/Direction
T460 “projector”
Connection
Projector Connector
6-pin mini-DIN
Ground
Ground
Mini-DIN Pins 1, 2
3
4
Data from T460 to projector
Tx
Mini-DIN Pin 3 (RXD)
5
6
Reply data from projector to T460
Rx
Mini-DIN Pin 5 (TXD)
Plus 9 volt CTS/DTR to projector
N/C
N/C
1
2
Mini-DIN 6
solder side
After installation wiring of any projector to a T460, use a multimeter to check voltages of –9 on BOTH TX and RX pins
in any installation, as described in the troubleshooting part of this manual.
Eiki projectors: Most “LC” group are in “Sanyo” section. “EIP” are in “Sharp” section.
Eiki projectors: LC-XIP2000, LC-XIP2600, LC-XIP2610, LC-XNP4000, LC-XDP3500,
LC-XSP2600, LC-WIP3000, LC-WSP3000 (called LC-WI/SP3000 in index)
These projectors are odd ones in the Eiki family, and can be controlled for Power, Source select, Mute and Freeze from a
T460.
The XIP2000 has no reply from the projector in “Standby”, so there is no initial “Projector Coms OK” message and no lamp
hours readout available by pressing both yellow buttons in Standby. Lamps hours are shown at the end of the warm-up time.
The rest do have a valid response in power down, and do show lamp and filter hours when the two yellow buttons are pressed
in the standby state. These can be used in reply mode.
Older units: The projector audio system is of no use in an installation with any of these three, as the remote
(incremental mode only) commands are unreliable, and 50% of the time actually change source! There is only one (or
limited) audio input for all channels. JED suggests the use of a T461 for audio channel selection and absolute level
control. ONLY use it with a “Mute On/Mute OFF” or a “Mute On/Off Freeze On/Off keyboard if a T461 is not used.
This problem has probably been fixed in the more recent units like the LC-XIP2610, XDP3500 and WIP/WSP3000.
XIP-2000 codes and channel allocations:
T460 Channel
String sent
Input
Function
1
C02
Computer In 1 (DB15)
Computer Analog 1
2
C04
Computer In 2/YPbPr (DB15)
Computer Analog 2
3
C07
Composite Video (RCA)
Composite Video
4
C06
S-Video (DIN4)
S-Video
5
C03
Computer In 2/YPbPr (DB15)
Computer 2 (YPbPr)
6
C05
DVI or HDMI
HD video
7
C08
Component RCA
YPbPr
Don’t forget to set all unused T460 channels to “Skip” to jump over blank/unused inputs.
We note some confusion re channel allocations, with C04 and C03 swapped on some manuals. We are providing all
possible codes in the above user selection, but functions may vary from the designation in the third column. Just test!
T460/461/T462 Manual 9th Sept 2015 Part B 3.84 release © Jed Micro Pty Ltd
12
RS232 connections to Eiki projector LC-XIP2000
Communications are at 19200 baud. 8N1. Pinout is as shown below. Note: This manual’s pinout (below) follows the DIN
standard pinout in these JED drawings, NOT the non-standard one shown in the maker’s documentation.
Function/Direction
Ground
T460 “projector”
Connection
Ground
“Serial” Port Connector
1
8-pin mini-DIN pins 4, 8
Data from T460 to projector
Tx
8-pin mini-DIN pin 3 (RXD)
Reply data from projector to T460
Rx
8-pin mini-DIN pin 6 (TXD)
Plus 9 volt CTS/DTR to projector
N/C
N/C
2
3
4
6
7
5
8
Mini-DIN 8
solder side
After installation wiring of any projector to a T460, use a multimeter to check voltages of –9 on BOTH TX and RX pins in any
installation, as described in the troubleshooting part of this manual. Do this with the projector manually turned ON, as in
the “Standby” state, this projector sends out a +6 to +8 volts signal on the reply data line. (Yes! Don’t ask!)
RS232 connections to Eiki projector with DB9 connectors
These use a 9-pin-D9 male on the plasma, female on cable. Comms is at 9600 baud, 8 bits, no parity, 1 stop.
Function/Direction
T460 “projector”
Connection
“Serial” Port Connector
Ground
Ground
9-pin D-sub pin 5
Data from T460 to panel
Tx
9-pin D-sub pin 3
Reply data from panel to T460
Rx
9-pin D-sub pin 2
Plus 9 volt CTS/DTR to panel
N/c
N/c
1
2
6
3
7
4
8
5
9
D-sub 9 female
solder side
Epson ESCVP/21 projectors
Standard channel allocation for first 4 channels for all Epson VP21 family groups 1,2, 4, and 5:
T460 Channel
Source code
Connector
Function
Function on screen
Channel 1
SOURCE 11
Input 1, D-Sub 15
Analog RGB 1
Computer 1
Channel 2
SOURCE 21/B1
Input 2/BNC (RGB)
Analog RGB 2
Computer 2 ** some only
Channel 3
SOURCE 41/45
Video RCA
Video
Video
Channel 4
SOURCE 42/60/14*
* if FLAG1 set
Video-S/SDI (EB-Z)
S-Video/SDI
S-Video / SDI /
Comp DB15/1 (Group 6)
Group 1: Source codes for Epson Generic 1, EB-92, EB93/e, EB-95, EB-96W, EB-97, EB-98,
EB-440W*, EB-450W/i*, EB-455Wi*, EB-460/i*, EB-465i*, EB-470, EB475W/Wi, EB480/i,
EB485W/Wi, EB-520W, EB-525W, EB-530W, EB-535W, EB-536W/i/T, EB-900*, EB-905, EB910W*, EB-915W, EB-925*, EB-935*, EB-940, EB-945, EB-950W, EB-955W, EB-965, EB1400Wi, EB1410Wi, EB-1830, EB-1840W, EB-1850W, EB-1860, EB-1870, EB-1880**, EB1900, EB-1910, EB1915, EB-1920W, EB1925W, EB-1930, EB-1935, EB-1940W, EB-1945W,
EB-1950, EB-1954, EB-1955, EB-1960, EB-1964, EB-1965, EB-D6150 EB-D6155W, EBD6250, EB-S11/H, EB-S12, EB-S17, EB-S21, EB-W17, EB-W22, EB-X11/H, EB-X17, EB-X14H,
EB-X15, EB-X20, EB-X21, EB-X22, EB-X25, EMP-600*, EMP/EH-TW100*,
(* need audio setup, ** network option on Ch8)
***(5 x BNC, Ch 8) EB-G5000)
T460/461/T462 Manual 9th Sept 2015 Part B 3.84 release © Jed Micro Pty Ltd
13
T460 Channel
Source code
Connector
Function
Function on screen
Channel 5
SOURCE 14
Input 1 Component
Component Video
Component
Channel 6
SOURCE 24
Input 2 Component
Component Video
Component
Channel 7
SOURCE 30
HDMI/DVI
Digital In
HDMI/D-RGB/Comp
Channel 8 **
SOURCE 50/53
RJ45
Easy MP network
LAN ** some only
Channel 8 ***
SOURCE B0
5 x BNC
RGB Input
RGB / Component
Don’t forget to set all unused T460 channels to “Skip” to jump over blank/unused inputs in the above table.
Group 2: Source codes for EB-G5100, EB-G5150, EB-G200W, EB-G5300, EB-G5350,
EB-G5600, EB-G5650W, EB-G5900, EB-G5950,
(Channels 1-4 shown above)
T460 Channel
Source code
Connector
Function
Channel 5
SOURCE B1
BNC
RGB
Channel 6
SOURCE B4
BNC
Component Video YCbCr
Channel 7
SOURCE 30
DVI/HDMI
Digital video
Channel 8
SOURCE 24
Input 2 (YPbPr)
Component Video YPbPr
If FLAG1 is set to a “1”, a network command of “SOURCE 50” or “SOURCE 53” is sent for Channel 8.
Don’t forget to set all unused T460 channels to “Skip” to jump over blank/unused inputs in the above table.
Group 3: Source codes EB-G5450WU, EB-G5500, EB-G5550, EB-G5750WU**, EB-G5800,
Generic EB-Z group includes EB-Z8000W/WU, EB-Z8050WU, EB-Z8150, EB-Z5250,
EB-Z8255NL, EB-Z8350W, EB-Z8355W, EB-Z8450WU, EB-Z8455WU, EB-Z9750, EB-Z9800,
EB-Z9805W, EB-Z9810, EB-Z9850W, EB-Z9870/U, EB-9875U, EB-Z9900/W, EB-Z10000/UNL,
EB-Z10005UNL, EB-Z11000/W, EB-Z11005 No audio (set flag 3).
Ch3: Video (Source 45), Ch4: SDI (Source 60), Ch8: LAN (Source 53) if Flag1 set.
Setting (FLAGJ = 1) AND (FLAGK = 0) Channel 5 sends: “SOURCE 80<0DH>" Selects HDbaseT *
(Channels 1-4 shown above)
T460 Channel
Source code
Connector
Function
Channel 5
SOURCE B4/80 *
INPUT 4, BNC Component
RGB Analog Component/HDbaseT *
Channel 6
SOURCE 30
DVI or HDMI
Digital Video
Channel 7
SOURCE A0
DVI or HDMI
Digital Video
Channel 8
SOURCE 14
INPUT 1, VGA Component/LAN*
Video component (YPbPr)/LAN *
* If FLAG1 is set to a “1”, a network command of “SOURCE 50” or “SOURCE 53” is sent for Channel 8.
Don’t forget to set all unused T460 channels to “Skip” to jump over blank/unused inputs in the above table.
Group 4: Source codes for TW400, TW520, TW550, TW600, TW700, TW800, TW1000,
TW2000, TW2800, TW2900, TW3000, TW3200, TW3500, TW3600, TW3800, TW4000,
TW4400, TW4500,TW5000, TW5500, TW5900, TW6000/W, TW8000/W, TW9000/W
T460/461/T462 Manual 9th Sept 2015 Part B 3.84 release © Jed Micro Pty Ltd
14
(Channels 1-4 shown above) (all no audio)
T460 Channel
Source code
Connector
Function
Channel 5
SOURCE 14
Input 1, D-Sub 15
Component Video
Channel 6
SOURCE 15
INPUT 1/A, D-Sub 15
YPbPr
Channel 7
SOURCE 30
INPUT 3 HDMI /HDMI 1
Digital Video
Channel 8
SOURCE A0
INPUT 5 HDMI 2
Digital Video
Don’t forget to set all unused T460 channels to “Skip” to jump over blank/unused inputs in the above table.
Group 6: Source codes, EB-4550, EB-4650, EB-4750W, EB-4850WU, EB-4855WU, EB4950WU, EB-4955WU, EB-G6050W, EB-G6150, EB-G6250W, EB-G6350, EB-G6450WU,
EB-G6550WU, EB-G6650WU, EB-G6750WU, EB-G6800, EB-G6900WU. All need audio setup.
Setting (FLAGJ = 1) AND (FLAGK = 0) Channel 5 sends: “SOURCE 80<0DH>" Selects HDbaseT *
(Channels 1-4 shown above)
T460 Channel
Source code
Connector
Function
Channel 5
SOURCE B4 / 80 *
BNC / RJ45 *
BNC Component YPbPr or HDbaseT *
Channel 6
SOURCE 30
HDMI
HDMI
Channel 7
SOURCE 70
DisplayPort
DisplayPort
Channel 8
SOURCE 53
CAT5 / RJ45
Network
Don’t forget to set all unused T460 channels to “Skip” to jump over blank/unused inputs in the above table.
Group 7: Source codes, EB-570, EB-575W/i, EB-580, EB-585W/i, EB-590WT, EB-595Wi,
EB-1420Wi, EB-1430Wi, EB-1970W, EB-1975W, EB-1980WU, EB-1985WU, EB-W28
T460 Channel
Source code
Connector
Function
Channel 1
SOURCE 11
DB15 Computer 1
Computer 1
Channel 2
SOURCE 21
DB15 Computer 1
Computer 2 (*some only)
Channel 3
SOURCE 41
RCA
Composite Video
Channel 4
SOURCE 24 /
SOURCE 56 /
SOURCE 51 /
SOURCE 55
DB15 Computer 2 /
Screen Mirror /
USB Display /
Whiteboard
Component Video YPbPr/YCbCr* /
Screen Mirror (WiDi) if FLAGJ=1, FLAGK=0 /
USB Display if FLAGJ=0, FLAGK=1 /
Whiteboard if FLAGJ=1, FLAGK=1
Channel 5
SOURCE 52
USB A
USB
Channel 6
SOURCE 30
HDMI 1
HDMI 1
Channel 7
SOURCE A0
HDMI 2
HDMI 2
Channel 8
SOURCE 53
CAT5
Network
RS232 connections to Epson ESC-VP21 projectors
These use a 9-pin-D9 male on the projector, female on cable. Comms is at 9600 8N1.
Function/Direction
T460 “projector”
Connection
Epson ESC-VP21 “Control”
Port Connector
Ground
Ground
9-pin D-sub pin 5
Data from T460 to projector
Tx
9-pin D-sub pin 2 (RXD)
Reply data from projector to T460
Rx
9-pin D-sub pin 3 (TXD)
Plus 9 volt CTS/DTR to projector
N/C
N/C
T460/461/T462 Manual 9th Sept 2015 Part B 3.84 release © Jed Micro Pty Ltd
1
2
6
3
7
4
8
5
9
D-sub 9 female
solder side
15
Fujitsu plasmas:
P42/50/63XHA5xxx, P42/50/55/63XTA51U, P42H/VCA5xxx, P50/63XCA5/6xxx, P42/50XHA58xxx,
Hitachi / 3M / Viewsonic projectors (with 12 or 13 byte codes)
Group 1, simple audio control: CP-X980, CP-X985
Hitachi Group 2, per-channel audio control: Generic 1, (use if not listed) CP-A52, CP-A100,
CP-AW100N, CP-A200/N, CP-A220, CP-A221N, CP-A222WN, CP-A300, CP-A301N,
CP-A302WN, CP-A352WN, CP-AW252WN, CP-AW250N/M, CP-AW251N, CP-AW312WN,
CP-AW2503, CP-AW2519NM, CP-AW3003, CP-AX2503, CP-AX3003, CP-AX3503, CP-D10,
CP-D27WN, CP-D31N, CP-D32WN, CP-DW10N, CP-DW25WN, CP-D20, CP-EW/EX250N,
CP-EW/EX300N, CP-TW2503, CP-X8, CP-WX8, CP-WX3014WN, CP-X9, CP-X615, CP-WX625,
CP-WX2015WN, CP-WX2021WN, CP- WX3015WN, CP-SX635, CP-X2010/N/Z, CP-X2011/N,
CP-X2012WN, CP-X2015WN, CP-X2020, CP-X2021WN, CP-X2510/EN/Z, CP-X2511/N, CP-X2514WN,
CP-WX2515WN, CP-X2515WN CP-X2520, CP-X2521WN, CP-X2530WN, CP-X3010/N/Z, CP-X3011/N,
CP-X3014WN, CP-X3015WN, CP-X3020, CP-X3021N, CP-X3030WN, CP-X3511, CP-X4011/N,
CP-X4014WN, CP-X4015WN, CP-X4020/E, CP-X/WX4021/N, CP-X5021/N, CP-SX8350, CP-WU8440,
CP-WU8450, CP-WX8240, CP-WX8255, CP-X8150, CP-X8160, CP-WU8460, CP-WX8265, CP-X8170
Viewsonic, 3M Hitachi Equivalents: PJL3211, PJL9371
No Audio: CP-X9110, CP-X9111, CP-WX9210, CP-WX9211, CP-WU9410, CP-WU9411
Note: We strongly recommend that Hitachi projectors are run in “reply” mode. Hitachi projectors have no “absolute”
volume setting commands, but in “reply” mode will return the actual volume setting for a channel and the T460 will
display this on the lower line of the LCD for users. (“Non-reply” mode will just show “Volume +/-” on the lower line.)
The Hitachi projector does NOT show a volume level on the projected image as a bar, etc, so the T460 display is made
good use of here.
The following table shows the mapping of T460 channel number, the string sent, and the input associated with that channel in
the manual, and how it is identified on the on-screen menu: (Coms is at 19200 8N1) Reply mode supported.
T460 Channel
TX code, byte 12
Input name in manual
Function as identified on screen.
1
00h
RGB IN 1
RGB IN 1
2
04h
RGB IN 2
RGB IN 2, (BNC on some, missed in some)
3
01h
VIDEO (or VIDEO 1)
VIDEO (or VIDEO 1)
4
02h*
S-VIDEO (or VIDEO 2)
S-VIDEO *(FLAGJ = 0) & (FLAGK = 0)
4
11h**
HDBaseT
**(FLAGJ = 1) & (FLAGK = 0)
5
05h
COMPONENT VIDEO
COMPONENT VIDEO (some only)
6
03h
HDMI or DIGITAL
HDMI or DIGITAL (some only), M1-D (some
only)
7
0Dh
HDMI 2
HDMI 2 (some only)
8
0Bh
LAN
LAN
Don’t forget to set all unused T460 channels to “Skip” to jump over blank/unused inputs.
Note: you MUST set the communications speed for MP8730 using projector menu to 19200 8N1
T460/461/T462 Manual 9th Sept 2015 Part B 3.84 release © Jed Micro Pty Ltd
16
RS232 connections to Hitachi and 3M, and InFocus Hitachi-made projectors
These use either a D-sub 15 shrink jack pin connector, female on cable, or a DB9, female on cable:
Function/ Direction
T460 “projector”
Connection
Hitachi “Control” Port
Connector 15-pin shrink
Hitachi “Control” Port
Connector, DB9 (some)
Ground
Ground
Pin 6, 7 and 10. Use all pins
Pin 5
Data from T460 to projector
Tx
Pin 13
Pin 2
Reply data from projector to T460
Rx
Pin 14
Pin 3
Plus 9 volt CTS/DTR
N/C
N/C
N/C
After installation wiring of any projector to a T460, use a multimeter to check voltages of –9 on BOTH TX and RX pins in any
installation, as described in the troubleshooting part of this manual. CTS is NOT needed.
Hitachi LCD screens:
FHD6500/6514/6516 touchscreens covered by “Generic1 LCD”
These can have a built-in PC (adding a /PC after then number), called “OPS”. Monitor power is turned on and off with T460
On and Off buttons. Power for the OPS (PC) module is controlled by the dummy channels 5 and 6 which turn it On and Off,
and Channel 4 selects the built-in PC video/audio output. If using channels 1/2/3 (external inputs) the OPS module can be
turned Off.
The following table shows the mapping of T460 channel number, the string sent, and the input associated with that channel in
the manual, and how it is identified on the on-screen menu:
T460 Chan
TX code
Function
1
BE EF 03 06 00 6E D2 01 00 00 20 01 00
External VGA input
2
BE EF 03 06 00 0E D2 01 00 00 20 03 00
External HDMI 1 input
3
BE EF 03 06 00 0E D2 01 00 00 20 03 01
External HDMI 2 input
4
BE EF 03 06 00 FE D2 01 00 00 20 00 00
Internal OPS (PC) input
5
BE EF 03 06 00 BA D2 01 00 00 60 01 00
OPS Unit power On
6
BE EF 03 06 00 2A D3 01 00 00 60 00 00
OPS Unit power Off
Don’t forget to set all unused T460 channels to “Skip” to jump over blank/unused inputs.
(RS232 connections still to be determined. Use a multimeter to determine connections.)
T460/461/T462 Manual 9th Sept 2015 Part B 3.84 release © Jed Micro Pty Ltd
17
InFocus/ASK series drivers
See this site for RS232 code support: http://www.infocus.com/Products/AllProducts.aspx These are done in “series” as
follows:
IN2100 group: IN2102/EP, IN2104/EP, IN2106/EP, IN2112, IN2114, IN2116** (Note IN2116 tests
as part of this group even though manual shows it should be in IN2110 group), A1100, A1200/EP, IN25,
IN27/W, C212, C214, Also IN3914, IN3916 (Comes preset to 115,200, BUT NOW SUPPORTED BY T460
th
IF PROJECTOR BAUD RATE IS SET MANUALLY TO 19200 using 36 step of Setup Menu)
IN3100 group: IN3102, IN3104, IN3106, IN3108, IN3182, IN3184, IN3186, IN3188, Note: We
have been unable to get absolute source mapping for (SRC0) to (SRC5) but SRC2 is shown as Composite in one
document we have seen, which does NOT agree with other docs. (Comes preset to 115,200, BUT NOW
th
SUPPORTED BY T460 IF PROJECTOR BAUD RATE SET MANUALLY TO 19200 using 36 step of Setup Menu)
IN5100 group: IN5102, IN5104, IN5106, IN5108, IN5110, C447, C500 (preset to 19200 baud)
X6, X7, X9, X15 group: X6/C, X7/C, X9, X15 (Comes preset to 9600 baud, and T460 is set to this speed.)
The following table shows the mapping of T460 channel number, the string sent, and the input associated with that channel in
the manual, and how it is identified on the on-screen menu:
T460
Chan.
TX code
IN2100,
group,
IN3914/16
IN3100/
IN5100
LP815/20
IN3916
IN32
IN34
IN36
IN35/W
IN37
SP8602,
SP8682
X6, X7, X9,
X15 group
1
(SRC0)
VGA1
Comp. 1
LAN
M1 A.PC
M1 D PC
VGA
VGA1
2
(SRC1)
VGA2
Comp. 2
VGA1
M1 A. Vid
M1 D Vid
HDMI 1
VGA2
3
(SRC2)
Comp
Comp. 3
VGA2
M1 Dig
M1 A. PC
HDMI 2
S-Video
4
(SRC3)
S-Video
Video 1
USB
VGA PC
M1 A Comp
Compon 1
Comp. Vid
5
(SRC4)
LitePort**
Video 2
HDMI
Comp. Vid
VGA PC
Compon 2
DVI
6
(SRC5)
Video 3
Comp. Vid
S-Video
VGA Comp
Compon 3
SCART
7
(SRC6)
Video1RGB
LitePort
Comp Vid
S-Vid
HDMI
8
(SRC7)
S-Vid
Comp. Vid
Don’t forget to set all unused T460 channels to “Skip” to jump over blank/unused inputs.
Aspect ratio set-up is supported for 4:3 small & regular and 16:9 reg. Use source names: “Set small 4:3” “Set reg 4:3” and
“Set reg 16:9”.
IN100 group (All are preset to 9600 baud): IN112a, IN112aT, IN114a, IN114aT, IN114STa,
IN116a, IN118HDa, IN120STa, IN124STa, IN126STa
InFocus/ASK series drivers (All codes preset to 115,200, not supported by T460. Set to 19200 manually.)
IN146
IN2110 group: IN2112, IN2114, IN2116 (tested IN2116 shows codes of IN2100 group above)
IN3110 group: IN3114, IN3116
IN5300 group: IN5302, IN5304
IN5500 group: IN5532/L, IN5533/L, IN5535
LP540, LP640, LP650, LP815, LP820, LP840, LP850, LP860 (older group with unidentified
SRC allocations to channels 1-6)
(Some other InFocus seem to be similar to BenQ MP722)
T460/461/T462 Manual 9th Sept 2015 Part B 3.84 release © Jed Micro Pty Ltd
18
The following table shows the mapping of T460 channel number, the string sent, and the input associated with that channel in
the manual, and how it is identified on the on-screen menu:
T460 Chan
TX code
IN100 group
various LP
IN146, LP540,
LP640,
TX code
IN2110, IN3110, groups
IN5300, IN5500 groups
1
(SRC0)
VGA1
VGA1
(SRC1)
VGA1
2
(SRC1)
VGA2
VGA2
(SRC2)
VGA2
3
(SRC2)
Composite
HDMI (not LP)
(SRC3)
RGBHV
4
(SRC3)
S-Video
S-Video
(SRC5)
HDMI 1
5
(SRC4)
HDMI
Composite
(SRC6)
HDMI 2
6
(SRC5)
(SRC7)
Component
7
(SRC6)
(SRC8)
S-Video
8
(SRC7)
(SRC9)
Composite
Don’t forget to set all unused T460 channels to “Skip” to jump over blank/unused inputs.
Aspect ratio set-up is supported for 4:3 regular and 16:9 reg. Use source names: “Set reg 4:3” and “Set reg 16:9”.
Users can set FlagG (see flag setup menu) to enable sending (Auto Position) after each source transmission to these models.
RS232 connections to InFocus, ASK and Proxima with D9
These use a 9-pin-D9 male on the projector, or on the Cable Wizard cables, female on T460 cable.
Coms is at 19200, except 9600 for X6, X7, X15 series.
Function/Direction
T460 “projector”
Connection
“Serial” Port Connector
Ground
Ground
9-pin D-sub pin 5
Data from T460 to projector
Tx
9-pin D-sub pin 2 (RXD)
Reply data from projector to T460
Rx
9-pin D-sub pin 3 (TXD)
Plus 9 volt CTS/DTR to projector
N/c
1
2
6
3
7
4
8
5
9
D-sub 9 female
solder side
After installation wiring of any projector to a T460, use a multimeter to check voltages of –9 on BOTH TX and RX pins in any
installation, as described in the troubleshooting part of this manual.
LG LCD, LG Plasma and Zenith Plasma flat screens
LG drivers are divided into groups by:
•
Code sent to select an input channel (“kb”, “i” or “xb”);
•
Choices of sources allocated to T460 channels (allowing Analog & Digital TV, Digital TV only, or NO TV at all.)
The channel codes provided in a particular panel are shown in back of the handbook in each case, in the appendix in the
section called “Input Select”. There are up to 12 channels on some of these units, and as there are only 8 channels in the T460,
the group must be chosen appropriately.
LG Group A, B, C for “kb” channel select codes (older panels, but still supported):
This choice is for panels with a “kb” command lead-in (called “Command2:b”) is provided by selecting one of Groups A, B or
C code sets. The T460 drivers can select a sub-set of up to 8 of these channels to be used. What the particular panel switches to
when a particular code is sent is listed in this appendix
Group A for “kb” provides channels “Data = 0, 1, 2, 3, 4, 5, 6, 7” for T460 channels 1 through 8.
Use Group B only if an HDMI 1 /DVI channel is needed which needs “Data = 8” to select (Data= 6, RGB-DTV is dropped).
Use Group C only if an HDMI 2 channel is needed which needs “Data = 9” to select (Data= 6, RGB-DTV, and Data=7, RGBPC are both dropped).
LG Group D for “i” channel select codes
Group D codes select: 0=RGB, 1=AV, 2=Component, 3=S-Video. (Zenith P42W26/A and P60W26/A use code “i”).
LG Group E, F, G and Group H channel allocations for “xb” codes (newer panels):
T460/461/T462 Manual 9th Sept 2015 Part B 3.84 release © Jed Micro Pty Ltd
19
Group E: Analog and Digital TV, 2 x A/V, 2 x Component, RGB (“xb 00 50” code) and one HDMI input (older);
Group F: Digital TV, 2 x A/V, 2 x Component, RGB (“xb 00 50” code) and HDMI 1 & 2 input (older);
Group G: Digital TV, 2 x A/V, 2 x Component, RGB (“xb 00 60” code) and HDMI 1 & 2 input (newer);
Group H: NO TV, 2 x A/V, 2 x Component, RGB (“xb 00 60” code) and HDMI 1, 2 & 3 input (newer);
Note: Some PG and LG appear with both 50h and 60h for PC mode in different documents. Thank you LG!
Message
Group E
T460 Ch.
Group F
T460 Ch.
Group G
T460 Ch.
xb 00 00 <0Dh>
Ch. 1
Ch. 1
Ch. 1
xb 00 10 <0Dh>
Ch. 2
xb 00 20 <0Dh>
Ch. 3
Ch. 2
Ch. 2
xb 00 21 <0Dh>
Ch. 4
Ch. 3
xb 00 40 <0Dh>
Ch. 5
xb 00 41 <0Dh>
xb 00 50 <0Dh>
Connector /
function
Screen
display
Dig TV tuner
DTV
An. TV tuner
TV
Ch. 1
A/V 1 RCA
AV 1
Ch. 3
Ch. 2
A/V 2 RCA
AV 2
Ch. 4
Ch. 4
Ch. 3
Component 1 (RCA)
Component 1
Ch. 6
Ch. 5
Ch. 5
Ch. 4
Component 2 (RCA)
Component 2
Ch. 7
Ch. 6
RGB IN (PC) (DB15)
RGB
xb 00 60 <0Dh>
xb 00 90 <0Dh>
Ch. 8
xb 00 91 <0Dh>
Group H
T460 Ch.
Ch. 6
Ch. 5
RGB IN (PC) (DB15)
RGB
Ch. 7
Ch. 7
Ch. 6
HDMI 1
HDMI 1
Ch. 8
Ch. 8
Ch. 7
HDMI 2
HDMI 2
Ch. 8
HDMI 3
HDMI 3
xb 00 92 <0Dh>
Don’t forget to set all unused T460 channels to “Skip” to jump over blank/unused inputs in the above table.
Mute On/Mute Off is supported, but Freeze is not. Pressing both yellow buttons for Mute is supported.
Aspect ratio control is provided via dummy channel names called: "Set reg 4:3” and "Set reg 16:9".
RS232 connections to LG LCD, LG Plasma and Zenith flat screens
These use a 9-pin-D9 male on the panel, female on cable. Coms is at 9600, 8N1, Some might use reverse 2/3.
Function/Direction
T460 “projector”
Connection
Fujitsu “Control” Port
Connector
Ground
Ground
9-pin D-sub pin 5
Data from T460 to projector
Tx
9-pin D-sub pin 2 (RXD)
Reply data from projector to T460
Rx
9-pin D-sub pin 3 (TXD)
Plus 9 volt CTS/DTR to projector
N/C
N/C
1
2
6
3
7
4
8
5
9
D-sub 9 female
solder side
After installation wiring of any projector to a T460, use a multimeter to check voltages of –9 on BOTH TX and RX pins in any
installation, as described in the troubleshooting part of this manual.
Some have clamp diodes on signal lines so voltages may be limited to -0.7 volts and plus 5v signal pulses.
T460/461/T462 Manual 9th Sept 2015 Part B 3.84 release © Jed Micro Pty Ltd
20
Mimio (generic) One model quoted is 1865050
Mimio projectors seem to be made by Eiki (they share codes) and have limited information as to wiring, etc.
http://www.mimio.com/en-AP/Support/Mimio-Product-Documentation.aspx
T460 Channel
TX code
Function as identified
1
~vgaa
Computer 1
2
~vgab
Computer 2
3
~composite
Video
4
~svideo
S-Video
5
~hdmi
HDMI
•
Two-yellow button Blank & Mute commands are supported;
•
Freeze command is available;
•
Audio volume control 0 -> 20 is provided.
RS232 connections to Mimio Models: to be advised: a D9 connector is shown in the connection
sheet.
After installation wiring of any projector to a T460, use a multimeter to check voltages of –9 on BOTH TX and RX pins in any
installation, as described in the troubleshooting part of this manual.
Mitsubishi LCD, (NEC equiv, see NEC: MDT321S, LDT421V, MDT421S, MDT521S,
LDT461V) (for LDT651L & P see SHARP LCD Generic PN1 & PN2)
LDT321V, LDT322V, LDT323V, LDT371V, LDT421V, LDT422V, LDT461V, LDT551V,
MDT401S, MDT521S, MDT551S follow projector codes with 00_r1->00_r4, 00_v1->00_v4.
Note: Some of these displays have issues re audio control. This is a fault in the LCD panel’s firmware.
Mitsubishi projector group 1:
EX10U, ES/EX100U, FL6900, FL7000, HC100/900/1100/1500/1600/3000/3100/3800/3900/
4000/4900/5000/6500, HD1000/4000, HD8000, NF32U, NW30U, NW31U, S/X1-U, S/XL2U,
S/XL4U, SL6U, XL5U, XL6U, XL8U, S/XL25U, WL639U, XL30U, S/X50U, SA51U, X70-U-,
X80U, X100E, S/X120E, S/XD200U, X200E, XD221, SD220U, S/X250U, S290U, UD8400,
X/XD300U, X390U, X400-U, XD400/450/460/470/480/490, S/X490U, X500U, XD500, XD510U,
XD520, XL9/550/650U, XD1000/2000U, XL1550/2550, WD2000, WD/XD3200, WD8200,
WD8350U, WD8400U, WD8700U, WL6700, XD3500U, WD3300, XL5900U, XL5950U,
XL5980U/LU. ***EX241U, EX320U/ST, EX321U/ST, EW330U/ST, EW331U/ST have audio 0>10 only, but supported in incremental mode only.
** Below are XD530U, EX53U, FD730U/G ,XD550U, XD560U, WD570U, XD360U-EST,
WD380U-EST, XD365U-EST, WD385U-EST, WD390U-EST, XD700U, WD720U, UD740U
T460/461/T462 Manual 9th Sept 2015 Part B 3.84 release © Jed Micro Pty Ltd
21
T460 Channel
TX code
Input name in manual
Function as identified
1
00_r1 0Dh
Computer 1
Computer 1
2
00_r2 0Dh
Computer 2
Computer 2 (some only)
3
00_v1 0Dh
Video 1 /S-Video
Video 1
4
00_v2 0Dh
BNC/ RCA Video 2/S-Video
Video 2
5
00_d1 0Dh
DVI or HDMI
DVI or HDMI (some only)
6
00_d2 0Dh
DVI
DVI (some only)
7
00_d3 0Dh or 00_n1 0Dh**
SDI or LAN**
SDI (some only) or LAN**
8
00_c1 0Dh or 00_s1 0Dh**
Component or PC-Less **
Component (some) or “PC-less”**
Note: Users can set FlagG (see flag setup menu) to enable sending "00r09<0Dh>" (Auto Position) after each source
transmission to these model projectors. (was Flag1)
Split screen mode: A number of Mitsubishi projectors have a split mode, which allows an image to be projected with a
“Computer” input shown on the left, with sources from: Computer1, Computer2, DVI, HDMI or SDI, and “Video” input
on the right from: Video or S-Video. Split mode is selected by setting up a dummy T460 channel as “Split/Unsplit” and then in
operation, stepping to it. It shows this for 2 seconds before returning to a source channel. The projected image then shows sideby-side the most-recently-selected “computer” and “video” sources. Any source selection cancels the “split” mode.
Mitsubishi projector group 2: SD105, S/XD206
Note: This group has slightly different coding, different voltages and different behaviour at startup.
It seems that there is a static protection diode placed across the TX and RX communications lines which means that when the
T460 drives the projector, the static voltage seen on the line is clamped at –0.7 volts. When the signal goes positive, instead of
going to 9 volts or so positive, it is clamped to about +6 volts. The current limiting characteristics of the RS232 specification
are met by the drivers on the T460 so the fact that the T460 is driving current into the clamp diode does not stop correct
operation, it just looks funny on a multimeter.
Also, there is no reply from the projector in ‘standby’ so the normal message indicating ‘Projector Coms OK’ screen is not
available as a system check. Also, no indication of lamp hours is available in ‘standby’ so instead this is read out at the end of
the ‘warmup’ time and displayed for 2 seconds.
The current volume setting display on the projected image comes on when a ‘volume’ key is pressed, but does NOT change as
more pushes are done on the keys. Only the initial setting with one change of level is shown. It is correct if you wait for it to go
away after several seconds and then press a Volume once more. Weird! There is only one audio input, so if audio is needed on
more channels use a T461 audio box.
There are no absolute aspect ratio commands, rather there is a toggle, so users can change aspect ratio by setting a dummy
channel (say, Ch 8) to “4:3/16:9/Zm.” and stepping to it to change aspect ratio.
Users can set FlagG (see flag setup menu) to enable sending "00r09<0Dh>" (Auto Position) after each source transmission to
these model projectors. (was Flag1)
T460 Channel
TX code
Input name in manual
Function as identified on screen
1
00_r1 0Dh
Computer 1
Computer 1
2
00_r2 0Dh
Computer 2
Computer 2 (some models only)
3
00_v1 0Dh
Video 1 /S-Video
Video 1 (Use varies between models)
4
00_v2 0Dh
BNC/ RCA Video 2/S-Video
Video 2 (Use varies between models)
5-8
Various combination of digital, HDMI, DVID, network, etc provided for higher channels
Don’t forget to set all unused T460 channels to “Skip” to jump over blank/unused inputs.
T460/461/T462 Manual 9th Sept 2015 Part B 3.84 release © Jed Micro Pty Ltd
22
RS232 connections to Mitsubishi projectors (see also D9 following)
These use an 8 or 9-pin mini-DIN male on the cable. Comms is at 9600 baud, 8 bits, no parity, and 1 stop.
Function/Direction
T460 “projector” Connection
“Serial” Port Connector
Ground
Ground
8 or 9-pin mini-DIN pin 4
Data from T460 to projector
Tx
8 or 9-pin mini-DIN pin 1 (RXD)
Reply data from projector to T460
Rx
8 or 9-pin mini-DIN pin 7 (TXD)
Plus 9 volt CTS/DTR to projector
N/C
N/C
NOTE: Mitsubishi use either an 8 or a 9-pin
connector for RS232 (the 9-pin one has some USB
lines, which are ignored in use with the T460).
Mitsubishi in some cases supply an off-the-shelf
mini-DIN 8 to DB9 and a mini-DIN 9 to DB9 cable
called by them the “RS232C” cable.
After installation wiring of any projector to a T460, use
a multimeter to check voltages of –9 on BOTH TX and
RX pins in any installation, as described in the
troubleshooting part of this manual.
1
2
3
4
6
7
3
5
1
2
4
5
6
8
7
Mini-DIN 8
solder side
8
9
Mini-DIN 9
solder side
RS232 connections to Mitsubishi projectors
These use a 9-pin-D9 male on the proj, female on cable. Comms is at 9600 baud, 8 bits, no parity, and 1 stop.
Function/Direction
T460 “projector”
Connection
“Serial” Port Connector
Ground
Ground
9-pin D-sub pin 5
Data from T460 to projector
Tx
9-pin D-sub pin 2 (RXD)
Reply data from projector to T460
Rx
9-pin D-sub pin 3 (TXD)
Plus 9 volt CTS/DTR to projector
N/c
1
2
6
3
7
4
8
5
9
D-sub 9 female
solder side
After installation wiring of any projector to a T460, use a multimeter to check voltages of –9 on BOTH TX and RX pins in any
installation, as described in the troubleshooting part of this manual.
NEC LCD (old codes Mitsubishi projector style codes, e.g. “00_r1<CR>”):
LCD3000, LCD4010, LCD4610, LCD5710, SC40/SC46, Old T1/T2,
NEC LCD (new codes e.g. “SOH,0A0E0A,STX,00600003,ETX,Cksum, <CR>” ):
LCD3210, LCD3215, LCD4000, LCD4020, LCD4215, LCD4620, LCD5220, LCD6520, LCD8205, V322,
M/P/S/X401, P402, V422, V423, X431BT, M/P/S/X461/S, P/V/X462, V/X463, X464UN/UNV, M/P/S521,
V/X551S/UN, P/V/X552, P553, X554UN/UNS, V651, V652, P701, P702, P703, V801, M40/M46
(Multeos)
NEC LCD (E-series):
E324, E424, E464, E554, E654: Called: ‘E-Series x1' & 'E-Series x5' for 1/5 volume Inc’s / Dec’s per press:
T460/461/T462 Manual 9th Sept 2015 Part B 3.84 release © Jed Micro Pty Ltd
23
NEC Plasma:
42XC10/42XP10, 50XC10/50XP10, 60XC10/60XP10
Also Mitsubishi NEC equiv: MDT321S, LDT421V, MDT421S, MDT521S, LDT461V (for LDT651L & P
see SHARP LCD Generic PN1 & PN2
The following table shows the mapping of T460 channel number, the string sent, and the input associated with that channel in
the manual, and how it is identified on the on-screen menu:
T460 Chan.
TX code (old)
TX code (new,
last 4 digits)
Input name in
manual
Function as identified on
screen
1
00_r1 <0D>
…0003<STX>
RGB 1 (DVI)
RGB 1 (DVI)
2
00_r2 <0D>
…0001<STX>
RGB 2 (DB15)
RGB 2 (VGA)
3
00_r3 <0D>
…0002<STX>
RGB 3: RGB/BNC
RGB 3
4
00_v1 <0D>
…0005<STX>
VIDEO (1)
VIDEO 1 (Shared S-VIDEO
on LCD3000)
5
00_v2 <0D>
…000C<STX>
DVD/HD (RCA)
DVD/HD(1)/Component
6
00_v3 <0D>
…0011<STX>*
S-VIDEO/HDMI
S-VIDEO or HDMI*
7
00_h1 or 00_v4 <0D>
…0004<STX>
HDMI or Video 2
HDMI or VIDEO 2 (Plasma)
8, Flag1=0
Flag1 ignored for old codes
…000F<STX>
DisplayPort
DPORT
8, Flag1=1
(Multeos mode only) 00_t1,
00_t2 or 00_v5 <0D>
…000A<STX>
TV / Component
via BNC
t1= TV-A, t2=TV-D, HD(2)
(Plasma)
Multeos M40/M46 new mode have different strings (up to 21 bytes) but have same channel allocations as “old” strings.
Three different “Set proj” settings are provided for M40/M46 to select Analog or Digital TV for Ch.8 or new mode.
Multeos mode is TV-D only on Ch.8.
Switch OFF “ECO standby” mode so RS232 can start “Standby” system.
Use on-screen setup to manually allocate audio inputs to channels. RS232 control of audio only in Multeos mode, but only to
speaker drive, NOT line level drive.
Switch “INPUT DETECT” to “NONE” to prevent channel changing when non-selected signals come and go.
“DVI MODE” may need to be setup to control type of input signal expected on that input.
“S-VIDEO MODE” should be set to “SEPARATE” so users can select between Composite Video and S-Video sources using
the T460. Don’t forget to set all unused T460 channels to “Skip” to jump over blank/unused inputs.
NEC LCD (E-series): E324, E424, E464, E554, E654
T460 Chan.
TX code (last 4 digits)
Input name in manual
Function as identified on screen
1
…0001<STX>
VGA
PC
2
…0011<STX>
HDMI 1
HDMI 1
3
…0012<STX>
HDMI 2
HDMI 2
4
…0013<STX>
HDMI 3
HDMI 3
5
…0005<STX>
Video (Composite)
Video
6
…000C<STX>
Video (Component)
Component
7
…0014<STX>
USB
USB
8
…000A<STX>
DTV
DTV
Note: Volume x5 and x1 options are provided for Audio auto-increment. Choose what works.
T460/461/T462 Manual 9th Sept 2015 Part B 3.84 release © Jed Micro Pty Ltd
24
RS232 connections to NEC LCD with D9
These use a 9-pin-D9 male on the plasma, female on cable. Comms is at 9600 baud, 8 bits, Odd parity, 1 stop.
Function/Direction
T460 “projector”
Connection
“Serial” Port Connector
Ground
Ground
9-pin D-sub pin 5
Data from T460 to projector
Tx
9-pin D-sub pin 2 (RXD)
Reply data from projector to T460
Rx
9-pin D-sub pin 3 (TXD)
Plus 9 volt CTS/DTR to projector
N/C
N/C
1
2
6
3
4
8
7
5
9
D-sub 9 female
solder side
NEC Plasma: X-42VM5, PX-42VP4/5/5, PX-42XM2/3/4/5, PX-42XR4/5, PX-50XM3/4/6,
PX-50XR5/6, PX-60XM5, PX-60XR5, PX-61XM2/3/4, PX-61XR4
The following table shows the mapping of T460 channel number, the string sent, and the input associated with that channel in
the manual, and how it is identified on the on-screen menu: (Note: Freeze and Mute keyboards not supported.)
T460 Channel
TX code byte 6
Input name in manual
Function on screen
1
01h
BNC
Video 1
2
02h
RCA
Video 2
3
03h
S-VIDEO
Video 3
4
05h
DVD1 / HD1 (3 RCA) Y, Pb(Cb), Pr(Cr)
DH1 / DVD1 / DTV1
5
06h
RGB2 / DVD2 / HD2 (5BNC) ** Y, Pb/Cb, Pr/Cr
DH2 / DVD2 / DTV2
6
07h
9-pin D-sub (Analog)
RGB1 / PC1
7
08h
RGB2 / DVD2 / HD2 (5BNC) ** R, G, B, H/CS, V
RGB2 / PC2 **
8
0Ch
DVI (Digital)
RGB3 / PC3
** Shared inputs, select one function only using BNC-Input setting in “Option 1” menu.
The audio inputs (on 3 RCA sockets or socket pairs) are allocated to particular video channels in the “Audio” menu
using the IR remote control and are stored in non-volatile memory. Set these “links” up at install time.
Don’t forget to set all unused T460 channels to “Skip” to jump over blank/unused inputs.
RS232 connections to NEC Plasma with D9
These use a 9-pin-D9 male on the plasma, female on cable. Comms is at 9600 baud, 8 bits, Odd parity, 1 stop.
Function/Direction
T460 “projector”
Connection
“Serial” Port Connector
Ground
Ground
9-pin D-sub pin 5
Data from T460 to projector
Tx
9-pin D-sub pin 2 (RXD)
Reply data from projector to T460
Rx
9-pin D-sub pin 3 (TXD)
Plus 9 volt CTS/DTR to projector
“RTS”
9-pin D-sub pin 8(CTS IN)
1
2
6
3
7
4
8
5
9
D-sub 9 female
solder side
After installation wiring of any projector to a T460, use a multimeter to check voltages of –9 on BOTH TX and RX pins in any
installation, as described in the troubleshooting part of this manual.
T460/461/T462 Manual 9th Sept 2015 Part B 3.84 release © Jed Micro Pty Ltd
25
NEC projectors:
The following table shows the mapping of T460 channel number, the string sent, and the input associated with that channel in
the manual, and how it is identified on the on-screen menu:
T460 Channel
TX codes (last
2 bytes)
Input name in manual
Function as identified on screen
1
01h 09h
RGB1 / DVI ANALOG
RGB1 / DVI ANALOG (Some only)
2
02h 0Ah
RGB2 / Component
RGB2 (some only, via D9, DVI or 5 BNC connectors)
3
06h 0Eh
VIDEO (1)
VIDEO (1)
4
0B 13 / 1B 23
S-VIDEO / DisplayPort
S-VIDEO / DisplayPort if FLAGJ = 1
5
10h 18h/22 2A
Component 3 x RCA
Component YPbPr/YCbCr, USB Display FLAGK=1
5 ** alternate
11h 19h
Component 3 x RCA
Component YPbPr/YCbCr HT410/510/LT180 (some)
6
1Ah 22h
DVI Digital / RGB3
DVI Digital / HDMI (some) / Computer 3 (some)
7
03h 0Bh
DVI Analog / RGB3
DVI Analog (some), RGB3/YPbPr (some)
8
20h 28h
LAN
Network on NP1000, NP2000, GT5000, GT6000
Don’t forget to set all unused T460 channels to “Skip” to jump over blank/unused inputs.
NOTE: No remote control of audio is available on the VT46/47/460/465/470/560/570/660/670 models. It can be set
manually with the buttons on the projector and on the remote control but NOT via an RS232 control. Audio and Video
mute work OK, so the volume control keys can be used for mute functions. Use a T461 if audio control is needed.
(Rev 3.12) Aspect ratio setting is supported with dummy channels: “Set small4:3”, “Set reg 4:3” and “Set reg 16:9”.
NEC groups by options and default baud rates (Groups separated by “/” share codes/manuals)
NEC 38400 baud, no audio: HT1000, HT1100 (fixed 38400), LT25/LT30/LT35, NP40/NP50/NP60,
NP41/NP51/NP61/NP62, NP43/NP54/NP63/NP64, NP110/NP115/NP210/NP215.
Different Component code: HT410/HT510, LT180, PH1000U, PX700W, PX750U, PX800X
NEC 38400 baud, with audio (0-62): GT950, GT1150/GT2150, GT5000/GT6000(fixed 38400), LT85/LT150,
LT154/LT155/LT156, LT157/LT158, LT280/LT380, NP901W/NP905, NP1000/NP2000,
P1150/NP2150/NP3150/NP3151W, NP1250/NP2250/NP3250, NP4000/NP4001, NP4100/NP4100W, PA500U,
PA500X, PA500W, PA600X, V230, V230X,V260, V260W,V300X/W
VT440/VT540(fixed 38400), VT770, VT800
NEC 38400 baud, with audio (0-31): WT600, WT610/WT615, LT220/LT240/LT260, LT245/LT265, M230X,
M260X/W, M271W/X, M300X/W, M311W/X, NEC M350X, M361X, NP216, U250X, P350W/X, P401W, P420X,
P451W/X, P501X, PE401H, PE501X, U260W, U300X, NEC U310W, VE280/X, VE281/X, VE282/X, UM280W/X,
UM301W_X, UM330W/X, UM351W, UM361X
NEC 38400 baud, with audio (0-31), new (2014) M, PA series: See below
NEC 19200 baud, no audio: LT75Z, VT37, VT46/VT460/VT465/VT560/VT660,
VT47/VT470/VT570/VT575/VT670/VT676, VT48/VT57/VT58,
NEC 19200 baud, with audio (0-62): NP305/NP310/NP405/NP410/W/NP510/W/WS/NP610/S,
NP300/NP400/NP500/W/NP600, NP1200, NP2200, NP3200
VT45, VT49/VT59/VT490/VT590, VT480/VT580, VT595/VT695/VT700, VT650,
NEC 9600 (fixed) baud, no audio: LT84/LT140
T460/461/T462 Manual 9th Sept 2015 Part B 3.84 release © Jed Micro Pty Ltd
26
NEC 38400 baud, with audio (0-31), new (2014) M, PA series: M282X, M302WS, M322W/X, M332XS, M352WS,
M362W/X, M402W/X, PA521U, PA522U, PA571W, PA572W, PA621U/X, PA622U/X, PA671W, PA721X, PA672W,
PA722X
T460 Channel
TX codes
(last 2 bytes)
Input name in manual
Function as identified on screen
1
01h 09h
RGB1 / VGA
RGB1
2
02h 0Ah
RGB2 / VGA / BNC
RGB2 (some only, via D9, or 5 BNC connectors)
3
06h 0Eh
VIDEO
VIDEO (BNC on PA series)
4
0A1H,0A9H
HDMI 1 (new codes)
HDMI 1
5
0A2H,0AAH
HDMI 2 (new codes)
HDMI 2
6
0A6H,0AEH
DisplayPort
DisplayPort
7
022H,02AH
USB-B
(some only)
8
20h 28h
Network or HDBaseT
Network or HDBaseT
Don’t forget to set all unused T460 channels to “Skip” to jump over blank/unused inputs.
NOTE 1: LT180/LT25/30/35 all work best with Reply mode enabled in single-projector applications.
NOTE 2: VT48/58 always works in Reply mode, so are NOT suitable for parallel projector operation.
NOTE 3: Freeze keyboard support has been added to release 2.96 for many NEC projectors. If Freeze is supported on the IR
remote control then it is usually available via RS232 from a T460.
NOTE 4: If the lower output drive from the projector causes problems driving long cables, on projector where baud rate can be
altered, an option exists to set the T460 coms to 4800 baud by setting FLAG1. Change proj. to 4800 also.
Special setup for NEC for IDLE or ECO mode
As supplied, these projectors appear to default to a deep “Standby” mode when power is off, and they will show no response to
the poll as the T460 starts, showing the “Projector not replying” message instead, and refusing to accept an ON command. If
you get this message, you will need to go through the setup sequence using the keys on the top of the projector to set the
default rest state the “Idle” mode rather than “Standby” mode. This is shown in the user manual (search for the word “idle”).
Various other projectors have a similar modes: eg for a NP305/NP310/NP405/NP410/W/NP510/W/WS/NP610/S family
device, the key sequence is: Menu > (right arrow twice) Setup > Enter > (Down arrow down to) ECO mode > Enter > Up
arrow (turn ECO mode OFF) > Enter > Exit > Exit > Exit
RS232 connections to NEC projectors with 8-pin DIN
Communications are at baud rates indicated above by model. We have attempted to use the default baud rate from the manual.
Function/Direction
T460 “projector”
Connection
“Serial” Port Connector
1
Ground
Ground
8-pin mini-DIN pin 4
Data from T460 to projector
Tx
8-pin mini-DIN pin 1 (RXD)
Reply data from projector to T460
Rx
8-pin mini-DIN pin 7 (TXD)
Plus 9 volt CTS/DTR to projector
N/C
N/C
2
3
4
6
7
5
8
Mini-DIN 8
solder side
Note: On the LT260 (and maybe the 240 and 220) the measured voltages from the projector were considerably lower,
measuring a standing –4 volts, and signals going to +4 peak, which is OK for the RS232 spec, but lower than usual. (The T460
puts out + and – 9 volt signals.)
If the lower output drive from the projector causes problems driving long cables, on projector where baud rate can be
altered, an option exists to set the T460 coms to 4800 baud by setting FLAG1. Change proj. to 4800 also.
T460/461/T462 Manual 9th Sept 2015 Part B 3.84 release © Jed Micro Pty Ltd
27
RS232 connections to NEC Projector with D9
These use a 9-pin-D9 male on the plasma, female on cable. Comms is at 19200 or 38400 baud, 8 bits, no parity, 1 stop.
Function/Direction
T460 “projector”
Connection
“Serial” Port Connector
1
Ground
Ground
9-pin D-sub pin 5
Data from T460 to projector
Tx
9-pin D-sub pin 2 (RXD)
Reply data from projector to T460
Rx
9-pin D-sub pin 3 (TXD)
Plus 9 volt CTS/DTR to projector
n/c
n/c
2
6
3
7
4
8
5
9
D-sub 9 female
solder side
After installation wiring of any projector to a T460, use a multimeter to check voltages of –9 on BOTH TX and RX pins in any
installation, as described in the troubleshooting part of this manual. (Voltages may be lower (see above under DIN connector.)
Optoma (Inc. BenQ, Planar, Promethean, Vivitech) Note: many prefixes to numbers
Group 1: (Vol: 0->15), DS309, EW728, EW1610,
Group 2:
There have been a number of problems with Optoma projectors NOT accepting the designated Off
commands for power, mute and freeze, but only accepting an alternate Off command. We have no way
of knowing if this is a permanent situation, or if the accepted commands will change in future. To help
overcome this, this release includes “generic” drivers so users have a choice of choosing between the
options. The last number in the generic name is the maximum volume setting.
One group, designated with 1/0 in the name uses strings: ~0000 1 and ~0000 0 (power On/Off, etc).
The other group, with 1/2 in the name uses strings: ~0000 1 and ~0000 2 (power On/Off, etc).
The available names are: Gen1:1/0 V10, Gen2:1/2 V10, Gen3:1/2 V15, Gen4:1/2 V16 & Gen5:1/2 V20
(Vol: 0->10), HD25_LV, ZW_ZX_201ST, ZW_ZX_212ST, DS_DX211, W_X305ST, C222, ES_EX_521,
DS216, DS219, W290, EH300, S_W_X303, W_X305ST, W_X306ST, W/X306ST alt (uses alt 0/1),
W_X307USTi, W316, DS317, DX319, DS316, DW318, DS323, DS_DW_DX339, EX400, W_X401,
EH500, EH_W_X501, EH_W505, ES_EX520, ES_EX522, ES_TS526, ES_EX530, EX531, EX532,
EW_EX_TW_TX536, EX538, EX_TX540, EX_TX542, ES_EX_555, ES_EW_EX_TW_556, X600,
EW_EX605ST, X605, EW_EX_TW_TX610ST, EX_TX612, EX_TW_TX615, DX617, DX623,
TW_TX631, EW_EX_TW_TX635, EX685UT, EW695UTi, EW_EX_TW_TX762, EW_TW775, EP776,
TX778W, EP782_W, EX_TX779, EX784, EX_TX785, EX850, EX855, EW860, EX865, DH1011,
DH1015, EH_TH_1060, S_X2010, S_W_X2015, FW_FX5200, TW6000, TX7000, , PRO150S,
PRO160S, PRO250X, PRO260X, PRO360W
(*For this group, setting FLAG1 = 1 selects Wireless (~0012 11<0Dh>) for T460 Ch8. Setting FLAGJ=1
and FLAGK=0 sets Channel 6 to DVI-D (~0012 2<0DH>), and setting FLAGJ=1 and FLAGK=1 will set
Channel 6 to DVI-I / DVI-A (This is RGB analog on 4 extra pins on the DVI connector by the spade
terminal. Both names are used interchangeably.))
(Vol: 0->16), EP752, EP761, EP763, EP/TX1080 (Vol: 0->15),
EP/TX783
DS_DX327, DS329, DS_DX_ES_EX_550, DS_DX_ES_EX_TS_TX_551, EX_TX_565UT,
EX_TX_665UST, EW_TW_675UT, EW_TW766_W, EX_TX765_W (Vol: 0->20)
Group 3: (Vol:0->10), EW674, EX772, EX_TXR774, TWR1693, HD75, DVI-A is substituted for VGA2)
(Vol: 0->15), DX609, EP721, EP723, EP727, EP728, EX525ST, HD71
Group 4: (Audio, vol: 0->10), DS318, EH1020, TH1020, TH1060, GT360, GT700, GT720, HD66,
T460/461/T462 Manual 9th Sept 2015 Part B 3.84 release © Jed Micro Pty Ltd
28
HD600X, PRO350W, GT750_E, HD33_3300, HD67_6700, HD600X_LV, HD82_8200, HD83_8300,
HD86_8600, HD87, PRO8000, EH_TH7500, EH/TH-1060, EH_2060 (no audio), EH7700.
The following table shows the mapping of T460 channel number, the string sent, and the input associated with that channel in
the manual, and how it is identified on the on-screen menu. There are three similar groups of codes.
T460
Channel
TX code
Group 1
Input
name
TX code Group 2*
Group 3 **
Input
name
TX code
Group 4
Input
name
1
~0039 5<CR>
VGA1
~0012 5<CR>
VGA1
~0012 5<CR>
VGA1
2
~0039 6<CR>
VGA2
~0012 6<CR> or
** ~0012 2<CR>
VGA2 or
** DVI-A
~0012 1<CR>
HDMI 1
3
~0039 10<CR>
Comp. Vid.
~0012 10<CR>
Comp. Vid.
~0012 10<CR>
Comp. Vid.
4
~0039 9<CR>
S-Video
~0012 9<CR>
S-Video
~0012 9<CR>
S-Video
5
~0039 2<CR>
DVI-D
~0012 8<CR>
VGA 1
Component
~0012 8<CR>
VGA 1
Component
6
~0039 7<CR>
VGA 1
SCART*
~0012 13<CR>
VGA 2
Component
~0012 14<CR>
RCA
Component
7
~0012 1<CR>
HDMI
~0012 15<CR>
HDMI 2
8
~0012 2<CR> or
* ~0012 11<CR>
DVI-D or
* Wireless
~0012 16<CR>
HDMI 3
Don’t forget to set all unused T460 channels to “Skip” to jump over blank/unused inputs.
The “Source Lock” option in the “Options” menu MUST be turned ON (to stop the projector searching for other
channels when an input is dropped.) Under “Options | Advanced | Power Mode (Standby)” set to “Active”.
Aspect ratio control is included. Use source names: “Set reg 4:3” and “Set reg 16:9”.
There are audio inputs for all signal inputs, and the RS232 control system controls the audio level to the audio output jack.
MuteOn/Mute Off and Freeze On/Off and Mute On/Off keyboards are supported, and work normally.
RS232 connections to Optoma Group 1 projectors: Use the three-pin DIN wiring diagram below.
Data in is on pin 2 (RXD) Comms is at 9600 8N1
RS232 connections to Optoma Group 2: EP776, EP782 etc projector with D9
These use a 9-pin-D9 male on the proj, female on cable. Comms is at 9600 baud, 8 bits, no parity, 1 stop. Note: This is
opposite to the Optoma D9 wiring below!!
Function/Direction
T460 “projector”
Connection
“Serial” Port Connector
1
Ground
Ground
9-pin D-sub pin 5
Data from T460 to projector
Tx
9-pin D-sub pin 3 (RXD)
Reply data from projector to T460
Rx
9-pin D-sub pin 2 (TXD)
2
6
3
7
4
8
5
9
D-sub 9 female
solder side
After installation wiring of any projector to a T460, use a multimeter to check voltages of –9 on BOTH TX and RX pins
in any installation, as described in the troubleshooting part of this manual.
T460/461/T462 Manual 9th Sept 2015 Part B 3.84 release © Jed Micro Pty Ltd
29
Optoma: Group 4: EP706, EP708S, EP709, EP712E, EP719H
The following table shows the mapping of T460 channel number, the string sent, and the input associated with that channel in
the manual, and how it is identified on the on-screen menu. No audio in provided, so use a T461 if audio control needed:
T460 Channel
TX code
Input name in manual
Function as identified on screen
1
ID00IR021
VGA RGB/YPbPr/YCbCr/SCART
VGA (1)
2
ID00IR022
D-SUB 2
VGA2 (EP719 only)
3
ID00IR024
Composite Video
VIDEO
4
ID00IR023
S-Video
S-VIDEO
5
ID00IR020
DVI-D
DVI (EP709, EP712, EP719H only)
Don’t forget to set all unused T460 channels to “Skip” to jump over blank/unused inputs. The “Source Lock” option in
the “Management-I” menu MUST be turned ON (to stop the projector searching for other channels when an input is
dropped.)
Note: Aspect ratio control is included. Use source names: “Set small4:3”, “Set reg 4:3” and “Set reg 16:9”.
Note: MuteOn/Mute Off and Freeze On/Off and Mute On/Off keyboards are supported, and work normally. If a Volume
keyboard is used, a T461 is needed.
Note: Coms is at 9600 8N1. Optoma EP706, EP708S, EP709, EP712E, EP719H, EW766/W, EX765/W definitely use pin 2
(above) as an input, in the three-pin DIN wiring diagram below.
Optoma Group 5: Promethean, BenQ, Vivitek: EP771/772/774, Planar: PR5020, Promethean
PRM-25, PRM-35, EST-P1, BenQ: SP820, Vivitek Generic 1, 2, 3
These are all made by the same manufacturer, Delta, in China and have the same codes. (Boxlight Pro45000dp is similar).
The Vivitek range us a mixture of two-letter source codes (eg ~SR, ~SG) and numeric S codes (eg ~S1, ~S2). Some
understand both source select types, but not for all channels (eg D5000, D6000, Boxlight need ~S2 to access the RGBHV BNC
channel). All transmissions to Vivitek operate with large inter-character spacing, needed for reliability, and none of them reply
with a status in standby so no “projector Coms OK” message is possible. Lamp hours (single and dual) are read out after
warmup is completed. No reply mode is possible with these, either.
NOTE: Vivitek D5500 uses quite different (Sanyo-like) codes but at a non-standard speed (for Sanyo) of 38400. It is not
supported at this time.
The Promethean PRM-25, PRM-35, EST-P1, have NOT been tested at this release, but follows all this group’s codes. (Reports
appreciated.)
The following table shows the mapping of T460 channel number, the string sent, and the input associated with that channel in
the manual, and how it is identified on the on-screen menu.
Aspect ratio control is provided via dummy channel names called: "Set reg 4:3” and "Set reg 16:9" and “Set small 4:3” for the
Optoma and Vivitek Generic 1. Vivitek Generic 1 and Generic 3, and Promethean PRM-25, and Planar and BenQ have only
"Set reg 4:3” and "Set reg 16:9" with other codes.
Mute and Freeze are provided, but because they are toggles, “two yellow button mute” mode is not. Reply mode NOT used.
T460 Channel
TX code, all,
Viv. Gen 1, 2
TX code
Viv. Gen3
Input name in manual
Function as identified
on screen
Analog RGB
1
~SR<0Dh>
~S1<0Dh>
RGB 1 In via DB15
2
~SG<0Dh>
~S2<0Dh>*
RGB 2 In via DB15
3
~SV<0Dh>
~S5<0Dh>
Video In RCA
Video
4
~SS<0Dh>
~S6<0Dh>
S-Video In
S-Video
5
~SY<0Dh>
~S4<0Dh>
Component Video via DB15/RCA
Component Video
6
~SD<0Dh>
~S7<0Dh>
DVI-D In/HDMI 1
DVI/HDMI 1
7
~SW<0Dh>
~S3<0Dh>
Wireless
(Not all)
8
~SH<0Dh>
~S8<0Dh>
HDMI 2
HDMI (Not all)
* RGBHV-BNC
(Not all)
NOTE: Optoma: You MUST turn the “Source lock” function to “On” in the “Setup” menu (to stop the projector
searching for other channels when an input is dropped or is not connected.)
T460/461/T462 Manual 9th Sept 2015 Part B 3.84 release © Jed Micro Pty Ltd
30
NOTE: BenQ SP820: You must turn off “Auto Source”, “Auto Power Off” and “Direct Power On” in Configure Menu.
NOTE: Vivitek: You must turn off “Auto Source”, “Auto Power On” and “Auto Power Off” in “Installation II” menu.
RS232 connections to Optoma EP771/772/774 / Promethean PRM-25, PRM-35, EST-P1,
BenQ SP820 and Vivitek projectors with D9
These use a 9-pin-D9 male on the proj, female on cable. Comms is at 9600 baud, 8 bits, no parity, 1 stop.
Function/Direction
T460 “projector”
Connection
“Serial” Port Connector
Ground
Ground
9-pin D-sub pin 5
Data from T460 to projector
Tx
9-pin D-sub pin 3 (RXD)
Reply data from projector to T460
Rx
9-pin D-sub pin 2 (TXD)
Plus 9 volt CTS/DTR to projector
n/c
n/c
1
2
6
3
7
4
8
5
9
D-sub 9 female
solder side
After installation wiring of any projector to a T460, use a multimeter to check voltages of –9 on BOTH TX and RX pins
in any installation, as described in the troubleshooting part of this manual.
Optoma: Group 6: EP780/EP781/EP810/EP910
The following table shows the mapping of T460 channel number, the string sent, and the input associated with that channel in
the manual, and how it is identified on the on-screen menu (assuming an ID of “1”):
T460 Channel
TX code
Input name in manual
Function as identified on screen
1
ID01IR021
D-SUB 1
VGA1
2
ID01IR022
D-SUB 2
VGA2
3
ID01IR024
Composite Video
Video
4
ID01IR024
S-Video
S-Video
5
ID01IR020
DVI-D
DVI
Don’t forget to set all unused T460 channels to “Skip” to jump over blank/unused inputs.
The “Source Lock” option in the “Management” menu MUST be turned to “Lock” (to stop the projector searching for
other channels when an input is dropped.) Note: The Menu button sometimes does not work while searching for a signal.
The “RS232 Port” option in the “Management” menu MUST be set to RS232 (Not Network). This is 18 levels down in
the menu, and on a second, normally invisible page. Also set the “Projector ID” in the following menu option to “1”.
Optoma seem confused about the range of the on-board audio volume setting. There is NO indication on the projected screen
image of the audio level, but we find that the working range is 0 to 15 as shown on the T460 screen. (The projector shows a
range of 0 to 10 in the “Management” menu, from Off to Full. The documentation supplied says it is 000 to 030!)
Aspect ratio is included. Use source names: “Set reg 4:3” and “Set reg 16:9”, and seems to work with no issues.
MuteOn/Mute Off and Freeze On/Off and Mute On/Off keyboards are supported, and work normally. Lamp hours are shown
at startup. Reply mode is available. Two-yellow-button mute mode is implemented.
T460/461/T462 Manual 9th Sept 2015 Part B 3.84 release © Jed Micro Pty Ltd
31
Optoma: Group 7: EP1690
The following table shows the mapping of T460 channel number, the string sent, and the input associated with that channel in
the manual, and how it is identified on the on-screen menu:
T460 Channel
TX code
Input name in manual
Function as identified on screen
1
ID00IR031
D-SUB 1
VGA1
2
ID00IR032
D-SUB 2
VGA2
3
ID00IR034
Composite Video
PAL (Note: same as for S-Video!)
4
ID00IR033
S-Video
PAL (Note: same as for Video!)
5
ID00IR030
DVI-D
DVI-D
Don’t forget to set all unused T460 channels to “Skip” to jump over blank/unused inputs.
The “Source Lock” option in the “Options” menu MUST be turned ON .
This projector puts lots of messages on the screen which are sometimes NOT automatically cleared after a time period.
Channel change messages are cleared as soon as a valid signal is detected, but will stay until this time.
Volume change messages are NOT cleared automatically, and a line, a volume bar graph and a volume number appear and stay
just below mid-screen. To clear this message when using the projector for audio switching and level control, set FLAG4->1
and this will automatically send a “OSD Reset” command 5 seconds after each volume change. It takes the projector up to
17 seconds to clear the messages, and a couple of screen off and on cycles occur during this time. If this is not acceptable,
we suggest the use of the T461 audio mixer/attenuator.
Aspect ratio is included. Use source names: “Set reg 4:3” and “Set reg 16:9”. However, this also has on screen display
issues, in that an aspect ratio message appears mid-screen and stays. (The “OSD Reset” command does NOT help, as
sending this command actually changes the screen aspect ratio back to 16/9! Weird! Changing channels also reverts the
display mode to 16/9.) Optoma (in Australia, distributor Amber Technology) are organising a projector software update
service which will apparently correct these display message problems. Contact them for an update. When this update is
installed, it will not be necessary to set FLAG4.
MuteOn/Mute Off and Freeze On/Off and Mute On/Off keyboards are supported, and work normally.
So as it stands, the Optoma EP1690 works well and appears reliable with a JED controller with a T461 for audio, or with
MuteOn/Mute Off and Freeze On/Off and Mute On/Off keyboards.
RS232 connections to 3-Pin DIN Optoma/Acer projectors.
Mini-DIN 3 socket on projector. Coms at: 9600 DP8N1
Function/Direction
T460 “projector”
Connection
Optoma/Acer Serial Port
Connector
Ground
Ground
Mini-DIN 3 pin 3 (Gnd)
Data from T460 to projector
Tx
Mini-DIN 3 pin 1 or 2 (RXD)
Reply data from projector to T460
Rx
Mini-DIN 3 pin 2 or 1 (TXD)
1
2
3
Mini-DIN 3
solder side
Note: We have seen both options for pins 1 and 2. Check with a multimeter, and the projector output (called “RX” in the above
table) will have –5 to –9 volts on it. Acer PD523PD and Optoma EP706, EP708S, EP709, EP712E, EP719H EP780, EP810,
EP910 DS309, DX609, EP752, EP761, EP763, EP721, EP723, EP727, EP728, EW766/W and EX765/W definitely use pin 2
(above) as an input.
After installation wiring of any projector to a T460, use a multimeter to check voltages on BOTH TX and RX pins.
T460/461/T462 Manual 9th Sept 2015 Part B 3.84 release © Jed Micro Pty Ltd
32
Panasonic projectors
Note: Originally all Panasonic projectors communicated at 9600 baud, then over the years a number have introduced
19200 baud default models but always with an “AMX mode” which set coms to 9600. Groups 1a and 4b below are
19200 exclusively, without an AMX mode. These are set, in rev 3.73 to 19200 coms. A new flag setting is available to
over-ride the automatic setting, provided because Panasonic has been known to vary code in projectors, in case the
baud rate default changes. Setting FlagR = 1 will force all models to 9600 baud, and setting FlagS = 1 sets all to 19200.
The following table shows the mapping of T460 channel number, the string sent, and the input associated with that channel in
the manual, and how it is identified on the on-screen menu:
T460 Ch.
TX code
Group 6
Group 7
1
VID
VID
VD1
2
SVD*, Setting FlagJ sets Component, SD1->Ch 7
SVD
VD2*
3
RG1
RG
RG1
Group 1
Group 2
Group 3
Group 4
Group 5
4
RG2
YUV
HD1
RG2
RG2
5
YUV
HDM
HD2
YUV
HD1
6
DVI
HD1
CP1
HD2
DVI
DVI
7
HDM/HD1
HD2
CP2
HD1
AUX / SD1
CP1
8
NWP
NWP
YUV
NWP
NWP
CP2
RG2
HD1
HD1
Note: Quite a few Panasonic projectors need an address setup. The address mode projectors mainly use a global address of
ZZ and a separator of ‘;”.
Group 1a: PT-LB280, PT-LB300, PT-LB330, PT-LB360, PT-LW280, PT-LW330 (all 19200 baud)
PT-VW330E, PT-VW430E, PT-VW431D, PT-VW440E, PT-VX41, PT-VX45, PT-VX400E, PT-VX405, PT-VX500E,
PT-VX501, PT-VX510E (9600 with AMX mode) setting flag K=1 sets codes to command DigtalLink system
T460 Channel
TX code
Input name in manual
TX code FlagK=1
Input name Via Dig Link
1
IIS:VID
Composite Video
IIS:DL1:VID
Comp Video
2
IIS:SVD
S-Video
IIS:DL1:SVD
S-Video
3
IIS:RG1
VGA 1
IIS:DL1:HD1
HDMI 1
4
IIS:RG2
VGA 2
IIS:DL1:HD2
HDMI 2
5
IIS:CP1 / IIS:DL1
Component or DigitalLink
IIS:DL1:PC1
PC1
6
IIS:HD1
HDMI 1
IIS:DL1:PC2
PC2
7
IIS:HD2
HDMI 2
8
IIS:NWP
Network
Group 2: PT-AE900, PT-AX100, PT-AX200
Group 3: PT-AE4000, PT-AE7000, PT-AE8000EH, PT-AH1000, PT-AR100, PT-AT5000E, PT-AT6000E
Group 4: PT-F-FW100, PT-LB2EA, PT-LB3EA, PT-LB75_NT, PT-LB78, PT-LB90/NT/E, PT-LB80/NT, T-LW80/NT,
PT-ST10E, PT-LX22U/E/EA, PT-UX220, PT-LW25HE, PT-LX25HU/E/EA, PT-LX26HU/E/EA, PT-LX30HU/E/EA,
PT-UW250, PT-UX/X260, PT-UX/X300, PT-TW230U/E/EA, PT-XW23ST, PT-TW231RU/E/EA, PT-XW25SR, PTTW240E, PT-TW330E, PT-TW331RE, PT-TX300E, PT-TX301RE, PT-VW530, PT-VW535N, PT-VX60, PT-VX600, PTVX605N, PT-VZ570, PT-VZ575N
Group 4a: PT-F200E_NTE, PT-F_FW300_NT, (at 9600 with AMX mode)
Group 4b: PT-CW330E, PT-CX300, PT-CW240, PT-CW331RE, PT-CW241RE, PT-CX301RE PT-LX270, PT-LX300,
PT-LW321, PT-LW271, PT-LX351, PT-LX321, PT-LX271 (at 19200)
Group 6: PT-LX22, PT-LX26, (Note PT-LX22U/E/H and PT-LX26U/E/H use RG1, not RG)
Group 7: PT-EW530, PT-EW630, PT-EX500, PT-EX600, PT-EZ570. Setting FlagK = 1 swaps VD2 to S-Video
T460/461/T462 Manual 9th Sept 2015 Part B 3.84 release © Jed Micro Pty Ltd
33
Addressed group 8 without DigitalLink option. Setting flags J and K selects modes. PT-DW100E, PT-DZ680KLS,
PT-DW640KLS, PT-DX610KLS, PT-DZ770KLS, PT-DW740KLS, PT-DX810KLS, PT-DZ6710/E/L, PT-DZ6700/E/L,
PT-DW6300E/L/S/K, PT-D6000E, PT-D5000E, PT-DZ570E, PT-DW530E, PT-DX500E, PT-DX800/L/S/K,
PT-DW730/L/S/K, PT-DZ21K, PT-DS20K, PT-DW17K, PT-DZ8700U, PT-DS8500U, PT-DW8300U, PT-DZ110XE, PTDS100XE, PT-DW90XE, PT-FX400, PT-FW430, PT-DZ13KE, PT-DS12KE, PT-DW11KE, PT-DZ10KE, PT-DZ16K/D/E/U,
PT-EZ770Z, PT-EW730Z, PT-EX800Z, PT-VW340Z, PT-VX410Z, PT-VW345NZ, PT-VX415NZ, PT-VX42Z, PT-DZ870E,
PT-DW830E, PT-DX100E, PT-LZ370U
T460
Channel
TX code
FlagJ=0, K=0
Input name
TX code
FlagJ=1, K=0
Input name
1
IIS:VID
Comp Video
IIS:VID
Comp Video
2
IIS:SVD
S-Video
IIS:YUV
Component
3
IIS:RG1
VGA 1
IIS:RG1
VGA 1
4
IIS:RG2
VGA 2
IIS:RG2
VGA 2
5
IIS:HD1
HDMI 1
IIS:HD1
HDMI 1
6
IIS:DVI
DVI
IIS:HD2
HDMI 2
7
IIS:AUX
Auxiliary
IIS:SDI
Serial Digital Interface
8
IIS:NWP
Network
IIS:NWP
T460
Channel
TX code
FlagJ=0, K=1
Input name
TX code
FlagJ=1, K=1
Input name
1
IIS:VID
Comp Video
IIS:VID
Comp Video
2
IIS:SVD
S-Video
IIS:SVD
S-Video
3
IIS:RG1
VGA 1
IIS:RG1
VGA 1
4
IIS:RG2
VGA 2
IIS:RG2
VGA 2
5
IIS:HD1
HDMI 1
IIS:HD1
HDMI 1
6
IIS:DVI
DVI
IIS:DVI
DVI
7
IIS:SD1
Serial Digital Interface 1
IIS:SDI
Serial Digital Interface
8
IIS:SD2
Serial Digital Interface 2
IIS:DP1
DisplayPort
Network
Addressed group 8 with DigitalLink option. Setting flags J and K selects modes. PT-EX16K, PT-EX12KU/E, PTSLX12KC, PT-RZ470, PT-RZ370, PT-RW330. PT-EZ580, PT-EW640/L, PT-EX610, PT-EW540, PT-EX510, PT-RZ475
T460
Channel
TX code
FlagJ=0,K=0
Input name
TX code
FlagJ=1,K=0
1
IIS:VID
Comp Video
IIS:VID**
2
IIS:SVD
S-Video
3
IIS:RG1
4
Input name
TX code
FlagJ=0,K=1
Input
name
Comp Video**
IIS:DL1:VID
Comp Video
IIS:DL1
DigitalLink
IIS:DL1:SVD
S-Video
VGA 1
IIS:RG1
VGA 1
IIS:DL1:HD1
HDMI 1
IIS:RG2
VGA 2
IIS:RG2
VGA 2
IIS:DL1:HD2
HDMI 2
5
IIS:HD1
HDMI 1
IIS:HD1
HDMI 1
IIS:DL1:PC1
PC1
6
IIS:DVI
DVI
IIS:DVI
DVI
IIS:DL1:PC2
PC2
7
IIS:DP1
DigitalLink
IIS:PC1
PC1
8
IIS:NWP
Network
IIS:PC2
PC2
** setting FlagJ=1,K=1puts SDI here for PT-RZ670, PT-RW630
T460/461/T462 Manual 9th Sept 2015 Part B 3.84 release © Jed Micro Pty Ltd
34
Addressed Home theatre group: PT-AE4000, PT-AE7000, PT-AE8000EH, PT-AH1000, PT-AR100, PT-AT5000E,
PT-AT6000E
T460 Channel
TX code
Input name in manual
1
IIS:VID
Composite Video
2
IIS:SVD
S-Video
3
IIS:RG1
VGA
4
IIS:HD1
HDMI 1
5
IIS:HD2
HDMI 2
6
IIS:CP1
COMPONENT 1 YPBPR
7
IIS:CP2
COMPONENT 2 YPBPR
8
IIS:HD3
HDMI3
Don’t forget to set all unused T460 channels to “Skip” to jump over blank/unused inputs. Turn off auto-source.
Many don’t have audio: use a Freeze/mute or Mute On/Mute Off keyboard only with these, unless a T461 is used.
The PT-AE900/AE1000/AE2000/AE4000/AX100 (and maybe more models) support aspect ratio using the dummy channel
“4:3/16:9/Zm.” (“VS1”)
Several Panasonic projectors do not process Mute (Shutter) or Freeze commands.
RS232 connections to Panasonic projectors: Three systems in use:
D-SUB 9 Female on projector, male on cable. Comms at 9600 8N1. Select AMX “Discovery” mode to set projector to
9600 if it defaults to 19200.
Function/Direction
T460 “projector”
Connection
Panasonic Serial Port
Connector
Ground
Ground
9-pin D-sub pin 5
Data from T460 to projector
Tx
9-pin D-sub pin 3 (RXD)
Reply data from projector to T460
Rx
9-pin D-sub pin 2 (TXD)
Plus 9 volt CTS/DTR to projector
N/C
N/C
5
4
9
3
8
2
7
1
6
D-sub 9 male
solder side
D-SUB 9 Male on projector, female on cable. Comms at 9600 8N1
Function/Direction
T460 “projector”
Connection
Panasonic Serial Port
Connector
Ground
Ground
9-pin D-sub pin 5
Data from T460 to projector
Tx
9-pin D-sub pin 2 (RXD)
Reply data from projector to T460
Rx
9-pin D-sub pin 3 (TXD)
Plus 9 volt CTS/DTR to projector
N/C
N/C
1
2
6
3
4
8
7
5
9
D-sub 9 female
solder side
Mini-DIN-8 socket on projector. Comms at 9600 8N1
Function/Direction
T460 “projector”
Connection
Panasonic Serial Port
Connector
Ground
Ground
mini-DIN 8 pin 4
Data from T460 to projector
Tx
mini-DIN 8 pin 3 (RXD)
Reply data from projector to T460
Rx
mini-DIN 8 pin 5 (TXD)
Plus 9 volt CTS/DTR to projector
N/C
N/C
1
2
3
4
6
7
5
8
Mini-DIN 8
solder side
After installation wiring of any projector to a T460, use a multimeter to check voltages of –9 on BOTH TX and RX pins in any
installation, as described in the troubleshooting part of this manual.
T460/461/T462 Manual 9th Sept 2015 Part B 3.84 release © Jed Micro Pty Ltd
35
Panasonic LCD
TH-42LF6U, TH-47LF6U, TH-55LF6U, TH-42LF30U, TH-47LF30U, TH-70LF50W,
TH-80LF50W, TH-42LF60U, TH-47LF60U, TH-55LF60U, TH-42LFP30, TH-47LFP30,
TH-42LF5U, TH-47LF5U, TH-42LFE6E, TH-50LFE6E, TH-47LFT30, TH-47LFX6J
There are many displays covered by these drivers, but to determine the appropriate sources, please examine the
pages in the user manual of your display to see which is needed. Do a search (Ctrl “F”) for “9600” (the coms baud
rate) to get to the page “Serial Terminals connection”. This or the next page shows the inputs for this model.
Compare these to the table below to see commands needed.
This group of LCD panels are similar to the Plasma displays covered next, but have different channels and different volume
range of 0->100 and a 3-digit rather than a 2-digit volume command.
The following tables show the mapping of T460 channel number, the string sent, and the input associated with that channel in
the manual, and how it is identified on the on-screen menu:
T460 Channel
TX code
Input name in manual
Function as identified on screen
1
IMS:PC1
PC VGA input (D sub 15)
PC
2
IMS:DV1
DVI -D
DVI-D
3
IMS:AV1
AV1
Video
4
IMS:HM1
HDMI 1
HDMI 1
5
IMS:HM2
HDMI 2
HDMI 2
6
IMS:AV2
AV2
Video / Component on BNC
7
IMS:SL1
Slot 1
Plugin (some only)
8
IMS:S1A
Slot 1A
Plugin (B is not supported) (some only)
Don’t forget to set all unused T460 channels to “Skip” to jump over blank/unused inputs.
Connections: Please consult the connection diagram in the user manual for the RS-232 connection. It is usually a D9-male on
the cable.
Panasonic plasma
A large number of units are drivable with a T460, and the range of units (assuming they have a serial D9 connector) can all be
driven. There are four groups of codes, but to make it simpler, the T460 projector/plasma/LCD selection menu divides the 62
device into eleven “groups”. They range from “TH-nnPxGrp3” to “TH-nnPxGrp12” and “TH-nnPxGrp20”. The secret to these
group names are that the “nn” field represents the screen size, which ranges from 37 to 103 (screen size), the Px field is one or
more letters starting with a “P”. The code “Grp3” to “Grp20” is the Panasonic “generation” or “group” number. This is often
followed by none, one or two letter-codes, often county-specific. It is the number in the “Grp” section of the code which
determines the codes needed.
The following tables show the mapping of T460 channel number, the string sent, and the input associated with that channel in
the manual, and how it is identified on the on-screen menu:
TH-nnPxGrp3, (eg TH-42PW3), TH-nnPxGrp4 (eg TH-37PWD4), TH-nnPxGrp5 (eg TH-37/42PW5), TH-61PHW6
T460 Channel
TX code
Input name in manual
Function as identified on screen
1
IMS:RG1
PC VGA input (D sub 15)
PC
2
IMS:YP1
Component/RGB in
Component / RGB
3
IMS:VID
AV in (Video/S-Video)
Video
T460/461/T462 Manual 9th Sept 2015 Part B 3.84 release © Jed Micro Pty Ltd
36
TH-nnPxIIS: (This covers Plasma screens with “IIS” leading to source ID, eg TH-42PWD3, TH-42PW4, TH42PWD4,
TH-42/50PHD5, TH-37/42PW5, TH42PWD5) Note: We have also seen the TH-61PHW6 in this group!!
T460 Channel
TX code
Input name in manual
Function as identified on screen
1
IIS:RG1
PC VGA input (D sub 15)
PC
2
IIS:YP1
Component/RGB in
Component / RGB
3
IIS:VID
AV in
Video
4
IIS:SVD
S-Video
S-Video
5
IIS:YP
AV in (Video/S-Video)
Component (alternative)
Don’t forget to set all unused T460 channels to “Skip” to jump over blank/unused inputs.
TH-nnPxGrp6, (eg TH-37/42PWD6UX, TH-42/50PHD6),
TH-nnPxGrp7, (eg TH-37/42PWD7UX, TH-50PHD7UX),
TH-nnPxGrp8, (eg TH-37/42PWD8GK/S, TH-37/42PHD8GK/S),
TH-nnPxGrp9, (eg TH-37/42/50PH9UK, PH9(HD) series, PR9(HD) series, PS9(SD) PG9(SD) series),
TH-nnPxGrp10, (eg TH-37/42PR10U/ UK),
TH-nnPxGrp11, (eg TH-42PFH11, TH-42PH11UK, THnn-PF11(FHD), PH11(HD),PR11(HD), LR11(HD) series),
TH-nnPxGrp12, (eg TH-42PD12, TH-50/58/65/85/103PF12, TH-42/50PH12, TH-PF12(FHD) series, TH-PH12(HD)
series, TH-PD12(HD) series),
TH-nnVX100, (eg TH-50/65VX100)
T460 Channel
TX code
Input name in manual
Function as identified on screen
1
IMS:PC1
PC VGA input (D sub 15)
PC input
2
IMS:SL1
Slot input
Slot input
3
IMS:SL2
Slot 2 input (video)
Input 2
4
IMS:SL3
Slot 3 input (video)
Input 3
5
IMS:SL1A
Slot 1 input A
6
IMS:SL1B
Slot 1 input B
These slot fields are only used if dual-input
modules are inserted into these slots.
7
IMS:SL2A
Slot 2 input A
8
IMS:SL2B
Slot 2 input B
They are only used with Plasma panels in
group: TH-nnPxGrp10/11/12
Don’t forget to set all unused T460 channels to “Skip” to jump over blank/unused inputs.
TH-nnPxGrp20: (eg TH-42/50PF20U, TH-42/50PH20W)
T460 Channel
TX code
Input name in manual
Function as identified on screen
1
IMS:PC1
PC VGA input (D sub 15)
PC
2
IMS:YP1
Component/RGB input
BNC
Component/RGB (depends on setting of
“Component/RGB-IB Select” in panel.)
3
IMS:VD1
Composite Video BNC
Video
4
IMS:SL1
Slot input
Slot input
5
IMS:S1A
Slot input A
6
IMS:S1B
Slot input B
These slot fields are only used if a dualinput module is inserted into the slot.
7
IMS:HM1
HDMI
HDMI
8
IMS:DV1
DVI-D
DVI
Don’t forget to set all unused T460 channels to “Skip” to jump over blank/unused inputs.
RS232 connections to Panasonic Plasma with D9:
We have seen male and female on cable, and pins 2 and 3 both being used for the signal into the panel from the controller.
(There is always a connection diagram in the User’s Manual, so please consult that document.)
T460/461/T462 Manual 9th Sept 2015 Part B 3.84 release © Jed Micro Pty Ltd
37
Philips BDL series LCD
Some models we know of matching this driver are: BDL4230E/BDL4230ET/BDL4651VH/BDL4675XU
/BDL4681XU/BDL4785SL, BDL5530EL/BDL5585XL/BDL6450AT/BDL6531E/BDL6551V
The following tables show the mapping of T460 channel number, the string sent, and the input associated with that channel in
the manual, and how it is identified on the on-screen menu. It assumes the optional Video card is installed:
Philips have some 5 versions of protocol currently implemented in these LCD panels. They load software from a
memory stick as updates and this can change protocols used. The protocol version does NOT follow the software
version loaded. (The 10-pin RJ50 connector is not currently supported.
Protocol 1.6 (Non-addressed mode), 8-byte source messages.
T460 Channel
TX message
Function
1
008H,001H,0ACH,005H,000H,001H,000H,0A1H
VGA D-sub15
2
008H,001H,0ACH,009H,001H,001H,000H,0ACH
DVI-D
3
008H,001H,0ACH,001H,000H,001H,000H,0A5H
Video Composite via RCA
4
008H,001H,0ACH,009H,000H,001H,000H,0ADH
HDMI
5
008H,001H,0ACH,007H,001H,001H,000H,0A2H
Display Port
6
008H,001H,0ACH,008H,000H,001H,000H,0ACH
Card OPS
7
008H,001H,0ACH,003H,000H,001H,000H,0A7H
Component
8
008H,001H,0ACH,001H,001H,001H,000H,0A4H
S-Video
Don’t forget to set all unused T460 channels to “Skip” to jump over blank/unused inputs.
Protocol 1.86 (Addressed mode), 9-byte source messages.
T460 Channel
TX message
Function
1
009H,001H,001H,0ACH,005H,000H,001H,000H,0A1H
VGA D-sub15
2
009H,001H,001H,0ACH,009H,001H,001H,000H,0ACH
DVI-D
3
009H,001H,001H,0ACH,001H,000H,001H,000H,0A5H
Video Composite via RCA
4
009H,001H,001H,0ACH,009H,000H,001H,000H,0ADH
HDMI 1
5
009H,001H,001H,0ACH,005H,001H,001H,000H,0A0H
HDMI 2
6
009H,001H,001H,0ACH,007H,001H,001H,000H,0A2H
DisplayPort 1
7
009H,001H,001H,0ACH,006H,001H,001H,000H,0A3H
DisplayPort 2
8
009H,001H,001H,0ACH,003H,000H,001H,000H,0A7H
Component
Don’t forget to set all unused T460 channels to “Skip” to jump over blank/unused inputs.
Protocol 1.88 (Addressed mode), 9-byte source messages.
T460 Channel
TX message
Function
1
009H,001H,001H,0ACH,005H,000H,001H,000H,0A1H
VGA D-sub15
2
009H,001H,001H,0ACH,00EH,000H,001H,000H,0AAH
DVI-D
3
009H,001H,001H,0ACH,001H,000H,001H,000H,0A5H
Video Composite via RCA
4
009H,001H,001H,0ACH,00DH,000H,001H,000H,0A9H
HDMI 1
5
009H,001H,001H,0ACH,006H,000H,001H,000H,0A2H
HDMI 2
6
009H,001H,001H,0ACH,00AH,000H,001H,000H,0AEH
DisplayPort 1
7
009H,001H,001H,0ACH,007H,000H,001H,000H,0A3H
DisplayPort 2
8
009H,001H,001H,0ACH,003H,000H,001H,000H,0A7H
Component
Don’t forget to set all unused T460 channels to “Skip” to jump over blank/unused inputs.
T460/461/T462 Manual 9th Sept 2015 Part B 3.84 release © Jed Micro Pty Ltd
38
Note: Aspect ratio control, Mute, Blank and Freeze are NOT supported.
Absolute audio volume control is provided and the panel drives external speakers directly. Reply mode is supported.
Protocol 1.6 is a “non-addressed” protocol strings. If you don’t know what protocol a particular panel uses, try 1.60 first. If it is
a “non-addressed” protocol it will show Comms OK when connected and selected for this. If it shows no coms, try the other
two --- it may be an “addressed” protocol that is being used (codes 1.86 and1.86). If it is correctly a “non-addressed” protocol,
and several source commands do not work, try the other “non-addressed” one. Similarly, if you have identified the panel as
“addressed” (longer messages), and e.g. the HDMI2 command selects VGA, then try the other “addressed” one.
RS232 connections to Philips LCD/LED with D9 OR JACK
Some use a 9-pin-D9 male on the LCD, female on cable. Others use a 4-sleeve miniature audio-type jack (supplied by
Philips, cabled to a DB9). Comms is at 9600 baud, 8 bits, no parity, 1 stop.
Function/Direction
T460 “projector”
Connection
“Serial” Port Connector
1
Ground
Ground
9-pin D-sub pin 5
Data from T460 to panel
Tx
9-pin D-sub pin 3
Reply data from panel to T460
Rx
9-pin D-sub pin 2
2
6
3
7
4
8
5
9
D-sub 9 female
solder side
Pioneer plasma
Some models we know of matching this driver are: PDP-42/50MXE10, PDP-42/50MXE11, PDP-42/50/60MXE20,
PDP-43/50MXE1, PDP-425/525CMX, PDP-434/505CMX.
A large number of models are drivable with a T460, assuming they have a serial D9 connector. There are four entries provided
in the T460 projector model/maker data base. All models use the same codes and run at the same speed (9600 baud).
Differences are the use of a <STX>GST<ETX> command or a <STX>QST<ETX format for fetching the panel status (used for
Plasma running sensing (in reply mode) and the hours meter). The second difference between models is the offset where
“hours” data is located in the 56 byte (or 54 byte) reply message.
Pioneer
PDP-PLAS.Gr1
-GST status fetch: 48 offset (Reply mode available) (This is most usual form)
Pioneer
PDP-PLAS.Gr2
-QST status fetch: 48 offset (Reply mode available)
Pioneer
PDP-PLAS.Gr3
-GST status fetch: 46 offset (Reply mode NOT available)
Pioneer
PDP-PLAS.Gr4
-QST status fetch: 46 offset (Reply mode NOT available)
On startup, the T460 resets all existing ID fields and sets up an ID field of “01” for the connected plasma. This ID is then used
at the start of each command.
The following tables show the mapping of T460 channel number, the string sent, and the input associated with that channel in
the manual, and how it is identified on the on-screen menu. It assumes the optional Video card is installed:
T460 Channel
TX code
Input name in manual
and on screen
Function
1
02h,'01IN1',03h
Input 1
VGA D-sub15
2
02h,'01IN2',03h
Input 2
DVI-D
3
02h,'01IN4',03h
Input 4
Video Composite via RCA
4
02h,'01IN3',03h
Input 3
S-Video via DIN4
5
02h,'01IN5',03h
Input 5
Component via RCA
Don’t forget to set all unused T460 channels to “Skip” to jump over blank/unused inputs.
Note: Aspect ratio control is included (not on all). Use source names: “Set reg 4:3” and “Set reg 16:9”.
Note: MuteOn/Mute Off and Freeze On/Off and Mute On/Off keyboards are supported, and work normally. Absolute audio
volume control is provided and the panel drives external speakers directly.
T460/461/T462 Manual 9th Sept 2015 Part B 3.84 release © Jed Micro Pty Ltd
39
RS232 connections to Pioneer Plasma with D9
These use a 9-pin-D9 male on the plasma, female on cable. Comms is at 9600 baud, 8 bits, no parity, 1 stop.
Function/Direction
T460 “projector”
Connection
“Serial” Port Connector
Ground
Ground
9-pin D-sub pin 5
Data from T460 to panel
Tx
9-pin D-sub pin 3
Reply data from panel to T460
Rx
9-pin D-sub pin 2
Plus 9 volt CTS/DTR to panel
N/c
N/c
1
2
6
3
7
4
8
5
9
D-sub 9 female
solder side
After installation wiring of any projector to a T460, use a multimeter to check voltages of –9 on BOTH TX and RX pins in any
installation, as described in the troubleshooting part of this manual.
Planar PR5020 projector: see Optoma EP771/772
Plus projectors:
U2-817/1200 (for Taxan/Kaga see Taxan)
The following table shows the mapping of T460 channel number, the string sent, and the input associated with that channel in
the manual, and how it is identified on the on-screen menu:
T460 Channel
TX codes bytes 6,7,8
Input name in manual
Function as identified on screen
1
0Dh, 0C4h, 0D4h
RGB
RGB
2
094h, 0C4h, 0DDh
DVI
DVI
3
0DCh, 0C5h, 0D5h
Video
Video
4
0A7h, 0C4h, 0DEh
S-Video
S-Video
Don’t forget to set all unused T460 channels to “Skip” to jump over blank/unused inputs.
You will need to disable the “Auto Source” function in the projector so it accepts remote RS232 commands. Not doing
so will allow the projector to seek a signal (on, say a Video source) when the PC source drops out), and it ignores serial
commands. This is the first item in the “Setup” (third) menu.
Plus projector U4-136 (and probably all others in U4 family)
The following table shows the mapping of T460 channel number, the string sent, and the input associated with that channel in
the manual, and how it is identified on the on-screen menu:
T460 Channel
TX codes bytes 6,7,8
Input name in manual
Function as identified on screen
1
0A1h, 0C3h, 0F8h
PC Card
PC Card
2
094h, 0C4h, 0DDh
PC
PC
3
0DCh, 0C5h, 0D5h
Video
Video
4
0A7h, 0C4h, 0DEh
S-Video
S-Video
Don’t forget to set all unused T460 channels to “Skip” to jump over blank/unused inputs.
Disable the “Auto Source” function in the projector so it accepts remote RS232 commands.
Plus projector U5-132, U5-232, U5-332, U5-432, U7-132, U7-137
This family of projectors can be operated at 115,200 baud or 19,200 baud. As shipped from Plus, communications is at
115,200 baud, and must be set using a PC to 19,200 for use with a T460. (The T460 does NOT have a 115,200 baud option.)
It can be switched to operate at 19,200 by the following sequence:
Connect to a PC via a straight-though serial cable and run HyperTerminal, setting it up to run at 115,200 baud, 8 bit data, 1
start, 1 stop, no parity, no hardware handshake (8N1). (Unless you have enabled “local echo”, you will not see the characters
as you type them. You can enable echo by going to File->Properties->Settings->ASCII Setup and ticking Echo typed
characters locally.) HyperTerminal is found under Accessories or Programs in the Windows system or can be downloaded
from: http://www.hilgraeve.com/htpe/
T460/461/T462 Manual 9th Sept 2015 Part B 3.84 release © Jed Micro Pty Ltd
40
Verify communications by typing #QS(CR)(LF) (The “QS” must be upper case. The CR and LF must follow. Send a CR with
the ENTER key, and send the LF by holding down CTRL and pressing ENTER.) The projector should reply with its status,
eg #QS2 if OFF, and #QS6 if warmed up and running.
If, OFF, the projector can be turned ON with the #P1(CR)(LF) command. (The character after the P is a numeric 1.)
Now set it to 19,200 baud by sending a command #CL(CR)(LF) from a PC running HyperTerminal at 115,200 baud. (It will
switch immediately, so the reply will be gibberish.)
Now terminate the HyperTerminal session at 115,200 baud and restart it at 19200 baud, (8N1, no handshake, local echo
enabled). Type #QS(CR)(LF) and verify status reply at 19,200 baud. A #P0(CR)(LF) command powers down the U5. (The
character after the P is a numeric 0.) (The U5 can be reset to 115,200 baud with a #CH(CR)(LF) command.)
The baud rate is held in projector non-volatile memory, so the baud rate setting to 19,200 need be done only once. (These
commands are in Release N of the manual).
The following table shows the mapping of T460 channel number, the string sent, and the input associated with that channel in
the manual, and how it is identified on the on-screen menu:
T460 Channel
TX string
Input name in manual
Function as identified on screen
1
#SR 0Dh, 0Ah
RGB or DVI
RGB (U5) DVI (U7)
2
#SA 0Dh, 0Ah
RGB 2 (also via DVI)
RGB (U7 only)
3
#SV 0Dh, 0Ah
Comp Video
Video
4
#SS 0Dh, 0Ah
S-VIDEO
S-Video
5
#SN 0Dh, 0Ah
NETWORK
NETWORK (we think!?)
Don’t forget to set all unused T460 channels to “Skip” to jump over blank/unused inputs.
U5: You MUST enable the “Auto Source” function in the projector (“Setup” menu) so it does not hang up waiting for
signals on channels without incoming data when switched by a remote RS232 commands. Also set the “Input Format” to
auto for all channels (“Setup” menu). Please inform customers/users that if they select a channel that does NOT have a valid
signal, the projector will switch to the next available channel. To set to the desired channel, allow a channel to have data before
switching to it. (The need to leave “Auto” enabled is a peculiarity of the U5, and is a better choice than allowing the projector
to “hang up” on a channel without a signal.) (This may have been fixed in firmware upgrades to the U5.)
U7: Turn OFF the “Auto Source” function in the projector. Function does operate correctly in U7.
Also, turn off “Auto power Off”. Instead use the Run Timer in the T460.
The Plus U5 T460 interface supports Mute On/Mute Off keyboards and Freeze On/Off and Mute On/Off keyboards. The Plus
U5/U7 do NOT have an audio output, so while the U5 does have remote control of the projector audio control from the T460,
the 5cm loudspeaker is hardly sufficient to be heard in a classroom. We suggest the use of the T461 to control the audio output.
We also suggest you select “Reply mode” when selection of U5 projectors in made, as the Mute and Freeze commands
are toggle commands, and the T460 needs to poll the U5 for the current status.
There is provision for support of the Aspect Ratio control commands. A dummy channel “4:3/16:9/Zm.” allows moving
between 4:3 and 16:9 and Zoom screen images. Set up this on, say, channel 6, and move to it with the ON key to change states.
RS232 connections to (all) Plus projectors
U2 and U4 use a short cable with a 9-pin-D9 female one end and a 4-pin USB-style on the other. This cable is supplied by
PLUS, and the hole to plug it in is very small, on the rear terminal panel covered with a stick-on silver plastic film.
U5 has a standard D9 male connector on the rear. U7 has 9-pin mini-DIN. Connections are the same for all four ranges.
Function/Direction
T460 proj.
Connection
Plus “Control”
Port 9-pin D-sub
Plus “Control”
Port mini-DIN 9 pin
3
Ground
Ground
9-pin D-sub pin 5
9pin mini-DIN Pin 4
Data from T460 to projector
Tx
9-pin D-sub pin 3
(RXD)
9-pin mini-DIN,
Pin 1 (RXD)
Reply data from projector to T460
Rx
9-pin D-sub pin 2
(TXD)
9-pin mini-DIN,
Pin 7 TXD)
Plus 9 volt CTS/DTR to projector
N/C
N/C
N/C
1
2
4
5
6
7
6
8
Mini-DIN 9
solder side
After installation wiring of any projector to a T460, use a multimeter to check voltages of –9 on BOTH TX and RX pins in any
installation, as described in the troubleshooting part of this manual.
T460/461/T462 Manual 9th Sept 2015 Part B 3.84 release © Jed Micro Pty Ltd
41
Projection Design … ASCII and Binary code sets
Projection Design … ASCII code set SIS (Simple Instruction Set): F12, FR12, F22, F32, FL32, F80,
F82 (Shows on LCD screen as “Proj. Design” “F12-F82”.)
The following table shows the mapping of T460 channel number, the string sent, and the input associated with that channel in
the manual, and how it is identified on the on-screen menu:
T460 Channel
TX string
Input name in manual
Function as identified on screen
1
:IVGA'<CR>
VGA
VGA
2
:IDVI<CR>
DVI-I
DVI-A, DVI-D
3
: ICVI <CR>
C-Video
Composite Video
4
: ISVI <CR>
S-VIDEO
S-Video
5
: IYPP <CR>
YPbPr
Component Video
6
: IRGS <CR>
RGB Video, (3 lines on
Component inputs and
separate Sync on
Composite Video input)
(Some only)
7
: IHDM <CR>
HDMI
(Some only)
8
: IBNC <CR>
BNC
(Some only)
Don’t forget to set all unused T460 channels to “Skip” to jump over blank/unused inputs.
No audio control is provided with this command set, but these projectors don’t have audio inputs, anyhow. If a Volume
keyboard is used, a T461 is needed.
Disable “Source Scan” in the Settings menu.
Aspect ratio control is included. Use source names: “Set reg 4:3” and “Set reg 16:9”.
MuteOn/Mute Off and Freeze On/Off and Mute On/Off keyboards are supported, and work normally.
Note: Some projectors appear to support both the SIS (ASCII) and the following 32-byte binary protocol.
We suggest you try the ASCII protocol first, as it supports lamp hour display and Reply mode with
projector state sensing.
Projection Design … Binary: Action! (etc), eCinema (etc), evo (etc), F1 (etc), F2 (etc) and F3 )
The following table shows the mapping of T460 channel number, the string sent, and the input associated with that channel in
the manual, and how it is identified on the on-screen menu:
th
T460 Channel
17 byte of 32-byte message
Connector / function
Channel 1
00h
VGA 1
Channel 2
01h
VGA 2
Channel 3
02h
DVI
Channel 4
03h
Video Component
Channel 5
04h
S-Video
Channel 6
05h
Video Composite
Channel 7
06h
Video Component HD
Don’t forget to set all unused T460 channels to “Skip” to jump over blank/unused inputs in the above table.
T460/461/T462 Manual 9th Sept 2015 Part B 3.84 release © Jed Micro Pty Ltd
42
RS232 connections to all ProjectionDesign, Christie DS30, DS+25, Matrix 1500
To connect the T460 to these projectors use a DB9 male on the cable: Communication is at 19200 8N1
Function/Direction
T460 “projector”
Connection
Projector Connector
(Male on cable)
Ground
Ground
9-pin D-sub pin 5
Data from T460 to projector
Tx
9-pin D-sub pin 3 (RXD)
Reply data from projector to T460
Rx
9-pin D-sub pin 2 (TXD)
Plus 9 volt CTS/DTR to projector
N/C
N/C
5
4
9
3
8
2
7
1
6
D-sub 9 male
solder side
After installation wiring of any projector to a T460, use a multimeter to check voltages of –9 on BOTH TX and RX pins in any
installation, as described in the troubleshooting part of this manual.
Promethean: (Electronic WhiteBoard manufacturer also selling projectors)
PRM-10, PRM-20 are Sanyo-manufactured units which are covered by Sanyo/Eiki Group 12. See these for details.
PRM-25, 35, EST-P1: These are similar to: Optoma: Group 4: EP771/772/774, Planar: PR5020, BenQ: SP820. See these
for details.
PRM-30 is a Sanyo-manufactured unit which are covered by Sanyo/Eiki Group 16. See these for details.
Proxima projector:
DP6150/55, ASK C20/C60/C85/C90/C95/C100/C105, InFocus LP280/290 projectors
This range of Proxima projectors has been removed from the manual to save paper, although they are in the T460 controller
data base. If the setup notes are needed, please download code release 2.88, Part B, from JED’s site.
Samsung LCD panel:
Samsung Generic1: SyncMaster (320/400/460 M/P/Pn*) and newer series: DB, DE, DH, DM, EDxxC,
EDxxD, H, LE, ME, PE, UD and UE.
The following table shows the mapping of T460 channel number, the string sent, and the input associated with that channel in
the manual, and how it is identified on the on-screen menu. Aspect ratio control is provided via dummy channel names called:
"Set reg 4:3” and "Set reg 16:9". Audio Mute is provided. (no Picture Mute). Freeze is NOT supported.
In rev 3.74, ALL strings sent have been changed to have 0FEh as the third byte (rather than 0FFh in previous versions), so that
strings can address all units simultaneously via the “daisy-chain” connection of RS232 inputs and outputs.
th
th
T460 Channel
TX code 5 byte
FlagJ=0
TX code 5 byte
FlagJ=1
Input name in manual (and on screen)
1
014H
014H
PC
2
022H
01EH
HDMI 1 (BNC if FlagJ=1)
3
031H
018H
HDMI 3 (DVI if FlagJ=1)
4
00CH
00CH
AV (Composite Video)
5
008H/025H
008H/025H
6
021H
021H
HDMI 1
7
023H
023H
HDMI 2 (some only)
8
020H/050h
020H/050h
Component (FlagK=0), DisplayPort (FlagK=1)
Magic-Net (FlagV=0), Plug In Module (FlagV=1)
Note: An addressing scheme is used to send data to a selected LCD panel. A default address of 0xFF is assumed here.
T460/461/T462 Manual 9th Sept 2015 Part B 3.84 release © Jed Micro Pty Ltd
43
RS232 connections to Samsung SyncMaster LCD panel 400/460 with D9
Comms is at 9600 baud, 8 bits, no parity, 1 stop. These use a 9-pin-D9 male on the LCD, female on cable
Function/Direction
T460 “projector”
Connection
“Serial” Port Connector
Ground
Ground
9-pin D-sub pin 5
Data from T460 to projector
Tx
9-pin D-sub pin 2
Reply data from projector to T460
Rx
9-pin D-sub pin 3
Plus 9 volt CTS/DTR to projector
n/c
n/c
1
2
6
3
4
8
7
5
9
D-sub 9 female
solder side
After installation wiring of any projector to a T460, use a multimeter to check voltages of –9 on BOTH TX and RX pins in any
installation, as described in the troubleshooting part of this manual.
Sanyo LCD:
42/47XR7 (XR2 deleted)
T460 Channel
Command
Input
Function (group 1)
1
<02>INP:6<03>
DB15
VGA
2
<02>INP:2<03>
DB15
YPbPr (Component)
3
<02>INP:1<03>
RCA & DIN 4
AV, Video (Composite) & S-Video (S-Video has priority)
4
<02>INP:3<03>
SCART 1
SCART 1 (Composite Video via RCA on adaptor)
5
<02>INP:4<03>
SCART 2
SCART 2 (Composite Video via RCA on adaptor)
6
<02>INP:5<03>
SCART 2
SCART 2 (S-Video via DIN 4 on adaptor)
7
<02>INP:7<03>
HDMI 1
HDMI 1
8
<02>INP:8<03>
HDMI 2
HDMI 2
Don’t forget to set all unused T460 channels to “Skip” to jump over blank/unused inputs.
Notes: There is no “video mute” or “Blank” on this panel, but there is an Audio mute. Two-yellow-button mute mode ONLY
mutes Audio. Don’t use a Mute On/Mute Off keyboard, but if Freeze is needed, use the Freeze/Mute keyboard, but ONLY the
Freeze On/Off function works.
There is provision for support of the Aspect Ratio control commands. A dummy channel “4:3/16:9/Zm.” allows moving
between 4:3 and 16:9 and Zoom screen images.
RS232 connections to Sanyo LCD42/47XR7 panel
These use a 9-pin-D9 female on the LCD, male on cable. Comms is at 9600 baud, 8 bits, no parity, 1 stop. Reply mode OK.
Function/Direction
T460 “projector”
Connection
“Serial” Port Connector
Ground
Ground
9-pin D-sub pin 5
Data from T460 to projector
Tx
9-pin D-sub pin 3 (RXD)
Reply data from projector to T460
Rx
9-pin D-sub pin 2 (TXD)
Plus 9 volt CTS/DTR to projector
N/c
5
T460/461/T462 Manual 9th Sept 2015 Part B 3.84 release © Jed Micro Pty Ltd
4
9
3
8
2
7
1
6
D-sub 9 male
solder side
44
Sanyo projector: (Inc. some Eiki, Christie, Philips, Promethean)
Philips projectors: (PXG30, LC1341, LC1345) / 7320/ 7325/ 7350/ 7355,
(For Eiki EIP-200/1000/1600/2500/3000/3500/4500/S200/X200/X350 see Sharp.)
The Sanyo range has a very confusing input channel allocation, and these differ from projector to projector, in ways that defy
imagination! A number of “inputs” are grouped as an “Input”, so for a computer input you might have a HD DB15 (VGA
analog), a DVI and a DVI (High-bandwidth Digital Content Protection (HDCP), all called “Input 1”. On some Sanyo models
these are mutually exclusive, and you can only have one of these, and they are selected by a command string, but ONLY ONE
CAN BE FED TO THE PROJECTOR AT ONCE. On other Sanyo/Eiki projectors, there are up to 8 input commands, and
selection between these multiple sources fed to one input can be made with command strings. YOU MUST SELECT THE
APPROPRIATE T460 CHANNEL; OTHERWISE THE DEVICE WILL NEVER BE SELECTED.
In a similar way, some Sanyo devices have “Composite Video”, “Component video” and “S-Video” inputs all called as one
input, eg. “Input 3” or “Video”. If the projector has extended codes to differentiate between them, they can be remotely
selected by a T460 (Groups 2 … 15). If they don’t, only manually preselected inputs for Inputs 1, 2 and 3 can be selected.
For a limited number or projectors there are other codes and they are covered in separate tables below. So if the projector you
are driving is NOT in groups 2 to 15, use group 1 which follows, and be prepared to try all 8 channels/codes to select the
particular ones needed. (Set all unused ones to “skip”). What each code selects in a particular projector varies, and needs to be
determined experimentally, or by comparing codes shown in the second column of the “Group 1” table with ones in your
projector manual. (Just trying is probably easier!)
Most in these groups have a HEX mode for lamp time display. Group 6 and 10 is decimal. If any others are decimal, set
FLAG4. Check T460 hours display (at startup) matches projector hour. Check display count has no gaps.
If two or more lamps are used, the T460 will read out all provided, and show these in a sequence of 2 second displays, as many
as necessary, labelled by lamp number 1 .. 4.
Note: If using channels scattered over the range 1 to 8 and a T461 is used, the T461 links menu allows, for instance,
channels 1, 5 and 8 to be allocated to T461 channels 1, 2, and 3.
Note: Users can set FlagG (see flag setup menu) to enable sending "C89<0Dh>" (Auto Image) after each source
transmission to these model projectors. (was Flag1)
**************************************************************************************************
Note: With some Sanyo/Eiki projectors, you must turn the “Input Search” to “OFF”.
Note: With some Sanyo/Eiki projectors, you need to disable the timed power-down function.
Note: Some Sanyo projectors recently have an “Eco” mode … this is a low power standby mode, and must be disabled
for RS232 coms to work to start the projector.
Set the projector to “Network” under the “Setting->Power management->Standby”
**************************************************************************************************
Sanyo/Eiki Group 1, default if not in groups below.
T460 Channel
String sent
Input
Function (group 1)
1
C05
1
INPUT1 ANALOG MODE SET (HD DB15 VGA)
2
C06
2
INPUT2 RGB MODE SET
3
C07
2
INPUT2 VIDEO MODE SET (COMPOSITE)
4
C08
3
INPUT3 VIDEO MODE SET (COMPOSITE)
5
C22
1
INPUT1 DIGITAL MODE SET (DVI)
6
C24
3
INPUT3 S-VIDEO MODE SET
7
C25
2
INPUT2 Y, Pb/Cb, Pr/Cr SET (COMPONENT)
8
C26
3
INPUT3 Y, Pb/Cb, Pr/Cr SET (COMPONENT)
Don’t forget to set all unused T460 channels to “Skip” to jump over blank/unused inputs.
T460/461/T462 Manual 9th Sept 2015 Part B 3.84 release © Jed Micro Pty Ltd
45
Sanyo/Eiki Group 2 Sanyo PLC-XP41/XP46, PLV-70, Christie LW25/LX33/LX41,
Eiki LC-X986/X1100
T460 Channel
String sent
Input
Function (group 2)
1
CF INPUT1 ANALOG
1
INPUT1 ANALOG MODE SET (HD DB15 VGA)
2
CF INPUT2 ANALOG
2
INPUT2 RGB MODE SET
3
CF INPUT2 VIDEO
2
INPUT2 VIDEO MODE SET (COMPOSITE)
4
CF INPUT3 VIDEO
3
INPUT3 VIDEO MODE SET (COMPOSITE)
5
CF INPUT1 DIGITAL
1
INPUT1 DIGITAL MODE SET (DVI)
6
CF INPUT3 S-VIDEO
3
INPUT3 S-VIDEO MODE SET
7
CF INPUT2 YPBPR
2
INPUT2 Y, Pb/Cb, Pr/Cr SET (COMPONENT)
8
CF INPUT3 YPBPR
3
INPUT3 Y, Pb/Cb, Pr/Cr SET (COMPONENT)
Don’t forget to set all unused T460 channels to “Skip” to jump over blank/unused inputs.
Sanyo/Eiki Group 3 Sanyo PLC-XT10/XT11/XT15/XT16, Christie LX32,
Eiki LC-XG100/XG110/XG200/XG210
T460 Channel
Strings sent (One or both)
Input
Function (Group 3)
Application
1
CF INPUT1
1
Input 1 Analog VGA
DB15 VGA Computer analog 1
or SCART (Some Christie)
2
CF INPUT2
CF SOURCE ANALOG
2
Input 2 Analog VGA
DB15 VGA Computer analog 2
3
CF INPUT2
CF SOURCE DIGITAL
2
Input 2 Digital
DVI
4
CF INPUT3
CF SOURCE VIDEO
3
Input 3 Composite
Video
RCA Video
5
CF INPUT3
CF SOURCE YPBPR
3
Input 3 Component
Video
Component Video
6
CF INPUT3
CF SOURCE S-VIDEO
3
Input 3 S-Video
S-Video
Sanyo/Eiki Group 4 Sanyo PLV-60 HT, Christie LX26/LX35.
Separate commands are provided FOR ALL CHANNELS
T460 Channel
String sent
Input
Function (group 4)
1
C05
1
INPUT1 (Computer RGB analog on DB15 or DVI as preset)
2
C06
2
INPUT2 RGB (BNC)
3
C07
2
INPUT2 VIDEO MODE SET (COMPOSITE) BNC
4
C08
3
INPUT3 VIDEO MODE SET (COMPOSITE) RCA
5
C23
2
INPUT2 S-VIDEO (Not Christie)
6
C24
2
INPUT2 Y/C (S-Video Input 3 on Christie)
7
C25
2
INPUT2 Y, Pb/Cb, Pr/Cr SET (COMPONENT) BNC
8
C26
3
INPUT3 Y, Pb/Cb, Pr/Cr SET (COMPONENT) RCA
T460/461/T462 Manual 9th Sept 2015 Part B 3.84 release © Jed Micro Pty Ltd
46
Sanyo/Eiki Group 5, Sanyo PLC-SC10/XC10, PLC-SU60/XU60, PLV-75, PLV-80
Separate commands are provided FOR ALL CHANNELS. The table below shows how these are allocated. SEE
IMPORTANT WIRING NOTE RE CTS/RTS ON THESE IN FOLLOWING RS232 CONNECTION NOTES.
T460 Channel
String sent
Input
Function (group 5)
1
C50
1
INPUT1 ANALOG RGB (via HDB 15 VGA to DVI cable)
2
C52
1
INPUT1 DVI-Digital (via DVI-Digital cable to PC)
3
C53
1
INPUT1 A/V input HDCP (via DVI to 5 RCA or DVI-DVI
cable) HDCP = “High-bandwidth Digital Content Protection”
4
C25
2
INPUT2 ANALOG RGB (via HDB 15 VGA connector/cable)
5
C26
2
INPUT2 ANALOG RGB (via SCART-VGA cable)
6
C33
3
INPUT3 VIDEO (composite) mode set via RCA connector
7
C34
3
INPUT3 S-Video into S-Video DIN sub connector
8
C35
3
INPUT3 Y, Pb/Cb, Pr/Cr SET (COMPONENT)
Don’t forget to set all unused T460 channels to “Skip” to jump over blank/unused inputs.
Sanyo/Eiki Group 6, Sanyo PLC-SU50, PLC-SE20, PLC-SL20, PLC-SU51, PLC-SU55,
PLC-WXU30, PLC-XC50, PLC-XC55, PLC-XE20, PLC-XL20, PLC-XU25, PLC-XU50, PLCXU56 PLC-XU58, PLC-XU83, PLC-XU84, PLC-XU86, PLC-XU87, PLC-XU88, PLC-XU100,
PLC-XU101, PLC-XU110, PLC-XU111 PLC-XU115.
Eiki LC-SB20, LC-SB21, LC-XB20, LC-XB21, LC-XB25, LC-XB26, LC-XB27, LC-XB29,
LC-XB30, LC-XB40, LC-XB41, LC-XS25, LC-XS30 Christie-LX25
Group 18: (* below) PLC-XU105, Eiki XB42
Group 22: (** below) PDG-DXL100, PDG-DWL100, PDG-DSU30 (audio 0-10)
Separate commands are provided FOR ALL CHANNELS. SEE IMPORTANT WIRING NOTE RE CTS/RTS ON THESE
MODELS IN FOLLOWING RS232 CONNECTION NOTES.
T460 Channel
String sent
Input
Function (group 6)
1
C50/C05* **
1
INPUT1 ANALOG RGB (via DVI to HDB 15 VGA cable)
2
C52/C06* **
1
INPUT1 DVI-Digital (via DVI-Digital cable to PC)
3
C53/C07*/
C35**
1
INPUT1 A/V input HDCP (via DVI to 5 RCA or DVI-DVI cable)
HDCP = “High-bandwidth Digital Content Protection”
4
C24
2
INPUT2 Component Y, Pb/Cb, Pr/Cr (via VGA to Comp cable)
5
C25/ C04**
2
INPUT2 ANALOG RGB (HDB 15 VGA) / **HDMI
6
C26
2
INPUT2 SCART (via VGA to SCART 21pin cable)
7
C33
3
INPUT3 Composite Video (RCA)
8
C34
3
INPUT3 S-Video
Don’t forget to set all unused T460 channels to “Skip” to jump over blank/unused inputs.
T460/461/T462 Manual 9th Sept 2015 Part B 3.84 release © Jed Micro Pty Ltd
47
Sanyo/Eiki Group 7, Sanyo PLV-Z1/Z2, Christie LX20.
Separate commands are provided FOR ALL CHANNELS.
T460 Channel
String sent
Function (group 7)
1
C05
Computer Input: ANALOG RGB (HDB 15 VGA)
2
C07
AV mode … probably will not be used … use 3/4/5 (Not LX20)
3
C08
Computer Input: DVI-Digital (Not PLV-Z1, -Z2)
4
C23
Composite Video on RCA
5
C24
S-Video input on DIN 4
6
C25
Component Y, Pb/Cb, Pr/Cr (via 3-RCA)
Don’t forget to set all unused T460 channels to “Skip” to jump over blank/unused inputs.
Sanyo/Eiki Group 8, Sanyo PLC-ET30L, PLC-XM100/L, PLC-XM150/L, PLC-XP50,
PLC-XP51, PLC-XP55, PLC-XP56, PLC-XP57, PLC-XP100, PLC-XP200, PLC-XT20,
PLC-XT21, PLC-XT25, PLC-XT35, PLC-XTC50
Christie LW300, LX37, LX40, LX45, LX50, LX55, LX380, LX450, LX650,
Eiki LC-W3, LC-X60, LC-X70, LC-X71, LC-X80, LC-X85, LC-XG250, LC-XG300,
LC-XG450, LC-XL100, LC-XL200, LC-SXG400L, LC-XGC500, LC-SXG400L,
Separate commands are provided FOR ALL CHANNELS.
T460 Channel
String sent
Input
Function (group 8)
1
C50
1
INPUT1 ANALOG RGB HDB 15 VGA
2
C52
1
INPUT1 DVI-Digital
3
C53
1
INPUT1 A/V input HDCP (via DVI to 5 RCA or DVI-DVI cable)
HDCP = “High-bandwidth Digital Content Protection”
4
C23
2
INPUT2 Composite Video (via 1 BNC)
5
C24
2
INPUT2 Component Y, Pb/Cb, Pr/Cr (via 3 BNC)
6
C25
2
INPUT2 Computer (via 5 BNC)
7
C33
3
INPUT3 Composite Video (RCA)
8
C34
3
INPUT3 S-Video
Don’t forget to set all unused T460 channels to “Skip” to jump over blank/unused inputs.
Sanyo/Eiki Group 9 PLC-SU/XU32 (This is a weird one, as theoretically SU/XU32 will NOT use codes past C07,
but it DOES!) SAN PDG-DTW50L/KL, PDG-DXT10L (see* below)
T460 Channel
String sent
Input
Function (group 9)
1
C05
1
INPUT1 ANALOG MODE SET (HD DB15 VGA) / *Computer 1
2
C06
2
INPUT2 RGB MODE SET / *Computer 2
3
C07
2
INPUT2 VIDEO MODE SET (COMPOSITE) / *Computer 3
4
C08
3
INPUT3 VIDEO MODE SET (COMPOSITE) / *Component
5
C25*
2
INPUT2 ANALOG RGB (HDB 15 VGA) *Not DTW-50/DXT10-L
6
C26*
2
INPUT2 SCART (via VGA to SCART cable) *NotDTW-50/ DXT10-L
7
C33
3
INPUT3 Composite Video (RCA)
8
C34
3
INPUT3 S-Video
Don’t forget to set all unused T460 channels to “Skip” to jump over blank/unused inputs.
T460/461/T462 Manual 9th Sept 2015 Part B 3.84 release © Jed Micro Pty Ltd
48
Sanyo/Eiki Groups 10, Sanyo PLC-SU70, PLC-SW30, PLC-SW35, PLC-XE31, PLC-40,
PLC-50, XL40, PLC-XL50, PLC-XU41, PLC-XU47, PLC-XU48, PLC-XU51, PLC-XU70,
PLC-XU73, PLC-XU74, PLC-XU75, PLC-XU78, PLC-XU305, PLC-XU355,
Eiki LC-SB22, LC-XB22, LC-XB23, LC-XB24, LC-XB28, LC-SD10, LC-SD12, LC-SD15,
Group 16: (* below), Sanyo: PLC-XC56, PLC-XU305, PLC-XU355, PLC-XW50, PLC-XW55,
PLC-XW56, PLC-XW57, PLC-XU116, Eiki LC-XA20, LC-XB21, LC-XB100, LC-XB200.
Group 17: (** below) Sanyo: PLC-WL2500, PLC-WL2501, PLC-WK2500, PLC-XE32,
PLC-XK2200, PLC-XK2600, PLC-XK3010, PLC-XU106, PLC-XU300, PLC-XU350,
PLC-XU4000, PLC-XW56, PLC-XW60, PLC-XW65,
Eiki LC-XB21B, LC-XD25, LC-XB43, LC-WS250
Group 19: (** below) Sanyo: PLC-XW200, PLC-XW250, PLC-XW300, PLC-XD2200,
PLC-XD2600, Eiki: LC-XBL20, LC-XBL21, LC-XBL25, LC-XBL26 (audio 0-31)
Group 21: (***, **, * below), Sanyo: PDG-DWL2500, PDG-DXL2000, PLC-WXU300/WXU350,
PLC-WXU700, Panasonic: CW230,CX200, Canon: LV8235UST, Eiki LC-WB42N, LC-WB100,
LC-WB200, Promethean PRM-30****.
T460 Channel
String sent
Input
Function (group 10)
1
C50
1
INPUT1 ANALOG RGB HDB 15 VGA
2
C51/ C54*/C04 ****
1
INPUT1 SCART (via VGA to SCART 21pin cable) ****
HDMI
3
C54/C06*
1
INPUT1 Component Y, Pb/Cb, Pr/Cr
4
C25/C06 **,****
2
INPUT2 Analog RGB (HDB 15 VGA) ** XE32, XW60,
XW65, PLC-XU106, LC-XB43
5
C33 */C07 **,****
3
INPUT3 Comp Video (RCA) * XW50/55/56, XA20, XW60,
XW65, **PLC-XU106, LC-XB43, PLC-XU116
6
C34
3
INPUT3 S-Video (on some, via HDB 15 VGA connector)
7
CF INPUT VIDEO
3
Video Absolute or DVI PC Digital, code C5B<CR>
8
CF INPUT SVIDEO
3
S-Video Absolute or DVI (AV HDCP) code C5C<CR>
Don’t forget to set all unused T460 channels to “Skip” to jump over blank/unused inputs.
Sanyo/Eiki Group 11, Eiki LC-X50, LC-X50M.
T460 Channel
String sent
Input
Function (group 11)
1
C50
1
INPUT1 ANALOG RGB HDB 15 VGA 1
2
C51
1
INPUT1 SCART (via VGA to SCART 21pin cable)
3
C25
2
INPUT2 ANALOG RGB HDB 15 VGA 2 (Must be enabled as IN)
4
C33
3
INPUT3 Composite Video (RCA)
5
C35
3
INPUT3 Component Y, Pb/Cb, Pr/Cr (via 3 RCA)
6
C81
4
INPUT4 Composite Video (RCA)
7
C82
4
INPUT4 S-Video
8
C83
4
INPUT4 Component Y, Pb/Cb, Pr/Cr (via 3 RCA)
Don’t forget to set all unused T460 channels to “Skip” to jump over blank/unused inputs.
Note: Audio output must be enabled to “Audio 2” connector to get controlled and switched audio OUT.
T460/461/T462 Manual 9th Sept 2015 Part B 3.84 release © Jed Micro Pty Ltd
49
Sanyo/Eiki Group 12, SAN PLC-WXE45, PLC-WXE46, PLC-WXL46 , PLC-XL51,
Eiki SE/XE10, XB31, XB33 projectors. Promethean PRM-10, PRM-20
Separate commands are provided FOR ALL CHANNELS. The table below shows how these are allocated. SEE WIRING
NOTE RE CTS/RTS ON THESE MODELS IN FOLLOWING RS232 CONNECTION NOTES.
T460 Channel
String sent
Input
Function (group 12)
1
C50
1
INPUT1 ANALOG RGB (via HDB 15 VGA to DVI cable)
2
C52
1
INPUT1 DVI-Digital (via DVI-Digital cable to PC)
3
C53
1
INPUT1 A/V input HDCP (via DVI to 5 RCA or DVI-DVI cable)
4
C06
2
INPUT2 ANALOG RGB (via HDB 15 VGA connector/cable)
5
C33
3
INPUT3 VIDEO (composite) mode set via RCA connector
6
C34
3
INPUT3 S-Video into S-Video DIN sub connector
7
C35
3
INPUT3 Y, Pb/Cb, Pr/Cr SET (COMPONENT)
8
C54
1
INPUT1 Y, Pb/Cb, Pr/Cr SET (COMPONENT)
Don’t forget to set all unused T460 channels to “Skip” to jump over blank/unused inputs.
Sanyo/Eiki Group 13, Sanyo, PDG-DET100, PDG-DHT100L, PLC-EF60,PLC-XF47,
PLC-XF60, PLC-XF70, PLC-XF71, PLC-XF1000, PLC-XR70,PLV-WF20,PLV-HD150,
PLV-HD2000, Christie: LS-PLUS-58, LW600, LX66, LX900,
Eiki: EIP-DHT20, EIP-SXG20, LC-SX6, LC-W5, LC-X6, LC-X7, LC-X8, LC-XT5
T460 Channel
String sent
Function (group 13)
1
C05
INPUT1
2
C06
INPUT2
3
C07
INPUT3
4
C08
INPUT4
5
C03
INPUT5
6
C04
INPUT6
Don’t forget to set all unused T460 channels to “Skip” to jump over blank/unused inputs.
Sanyo/Eiki Group 14, Sanyo PLV-1080HD, PLV-Z3, PLV-Z4, PLV-Z5, PLV-Z700, PLV-Z800,
PLV-Z2000, PLV-Z3000, PLV-Z4000
T460 Channel
String sent
Input
Function (group 14)
1
C50
Computer
ANALOG RGB (via DVI to HDB 15 VGA cable)
2
C51
Computer
SCART (via VGA to SCART 21pin cable)
3
C53
HDMI 1
High-Definition Multimedia Interface
4
C54
HDMI 2
High-Definition Multimedia Interface
5
C23
Video
Composite Video RCA
6
C24
Video
S-Video
7
C25
Video
Component Video 1
8
C26
Video
Component Video 2
Don’t forget to set all unused T460 channels to “Skip” to jump over blank/unused inputs.
Sanyo/Eiki Group 15, EIKI LC-XB27NAlt / Sanyo PLC-XU86Alt, Eiki LC-XB33NAlt / Sanyo
PLC-XU88Alt, Eiki LC-XB42NAlt / Sanyo PLC-XU115Alt, Sanyo PLC-XU110Alt, XU111Alt,
PLC-WXU30Alt (Alternate channel allocation from Group 6 inc wireless)
T460/461/T462 Manual 9th Sept 2015 Part B 3.84 release © Jed Micro Pty Ltd
50
SEE IMPORTANT WIRING NOTE RE CTS/RTS ON THESE MODELS IN FOLLOWING RS232 CONNECTION
NOTES.
T460 Channel
String sent
Input
Function (group 15)
1
C50
1
INPUT1 ANALOG RGB (via DVI to HDB 15 VGA cable)
2
C24
2
INPUT2 Component Y, Pb/Cb, Pr/Cr (via VGA to Comp cable)
3
C25
2
INPUT2 ANALOG RGB (HDB 15 VGA)
4
C33
3
INPUT3 Composite Video (RCA)
5
C34
3
INPUT3 S-Video
6
C81
INPUT WIRED (Some only)
7
C82
INPUT WIRELESS
8
C83
INPUT VIEWER (Some only)
Sanyo/Eiki Group 20, Sanyo: PLC-WM4500, PLC-WM5500, PLC-WTC500L, PLC-ZM5000,
Eiki: LC-HDT700, LC-WGC500
Separate commands are provided FOR ALL CHANNELS.
T460 Channel
String sent
Input
1
Function (group 8)
1
C50
INPUT1 ANALOG RGB HDB 15 VGA
2
C4F
3
C25
2
INPUT2 Computer (via 5 BNC)
4
C24
2
INPUT2 Component Y, Pb/Cb, Pr/Cr (via 3 BNC)
5
C23
2
INPUT2 Composite Video (via 1 BNC)
6
C33
3
INPUT3 Composite Video (RCA)
7
C34
3
INPUT3 S-Video
8
C08
HDMI
INPUT Network
Don’t forget to set all unused T460 channels to “Skip” to jump over blank/unused inputs.
T460/461/T462 Manual 9th Sept 2015 Part B 3.84 release © Jed Micro Pty Ltd
51
RS232 connections to Sanyo, Eiki, Christie LX25, 32, 37, 45 and some Philips
There are three types of connectors used on these families of projectors, and rather than list them here by projector (over 100
types) it is simpler to just list the three connection schemes, and then allow users to choose one from the three tables for the
appropriate connector after physically examining the projector of checking the projector user manual. After installation wiring
of any projector to a T460, use a multimeter to check voltages of –9 on BOTH TX and RX pins in any installation, as
described in the troubleshooting part of this manual.
While it does not appear that CTS is ever needed on almost all projectors in this family, some list it on DIN8, Pin 5, and
IT IS DEFINITELY NEEDED ON THE NEWER PLC-SC/XC10 MODELS. We hence recommend that all
installations actually wire this line in, to allow for what may be a future trend in this family as projectors are updated.
8-Pin DIN circular connector group: Comms at 19200 baud, 8N1.
Function/Direction
T460 “projector”
Connection
Control Port Connector
Ground
Ground
8-pin DIN pin 4,
(maybe 7, 8 as well)
1
Data from T460 to projector
Tx
8-pin DIN pin 1 (RXD)
Reply data from projector to T460
Rx
8-pin DIN pin 6 (TXD)
Plus 9 volt CTS/DTR to projector
CTS
8-pin DIN pin 5 (CTS/RTS)
2
3
4
6
7
5
8
Mini-DIN 8
solder side
12-Pin DIN circular connector group: Comms at 19200 baud, 8N1
Function/Direction
T460 “projector” Connection
Control Port Connector
Ground
Ground
12-pin DIN pin 9
Data from T460 to projector
Tx
12-pin DIN pin 2 (RXD)
Reply data from projector to T460
Rx
12-pin DIN pin 3 (TXD)
9-Pin D sub min. connector group: Comms at 19200 baud, 8N1.
Function/Direction
T460 “projector” Connection
Control Port Connector
Ground
Ground
9-pin D sub min pin 5 (Ground)
Data from T460 to projector
Tx
9-pin D sub min pin 2 (RXD)
Reply data from projector to T460
Rx
9-pin D sub min pin 3 (TXD)
Sanyo: PLC-WXU10N
This is a completely non-typical projector from Sanyo, using different connectors, hex codes (BE EF etc), etc.
The following table shows the mapping of T460 channel number, the string sent, and the input associated with that channel in
the manual, and how it is identified on the on-screen menu.
T460 Channel
th
TX code, 8 byte
Input
Function on screen
1
32h
DB15 Analog RGB
Computer
2
36h
DVI
Digital
3
35h
RCA composite video
Composite Video
4
34h
DIN-4 S-Video
S-Video
5
33h
3-RCA component
Component
The “Input search” function MUST be disabled.
Audio is limited: there is only one stereo RCA input, and NO audio output. There is control (incremental, 0->100 NOT 0->60
as the manual says) via the RS232 control, but only to the rather weak internal speaker. Use a T461 if better audio is needed.
Freeze and mute (pic and sound) are supported, but toggle only with the “Freeze/Mute” keyboard, but no 2-yellow-button mute
is provided with a “Volume” keyboard as the projector codes cannot command absolutely or read back the mute state.
Aspect ratio control is provided, and is done by setting the dummy channel, say, Ch 8, to “4:3/16:9/Zm.”. Moving to this
“dummy” channel will roll the aspect ratio through 4:3 option, a full screen, and 16:9.
T460/461/T462 Manual 9th Sept 2015 Part B 3.84 release © Jed Micro Pty Ltd
52
Users can set FlagG=1 (see flag setup menu) to enable sending Automatic Pixel Align after each source transmission.
No “Projector Coms OK” message is available from the projector in Standby, and no “lamp hours” is available.
RS232 connections to Sanyo PLC-WXU10N
To connect the T460 to these projectors use a mini-DIN 6 male on the cable: Comms is at 19200 baud 8N1.
Function/Direction
T460 “projector”
Connection
Projector Connector
6-pin mini-DIN
Ground
Ground
Mini-DIN Pins 1, 2
Data from T460 to projector
Tx
Mini-DIN Pin 3 (RXD)
Reply data from projector to T460
Rx
Mini-DIN Pin 5 (TXD)
Plus 9 volt CTS/DTR to projector
N/C
N/C
1
2
3
4
5
6
Mini-DIN 6
solder side
Note: The signal input and output of this projector has clamp diodes and never goes below –0.7 volts or over +5.7 volts,
even when connected to the T460.
Sharp projectors: (Inc some Eiki EIP family)
Communications is at 9600 8N1, and this may need to be set up in the projector, and RS232 may need to be enabled. (This is
in the “Options(2)” menu under “LAN/RS232”. Set to “Enable”.) Also, Auto channel change, if present, will need to be
disabled. Freeze (SOME ONLY…check with JED) and Mute On/Mute Off keyboards are supported.
* In table is for SHARP DT-400, XV-Z2000, EIKI EIP-1500;
** In table is for Eiki EIP-S200, X200, X350;
*** In table is for Sharp XV-Z10 (IASI commands select mode on Input 1)
Eiki in “Default” include: EIP-200, EIP-250, EIP-1000, EIP-1500, EIKI-EIP-1600, EIP-2500, EIP-2600, EIP-3000,
EIP-3500, EIP-4200, EIP-4500, EIP-S200, EIP-X200, EIP-X350, EIP-WX5000/L
T460 Channel
Default
*
**
***
Function
1
IRGB 1
IVED 1
IRGB 1
IRGB 1
2
IRGB 2
IVED 2
IVED 1
IASI
1
3
IRGB 3
IVED 3
ISEV 1
IASI
2
4
IRGB 4
IVED 4
ICMP 1
IVED 1
5
IVED 1
IVED 5
IDVI
IVED 2
6
IVED 2
IVED 6
7
IVED 3
8
IVED 4
1
RGB inputs are used for both Computer
and Component RGB sources. Sharp/Eiki
have varying numbers of RGB inputs, from
1 to 4. Test on site and skip unused
channels.
Video inputs are called various names on
screen, and can vary from 2 to 6. Test on
site and skip unused channels.
NOTE: You will have to set up
“Channels” in the second setup menu
to get “Video”.
Don’t forget to set all unused T460 channels to “Skip” to jump over blank/unused inputs.
The driver routines provide for audio setting via the projector, showing a range of 0 … 20 on the display, mapping to 0 … 60
on the projector volume display function. (Not for Eiki EIP-S200, X200, X350) If a T461 is selected, don’t forget to map the
channels using the map T461 option in the setup screen.
Audio note: On some Sharp projectors there is a selection menu item allowing the “Audio Output” to be selected to be
controlled or un-controlled by the audio volume commands. If controlling the system audio via the projector (i.e. no T461
used) you would select the VAO, “Variable Audio Output” mode. If using a T461, select FAO, “Fixed Audio Output” mode.
(This is in the “Audio Adjustment” menu.)
Note: Users can set FlagG (see flag setup menu) to enable sending "ADJS 1<0Dh>" (Auto Sync Start) after each source
transmission to these model projectors.
Note: Dual lamp readout is automatically provided for projectors with two lamps. Both are shown with labels “1” and “2”.
Aspect ratio control: Aspect ratio control (Not for Eiki EIP-S200, X200, X350)is done by setting the dummy channel, say,
Ch 8, to “4:3/16:9/Zm.”. Moving to this “dummy” channel will roll the aspect ratio through a small 4:3 option, a full screen
4:3 and 16:9. The code varies by channel (RGB or Video) and corresponds to codes in the manual, and is displayed with a
“Screen aspect ratio” and a code number.
T460/461/T462 Manual 9th Sept 2015 Part B 3.84 release © Jed Micro Pty Ltd
53
RS232 connections to Sharp/Eiki projectors
These use a D-sub 9-pin connector, female or male on cable: (May be via an adaptor cable from projector 9-pin mini-DIN)
Function/Direction
T460 “projector”
Connection
Sharp Control Port
Connector, D-sub 9
Sharp Control Port
Connector DIN 9
Ground
Ground
9-pin D-sub pin 5
9-pin D-sub pin 5
Data from T460 to projector
Tx
9-pin D-sub pin 2
9-pin D-sub pin 2
Reply data from projector to T460
Rx
9-pin D-sub pin 3
9-pin D-sub pin 3
Plus 9 volt CTS/DTR to projector
CTS
unused
unused
After installation wiring of any projector to a T460, use a multimeter to check voltages of –9 on BOTH TX and RX pins in any
installation, as described in the troubleshooting part of this manual.
RS232 connections to Eiki EIP-S200, X200, X350 *** note: still in testing
Note: For these projectors, no “Projector Coms OK” message is available from the projector in Standby, and no “lamp hours”
is available. A latch-up mode can occur in the projector which can only be cleared by an AC power down an up via the switch.
To connect the T460 to these projectors use a mini-DIN 6 male on the cable:
Function/Direction
Ground
T460 “projector”
Connection
Ground
Projector Connector
6-pin mini-DIN
Mini-DIN Pins 1, 2
Data from T460 to projector
Tx
Mini-DIN Pin 3 (RXD)
Reply data from projector to T460
Rx
Mini-DIN Pin 5 (TXD)
Plus 9 volt CTS/DTR to projector
N/C
N/C
1
2
3
4
5
6
Mini-DIN 6
solder side
Note: The signal input of these projectors has a clamp diode and never goes below –0.7 volts, even when connected to
the T460. Voltage out from projector is a normal –5 to –9 volts.
Sharp LCD screens:
LC-M3700, LC-3710
T460 Channel
String sent
Input (on screen)
Function / connection
1
INPS 1<0Dh>
Input1 AV
Composite Video (RCA)
2
INPS 2<0Dh>
Input1 Y/C
S-Video (4-pin DIN)
3
INPS 4<0Dh>
Input2
Composite Video (RCA)
4
INPS 5<0Dh>
Input3 Component
YPbPr / YCbCr / RGB (5-BNC sockets)
5
INPS 6<0Dh>
PC Analog
PC Analog (D SUB 15)
6
INPS 7<0Dh>
PC Digital
PC Digital (DVI)
Don’t forget to set all unused T460 channels to “Skip” to jump over blank/unused inputs.
•
Freeze is not supported
T460/461/T462 Manual 9th Sept 2015 Part B 3.84 release © Jed Micro Pty Ltd
54
Sharp LCD screens: SHARP Generic PN1 & PN2
Typical models are:
PN-325 / PN-425, PN-465U / PN-G655E, PN-E521 / PN-E601,
PN-E421 / PN-E471, PN-S525. Also Mitsubishi LCD (Sharp codes) models LDT651L & P.
Alternate Channel 8 function is provided by choosing PN1 or PN2 option. * and ** shows shared inputs.
T460 Channel
String sent
Input
Function
1
INPS 1<0Dh>
DVI-D *
DVI-D PC digital
2
INPS 2<0Dh>
D-Sub 15
PC Analog
3
INPS 3<0Dh>
Component, BNC x 5 **
YPbPr
4
INPS 4<0Dh>
RCA (& Din4 on PN325/425)
Composite Video & S-Video on PN325/425
5
INPS 6<0Dh>
Analog RGB, BNC x 5 **
Analog RGB (BNC)
6
INPS 7<0Dh>
DVI-D *
DVI-D AV digital
7
INPS 8<0Dh>
Din4 on all but PN325/425
S-Video on all but PN325/425
8
INPS 9<0Dh>
HDMI
AV HDMI
Generic PN1
8
INPS 10<0Dh>
HDMI
PC HDMI
Generic PN2
Don’t forget to set all unused T460 channels to “Skip” to jump over blank/unused inputs. Freeze is not supported.
Sharp LCD screens: SHARP Generic 3, with digital TV on Source 8 (no channel change)
This driver covers over 100 screens, but not the ones requiring a RSPW command to come out of standby.
T460 Channel
String sent
Input
Function / connection
1
IAVD 1<0Dh>
Input 1
2
IAVD 2<0Dh>
Input 2
All these inputs are allocated to a wide mix of
HDMI. Component, S-Video, Composite Video,
SCART, DVI and DB15.
3
IAVD 3<0Dh>
Input 3
4
IAVD 4<0Dh>
Input 4
5
IAVD 5<0Dh>
Input 5
6
IAVD 6<0Dh>
Input 6
7
IAVD 7<0Dh>
Input 7
8
IDTV
TV
<0Dh>
See the back of each flat panel manual to see
allocation.
Use the channel setting buttons on the screen for
TV channel change.
DIG TV Tuner
Don’t forget to set all unused T460 channels to “Skip” to jump over blank/unused inputs.
Sharp LCD screens: Generic 6 via LAN (e.g. PN60/70TA/B3, via LAN RS232 to LAN adaptor)
This driver communicates through an xDirect RS232 to LAN “dongle” to the panel using TCP communications.
T460 Channel
String sent
Input
1
INPS
D-SUB1 (RGB)
2
INPS 10<0Dh>
HDMI 1 (PC)
3
INPS
HDMI 1 (AV)
4
INPS 13<0Dh> / INPS 16<0Dh>
HDMI 2 (PC) or D-SUB2 (RGB) if FLAGJ=1 & FLAGK=0
5
INPS 12<0Dh>
HDMI 2 (AV)
6
INPS 18<0Dh>
HDMI 3 (PC)
7
INPS 17<0Dh>
HDMI 3 (AV)
8
INPS 14<0Dh>
DisplayPort
2<0Dh>
9<0Dh>
Don’t forget to set all unused T460 channels to “Skip” to jump over blank/unused inputs.
T460/461/T462 Manual 9th Sept 2015 Part B 3.84 release © Jed Micro Pty Ltd
55
Mute is supported but not freeze. Volume goes 0->31.
See JED document:
http://www.jedmicro.com.au/PDF_Docs/Setting%20Up%20LAN%20control%20with%20JED%20controllers%20.pdf
This discusses in detail the setup to the Sharp screen, the xDirect interface, the T460 setup and connections between them.
The HDMI channels seem to have to be setup for PC or AV use. If a channel is commanded to an HDMI-PC the HDMIx PC
message appears top right on the screen,(x is HDMI number), even if no signal is present, but if an HDMI-AV channel is
selected, the corresponding ID message does NOT appear, even though the panel does switch to it. Weird!
Reply mode is available and works via the PLAN interface, polling the panel every 5 seconds, and closing down the T460R if,
for instance, the panel is turned off by the IR remote.
(Warmup does take about 30 seconds, even if a picture does appear after only 5 seconds. The panel has a long startup sequence
of some sort of about 25 seconds, sending out “wait” messages every 5 seconds during this time. Don’t attempt to shorten this.)
Sharp LCD screens: SHARP Generic 4, Generic 5, (2012/13 “LE” series)
(This group uses different format commands, e.g. Power on is POWR1 <CR> instead of POWR 1<CR>.)
Special note: Sharp panels are now shipped with the RS232 interface disabled as a stand-by power saving
measure. There is NO menu item to turn it on … it can only be enabled by a special secret command
sequence, to enable what is called “Hotel mode”. Call JED or Sharp for details.
Generic 4 drives audio volume range of 0->60, Generic 5 drives audio volume range of 0->100. The Sharp
manuals all specify audio on ALL units as 0->60, but field reports indicate some models (at least) are 0->100,
so we would appreciate feedback on this. The change of some models to be 0->100 has been confirmed by
Sharp.
Some models are: LC-32LE360X LC-40LE360X, LC-40LE530X, LC-46LE530X, LC-60LE630X, LC-60LE640X, LC60LE650x, LC-70LE650x, LC-40LE700X, LC-60LE632U, LC-70LE632U, LC-70LE732U, LC-70LE735X, LC-40LE830X, LC46LE830X, LC-52LE830X, LC-60LE632X, LC-40LE835X, LC46LE835X, LC-52LE835X, LC-60LE835X. LC90LE740X,
LC-46LE840X, LC-52LE840X, LC-60LE940X, LC-80LE940X (Freeze is not supported)
T460 Channel
String sent
Input
Function / connection
1
IAVD1 <0Dh>
Input 1
2
IAVD2 <0Dh>
Input 2
All these inputs are allocated to a wide mix of 3 or
4 HDMI. Component, Composite Video, and DB15.
3
IAVD3 <0Dh>
Input 3
4
IAVD4 <0Dh>
Input 4
5
IAVD5 <0Dh>
Input 5
6
IAVD6 <0Dh>
Input 6
7
IAVD7 <0Dh>
Input 7
8
IAVD8 <0Dh>
Input 8
See the back of each flat panel manual to see
allocation.
Don’t forget to set all unused T460 channels to “Skip” to jump over blank/unused inputs.
RS232 connections to Sharp LCD screens.
These use a 9-pin-D9 male on the LCD, female on cable. Comms is at 9600 baud, 8 bits, no parity, 1 stop.
Function/Direction
T460 “proj” Con.
“Serial” Port Connector
Ground
Ground
9-pin D-sub pin 5
Data from T460 to projector
Tx
9-pin D-sub pin 2 (RXD)
Reply data from projector to T460
Rx
9-pin D-sub pin 3 (TXD)
Plus 9 volt CTS/DTR to projector
N/c
1
2
6
3
7
4
8
5
9
D-sub 9 female
solder side
After installation wiring of any projector to a T460, use a multimeter to check voltages of –9 on BOTH TX and RX pins in any
installation, as described in the troubleshooting part of this manual.
T460/461/T462 Manual 9th Sept 2015 Part B 3.84 release © Jed Micro Pty Ltd
56
Smart LCD
SBID8055i SBID8070i, LCD panels.
T460 Channel
Command string, BID8055i
Command string, SBID8055i
1
set input=VGA1<CR>
set input=VGA<CR>
2
set input= VGA2<CR>
set input=RGB/HV<CR>
3
set input=Video1<CR>
set input=Video1<CR>
4
set input=DVI<CR>
set input=Video2<CR>
5
set input=DVD/HD1<CR>
set input=DVD/HD1<CR>
6
set input=DVD/HD2<CR>
set input=DVD/HD2<CR>
7
set input=HDMI1<CR>
set input=HDMI1<CR>
8
set input=HDMI2<CR>
set input=HDMI2<CR>
Don’t forget to set all unused T460 channels to “Skip” to jump over blank/unused inputs.
Mute and freeze functions are available with these panels. Absolute audio is provided. Connections as below.
Smart projector
INIFI UF55, SLR40wi, UNIFI UX60, UF75 communications via Smartboard to projectors under their
control.
Projector manufacturer varies but control strings seem consistent across range.
T460 Channel
Command string
Function
1
set input=vga1<CR>
RGB1
2
set input=vga2<CR>
RGB2
3
set input=composite<CR>
Composite Video
4
set input=s-video<CR>
S-Video
5
set input=HDMI<CR>
HDMI
Don’t forget to set all unused T460 channels to “Skip” to jump over blank/unused inputs.
Freeze and Mute supported on UF75, UX60, SLR40wi only. Incremental audio control is provided.
RS232 connections to Smart LCD and projectors screens.
These use a 9-pin-D9 female on projector/LCD, male on cable. Comms is at 19200 baud, 8 bits, no parity, 1 stop.
Function/Direction
T460 “projector”
Connection
“Serial” Port Connector
Ground
Ground
9-pin D-sub pin 5
Data from T460 to projector
Tx
9-pin D-sub pin 3 (RXD)
Reply data from projector to T460
Rx
9-pin D-sub pin 2 (TXD)
Plus 9 volt CTS/DTR to projector
N/c
5
4
9
3
8
2
7
1
6
D-sub 9 male
solder side
After installation wiring of any projector to a T460, use a multimeter to check voltages of –9 on BOTH TX and RX pins in any
installation, as described in the troubleshooting part of this manual.
Sony projector (old A5/5A codes):
VPL-PX20/21/30/31/32, VPL-VW10/12HT projectors Deleted 3.46. Download 2.88 to use from JED web site.
T460/461/T462 Manual 9th Sept 2015 Part B 3.84 release © Jed Micro Pty Ltd
57
Sony projector (newer A9-9A codes):
(Use Generic 1 for unlisted, VPL-CH series, VPL-EX and EW series, VPL-S200, S500 and S600
series) (VPL-D100 series has no RS232) VPL-BW5, VPL-CW125, VPL-CW255, VPL-CW258,
VPL-CW275, VPL-CW278, VPL-CX61, VPL-CX 63, VPL-CX80, VPL-CX85, VPL-CX86, VPL-CX100,
VPL-CX120, VPL-CX125, VPL-CX130, VPL-CX131, VPL-CX135, VPL-CX150, VPL-CX155,
VPL-CX160, VPL-CX161, VPL-CX165, VPL-CX235, VPL-CX238, VPL-CX275, VPL-CX278,
VPL-ES3*, VPL-ES4, VPL-EW5, VPL-EW7, VPL-EW130, VPL-EW225, VPL-EW226, VPL-EW245,
VPL-EW246, VPL-EW275, VPL-EW276, VPL-EX3*, VPL-EX4, VPL-EX5/U, VPL-EX7, VPL-EX50,
VPL-EX70, VPL-EX71N, VPL-EX100, VPL-EX101, VPL-EX120, VPL-EX121, VPL-EX123, VPL-EX130,
VPL-EX145, VPL-EX146, VPL-EX147, VPL-EX148, VPL-EX175, VPL-EX176, VPL-EX178, VPL-EX221,
VPL-EX222, VPL-EX225, VPL-EX226, VPL-EX241, VPL-EX242, VPL-EX245, VPL-EX246, VPL-EX271,
VPL-EX272, VPL-EX273, VPL-EX274, VPL-EX275, VPL-EX276, VPL-F400H/X, VPL-F401H,
VPL-F420HZ, VPL-F500H/X, VPL-F501H, VPL-F600X, VPL-F700HL/XL, VPL-F720HZ , VPL-FE40,
VPL-FH30, VPL-FH31, VPL-FH35, VPL-FH36, VPL-FH300L, VPL-FH500L, VPL-FHZ55, VPL-FHZ700,
VPL-FW300L, VPL-FX30, VPL-FX35, VPL-FX37, VPL-FX40, VPL-FX41/L, VPL-FW41/L, VPL-FX50,
VPL-FX51, VPL-FX52, VPL-FX, VPL-PX11, VPL-FX15, VPL-FX35, VPL-FX40, VPL-FX41, VPL-FX50,
VPL-FX51, VPL-FX52, VPL-FX500L, VPL-HW15, VPL-HW30, VPL-HW50, VPL-PX11, VPL-PX15,
VPL-PX35, VPL-PX40, VPL-PX41, VPL-SW125, VPL-SW525/C, VPL-SW526/C, VPL-SW535/C,
VPL-SW536, VPL-SX525, VPL-SX535, VPL-SX536, VPL-TX7, VPL-TX70, VPL-VW70, VPL-VW85,
VPL-VW95, VPL-VW200, VPL-VW1000 *VPL-ES3 and EX3 are no parity, all other even.
T460 Channel
Char sent as Data 5
Function
1
00h
Video
2
01h
S-Video
3
02h
Input A (Analog RGB computer / Component / GBR) on D-15)
4
03h
Input B (Analog RGB, D-15) / DVI analog or digital / HDMI
5
04h
Input C (RGB, DVI, DVI-D,HDMI) (PC card/memory stick or Ethernet)
6
05h
Input D D-15 / Comp. Video / Video RGB / HDMI / LAN/HDbaseT / USB-B
7
06h
Input E Computer / Component Video / Video RGB / LAN / USB-B
8
07h
Input F Computer / Component Video /Video RGB / USB-A / LAN
There are multiple setup selections available for Inputs A -> F; these are selected via the menu setup or via the IR remote.
T460 selection does not extend to these preset functions, as they are not available for RS232 control. Note: Users can set
FlagG=1 (see flag setup menu) to enable sending ATA (Automatic Pixel Align) after each source transmission to this
model projector. (was Flag1)
Sony LCD panels
Group 1: FWD-32/40LX1/R, FWD-50PX2
Sony LCD setup means allocating input names to each of the eight channels allowed, using the table below:
th
T460 Channel
String sent (5 byte)
Input (on screen)
Function / connection
1
00AH
HD15
2
020H
DVI
3
00CH
Option 1
Composite Video BNC
4
00DH
Option 1
S-Video (DIN 4)
5
00EH
Option 1
RGB Digital Input 2
6
00FH
Option 1
Component 2
7
00BH
YUV
RGB Component (D SUB 15)
8
010H
BNC
Option 2 Video (FWD-40LX1 only)
RGB PC Analog (D SUB 15)
DVI
T460/461/T462 Manual 9th Sept 2015 Part B 3.84 release © Jed Micro Pty Ltd
58
Sony LCD panel: Group 2: FWD-32/40LX2F/X and KLH-W26/32
Sony LCD setup means allocating input names to each of the eight channels allowed, using the table below:
th
T460 Channel
String sent (5 byte)
Input (on screen)
Function / connection
1
008H
HD15
PC Analog (D SUB 15)
2
009H
HD15
Component (D SUB 15)
3
010H
Option 2
Composite Video (Note: BNC)
4
011H
Option 2
S-Video (DIN 4)
5
044H
HDMI 1
RGB Digital Input 2
6
045H
HDMI 1
DTV Digital Input 2
7
054H
HDMI 2
RGB Digital Input 3
8
055H
HDMI 2
DTV Digital Input 3
Sony LCD panel: Group 3: FWD-42PV1/A/P (and FWD-42V1, FWD-42X1, FWD-50PX1)
Sony LCD setup means allocating input names to each of the eight channels allowed, using the table below:
th
T460 Channel
String sent (5 byte)
Input (on screen)
Function / connection
1
00AH
HD15
2
020H
DVI
3
010H
Option 1
Composite Video BNC
4
011H
Option 1
S-Video (DIN 4)
5
012H
Option 1
RGB Digital Input 2
6
013H
Option 1
Component 2
7
00BH
YUV
RGB Component (D SUB 15)
8
00CH
BNC
Option 2 Video
RGB PC Analog (D SUB 15)
DVI
Sony LCD panel: Group 4: FWD-S42E1, FWD-S42H1, FWD-S47H1
Sony LCD setup means allocating input names to each of the eight channels allowed, using the table below:
th
T460 Channel
String sent (5 byte)
Input (on screen)
Function / connection
1
008H
HD15
2
020H
DVI
3
030H
Video
4
031H
S-Video
5
009H
HD15
6
00EH
Option 1
RGB PC (D Sub 15)
7
00FH
Option 1
RGB Component (D SUB 15)
8
084H
HDMI 1
HDMI 1
RGB PC Analog (D SUB 15)
DVI
Composite Video BNC
S-Video (DIN 4)
RGB YUV (D-Sub 15)
T460/461/T462 Manual 9th Sept 2015 Part B 3.84 release © Jed Micro Pty Ltd
59
Sony LCD panel: Group 5: GXD-L52H1, GXD-L65H1
Sony LCD setup means allocating input names to each of the eight channels allowed, using the table below:
th
T460 Channel
String sent (5 byte)
Input (on screen)
Function / connection
1
008H
HD15
2
020H
DVI
3
030H
Video
4
031H
S-Video
5
009H
HD15
6
084H
HDMI 1
HDMI 1
7
085H
HDMI 2
HDMI 2
RGB PC Analog (D SUB 15)
DVI
Composite Video BNC
S-Video (DIN 4)
RGB YUV (D-Sub 15)
Don’t forget to set all unused T460 channels to “Skip” to jump over blank/unused inputs.
The driver routines provide for audio setting via the LCD, showing a range of 0 … 20 on the T460 display, mapping to 0 …
100 on the LCD. Volume is not normally shown on the panel screen.
The mute function is Audio ONLY by pressing both yellow keys together. No Freeze function is supported, so only use Vol
Up/Down keyboards. FlagG sets AutoPixelAlign for DB15 channels. Roll of aspect ratios is supported by dummy channel
using channel: "4:3/16:9/Zm."
Only two audio inputs are provided (other than the HDMI): One shared between Composite and S-Video and one used for the
DB15 functions. If more are needed, use the T461. If a T461 is selected, don’t forget to map the channels in the setup screen.
Sony LCD panel: Group 6: KDL BRAVIA family FY11 series
HX92x/82x/72x series, NX72x series, EX72x/62x/52x/46x/42x/32x series, CX52x/400 series, 60W600B
These all communicate via a Sony supplied CBX-H10/1 or CBX-H11/1 to HDMI communications box. The panels
themselves do NOT have an RS232 interface. (A cable from this box plugs into any unused HDMI connector. “Control
for HDMI” must be set to “On” in the setup menu. A setup document “CBX-H11 Control info.pdf” is available from
JED or directly from Sony.)
Sony LCD setup means allocating input names to each of the eight channels allowed, using the table below:
T460 Channel
String sent (5/6/7
th
bytes)
Input (on screen)
Function / connection
1
005H,001H,097H
PC
RGB PC Analog (D SUB 15) + 3.5 audio
2
002H,001H,094H
Video 1
Composite Video1 RCA + 2 RCA audio
3
003H,001H,095H
Video 2 /
Component
4
004H,001H,096H
HDMI 1
HDMI 1
5
004H,002H,097H
HDMI 2
HDMI 2
6
004H,003H,098H
HDMI 3
HDMI 3
7
004H,004H,099H
HDMI 4
HDMI 4
8
001H,091H
DTV
RGB 3 RCA + 2 RCA audio
TV
Don’t forget to set all unused T460 channels to “Skip” to jump over blank/unused inputs.
The driver routines provide for audio setting via the LCD, showing a range of 0 … 20 on the T460 display, mapping to 0 …
100 on the LCD. Volume is not normally shown on the panel screen.
The mute/blank function of audio/video is supported by pressing both yellow keys together. No Freeze function is supported,
so only use Vol Up/Down or MuteOn/Off keyboards.
Aspect ratio control is included. Use source names: “Set reg 4:3” and “Set reg 16:9”.
Only two audio inputs are provided (other than the HDMI): One shared between Composite and S-Video and one used for the
DB15 functions. If more are needed, use the T461. If a T461 is selected, don’t forget to map the channels in the setup screen.
T460/461/T462 Manual 9th Sept 2015 Part B 3.84 release © Jed Micro Pty Ltd
60
RS232 connections to Sony projectors and LCD flat panels
These all use a D-sub 9-pin connector, male on cable.
VPL- CX85/86, FX50/51/52, PX11/15/35/40/41 38400 BAUD, Even parity, 1 stop.
VPL- ES3/EX3, 38400 BAUD, No parity, 1 stop.
FWD-32/40LX2F/X, KDL and KLH-W26/32 LCD, 9600 BAUD, No parity, 1 stop.
Function/Direction
T460 “projector”
Connection
Projector Connector
(Male on cable)
Ground
Ground
9-pin D-sub pin 5
Data from T460 to projector
Tx
9-pin D-sub pin 2 (RXD)
Reply data from projector to T460
Rx
9-pin D-sub pin 3 (TXD)
Plus 9 volt CTS/DTR to projector
N/C
N/C
5
4
9
3
8
2
7
1
6
D-sub 9 male
solder side
After installation wiring of any projector to a T460, use a multimeter to check voltages of –9 on BOTH TX and RX pins in any
installation, as described in the troubleshooting part of this manual.
Taxan-Kaga-Plus projector families:
KG-PV-131S/X/XH, KG-PS-232X/Xh
This family of projectors can be operated at 115,200 baud or 19,200 baud. As shipped from Plus, communications is at
115,200 baud, and must be set using a PC to 19,200 for use with a T460. (The T460 does NOT have a 115,200 baud option.)
It can be switched to operate at 19,200 by the following sequence:
Connect to a PC via a straight-though serial cable and run HyperTerminal, setting it up to run at 115,200 baud, 8 bit data, 1
start, 1 stop, no parity, no hardware handshake (8N1). (Unless you have enabled “local echo”, you will not see the characters
as you type them. You can enable echo by going to File->Properties->Settings->ASCII Setup and ticking Echo typed
characters locally.) HyperTerminal is found under Accessories or Programs in the Windows system or can be downloaded
from: http://www.hilgraeve.com/hyperterminal.html
Verify communications by typing #QS(CR)(LF) (The “QS” must be upper case. The CR and LF must follow. Send a CR with
the ENTER key, and send the LF by holding down CTRL and pressing ENTER.) The projector should reply with its status,
eg #QS021 if OFF, and #QS051 if warmed up and running.
If, OFF, the projector can be turned ON with the #PO(CR)(LF) command. (The character after the P is alphabetic U/C “O”.)
Now set it to 19,200 baud by sending a command #CL(CR)(LF) from a PC running HyperTerminal at 115,200 baud. (It will
switch immediately, so the reply will be gibberish.)
Now terminate the HyperTerminal session at 115,200 baud and restart it at 19200 baud, (8N1, no handshake, local echo
enabled). Type #QS(CR)(LF) and verify status reply at 19,200 baud. A #PF(CR)(LF) command powers down the Taxan.
(The Taxan can be reset to 115,200 baud with a #CH(CR)(LF) command.)
The baud rate is held in projector non-volatile memory, so the baud rate setting to 19,200 need be done only once.
The following table shows the mapping of T460 channel number, the string sent, and the input associated with that
channel in the manual, and how it is identified on the on-screen menu:
T460 Channel
TX string
Input name in manual
Function as identified on screen
1
#SA 0Dh, 0Ah
RGB or DVI
RGB (U5) DVI (U7)
2
#SB 0Dh, 0Ah
RGB 2 (also via DVI)
RGB (U7 only)
3
#SV 0Dh, 0Ah
Comp Video
Video
4
#SS 0Dh, 0Ah
S-VIDEO
S-Video
Don’t forget to set all unused T460 channels to “Skip” to jump over blank/unused inputs.
Turn OFF the “Auto Source” function in the projector. Also, turn off “Auto power Off”. Instead use the Run Timer in
the T460.
(Projector lamp hour readout is not fully tested … reports welcomed from users.)
The driver supports Mute On/Mute Off keyboards and Freeze On/Off and Mute On/Off keyboards. These are toggles with no
read-back, so two-yellow-button mute mode is NOT supported.
T460/461/T462 Manual 9th Sept 2015 Part B 3.84 release © Jed Micro Pty Ltd
61
These is only one audio input and no output, so audio control in the projector is NOT supported. Use a T441 or T461.
Reply mode is supported for manual closedown detect.
RS232 connections to Kaga -Taxan - Plus projectors
These use a 9-pin-D9 male on the projector, female on cable. Comms is at 19200 baud, 8 bits, no parity, 1 stop.
Function/Direction
T460
“projector”
Connection
“Serial” Port
Connector
Ground
Ground
9-pin D-sub pin 5
Data from T460 to projector
Tx
9-pin D-sub pin 3
Reply data from projector to T460
Rx
9-pin D-sub pin 2
Plus 9 volt CTS/DTR to projector
N/C
N/C
1
2
6
3
7
4
8
5
9
D-sub 9 female
solder side
After installation wiring of any projector to a T460, use a multimeter to check voltages of –9 on BOTH TX and RX pins in any
installation, as described in the troubleshooting part of this manual.
TEAC Plasma:
PLMSDM1060, PLMHDM1065, PLMHDM1275
The following table shows the mapping of T460 channel number, the string sent, and the input associated with that channel in
the manual, and how it is identified on the on-screen menu:
T460 Channel
TX codes
Input name in manual
Function as identified on screen
1
91h 01h
AV1 Composite
Video 1
2
91h 02h
AV2 S-Video
Video 2
3
91h 03h
AV3
Video 3
4
91h 04h
Component 1
5
91h 05h
Component 2
6
91h 06h
RGB 9-pin D-sub (Analog)
PC Analog
7
91h 07h
DV1
PC Digital
Don’t forget to set all unused T460 channels to “Skip” to jump over blank/unused inputs.
RS232 connections to TEAC Plasma with D9
These use a 9-pin-D9 male on the plasma, female on cable. Comms is at 9600 baud, 8 bits, no parity, 1 stop.
Function/Direction
T460 “projector” Connection
“Serial” Port Connector
Ground
Ground
9-pin D-sub pin 5
Data from T460 to projector
Tx
9-pin D-sub pin 3 (RXD)
Reply data from projector to T460
Rx
9-pin D-sub pin 2 (TXD)
Plus 9 volt CTS/DTR to projector
“RTS”
N/C
After installation wiring of any projector to a T460, use a multimeter to check voltages of –9 on BOTH TX and RX pins in any
installation, as described in the troubleshooting part of this manual.
T460/461/T462 Manual 9th Sept 2015 Part B 3.84 release © Jed Micro Pty Ltd
62
Toshiba projectors
For Toshiba TDP-S3/T3 see InFocus models: LP500/520/530.
Make sure to turn off “Auto input search” in the third menu of the projector.
Group 1.1: TLP-S200/S201/S220/S221, TLP-T400/T401, TLP-T500/T501/T520/T521, TLPT600/T601/T620/T621, TLP-T700/T701/T720/T721
Group 1.2: TDP-MT200/MT400
Group 1.3: TDP-S20/S21/SC21/S25/SC25/SW25/S35/SC35/SW35
TDP-S80/SW80/S81/T90/TW90/T91/T99/TW99, TLP-710/711
Group 1.4: TDP-S8/S10, SW20, TDP-T8/T9/T30/T40/T45/T80/T98, TLP-250/251/260/261 TLP380/381/550/551/560/561/780/781/790/791, TLP-MT7E, TLP-X10U/11U/20U/21U
Group 1.5: TDP-D1/D2, TLP-S30/S40/S41/S70/S71, TLP-T50/T60/T61/T70/T71,
Group 1.6: TLP-450/451/470/471/650/651/670/671/680/681/, TLP-B2/U (RGB set only Ch 1).
T460 Ch
TX Codes
Group
1.1
Group
1.2
Group
1.3
Group
1.4
Group
1.5
Group
1.6
1
STX IN1 ETX
RGB1
RGB1
RGB1
RGB1
RGB
RGB
2
STX IN2 ETX
YPbPr1
DVI
RGB2
RGB2
YPbPr
Video
3
STX IN3 ETX
RGB2
Video
Video
Video
Video
Camera
4
STX IN4 ETX
YPbPr2
S-Video
S-Video
S-Video
S-Video
5
STX IN5 ETX
Video
YPbPr
Camera
PC-Card
Camera
6
STX IN6 ETX
S-Video
Network
Camera
7
STX IN7 ETX
PC-Card
8
STX IN8 ETX
Camera
Don’t forget to set all unused T460 channels to “Skip” to jump over blank/unused inputs.
Group 2.1: TDP-T/TW95, T/TW100, TDP-T250/TW250, TDP-T300/TW300,
TDP-T350/TW350, TDP-T355/TW355
Group 2.2: TLP-X2000/XC2000/XD2000, TLP-X2500/XC2500, TLP-X3000/XC3000,
TLP-WX2200
Group 2.3: TDP-ST20, TDP-EX20, TDP-EW25
T460 Ch
TX codes
Group 2.1
TX codes
Group 2.2
TX codes
Group 2.3
1
STX IN3 ETX
RGB1/DVI-A
STX IN3 ETX
RGB1
STX IN3 ETX
RGB1
2
STX IN4 ETX
YPbPr1/DVI-A
STX IN4 ETX
YPbPr1
STX IN4 ETX
YPbPr1
3
STX IN5 ETX
RGB2/DSUB
STX IN5 ETX
RGB2
STX IN5 ETX
RGB2
4
STX IN6 ETX
YPbPr2/DSUB
STX IN6 ETX
YPbPr2
STX IN6 ETX
YPbPr2
5
STX IN9 ETX
Video
STX IN9 ETX
Video
STX IN9 ETX
Video
6
STX INA ETX
S-Video
STX INA ETX
S-Video
STX INA ETX
S-Video
7
STX IN8 ETX
None/BNC 3
YPbPr 3/Camera
STX INB ETX
Camera
STX INC ETX
Network
8
STX IND ETX
USB/Wireless
STX IND ETX
USB/Wireless
Group 3: TLP-X100,TLP-X150,TLP-X200,TLP-WX100,TLP-WX200
T460/461/T462 Manual 9th Sept 2015 Part B 3.84 release © Jed Micro Pty Ltd
63
T460 Ch
TX codes
Group 3
1
#INP:1<CR>
RGB1/D-SUB 15
2
#INP:2<CR>
YPbPr1/ D-SUB 15
3
#INP:3<CR>
RGB2/ D-SUB 15
4
#INP:4<CR>
YPbPr2/ D-SUB 15
5
#INP:9<CR>
Video
6
#INP:10<CR>
S-Video
7
#INP:5<CR>
HDMI
8
#INP:12<CR>
Network
Don’t forget to set all unused T460 channels to “Skip” to jump over blank/unused inputs.
RS232 connections to Toshiba projectors with DIN-8 connectors
The majority all use a mini-DIN 8 male connector wired, as follows: (Comms is at 9600 baud, 8 bits, no parity, 1 stop)
Function/Direction
T460 “projector”
Connection
Toshiba Control Port
Connector
Ground
Ground
mini-DIN 8 pin 4
Data from T460 to projector
Tx
mini-DIN 8 pin 1 (RXD)
Reply data from projector to T460
Rx
mini-DIN 8 pin 7 (TXD)
Plus 9 volt CTS/DTR to projector
CTS
mini-DIN 8 pin 2 (opt.)
1
2
3
4
6
7
5
8
mini-DIN 8
solder side view
NOTE: We have noticed that a number of Toshiba projectors have a VERY small hole in the plastic case surrounding the miniDIN 8 RS232 “Control” port connector, such that commonly available plugs, while they appear to plug in OK, and are held
firm, in fact don’t actually connect the pins, just the outer shell. If you have comms problems, this may be the cause.
Multimeter checks of RS232 voltage levels will show no connections. We fixed it by removing the outer plastic shell sleeve,
and just using the plug internals, with the two split metal sections and the two split plastic sections, and then heat-shrink a
15mm sleeve of 12mm tubing around the outer 15mm length only of the plug, leaving the far end of the plug free of plastic.
Some pre-assembled (moulded) connectors may be OK, where you can cut the other end off and re-terminate, but the selfassembly ones could be nasty!
RS232 connections to Toshiba TLP-X100,TLP-X150,TLP-X200,TLP-WX100,TLP-WX200
These use a 9-pin-D9 male on the projector, female on cable. (Comms is at 9600 baud, 8 bits, no parity, 1 stop.)
Function/Direction
T460
“projector”
Connection
“Serial” Port
Connector
Ground
Ground
9-pin D-sub pin 5
Data from T460 to projector
Tx
9-pin D-sub pin 3
Reply data from projector to T460
Rx
9-pin D-sub pin 2
Plus 9 volt CTS/DTR to projector
N/C
N/C
1
2
6
3
7
4
8
5
9
D-sub 9 female
solder side
After installation wiring of any projector to a T460, use a multimeter to check voltages of –9 on BOTH TX and RX pins in any
installation, as described in the troubleshooting part of this manual.
T460/461/T462 Manual 9th Sept 2015 Part B 3.84 release © Jed Micro Pty Ltd
64
RS232 connections to Toshiba projectors TLP-710/711
These use a D-sub 9 pin connector (documentation does not show male/female):
Function/Direction
T460 “projector” Connection
Toshiba Control Port Connector
Ground
Ground
9-pin D-sub pin 5
Data from T460 to projector
Tx
9-pin D-sub pin 2
Reply data from projector to T460
Rx
9-pin D-sub pin 3
Plus 9 volt CTS/DTR to projector
CTS
9-pin D-sub pin 7 (seems optional)
After installation wiring of any projector to a T460, use a multimeter to check voltages of –9 on BOTH TX and RX pins in any
installation, as described in the troubleshooting part of this manual.
2-Touch / CTOUCH LCD touch panel.
These are an LG-style panel with touchscreen add-on on the front, in sizes of 46”, 55”, 65”, 70”, 82” and 84”.
Setup means allocating input names to each of the eight channels allowed, using the table below:
T460 Channel
String sent
Input (on screen)
Function / connection
1
'kb 00 00',00DH
Dig TV
Tuner
2
'kb 00 02',00DH
AV
RCA Composite Video
3
'kb 00 03',00DH
S-Video
S-Video (DIN 4)
4
'kb 00 04',00DH
Component
RCA
5
'kb 00 07',00DH
PC-RGB
DB15
6
'kb 00 09',00DH
HDMI 1
HDMI 1
7
'kb 00 0a',00DH
HDMI 2
HDMI 2
8
'kb 00 0b',00DH
HDMI 3
HDMI 3
Don’t forget to set all unused T460 channels to “Skip” to jump over blank/unused inputs.
RS232 connections to 2-Touch / CTOUCH LCD projectors:
D-SUB 9 Female on panel, male on cable. Comms at 9600 8N1.
Note: Connector wiring on 2-Touch and CTOUCH documentation is totally incorrect, (e.g. Gnd on pin 1, links on 8->9)
Following has been tested and works correctly.
Function/Direction
T460 “projector”
Connection
Panasonic Serial Port
Connector
Ground
Ground
9-pin D-sub pin 5
Data from T460 to projector
Tx
9-pin D-sub pin 3 (RXD)
Reply data from projector to T460
Rx
9-pin D-sub pin 2 (TXD)
Plus 9 volt CTS/DTR to projector
N/C
N/C
5
4
9
3
8
2
7
1
6
D-sub 9 male
solder side
After installation wiring of any projector to a T460, use a multimeter to check voltages of –9 on BOTH TX and RX pins in any
installation, as described in the troubleshooting part of this manual.
T460/461/T462 Manual 9th Sept 2015 Part B 3.84 release © Jed Micro Pty Ltd
65
Viewsonic projector (non-Hitachi models):
Units with Toggle Blank/Mute/Freeze: PJD5112, PJD6210, PJD6211, PJD6212, PLD6220,
PLD6221, PJD6230, PJD6240, PJD6241, PJD6251, PJD6381, PJD6531w, Pro8450w,
Pro8500, Pro8600.
Units with Absolute Blank/Mute/Freeze: PJD5123, PJD5223, PJD5232, PJD5234, PJD5345,
PJD5353, PJD6243, PJD6544w, PJD7223, PJD7333, PJD7533w, PJD8333s, PJD8633ws.
Setup means allocating input names to each of the eight channels allowed, using the table below:
th
T460 Channel
String sent (4/5/6 byte)
Input (on screen)
Function / connection
1
000h, 019h, 029h
RGB1
RGB 1 PC Analog (D SUB 15)
2
01Eh, 090h, 072h
RGB2
RGB 2 PC Analog (D SUB 15) (some)
3
000h, 078h, 0A8h
Video
Composite Video BNC
4
000h, 0E8h, 069h
S-Video
S-Video (DIN 4)
5
000h, 0DAh, 02Bh
Component/HDMI
RGB YUV or HDMI 1 (some)
6
000h, 089h, 0E8h
Component
Component (some)
7
000h, 0DFh, 043h
LAN
LAN
Don’t forget to set all unused T460 channels to “Skip” to jump over blank/unused inputs.
Pro8100, Pro8200, Pro8300, Pro8400P. (Note: still under test)
Setup means allocating input names to each of the eight channels allowed, using the table below:
th
T460 Channel
String sent (6/7/8 byte)
Input (on screen)
Function / connection
1
0BCh, 0D3h, 035h
RGB1
RGB 1 PC Analog (D SUB 15)
2
08Fh, 0D3h, 036h
RGB2
RGB 2 PC Analog (D SUB 15) (some)
3
0A1h, 0D2h, 038h
Video
Composite Video BNC
4
070h, 0D3h, 039h
S-Video
S-Video (DIN 4)
5
05Eh, 0D2h, 037h
Component
RGB YUV
6
043h, 0D3h, 03Ah
HDMI 1
HDMI 1
7
092h, 0D2h, 03Bh
HDMI 2
HDMI 2
8
08Ah, 0DFh, 063h
LAN
LAN
Don’t forget to set all unused T460 channels to “Skip” to jump over blank/unused inputs.
Audio provision is minimal, some have an input or two, most have no outputs. Use a T461 or T441 if audio control is needed.
(Incremental volume commands are included.)
The Video mute (blank) function (toggle only) is supported by a “Mute-On/Mute-Off” keyboard. Toggle Freeze function is
supported on some. Two yellow button “Mute” mode is NOT supported.
Reply mode is supported.
This family supports aspect ratio control via the dummy channel, say, Ch 8, to “4:3/16:9/Zm.”.
FlagG sets AutoPixelAlign for DB15 channels.
T460/461/T462 Manual 9th Sept 2015 Part B 3.84 release © Jed Micro Pty Ltd
66
RS232 connections to Viewsonic projectors with D9 connectors
Following use D9 female on cable: PJD5112, PJD6211, PJD6212, PJD6221, PJD6241, PJD6251, PJD6381, and
PJD6531w
These use a 9-pin-D9 male on the projector, female on cable. (Coms is at 19200 BAUD, no parity, 1 stop.)
Function/Direction
T460 “projector”
Connection
Viewsonic Control Port
Connector D9
Ground
Ground
9-pin D-sub pin 5
Data from T460 to projector
Tx
9-pin D-sub pin 3
Reply data from projector to T460
Rx
9-pin D-sub pin 2
Plus 9 volt CTS/DTR to projector
n/c
n/c
1
2
6
3
4
8
7
5
9
D-sub 9 female
solder side
After installation wiring of any projector to a T460, use a multimeter to check voltages of –9 on BOTH TX and RX pins in any
installation, as described in the troubleshooting part of this manual.
RS232 connections to Viewsonic projectors with DIN-8 connectors
Following use Din8 connector: PJD6210
These use a mini-DIN 8 male connector wired, as follows: (Comms is at 19200 baud, 8 bits, no parity, 1 stop)
Function/Direction
T460 “projector”
Connection
Viewsonic Control Port
Connector DIN-8
Ground
Ground
mini-DIN 8 pin 4
Data from T460 to projector
Tx
mini-DIN 8 pin 1 (RXD)
Reply data from projector to T460
Rx
mini-DIN 8 pin 7 (TXD)
Plus 9 volt CTS/DTR to projector
CTS
n/c
1
2
3
4
6
7
5
8
mini-DIN 8
solder side view
After installation wiring of any projector to a T460, use a multimeter to check voltages of –9 on BOTH TX and RX pins in any
installation, as described in the troubleshooting part of this manual.
RS232 connections to Viewsonic projectors with DIN-6 connectors
Following use Din8 connector: PJD6220, PJD6230, and PJD6240
The majority all use a mini-DIN 6 male connector wired, as follows: (Comms is at 19200 baud, 8 bits, no parity, 1 stop)
Function/Direction
Ground
T460 “projector”
Connection
Ground
Viewsonic Control Port
Connector DIN-6
Mini-DIN Pins 1, 2
Data from T460 to projector
Tx
Mini-DIN Pin 3 (RXD)
Reply data from projector to T460
Rx
Mini-DIN Pin 5 (TXD)
Plus 9 volt CTS/DTR to projector
n/c
n/c
1
2
3
4
5
6
Mini-DIN 6
solder side
After installation wiring of any projector to a T460, use a multimeter to check voltages of –9 on BOTH TX and RX pins in any
installation, as described in the troubleshooting part of this manual.
T460/461/T462 Manual 9th Sept 2015 Part B 3.84 release © Jed Micro Pty Ltd
67
Vivitek: See Optoma group 5 for Vivitek Generic 1, 2, 3.
Note: Vivitek have some projectors which respond to multiple code sets. Very confusing.
Vivitek: Generic 1, 2 (9600) (~SR etc. group): D82EX, D863, D925, D927, D930, D935, D940, D945,
H1080, D1085
Vivitek: Generic 3 (9600) (~S1 etc. group), D5500, D6000, D6500, D6510, Projection Design: DP3650
Vivitek Generic 4: D54HA, D55BA, D86, D87, D501ZAA, D501ZAA, D501ZWAA, D516, D517, D518, D519,
D548, D550, D551, D552, D553, D554, D555, D556, D557, D557W, D557WH, D560ST, D751ST, D755WT/i,
D791ST, D795WT, D837, D850, D851, D853W, D855ST, D856, D857WT, D858, D859, D860, D861, D862, D863,
D864, D865W, D867, D869, D871ST, D873ST, D910HD, D912HD, D965, D966HD, D967, D968U, D5005, D5010,
D5110W, D5180HD, D5185HD, D5010, D5190HD, D5280U, D5290U, D5380U, D7080HD, D7180, H1180HD,
H1185HD (also Digital Projection)
Setup means allocating input names to each of the eight channels allowed, using the table below:
T460 Channel
String sent
Input (on screen)
Function / connection
1
V99S0201 +0Dh
RGB1
RGB 1 PC Analog (D SUB 15)
2
V99S0202 +0Dh
RGB2
RGB 2 PC Analog (D SUB 15) (some)
3
V99S0204 +0Dh
Video
Composite Video BNC
4
V99S0205 +0Dh
S-Video
S-Video (DIN 4)
5
V99S0207 +0Dh
RGB
BNC (some)
6
V99S0203 +0Dh
DVI
DVI-A and DVI-D automatic (some)
7
V99S0206 +0Dh
HDMI
HDMI (1)
8
V99S0209 +0Dh
HDMI 2
HDMI 2 (some)
Don’t forget to set all unused T460 channels to “Skip” to jump over blank/unused inputs.
Audio provision range is 0->10 (some are actually 0->8) only. Use a T461 or T441 if more audio control is needed.
The Video mute (blank) function is supported by a “Mute-On/Mute-Off” keyboard. Freeze is supported. Two yellow button
“Mute” mode is supported for video blank only on some, audio AND video on more recent ones.
You must set “Standby Mode” to “Standard” (some only). Turn “Auto Source” OFF. Set “No Signal Power Off (min)” to “0”.
Reply mode is supported.
Aspect ratio control is included. Use source names: “Set reg 4:3” and “Set reg 16:9”.
FlagG sets AutoPixelAlign for DB15 channels.
RS232 connections to Vivitek projectors with D9 connectors
These use a 9-pin-D9 male on the projector, female on cable. (Coms is at 9600 BAUD, no parity, 1 stop.)
Function/Direction
T460 “projector”
Connection
Viewsonic Control Port
Connector D9
Ground
Ground
9-pin D-sub pin 5
Data from T460 to projector
Tx
9-pin D-sub pin 2
Reply data from projector to T460
Rx
9-pin D-sub pin 3
Plus 9 volt CTS/DTR to projector
n/c
n/c
1
2
6
3
7
4
8
5
9
D-sub 9 female
solder side
After installation wiring of any projector to a T460, use a multimeter to check voltages of –9 on BOTH TX and RX pins in any
installation, as described in the troubleshooting part of this manual.
(Another Group not currently supported till we get one to test: D8300/EST/LT/ST, D8010W, D8800, D8900)
T460/461/T462 Manual 9th Sept 2015 Part B 3.84 release © Jed Micro Pty Ltd
68