1
H4D
User Manual
H4D-200MS
H4D-60
H4D-50MS
H4D-50
H4D-40
H4D-31
H4D
2
General overview
– controls and displays
This section provides an introduction to the control buttons'
functions as well as the information provided on the display
screens.
Photo: Claudio Napolitan / Hasselblad Masters
13
H4D
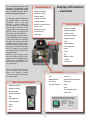
Button functions − overview
Below is an overview of the primary functions of the control wheels and buttons. Some controls have dual or triple
functions according to the state of the menu or setting. A full description can be found further on in this manual.
Shutter release button
MENU button
Releases shutter. Also activates camera from standby mode.
Accesses menu.
FLASH / (CONTROL LOCK) button
Illuminates grip display. Accesses
battery status and general information screen.
Locks settings to avoid inadvertent
change. Also accesses flash settings
as well as acting as Exit button.
AF button
Accesses focus modes.
ISO/WB button
Accesses ISO and White Balance
settings. Also acts as Save button.
Front control wheel
Illumination/Battery status button
ON.OFF (PROFILES/ESC) button
Turns the camera on and off. Accesses
Profiles and acts as escape button for
other functions.
Rear control wheel
Accesses and changes various settings.
Accesses and changes various settings.
M.UP button
True Focus button
Eyesight correction adjustment wheel
Raises and lowers mirror. Can be
reassigned to another function.
Activates True Focus function. Can
be reassigned to another function.
Adjusts viewfinder image to suit
individual eyesight.
Remote release cord port
Format button
EV correction adjustment button
For attaching a remote release
cord (electrical).
Re-formats CF card.
Produces EV exposure compensation.
STOP DOWN button
AE-L button
EXP button
Locks light reading made in both
automatic and manual exposure
modes. Can be reassigned to
another function.
Accesses exposure mode and metering method.
Stops down aperture to current
setting. Can be reassigned to
another function.
14
H4D
This overview illustrates the
functions and features most
commonly needed when shooting, and how they are distributed on the three displays.
Display information
− overview
VIEWFINDER INFORMATION
t Metering method
t Aperture setting
t Shutter speed
For example, aperture and shutter settings appear in both the
viewfinder and on the grip
displays in normal mode but
can also appear on the sensor
unit display if set to do so. ISO
settings appear on the grip and
on the sensor unit display but
not on the viewfinder display.
Also, changing settings are mirrored throughout. For example,
if you change the ISO setting on
the grip, the change will automatically appear on the sensor
unit display. Also, in this particular case, you are able to change
the ISO setting on the sensor
unit which will be mirrored on
the grip display.
t Exposure method
t Capture counter
t Exposure compensation
GRIP LCD INFORMATION
t Focus assist
t Metering method
t Warning triangle
t Aperture setting
t Flash warning
t Shutter speed
t Spirit level
t Exposure method
t Capture counter
t ISO
t White Balance
t 'MBTIJOEJDBUJPO
t 'PDVT
t %SJWF
t &7
However, some settings, aperture and shutter settings for example, are only changed on the
grip but are nevertheless mirrored in the viewfinder and sensor unit displays.
t #BUUFSZTUBUVT
.....optional.....
t )JTUPHSBN
Please note that the grip and sensor unit displays also illustrate
many more specialist settings.
These are covered in detail further
on in this manual.
REAR LCD INFORMATION (Currently 60 Mpix model only)
PHOCUS / PHOCUS MOBILE INFORMATION
t Metering method
t *40
.....optional.....
t 8IJUF#BMBODF
t &YQPTVSFDPNQFOTBUJPO
t *""SBUJOH
t )JTUPHSBN
t 4UPSBHFNFEJVN
t %BUF
t 5JNF
t Aperture setting
t 'PDBMMFOHUIPGMFOT
t Shutter speed
t 4QJSJUMFWFM
t Exposure method
t ISO
0QUJPOBMJOTUBOUMZBDDFTTJCMFGVMMTDSFFO
display of camera information to show:
t White Balance
Metering method
Aperture setting
Shutter speed
Flash indication
Focus
Drive
t 'MBTIJOEJDBUJPO
t 'PDVT
t %SJWF
t &7
15
EV
Battery status
Exposure method
Capture counter
ISO
White balance
H4D
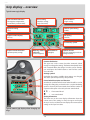
Grip display − overview
Typical camera grip display.
Flash condition indication
(No exposure compensation,
normal flash synchronisation)
Focus setting
(Autofocus setting,
single shot mode)
%SJWFDPOEJUJPO
(Single setting)
Aperture setting
(f/5.6)
Shutter speed setting
(1/400s)
&YQPTVSF7BMVFEJTQMBZ
(EV 13.8)
ISO setting
(100 ISO)
Low battery symbol
Exposure mode indication
(Aperture priority setting)
Metering method
indication
(Centre weighted)
White balance
(Daylight)
Capture counter
(28 shots remaining on chosen
storage medium)
Command indication
The upper row on the screens describes commands (which
change according to the setting). The button immediately above
each command effects the change. So in this case, for example,
you would press the FLASH button to ‘exit’ from the screen.
See note below.
Settings symbols
Symbolize the options available when settings are changed.
The active symbol is depicted by a drop shadow.
Control wheel description and direction
Arrowheads symbolize which control wheel should be used to
change the setting they are beside. In this case, the Bracketing
option is chosen by the front control wheel and the number of
captures in that option is chosen by the rear control wheel.
...
=
front control wheel
=
rear control wheel
Setting information
The lower row on the screen displays information about the
current state of the setting. In short, the upper row displays
what you can do, and the lower row displays the current state of
settings or what you have done.
Typical camera grip display when changing settings.
16
H4D
Viewfinder display − overview
Typical viewfinder display. Note the LEDs will only be visible when activated (by the camera or a setting).
Exposure method indication
(‘aperture priority’ mode)
Aperture setting
(f/5.6)
Exposure compensation
setting reminder symbol
Metering method setting
(Centre weighted)
'PDVT"TTJTU-&%
True Focus (all models)
and HCD crop (60 Mpix
only) icons appear
on right hand side of
display when functions are activated.
'MBTI-&%
Warning triangle
-&%
Exposure compensation
setting (+0.7 EV)
Shutter speed setting
(1/30 second)
Capture
counter
When activated, the integral spirit level replaces normal display.
(Currently 60 Mpix model only)
Some examples of various viewfinder displays
Standard settings
Normal screen with True Focus
activated
Normal screen with AE lock
activated
Normal screen with exposure
compensation set
7JFXGJOEFSEJTQMBZBDDPSEJOHUPTFUUJOH
Exposure method and
metering method mode
examples
Drive mode
etc. where:
Flash mode
AF mode
Exposure compensation
mode
A
S
P
Pv
M
= Aperture priority
= Shutter priority
= Program
= Program variable
= Manual
Centre Weighted =
CentreSpot =
Spot =
17
H4D
Sensor unit display overview
When shooting, the sensor unit can display the information most often required for a quick settings check.
The unit's buttons are used to navigate the main menu and change settings.
ISO setting
White
balance
Storage
medium
ISO setting, white balance etc information is
retained when navigating the menu.
Button
function
Capture file
name
IAA rating
The unit's buttons are used for navigation
and setting changes.
(Currently 60 Mpix model only)
The control wheels on the
grip can be set to duplicate
the actions of several of the
buttons on the unit if you
wish.
See under Sensor unit −
introduction for details.
Camera information (such as: aperture
setting, shutter speed, flash indication,
focus setting, drive, EV, battery status,
FYQPTVSFNFUIPEDBQUVSFDPVOUFS*40
and white balance) can also be displayed on the sensor unit by clicking
the upper arrow on the Navigation
button.
(Currently 60 Mpix model only)
Spirit levels can be displayed on the sensor unit
(a horizontal spirit level
is also visible in the viewfinder simultaneously).
This feature is activated by
holding down the Viewmode button for a second.
The display can call up all saved captures for browsing and enlarge them for detailed inspection.
When shooting, you can control the amount of information visible together with the current preview by choosing
various modes (see Preview Modes section further on in this manual). In the upper left example, the preview is
showing a histogram overlay with ISO and white balance information etc as an example.
See Sensor unit − introduction further on in this manual for an overview of the information that is accessible on
the sensor unit menu.
18
H4D
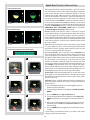
Spirit level (Currently 60 Mpix model only)
Normal (at default setting)
Not level
Level
Repro (at default setting)
Not level
Level
The spirit level as it appears in the viewfinder display.
1
2
3
4
5
6
The integrated electronic spirit level provides a rapid and accurate
way of ensuring the camera is either horizontally neutral in alignment
(level) and/or vertically neutral in alignment (plumb). It uses two
methods that are fully visible on the sensor unit display and partly
visible in the viewfinder. The method is selected by the camera automatically according to alignment. So, if the camera is in a relatively
normal orientation, then Normal is selected and when the camera is
in a more extreme orientation then Repro is selected. You can activate
the spirit level (for both sensor unit and viewfinder displays) by holding down the View Mode button for a second, or, by re-assigning the
TRUE FOCUS / AE-L / STOP DOWN or M.UP button as an activator.
See Custom Options #4, #5, #6 and #7 for details.
Normal: Generally used when the camera is mounted on a tripod/
stand in either landscape or portrait orientation. Allows the camera to
be correctly aligned in two planes regardless of apparent deviations
in the viewfinder. Particularly useful for landscape work where most
of the horizon is hidden, for example, or architectural/interior work
where wide angle lenses can often create a difficult situation to level
the camera visually.
Repro: Normally used when the camera is mounted on a tripod/stand
in a 'repro' alignment, that is, camera pointing directly downwards
(this feature also works pointing directly upwards). Ensures that the
camera is in a truly perpendicular alignment.
In use: Sensor unit display o Three scales can be seen in Standard mode.
The scale along the lower edge and to the right hand side (in landscape mode) require you to alter the camera's orientation to center
the yellow 'bubbles'. When centered, these bubbles become green.
The third central scale consisting of a large circle with cross-hairs
provides an alternative combined display. The content of the circle
changes from yellow to green when the horizontal orientation is correct. In Repro mode, the central scale is also a 'bubble' type. Again,
the two yellow bubbles become green when centered in their respective scales. As an alternative, the central blue bubble can be centered within the green circle (no color change to the bubble).
Viewfinder display o Only horizontal alignment can be seen in the viewfinder display. It uses the bubble method as described above except
the bubble becomes black when the camera is level. Custom calibration can also be used.
Calibration: There is a default calibration for either mode which is selected automaticaly. However you can store a custom calibration for
various purposes.
1) Press the Preview button for one second (toggle function) to
activate the spirit level feature.
2) The text along the bottom of the display reads EXIT, Standard,
MODE.
3) Press the MODE button ("QQSPWBM0,CVUUPO).
4) The text along the bottom of the display now reads CAL, User,
MODE, and a green user icon appears in the top left of the display.
5) When you are satisfied that the camera is securely in the chosen
orientation, press the CAL button (Menu/Exit button) to store
the new setting.
6) Press the MODE button to toggle between default and custom
settings.
Custom settings are retained for future use. To make a new custom
setting, repeat the above procedure.
19
H4D
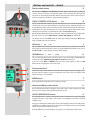
Buttons and controls − details
A
Shutter release button
A
This button has half-press and full-press positions. By pressing half-way (or softly) the
camera, auto focus function and exposure meter can be activated. By pressing all the
way down (or more firmly) the shutter will be released (or the chosen exposure procedure for example, the self timer is activated with this button).
'-"4)$0/530--0$,
CVUUPO (EXIT)
B
This is a triple function button. If you press the button for one second, the beeper will
sound (if set) and a key symbol will appear on the grip display signifying that the controls (except the shutter release) have been locked and therefore cannot be altered unintentionally in use. Press the button for one second again to unlock (this function can be
altered to lock all controls or control wheels only in $VTUPN0QUJPOT).
B
C
D
Quickly clicking the button will access the flash settings information on the display from
the main screen. See under Flash /Strobe - controls and displays for full details.
E
This button also acts as the EXIT button for many other settings including an EXIT button
when navigating the sensor unit menu.
AF button
/
0/
/
C
(SEL.)
This is a triple function button. Press this button to directly access the autofocus/manual
focus choice screen from the main screen. See under Lenses for full details. It also acts as
the ON and SEL. (= select) buttons for many other settings.
*408#CVUUPO (SAVE)
/
&/5&3
D
This is a triple function button. It provides direct access to the ISO and White Balance
settings (see under Light Metering & Exposure Control for full details).
It also acts as the SAVE and ENTER buttons for many other settings as well as an OK
button when navigating the sensor unit menu.
F
G
H
Front control wheel
E
The front and rear control wheels are used to make changes in exposure settings, access
the grip menu for settings as well as navigate the sensor unit’s menu. The effect of the
wheels’ direction is customizable.
.&/6CVUUPO
'
Accesses the first level of the menu for settings changes.
Illumination/Battery status button
G
Press to illuminate the display. Remains active until camera enters standby mode. Hold
down to access battery status/general information screen.
0/0''130'*-&4&4$
CVUUPO
I
)
Press the button for 1 second to activate the camera. The H4D start-up logo will appear
and then the main screen. After a few seconds (customizable) the camera will enter
Standby mode.
A long press of the button will turn the camera off completely (even from Standby mode)
signified by an audible signal (if set). A quick ‘click’ on the button will access the Profiles
section of the menu from the main screen.
Note the difference in results between a long press and a quick click of this button.
20
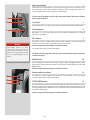
H4D
Rear control wheel
I
The front and rear control wheels are used to make changes in exposure settings, access
the various loop sections of the menu for settings as well as navigate the sensor unit’s
menu. The effect of the wheels’ direction is customizable.
J
On the rear of the grip, as well as the rear control wheel, there are a further
three control buttons:
K
True Focus
J
Activates the True Focus setting. See separate section for explanation of this function.
L
Format button
K
Re-formats a CF card. Purposefully recessed to prevent unintentional use. Dialogue
appears for confirmation.
AE-L button
Note
Reassignable buttons are particularly useful and can save you a
great deal of time and effort. You are
advised to investigate their potential
fully. See Custom Options for full
details.
L
This button can lock a light reading made in both automatic and manual exposure
modes. It can also be used in Zone mode to take a new reading.
Can be reassigned in Custom Options to another function.
See section on the AE-L button for full details.
On the front of the grip there are two more control buttons plus the remote
cord release port:
.61CVUUPO
.
Press this button to raise the mirror and press again to lower it (toggle function). A quick
double press of the button (two within a half second) will immediately access the Self
timer function.
Can be reassigned in Custom Options to another function.
3FNPUFSFMFBTFDPSEQPSU
M
/
0
/
For attaching a remote release cord (electrical). The Hasselblad accessory jack plug
socket is protected by a captive rubber plug.
4501%08/CVUUPO
0
Press this button to make a visual check of the depth-of-field on the viewfinder screen at
the chosen aperture. The aperture will close according to the setting and remain closed
as long as the pressure is maintained. You can alter the aperture at the same time to see
the changes taking place.
Can be reassigned in Custom Options to another function.
21
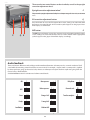
H4D
There are also two control buttons on the viewfinder, as well as the eyesight
correction adjustment wheel:
Eyesight correction adjustment wheel
P
The personal eyesight adjustment facility has a diopter range of -5 to +3.5, to suit most
users.
EV correction adjustment button
ON:
Q
Press this button to access the EV compensation screen. Settings are made with either
the front or rear control wheels. An EV correction symbol appearsOFF:
on the grip and viewfinder display as confirmation.
EXP button
P
Q R
Error:
The EXP (Exposure) button accesses the exposure mode and metering method options
screen. Settings are made with the front and rear control wheels and the appropriate
symbols appear on the grip and viewfinder displays accordingly.
Ready:
Low battery:
Audio feedback
R
ON:
Overexposure:
OFF:
Underexposure:
Error:
5 images left:
There are fourteen different sounds to help provide immediate information. A button press has a normal mechanical ‘click’
sound while the remaining actions listed here are more musical. For example, a capture rated as overexposed is signified
by three rapid notes going up the musical scale, whereas anReady:
underexposed capture has three rapid
notesleft:
going down the
1 image
musical scale, as illustrated here.
See 6TFS*OUFSGBDF section for activation and volume control details.
Low battery:
Media full:
ON:
ON:
Overexposure:
Overexposure:
IAA yellow:
IAA yellow:
OFF:
OFF:
Underexposure:
Underexposure:
Overwritered:
red:
Overwrite
Error:
Error:
5 images left:
5 images left:
Transfer complete:
Transfer complete:
Ready:
Ready:
1 imageleft:
left:
1 image
Low
Battery:
Low
battery:
Medium full:
Media full:
Overexposure:
IAA yellow:
22
H4D
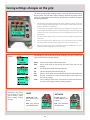
Saving settings changes on the grip
The basic principle behind making changes is that the appropriate button is
first pressed to access the menu and then settings altered by way of the control
wheels. The appropriate control wheel is designated by arrowheads alongside
the setting description.
Some buttons have a toggle function, the ON.OFF button has a quick ‘click’ action
as well as a longer (half-second) ‘press’ action and the shutter release has two
positions: ‘half-press’ and ‘full-press’.
Several buttons on the grip are multifunctional, according to the state of the menu.
In the example illustrated here, the FLASH button functions as the EXIT button, the
AF button functions as the ON button and the ISO/WB button functions as the
SAVE button.
The front and rear control wheels can also be used to navigate the menu on the
sensor unit.
At very low temperatures the displays require a few seconds to present new settings.
The control wheels are also used to navigate the menu on the sensor unit.
The FLASH button also acts as an EXIT button and the ISO/WB button acts as an
OK button when navigating the sensor unit menu.
The following is a list of the various terms describing the various actions that
appear in the menu (on the grip display):
Examples
Enter:
Exit:
Off:
On:
Sel.:
ESC:
Save:
Remember the following groupings of ‘saved’
and ‘not-saved’ actions
when making settings
changes:
moves screen down one level on the menu.
moves screen back up one level on the menu. Does not save any
settings.
deactivates the particular function being set.
activates the particular function being set.
(Select) - selects the character marked for image info and profile name
(Escape) - terminates an action and returns to the main screen. Does
not save any settings.
saves a setting and also moves screen back up one level on the menu.
Can save many changes made in a setting sequence.
SAVED
NOT SAVED
‘Quick save’ - halfpress shutter release
button
Escape - press ESC
button (PROFILES /ESC
button)
Save - press save button (ISO/WB button)
Exit - press exit button
(FLASH button)
23
H4D
Hasselblad A/S
Hejrevej 30, DK - 2400 Copenhagen,
Denmark
Victor Hasselblad AB
Box 220, SE - 401 23 Göteborg,
Sweden
09.2011 - UK v15
141