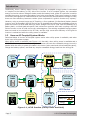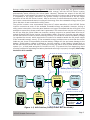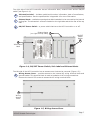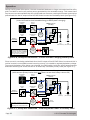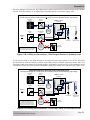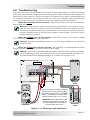
1
ACLD-40
AC Load Diversion Controller - 4.0kW
Owner’s Manual
Thank you from all of us at Sensata Technologies for purchasing this ACLD-40 controller. The
ACLD-40 (also know as the ACLD) is a product under the Magnum-Dimensions brand from Sensata
Technologies. We understand that you have many purchasing options in the marketplace, and we
are pleased that you have decided on this product. This ACLD was proudly assembled and tested
in the United States at our facility in Everett, Washington.
At Sensata, we are committed to providing you with quality products and services, and hope that
your experience with us is pleasant and professional.
Disclaimer of Liability
The use of this manual and the conditions or methods of installation, operation, use and maintenance
of the ACLD controller is beyond the control of Sensata Technologies. Therefore, this company does
not assume responsibility and expressly disclaims liability for loss, damage, or expense whether
direct, indirect, consequential or incidental that may arise out of or be any way connected with
such installation, operation, use, or maintenance.
Due to continuous improvements and product updates, the images shown in this manual may not
exactly match the unit purchased.
Restrictions on Use
The ACLD may only be used in life support devices and systems with the express written approval
of Sensata Technologies. Failure of this load diversion controller can reasonably be expected to
cause failure of that life support device or system, or to affect the safety or effectiveness of that
device or system. If the ACLD fails, it is reasonable to assume the health of the user or other
persons may be endangered.
Copyright Notice
Copyright © 2015 by Sensata Technologies. All rights reserved. Permission to copy, distribute, and/
or modify this document is prohibited without express written permission from Sensata Technologies.
Document Information
Description – ACLD-40 Owner’s Manual
Part Number and Revision – 64-0062 Rev A
Date Published – February 2015
This manual is printed without color for cost savings. However, this entire manual is available
for download—with many of the figures available in color—under the Document Library tab at
www.Magnum-Dimensions.com.
Contact Information
For Magnum-Dimensions Products:
Sensata Technologies
2211 West Casino Rd.
Everett, WA 98204
Phone: 425-353-8833
Fax: 425-353-8390
Web: www.Magnum-Dimensions.com
Record the ACLD’s serial number in case you need to provide this information in the future.
Model:
ACLD-40
© 2015 Sensata Technologies
Serial Number:
TA
Page i
Safety Information
IMPORTANT PRODUCT SAFETY INSTRUCTIONS
SAVE THESE INSTRUCTIONS
THIS MANUAL CONTAINS IMPORTANT INSTRUCTIONS FOR THE ACLD-40 CONTROLLER THAT SHALL
BE FOLLOWED DURING THE INSTALLATION AND OPERATION OF THIS PRODUCT. Before using
the ACLD, read all instructions and cautionary markings. Also, be sure to follow the instructions
provided for each component of the system. Do not perform any installation or service described
in this owner’s manual unless properly trained and capable. Incorrect installation or service may
result in the risk of electric shock, fire, or other safety hazard.
Safety Symbols
The following safety symbols have been placed throughout this manual to indicate dangerous and
important safety instructions.
WARNING: This symbol indicates that failure to take a specified action could result in
physical harm to the user.
CAUTION: This symbol indicates that failure to take a specified action could result in
damage to the equipment.
Info: This symbol indicates information that emphasizes or supplements important
points of the main text.
Safety Precautions
•
•
•
•
•
•
•
•
•
•
•
•
•
•
All electrical work must be performed in accordance with local and national electrical codes.
This product is designed for indoor/compartment installation. It must not be exposed to rain,
snow, moisture, or liquids of any type.
Use insulated tools to reduce the chance of electrical shock or accidental short circuits.
There are no user-serviceable parts contained in this product.
This unit is provided with integral protection against overloads.
Use Class 1 wiring methods for field wiring connections to terminals of a Class 2 circuit.
Listed or labeled equipment shall be installed and used in accordance with any instructions
included in the listing or labeling.
Always verify proper wiring prior to turning on the ACLD.
Use only copper wires with a minimum temperature rating of 75°C (167°F).
AC wiring must be no less than #10 AWG (5.3 mm2) gauge copper wire.
Torque all AC wiring connections to the required values.
The ACLD must be properly mounted, see Section 2.3 “Mounting the ACLD” in this manual.
Protection for the AC output wiring against overcurrent is not included in the ACLD and must
be provided as part of the system installation. Refer to Section 2.8 “Wiring the ACLD” for more
information.
The AC output neutral conductor is not connected (bonded) to the ACLD chassis. Both the input
and output conductors are isolated from the ACLD chassis. System grounding, if required, is
the responsibility of the system installer and must comply with local and national electrical
codes and standards.
Page ii
Safety Information
CONSIGNES DE SÉCURITÉ IMPORTANTES
CONSERVER CES INSTRUCTIONS
CE MANUEL CONTIENT DES INSTRUCTIONS IMPORTANTES POUR LE CONTRÔLEUR ACLD-40 AU
COURS DE L’INSTALLATION ET FONCTIONNEMENT DU PRODUCT. Before utilisant le ACLD, lire
toutes les instructions et mises en garde. Aussi, assurez-vous de suivre les instructions fournies
pour chaque composant du système. Ne pas effectuer toute installation ou service décrit dans le
manuel du propriétaire, à moins bien formé et capable. Mauvaise installation ou entretien peuvent
entraîner des risques de choc électrique, d’incendie ou autre danger pour la sécurité.
Symboles de sécurité
Les symboles de sécurité suivants ont été placéstout au long de ce manuel pour indiquer des
conditions dangereuses et les consignes de sécurité importantes.
AVERTISSEMENT: Ce symbole indique que le défaut de prendre une action spécifiée
pourraitcauser des dommages physiques à l’utilisateur.
ATTENTION: Ce symbole indique que le défaut de prendre une action spécifiée peut
entraîner des dommages à l’équipement.
Info: Ce symbole indique une information qui met l’accent ou des suppléments points
importants du texte principal.
Consignes de sécurité
•
•
•
•
•
•
•
•
•
•
•
•
•
•
Tous les travaux électriques doivent être effectués en conformité avec les codes locaux et
nationaux électriques.
Ce produit est conçu pour l’installation / du compartiment intérieur. Il ne doit pas être exposé
à la pluie, la neige, l’humidité ou des liquides de tout type.
Utiliser des outils isolés pour réduire le risque de choc électrique ou courts-circuits accidentels.
Il n’y a pas réparable par l’utilisateur contenues dans ce produit.
Cet appareil est fourni avec une protection intégrale contre les surcharges.
Utiliser des méthodes de câblage Classe 1 pour les connexions de câblage sur le terrain aux
bornes d’un circuit de Classe 2.
Coté ou étiquetés équipement doit être installé et utilisé conformément aux instructions
figurant dans la liste ou l’étiquetage.
Toujours vérifier le câblage avant de mettre sur le ACLD.
Utilisez des fils de cuivre seulement avec une cote de température minimale de 75°C (167°F).
AC câblage ne doit pas être inférieure à #10 AWG (5.3 mm2) de cuivre de calibre.
Serrer toutes les connexions de câblage ca aux valeurs requises.
Le ACLD doit être correctement monté, voir la Section 2.3 “Montage du ACLD” dans ce manuel.
Protection pour le câblage de sortie AC contre les surintensités n’est pas inclus dans le ACLD
et doivent être fournis dans le cadre de l’installation du système. Reportez-vous à la Section
2.8 “Câblage du ACLD “ pour plus d’informations .
Le conducteur de sortie CA neutre n’est pas connecté (collé) sur le châssis ACLD. À la fois
l’entrée et la sortie des conducteurs sont isolés du châssis ACLD. Sol, si nécessaire, est
de la responsabilité de l’installateur du système et doit être conforme aux codes locaux et
nationaux et des normes électriques.
© 2015 Sensata Technologies
Page iii
Table of Contents
1.0
Introduction ............................................................................. 1
2.0
Installation .............................................................................. 8
3.0
Operation ............................................................................... 23
4.0
Troubleshooting ..................................................................... 33
1.1
1.2
1.3
1.4
1.5
2.1
2.2
2.3
2.4
2.5
2.6
2.7
2.8
2.9
2.10
2.11
3.1
3.2
3.3
3.4
3.5
3.6
3.7
3.8
3.9
What is an AC Load Diversion Controller (ACLD)? ...................................... 1
What is an AC Coupled system, and why do I need an ACLD? ..................... 1
How an AC Coupled System Works .......................................................... 2
Battery Regulation Methods ................................................................... 4
ACLD Features and Benefits ................................................................... 6
Pre-Installation .................................................................................... 8
Locating the ACLD Controller ................................................................ 10
Mounting the ACLD Controller............................................................... 11
General Wiring Requirements ............................................................... 13
Torque Requirements .......................................................................... 14
ACLD Terminal Block Connections ......................................................... 15
Electrical System Wiring Diagrams ........................................................ 15
Wiring the ACLD ................................................................................. 18
ACLD Load Requirements ..................................................................... 19
Connecting the ACLD to a MS-PAE Series Inverter ................................... 21
Using a Remote Control with the ACLD Controller .................................... 22
ACLD Operation ..................................................................................
Three-Stage Regulation .......................................................................
Operation Scenarios - Utility Connected .................................................
Power Flow Scenarios - Utility Not Connected .........................................
Power Switch Operation .......................................................................
Inverter Fan Operation ........................................................................
Operating Modes ................................................................................
Monitoring the ACLD Controller with a ME-ARC Remote Display .................
ACLD Startup .....................................................................................
23
25
26
27
30
30
31
31
32
Appendix A – Specifications and Optional Equipment ..................... 35
A-1
A-2
A-3
ACLD-40 Load Diversion Controller Specifications .................................... 35
Regulatory Compliance ........................................................................ 36
Optional Equipment and Accessories...................................................... 36
Appendix B – Warranty and Service .............................................. 37
B-1
B-2
Page iv
Limited Warranty ................................................................................ 37
How to Receive Repair Service .............................................................. 37
© 2015 Sensata Technologies
List of Figures
Figure
Figure
Figure
Figure
Figure
Figure
Figure
Figure
Figure
Figure
Figure
Figure
Figure
Figure
Figure
Figure
Figure
Figure
Figure
Figure
Figure
Figure
Figure
Figure
Figure
1-1, ACLD Inactive (Utility Power Available) ............................................................ 2
1-2, ACLD Active (Utility Power NOT Available)........................................................ 3
1-3, Intake Fan, Status LED, Connection Ports, and Knockouts .................................. 6
1-4, ON/OFF Power Switch, Info Label and Exhaust Vents ......................................... 7
1-5, Wiring Access Cover ..................................................................................... 7
2-1, Simplified ACLD System ................................................................................ 8
2-2, Removing Knockouts ...................................................................................10
2-3, Approved Mounting Positions ........................................................................11
2-4, ACLD Dimensions and Side Reference ............................................................12
2-5, ACLD Terminal Block ....................................................................................15
2-6, ACLD System Wiring ....................................................................................16
2-7, AC Wiring from Inverter to ACLD ...................................................................17
2-8, ACLD to Inverter Communications Cable Connection ........................................21
2-9, ACLD/NETWORK Communication Cable ..........................................................21
3-1, Automatic 3-Stage Graph .............................................................................25
3-2, Utility Connected - Surplus Power Fed to the Utility Grid ...................................26
3-3, Utility Connected - Additional Power Provided by the Utility Grid ........................26
3-4, Utility not Connected - RE Powers Critical Loads ..............................................27
3-5, Utility not Connected - Additional Power Provided to Critical Loads .....................27
3-6, Utility not Connected - Excess Current Charging Battery Bank ...........................28
3-7, Utility not Connected - Diverting some Power to Primary Load ...........................28
3-8, Utility not Connected - Diverting all Power to Primary Load ...............................29
3-9, Utility not Connected - Diverting Power to Secondary Load ...............................29
3-10, Power Switch ............................................................................................30
3-11, Checking Load Resistance ...........................................................................33
List of Tables
Table 2-1, Torque Values for Ground Busbar ....................................................................14
Table 2-2, Torque Values for the AC Terminal Blocks .........................................................14
Table 3-1, LED Blinks to Fault Condition ..........................................................................32
© 2015 Sensata Technologies
Page v
Page vi
© 2015 Sensata Technologies
Introduction
1.0 Introduction
Congratulations on your purchase of the ACLD-40 (AC Load Diversion - 4.0kW) controller. The
ACLD-40 (also know as the ACLD) is designed to be used in an AC coupled system—networked
with a MS-PAE Series1 inverter—to provide three-stage battery charging and to divert any excess
power to a resistive load.
The ACLD-40 controller includes the following features:
•
•
•
•
•
•
•
•
•
1.1
Automatic three-stage battery regulation (with adjustable voltage and charging parameters).
Controls up to 4000 watts of excess power to prevent battery overcharge.
Automatic battery temperature compensation—provides optimum charging even during
extreme temperature changes (when using the inverter’s Battery Temperature Sensor).
A networked diversion device—using inverter and network ports.
ON/OFF mounted switch with status/fault indicator LED; operation and power information
is provided when using the inverter’s remote.
Designed to work with MS-PAE Series inverters to prevent battery overcharging.
Diversion load is isolated from in-home AC loads and receives PWM (Pulse Width Modulation)
voltage—prevents AC line disturbance by providing smooth transition when regulating.
Allows the use of resistive AC household loads (i.e., water heater tanks) instead of expensive
and hard to find DC loads to divert excess current.
Does not require additional/external sensors to monitor battery inverter output current,
battery voltage, or battery type.
What is an AC Load Diversion Controller (ACLD)?
The basic operating concept of an AC or DC diversion controller is quite simple. Monitor the battery
bank, and if an energy source (e.g. solar panel, wind generator, etc.) should cause the battery
to rise to a predetermined voltage level, connect a diversion load of sufficient size to prevent the
battery from being overcharged. By diverting the unused energy that your solar panel or wind
generator is producing, you can make use of it—such as heating a hot water or heating a room.
The ACLD-40 is an AC load diversion controller that maximizes the use of onsite-generated power
(i.e., renewable energy) by diverting any excess energy to resistive loads on the AC side. By
diverting the excess current on the AC side and not on the DC side (through the battery-based
inverter), there is less strain on the battery-based inverter. Also, since the wiring is on the AC
side, there is less voltage drop, less expensive system wires and diversion loads, and fewer issues
when trying to determine how to size the diversion loads/hardware.
1.2
What is an AC Coupled system, and why do I need an ACLD?
Many homeowners utilize renewable energy (i.e., PV, wind, etc.) by installing a high efficiency,
battery-less, grid-tie inverter (also known as an utility-interactive inverter) to offset their power
consumption from the utility grid. However, these homeowners soon learn that when a utility
power outage occurs, the grid-tie inverter is required to shut down. This can cause considerable
frustration as the homeowner realizes that the critical loads in the home (refrigerator, lights, water
pump, etc.) are no longer powered and all the energy produced by the renewable energy source
is being wasted while the utility power is out.
To overcome some of the disadvantages of a battery-less, grid-tie inverter; homeowners add a
battery-based inverter and batteries to power critical loads during a utility power outage. However,
the generated power from the renewable energy continues to be wasted until the utility power
returns.
1
This manual will specifically refer to the MS-PAE Series to work with the ACLD-40. However, the ACLD will work with any battery-based inverter that provides a MagNet communications
port and has an output of 230 or 240 VAC (50 or 60 Hz). This means the MS-PAE Series, MS-E
Series, or MS-PE Series inverters will work with the ACLD-40.
© 2015 Sensata Technologies
Page 1
Introduction
Traditionally, when a battery-based inverter is used, the renewable energy system is connected
or ‘coupled’ to the battery (or DC) side of the inverter. In a DC coupled system, the renewable
energy is wired at a lower voltage to better match the battery bank, and a DC controller is used to
manage the energy to prevent the battery from being overcharged. This type of system is usually
more costly and complex to install because of more components; and because the voltage is lower,
there are more efficiency losses as a whole (when compared to a grid-tie inverter-only system).
However, using a concept known as AC Coupling, a four quadrant (bi-directional) battery-based
inverter (such as Sensata’s MS-PAE Series) can be installed that utilizes the renewable energy to
power the home’s critical loads during a power outage from the AC side. With the addition of a
battery bank, a critical-loads sub-panel, and a diversion controller with load, coupling a MS-PAE
Series inverter on the AC side can be very advantageous. The existing renewable energy system
does not need to be rewired to the DC side, and the high conversion efficiency of the grid-tie
inverter is maintained while the utility power is available.
1.3
How an AC Coupled System Works
Described below is how an AC-Coupled system works when utility power is available, and when
there is an utility power outage.
When utility power is available (see Figure 1-1): Normally, when utility power is available and a
MS-PAE Series inverter is installed, the grid-tie inverter converts the renewable energy to work in
parallel with the utility to power the loads in the home (main-panel and critical loads sub-panel),
charge the battery system, and feed any surplus renewable energy back into the utility grid.
Utility
Grid
Main
Panel
Battery
Bank
Inverter
Battery Back-up Section
Critical
Loads
SubPanel
ACLD-40
Controller
AC Load
(Secondary)
ACLD Section
Renewable
Energy
Grid-Tie
Inverter
AC Load
(Primary)
Power Flow
Utility Grid
Renewable
Energy
Figure 1-1, ACLD Inactive (Utility Power Available)
Page 2
© 2015 Sensata Technologies
Introduction
During a utility power outage (see Figure 1-2): When the utility power fails, the grid-tie inverter
disconnects (preventing the use of the renewable energy) and the MS-PAE Series inverter
automatically starts powering the critical loads. However, because the output of the MS-PAE
Series inverter is connected to the same AC bus as the grid-tie inverter and its output waveform
is compatible to the utility’s waveform, the grid-tie inverter re-synchronizes to the AC output
waveform of the MS-PAE Series inverter. After a minimum 5-minute disconnect period, the gridtie inverter reconnects and starts inverting all the energy from the renewable energy source just
like it did when it was connected to utility power.
The grid-tie inverter—now reconnected using the AC output waveform of the MS-PAE Series
inverter—converts as much of the available renewable energy as possible. However, during a
utility power interruption, the main panel loads are no longer connected and the utility grid is not
available to export any excess power that is generated. This means there may be more power on
the AC bus than the critical loads can consume, causing current to be pushed back thru the AC
output of the MS-PAE Series inverter into the battery bank. Since this is not the normal path for
the MS-PAE Series inverter to sense incoming current, it is not able to control the battery voltage
(or regulate the current, which requires the inverter to be rated to handle the full power output
of the renewable energy source). If the renewable energy provides more current that the critical
loads can use, there is the possibility that the battery voltage will rise and cause damage to the
battery. If the battery voltage is allowed to rise high enough, a High Battery Voltage fault on
the MS-PAE Series inverter will occur, causing it to turn off; which in turn shuts down the entire
system (i.e., critical loads and grid-tie inverter turn off). To prevent this from happening, there
must be a method of regulating the battery bank and ensuring it is properly charged; this is why
the ACLD-40 is needed.
Utility
Grid
Main
Panel
Battery
Bank
Inverter
Battery Back-up Section
SubPanel
Critical
Loads
ACLD-40
Controller
AC Load
(Secondary)
ACLD Section
Renewable
Energy
Grid-Tie
Inverter
AC Load
(Primary)
Power Flow
Renewable
Energy (RE)
Inverter power
(when RE not
available)
Figure 1-2, ACLD Active (Utility Power NOT Available)
© 2015 Sensata Technologies
Page 3
Introduction
1.4
Battery Regulation Methods
In an AC-coupled system, there are several methods that are used to regulate the battery voltage,
as described below:
1. AC disconnect driven by DC controlled relays: When the battery voltage rises above a
maximum setpoint, a battery voltage controlled relay is activated to open the AC connection to
the grid-tie inverter. This causes the critical load sub-panel to now be powered from the batteries
through the battery-based inverter. When the battery voltage falls to the low setpoint, the relay
closes and allows the grid-tie inverter to reconnect and begin generating power from the renewable
energy. If the battery voltage rises again, this cycle repeats.
Disadvantages:
• Batteries are cycled, not regulated—does not allow the batteries to be properly charged.
• Generated power from the renewable energy is wasted while the relay is opened.
• The DC relay setpoints must be set much higher than required to ensure the DC relay
doesn’t connect or interfere with normal charging (from the battery-based inverter) and
any sell back voltage settings once the utility power returns.
• No temperature-compensated regulation while charging.
2. DC diversion driven by DC controlled relays: When the battery voltage rises above a
maximum setpoint, a battery voltage controlled relay is used to switch on a dedicated DC diversion
load to consume any excess power. When the battery voltage falls to the low setpoint, the dedicated
diversion load turns off. If the battery voltage rises again, this cycle repeats.
Disadvantages:
• Batteries are cycled, not regulated—does not allow the batteries to be properly charged.
• Difficult to source and size DC diversion loads to absorb the full output of the renewable
energy source.
• The regulation setpoint must be set much higher than required to ensure the diversion load
is not always in “regulation”, and that it doesn’t interfere with normal charging (from the
battery-based inverter) or any sell back voltage settings once the utility power returns.
• Since excess power is regulated on the DC side, the battery-based inverter is required to be
always on, re-converting the renewable energy from AC back to DC where it is diverted—an
extra conversion step creates energy loss and there is an unnecessary use of the inverter.
• No temperature-compensated regulation while charging.
3. DC Diversion Controller off the battery: When the battery voltage rises above a voltage
regulation setpoint, the DC Diversion Controller sends excess current to a dedicated DC diversion
load to maintain the battery voltage. When the battery voltage falls below the regulation setpoint,
current is no longer sent to the dedicated diversion load.
Disadvantages:
•
•
•
•
Difficult to source and size DC diversion loads correctly. If the load is too small, it cannot divert
enough power from the source (wind, hydro, etc.), and the battery could be overcharged. If
the diversion load is too large, it will draw more current than the rating of the controller—
causing damage or causing the controller’s protection circuits to open the load.
Multiple controllers are usually needed even for medium sized renewable energy systems
(i.e., a 4kW/48VDC system requires at least a 70-amp controller).
The regulation setpoint must be set much higher than required to ensure the diversion load
is not always in “regulation”, and that it doesn’t interfere with normal charging (from the
battery-based inverter) or any sell back voltage settings once the utility power returns.
Since excess power is regulated on the DC side, the battery-based inverter is required to be
always on, re-converting the renewable energy from AC back to DC where it is diverted—this
extra conversion step creates energy loss and there is an unnecessary use of the inverter.
Page 4
© 2015 Sensata Technologies
Introduction
4. Frequency disturbance/shift from the battery-based inverter: When the battery voltage
rises above a maximum setpoint, a battery-based inverter changes its output frequency to cause
the grid-tie inverter to limit the energy from the renewable energy source to the battery.
Disadvantages:
• Generated power from the renewable energy is limited/wasted during the frequency shift.
• Batteries are cycled, not regulated—does not allow the batteries to get properly charged1.
• The frequency-shift setpoint must be set higher than required to ensure it doesn’t interfere
with normal charging (from the battery-based inverter) or any sell back voltage settings
once the utility power returns1.
• No temperature compensated regulation while charging1.
Note1 – May not occur if networked to the grid-tie inverter
5. AC diversion driven by DC controlled relays: A battery voltage controlled relay is used
to switch on a dedicated AC diversion load (i.e., space heater, air conditioner, etc.) to consume
any excess power when the battery voltage rises above a maximum setpoint. When the battery
voltage falls to the low setpoint, the dedicated diversion load turns off. If the battery voltage rises
again, this cycle repeats.
Disadvantages:
• Batteries are cycled, not regulated—does not allow the batteries to be properly charged.
• AC diversion loads must be sized to absorb the full output of the renewable energy source
and configured to always be on (no temperature or thermostat turn-off control).
• AC diversion loads, when activated, can cause enough AC line drop/disturbance to disconnect
the grid-tie inverter—wasting generated energy.
• No temperature compensated regulation while charging.
6. AC Load Diversion Controller (ACLD-40): When the battery voltage rises above a voltage
regulation setpoint, the ACLD-40 begins to send excess current to a dedicated AC diversion load
to maintain the battery voltage. When the battery voltage falls below the regulation setpoint,
current is no longer sent to the dedicated diversion load.
Advantages:
• Batteries are properly charged/regulated - true three-stage charging to batteries during
power outage.
• Easier to source and size AC diversion loads to absorb the full output of the renewable
energy source.
• Primary AC diversion loads can be configured for temperature/thermostat turn-off—primary
loads are not required to always be on.
• AC diversion loads are isolated from the grid-tie inverter’s output to provide a smooth turnon transition—prevents the inverter from disconnecting due to AC line drop/disturbance.
• ACLD-40 communicates with the MS-PAE Series inverter, this provides:
o No confusion or interference trying to coordinate the inverter’s and controller’s setpoints
once the utility power returns—controller uses same charge setpoints as the MS-PAE
Series inverter for regulation.
o Temperature compensated regulation while charging—uses temperature sensor readings
from the MS-PAE Series inverter.
o Information on diverted power and the controller’s status can be displayed using a
remote control.
o Knows when grid power returns—ensures the renewable energy is not being diverted
and is available to be fed back to the utility grid.
• Does not require multiple current sensors and devices—all current flow is monitored at the
controller to determine when to divert excess current.
• No AC to DC energy conversion loss when trying to regulate battery voltage—excess power
is regulated on the AC side.
© 2015 Sensata Technologies
Page 5
Introduction
1.5
ACLD Features and Benefits
The ACLD controller is designed with features that allow easy access to wiring and controls.
The front of the ACLD controller is equipped with the following (refer to Figure 1-3):
1
Status LED Indicator – this green LED illuminates to provide operation and fault
information on the ACLD controller.
2
Inverter Connection Port (orange) – a RJ11 port for connecting the ACLD controller
to the network port (green) on a the MS-PAE Series inverter.
3
Network Connection Port (green) – a RJ11 port for connecting the ACLD controller to
a Network controlled device (i.e., ME-BMK, ME-AGS-N).
4
Knockouts – four dual knockouts (½” and
routing.
¾”) to accommodate AC wiring access and
Info: Four additional dual knockouts (½” and ¾”) identical to the ones noted in Item 4
are located on the opposite side (eight dual knockouts total).
Intake Cooling Fan – an intake fan to pull in air to allow the ACLD controller to operate
continuously at full power.
5
Status LED
Indicator
Inverter
Connection Port
Network
Connection Port
1
2
3
S
T
L
E A
D T
U
S
TO
INVERTER
TO
NETWORK
4
5
Dual Knockouts
(½” and ¾”)
Intake
Cooling Fan
Figure 1-3, Intake Fan, Status LED, Connection Ports, and Knockouts
Page 6
© 2015 Sensata Technologies
Introduction
The right side of the ACLD controller has an information label, exhaust vents and an ON/OFF
switch (see Figure 1-4):
6
Information Label – includes model/serial number information, date of manufacture,
and specifications. See the specifications in Appendix A for more information.
7
Exhaust Vents – ventilation openings that allow heated air to be removed by the internal
cooling fan. The exhaust air vents are located on the right side and at the rear of the top
side.
8
ON/OFF Power Switch – a power switch that turns the ACLD controller on or off.
Exhaust Vents
(on right and top sides)
7
ON/OFF
Power
Switch
8
6
Information
Label
Figure 1-4, ON/OFF Power Switch, Info Label and Exhaust Vents
The left side of the ACLD controller has an access cover that can be removed (Figure 1-5):
9
Wiring Access Cover – provides access to the internal AC wiring terminal block and
ground busbar. This terminal block is used to hardwire all AC wiring connections.
Remove the two #6-32 screws to access the AC wiring terminal block.
9
Wiring
Access
Cover
Figure 1-5, Wiring Access Cover
© 2015 Sensata Technologies
Page 7
Installation
2.0 Installation
Read the entire Installation section to determine how best to install the ACLD controller. The more
thorough you plan in the beginning, the better the chances are that the installation will go well.
WARNING: Installations should be performed by qualified personnel, such as a
licensed or certified electrician. It is the installer’s responsibility to determine which
safety codes apply and to ensure that all applicable installation requirements are
followed. Applicable installation codes vary depending on the specific location and
application of the installation.
WARNING: Review the “Important Product Safety Information” on pages ii-v before
any installation.
CAUTION: The ACLD controller weighs 20 lb (9.1 kg), use proper lifting techniques
during installation to prevent personal injury.
Info: The ACLD controller only controls the renewable energy source connected to the
AC side of the system. Any renewable energy source connected to the DC side of the
system must be controlled separately using a DC controller/diversion load.
2.1
Pre-Installation
The simplified system diagram shown in Figure 2-1 should be reviewed to assist you in planning
and designing your installation. This drawing is not intended to override or restrict any national
or local electrical codes. This drawing should not be the determining factor as to whether the
installation is compliant, that is the responsibility of the electrician and the onsite inspector.
Critical Loads
(Sub-Panel)
Grid-Tie
Inverter (GTI)
PV
Power
Battery
Bank
Grid
Power
Mini Magnum
Panel
Main Loads
(Main Panel)
MS-PAE Series
MagNet
Comm
-
Battery Based
Inverter (BBI)
Input
(from GTI)
Input
(from BBI)
ACLD-40
Load
Controller
Primary
Diversion Load
Output
(to Pri load)
Secondary
Diversion Load
Output
(to Sec load)
Figure 2-1, Simplified ACLD System
Page 8
© 2015 Sensata Technologies
Installation
2.1.1
•
•
•
•
•
•
•
Considerations when Installing the ACLD System
The ACLD controller is designed to be connected and powered from the AC output of a batterybased inverter that provides a MagNet communications port and has an output of 230 or 240
VAC (50 or 60 Hz). Normally this would be the MS-PAE Series (MS4024PAE or MS4448PAE),
but can also connect to the MS-E Series and MS-PE Series inverters.
The continuous power rating of the inverter (MS-PAE Series) must be at least 10% larger than
the maximum power rating of the renewable energy source. Otherwise, the inverter may be
damaged if required to handle current greater than designed.
During an AC utility outage, some brands of grid-tie inverters are sensitive and disconnect
when powered from battery-based inverters.
As required by the NEC, a photovoltaic power system (or small wind electric system) employing
a diversion charge controller of regulating the charging of a battery shall be equipped with a
second independent means to prevent overcharging of the battery. The MS-PAE Series inverters
can provide an automatic frequency-shift feature that disconnects the grid-tie inverter when
high voltage is detected on the battery. Note: This frequency-shift feature is enabled by setting
the battery type to ‘custom’ using a remote control, however, this feature should only be used
as a backup—the ACLD-40 should be used as the primary regulation method.
A diversion load must be connected to the ACLD to prevent over-charge damage to the
inverter’s battery bank. It must be at least 10% larger than the maximum power rating of the
renewable energy source. See Section 2.9 for information on the ACLD load requirements.
As the AC current is being provided by the grid-tie inverter through the sub-panel (i.e., critical
loads panel) into the ACLD, a 30-amp branch rated circuit breaker must be provided from
the sub-panel to the ACLD. Note: The installation can be made easier by using the MMP-30D
Series enclosure. This enclosure provides the required 30-amp overcurrent circuit protection
between the sub-panel and the ACLD controller.
The ACLD-40 is limited to 4000 watts continuous and is designed to work with a single MSPAE Series pure sinewave inverter that has an output voltage of 240VAC. Note: The ACLD-40
cannot be stacked or combined with another ACLD to handle additional power.
2.1.2
Unpacking and Inspection
Carefully remove the ACLD controller from its shipping container and inspect all contents. Verify
the following items are included:
•
The ACLD Controller
•
6’ yellow communications cable
•
ACLD Owner’s Manual
•
Access panel with hardware
If items appear to be missing or damaged, contact Sensata. If at all possible, keep your shipping
box to help protect your ACLD controller from damage if it ever needs to be returned for service.
Important: Save your proof-of-purchase as a record of your ownership; it will be required
if the ACLD should require in-warranty repair.
Record the unit’s model and serial number in the front of this manual in case you need to provide
this information in the future. It will probably be much easier to record this information now, rather
than trying to gather it after the unit has been installed.
2.1.3
Required Tools and Materials
Hardware/Materials
•
Conduit or strain-reliefs and appropriate fittings
•
Mounting bolts and lock washers
•
Electrical tape
•
Wire ties
Tools
•
Miscellaneous screwdrivers
•
Pliers
•
Wire strippers
•
Drill and drill bits
•
Pencil or marker
•
Multimeter
•
Level
•
1/2” wrench
© 2015 Sensata Technologies
Page 9
Installation
2.2
Locating the ACLD Controller
Only install the ACLD controller in a location that meets the following requirements:
Clean and Dry – The controller should not be installed in an area that allows dust, fumes, insects,
or rodents to enter or block the controller’s ventilation openings. This area also must be free from
any risk of condensation, water, or any other liquid that can enter or fall on the controller. Failure
due to any of the above conditions is not covered under warranty.
Info: If the controller is installed in an area where moisture may occur, we recommend
putting silicone dielectric grease compound into the electrical ports (as shown in Figure
1-3, Items 2 and 3). Before installing the cables, or if leaving any ports open, squirt a
liberal amount into each port. Silicone dielectric compound makes an effective moisture
and corrosive barrier to help protect and prevent corrosion to the RJ11 connections.
Cool – The controller should be protected from direct sun exposure or equipment that produces
extreme heat. If the ambient temperature around the controller exceeds 77°F (25°C), the power
specifications are reduced.
Ventilation – In order for the controller to provide full output power and to avoid over-temperature
fault conditions, do not cover or block the controller’s ventilation openings or install this controller
in an area with limited airflow. The controller uses a fan to provide forced air cooling, this fan pulls
in air through the intake opening (see Figure 1-3, Item 5) and blows out air through the exhaust
vents (see Figure 1-4, Item 7). Allow at the minimum an airspace clearance of 6” (15.2 cm) at
the intake and exhaust vents, and 3” (7.6 cm) everywhere else to provide adequate ventilation.
Safe – Keep any flammable/combustible material (i.e., paper, cloth, plastic, etc.) that may be
ignited by heat, sparks, or flames at a minimum distance of 2 feet (61 cm) from the controller.
Have access to the MS-PAE Series inverter – The communications control for the ACLD is provided
by the MS-PAE Series inverter, so the ACLD controller must be in an area that allows the network
cable to be connected to the inverter. The network cable provided is 6’ and can be extended up to a
length of 200 feet without data degradation. See Section 2.10.1 for more information on the cable.
Accessible – Do not block access to the controller’s inverter and network ports, as well as the
ON/OFF switch and status indicator. Allow enough room to access the AC wiring terminals and
connections, as they will need to be checked and tightened periodically.
Away from sensitive electronic equipment – High powered devices with PWM circuitry can
generate levels of RFI (Radio Frequency Interference). Locate any electronic equipment susceptible
to radio frequency and electromagnetic interference as far from the controller as possible.
2.2.1
Conduit Knockouts
The ACLD controller comes standard with four dual knockouts (for 1/2” and 3/4” conduits) on each
side (eight total). Figure 1-3 shows the location of these conduit knockouts. Select the appropriate
knockout that is close to the terminal that the wire will connect to, or whichever one works for the
way your field wiring comes in.
Info: The knockouts can be easily removed by tapping the edge with a straight bladed
screwdriver and a hammer, then twist out with pliers. See Figure 2-2.
Before removing any knockouts and mounting the ACLD controller, think about whether you are
going to use cable clamps or conduit (using the optional MPX-CB conduit box), and the different
wiring required. See Section 2.4.3 for wire routing requirements to/from the ACLD controller.
Figure 2-2, Removing
Knockouts
Page 10
© 2015 Sensata Technologies
Installation
2.3
Mounting the ACLD Controller
When mounting the ACLD controller, the surface and the mounting hardware must be capable of
supporting at least twice the weight of the unit. To meet regulatory requirements, the ACLD must
be mounted in one of the following positions (as shown in Figure 2-3):
• above or under a horizontal surface (shelf or table),
• on a vertical surface (wall) with the intake cooling fan to the right,
• on a vertical surface (wall) with the intake cooling fan toward the bottom, and an optional
MPX-CB (conduit box) installed below the controller.
Info: The four mounting holes on the ACLD have a diameter of 0.280” (7.11 mm), good
for 1/4” bolts/screws (see Figure 2-4 for hole locations).
Info: The MPX-CB prevents material from falling out the bottom in the event of an
internal fire, and also allows sufficient ventilation to prevent the ACLD controller from
overheating under normal operating conditions.
Info: Sensata provides a backplate that can be used to mount the ACLD (and if required,
the MPX-CB). This backplate part number is BP-S (Back Plate - Single).
After determining the mounting position, refer to the physical dimensions as shown in Figure 2-4
or use the base of the ACLD as a template to mark your mounting screw locations. After marking
the mounting screw locations, mount the controller with appropriate mounting hardware.
SHELF OR TABLE MOUNTED
(Fan facing away from wall)
WALL MOUNTED
(Fan to the right)
WALL MOUNTED
(Fan facing down and MPX-CB installed)
When the unit is mounted in this position,
either the MPX-CB (MPX conduit box) or
MMP Series Enclosure must be attached
below.
Figure 2-3, Approved Mounting Positions
© 2015 Sensata Technologies
Page 11
Page 12
Left Side
&
¾"
12"
(30.5 cm)
Top
Side
11 ¼"
(28.6 cm)
12 ¾"
(32.4 cm)
(x4)
½"
Dual
6 ¾"
Knockouts
(17.1 cm)
Ø.280
(0.71 cm)
4 places
Exhaust
Vents
5 ½"
(14 cm)
Right Side
6 ½"
(16.5
cm)
Intake Cooling Fan
Front Side
Figure 2-4, ACLD Dimensions and Side Reference
13 ⅝"
(34.6 cm)
& ¾"
Dual
Knockouts
(x4)
½"
Back Side
Installation
© 2015 Sensata Technologies
Installation
2.4
General Wiring Requirements
This section describes the requirements and recommendations for wiring the ACLD controller.
Before wiring the controller, carefully read all instructions.
Wiring should meet all local codes and standards and be performed by qualified personnel
such as a licensed electrician.
The NEC (National Electric Code, ANSI/NFPA 70) for the United States and the CEC (Canadian
Electrical Code) for Canada provide the standards for safely wiring residential and commercial
installations. The NEC (or CEC) lists the requirement for wire sizes, overcurrent protection, and
installation methods and requirements.
WARNING: Because the ACLD is wired with an inverter/charger, there is power from
multiple sources (inverter, generator, utility, batteries, solar arrays, etc.) which make
the wiring more hazardous and challenging. Ensure they are all de-energized (i.e.,
breakers opened, fuses removed) before proceeding—to prevent accidental shock.
2.4.1
Protecting Wire – Conduit Box
The AC wires to and from the load controller must be protected as required by code. This can be
done by using jacketed wires or by feeding the wires through conduit. A conduit box (MPX-CB) is
available that allows the AC conduit to be connected to the ACLD controller.
2.4.2
•
•
•
•
•
•
•
Wiring Requirements
All conductors that are at risk for physical damage must be protected by conduit, tape, or
placed in a raceway.
Always check for existing electrical, plumbing, or other areas of potential damage prior to
making cuts in structural surfaces or walls.
AC overcurrent protection must be provided as part of the installation and be properly sized.
Use only copper wires with a minimum temperature rating of 75°C (167°F).
Always use properly rated circuit breakers. If using an electrical sub-panel, circuit breakers
can be moved from the main electrical panel to the sub-panel only if the breakers are also
listed to be installed in the sub-panel.
Wiring must be no less than #10 AWG (5.3 mm2) gauge copper wire and be approved for
the application (i.e., residential wiring).
The wire sizes recommended in this manual are based on the ampacities given in Table
310.16 (in conduit) or Table 310.17 (in free air) of the NEC, ANSI/NFPA 70, for 75°C (167°F)
copper wire based on an ambient temperature of 30°C (86°F).
2.4.3
Wire Routing
Before connecting any wires, determine all wire routes to and from the load controller. Typical
routing scenarios are:
•
Network communication cable from the inverter to the load controller.
•
AC wiring from the inverter output to the load controller.
•
AC wiring from the load controller to circuit protection (if not using the MMP enclosure)
•
AC wiring from the circuit protection (or MMP enclosure) to the AC sub-panel (i.e., dedicated
inverter circuits).
•
AC output wiring from the load controller to the primary diversion load (which can be
configured to turn off).
•
AC output wiring from the load controller to the secondary diversion load (which must be
configured to always be available and stay on).
•
Ground wiring to and from the load controller.
•
Remote control cable to the inverter.
© 2015 Sensata Technologies
Page 13
Installation
2.4.4
Wire Size and Overcurrent Protection
The wiring must be approved for the application (i.e., residential wiring) and sized per the local
electrical safety code requirements to ensure the wire’s ability to safely handle the maximum load
current. The wiring must be protected from short circuits and overloads by an overcurrent protection
device. This overcurrent protection device must have a means to disconnect the circuits (e.g., circuit
breaker or a fuse/disconnect), be properly sized, and branch circuit rated for the wire it is protecting.
As shown in Figure 2-5, the ACLD provides two input circuits, the Battery Based Inverter (BBI)
and Grid-Tie Inverter (GTI) input circuits. As part of the installation, overcurrent protection rated
to handle a maximum 30 amps must be provided from the source to these two input circuits. A
dual-pole, 30 amp, 240-volt branch rated circuit breaker to protect both L1 and L2 circuits for
each input circuit is required. Referring to Figure 2-6, the BBI input to the ACLD (terminals 1 and
2) is protected from a 30A breaker from the main utility panel; and the GTI input to the ACLD
(terminals 5 and 6) is protected using the 30A breaker in the MMP. Note: If the MMP enclosure is
not used, an external panel with a 30A breaker must be provided to protect the GTI input from
the Grid-Tie Inverter.
The ACLD also provides a primary output circuit (terminals 7 and 8) and secondary output circuit
(terminals 9 and 10) that are connected to the diversion loads. An external overcurrent protection
device is not required for these two output circuits as the diversion loads are the only connections
to these two circuits and these circuits are protected by the ACLD’s internal electronic overcurrent
protection circuitry.
CAUTION: The ACLD internal wires are rated for 30 amps, the pass-thru current must
be no greater than 30 amps or damage to the ACLD will occur.
CAUTION: The wiring must be no less than #10 AWG (5.3 mm2) gauge copper wire
and be approved for the application (i.e., residential wiring).
2.5
Torque Requirements
Follow the specific torque recommendations below to ensure your fasteners are tightened
sufficiently. To ensure your connections are correct, you should use an accurate, quality torque
wrench. It is highly recommended to go back over all fasteners and re-torque after five days, and
every six months thereafter.
Table 2-1, Torque Values for Ground Busbar
Note: The ground busbar has different torque values for the small and large screws.
Wire Size
Busbar Screw Size Torque Values
10-32 [Small Screw]
5/16-24 [Large Screw]
#14 to #10 AWG
(2.1 to 5.3 mm2)
15 in. lbs. (1.7 N-m)
35 in. lbs. (4.0 N-m)
#8 AWG (8.4 mm2)
20 in. lbs. (2.3 N-m)
40 in. lbs. (4.5 N-m)
#6 AWG
(13.4 mm2)
25 in. lbs. (2.8 N-m)
45 in. lbs. (5.1 N-m)
#4 AWG (21.1 mm2)
NA
45 in. lbs. (5.1 N-m)
#3 to #1/0 AWG
(26.6 to 53.5 mm2)
NA
50 in. lbs. (5.6 N-m)
Table 2-2, Torque Values for the AC Terminal Blocks
Page 14
Wire Size
Slotted M3.5 Screw Torque Values
#14 to #6 AWG
(2.1 to 13.4 mm2)
16 in. lbs. maximum
(1.8 N-m maximum)
© 2015 Sensata Technologies
Installation
2.6
ACLD Terminal Block Connections
The ACLD controller has a ten-pole terminal block and a ground busbar to permanently connect
the BBI/Battery Based Inverter (e.g., MS-PAE Series), the GTI/Grid-Tie Inverter and any primary
or secondary loads (see Figure 2-5). To access and view the terminal block and ground busbar,
remove the two Phillips screws holding the AC wiring access cover plate (see Figure 1-5, Item 9).
Each connection on the terminal block is rated to accept one #14 to #6 AWG (2.1 to 13.4 mm2)
CU stranded wire, or two #12 AWG (3.3 mm2) CU stranded wires. Each connection uses a M3.5
slotted head screw, and the maximum tightening torque is 16 in. lbs. (1.8 N-m).
Info: Both of the ACLD’s NEUTRAL terminals are electrically connected to each other
and either connection can be used to connect the inverter and electrical panel.
The ground busbar has two #14 to #1/0 AWG (2.1 to 53.6 mm2) and three #14 to #6 AWG (2.1 to
13.4 mm2) compression terminals with slotted-head screws. See Table 2-1 for torque requirements.
1
2
3
4
5
6
7
8
8
9
10
Ground Busbar
(In & Out)
7
To Secondary
Load (LEG 1)
6
5
OUTPUT
(SEC)
To Secondary
Load (LEG 2)
3 4
OUTPUT
(PRI)
To Primary
Load (LEG 1)
2
To Primary
Load (LEG 2)
From Sub-Panel /GridTie Inverter (LEG 1 out)
Common Neutrals
(from inverters)
From MS-PAE Series
inverter (HOT 1 out)
From MS-PAE Series
inverter (HOT 2 out)
1
From Sub-Panel /GridTie Inverter (LEG 2 out)
INPUT
(GTI)
INPUT
(BBI)
11
9 10
11
Figure 2-5, ACLD Terminal Block
2.7
Electrical System Wiring Diagrams
A diagram of the wiring for the ACLD controller is shown in Figure 2-6, and is provided to assist
you or your system installer. Due to the variety of applications and differences in local and national
electrical codes, this wiring diagram should be used as a general guideline only. It is not intended
to override or restrict any national or local electrical codes; and, this diagram should not be the
determining factor as to whether the installation is compliant, that is the responsibility of the
electrician and the onsite inspector.
© 2015 Sensata Technologies
Page 15
Page 16
Primary
Load
(thermostat
controlled can turn off)
R
E
T
O R
T E
V
IN
Battery Management
Secondary
4kW Load
(must
always
remain on)
1
2
3
4
5
6
7
8
9
10
ACLD-40
Diversion
Controller
1
2
3
4
5
6
7
8
9
10
=
=
=
=
=
=
=
O
N
O
N
O
N
O
F
F
O
F
F
O
F
F
N
O
N
O
N
O
N
O
F
F
O
F
F
O
F
F
O
F
F
O
Critical Loads
Sub-Panel
O
N
O
F
F
OFF
ON
MS-PAE
Inverter on
MMP
Enclosure
REMOTE
Remote
Control
O
N
O
N
O
N
O
N
O
N
O
N
O
N
O
F
F
O
F
F
O
F
F
O
F
F
O
F
F
O
F
F
O
F
F
N
O
N
O
N
O
N
O
N
O
N
O
N
O
N
O
F
F
O
F
F
O
F
F
O
F
F
O
F
F
O
F
F
O
F
F
O
F
F
O
PV Array
Disconnect
Inverter
Battery
Bank
O
N
O
F
F
OFF
ON
Main Utility
Panel
Figure 2-6, ACLD System Wiring
PV
Performance Utility-Interactive
Meter
Inverter
240VAC
@60Hz
COMMON NEUTRAL
ELECTRICAL SUB-PANEL (L1)
ELECTRICAL SUB-PANEL (L2)
PRIMARY LOAD (L2)
PRIMARY LOAD (L1)
SECONDARY LOAD (L2)
SECONDARY LOAD (L1)
= INVERTER HOT OUT (L2)
= INVERTER HOT OUT (L1)
= COMMON NEUTRAL
Bi-Directional
Utility Meter
Utility/Grid
Power
Photovoltaic Array
120/240VAC
@60Hz
OFF
ON
Utility Power
Disconnect
Installation
© 2015 Sensata Technologies
Installation
Inverter AC Terminal Block
(Input and Output Wiring)
MS-PAE Inverter/Charger
(on MMPxxx-30D Enclosure
with hood and backplate)
AC LEG 1 IN
(from Main Panel)
1
AC LEG 2 IN
(from Main Panel)
2
INV HOT 1 OUT
(to Sub-Panel via ACLD)
3
AC NEUTRAL
(from Main Panel)
4
AC NEUTRAL
(to Sub-Panel via ACLD)
5
C
INV HOT 2 OUT
(to Sub-Panel via ACLD)
6
A
B
AC GROUNDS
(to Sub Panel)
ACLD-40
Diversion
Controller
3
C
AC NEUTRAL
(to Sub-Panel Neutral)
4
D
SUB-PANEL (LEG 1)
(to Sub-Panel/AC Loads)
5
E
SUB-PANEL (LEG 2)
(to Sub-Panel/AC Loads)
6
F
PRIMARY LOAD (L2)
(to Diversion Load)
7
PRIMARY LOAD (L1)
(to Diversion Load)
8
SECONDARY LOAD (L2)
(to Diversion Load)
9
MMPxxx-30D AC Terminal Block
(Input and Output Wiring)
E
D
6
5
4
3
2
1
INV NEUTRAL IN
(from Main Panel)
AC NEUTRAL
(from inverter Neutral)
INV HOT 1 IN
(from Main Panel)
B
INV HOT 2 IN
(from Main Panel)
2
INV NEUTRAL OUT
(from ACLD to Sub-Panel)
A
INV OUT (HOT 1)
(from inverter H1 Out)
INV HOT 1 OUT
(from ACLD to Sub-Panel)
1
INV HOT 2 OUT
(from ACLD to Sub-Panel)
INV OUT (HOT 2)
(from inverter H2 Out)
F
G
SECONDARY LOAD (L1)
(to Diversion Load)
G
ACLD Terminal Block
(Input and Output Wiring)
Figure 2-7, AC Wiring from Inverter to ACLD
© 2015 Sensata Technologies
Page 17
Installation
2.8
Wiring the ACLD
The following steps are basic guidelines for installing and connecting wiring to and from the ACLD
controller. Refer to Figure 2-7 for visual guidance.
Note: The instructions below refer to the ACLD’s terminals using the attached label terminology.
Wiring the Inverter AC Output to the ACLD
1. Route wires from the inverter’s AC output (HOT 1 OUT, HOT 2 OUT and NEUTRAL) thru the
unused strain relief clamp on the inverter and into the ACLD (using an appropriate knockout).
2. Connect the HOT 1 OUT (black) wire from the inverter’s INV HOT 1 OUT terminal to the INV
OUT (HOT 1) terminal on the ACLD.
3. Connect the HOT 2 OUT (red) wire from the inverter’s INV HOT 2 OUT terminal to the INV OUT
(HOT 2) terminal on the ACLD.
4. Connect a NEUTRAL (white) from one of the inverter’s AC NEUTRAL terminals to one of the
NEUTRAL terminals on the ACLD.
Wiring from the ACLD to the Critical Loads Sub-panel (thru circuit protection)
1. On the ACLD terminal block, connect a black wire to the ELECTRIC PANEL (L1) terminal, a red
wire to ELECTRIC PANEL (L2) terminal, and a white wire to the unused NEUTRAL terminal.
2. Connect a wire (green or bare copper) to the GROUND busbar on the ACLD.
3. Route the ELECTRIC PANEL (L1) and ELECTRIC PANEL (L2), NEUTRAL, and GROUND wires
through an appropriate knockout on the ACLD to an enclosure with a dual-pole 30A branchrated circuit breaker (using minimum #10 AWG/5.3 mm2 wire).
4. Connect the ELECTRIC PANEL (L1) and ELECTRIC PANEL (L2) wires to the line side of the dualpole 30A circuit breaker (one wire for each pole). See Section 2.4.4 for breaker information.
Info: Figures 2-6 and 2-7 show the ACLD wired through a MMP-30D Series enclosure.
The MMP-30D Series enclosures provide the required branch-rated 30-amp circuit
breaker. These enclosures also provide a full system Inverter Bypass Switch. This
simple item provides a convenient way to isolate the ACLD and inverter from the AC
loads without any re-wiring, which could save you hours of downtime—if you ever
need to service your load controller or inverter.
5. From the load side of the dual-pole 30A circuit breaker, connect the ELECTRIC PANEL (L1)
and ELECTRIC PANEL (L2) wires and route (along with the NEUTRAL and GROUND wire on the
ACLD) to the AC electrical sub-panel.
Wiring to the Diversion Load
1. On the ACLD terminal block, connect a black wire to the PRIMARY LOAD (L1) terminal and a
red wire to PRIMARY LOAD (L2) terminal.
2. Connect a wire (green or bare copper) to the GROUND busbar on the ACLD.
3. Route the wires [PRIMARY LOAD (L1), PRIMARY LOAD (L2) and GROUND] through an appropriate
knockout on the ACLD to a diversion load. See Section 2.4.4 for diversion load information.
Info: If connecting a secondary diversion load, use the same three steps listed above,
except connect a black wire to the SECONDARY LOAD (L1) terminal, a red wire to
SECONDARY LOAD (L2) terminal, and connect an additional GROUND wire.
Wiring Inspection
1. Verify all wire runs are secured. If using strain relief clamps on the knockouts, tighten the
strain relief clamp securely on the wires. Always leave a little extra slack in the wiring.
2. Verify that all connections are correct and secure, all the ACLD terminal screws are torqued to
a maximum tightening torque of 16 lbf-in (2.0 N-m), and the ground screws are torqued based
on Table 2-1.
3. Replace the ACLD wiring access cover and any other cover you removed to access wiring
terminals during this installation (i.e., on the electrical/distribution sub-panel, etc.).
Page 18
© 2015 Sensata Technologies
Installation
2.9
ACLD Load Requirements
A diversion load is required to be connected to the ACLD. When the ACLD is activated during a
power outage, current from the renewable energy source is used to charge the battery. As the
battery becomes charged, the ACLD connects the diversion load to consume any excess power
—preventing the battery from being overcharged and damaged.
The diversion load connected to the ACLD must:
• handle 240VRMS,
• be pure resistive,
• sized a minimum of 110% of the renewable energy source,
• rated no less than 2500 watts and no greater than 5000 watts.
CAUTION: Do not use light bulbs, motors, or other electrical devices for diversion
loads. They are not stable and may be damaged or fail—causing the battery to be
overcharged. Only purely resistive heating elements (such as “Wire-wound” resistors or
electric heating elements) rated for 240-volts RMS should be used.
CAUTION: Ensure the diversion load is sized correctly. If the diversion load is sized too
low or too high, the ACLD could fault and disconnect—possibly resulting in damage to
the system battery or other system components.
2.9.1 Selecting and Sizing the Diversion Load
To size the diversion load, you should first consider the MS-PAE Series inverter that will be used
with the ACLD controller. The power output of the renewable energy source must be sized 10%
lower than the continuous power rating of the chosen inverter. This is to ensure the inverter will
not be damaged when handling the maximum current from the renewable energy source.
The load must have a total power rating at least 10% greater than the renewable energy source’s
maximum output to ensure all the excess current can be diverted from the batteries to prevent
overcharging. Also, each load (primary or secondary) must be no less than 2500 watts or greater
than 5000 watts to prevent the controller’s overload protection from activating; if this happens, the
diversion load would disconnect allowing all the excess current to go into the battery—causing an
overcharge condition.
Note: If using the MS4024PAE, the renewable energy source must be no greater than 3600 watts
and the load should be at least 4000 watts. For the MS4448PAE, the renewable energy source
must be no greater than 4000 watts and the diversion load should be at least 4400.
CAUTION: To prevent the battery from being overcharged and damaged, it is critical
that one of the diversion loads connected to the ACLD must always be available (must
not be thermostat controlled or be able to be turned off) and be correctly sized to
handle the full power produced by the renewable energy source (wind, hydro, etc).
If only one load is wired to the ACLD, it must be sized correctly and always be on and available—it
cannot be allowed to turn off. However, if there is both a primary and secondary load wired to
the ACLD, then the primary load does not need to stay on, nor is it required to be sized to handle
the full output current of the renewable energy source. However, if the primary load is allowed to
turn off (i.e., water heater with thermostat control) or not large enough to handle the full output
current, then the secondary load is used as a back-up to the primary load and must always be on
and available if needed—and correctly sized to handle the full power produced by the renewable
energy source (wind, hydro, etc.).
Note: If the primary load is not sized large enough to consume the excess power, the ACLD will
activate an internal relay to connect the secondary load in parallel with the primary load. Once
the secondary load connects, the benefit of the primary load will not be utilized because the
current to the primary load will be decreased. For example, if the primary load is a small water
heater, and the renewable energy is greater than the small water heater can handle, the ACLD
will connect the secondary load. Once the secondary has connected, the water heater element is
no longer able to stay hot because it is receiving less current now that the secondary load is in
parallel with the water heater (primary load).
© 2015 Sensata Technologies
Page 19
Installation
2.9.2 Compatible Diversion Loads
Below is a list of compatible loads that may be used with the ACLD.
Info: The diversion load must be sized at 110% or larger than the RE source (4800
watts max), and the RE source must be limited to 10% below the continuous power
of the battery-based inverter used. For MS-PAE Series inverters, the MS4024PAE is
limited to ≤3600 watts and the MS4448PAE is limited to ≤4000 watts.
Power Resistors:
Ohms
Watts
Part Number
Manufacturer
15
3840
PR4410-13A
PowerOhm
15
3150
PR15R3K15
PowerOhm
14
3150
PR14R3K15
PowerOhm
14
2657
222-8
IPC
13
3328
PR13R3K32
PowerOhm
13
2800
PF13R2K80
PowerOhm
12
3888
PR5505-16A
PowerOhm
12
3888
PR4405-14
PowerOhm
12
3072
PR12R3K07
PowerOhm
Resistor assemblies listed above are manufactured by IPC Power Resistors Inc. (www.ipcresistors.
com) and Powerohm Resistors Inc. (www.powerohm.com). Available resistor assembly options
from these companies include an overtemperature switch, auxiliary terminal blocks, and custom
enclosures.
Water Heaters:
Size
Watts
Part Number
Manufacturer
28-Gallon
3500
E2F30LD035V
Whirlpool
30-Gallon
3500
E2F30HD035V
Whirlpool
Air Heaters/Resistor Boxes:
Watts
Part Number
Manufacturer
2160
L2000W48V
Coleman Air (www.colemanair.us)
3000
W3024
Infratech (www.infratech-usa.com)
4000
WD4024
Infratech (www.infratech-usa.com)
4000
W4024
Infratech (www.infratech-usa.com)
4800
BRU-4.8KW/12R-J
EAGTOP (www.eagtop.com)
Baseboard Heaters:
Page 20
Watts
Part Number
Manufacturer
2500
8F2025
Cadet
2500
LC6025W31
Dimplex
© 2015 Sensata Technologies
Installation
2.10 Connecting the ACLD to a MS-PAE Series Inverter
One end of the ACLD/NETWORK cable plugs into the port labeled TO INVERTER (orange) on the ACLD,
and the other end plugs into the NETWORK (green) port on the MS-PAE Series inverter (see Figure 2-8).
Note: Do not connect the ACLD/NETWORK cable from the inverter into the TO NETWORK (green)
port on the ACLD, it will not be damaged, but will not operate correctly.
TO NETWORK port
[used to connect
additional network
accessories]
ME-ARC Advanced Remote
[connects to REMOTE (blue)
port on Inverter]
REMOTE cable
ACLD-40 Diversion Controller
[Connects from (orange) port to
inverter NETWORK (green) port]
MS-PAE Series Inverter/Charger
[Connects to remote from REMOTE (blue) port,
connects to ACLD from NETWORK (green) port]
ACLD / NETWORK cable
Figure 2-8, ACLD to Inverter Communications Cable Connection
2.10.1
ACLD/NETWORK Communication Cable
1234
4-conductor telephone-type
opposite colors from top to
bottom (tabs facing toward you)
same color
1234
same
color
TAB
TAB
The ACLD/NETWORK communications cable is
a 6-foot (1.83m), 4-conductor, twisted-pair,
telephone-type with RJ14 (m) connectors on both
ends; with a orange colored label on one end and
a green NETWORK label on the other end.
Note: This 6’ communications cable can be
extended up to a length of 200 feet without data
degradation.
Figure 2-9, ACLD/NETWORK
Communication Cable
© 2015 Sensata Technologies
Page 21
Installation
2.11 Using a Remote Control with the ACLD Controller
A remote control display (ME-ARC, ME-RC11, or ME-RTR1) is used to configure the MS-PAE Series
inverter to ensure the ACLD controller operates correctly. During the Standby and Active modes,
the ACLD controller is in charge of monitoring and regulating the battery voltage and determining
the absorption charge time. The following settings in the remote display should be adjusted to
operate with the ACLD:
•
Set the Battery Type to “Custom” - this setting is used to determine the battery voltage
regulation level and also enables the frequency shift feature. Once the battery type is set to
“Custom”, the battery voltage settings (i.e., bulk and float) must be set to the correct regulation
values for your battery type.
Info: The frequency shift feature causes the MS-PAE Series inverter to automatically
increase it’s output frequency when high voltage is detected on the battery. This
frequency shift is enough to cause the utility-interactive inverter to disconnect and
stop charging the battery bank. However, this feature does not guarantee protection
against overcharging the batteries. Therefore, it should only be used as a backup, the
ACLD-40 should be used as the primary regulation method to protect the battery bank
from being overcharged during utility power failures.
The frequency shift feature is enabled when the Battery Type is set to “Custom” (using an
optional remote that allows Battery Type to be set to Custom). This feature automatically
activates when the battery voltage increases 2-volts (24v units) or 4-volts (for 48v
units) above the Absorb Voltage setting. When activated, the output frequency of the
MS-PAE Series inverter increases to 60.6Hz, causing the utility-interactive inverter to
disconnect. When the battery voltage falls 2-volts (24v units) or 4-volts (for 48v units)
below the Absorb Voltage setting, the frequency returns to 60.0Hz, allowing the utilityinteractive inverter to reconnect.
•
Set the Absorb Time - this setting is used to determine the time that the ACLD will regulate
the battery at the absorption voltage.
•
Defeat the Search Watts feature - when the MS-PAE Series inverter is first turned on, its
automatic search feature is enabled. This feature must be disabled for the ACLD to operate
correctly. To disable the Search Watts feature, turn the Search Watts setting to “OFF”.
•
Set the Final Charge Stage to Float - change the final charge stage setting (if available
on your remote control) from “Multi” to “Float”. This ensures that the battery is ready and
maintained if a power outage occurs and the RE source is not available (i.e., night-time).
Note: The ACLD requires a ME-ARC remote display (version 4.0 or higher) to monitor the ACLD.
This remote provides displays for the ACLD that indicates: ACLD Status, Power Diverted, ACLD
Temperature, Target Volts, Model, and Software Version.
Info: When utility power is connected and the ACLD is in the Inactive mode, the MSPAE Series inverter is in charge of maintaining the battery bank—using the Absorb and
Float voltage settings in your remote. During the Standby and Active operating modes
of the ACLD—when utility power is lost—the same absorb and float voltage settings
in your remote are used to regulate the current to the battery. Therefore, these two
settings (absorb and float voltage settings) should already be adjusted correctly and
do not need to be changed when installing the ACLD.
Info: If the ACLD is used without a remote, the Battery Type will be defaulted to
“Flooded” and the Absorb Time will be set at 2.0 hours. Also, a load greater than 5
watts must always be connected to the inverter’s output to ensure the Search mode is
defeated (i.e., search turned off).
1
The ME-RC and ME-RTR can be used with and configure the ACLD, however, only the MEARC remote (version 4.0 or higher) provides displays for the ACLD that indicates: ACLD Status,
Power Diverted, ACLD Temperature, Target Volts, Model, and Software Version.
Page 22
© 2015 Sensata Technologies
Operation
3.0 Operation
3.1
ACLD Operation
Normally, when utility power is available, the grid-tie inverter in the system converts the renewable
energy to AC that works in parallel with the utility to: power the load panels (main panel and subpanel for critical loads) in the home, charge the battery system, and feed any power—from the
renewable energy source—that is not used in the home back into the utility grid.
The utility power connects to the input of the MS-PAE Series inverter/charger,. This causes an
automatic AC transfer relay inside the inverter to close, passing the current from the incoming
utility power through the MS-PAE Series inverter. Some of the current passing thru the MS-PAE
Series inverter is used by a powerful internal battery charger to keep the battery bank charged
in case of a power failure.
Info: The ACLD controller is designed to be connected and powered from the AC output
of a battery-based inverter that provides a MagNet communications port and has an
output of 230 or 240 VAC (50 or 60 Hz). Typically the MS-PAE Series (MS4024PAE or
MS4448PAE) is used, but the MS-E Series and MS-PE Series inverters can also be used
for applications that require 230VAC/50Hz inverters.
The current that passes thru the MS-PAE Series inverter connects and powers the ACLD, and then
passes through the ACLD to the grid-tie inverter. Once power is connected to the ACLD, the ON/OFF
power switch (Figure 1-4, Item 8) on the ACLD controller must be turned on to begin operating.
The controller’s green LED blinks slowly (once a second) when the ACLD is on. With utility power
connected and the ACLD turned on, the ACLD will be in the Inactive mode (not actively monitoring/
regulating the battery voltage) because the MS-PAE Series inverter/charger is providing threestage (Bulk, Absorption and Float) battery bank charging.
Info: When the MS-PAE Series inverter is first turned on, its automatic Search feature
is enabled. This feature must be disabled for the ACLD to operate correctly. To disable
the Search Watts feature, either connect a load on the inverter’s output that is greater
than 5 watts or use a remote display (ME-RC, ME-ARC or ME-RTR) to turn the Search
Watts setting to “OFF”.
If a utility power outage occurs, the MS-PAE Series inverter comes on and starts powering the
critical loads. However, now that the utility power is no longer connected to the input of the MSPAE Series inverter and the inverter is no longer in the charge mode, the ACLD becomes enabled
and enters Standby mode. In Standby mode, the ACLD starts monitoring the battery voltage to
determine when to become “active” and divert power to a diversion load to keep the battery from
overcharging. [During the utility power outage, the grid-tie inverter—after a minimum 5-minute
reconnect time—reconnects to the AC output waveform of the MS-PAE Series inverter and starts
inverting all the energy from the renewable energy source just like it did when it was connected
to utility power.] However, during a utility power interruption, the main panel loads are no longer
connected and any excess power that is generated cannot be sold/exported to the utility grid. This
means there may be more power generated than the critical loads can consume, causing current to
be pushed back into the inverter’s AC output, then to the battery bank, causing the battery voltage
to rise. As the battery voltage rises and the battery becomes fully charged (or the battery voltage
starts to increase above the regulation setpoints), the ACLD exits Standby mode and enters Active
mode. In Active mode, the ACLD uses Pulse Width Modulation (PWM) regulation to control how
much current from the renewable energy source is allowed to flow into the diversion load to keep
the battery voltage from rising further. As the battery’s current requirements change, the PWM
switch inside the ACLD either closes for longer periods of time (higher duty cycle) to direct more
current to the diversion load; or closes for shorter periods of time (lower duty cycle) to decrease
the current flow to the diversion load, which allows more current to flow into the battery.
Once the battery is fully charged, the PWM switch fully closes, causing all the current produced by
the renewable energy source to be diverted to the diversion load. When the current is no longer
required to be diverted away from the battery, the PWM switch fully opens and causes the ACLD to
exit Active mode and return again to Standby mode to start monitoring the battery voltage.
© 2015 Sensata Technologies
Page 23
Operation
The excess current is first diverted to the primary diversion load, which could be sized to absorb
the full power output from the renewable energy source without turning off. However, if the
primary load is designed or configured to turn off (such as a water heater with a thermostat), or
sized smaller than required to handle the full diverted current—the battery voltage would begin
to rise above its regulated voltage setting. In this case, a secondary load must be connected that
can handle the excess current.
When the primary load is too small or is no longer present (e.g., turned off), the ACLD closes an
internal relay to connect a secondary load in parallel with the primary load. The secondary load
must be sized to handle the full power output from the renewable energy source without turning
off. This secondary load will stay connected until there is no longer any power that needs to be
diverted (i.e., PV at night, all the current from the energy source is consumed by the critical loads,
etc.). Whenever the secondary load disconnects, the ACLD begins diverting excess current only
to the primary load. If the battery voltage begins to rise above the regulated setting, the ACLD
will reconnect the secondary load again. This cycle continues in an effort to ensure the battery
voltage is regulated until the utility power returns.
Once the utility power returns, the MS-PAE Series inverter reconnects to the utility power and
begins to monitor and charge the battery bank. The MS-PAE Series inverter communicates to the
ACLD controller that it is charging, causing the controller to return to Inactive mode.
Info: While in the Float regulation stage (either Standby-Float or Active-Float), if the
batteries fall to the rebulk voltage level (<25.6 VDC/24-volt systems, or <51.2 VDC/48volt systems), another Bulk/Absorption Charge stage will start. After the Absorption
stage is finished, the ACLD allows the voltage to fall to the Float stage again. This Float
to Bulk to Absorb and back to Float cycle continues as long as it is required to ensure
the batteries are continuously charged.
Info: The secondary load is used as a back-up to the primary load and must be sized
to absorb the full power output from the renewable energy source without turning off.
It must be available and always stay on (can not turn off) in case the primary load
happens to turn off or is no longer available.
Info: During the Standby and Active modes, the ACLD uses the same Absorb and Float
voltage regulation setpoints that the MS-PAE Series inverter uses while charging. These
regulation setpoints change based on temperature when a BTS (Battery Temperature
Sensor) is connected to the inverter. With a BTS connected, the actual voltage level
increases if the temperature around the BTS is below 77°F (25°C) and decreases if
higher than 77°F (25°C). This ensures the batteries receive the correct voltage level
regardless of temperature. See the owner’s manual for your MS-PAE Series inverter to
determine the amount of change to the voltage level based on temperature.
Info: Once Standby mode has been initiated, the ACLD determines the initial regulation
stage. If the battery voltage is greater than 25.6 volts for a 24-volt inverter system
(>51.2 VDC for a 48-volt system), the ACLD will skip the Bulk/Absorb stages and go
directly to the Float stage (Standby-Float). If the battery voltage is 25.6 volts or less
for a 24-volt inverter system (or ≤51.2 VDC for a 48-volt system), the ACLD goes to
the Bulk stage (Standby-Bulk).
Info: The ACLD controller monitors the battery voltage to help determine when to start
regulating the current—from the renewable sources connected to the AC side of the
system—to the battery. Even though the ACLD monitors battery voltage, if there is an
external charging source (i.e., PV or hydro) connected directly to the battery, a voltage
regulator/controller (different and independent of the ACLD) must be connected on the
DC side to prevent the batteries from being overcharged.
Info: The internal relay will close and connect the secondary load if the primary load
is open or less than 4kW. Once this relay has closed, it will stay closed until there is
no longer any power that needs to be diverted (i.e., PV at night, all the current from
the energy source is consumed by the critical loads, etc.) or determines that there is
to much current being drawn.
Page 24
© 2015 Sensata Technologies
Operation
3.2
Three-Stage Regulation
The ACLD uses a three-stage process to help monitor the battery voltage (during Standby mode)
and divert current (during Active mode) to help keep the batteries healthy. The three stages: Bulk,
Absorb, and Float (see Figure 3-1) provides complete and automatic recharging and monitoring
of the batteries without damage due to overcharging. When active, the ACLD uses the following
three-stage process to determine when to divert the excess current to regulate the battery voltage:
Bulk Stage: This is the initial stage. While in the Bulk stage, the ACLD allows as much current as
available to charge the battery. The ACLD remains in this stage until the absorb voltage is achieved.
The absorb voltage is determined by the Battery Type settings* in the MS-PAE Series inverter.
Absorb Stage: This is the second stage and begins after the absorb voltage has been reached. The
Absorb stage provides the batteries with a constant voltage and will divert current to the diversion
load in order to maintain the Absorb Voltage setting*. The ACLD stays in the Absorb stage until
the batteries have been maintained at the absorb voltage level for the entire absorption period
(as determined by the Absorption Time setting*), then switches to the Float stage.
Info: The remote control provides several ways to determine the inverter’s absorption
period (i.e., time, amps, or SOC). Even if a selection other than time is selected for
the inverter, the ACLD will only use the last Absorption “Time” setting in the remote.
Info: Contact your battery manufacturer to ensure the best charge settings are used
for your type of batteries. If the Absorb stage is short or terminated, the batteries may
not receive a full charge. In contrast, if the Absorb stage is too long the batteries may
be overcharged. Either scenario may damage the batteries.
Info: The battery bank size will typically determine the length of the absorption period.
The larger the battery bank, the longer the absorption period is needed to ensure a full
charge. The owner’s manual for the remote display provides guidance on determining
the Absorption Time setting based on the amp-hr capacity of your battery bank.
Info: If an equalize charge is required, this must be performed while utility power is
available and connected to the MS-PAE Series inverter. The ACLD does not allow an
equalize charge to be enabled when it is active.
Float Stage: The third stage occurs at the end of the absorb charging time. While in the Float
stage, the charge voltage is reduced to the Float Voltage setting (determined by the Battery Type
selection*). In this stage, the batteries are kept fully charged and ready if needed by the inverter.
The Float stage reduces battery gassing, minimizes watering requirements (for flooded batteries),
and ensures the batteries are maintained at optimum capacity.
* These settings are in the MS-PAE Series inverter and communicated to the ACLD. They have a
factory default value, but are changeable. The default values are listed in the owner’s manual for
your MS-PAE Series inverter and are adequate for most installations. However, if you determine
that some of the default values are not appropriate for your particular system, a remote control
can be used to change these settings in the MS-PAE Series inverter.
Bulk Stage
Float Stage
Absorb volts
DC
Voltage
Time
Absorb Stage
Absorb
Time
Increased
Voltage
Constant
Voltage
Float volts
Reduced
Voltage
Figure 3-1, Automatic 3-Stage Graph
© 2015 Sensata Technologies
Page 25
Operation
3.3
Operation Scenarios - Utility Connected
When utility power is connected, the grid-tie inverter synchronizes to the utility grid and converts
the renewable energy to work in parallel with the utility grid to power the main and critical loads in
the home. Some of this power is used by the battery charger inside of the MS-PAE Series inverter
to keep the battery bank charged in case of a power failure. If there is any surplus renewable
energy after satisfying the loads in the home, it is fed back into the utility grid (see Figure 3-2).
Utility Connected – Surplus Power Fed to the Utility Grid
(Renewable Energy greater than Household and Critical Loads)
Renewable
Energy
Grid-Tie
Inverter
ACLD Controller
(Inactive)
Relay
Battery
Bank
MS-PAE Series
Inverter
Critical
Loads
PWM
Switch
Battery
Full
Primary
Load
(Not powered)
MagNet Control
Note: When the MS-PAE Series inverter
is connected to the utility and charging
the battery, the ALCD is Inactive.
Main
Household
Loads
Secondary
Load
(Not powered)
Utility
Grid Power
Figure 3-2, Utility Connected - Surplus Power Fed to the Utility Grid
During occasions when the renewable energy is less than the power required by the loads in the
home (i.e., PV system on a cloudy day), the additional power is provided by the utility to continue
powering the household and critical loads (see Figure 3-3).
Utility Connected – Additional Power Provided by the Utility Grid
(Renewable Energy less than Household and Critical Loads)
Renewable
Energy
Grid-Tie
Inverter
ACLD Controller
(Inactive)
Relay
Battery
Bank
MS-PAE Series
Inverter
Critical
Loads
PWM
Switch
Battery
Full
Primary
Load
(Not powered)
MagNet Control
Note: When the MS-PAE Series inverter
is connected to the utility and charging
the battery, the ALCD is Inactive.
Main
Household
Loads
Secondary
Load
(Not powered)
Utility
Grid Power
Figure 3-3, Utility Connected - Additional Power Provided by the Utility Grid
Page 26
© 2015 Sensata Technologies
Operation
3.4
Power Flow Scenarios - Utility Not Connected
Whenever there is a utility power outage, the MS-PAE Series inverter automatically comes on to
start powering the critical loads. Since the grid-tie inverter is connected to the output of the MSPAE Series inverter, the grid-tie inverter reconnects and starts converting the renewable energy
to power the critical loads (see Figure 3-4).
Utility Not Connected – RE Powers Critical Loads
(Critical loads consume all the Renewable Energy)
Renewable
Energy
Grid-Tie
Inverter
ACLD Controller
(Standby)
Relay
Battery
Bank
MS-PAE Series
Inverter
Critical
Loads
PWM
Switch
Battery
Nominal
Primary
Load
(Not Powered)
MagNet Control
Note: When the utility power is lost
and the MS-PAE Series inverter is
inverting, the ACLD is in Standby
mode and ready to regulate the
charge current to the battery.
Main
Household
Loads
Secondary
Load
(Not Powered)
Utility
Grid Power
Figure 3-4, Utility not Connected - RE Powers Critical Loads
During occasions when the renewable energy is less than the power required by the critical loads
(i.e., PV system at night), the additional power is provided by the MS-PAE Series inverter using
power from the battery bank (see Figure 3-5).
Utility Not Connected – Additional Power Provided to Critical Loads
(Power to critical loads greater than available from the Renewable Energy)
Renewable
Energy
Grid-Tie
Inverter
ACLD Controller
(Standby)
Relay
Battery
Bank
MS-PAE Series
Inverter
Critical
Loads
PWM
Switch
Battery
Decreasing
Primary
Load
(Not Powered)
MagNet Control
Note: When the utility power is lost
and the MS-PAE Series inverter is
inverting, the ACLD is in Standby
mode and ready to regulate the
charge current to the battery.
Main
Household
Loads
Secondary
Load
(Not Powered)
Utility
Grid Power
Figure 3-5, Utility not Connected - Additional Power Provided to Critical Loads
© 2015 Sensata Technologies
Page 27
Operation
During a utility power interruption, the main household loads are no longer connected and the utility
grid is not able to receive any excess power generated by the renewable energy. This means there
may be more current available than the critical loads can consume, causing this excess current to be
pushed back thru the AC output of the MS-PAE Series inverter into the battery bank (see Figure 3-6).
Utility Not Connected – Excess Current Charging Battery Bank
(Critical AC Loads less than Renewable Energy so battery bank is charging)
Renewable
Energy
Grid-Tie
Inverter
ACLD Controller
(Standby)
Relay
Battery
Bank
MS-PAE Series
Inverter
Critical
Loads
PWM
Switch
Battery
Increasing
Primary
Load
(Not Powered)
MagNet Control
Note: When the utility power is
lost and the MS-PAE Series inverter
is inverting, the ACLD is in Standby
mode and ready to regulate the
charge current to the battery.
Main
Household
Loads
Secondary
Load
(Not Powered)
Utility
Grid Power
Figure 3-6, Utility not Connected - Excess Current Charging Battery Bank
Since current is now being pushed back thru the AC output of the MS-PAE Series inverter and this is
not the inverter’s normal path to sense incoming current, it is not able to regulate the battery voltage.
To prevent the battery from being over-charged, the PWM switch inside the ACLD becomes active
and starts diverting the excess current to an externally connected primary load (see Figure 3-7).
Utility Not Connected – Diverting some Power to Primary Load
(ACLD connects primary load to divert some excess current when battery is almost full)
Renewable
Energy
Grid-Tie
Inverter
ACLD Controller
(Active)
Relay
Battery
Bank
MS-PAE Series
Inverter
Critical
Loads
PWM
Switch
Battery
Almost Full
Primary
Load
(Powered)
MagNet Control
Note: When the battery is almost full,
the ACLD becomes Active and starts
diverting power to the primary load.
Main
Household
Loads
Secondary
Load
(Not Powered)
Utility
Grid Power
Figure 3-7, Utility not Connected - Diverting some Power to Primary Load
Page 28
© 2015 Sensata Technologies
Operation
Once the battery becomes full, the PWM switch inside the ACLD fully closes to divert all the excess
current from the battery to an externally connected primary load (see Figure 3-8).
Utility Not Connected – Diverting all Power to Primary Load
(ACLD connects primary load to divert all excess current to prevent battery overcharge)
Renewable
Energy
Grid-Tie
Inverter
ACLD Controller
(Active)
Relay
Battery
Bank
MS-PAE Series
Inverter
Critical
Loads
PWM
Switch
Battery
Full
Primary
Load
(Powered)
MagNet Control
Note: The ACLD is still Active, and
when the battery is full, all the power
is diverted to the primary load.
Main
Household
Loads
Secondary
Load
(Not Powered)
Utility
Grid Power
Figure 3-8, Utility not Connected - Diverting all Power to Primary Load
If the primary load is not large enough to consume all the excess power or turns off, the ACLD
will activate an internal relay to connect a secondary load in parallel with the primary load. The
secondary load must always be on and available, and sized to handle the full current capacity of the
renewable energy source to prevent the battery bank from being over-charged (see Figure 3-9).
Utility Not Connected – Diverting Power to Secondary Load
(Primary load turns off - ACLD connects secondary load to prevent battery overcharge)
Renewable
Energy
Grid-Tie
Inverter
ACLD Controller
(Active)
Relay
Battery
Bank
MS-PAE Series
Inverter
Critical
Loads
PWM
Switch
Battery
Full
Primary
Load
(Turned Off)
MagNet Control
Note: The ACLD is still Active, and
connects the secondary load
because the primary load has
turned off or is not able to divert
the current away from the battery.
Main
Household
Loads
Secondary
Load
(Powered, and
always on)
Utility
Grid Power
Figure 3-9, Utility not Connected - Diverting Power to Secondary Load
© 2015 Sensata Technologies
Page 29
Operation
3.5
Power Switch Operation
Power Switch – The power switch on the right side of the ACLD (see Figure 1-2, item 8) is a
multi-function switch. It provides the functions of an on/off switch and is a 20-amp circuit breaker
that provides overload protection for wiring inside the load controller.
The ACLD can be turned ON (l) or OFF (O) by pressing the power
switch:
ON (l): The controller will be powered if 240-volt AC (from the utility
grid or MS-PAE Series inverter) is present at the INV OUT terminals.
The load controller passes this incoming 240-volt power to the
grid-tie inverter through the Electrical Panel terminals on the load
controller. The 240-volt power is used as the synchronizing voltage
and frequency signal which the grid-tie inverter requires to power-up.
Figure 3-10,
Power Switch
OFF (O): The controller is not powered, but is allowed to pass the
incoming power through.
CAUTION: When the power switch is in the off (O) position, the ACLD will not be able
to regulate the battery voltage.
Info: The power switch is labeled with universal “l” and “O” symbols. The “l” (line)
symbol represents power on and the “O” (circle) symbol represents power off. These
symbols come from the binary system (l means on and O means off).
Info: If the automatic protection circuit has turned the controller off, the power switch
will need to be pressed OFF (O) then back ON (l) to clear the fault and restart the load
controller.
Info: The switch operates as a latched mechanism and the ON/OFF power switch
function is independent of the overload protection trip function.
3.6
Inverter Fan Operation
The ACLD contains a cooling fan that is automatically controlled. The fan speed increases or
decreases based on the output power and the internal temperature of the controller.
The controller’s fan operates under the following conditions:
• Fan comes on momentarily when the ACLD is first turned on.
• Fan comes on when the controller’s operating power and/or internal temperature creates a
proportional temperature that is greater than 40°C (104°F), and stops if there is no load and
the temperature drops to 35°C (95°F) or lower.
Note: The ACLD’s fan will not come on based on temperature sensed by the optional Battery
Temperature Sensor.
Page 30
© 2015 Sensata Technologies
Operation
3.7
Operating Modes
Once the ACLD load controller is powered and turned on, it has three normal operating modes:
•
Inactive - The ACLD is inactive (not regulating the battery voltage) because utility power is
connected to the MS-PAE Series inverter. During the inactive mode, the MS-PAE Series inverter is
using the utility grid connected to its input to provide multi-stage charging to the battery bank.
•
Standby - In the Standby mode, the ACLD no longer senses utility power and begins monitoring
the battery voltage to determine when to become “active” and begin diverting power. Once
Standby mode has been initiated, the ACLD then determines the regulation stage. If the battery
voltage is low (≤12.8 VDC/12v inverters, ≤25.6 VDC/24v inverters, or ≤51.2 VDC/48v inverter),
the ACLD initiates the Bulk stage (i.e., ‘Standby - Bulk’). If the battery voltage is high (≥12.9
VDC/12v inverters, ≥25.7/24v inverters, or ≥51.3/48v inverters), the ACLD will skip the Bulk
and Absorb stages and go directly to the Float stage (i.e., ‘Standby - Float’).
During Standby mode, the ACLD will be in one of the following regulation stages:
Standby - Bulk: The battery voltage is below the Absorb Voltage setting and remains in the
Bulk stage until the battery voltage has reached the Absorb Voltage setting.
Standby - Absorb: The battery voltage has reached the Absorb Voltage setting and remains in
the Absorb stage until the Absorb Time Done setting has been satisfied.
Standby - Float: The battery voltage is in the Float stage and remains in this stage unless the
battery voltage falls to a low voltage, which will start another Bulk Charge stage.
•
Active - In the Active mode, the ACLD is actively diverting excess current—from the renewable
energy source—to regulate the battery voltage by connecting external diversion loads.
During Active mode, the ACLD will be in one of the following regulation stages:
Active - Bulk: If the battery voltage begins rising quickly, the ACLD activates and starts diverting
current in an attempt to keep the voltage from rising above the absorb voltage setting. The
ACLD remains in the Bulk stage until the battery voltage has reached the Absorb Voltage setting.
Active - Absorb: Current is being diverted to the external load to regulate the battery bank at
the Absorb Voltage setting. The ACLD will remain in the Absorb stage until the Absorb Time
Done setting has been satisfied.
Active - Float: Current is being diverted to the external load to regulate the battery bank at
the Float Voltage setting. The ACLD remains in this stage unless the battery voltage falls to a
low voltage, which will start another Bulk Charge stage.
The ACLD also includes an extensive protection circuitry to shut down the controller under certain
fault conditions. When the ACLD is in a fault condition, the controller’s green LED blinks 1-10
times (depending on the fault) and then pauses for four seconds. See Section 4.0 to determine
the fault condition and find help with troubleshooting.
3.8
Monitoring the ACLD Controller with a ME-ARC Remote Display
The ACLD controller—when connected to a ME-ARC remote control display (Version 4.0 or greater)—
provides access to ACLD meters and the status of the ACLD. This gives you the ability to monitor
the ACLD controller’s operation remotely. For specific information on the ACLD menus displayed
on the ME-ARC, see the ME-ARC (V4.0) Owner’s Manual (PN: 64-0030 Rev C).
Info: The ME-RC and ME-RTR can be used with and configure the ACLD, however,
only the ME-ARC remote (version 4.0 or higher) provides displays for the ACLD that
indicates: ACLD Status, Power Diverted, ACLD Temperature, Target Volts, Model, and
Software Version.
© 2015 Sensata Technologies
Page 31
Operation
3.9
ACLD Startup
ON/OFF Switch – The ACLD can be turned on and off by pressing the ON/OFF switch on the
right side of the ACLD (refer to Figure 3-10). When the controller’s automatic protection circuit
has turned the controller off and the fault is corrected, the ON/OFF switch will need to be cycled
off then back on to reset the fault and start the unit.
Status LED Indicator – The status indicator (refer to Figure 1-3, Item 1) is a green LED (Light
Emitting Diode) that provides information on the operational mode of the ACLD. Watch this indicator
for at least 10 seconds to determine the controller’s operational condition using the information
below:
Normal Operation
• Off - The ACLD is off. Either the power switch on the ACLD controller is off, the inverter is
not in the Inverter mode, there is no AC power to the ACLD, or the AC power to the ACLD
is incorrect/out-of-tolerance.
•
Blinks on once every second - The ACLD is on and operating normally. It is either in the
Inactive mode (grid is present), Standby mode (monitoring the battery voltage), or the
Active mode (diverting excess current).
Protection Mode
The Status LED is also used to indicate abnormal or fault conditions that cause the ACLD
controller to shut down. Monitor the Status LED indicator for at least 10 seconds, if it blinks
and then turns off for four seconds an abnormal/fault condition is occurring. Refer to the chart
below to determine the fault condition and to Section 4.0 Troubleshooting to help diagnose/
clear this condition.
Table 3-1, LED Blinks to Fault Condition
Blinks
(between each pause)
Fault Condition
1
High Current
2
High AC In
4
No Load
5
Desaturation
7
Overcurrent
8
Output Short
9
Over-temperature
10
No communication
Info: There are not any fault conditions for 3 and 6 blinks.
Page 32
© 2015 Sensata Technologies
Troubleshooting
4.0 Troubleshooting
This section will help you troubleshoot the ACLD when it has a fault condition. The ACLD will indicate
a particular abnormal/fault condition by how many times the Status LED blinks before pausing. To
determine the fault condition, monitor the Status LED indicator for at least 10 seconds and count
the number of blinks that occur before the LED turns off for four seconds. After determining the
number of blinks, refer to the information below to help diagnose/clear the condition.
•
Blinks On 1 time then off four seconds - High Current Fault; the current is at least 30%
above rated current.
Remedy: Ensure that the load is connected and sized correctly. If the load is correct,
reset the unit. The unit is reset by pressing the ON/OFF switch on the side of the ACLD
controller to the OFF position (this removes power to the unit). After power is removed,
press the ON/OFF switch to the ON position again to restore power. If the fault recurs,
contact Sensata for service.
•
Blinks On 2 times then off four seconds - High VAC In Fault; a very high AC voltage
(>275 VAC) has been detected on the AC input.
Remedy: This fault automatically clears once the AC input voltage to the ACLD falls
below 260 VAC.
•
Blinks On 4 times then off four seconds - No Load Fault; no loads detected on either
output terminals (detected by minimum current flow to loads).
Remedy: Check to ensure that the loads are rated for 240 VAC, sized correctly (see Section
2.9.2 on load sizing criteria), and connected to the correct output terminals (see Figure 2-5).
The loads should have a resistance between 10-15 ohms (see to Figure 3-11).
ACLD-40
Primary
Load
Use an ohmmeter to check resistance
from terminal 7 to 8 (primary load),
then from terminal 9 to 10 (secondary
load). The resistance for each load
connected should be ~10-15 ohms.
CAUTION: Ensure all power to the
ACLD is removed prior to checking
the load resistance or damage to
the ohmmeter may occur.
Ohmmeter
Secondary
Load
Figure 3-11, Checking Load Resistance
© 2015 Sensata Technologies
Page 33
Troubleshooting
Troubleshooting Continued:
•
Blinks On 5 times then off four seconds - Desat (i.e. Desaturation) Fault; hardware
saturation inside the controller has occurred—indicates a possible catastrophic failure.
Remedy: This fault requires a reset of the ACLD. Press the ON/OFF switch on the side
of the ACLD controller to remove power to the unit, and then press the ON/OFF switch
again to restore power. If the fault recurs, contact Sensata for service.
•
Blinks On 7 times then off four seconds - Overcurrent Fault; the current has reached
an extremely high level (about twice the rated current).
Remedy: This fault could be the result of too big of a load. Ensure the loads are sized
and connected correctly. Press the ON/OFF switch on the side of the ACLD controller to
remove power to the unit, and then press the ON/OFF switch again to restore power.
(See Section 2.9.2 on load sizing criteria).
•
Blinks On 8 times then off four seconds - Output Short Fault; a shorted output to loads
has been detected.
Remedy: Check to ensure that the loads are sized and connected correctly. See Section
2.9.2 on load sizing criteria. Refer to Figure 3-11 to check the load resistance.
•
Blinks On 9 times then off four seconds - Overtemp Fault; the internal temperature of
the ACLD controller has risen above 90°C.
Remedy: This fault can be caused by loads too great for the controller to operate
continuously (see Section 2.9.2 on load sizing criteria) or by the lack of ventilation to
the controller (check for objects in front of the fan grill). Once the temperature falls
below 70°C, the fault automatically clears and the ACLD will resume operation.
•
Blinks On 10 times then off four seconds - No Comm condition; the ACLD does not
detect nor is able to communicate with the inverter/network.
Remedy: Disconnect the remote communications cable from the inverter for 5 seconds,
and then reconnect it (see Figure 2-8). If the fault continues, then check/replace the
remote cable. Ensure this cable is 4-wire telephone cable (see Figure 2-9). This fault will
automatically clear once the ACLD starts communicating with the inverter.
Page 34
© 2015 Sensata Technologies
Appendix A – Specifications and Optional Equipment
Appendix A – Specifications and Optional Equipment
A-1
ACLD-40 Load Diversion Controller Specifications
Electrical Specifications
Input Voltage (from inverter & grid)
Output Voltage (to load)
Output Waveform (to load)
240 VAC ± 10%
0 - 240 VDC
Full Rectified Sinewave
Nominal Frequency Input
50 or 60 Hz
Continuous Rated Power
4000 VA @ 25°C
Continuous Rated Current
Absolute Maximum Current
(Input and Output to Loads)
20 amps AC @ 25°C
30 amps AC
Diversion Load Specifications
Acceptable Load Type
Pure Resistive
Primary Load Rated Power*
2500 - 4500W
Secondary Load Rated Power*
3500 - 4500W
* one of the loads must be 110% of renewable source power or greater and must always
stay on (cannot turn off).
Rated Voltage
208VAC, 230VAC, or 240VAC
General Features and Capabilities
Temperature Compensated Regulation
With BTS connected to inverter
Internal Cooling
Uses ball-bearing fan for long life
Integrated Electronic Protection
Overcurrent and overtemperature
Safety Listings
Warranty
Operating Temperature
Non-operating Temperature
Operating Humidity
ETL listed to UL/cUL 1741 (2nd edition),
CSA C22.2 No. 107.1-01
Three years (Five years when purchased with and
installed on a MMP or MP enclosure system)
-20°C to +60°C (-4°F to 140°F)
-40°C to +70°C (-40°F to 158°F)
0 to 95% RH non-condensing
Physical Specifications
Enclosure Type
Unit Dimensions (width x height x depth)
Shipping Dimensions (w x h x d)
Mounting
Weight
Max Operating Altitude
Enclosure Environmental Rating Type 1 (indoor only)
13” x 13.75” x 7” (33 cm x 34.9 cm x 17.8 cm)
16” x 17” x 10.5” (40.6 cm x 43.2 cm x 26.7 cm)
Top of shelf or table or specifically mounted on a
vertical surface (wall)
Unit: 20 lb (9.1 kg) / Shipping: 23 lb (10.5 kg)
15,000 ft (4570 m)
Unless otherwise noted, specifications @ 77°F (25°C) – subject to change without notice.
© 2015 Sensata Technologies
Page 35
Appendix A – Specifications and Optional Equipment
A-2
Regulatory Compliance
The ACLD controller is designated as a “diversion controller”. It is used to divert excess power
from a renewable energy source when connected in an AC coupled system. Even though used in
an AC coupled system—and normally is connected to the utility grid—the ACLD-40 is not a gridinteractive (also known as utility-interactive) device and does not have the capability to export
(or sell) power back into the utility grid.
The ACLD controller is intended to be used for residential or commercial applications. It has
been tested and listed to UL 1741, 2nd Edition (Inverters, Converters and Controllers for Use in
Independent Power Systems) for use in the US; and is also certified to CSA C22.2 No. 107.1-01
(General Use Power Supplies) for use in Canada. It has been tested and certified to these product
safety standards by Intertek Testing Services (known as ETL), which is a Nationally Recognized
Testing Laboratory (NRTL). NRTL’s are qualified organizations that meet Occupational Safety and
Health Administration (OSHA) regulations to perform independent safety testing and product
certification.
A-3
Optional Equipment and Accessories
The following components are available for use with the ACLD-40. Some of these items are required
(depends upon the intended use of the inverter).
MMP Series Enclosures
The MMP175-30D, MMP175-60S, MMP250-30D, and MMP250-60S enclosures are for single inverter
applications. The MMP Series enclosures have been specifically designed to combine all of the major
components required for a renewable energy system—inverter/battery disconnect, AC overcurrent
protection, grounding connections and a full system inverter bypass switch as a convenient way
to isolate the inverter for battery maintenance—into a single, easy to install pre-wired enclosure.
MP Series Enclosures
The MPSL, MPSH, MPDH enclosures have been specifically designed to easily work with multiple
stacked inverters. The MP enclosures feature convenient front-mounted AC and DC connections and
easy front panel operation. Depending on the MP enclosure, you can connect from 2 to 4 inverters
together—using the MPX Series extensions—to handle your power capacity needs.
Advanced Remote Control
The ME-ARC remote control panel uses an LCD screen and at-a-glance LED’s to provide operating
information and allow advanced features—if available—to be configured. This LCD remote control
also provides advanced monitoring/troubleshooting and includes a FAVS button to quickly access
your favorite features.
Battery Monitor
The Battery Monitor Kit (ME-BMK) is a single battery bank amp-hour meter that monitors the condition
of the battery, provides information to let you know how much energy you have available, and lets
you plan your electrical usage to ensure the battery is not being over-discharged. The ME-BMK-NS
version does not include a DC shunt. You must order the ME-BMK to receive a 500A/50mv DC shunt.
Note: The DC shunt is included with MMP and MP Series enclosures. Order the ME-BMK-NS version
when installed with the MMP or MP enclosures.
MagWeb
The MagWeb – Wireless (ME-MW-W) or MagWeb – Ethernet (ME-MW-E) are powerful and costeffective tools for remotely monitoring the inverter and accessories. Installed on the MagNet
network, either MagWeb provides live internet monitoring of the inverter, battery monitor, and
automatic generator start module. Using your always on Internet connection, either MagWeb
makes live and historical conditions available to you.
MPX-CB Conduit Boxes
The MPX-CB Conduit Box is provided for installations where the electrical code requires the wiring
to the ACLD to be enclosed and protected by conduit. The top side is designed to fit MS-PAE Series
inverters. It has conduit knockouts on each side and on the bottom.
Page 36
© 2015 Sensata Technologies
Appendix B – Warranty & Service
Appendix B – Warranty and Service
B-1
Limited Warranty
Sensata Technologies warrants the ACLD-40 to be free from defects in material and workmanship that
may result in product failure during normal usage, according to the following terms and conditions:
1. The limited warranty for the product extends for 36 months beginning from the product’s
original date of purchase.
Note: The normal 3-year warranty on this ACLD-40 is extended to 5 years if it was ordered
with and installed on one of the MMP or MP enclosure systems. A proof-of-purchase is required
at the time of repair/service showing that the ACLD diversion controller and the MP or MMP
panel system were purchased at the same time.
2. The limited warranty extends to the original purchaser of the product and is not assignable or
transferable to any subsequent purchaser.
3. During the limited warranty period, Sensata Technologies will repair or replace at Sensata’s
option any defective parts—or any parts that will not properly operate for their intended use—
with factory new or rebuilt replacement items if such repair/replacement is needed because
of product malfunction or failure during normal usage. The limited warranty does not cover
structural or non-operative parts, or any defects in appearance be they cosmetic or decorative.
Sensata Technologies limit of liability under the limited warranty shall be the actual cash value of
the product at the time the original purchaser returns the product for repair, determined by the
price paid by the original purchaser. Sensata shall not be liable for any other losses or damages.
4. Upon request from Sensata Technologies, the original purchaser must prove the product’s
original date of purchase by presenting a dated bill of sale or itemized receipt.
5. The original purchaser shall return the product prepaid to Sensata Technologies in Everett,
WA, or to one of Sensata’s Authorized Service Centers (ASC). After the completion of service
under this limited warranty, the product will be returned prepaid to the original purchaser via
non-expedited surface freight within the contiguous United States and Canada; this excludes
Alaska and Hawaii.
6. If Sensata repairs or replaces a product, its warranty continues for the remaining portion of
the original warranty period or 90 days from the date of the return shipment to the original
purchaser, whichever is greater. All replaced products and parts removed from the repaired
products become the property of Sensata.
7. This limited warranty is voided if:
• the product has been modified without authorization
• the serial number has been altered or removed
• the product has been damaged from abuse, neglect, accident, high voltage or corrosion
• the product was not installed and operated according to the owner's manual
B-2
How to Receive Repair Service
If your product requires warranty service or repair, contact either:
• An authorized service center listed on the http://magnum-dimensions.com website; or
• Sensata Technologies (Magnum-Dimensions Products) at:
Phone: 425-353-8833, Fax: 425-353-8390, Email: [email protected]
If returning the product directly to Sensata Technologies for repair, you must:
1. Return the unit in the original, or equivalent, shipping container. Note: When shipping your product,
please ensure it is properly packaged. Damage due to inadequate packaging is not covered
under warranty. We recommend sending the product by traceable or insured service.
2. Receive a Return Materials Authorization (RMA) number from the factory prior to the return
of the product to Sensata Technologies for repair.
3. Place RMA numbers clearly on the shipping container or on the packing slip.
BEFORE RETURNING ANY UNIT TO SENSATA TECHNOLOGIES,
A RETURN MATERIAL AUTHORIZATION (RMA) NUMBER IS REQUIRED
© 2015 Sensata Technologies
Page 37
Notes:
Page 38
© 2015 Sensata Technologies
Magnum-Dimensions Products
Manufactured by:
Sensata Technologies
2211 West Casino Rd.
Everett, WA 98204
Phone: 425-353-8833
Fax: 425-353-8390
Web: www.magnum-dimensions.com/
ACLD-40 Owner’s Manual (PN: 64-0062 Rev A)