1
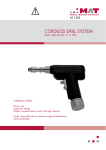
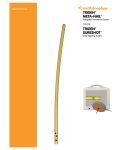
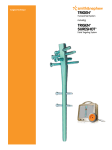
MEDICAL ADVANCED TECHNOLOGY
INTRAMEDULLARY NAILING - HUMERAL
MAT LOCK HUMERAL, ANTEROGRADE
AND RETROGRADE NAIL SYSTEM
TITANIUM & STEEL NAIL SYSTEM
HUMERAL NAILING IMPLANTS
AND OPERATING MANUAL
SOLUTION WITHOUT
COMPROMISE
introducing ourselve
Manufacturer of surgical implants and medical devices. Solutions for patient
orthopaedic and osteosyntheses fracture treatments, osteosyntheses customized
orthopaedic innovations and solutions.
corporate COMPANY philosophy,
SOLUTION WITHOUT COMPROMISE
MAT GmbH & Co. KG. design, develop and manufacture
implants and instruments for use in specific treatments of
trauma orthopedic systems, fracture reconstruction treatment systems.
- Plate- and screw systems
( mini, small- and large fragment systems )
- Locking plate- and screw systems
( small- and large fragment systems )
- Interlocking nailing systems
- Cranio maxillo facial plate- and screw systems
- Cannulated screw system
- Flexible reamer systems
- Hand and Foot implants ( screws- and staple systems )
- External fixator systems
- Oscillating saw blades
- Power tool systems, battery- and air drive systems
- General surgical instruments
- Hemi arthroplasty instruments for hip surgeries
and cement extraction
MAT GmbH & Co. KG. innovative and exiting product portfolio is updated and expanded in line with technological
advances to satisfy the current and future needs of both, patients and healthcare professionals.
MAT GmbH & Co. KG. is committed to playing our part in achieving improved healthcare outcomes worldwide.
2|
MAT Medical Advanced Technology
GENERAL INFORMATION
humeral NAILING
before using the product
Before every use you should carefully check the operability of the implants and the operating instruments. They should be free of
damages. If there are any cracks, fractures, discolouration, deformation or any damages on the implants, which may be due to
unsuitable storing, imperfect sterilization or preliminary inefficient treatment, the use of the implant is prohibited. The assembly,
perfect fitting and operation of the implants and all the necessary instruments should be tested. Perfect fitting and operation,
appropriate dimensions and positions should be checked in all cases.
requirements towards the user
The set of tools and implants can only be applied by doctors with appropriate qualifications and special information and
experience in the field of using implants.
The doctor who performs the operation is responsible for choosing the correct indication, the type of the implants and the
operation technology.
contraindication
Implantation is not recommended if the patient's health condition makes it difficult to accept it or problems are expected during the
recovery process e.g. decreased circulation, weak quality or quantity bone system, impossibility of rehabilitation due to the mental
condition of the patient etc.
general warnings
Before the operation the patient should be informed about the possible disadvantages of the implant. By choosing the appropriate
implant the type of the bone fracture, the weight and activity of the patient should be taken into consideration. The solidity of the
implant is restricted, so it is necessary to avoid overloading it by overweight. The biomechanical loading of the implant should be
minimized, as much as possible.
During the application of the implant the process of recovering is to be controlled. By repetitive loading or by protracted bone
recovering the implants may be deformed, dislocated. This needs intervention in time. Repeated deformation of the implant
should be avoided. The implants are only for one-time use, a re-implantation is prohibited. The type and the size of the implants
should be defined according to the specific case. Before operation the user's manual of the implants should be studied carefully.
applied materials
The applied materials are of best quality, specially developed for implants with high solidity, made of non magnetic stainless steel
and titan alloys.
Combined use of products of other manufacturers may start damaging processes, which the MAT GmbH & Co.KG can't
take the responsibility for.
protection of the product, packaging, preparation for use
The implants come clean, without any production pollution for packaging. Before use circumstances are to be assured where the
integrity of the packaging will be preserved. The storage should be in a clean, dry place avoiding extra temperature and
chemicals.
sterilisation
Before use unpack the implant and sterilize due to the prescriptions.
Avoid the touch by bare hand. The sterilisation of the instruments should be done together with the tray. The instructions of the
producers should always be considered.
interaction with medicines
An interaction of the implants with medicines is not known.
MAT Medical Advanced Technology | 3
SYSTEM OF IMPLANTS
Material: steel or titanium alloy
Locking humeral nail, cannulated, diameter 7 - 8 - 9 mm, cat. no.:
from NA-14294-70180 to NA-14294-70310
(steel)
from NA-34294-70180 to NA-34294-70310
(titanium alloy)
from NA-14294-80180 to NA-14294-80310
(steel)
from NA-34294-80180 to NA-34294-80310
(titanium alloy)
from NA-14294-90180 to NA-14291-90310
(steel)
from NA-34294-90180 to NA-34294-90310
(titanium alloy)
Locking screw, diameter 3,9 mm, cat. no.:
from LS-12200-39020 to LS-12200-39065
(steel)
from LS-32200-39020 to LS-32200-39065
(titanium alloy)
LS-12400-07011
(steel)
LS-32400-07011
(titanium alloy)
End cap, cat. no.:
Surgical set for locking humeral nailing, cat. no.:
SET-94290-00000
4|
MAT Medical Advanced Technology
implants for locking
humeral nailing
locking humeral nail, cannulated
Catalogue Number
L
(mm)
Ø7
steel
titanium alloy
steel
Ø8
titanium alloy
steel
Ø9
titanium alloy
180
NA-14294-70180
NA-34294-70180
NA-14294-80180
NA-34294-80180
NA-14294-90180
NA-34294-90180
205
NA-14294-70205
NA-34294-70205
NA-14294-80205
NA-34294-80205
NA-14294-90205
NA-34294-90205
220
NA-14294-70220
NA-34294-70220
NA-14294-80220
NA-34294-80220
NA-14294-90220
NA-34294-90220
230
NA-14294-70230
NA-34294-70230
NA-14294-80230
NA-34294-80230
NA-14294-90230
NA-34294-90230
240
NA-14294-70240
NA-34294-70240
NA-14294-80240
NA-34294-80240
NA-14294-90240
NA-34294-90240
250
NA-14294-70250
NA-34294-70250
NA-14294-80250
NA-34294-80250
NA-14294-90250
NA-34294-90250
260
NA-14294-70260
NA-34294-70260
NA-14294-80260
NA-34294-80260
NA-14294-90260
NA-34294-90260
270
NA-14294-70270
NA-34294-70270
NA-14294-80270
NA-34294-80270
NA-14294-90270
NA-34294-90270
280
NA-14294-70280
NA-34294-70280
NA-14294-80280
NA-34294-80280
NA-14294-90280
NA-34294-90280
295
NA-14294-70295
NA-34294-70295
NA-14294-80295
NA-34294-80295
NA-14294-90295
NA-34294-90295
310
NA-14294-70310
NA-34294-70310
NA-14294-80310
NA-34294-80310
NA-14294-90310
NA-34294-90310
locking screw
Thread diameter: 3,9 mm
Pitch:
1,75 mm
L
(mm)
steel
20
LS-12200-39020
end cAp for locking
humeral nail
Core diameter: 3,2 mm
Hex width:
2,5 mm
Catalogue Number
Catalogue Number
Catalogue Number
titanium alloy
L
(mm)
steel
titanium alloy
steel
titanium alloy
LS-32200-39020
44
LS-12200-39044
LS-32200-39044
LS-12400-07011
LS-32400-07011
22
LS-12200-39022
LS-32200-39022
45
LS-12200-39045
LS-32200-39045
24
LS-12200-39024
LS-32200-39024
46
LS-12200-39046
LS-32200-39046
26
LS-12200-39026
LS-32200-39026
48
LS-12200-39048
LS-32200-39048
28
LS-12200-39028
LS-32200-39028
50
LS-12200-39050
LS-32200-39050
30
LS-12200-39030
LS-32200-39030
52
LS-12200-39052
LS-32200-39052
LS-32200-39054
32
LS-12200-39032
LS-32200-39032
54
LS-12200-39054
34
LS-12200-39034
LS-32200-39034
55
LS-12200-39055
LS-32200-39055
35
LS-12200-39035
LS-32200-39035
56
LS-12200-39056
LS-32200-39056
36
LS-12200-39036
LS-32200-39036
58
LS-12200-39058
LS-32200-39058
38
LS-12200-39038
LS-32200-39038
60
LS-12200-39060
LS-32200-39060
40
LS-12200-39040
LS-32200-39040
65
LS-12200-39065
LS-32200-39065
42
LS-12200-39042
LS-32200-39042
MAT Medical Advanced Technology | 5
SURGICAL INSTRUMENTS
FOR locking humeral nailing
surgical set
Cat. no.: SET -94290-00000
Cat. no.: TRAY-94290-00000
Tray for humeral nailing
instrument set
Pos.
Cat.no.
Description
1
INS-94290-00105
Fixing screw, M8
pcs
Pos.
Cat.no.
Description
1
14
INS-94290-00600
Threaded removal shaft
2
INS-94290-00100
Proximal targeting arm
3
INS-94290-00503
M5 screw for auxiliary arm and
targeting shaft
4
INS-94290-00500
Auxiliary targeting arm
1
pcs
1
15
INS-99000-00008
Wrench, 11 mm
1
5
16
INS-15000-20250
Kirschner-wire, 2 x 250 mm
3
17
INS-99010-32190
Spiral drill, quick coupling,
3,2 x 190 mm
1
1
5
INS-94290-00400
Threaded stem, cannulated
1
18
INS-99010-45145
Spiral drill, 4,5 x 145 mm
1
6
INS-99000-00009
Wrench, 17 mm
1
19
INS-94290-01500
Screw length gauge
1
7
INS-94290-00103
Targeting shaft
left (retrograde), right (anterograde)
1
20
INS-94290-01700
Length gauge
1
8
INS-94290-00104
Targeting shaft
right (retrograde), left (anterograde)
1
21
INS-94290-01800
Burr
1
22
INS-94290-01003
Removal - impactor bumper
1
23
INS-99031-10200
Spiral drill, cannulated,
10/2,2 x 200 mm
1
24
INS-94290-01100
Hammer
1
25
INS-94290-01300
Drill sleeve 6/3,2 mm
2
26
INS-99000-00012
Quick coupling handle
1
27
INS-94290-01200
Pointer
1
28
INS-94290-01000
Removal - impactor shaft
1
9
INS-94290-00700
Reamer 10 mm, cannulated
1
10
INS-99150-35106
Screw driver, quick coupling,
3,5 x 106 mm
1
INS-99150-25150
Screw driver, quick coupling,
2,5 x 150 mm
1
12
INS-94290-01600
Impactor, cannulated
1
13
INS-94290-01400
Soft tissue protector, 8/6 mm
2
11
6|
MAT Medical Advanced Technology
implants for locking
humeral nailing
Pos.
1
Pos.
2
Pos.
3
Pos.
4
Pos.
5
Pos.
6
Pos.
7
Pos.
8
Pos.
9
Pos.
10
Cat. no.
Description
INS-94290-00105
Fixing screw, M8
Cat. no.
Description
INS-94290-00100
Proximal targeting arm
Cat. no.
Description
INS-94290-00503
M5 screw for auxiliary arm and targeting shaft
Cat. no.
Description
INS-94290-00500
Auxiliary targeting arm
Cat. no.
Description
INS-94290-00400
Threaded stem, cannulated
Cat. no.
Description
INS-99000-00009
Wrench, 17 mm
Cat. no.
Description
INS-94290-00103
Targeting shaft, left (retrograde), right (anterograde)
Cat. no.
Description
INS-94290-00104
Targeting shaft, right (retrograde), left (anterograde)
Cat. no.
Description
INS-94290-00700
Reamer 10 mm, cannulated
Cat. no.
Description
INS-99150-35106
Screw driver, quick coupling, 3,5 x 106 mm
MAT Medical Advanced Technology | 7
pcs
1
pcs
1
pcs
5
pcs
1
pcs
1
pcs
1
pcs
1
pcs
1
pcs
1
pcs
1
SURGICAL INSTRUMENTS
FOR locking humeral nailing
Pos.
11
Pos.
12
Pos.
13
Pos.
14
Pos.
15
Pos.
16
Pos.
17
Pos.
18
Pos.
19
8|
MAT Medical Advanced Technology
Cat. no.
Description
INS-99150-25150
Screw driver, quick coupling, 2,5 x 150 mm
Cat. no.
Description
INS-94290-01600
Impactor, cannulated
Cat. no.
Description
INS-94290-01400
Soft tissue protector, 8/6 mm
Cat. no.
Description
INS-94290-00600
Threaded removal shaft
Cat. no.
Description
INS-99000-00008
Wrench, 11 mm
Cat. no.
Description
INS-15000-20250
Kirschner-wire, 2 x 250 mm
Cat. no.
Description
INS-99010-32190
Spiral drill, quick coupling, 3,2 x 190 mm
Cat. no.
Description
INS-99010-45145
Spiral drill, 4,5 x 145 mm
Cat. no.
Description
INS-94290-01500
Screw length gauge
pcs
1
pcs
1
pcs
2
pcs
1
pcs
1
pcs
3
pcs
1
pcs
1
pcs
1
implants for locking
humeral nailing
Pos.
Cat. no.
Description
20
INS-94290-01700
Length gauge
Pos.
Cat. no.
Description
INS-94290-01800
Burr
21
Pos.
22
Pos.
23
Pos.
24
Pos.
25
Cat. no.
Description
INS-94290-01003
Removal - impactor bumper
Cat. no.
Description
INS-99031-10200
Spiral drill, cannulated, 10/2,2 x 200 mm
Cat. no.
Description
INS-94290-01100
Hammer
Cat. no.
Description
INS-94290-01300
Drill sleeve 6/3,2 mm
Pos.
Cat. no.
Description
26
INS-99000-00012
Quick coupling handle
Pos.
Cat. no.
Description
INS-94290-01200
Pointer
Cat. no.
Description
INS-94290-01000
Removal - impactor shaft
27
Pos.
28
MAT Medical Advanced Technology | 9
pcs
1
pcs
1
pcs
1
pcs
1
pcs
1
pcs
2
pcs
1
pcs
1
pcs
1
The Humerus Nail of MAT GmbH & Co. KG due to AO
classification A,B and C types fit to all 3 subtypes for
operation of fractures.
The correct placing of the nail depending on the
direction of the insertion, do according to the medical
prescriptions and the international literature.
1
2
For choosing the necessary implant with the help of Xray we define the appropriate sizes.
Knowing the length and diameter of the nail we
assemble the prepared implant with the aimer.
(2 - a proximal targeting arm, 5 – threaded stem, 7, 8 right-hand or left targeting shaft, 1 - a fixing screw).
We check fitting up, the punctuality of the borings, the
anatomically correct position of the nail, the stiffness of
the links.
3
4
Define the point of insertion.
Preparing countersink holes with 4.5 × 145 mm spiral
drill (18).
4/a Alternative technique:
If the bone fracture requires, for effectiveness of the
reposition we can choose either a leader-split. In this
case we drill the penetration pont by Kirshner wire (16)
we drive the wire in the necessary way of the
intramedullary .The loose end of the wire with the help of
the measuring strip (20) can identify the length of the
nail.
5
With the burr (21) we expand and fuse the countersink
holes. With this we prepare the point of inserting the nail.
5/a Alternative technique
We expand the penetration point - keeping the split (16)by cannulated hand miller and / or cannulated spiral drill.
10 |
MAT Medical Advanced Technology
surgical technique
with retrograde
insertion
6
We insert the nail assembled with the targeting arm (2),
(7-8), (1) and with the impactor shaft (28), (24) into the
medullary canal.
We check the proper position with X-ray. If necessary we
help the inserting with mild beats (24). After reaching the
wished position we remove the impactor shaft (28).
6/a Alternative technique:
We fix to the cannulated impactor – which connect the
nail and the targeting arm- the cannulated stem.The
driving in of the nail takes place with the driving of the
Kirschner. If necessary we can hammer slight the nail
by the cannulated stem - we need to avoid any further
damages and crack of the bone.
7
We carry out first the proximal locking, to which we look
for the position of the locking borings with bi-directional
X-ray control.
Using the soft tissue protector (13) and drill sleeve (25)
with use of 3.2 × 190 mm spiral drill (17) we prepare a
locking boring.
7/a Alternative technique:
If we used Kirshner leader split for driving in the nail, we
need to remove it from the intramedullary before locking.
Then remove the cannulated stem from impactor.
8
9
Keeping the soft tissue protector we define the length of
the proper locking screw. For this we fix the length
gauge (19) into the opposite corticalis through the
locking boring. The size shown on the soft tissue
protector matches the length of the screw.
Installing the locking screws is to be done through the
soft tissue protector (13). We put the steam of the screw
driver 2,5 × 150 mm (11) into the quick coupling handle
(26) and lock with the chosen screws.
MAT Medical Advanced Technology | 11
1.5
surgical technique
with retrograde insertion
10
The distal locking is to be done with the targeting device
assembled to the nail. For the lateral locking we place a
soft tissue protector (13 ) and a drill sleeve (25) into the
hole of the targeting arm (7, 8). On the prepared boring
with spiral drill 3,2 × 190mm (17) we do a length
measuring like by the proximal locking and screw in the
necessary locking screws.
If the direction of the fracture requires, we can do sagittal
locking as well.In order to do it we have to use the
auxiliary targeting arm (4) with a fixing screw (3).
Preparing locking, the length measuring and locking is
the same as previously described.
11
12
13
14
12 |
MAT Medical Advanced Technology
After finishing the locking we remove the targeting
device (2),(7-8), (4) with the wrench (6), put an end cup
into the nail and close the cut.
After the operation we check the reconstruction of the
function of the shoulder. During the recovering process
we control several times the process of the recovering.
We control the position of the implants as needed but at
least after 2 days and after 6 and 12 weeks with X-ray as
well.
At appropriate stage of the bone-regeneration we can
remove the medullary nail. At first we take out the
locking screws then with removing the end cup we open
the threaded link at the end of the nail.
We screw the threaded removal shaft (14) into the end of
the nail, than fix the removal shaft (28) on it. We place the
hammer (24) and close the shaft with the removal
bumper (22). We remove the nail with indulgent use of
the hammer.
surgical technique
with anterograde
insertion
1
2
For choosing the necessary implant with the help of Xray we define the appropriate sizes.
Knowing the length and diameter of the nail we
assemble the prepared implant with the aimer. (2 - a
proximal targeting arm, 5 – threaded steam, 7, 8 - righthand or left targeting shaft, 1 - a fixing screw).
We check fitting up, the punctuality of the borings, the
anatomically correct position of the nail, the stiffness of
the links.
3
4
Draw aside the muscle fibres, then define the point of
insertion. Open the medullary canal with 2 × 250 mm
Kirschner wire (16).
While keeping the muscle fibres drawn aside using the
correct position of the leader-spit (16) we enlarge the
insertion point with the reamer (9) to the size of the nail.
We remove both the spit (16) and the reamer (9).
4/a Alternative technique:
If the bone fracture requires, for effectiveness of the
reposition we can choose either a leader-split. In this
case we drill the penetration pont by Kirshner wire (16)
we drive the wire in the necessary way of the
intramedullary .The loose end of the wire with the help of
the measuring strip (20) can identify the length of the
nail.
5
We insert the nail assembled with the targeting arm (2),
(7-8), (1) and with the impactor shaft (28), and the
hammer (24) into the medullary canal. In case of the
right nail position the end of the nail must be in any case
under the cartilage surface.
We check the proper position with X-ray. The image of
the Kirschner wire led through the targeting arm helps to
control the right position of the nail. After reaching
wished position we remove the impactor shaft (28) and
the hammer (24).
5/a Alternative technique
We expand the penetration point - keeping the split (16)by cannulated hand miller and / or cannulated spiral drill.
MAT Medical Advanced Technology | 13
6
We begin locking on the distal end. We look for the
position of the locking borings with bi-directional X-ray
control. If necessary before drilling the lateral locking
hole we can help through the soft tissue protector (13)
with the use of pointer (27).
6/a A alternative technique:
We fix to the cannulated impactor – which connect the
nail and the targeting arm- the cannulated stem.The
driving in of the nail takes place with the driving of the
Kirschner. If necessary we can hammer slight the nail
by the cannulated stem - we need to avoid any further
damages and crack of the bone.
7
We carry out first the distal locking, to which we look for
the position of the locking borings with bi-directional Xray control.
Using the soft tissue protector (13) and drill sleeve (25)
with use of 3.2 × 190 mm spiral drill (17) we prepare a
locking boring.
7/a Alternative technique:
If we used Kirshner leader split for driving in the nail, we
need to remove it from the intramedullary before locking.
Then remove the cannulated stem from impactor.
14 |
MAT Medical Advanced Technology
8
Keeping the soft tissue protector we define the length of
the proper locking screw. For this we fix the length
gauge (19) into the opposite corticalis through the
locking boring. The size shown on the soft tissue
protector matches to the length of the screw.
9
Installing of the locking screws is to be done through the
soft tissue protector (13). We put the steam of the screw
driver (11) into the quick coupling handle (26) and lock
with the chosen screws.
surgical technique
with anterograde
insertion
10
11
12
13
14
The distal locking is to be done with the targeting device
assembled to the nail. For the lateral locking we place a
soft tissue protector (13) and a drill sleeve (25) into the
hole of the targeting arm (7, 8). On the prepared boring
with spiral drill (17) we do a length measuring like by the
proximal locking and screw in the necessary locking
screws. If the direction of the fracture requires we can do
sagittal locking as well.
In order to do it we have to use the auxiliary targeting arm
(4) with a fixing screw (3). The preparing locking, the
length measuring and the locking is the same as
previously described.
After finishing locking we remove the targeting device
(2),(7-8), (4) with the wrench (15), put an end cup into the
nail and close the cut.
After the operation we check the reconstruction of the
function of the shoulder. During the recovering process
we control several times the process of the recovering.
We control the position of the implants as needed but at
least after 2 days and after 6 and 12 weeks with X-ray as
well.
At appropriate stage of the bone-regeneration we can
remove the medullary nail. At first we take out the
locking screws then with removing the end cup we open
the threaded link at the end of the nail.
We screw the threaded removal shaft (14) into the end of
the nail, than fix the removal shaft (28) on it. We place the
hammer (24) and close the shaft with the removal
bumper (22). We remove the nail with indulgent use of
the hammer.
MAT Medical Advanced Technology | 15
MEDICAL ADVANCED TECHNOLOGY
Intramedullary Nailing - Humeral © MAT / AtelierUrban
MAT GmbH & Co.KG
Friedrich-Wöhler Straße 10
78576 Emmingen-Liptingen, Germany
Phone: +49 (0)7465 909 188 ∙ Fax : +49 (0)7465 909 024
www.mat-medical.com · [email protected]
Revision 10.07.2012