1
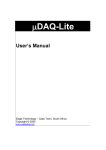
v1.08 Foreword Congratulations! You have acquired a REMUC Remote Control System. We dare to say you have chosen one of the best devices available as REMUC combines seamlessly quality design and production with ease of use and reliability. REMUC is a Finnish Avainlippu product, meaning its degree of domestic origin is over 50%. More information: www.remuc.fi All manuals are available in multiple languages from: www.remuc.fi/downloads 2 REMUC User Manual Contents Foreword.............................................................................................................................. 2 Contents .............................................................................................................................. 3 1 General information ...................................................................................................... 4 1.1 Package contents ................................................................................................... 4 1.2 Electrical features ................................................................................................... 4 2 Important information .................................................................................................... 5 3 Installing the controller .................................................................................................. 6 3.1 Connector schematics ............................................................................................ 6 3.2 Connecting the REMUC usage button .................................................................... 7 3.3 Connecting the heat sensor .................................................................................... 7 3.4 Configuring inputs ................................................................................................... 7 4 REMUC usage button and status lights ........................................................................ 8 4.1 Status lights ............................................................................................................ 8 4.2 Usage button .......................................................................................................... 9 4.3 Resetting the controller with usage button .............................................................. 9 5 Controller initialization and settings ............................................................................ 10 5.1 Choosing the SIM card ......................................................................................... 10 5.2 Connecting phone using QR code ........................................................................ 12 5.3 Connecting the phone using Android, Meego or Symbian application .................. 17 5.4 Connect phone using SMS and/or phone calls ..................................................... 22 5.5 Web user interface................................................................................................ 23 6 REMUC usage ............................................................................................................ 24 6.1 Windows Phone application .................................................................................. 25 6.2 Apple iPhone application ...................................................................................... 27 6.3 Android application ............................................................................................... 29 6.4 Symbian and MeeGo applications ........................................................................ 31 6.5 Phone calls ........................................................................................................... 31 6.6 SMS messages..................................................................................................... 31 6.7 Usage button ........................................................................................................ 31 6.8 Web browser client ............................................................................................... 32 6.8.1 Control tab...................................................................................................... 33 6.8.2 SIM card tab ................................................................................................... 34 6.8.3 Settings tab .................................................................................................... 35 7 REMUC settings ......................................................................................................... 36 8 SMS interface ............................................................................................................. 37 9 CE certification ........................................................................................................... 43 10 WEEE directive ........................................................................................................... 43 11 User manual ............................................................................................................... 43 12 Changes ..................................................................................................................... 43 13 Liability notice ............................................................................................................. 43 3 REMUC User Manual 1 General information REMUC controller enables controlling of different electric equipment like gasoline powered heaters, alarms and remote control system by using a mobile phone. Controller communicates on GSM network using either IP or SMS connection, depending on the mobile phone type in use. A SIM card is needed with a data plan or SMS plan, depending on the selected control method. 1.1 Package contents REMUC controller with an integrated antenna and SIM card reader Cables needed for installation Heat sensor with 2m installation cable Illuminated usage button with 1,5m installation cable QR sticker Embelin SIM card (optional) SIM card supplied by Embelin Ltd. cannot be used in any other target than REMUC. Removing an activated Embelin SIM card from REMUC causes the SIM card to be blacklisted and closed. Quick start for end user Installer guide 1.2 Electrical features Operational voltage Operational temperature Current consumption in stand-by Operational range of the heat sensor 4 REMUC User Manual +9V...32V -30...+80C < 30mA (12V) -55...+125C 2 Important information Warning! Always read usage-, safety-, and service instructions of the device to be controlled using REMUC. CONTROLLER MUST BE INSTALLED SO THAT THE INSTALLATION NEVER EXCEEDS GIVEN VOLTAGE AND CURRENT INPUT LIMITS. CURRENT INPUT MUST BE GUARDED WITH A 5A FUSE If the package contains an optional data SIM or a Prepaid SIM card, user may change it to any operator’s SIM card but Embelin Ltd. is not able to provide any support regarding any other SIM card than the one included in the package REMUC should be installed by a professional service to ensure proper operation PIN code for the SIM card must be one of the following: ”1234”, ”0000” or the PIN code query must be disabled completely If any other SIM card is used than the one included in the package, SIM card functionality must be verified with a mobile phone before installation. This is because usually after installation the device is located in a hard-to-reach spot. If the SIM card installed in REMUC does not have any kind of fixed rate data plan, switch data connection off by sending SMS “IP OFF” to REMUC. 5 REMUC User Manual 3 Installing the controller Installation must be performed by a professional service. Controller must be placed in a dry place shielded from water. Under car dashboard is a good example. 3.1 Connector schematics Installation cable wiring may vary, depending on the delivery version: RC2A RC2AE RC2AL Full connected cable Basic installation cable (Eberspächer) Basic installation cable (Webasto) 1 2 3 4 5 6 7 BLACK ORANGE NC NC GRAY GRAY GRAY Ground WBC x x x Button x x x x 8 VIOLET Input 2 9 RED V in 10 YELLOW Output1 (+) (heater control) Output2 (+) (Fan control) Button Button Temp sensor 11 WHITE 12 13 14 15 16 GREEN BROWN BROWN NC BLACK 6 REMUC User Manual Input 1 Ground RC2AL COLOUR FUNCTION RC2AE PIN NO RC2A Cable x x +0V...+24V (>1V = active) +0V...+24V (>1V = active) +9V…+32V (5A fuse needed) Output 0,5A (no fuse) V in voltage (PIN 9) x x x x x x Output 0,5A (no fuse) V in voltage (PIN 9) x x x x x INFORMATION x x x x x x 3.2 Connecting the REMUC usage button Installer should proceed with caution when assembling usage button connector. Wire contact going in the plug must be in correct orientation and of correct color, otherwise breakage may occur. 3.3 Connecting the heat sensor The heat sensor included in the installation wire set can be installed outside or inside of the vehicle, depending on the preference. 3.4 Configuring inputs Remuc has two inputs which can be used for example to connect home fire alarm or theft alarm. Input voltage must be between 0V…V in , where >1V is regarded as an active state. Inputs are on/off type. Inputs can be used to relay alarm or state data to phone or web client. If your Remuc has a SIM card with a data plan, you can configure input settings in http://www.remuc.fi/settings. Check [6.8 Web browser client] for detailed reference. You can also configure inputs using mobile application. When adding a new control, choose Switch as the type. If you don’t have a data plan but use SMS to access Remuc, you can use INPUT and ACK commands to manage inputs. See [8 SMS interface] for more details. 7 REMUC User Manual 4 REMUC usage button and status lights REMUC controller has an illuminated usage button and two separate status leds: one for controller status and another for internal GSM modem. 4.1 Status lights Controller status LED lit: Controller is active and network connection is established GSM modem status LED blinks depending on the network activity If controller status LED does not switch to continuously lit mode after 5 minutes from restart, check SIM card PIN code. PIN code MUST be “1234”, “0000” or disabled. TIP: You can switch PIN code query off from SIM card by installing it temporarily to a mobile phone and using it’s settings to deactivate PIN query GSM antenna Controller status LED GSM modem status LED SIM card slot Webasto connector (not available in all models) REMUC installation cable connector 8 REMUC User Manual 4.2 Usage button REMUC controller installation includes a usage button which is used to control default output state, for example switch heater on/off. It can also be used to reset the controller. Button use does not require GSM network coverage. Usage button is illuminated to ease locating the button in dark. When defined default output is active (for example car heater), button light is brightly illuminated. 4.3 Resetting the controller with usage button RESET / RESTART 1. Press and hold usage button at least 10 seconds. Release button. 2. Status light on usage button blinks for 10 seconds. After this controller is reset. 3. REMUC is ready for use when usage button LED stops blinking. FACTORY RESSET 1. Press and hold usage button for at least 10 seconds. Release button. 2. Status light in usage button blinks for 10 seconds. During this time press button shortly 3 times. 3. Controller will be reset to factory settings. REMUC is ready for use when usage button LED stops blinking. If REMUC does not have any SMS users configured, it will go into user addition mode automatically on reset. REMUC will leave user addition mode when a phone call is made to REMUC or timeout occurs (30 minutes). 9 REMUC User Manual 5 Controller initialization and settings The steps needed for REMUC controller initialization depend on the user’s mobile phone type and desired control method: 1 If only newer smart phones are used, initialization can be completed using QR code printed on the controller casing. See chapter [5.2 Connecting phone using QR code] 2 If there’s at least one older type smart phone or a plain mobile phone in use, the phone number must be added to REMUC controller. Also mobile application must be configured to connect correct REMUC controller. See chapter [5.3 Connecting the phone using Android, Meego or Symbian application] Mobile phone operating system 1 2 Connection method Android (e.g. Samsung Galaxy S II) IP iOS (Apple iPhone) Windows Phone (e.g. Nokia Lumia 800) Android (e.g. Samsung Galaxy S II) SMS Symbian Belle (Other smart phones by Nokia) Meego (Nokia N9) Muut puhelinmallit SMS Mobile application available? Yes Needs to add user? Ni Yes Yes No Yes Android exists in both categories because there’s both data-driven and SMS-driven application available for it. 5.1 Choosing the SIM card (Valid only if delivery contents did not include a SIM card) REMUC system can be controlled with SMS message or by data connection. SMS messages are used with all regular mobile phones and also MeeGo, Symbian and Android phones. Newer mobile phones like Windows Phone and iPhone connect using data connection. 10 REMUC User Manual TIP: Every REMUC state change generates one SMS (if SMS users have been configured). Do you have any of the following smart phones: iPhone, Windows Phone, Android, Symbian or MeeGo? NO Remuc can be used with traditional phones by phone calls and SMS messages. YES Is your phone Apple iPhone, Windows Phone, Android or do you want to use Remuc with web interface? YES Data plan is needed. Smallest/slowest data plan should be enough. (<100MB/kk) NO Is your phone Symbian or MeeGo? 11 REMUC User Manual YES Only SMS messages are used when communicating with Remuc. Get a basic SIM deal with a cheap monthly cost. 5.2 Connecting phone using QR code QR code is a two-dimensional bar code found in every REMUC controller casing. It is a unique identification used to connect user’s smart phone to the correct controller. There’s an application available for newer smart phones which can be connected to correct REMUC just by taking a picture of the QR code on REMUC casing. When QR code is used to connect phone to REMUC controller, user configuration by phone calls or SMS messages is not needed. Prerequisites Familiarize yourself with usage, service and safety instructions supplied with the device that is controlled using REMUC. Make sure REMUC controller has an active SIM card with a packet data plan. SIM card PIN code must be either “1234”, “0000” or PIN query completely disabled REMUC controller has been installed to your car 12 REMUC User Manual Get the mobile application from the phone software market Every smart phone operating system has its own marketplace for free and non-free applications user can download to their mobile phone. REMUC controller application is available in the following stores: Search from Play Store: “remuc controller” or use QR code below: Search from App Store: “remuc controller” or use QR code below: 13 REMUC User Manual Search from Marketplace: “remuc controller” or use QR code below: Connect mobile application to REMUC controller (Windows Phone) 1 2 Launch mobile application Select “Add remote” by clicking REMUC icon 3 Select ID field to activate camera 4 5 Use mobile device camera Accept new remote to shoot QR code in REMUC sticker 6 You’re done! Left icon switches heating on and clock icon shows timers. 14 REMUC User Manual Connect application to REMUC controller (Android) 1 2 Launch mobile Select ”Add device” application by clicking REMUC icon 3 Select ”Data plan” 5 6 Use mobile device Accept new device camera to shoot QR by cliking ”Create” code in REMUC sticker 7 You’re done! Left icon switches heating on and clock icon shows timers. 15 REMUC User Manual 4 Select ”Capture QR code” Connect mobile application to REMUC controller (iPhone) 1 2 Launch mobile application Select ”Add Remuc” by clicking REMUC icon 4 5 Use mobile device camera Accept new remote to shoot QR code in REMUC clicking ”Done”. sticker 16 REMUC User Manual 3 Click ”Scan device id” to start camera 6 by You’re done! Left icon switches heating on and clock icon shows timers. 5.3 Connecting the phone using Android, Meego or Symbian application If user has a phone that uses SMS messages as its connection method (category 2, check [5 Controller initialization and settings], it has to be configured to REMUC as user. If there aren’t any previous SMS users, the phone number will be automatically added as such when configuring the mobile application. If there are previous users, one of them must allow the new user addition. TIP: If you have previously used only QR code configurable smart phones, your REMUC most likely does not have configured SMS users. Prerequisites Familiarize yourself with usage, service and safety instructions supplied with the device that is controlled using REMUC. If the installed SIM card doesn’t have a flat rate data plan, switch data connection off after first user has been added. You can switch data connection off with an SMS “IP OFF. REMUC controller has been installed to your car REMUC controller has an active SIM card (SMS plan preferred) SIM card PIN code must be either “1234”, “0000” or PIN query completely disabled When controlling REMUC with phone calls, caller ID blocking must not be active 17 REMUC User Manual Get the mobile application from the phone software market Mobile application is available to Android and all Nokia phones with Symbian Belle operating system. It is also available on MeeGo OS (Nokia N9) Search Play Store for “remuc” or use the QR code below: Search Nokia Ovi Store for “remuc” or use the QR code below: 18 REMUC User Manual Search Nokia Ovi Store for “remuc” or use the QR code below: Option 1: REMUC does not have any previously added SMS user Go directly to section “Connect mobile application to REMUC controller”. Option 2: REMUC has a previously added user Reset REMUC by pressing and holding usage button >10s. REMUC restarts and goes into user addition mode After the usage button status LED stops blinking, make a phone call to REMUC. Call will be terminated automatically Your phone number is now added as a REMUC user and you can control REMUC using calls and SMS 19 REMUC User Manual Connect mobile application to REMUC controller (Symbian, MeeGo) 1 2 3 Launch mobile Add new device by Insert name, REMUC application by clicking clicking “+” button phone number and REMUC icon click ”Add” 5 Select ”Add control” 6 7 Enter name and click You’re done! ”Add” 20 REMUC User Manual 4 Add a new control by clicking and holding on just added service Yhdistä mobiilisovellus REMUC:iin (Android) 1 2 Launch mobile application Select ”Add device” by clicking REMUC icon 3 Select ”SMS plan” 4 Enter device phone number 6 You’re done! name 5 and Click ”Create” 21 REMUC User Manual 5.4 Connect phone using SMS and/or phone calls Prerequisites Familiarize yourself with usage, service and safety instructions supplied with the device that is controlled using REMUC If the installed SIM card doesn’t have a flat rate data plan, switch data connection off after first user has been added. You can switch data connection off with an SMS “IP OFF”. REMUC controller has been installed to your car REMUC controller has a working SIM card (SMS plan recommended) SIM card PIN code must be either “1234”, “0000” or PIN query completely disabled When controlling REMUC with phone calls, caller ID blocking must not be active Add user to REMUC Reset REMUC by holding usage button at least 10 seconds. REMUC restarts and goes into user add mode Once usage button led stops blinking, make a phone call to REMUC number Call is terminated automatically Your phone number is now added as a REMUC user and you can control REMUC using calls and SMS If this was the first user added, switch REMUC data connection off by sending an SMS ”IP OFF”.. Start using REMUC When your phone number is added to REMUC, you can start using controller. You can switch default output on and off by making a phone call to controller. More advanced control can be achieved using SMS commands. 22 REMUC User Manual 5.5 Web user interface In address http://www.remuc.fi/settings you can find a web page which allows your REMUC settings modification. More details are in section [6.8 Web browser client]. 23 REMUC User Manual 6 REMUC usage REMUC can be used in many different ways: with usage button with phone calls with SMS messages using mobile application on following platforms: o Windows Phone o Android o Apple iPhone o Nokia Symbian Belle, MeeGo Requirements for normal usage are that controller is installed successfully to the target, there’s a tested and working SIM card installed, controller is powered on and it’s successfully connected to GSM network. Functionality can be verified from usage button light. After logging into network it stops blinking and is left lightly illuminated. Usage button and phone calls control the default output on and off immediately. SMS messages allow more advanced control: output on time, switch on delays can be controlled freely. Also, different configuration settings are controller with SMS. Mobile applications are able to control all REMUC output both immediately and scheduled. You can also define recurring switching, for example: “switch output 1 on for an hour every weekday at 07:30”. 24 REMUC User Manual 6.1 Windows Phone application See chapter [5.2 Connecting phone using QR code], on how to connect the first mobile phone. REMUC name REMUC status information Control icon and state Control scheduling Control name Additional functions Add a new control Return to previous view 25 REMUC User Manual Switching control state State switching is done by clicking the state icon. The light under the icon is green when that output is active. Control output timers Scheduling allows delaying of state switching, defining how long output is switched on and creating of recurring timers. All previously defined timers can be viewed by clicking the clock icon. Adding and removal is also done there. All Windows Phone timers are REMUC-specific, meaning that all timers added on one phone will be seen in all other phones defined to control REMUC. Additional features Add remote: Add a new REMUC to connect to. If the REMUC already has configured users, must one of the previous users approve adding of the new user. When adding new remote, user defines a password which will be shown to previous users through the mobile application. New user won’t be able to control REMUC if the adding is not approved by any of the previous users. (in the approval dialog: Master user can approve new users, Regular user cannot) Modify settings: Rename REMUC or set REMUC in Service Mode, see chapter [5.5 Web user interface]. Delete remote: Deletes the previously added REMUC Application settings - Notifications: Switches background notifications on/off. If notifications are switched off, mobile application won’t get any status updates from REMUC when left to background. It is recommended to be left on. - Information about the mobile application. Switching between multiple configured REMUC remotes If you have more than one REMUC configured in the application, you can switch between them by panning horizontally. Configuring multiple control for one REMUC remote Depending on the installation, you can define more than one control for one REMUC remove. Additional control can be, for example, a fan/ventilation control (output) or a car alert status icon (input). Removing a control Press and hold on control name text. Dialog opens with an option “Delete control”. 26 REMUC User Manual 6.2 Apple iPhone application See chapter [5.2 Connecting phone using QR code], on how to connect the first mobile phone. REMUC name REMUC status information Control name Add new remote Information about the application 27 REMUC User Manual Control scheduling Switching control state State switching is done by clicking the state icon. The light under the icon is green when that output is active. Control output timers Scheduling allows delaying of state switching, defining how long output is switched on and creating of recurring timers. All previously defined timers can be viewed by clicking the clock icon. Adding and removal is also done there. All Apple iPhone timers are REMUC-specific, meaning that all timers added on one phone will be seen in all other phones defined to control REMUC Adding new REMUC remotes If the REMUC already has configured users, must one of the previous users approve adding of the new user. When adding new remote, user defines a password which will be shown to previous users through the mobile application. New user won’t be able to control REMUC if the adding is not approved by any of the previous users. (in the approval dialog: Master user can approve new users, Regular user cannot) REMUC-specific settings Remote-specific settings can be accessed by clicking the remote name. Service Mode Service mode is needed when accessing REMUC device settings using web user interface. See chapter [5.5 Web user interface] Configuring multiple controls Depending on the installation, you can define more than one control for one REMUC remove. Additional control can be, for example, a fan/ventilation control (output) or a car alert status icon (input). Removing a control Press and hold on control name text. Choose ”Delete OUT <number>”. 28 REMUC User Manual 6.3 Android application See chapter [5.2 Connecting phone using QR code], on how to connect the first mobile phone. REMUC information Control status and icon Control name and type Return to previous view 29 REMUC User Manual Control scheduling Placing the widget on home view Android application also includes a widget which can be added into home view. Widget allows quick REMUC output switching without starting the application itself. Note: Widget can’t be added to home view if there are no remotes or controls defined in the application. Switching control state State switching is done by clicking the state icon. The light under the icon is green when that output is active. Control output timers Scheduling allows delaying of state switching, defining how long output is switched on and creating of recurring timers. All previously defined timers can be viewed by clicking the clock icon. Adding and removal is also done there. All timers created when using data connection mode are REMUC-specific, meaning that other mobile phones using the same REMUC see them also. If application connection method is SMS, are timers phone-specific. Timer can be removed by clicking it. REMUC-specific settings REMUC-specific settings can be accesses by pressing and holding on device name or icon. Add control: Depending on the hardware installation, you may add more than one control pre device. Additional device can be, for example a vent control (output) or alert status (input) Refresh: Refresh device status. Usually status refreshes automatically only when some state changes. Modify: Change device name, defined phone number (only SMS usage) and device color on widget. Delete: Deletes the device SMS log (only applicable on SMS connection mode): Displays the SMS message traffic between REMUC device and the mobile phone. Sending messages also possible from this view. Modifying and deleting controls Press and hold on control name. In the opening dialog there’s ”Modify” and ”Delete control”. 30 REMUC User Manual 6.4 Symbian and MeeGo applications Symbian and MeeGo application are very similar to Android version, so refer to chapter [6.3 Android application]. Connecting the first phone is shown in chapter [5.3 Connecting the phone using Android, Meego or Symbian application] 6.5 Phone calls REMUC can also be controlled using plain phone calls if user’s phone number is added to REMUC users. When a call is made to REMUC number, it will be disconnected automatically and default output will switch state immediately. TIP: If mobile application is installed on Symbian or MeeGo phone, all SMS traffic between the phone and REMUC can be viewed in the application’s ”SMS Log” view. REMUC messages will not be visible in the phone’s own messaging application. 6.6 SMS messages Example SMS messages: Description SMS message Output 1 ON indefinitely ”OUT 1 ON 0” Output 1 OFF ”OUT 1 OFF” Output 2 ON for 60 minutes ”OUT 2 ON 3600” Output 1 ON for 30 minutes (1800 s), starting after ”OUT 1 ON 1800 720” 12 hours (720 min) Output and input status query ”STATUS” Add next caller as USER in user database ”CALLADD” All SMS commands are described in detail in section [TBD] 6.7 Usage button Usage button can be used to switch default output on and off independently from GSM network coverage, defined users or connected mobile phones. Usage button is also used for device reset. See chapter [4.3 Resetting the controller with usage button]. 31 REMUC User Manual 6.8 Web browser client Web client can be found from http://www.remuc.fi/settings, but it’s also accessible from www.remuc.fi front page. Login is done with QR code or a previously defined alias. You can log in without password if you set Remuc into service mode. QR code is a device specific, unique 16 character identification. You can access a feature specific online help by moving the mouse cursor on top of the orange question mark . SERVICE MODE Service mode allows logging in to Remuc web client without password. Service mode can be set using the mobile client or a SMS “SET SERVICE ON”. Service mode is disabled automatically in 60 minutes. 32 REMUC User Manual 6.8.1 Control tab “Control” tab allows adding, removing and modifying of Remuc device controls. You can also add and remove single and recurring timers. 33 REMUC User Manual 6.8.2 SIM card tab If you have an activated Embelin-supplied SIM card in your Remuc device, there will be a SIM card tab available also in the web client. In SIM card tab you can see how much paid use time you have left on your Embelin SIM card. When mobile application notifies user about the SIM subscription expiration, you can go to this tab to renew SIM subscription. If the package did not include an Embelin SIM card or your card subscription has expired, this tab is not visible. 34 REMUC User Manual 6.8.3 Settings tab Last tab is labeled “Settings”. There you can modify all Remuc specific settings. 35 REMUC User Manual 7 REMUC settings General settings Default output Temp unit Allow roaming Button led boost Low voltage cutoff Timeout after signal lost Password for device manager Webasto® Webasto emulation mode Webasto / OUT1 parallel mode Selected default output which can be controlled with phone calls and usage button Celsius or Fahrenheit Allow network roaming Led indicator light intensity Disable all control if voltage under defined limit Timeout after which all outputs are switched off if GSM network coverage is lost. Define password to access this device manager without settings the Remuc to service mode Choose which Webasto controller type Remuc will emulate Enable OUT1 automatically when Webasto heating or ventilation is enabled Inputs * Configure when to send status messages about output changes Acknowledgement Send next status message only if user has acknowledged the previous one Reporting Status message is sent on chosen levels of input signal Output timeouts Defines the default ON time for outputs when switched on without specified duration (e.g. ”OUT 1 ON”) SMS-users * Configure REMUC users User phone number Delete data connection users Added phone number Remove all data connection users from Remuc Aliases Define a free formed shortcut for most used commands. For example: Alias: ”WARM” Command: ”OUT 1 ON 3600” 36 REMUC User Manual 8 SMS interface REMUC can be controlled extensively using SMS messages. Use of SMS messages require that the user phone number is added to REMUC user groups using CALLADD command. OUTPUT CONTROL [OUT] ............................................................................................... 38 INPUT CONFIGURATION [INPUT] ................................................................................... 38 INPUT STATUS CHANGE ACKNOWLEDGEMENT [ACK] ............................................... 39 STATUS QUERY [STATUS] .............................................................................................. 39 GENERAL INFO QUERY [INFO] ....................................................................................... 39 REMUC SMS USERS [USERS] ........................................................................................ 39 ADDING A USER BY CALLING [CALLADD] ..................................................................... 39 REMOVING A USER BY CALLING [CALLDEL] ................................................................ 39 REMOVE A USER [DEL] ................................................................................................... 40 SET BALANCE LIMIT [BALANCE SET] ........................................................................... 40 QUERY BALANCE [BALANCE]......................................................................................... 40 MANUAL NETWORK SELECTION [NETWORK] .............................................................. 41 RESET ............................................................................................................................... 41 DATA CONNECTION CONFIGURATION [IP] ................................................................... 41 SETTINGS [SET] ............................................................................................................... 42 37 REMUC User Manual OUTPUT CONTROL [OUT] Action: Set selected output state. Return message contains status of all outputs, current temperature from both sensors and current voltage level OUT <PORT> <STATE> <OUTPUTTIME> <STARTDELAY> Command: Parameters: VARIABLE DESCRIPTION VALUE DEFAULT PORT Output number 1,2,H,V STATE Output state ON/OFF OUTPUTTIME ON duration (s) 0-65534 If not given, output will stay on for the duration of OUTTIME-setting. For OUT1 and OUT2 0 means it will stay on indefinitely. Outputs H and V can be ON only the maximum time of the heater connected on the WBUS. STARTDELAY Output set delay 0-65534 If not given or 0, start will set without (min) delay Examples: Response: Action: Command: OUT 1 ON Output 1 ON, stays ON for OUTTIME seconds. OUT H ON Output 1 ON indefinitely OUT 1 ON 45 900 Output 1 ON for 45 s, switch on delay 15h (900 min) OUT 2 ON 1800 Output 2 ON for 1800 s (30 min) REMU STATUS <variable>:<value>... REMU STATUS OUT1:ON OUT2:OFF IN1:LOW IN2:LOW T1:20C T2:10C V:12.3V INPUT CONFIGURATION [INPUT] Action: Modify status reporting conditions for the selected input INPUT <index> <edge> <ack> Command: Parameters: VARIABLE DESCRIPTION index Input port number edge Choose whether to report on rising, falling or both signal edges. (rise, falling, both, none) ack Require acknowledgement before next status message? R = Input status stays up after change until acknowledged F = Input status stays down after change until acknowledged B = Input stays in the state after change until acknowledged N = No acknowledgement required Examples: Response: Example response: INPUT 1 R R VALUE 1-2 R, F, B, N DEFAULT R, F, B, N Sends a message when input 1 goes up. Stays up until acknowledged. INPUT 2 B N Sends a message every time input 2 switches state. REMU INPUT <index>:<edge>:<ack>... REMU INPUT 1:B:B 2:R:R 38 REMUC User Manual INPUT STATUS CHANGE ACKNOWLEDGEMENT [ACK] Action: Acknowledge input signal change report. ACK <index> Command: Parameters: VARIABLE DESCRIPTION index Input number Examples: Response: VALUE 1-2 DEFAULT ACK 2 Acknowledge report from input 2 signal change REMU STATUS <variable>:<value>... REMU STATUS OUT1:ON OUT2:OFF IN1:LOW IN2:LOW T1:20C T2:10C V:12.3V STATUS QUERY [STATUS] Action: Command: Examples: Response: Example response: Returns all output, input, temperature and voltage statuses STATUS STATUS REMU STATUS <variable>:<value>... REMU STATUS OUT1:ON OUT2:OFF IN1:LOW IN2:LOW T1:20C T2:10C V:12.3V GENERAL INFO QUERY [INFO] Action: Returns the amount of outputs and inputs, service mode status, offline status, default output number, low voltage cutoff limit and automatic heating setting. INFO Command: INFO Examples: REMU INFO <variable>:<value>... Response: REMU INFO OUTPUTS:4 INPUTS:2 HW:1 SQ:1 SERVICE:ON OFFLINE:OFF Example response: DEFOUTPUT:1 UVOLTAGE:7.5V HEAT:OFF REMUC SMS USERS [USERS] Action: Returns all users USERS Command: USERS Examples: REMU USERS <index>:<number>... Response: REMU USERS 0:+358401231234 1:+358501123344 2:+358441123321 Example response: ADDING A USER BY CALLING [CALLADD] Action: Adds next caller to controller user database. Mode is active for 5 minutes or until call arrives. Call must not be made before controller replies with”REMU WAITING CALL”. CALLADD Command: Examples: REMU WAITING CALL (controller waits call for 5 minutes) REMU USERS <index>:<number>... (added user shown on list) REMU WAITING CALL Response: REMU USERS 0:+358401231234 1:+358501123344 2:+358441123321 REMOVING A USER BY CALLING [CALLDEL] Action: Removes next calling number from user database. Controller waits call for 5 minutes. Call must not be made before controller reports”REMU WAITING CALL”. CALLDEL Command: CALLDEL Examples: Response: REMU WAITING CALL (controller waits call for 5 minutes) REMU USERS <index>:< number>... (just removed user is not in this list anymore) REMU WAITING CALL Example response: REMU USERS 0:+358401231234 1:+358501123344 39 REMUC User Manual REMOVE A USER [DEL] Action: Removes user from selected slot DEL <index> Command: Parameters: VARIABLE DESCRIPTION index Muistipaikka Examples: Response: VALUE 0-9 DEFAULT DEL 2 Removes user from slot 2 REMU USERS <index>:<number>... REMU USERS 0:+358401231234 1:+358501123344 2:+358401233211 SET BALANCE LIMIT [BALANCE SET] Action: Sets a SMS cost-based use limit for the controller. Meant especially for prepaid usage. BALANCE SET <balance> <price> <notify> Command: Parameters: VARIABLE DESCRIPTION VALUE DEFAULT balance Total balance (cents) 0price One SMS cost 0(cents) notify Notify limit 0(cents) Examples: Response: BALANCE SET 30000 20 2000 Set total balance to 300€, one SMS costs 0,20€ and notification SMS received when total balance under 20€ REMU BALANCE <balance> <price> <notify> REMU BALANCE 30000 20 2000 QUERY BALANCE [BALANCE] Action: Returns balance, sms cost, notify limit BALANCE Command: BALANCE Examples: REMU BALANCE <balance> <price> <notify> Response: REMU BALANCE 30000 20 2000 Example response: LIST AVAILABLE NETWORKS [NETWORK] Action: Returns a list of available GSM networks NETWORK Command: NETWORK Examples: REMU NETWORK <auto> <index>:<name>… Response: REMU NETWORK A 0:*elisa Example response: 40 REMUC User Manual MANUAL NETWORK SELECTION [NETWORK] Action: Selects given GSM network manually or sets the automatic mode NETWORK <index> Command: Parameters: VARIABLE DESCRIPTION VALUE index Index of the 0-/A network Examples: Response: Action: RESET Action: Command: Examples: Response: Example response: NETWORK 2 Use network number 2 NETWORK A Enable automatic network selection REMU NETWORK <auto> <index>:<name>… REMU NETWORK M 0:*elisa 1:dna 2:SONERA Restarts REMUC. Does not affect any settings. RESET RESET - DATA CONNECTION CONFIGURATION [IP] Action: Enables and disables REMUC IP connection. IP <state> Command: Parameters: VARIABLE DESCRIPTION DESCRIPTION state IP connection ON/OFF possible Examples: Response: Example response: DEFAULT IP IP IP IP ON Enables data connection OFF Disables data connection <state> <remote server ip> ON 80.75.106.230 41 REMUC User Manual DEFAULT ON SETTINGS [SET] Action: Modify controller settings SET <variable> <value> Command: Parameters: VARIABLE DESCRIPTION OWNNUMBER Own phone number SERVICE Service mode OFFLINE Offline mode APN Operator access point USERNAME Operator data connection user name PASSWORD Operator data connection user password TEMPUNIT Temp unit DEFOUTPUT Default output, controllable by phone and usage button A = Automatic selection, depends on the controllable device UVOLTAGE Low voltage cutoff (V) OUTTIME Default output ON-time(seconds). Maximum value for H and V depends on the connected heater. HEAT Controller internal heating, switches on only when needed SLOFF Switch all outputs off if loses network for given minutes ROAMING Enable/disable roaming LEDBOOST Choose usage button LED intensity when in OFF state WBFAN Enable OUT1 automatically when Webasto heating or Ventilation (OUTH, OUTV) is enabled OFF = disabled 0-254 = start delay in minutes Examples: Action: Command: Parameters: VALUE ON/OFF ON/OFF string (teksti) string (teksti) string (teksti) C/F 1,2,H,V,A DEFAULT ON OFF ”internet” ”” ”” C A 0 – 30 0-65535 7.5 3600 ON/OFF OFF 0 = OFF 1-255 ON/OFF ON/OFF 0 OFF 0-254 0 OFF ON SET SERVICE OFF Disables service mode SET APN Sets access point to internet.sau””nalahti internet.saunalahti SET UVOLTAGE 10.8 Sets low voltage cutoff to 10.8V SET DEFOUTPUT 2 Sets output port 2 as default port REMU INFO <variable>:<value>... REMU INFO OUTPUTS:2 INPUTS:2 HW:5 SW:7 SERVICE:ON OFFLINE:OFF DEFOUTPUT:2 UVOLTAGE:10.8 HEAT:OFF SLOFF:0 ROAMING:OFF WB:YES WBFAN:0 LEDBOOST:ON 42 REMUC User Manual 9 CE certification This device fulfills CE-certificate EN 50498 (2010). Embelin Ltd. declares that Remuc conforms directive 1999/5/EC relevant standards and regulations. Full Declaration of Conformity is in address http://www.embelin.fi/uploads/pdf/Remuc-DoC.pdf 10 WEEE directive This symbol indicates that this product is not to be disposed of with your household waste, according to the WEEE Directive (2002/96/EC) and your national law. This product should be handed over to a designated collection point, e.g., on an authorized one-for-one basis when you buy a new similar product or to an authorized collection site for recycling waste electrical and electronic equipment (WEEE). 11 User manual This user manual is prepared thoroughly. Constant product development may cause some information to end being out of date. Embelin Ltd. reserves the right to modify this user manual without any further notice. Embelin Ltd. disclaims any responsibility of any possible technical or delivery related errors, lack of information, random or direct damages caused by the quality or usage of this material. 12 Changes Embelin Ltd. reserves all rights to modify product or user manual without any further notice. 13 Liability notice Use of this product happens at your own risk. Embelin Ltd. will not guarantee fault free function, performance or any accuracy of the information displayed. Embelin Ltd. disclaims any responsibility to any property and/or personal damage caused by the use of this product. © 2013 Embelin Ltd. – all rights reserved