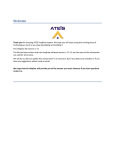
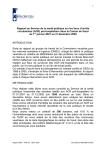
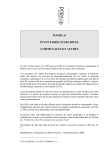
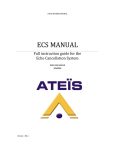
1
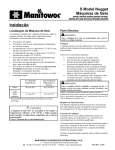
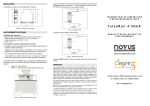
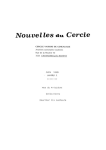
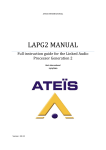
IDA 4 XM V 1.X
Installation and configuration of IDA 4 XM
User Manual
IMPORTANT SAFETY INSTRUCTIONS
- Switch the device’s power off before any maintenance operation (changing the CU card, etc.)
- The 24V power supply voltage should be between 20V and 28V.
- The maximum admissible wattage per amplifier channel is 500W effective power.
Customer Support ATEIS-INTERNATIONAL S.A
Les Charbonnières
1376 Goumoens-La-Ville
Switzerland
+41 21 881 25 10
+41 21 881 25 09
E MAIL : [email protected]
ida4xm_user_manual_v1.x_141204
Page 2 of 49
CONTENTS
1
SOFTWARE_______________________________________________________________________ 4
1.1
PRESENTATION______________________________________________________________ 4
1.2
MAIN ________________________________________________________________________ 5
1.3
SETTINGS ___________________________________________________________________ 7
1.3.1
Application ________________________________________________________________ 7
1.3.2
Site ______________________________________________________________________ 9
1.3.3
Zones____________________________________________________________________ 11
1.3.4
Call stations & messages ____________________________________________________ 16
1.3.5
Evacuation inputs __________________________________________________________ 29
1.3.6
Control inputs _____________________________________________________________ 31
1.3.7
Sources (0dB inputs)________________________________________________________ 34
1.3.8
Serial ports _______________________________________________________________ 39
1.3.9
Fault inputs _______________________________________________________________ 42
1.4
FAULT DESCRIPTION _______________________________________________________ 43
1.4.1
Fault type ________________________________________________________________ 43
1.4.2
Fault consequences _________________________________________________________ 43
1.5
2
MONITORING_______________________________________________________________ 45
HARDWARE _____________________________________________________________________ 46
2.1
REAR PANEL CONNECTIONS ________________________________________________ 46
2.2
BASE WIRING DIAGRAM ____________________________________________________ 47
2.3
MASTER – SLAVE WIRING DIAGRAM ________________________________________ 48
2.4
PC – IDA WIRING DIAGRAM _________________________________________________ 49
2.5
TECHNICAL FEATURES _____________________________________________________ 49
ida4xm_user_manual_v1.x_141204
Page 3 of 49
1 SOFTWARE
1.1 PRESENTATION
The PCIDA4XM software is composed of three windows :
1.1
Main for general settings
Communication
Appearance
IDA updating (date and time, internal software)
Language
1.2
Settings for application settings (site, zones, call stations, messages,…)
Site
Zones
Call stations and messages
Evacuation inputs
Control inputs
Sources (0dB inputs)
Serial ports
Fault inputs
1.3
Monitoring for the selection of signal which has to be routed to the monitoring loudspeaker
(8 ohms).
ida4xm_user_manual_v1.x_141204
Page 4 of 49
1.2 MAIN
Serial port
Windows
Language
Serial port
The roll list Serial port enables the choice of the serial port on which the communication
between the PC and IDA has to be established.
In case of failure, for example the selected port is not configured in the PC, the
corresponding list item indicates COM X : HS. Otherwise, it indicates COM X : OK.
Connection
By clicking on the check button Connection, the PC tries to communicate with the
connected IDA.
In case of success of the connection between the PC and IDA, the check button
Connection indicates the following message : Connected to IDA V1.X.
In case of failure of the connection between the PC and IDA, the message box NO IDA !
appears on the screen and the check button indicates Not connected.
Windows
The command button Windows saves the current position of the different windows on the
screen.
ida4xm_user_manual_v1.x_141204
Page 5 of 49
By new start of the PCIDA4XM software, the windows will appear on the screen as saved
by the last click on the command button Windows.
Set Date/Time
The command button Set Date/Time enables the updating of date and time in IDA.
The source can be either the PC or an external clock.
By clicking on the command button Date & Time, the message box Date and time
updating by PC ? appears on the screen. By clicking on the button OK, the date and time
is sent by the PC on IDA. By clicking on the button Cancel, a new message box Date and
time updating by an external clock ? appears on the screen. By clicking on the button
OK, a date and time updating request is sent to the external clock.
IDA Updating
The command button IDA Updating enables the updating of the IDA firmware.
To update IDA, the following procedure has to be done :
•
•
•
•
Connect IDA master with all IDA slaves (if IDA slaves are present)
Switch on power on IDA
The displayed IDA’s number must match with the real IDA’s number
Click on the command button IDA Updating to update IDA master and slaves
All the IDA will be updated.
Language
The roll list Language enables the choice of the language.
You will have to restart the software to have the new language activated.
ida4xm_user_manual_v1.x_141204
Page 6 of 49
1.3 SETTINGS
1.3.1 Application
Items
Number of IDA
Items
The roll list Items enables the choice of the item which has to be configured. All options of
each item are defined in the following parts.
Number of IDA
The roll list Number of IDA defines the number of IDA which are present in the current
application. Up to 64 IDA can be configured in the application.
When you start to set up, the first thing to do is to select the number of IDA cascaded in the
system (including the master).
Read
The command button Read reads the settings saved in IDA’s memory and displays the
dataset on the screen.
ida4xm_user_manual_v1.x_141204
Page 7 of 49
Write
The command button Write loads in IDA’s memory the current dataset which is
corresponding to the settings displayed on the screen.
You have to write the configuration in the IDA system to activate it.
Restart
The command button Restart resets the program in IDA.
Import
The command button Import reads the settings saved in the selected file stored in the PC
and displays the dataset on the screen.
Export
The command button Export saves in the selected PC file the current dataset which is
corresponding to the settings displayed on the screen.
ida4xm_user_manual_v1.x_141204
Page 8 of 49
1.3.2 Site
SITE > GENERAL
Name
The text box Name defines the name of the application.
The maximal length of the application name is 16 alphanumerical characters.
Password
The text box Password defines the password of the application.
The maximal length of the password is 8 numerical characters.
Music
The roll list Music enables the music start or stop.
•
•
•
Change… Music mode can be changed through the call stations
Music ON Starting music
Music OFF Stopping music
ida4xm_user_manual_v1.x_141204
Page 9 of 49
Fault display
The check button Fault display enables the display of faults on call stations.
Complete log
The check button Complete log selects the events which are saved in the log memory.
If Complete log is enable, all events are saved in the log memory. Otherwise, only security
events are saved.
Reduced level
The slider Reduced level adjusts the level in reduced mode.
The adjustment can be defined between –12 and 0 dB.
Loud level
The slider Loud level adjusts the level in loud mode.
The adjustment can be defined between 0 and +12 dB.
Level change
The roll list Level change defines the general level of the application.
•
•
•
•
Change…
Reduced
Loud
Normal
General level can be changed on call stations
General level is reduced to the adjusted level
General level is increased to the loud level
General level is set to the normal level
The check button Automatic enables the automatic change of level.
Text boxes Normal and Reduced define the timetables for the change.
•
•
Normal
Reduced
Level changes from reduced to normal
Level changes from normal to reduced
ida4xm_user_manual_v1.x_141204
Page 10 of 49
1.3.3 Zones
Four zones can be configured on each IDA.
ZONES > GENERAL
Name
The text box Name defines the name of the zone.
The maximal length of the application name is 11 alphanumerical characters.
ida4xm_user_manual_v1.x_141204
Page 11 of 49
ZONES > AUDIO
Music level
The slider Music level adjusts the normal music level in the selected zone.
The adjustment can be defined between –70 and +12 dB.
Music signal is OFF if the Music level slider is put on its bottom end.
Call level
The slider Call level adjusts the normal call level in the selected zone.
The adjustment can be defined between –70 and +12 dB.
Call signal is OFF if the Call level slider is put on its bottom end.
Delay
The slider Delay adjusts the delay in the selected zone.
The adjustment can be defined between 0 and 682 ms.
ida4xm_user_manual_v1.x_141204
Page 12 of 49
ZONES > EQUALIZATION
Parametric equalization
The output audio signal of each zone can be adjusted with a 7-bands equalizer.
The slider F defines the frequency between 20 and 19 000 Hz.
The slider Q defines the Q parameter (which is corresponding to the bandwidth) between
1/3 and 12.
The slider G defines the output level of the corresponding band between –12 and +12 dB.
Copy / Paste
The command buttons Copy and Paste enable the copy of one band settings in other
bands.
ida4xm_user_manual_v1.x_141204
Page 13 of 49
ZONES > MONITORING
Zone references
The command button Zone references measures the following parameters of the selected
zone (1k and 18k impedance, 18k gain and open gain, leak) and stores the values in IDA’s
memory.
All zones references
The command button All zones references measures the following parameters of all the
zones (1k and 18k impedance, 18k gain and open gain, leak) and stores the values in IDA’s
memory.
Zone Z1k test
The command button Zone Z1k test measures once the 1k impedance of the selected
zone.
All zones Z1k test
The command button All zones Z1k test measures once the 1k impedance of all the zones.
If the check button Auto is selected, the 1k impedance measurement is done at the defined
time (03:00 by default).
ida4xm_user_manual_v1.x_141204
Page 14 of 49
Measures display
If the check button Display is selected, the values of the parameters measures
corresponding to the selected zone are displayed in real-time.
Backup amplifiers
The roll list Backup amplifiers specifies the presence or not of amplifiers on the
application.
Monitoring
The option buttons Monitoring defines which components have to be controlled in the
selected zone :
•
•
•
•
•
No monitoring
Amplifier
Amplifier + Line
Amplifier + Backup amplifier
Amplifier + Backup amplifier+ Line
ida4xm_user_manual_v1.x_141204
Page 15 of 49
1.3.4 Call stations & messages
CALL STATIONS > GENERAL
Routing
Touch setting
setting
Page setting
Name
The text box Name defines the name of the call station.
The maximal length of the call station name is 11 alphanumerical characters.
Password
The text box Password specifies the password which is required to use the PSS call
station.
The password must be composed of 4 numerical characters.
Page setting
The command button Put allocates a page to the selected page in the call station pages list.
Up to 32 pages can be defined. The command button New selects the first page which is
not allocated to a call station.
The command button Delete deletes the page allocation for the selected page in the call
station pages list.
ida4xm_user_manual_v1.x_141204
Page 16 of 49
Key setting
To define a key on a selected page, the following procedure has to be done :
•
•
•
•
Select a page either with the page slider or with the command button New
Click on the key to define
Select the type of the key in the type roll list (Local zones, Telesonorisation, Reduced
level, Loud level, Music ON)
Enter the key name in the key picture
The command button Delete deletes the selected key settings.
The command button Name copy copies only the name of the selected key.
The command button Copy copies all the settings of the selected key.
The command button Paste pastes in the selected key either the name which was first
copied through the command button Name copy or all the settings which were first copied
through the command button Copy.
ida4xm_user_manual_v1.x_141204
Page 17 of 49
CALL STATIONS > AUDIO
Microphone level
The slider Level adjusts the call station microphone level.
The adjustment can be defined between –70 and +12 dB.
Microphone signal is OFF if the Level slider is put on its bottom end.
Speaker level
The slider Speaker adjusts the PSS speaker level.
The adjustment can be defined between –70 and +6 dB.
Speaker signal is OFF if the Speaker slider is put on its bottom end.
ida4xm_user_manual_v1.x_141204
Page 18 of 49
CALL STATIONS > EQUALIZATION
Parametric equalization
The input audio signal can be adjusted with a 3-bands equalizer.
The slider F defines the frequency between 20 and 19 000 Hz.
The slider Q defines the Q parameter (which is corresponding to the bandwidth) between
1/3 and 12.
The slider G defines the output level of the corresponding band between –12 and +12 dB.
Copy / Paste
The command buttons Copy and Paste enable the copy of one band settings on other
bands.
ida4xm_user_manual_v1.x_141204
Page 19 of 49
CALL STATIONS > PRIORITY
Priority
The priority of the corresponding call station can be adjusted through the slider Priority. It
can range from 0 to 100.
ida4xm_user_manual_v1.x_141204
Page 20 of 49
CALL STATIONS > MESSAGES
Message allocation on call station
To allocate a message on a call station, the following procedure has to be done :
•
•
•
Select a message in the Messages on station list (up to 4 messages can be set on
a PSS, MSGS1 to MSGS4)
Select the corresponding message in the Messages list (up to 32 messages can be
configured in an application)
Click on the command button < to allocate the message
Message deletion on call station
To delete a message on a call station, the following procedure has to be done :
•
•
Select an allocated message in the Messages on station list
Click on the command button Delete
Buzzer ON
The check button Buzzer ON enables the call station buzzer in case of fault.
ida4xm_user_manual_v1.x_141204
Page 21 of 49
Call station type
The check button Security selects the type of call station.
Fault reaction
The option button Fault reaction selects the kind of fault which appears in case of call
station absence.
The difference between immediate and deferred fault is described on section 1.4 Fault
description.
ida4xm_user_manual_v1.x_141204
Page 22 of 49
MESSAGES > GENERAL
Name
The text box Name defines the name of the message.
The maximal length of the message name is 11 alphanumerical characters.
Type
The roll list Type defines the type of message : Evacuation or Normal.
Siren length
The slider Siren length adjusts the length of the siren before the message diffusion.
The adjustment can be defined between 0 and 255 seconds.
Delete message
The command button Delete message deletes the selected message if stored in IDA’s
memory.
ida4xm_user_manual_v1.x_141204
Page 23 of 49
Delete all messages
The command button Delete all messages deletes all the messages which are stored in
IDA’s memory.
Send message
The command button Send message saves in IDA’s memory a recorded message stored
on PC (*.wav format). The sampling of messages must be 16 bits 16kHz.
The maximal length including all messages is 2 minutes and 11 seconds.
Message recording through 0dB input is not allowed on IDA4XM.
ida4xm_user_manual_v1.x_141204
Page 24 of 49
MESSAGES > AUDIO
Level
The slider Level adjusts the message level for the selected message.
The adjustment can be defined between –70 and +12 dB.
Message signal is OFF if the Level slider is put on its bottom end.
ida4xm_user_manual_v1.x_141204
Page 25 of 49
MESSAGES > EQUALIZATION
Parametric equalization
The message signal can be adjusted with a 3-bands equalizer.
The slider F defines the frequency between 20 and 19 000 Hz.
The slider Q defines the Q parameter (which is corresponding to the bandwidth) between
1/3 and 12.
The slider G defines the output level of the corresponding band between –12 and +12 dB.
Copy / Paste
The command buttons Copy and Paste enable the copy of one band settings on other
bands.
ida4xm_user_manual_v1.x_141204
Page 26 of 49
MESSAGES > PRIORITY
Priority
The priority level (0 to 100) of the corresponding message can be adjusted through the
slider Priority.
ida4xm_user_manual_v1.x_141204
Page 27 of 49
MESSAGES > SIREN
Siren level
The slider Siren level adjusts the siren level for all messages configured with siren.
The adjustment can be defined between –71 and +12 dB.
Parametric equalization
The siren signal can be adjusted with a 3-bands equalizer.
The slider F defines the frequency between 20 and 19 000 Hz.
The slider Q defines the Q parameter (which is corresponding to the bandwidth) between
1/3 and 12.
The slider G defines the output level of the corresponding band between –12 and +12 dB.
ida4xm_user_manual_v1.x_141204
Page 28 of 49
1.3.5 Evacuation inputs
Four evacuation inputs can be configured on each IDA.
Routing
Name
The text box Name defines the name of the evacuation input.
The maximal length of the evacuation input name is 11 alphanumerical characters.
Message
The roll box Message selects the message which is played back when the corresponding
evacuation input is active.
Play mode
The slider Play mode adjusts the number of times the message is playing back.
The adjustment can be defined between 1 and 255 times.
Play mode is Looped if the Play mode slider is put on its bottom end.
ida4xm_user_manual_v1.x_141204
Page 29 of 49
Routing
The zones on which the message is played back can be selected through the check boxes
Routing.
ida4xm_user_manual_v1.x_141204
Page 30 of 49
1.3.6 Control inputs
Four control inputs can be configured on each IDA.
CONTROL INPUTS > GENERAL
Name
The text box Name defines the name of the control input.
The maximal length of the control input name is 11 alphanumerical characters.
Mode
The roll list Mode selects the call playing mode : inactive, call or chime + call.
Chime must have been first stored on IDA’s memory. See section 3.4 MESSAGES >
GENERAL to send the message “Chime” (wave file).
Source allocation on control input
To allocate a source (0dB input) to a control input, the following procedure has to be done :
•
•
Select a source in the Available 0dB inputs list
Click on the command button < to allocate the message
ida4xm_user_manual_v1.x_141204
Page 31 of 49
Source deletion on control input
To delete a source on a control input, the following procedure has to be done :
•
Click on the command button Delete
Busy signal
When an higher priority message or call is currently played on the zones allocated to the
control input, either a relay is commuted on the selected contact output or a 400 Hz tone is
played on the selected 0dB output. The roll list Busy signal selects the contact or the 0dB
output.
Tone must have been first stored on IDA’s memory. See section 3.4 MESSAGES >
GENERAL to send the message “Tone” (wave file).
ida4xm_user_manual_v1.x_141204
Page 32 of 49
CONTROL INPUTS > ROUTING
Routing
Routing
The check buttons Routing enable the routing of the control input’s allocated source on
defined zones.
ida4xm_user_manual_v1.x_141204
Page 33 of 49
1.3.7 Sources (0dB inputs)
Four 0dB inputs can be configured on each IDA.
0dB INPUTS > GENERAL
Name
The text box Name defines the name of the 0dB input.
The maximal length of the 0dB input name is 11 alphanumerical characters.
ida4xm_user_manual_v1.x_141204
Page 34 of 49
0dB INPUTS > AUDIO
Level
The slider Level adjusts the input level of the selected 0dB input.
The adjustment can be defined between –70 and +12 dB.
Input signal is OFF if the Level slider is put on its bottom end.
ida4xm_user_manual_v1.x_141204
Page 35 of 49
0dB INPUTS > EQUALIZATION
Parametric equalization
The input audio signal can be adjusted with a 3-bands equalizer.
The slider F defines the frequency between 20 and 19 000 Hz.
The slider Q defines the Q parameter (which is corresponding to the bandwidth) between
1/3 and 12.
The slider G defines the output level of the corresponding band between –12 and +12 dB.
Copy / Paste
The command buttons Copy and Paste enable the copy of one band settings on other
bands.
ida4xm_user_manual_v1.x_141204
Page 36 of 49
0dB INPUTS > ROUTING
Routing
Sources mode
The option button Sources mode selects the mode of routing :
•
•
Permanent
The source is routed permanently to the fixed zones.
Modulation detection
(VOX activation) The Source routing is active if the source
level exceeds defined threshold. This threshold is adjustable through a slider from 70 to +20 dB.
Routing
The check buttons Routing enable the routing of the corresponding source on defined
zones.
ida4xm_user_manual_v1.x_141204
Page 37 of 49
0dB INPUTS > PRIORITY
Priority
The priority of the corresponding source can be adjusted through the slider Priority.
In permanent mode, the priority can’t be adjusted and is set to Low.
ida4xm_user_manual_v1.x_141204
Page 38 of 49
1.3.8 Serial ports
Two serial ports can be configured on each IDA.
SERIAL PORTS > SERIAL PORTS
Settings
All serial port parameters can be set through the several roll lists Protocol, Baud rate,
Parity, Stop and Data bits.
Source allocation on channel
To allocate a source (0dB input) to a channel, the following procedure has to be done :
•
•
•
Select a source in the Available 0dB inputs list
Select the corresponding channel in the Audio channels list
Click on the command button < Put to allocate the source
ida4xm_user_manual_v1.x_141204
Page 39 of 49
Source deletion on channel
To delete a source on a channel, the following procedure has to be done :
•
•
Select a channel in the Audio channels list
Click on the command button Delete
ida4xm_user_manual_v1.x_141204
Page 40 of 49
SERIAL PORTS > ZONES ALLOCATION CODES
Routing
Codes
Codes correspond to selected zones on which the channel must be routed.
To allocate zones on codes, the following procedure has to be done :
•
•
Select a code in the Codes list
Configure the check buttons Routing
Copy
The command button Copy copies the allocated zones of the selected code.
Paste
The command button Paste pastes in the selected code the zone which were first copied
through the command button Copy.
Delete
The command button Delete deletes the allocated zones of the selected code. After a
Delete command, the code is empty.
ida4xm_user_manual_v1.x_141204
Page 41 of 49
1.3.9 Fault inputs
One fault input can be configured on each IDA.
Name
The text box Name defines the name of the fault input.
The maximal length of the fault input name is 11 alphanumerical characters.
Faults
The roll lists Faults define the kind of fault :
•
•
•
Immediate or deferred fault, or inactive
Opening or closing (contact normally close or normally open)
Security or normal
ida4xm_user_manual_v1.x_141204
Page 42 of 49
1.4 FAULT DESCRIPTION
1.4.1 Fault type
Immediate faults
•
•
•
•
•
•
All call station-related faults
Fault inputs if immediate type selected
All LS line-related faults (except leakage fault)
Power amplifier-related faults if no backup amplifier
Power amplifier-related faults if backup amplifier OL
No message in memory fault
Deferred faults
•
•
•
•
Power amplifier-related faults if backup amplifier OK
Backup amplifier-related faults if all power amplifiers OK
LS line earth leakage fault
Fault inputs if deferred type selected
Security faults
•
Fault inputs if security type selected
1.4.2 Fault consequences
Immediate faults
On IDA Master
• Yellow LED “Fault” lighted
• Fault display on LCD
• Remote control outputs open
• Immediate fault general relay open
• Deferred fault general relay closed
On IDA Slave
• Yellow LED “Fault” lighted if link with Master disconnected or presence of immediate
fault on this unit
On call station (if option Fault display on call station selected – see section 1.3.4)
• Yellow LED “Fault” blinking
• “DEF I” display on the zones (keys) concerned by the immediate fault
• Fault display on the screen right bottom
• Buzzer on
Deferred faults
On IDA Master
• Fault display on LCD
• Deferred fault general relay open
• Immediate fault general relay closed
ida4xm_user_manual_v1.x_141204
Page 43 of 49
On call station (if option Fault display on call station selected – see section 1.3.4)
• Yellow LED “Fault” blinking
• “DEF D” display on the zones (keys) concerned by the deferred fault
• Fault display on the screen right bottom
Security faults
Evacuation messages and call stations defined as security call stations are allowed. All
other functions are not allowed. Music is switched OFF, calls on not security call stations
are not permitted …
ida4xm_user_manual_v1.x_141204
Page 44 of 49
1.5 MONITORING
Presence signal bar graph
Monitoring selection
The roll list Monitoring selection enables the selection of the signal which has to be routed
to the monitoring loudspeaker (8 ohms).
•
•
•
•
•
•
Speaker OFF
Loudspeakers lines
0dB outputs
0dB inputs
0db inputs (EQ)
Call stations microphones
No signal
Zone signal after amplification
Zone signal before amplification
Source signal before equalization
Source signal after equalization
Call station microphone signal
Volume setting
The slider adjusts the volume of the signal on the monitoring loudspeaker.
Signal presence
The presence of signal can be controlled by a bar graph which appears on the top of the
window (only if signal is present).
ida4xm_user_manual_v1.x_141204
Page 45 of 49
2 HARDWARE
2.1 REAR PANEL CONNECTIONS
ida4xm_user_manual_v1.x_141204
Page 46 of 49
2.2 BASE WIRING DIAGRAM
ida4xm_user_manual_v1.x_141204
Page 47 of 49
2.3 MASTER – SLAVE WIRING DIAGRAM
IDA4XM
IDA4XMs 1
IDA4XMs 2
IDA4XMs n
IDA4XM(s) n + 1
Rx
12 34 56 78
MASTER - SLAVE CONFIGURATION CABLE
12 34 56 78
IDA4XM(s) n
Tx
ida4xm_user_manual_v1.x_141204
Page 48 of 49
2.4 PC – IDA WIRING DIAGRAM
2.5 TECHNICAL FEATURES
0 dB inputs / outputs
100 V inputs / outputs
Digital audio messages
Evacuation / control inputs / outputs
Serial connections
Size and material
Power supply
Audio input impedance: 10 kOhms (balanced, screw terminal)
Input sensivity: 0 dB
Audio output impedance: 50 Ohms (balanced, screw terminal)
Output level: 0 dB
Max. input / output level: +14 dBv
Audio bandwidth: 10 Hz to 22 kHz
Sampling: 48 kHz 24 bits
Distortion: 0.02 % to 1 kHz
Output noise: < -84 dBu Lin, < -88 dBu A-weighted
Output dynamic: > 98 dBu Lin, > 102 dBu A-weighted
Max. power per channel: 500 W
Amplifier gain measurement: 1 kHz, 18 kHz
Line impedance measurement: 100 V 1 kHz 18 kHz
Bandwidth: 8 kHz
Sampling 16 kHz 16 bits
4 messages, total length 2 minutes and 11 seconds
4 evacuation (alarm) inputs (activation 24 – 72 V)
4 contact outputs
1 contact input (main power fault or battery backup fault)
1 contact output (fault synthesis)
1 RS485 connection to PSS microphone
2 RS232 connections to a configuration PC or a message base
Metal enclosure 1U 19” grey RAL 7016
L * W * D: 430 * 44 * 230 mm
Weight: 3 Kg
24 VDC (power supply 230 VAC / 24 VDC included)
300 mA without PSS microphone, 750 mA with PSS microphone
ida4xm_user_manual_v1.x_141204
Page 49 of 49