1
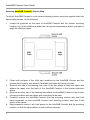
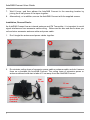
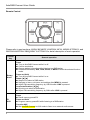
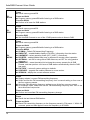
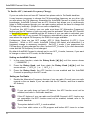
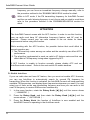
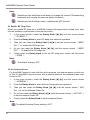
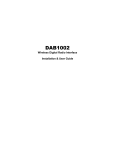
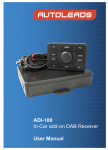
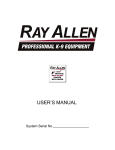
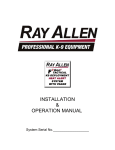
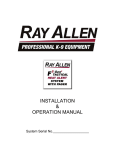
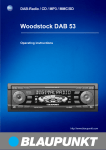
AutoDAB Connect In-Car DAB Adapter User Guide www.AutoDAB.com AutoDAB Connect User Guide Table of Content INTRODUCTION .................................................................................................................. 1 CONTENTS OF PACKAGE .................................................................................................. 2 INSTALLATION .................................................................................................................... 3 OPERATION CONTROLS .................................................................................................... 8 STARTING UP THE SYSTEM ............................................................................................ 11 USING REMOTE CONTROL KEYS ................................................................................... 12 To Turn AutoDAB Connect On or Off ........................................................................ 12 To Scan for the Digital Stations ................................................................................. 12 To Listen to the Digital Stations ................................................................................. 12 To Display Digital Station’s information ..................................................................... 13 To Set a Digital Preset Mode..................................................................................... 13 To Save a Digital Memory Preset .............................................................................. 14 To Recall a Digital Memory Preset ............................................................................ 14 To Recall the Last Listened Digital Station ................................................................ 15 To Set the Auxiliary Input mode................................................................................. 15 FM TRANSMITTING FREQUENCY SETTINGS ................................................................ 16 To Display the current FM Transmitting Frequency ................................................... 16 To Set FM Transmitting Frequency in AFC Mode...................................................... 16 To Set FM Transmitting Frequency in AutoScan Mode ............................................. 16 To Set FM Transmitting Frequency Manually ............................................................ 17 To Save a Desired FM Transmitting Frequency in Memory ...................................... 17 To Recall FM Transmitting Frequency Saved in Memory .......................................... 18 To Force Immediate FM Transmitting Frequency Change ........................................ 18 To Set FM Transmitting Frequency Setting to Preset F1 ........................................... 19 MENU SETTINGS .............................................................................................................. 20 To Reset FM Transmitting Frequency Setting ........................................................... 20 To Enable DLS/DL+ Display...................................................................................... 20 To Enable AFC (Automatic Frequency Change) ....................................................... 21 To Enable AutoScan.................................................................................................. 22 To Enable RC Beep Tone .......................................................................................... 23 To Set Antenna Power .............................................................................................. 23 To Perform DAB Reset.............................................................................................. 24 To Restore to Factory Settings .................................................................................. 24 To Display Software Version ..................................................................................... 24 To Upgrade Software ................................................................................................ 25 TROUBLESHOOTING ....................................................................................................... 26 TECHNICAL SPECIFICATIONS ......................................................................................... 28 INFORMATION ON WASTE DISPOSAL ............................................................................ 29 AutoDAB Connect User Guide INTRODUCTION The AutoDAB Connect is an in-car audio adapter that offers a flexible and cost effective way to add DAB / DAB+ Digital Radio to your existing FM in-car Radio. + The existing analogue system can be easily upgraded to receive DAB/DAB digital radio services. AutoDAB Connect uses FM-RDS micro-transmitter and no complex cabling to your car audio system. The AutoDAB Connect DAB receiver is operated using a remote control, while all of the messages related to the system’s operations, such as service name, memory preset, etc., are converted to RDS text and displayed on your existing FM Radio. The flexible configuration options of the AutoDAB Connect makes it easy to install in different car makes and models. Furthermore, AutoDAB Connect has an AFC (Automatic Frequency Change) function that allows you to continuously listen to your favorite DAB programs through your car radio system without the need to frequently change the FM frequency manually when you drive into a metropolitan area where FM stations are highly crowded. Consult your car radio manual or the car dealer if your car radio has AF (alternative frequency) function, and how to enable AF function before using this AFC function. If AF function is not built in your car radio, you can use AutoDAB Connect’s AutoScan function to automatically scan for 3 useable FM frequencies; you will need to choose a new frequency from the scanned frequencies to set and synchronize it between the car radio and the AutoDAB Connect manually. Alternately, you can use AutoDAB Connect to set a new FM transmitting frequency manually or set a frequency from one of the FM transmitting frequency presets which have been previously saved, and then set the car radio’s FM frequency to match. Note: AutoDAB Connect needs to operate with an RDS car radio in order to properly display the relevant system message from AutoDAB Connect via the in-car radio display. 1 AutoDAB Connect User Guide CONTENTS OF PACKAGE 2 AutoDAB Connect unit Rotary Knob Remote Control Power Cable with Cigarette Lighter CR2032 Battery Dual Lock Tape x1 25mm x 35 mm Dual Lock Tapes x2 25mm x 55 mm User Guide Screw x2 AutoDAB Connect User Guide INSTALLATION Overview Connectors ❶ ❶ ❷ ➌ 3 ❷ ➌ SMB Connector, for DAB antenna 3.5mm stereo audio jack, for aux cable Power jack, for power Cable with Cigarette Lighter Plug AutoDAB Connect User Guide Installation Procedure 1. Please read the installation procedure carefully prior to the actual installation. Consult a professional installer if you have any issues or concerns with the installation. ATTENTION 1. We recommend that if you are going to use the cigarette lighter as the power source for AutoDAB Connect, the lighter socket needs to connect to the ignition. 2. Otherwise, you may have the following condition, after the car engine is turned off: AutoDAB Connect will continue to draw minimal power from the battery. For many intelligent new cars, AutoDAB Connect may be detected as device not disconnected. The car radio and AutoDAB Connect may become out of sync when you resume listening. In this case, please read the troubleshooting section for the solution. 4 2. Select a location to mount your AutoDAB Connect. For the best performance, please locate it in the middle and under the car’s glove compartment. For other locations, please store it away from metal objects and in an open area. 3. Mount your AutoDAB Connect with the bottom cover up and the cables and connectors to the back. 4. Secure the AutoDAB Connect with the supplied dual lock tapes and screws. Please refer to the section on Securing AutoDAB Connect, Step by Step. 5. Install your DAB antenna; please refer to your DAB antenna installation guide for installation instruction. AutoDAB Connect User Guide ATTENTION 1. 2. 3. 4. 5 For AutoDAB Connect to work with the active antenna, the antenna power must be set to ON; for AutoDAB Connect to work with a passive antenna, the antenna power must be set to OFF. Anytime you need to disconnect/connect the antenna you’re your AutoDAB Connect, please unplug your AutoDAB Connect from the cigarette lighter first to avoid possible damage to the antenna. Damage resulted from incorrect installation of the antenna is not covered by the warranty. Consult a professional installer if you have any issues or concerns with the installation. 6. Minimize coiling loops of excessive power cable and antenna cable, and do not secure them on AutoDAB Connect. Please refer to section on Installation dos and don’ts 7. Plug one end of the power cable to AutoDAB Connect and the cigarette-lighter plug into car’s cigarette lighter. There is a lock mechanism on the plug of Power Cable to AutoDAB Connect. First, plug the power cable into the 12V DC jack (1), and then you need to turn the power plug 90 degree clockwise (2) as illustrated below. This is to ensure that the power cable will be firmly connected to the AutoDAB Connect at all times. 8. Start using AutoDAB Connect with the remote control, please refer to the sections on OPERATION CONTROLS and STARTING UP THE SYSTEM. AutoDAB Connect User Guide Securing AutoDAB Connect, Step by Step To secure AutoDAB Connect in your chosen mounting location using the supplied dual lock tapes and/or screws, do the following: 1. Locate the positions on the back of AutoDAB Connect and the chosen mounting location (e.g. in the middle and under the car’s glove compartment) where you want to apply the dual lock tapes. 2. Clean both surfaces of the ‘affix tape’ positions on the AutoDAB Connect and the chosen store location, with alcohol if available and wipe dry before you start. Remove one side of the backing from each of the two pieces of dual lock tapes, and adhere the tapes onto the back of the AutoDAB Connect in the marked positions above. Remove the other side of the backing and adhere the AutoDAB Connect to the chosen mounting location with the cables and connectors to the back. Carefully, remove the AutoDAB Connect from the mounting location with dual lock tapes separated, so that AutoDAB Connect and mounting location each has 2 half pieces of the tapes. Apply pressure evenly to all 4 half pieces on the AutoDAB Connect and the mounting location, so that the tapes adhere to both surfaces securely. 3. 4. 5. 6. 6 AutoDAB Connect User Guide 7. 8. Wait 8 hours, and then adhere the AutoDAB Connect to the mounting location by joining the 4 half pieces of the tapes together. Alternatively, or in addition, secure the AutoDAB Connect with the supplied screws. Installation, Dos and Don’ts As AutoDAB Connect has an internal antenna and FM Transmitter, it is important to avoid signal interference from excessive cable coiling. Below are the dos and don’ts when you coil and store excessive antenna cable and power cable. 1. Don’t tangle the antenna and power cables together. 2. Do minimize coiling loops of excessive power cable or antenna cable, and don’t secure them on or besides the AutoDAB Connect. The coiling loops of excessive power or antenna cables should start at about 10 cm away from the AutoDAB Connect. Not 10 cm Cable attaches to AutoDAB Connect 7 10 cm 10 cm AutoDAB Connect User Guide OPERATION CONTROLS In-Car Audio System LCD Display The AutoDAB Connect unit is operated by using a remote control. The system messages from the remote control operation are converted to RDS text and displayed as 8 characters displayed on your car radio. Below is a list of AutoDAB Connect system messages displayed on the car radio, while operating with the remote control: Messages 8 Description DABRADIO Displays after AutoDAB Connect is powered on. station name Displays the 8-character short service name of the DAB station. TUNING Indicates tuning a DAB station is in progress. RESETING Indicates performing a DAB reset or factory reset is in progress. DONE Confirms completion for certain system operation, i.e., set a DAB preset mode. RETUNING Indicates FM transmitting frequency is being retuned to a new frequency. TO frequency Indicates AutoDAB Connect is changing FM transmitting frequency to a new frequency from a manual setting. AF frequency Indicates AutoDAB Connect is changing FM transmitting frequency to a new frequency from the AFC function. Other than pressing and holding the BACK key, any other remote control keys pressed are ignored before the change is completed. POWEROFF Displays after AutoDAB Connect is turned off (into the standby mode). RC LOW Indicates remote control’s battery is low, battery change is due. AutoDAB Connect User Guide Remote Control Please refer to next sections, USING REMOTE CONTROL KEYS, MENU SETTINGS, and FM TRANSMITTING FREQUENCY SETTINGS for detail description of each operation. Control key General operation Press Turn on AutoDAB Connect while it is off. Confirm a selection. Change station information while listening to a DAB station. Press and followed by AUX, DAB, SCAN, or MENU to enter the selected function mode. Rotary Knob Press and Hold Turn off AutoDAB Connect while it is on. Rotate [◄] [►] Step tune to select a DAB station. Navigate to items, sub items, and settings after MENU is pressed. Adjust FM transmitting frequency by 100 KHz after LINK is pressed. Accelerate Rotation [◄] [►] Quick tune to select a DAB station. Adjust FM transmitting frequency by 2MHz after LINK is pressed. Press Recall memory preset P1. P1 AUX Press and Hold Program memory preset P1 while listening to a DAB station. Function AUX Set AutoDAB Connect to AUX mode to listen to an external audio source. 9 AutoDAB Connect User Guide Press Recall memory preset P2. P2 SCAN Press and Hold Program memory preset P2 while listening to a DAB station. Function SCAN Perform a full scan for DAB stations. Press Recall memory preset P3. P3 DAB Press and Hold Program memory preset P3 while listening to a DAB station. Function DAB Set AutoDAB Connect to one of the 3 DAB preset modes to listen to DAB. Press Recall memory preset P4. Press and Hold Program memory preset P4 while listening to a DAB station. P4 MENU LINK Function MENU 87.6MHz – Default FM transmitting Frequency. RADIOTXT – enable/disable display of DLS/DL+ information from the station. LINKMODE – select operating mode (AFC_H/AFC_L/AutoScan). RC BEEP – enable/disable beep tone in response to remote control operation ANTENNA – set ON for using active DAB antennas, set OFF for using passive antennas. DABRESET – erase the station list but keep the memory presets for all DAB Presets, and then perform a full scan of DAB stations automatically after the DAB has reset. FACTORY – return all system settings to defaults. UPGRADE – upgrade the module software to a new version. VERSION – display the current software version. Press Display adaptor’s current FM transmitting frequency. Select and set the FM transmitting frequency from a manual setting or from one of the four memory presets. Save the FM transmitting frequency setting to one of the four memory presets. In AutoScan mode, select and set the FM transmitting frequency from one of the three AutoScan frequencies. Press and Hold Perform an immediate FM transmitting frequency change. Press Recall the last listened DAB station. BACK 10 Press and Hold Reset FM transmitting frequency to the frequency saved in FM preset 1. Within 30 seconds, press and hold again to return the frequency to 87.6MHz. AutoDAB Connect User Guide STARTING UP THE SYSTEM 1. Turn on your in-car audio system. 2. Enable the AF function on your car radio if it is equipped (Consult your car radio manual or the car dealer if your car radio has AF feature, and how to enable AF feature). 3. Tune the car radio’s FM frequency to FM 87.6MHz, which is the same as AutoDAB Connect’s default FM TX frequency. 4. Start AutoDAB Connect by plugging the cigarette-lighter power plug into the cigarette lighter, the audio system display will show 《 DABRADIO 》. 5. AutoDAB Connect will perform a Scan of DAB stations automatically. 6. If FM 87.6MHz is already used by a FM broadcaster or the station is noisy, change the initial FM TX frequency as below: Operating on AutoDAB Connect Press and hold LINK for 3 seconds, AutoDAB Connect will set a new and clear frequency to transmit the FM signal. Operating on Car Radio Use auto scan function of your car radio to search for an FM broadcast having program service name 《 DABRADIO 》. Stay tuned on this FM frequency, your AutoDAB Connect and car radio are now synchronized. 7. If your car radio does not have AF feature, make the following to change to AutoDAB Connect’s FMTX mode to AutoScan instead of the default AFC. 7.1 Press the Rotary Knob and then MENU to enter the menu function. 7.2 Rotate the Rotary Knob [◄] [►] until the screen shows《 LINKMODE 》. 7.3 Press the Rotary Knob, and then rotate the Rotary Knob [◄] [►] until the screen shows 《 AUTOSCAN 》. 7.4 Press the Rotary Knob, the function of AutoScan is now enabled and the AutoDAB Connect is operating in the AutoScan mode. 8. Listen to the DAB stations. Please refer to USING REMOTE CONTROL KEYS section for the system operation. 9. While you are using AutoScan function and you are experiencing noise on the listening DAB station, please refer to To Set FM Transmitting Frequency in AutoScan Mode to select a auto scanned FM frequency, or To Set FM Transmitting Frequency Manually to manually switch to another FM frequency. 10. To avoid unnecessary draining of the car battery when AutoDAB Connect is idle, after 4 hours of idling from the user’s last action, AutoDAB Connect will be automatically turned off. While in the standby mode, press the Rotary Knob to return AutoDAB Connect back to the operating mode. 11 AutoDAB Connect User Guide USING REMOTE CONTROL KEYS To Turn AutoDAB Connect On or Off The AutoDAB Connect operating mode can be turned off or turned on by the following: 1. Press and hold the Rotary Knob to turn it off, while it in the operating mode. 2. Press the Rotary Knob to return it to the operating mode, while it is off. To Scan for the Digital Stations This function searches for all DAB stations in Band III from channel frequency 5A to channel frequency 13F that are available in the area where your car is presently located. Stations found as a result of the search are added to the station list in the alphabetical order. To scan for the DAB stations, do the following: 1. Press the Rotary Knob then SCAN to do a full scan of DAB stations, the screen will show《 SCANNING 》. Note: Each time you start your AutoDAB Connect, if the station list is empty, it will perform a Full Scan of DAB stations automatically. You may also need to perform a Scan function if you drive your car to a new area where the broadcasting DAB stations are not on the current station list. While the Scan operation is in process, you can press the Rotary Knob at any time to stop Scan function and revert to listening to the currently selected station. If the DAB Station List is not empty before scanning then after completion of DAB Scan, the AutoDAB Connect will revert to playing the last DAB station automatically. If the DAB Station List is empty before scanning, the AutoDAB Connect will tune in the first station of the new DAB Station List resulted from this DAB Scan. If the DAB Station List is empty before scanning, and there is no station detected by DAB Scan, the screen will show 《 EMPTY 》. There are no DAB stations available in the area where you performed DAB Scan function. To Listen to the Digital Stations There are two options available for you to select and listen to a DAB station: Quick Tune and Step Tune. Step Tune is used when you want to step through the list of stations one by one and in alphabetical order. Quick Tune allows you to move more quickly through the list of stations by advancing to the first station in the previous/next alphabet character in the station list. Once you have reached the desired initial 12 AutoDAB Connect User Guide alphabet character; you can then use Step Tune to refine move to the desired station. Step Tune 1. Rotate the Rotary Knob [◄] [►] to step through the stations, one by one, until the screen shows the desired station: 《 station name 》. AutoDAB Connect will start tuning to the selected station immediately. Quick Tune 1. Accelerate Rotating the Rotary Knob [◄] [►] to quickly tune to the first station in the previous/next alphabet. Repeat the action, one alphabet at a time, until the screen shows the DAB station with desired initial alphabet. 2. Do the Step Tune to step through the stations, one by one, until the screen shows the desired station:《 station name 》. AutoDAB Connect will start tuning to the selected station immediately. Note: When the DAB station you have selected is not available, the screen will show《 UNAVAIL 》. There will be no audio output from the AutoDAB Connect. When the signal strength of the DAB station you have selected is too weak, the screen will show《 POOR SIG 》. To Display Digital Station’s information The AutoDAB Connect provides certain information about the current listening station; this information can be displayed thru repeatedly pressing the Rotary Knob key. 1. Each time you press the Rotary Knob while listening to a DAB station, the screen will cycle through station’s information below: 《 station name 》 where station name is name of the DAB station. 《 DLS/DL+ info 》 when DLS/DL+ is enabled thru menu settings, it displays real time Dynamic Label Segment (DLS) station information such as song titles, music type and news or traffic updates, or Dynamic Label Plus (DL+) extended information for song track and song artist. 《 SIG xx% 》 where xx is the signal quality value. Note: The default DLS/DL+ setting is ON. If the feature is OFF, the screen will show 《 TEXT OFF 》. To Set a Digital Preset Mode The AutoDAB Connect provides individual memory settings for up to three sets of DAB Preset Modes: DAB1, DAB2, and DAB3. Each DAB Preset Mode has its own Memory 13 AutoDAB Connect User Guide Presets of DAB stations; please refer to To Save a DAB Memory Preset and To Recall a DAB Memory Preset sections below. This allows user to setup three DAB Presets for different users (driver or passengers) or different group of stations to enjoy the favorite programs based on the individual settings. 1. Press the Rotary Knob and then DAB to enter the DAB Preset selection mode function, the screen will display the current DAB preset mode. 2. Rotate the Rotary Knob [◄] [►] to select a particular DAB Preset Mode. 3. Press the Rotary Knob or after a 3 seconds timeout, the system will tune to the selected Preset mode. The screen will then show 《 DONE 》. Note: When you switch to a different DAB Preset Mode, the Memory Preset list of the selected DAB Preset will be loaded into the internal operating system of the AutoDAB Connect automatically. The will then perform all functions based on the settings of this DAB Preset Mode. The system default is DAB1. To Save a Digital Memory Preset You can save your favorite stations in the Memory Preset List. There are 4 memory presets to store 4 DAB stations in the Memory Preset List for each DAB Preset Mode. 1. Rotate the Rotary Knob [◄] [►] to select a desired station. 2. Press and hold a PX button (where X is from 1 to 4) to save the current selected DAB station into Memory Preset PX of the present DAB Preset mode. 3. The screen will display a short message of 《 PX SAVED 》. Note: This new setting will overwrite a previous setting in Memory Preset X. To Recall a Digital Memory Preset This function allows you to recall a favorite preset DAB station from the Memory Preset List. 14 1. Press a PX button (where X is from 1 to 4) to select the memory preset. 2. If there is no DAB station saved in Memory Preset X, the screen will show《 PX EMPTY 》. Otherwise, the screen will show 《 * station name 》 where station name is the name of the DAB station saved in Memory Preset X. 3. Press the Rotary Knob or after a 3 seconds timeout, the system will tune to the Preset station if it is not empty. AutoDAB Connect User Guide Note: This function only recalls the stations saved in the Memory Preset List of the particular DAB Preset Mode (please refer to To Set a DAB Preset Mode section). To Recall the Last Listened Digital Station The AutoDAB Connect automatically remembers the station that is last listened to. This allows you to go back to last listened DAB station quickly; even it is not in the Memory Preset List. 1. Press BACK to recall the station that was most recently listened to. The screen will show 《 LS EMPTY 》 if the last listened station has not memorized a station name yet or 《 station name 》if it has. 2. Press the Rotary Knob or after a 3 seconds timeout to switch to the last listened station. To Set the Auxiliary Input mode The AutoDAB Connect provides the capability to play audio device such as MP3 or iPod® etc. through your car radio. 1. Press the Rotary Knob then AUX to set the listening mode to auxiliary input mode and start listening to the audio device. The screen will then show 《 DONE 》, and then 《 AUXMODE 》. Note: While in Auxiliary Input mode, to listen to the last listened DAB station, you must press the Rotary Knob and then press DAB to tune to the last listened DAB station and return to the DAB preset mode that was last listened to. While in Auxiliary Input mode, to recall a preset DAB station, you must press a PX button directly (where X is from 1 to 4) to return to the DAB preset mode that was last listened to and tune to the DAB station saved in the memory preset PX. If the memory preset PX pressed is empty then AutoDAB Connect will tune to the last listened DAB station instead. 15 AutoDAB Connect User Guide FM TRANSMITTING FREQUENCY SETTINGS The FM transmitting frequency is used by AutoDAB Connect to transmit the audio and for car radio to receive the audio. The FM transmitting frequency can be changed by the following: 1. 2. 3. 4. 5. 6. 7. Set FM transmitting frequency in AFC mode Set FM transmitting frequency in AutoScan mode Set FM transmitting frequency manually Recall FM transmitting frequency saved in the memory Force immediate FM transmitting frequency change Set FM transmitting frequency to memory preset F1 Reset FM transmitting frequency to default 87.6MHz (refer to MENU SETTINGS) To Display the current FM Transmitting Frequency 1. Press LINK, and the screen will show 《 Frequency 》 where Frequency is the current FM Transmitting Frequency. To Set FM Transmitting Frequency in AFC Mode When your AutoDAB Connect identifies a need to switch FM transmission frequency this will usually force the car radio to change FM frequency automatically in most cases and the car radio display will show《 AF Frequency 》where Frequency is the new frequency AutoDAB Connect is transmitting. Refer to To Enable AFC in the MENU SETTINGS section to enable AFC mode. To Set FM Transmitting Frequency in AutoScan Mode While in the AutoScan mode, AutoDAB Connect will automatically search for three unused FM frequencies and save them into the memory in sequence (from frequency 1 to frequency 3). When you are using AutoDAB Connect to listen to a DAB service and experience constant interference from other source, which means that you are driving into an area where the present FM frequency is used by an FM broadcaster. When this happens, you need to find an unused FM frequency for transmitting the DAB service to your car radio. Refer to To Enable AutoScan in the MENU SETTINGS section to enable AutoScan mode. The enabled AutoScan feature can help you to do FM frequency change quickly by the following steps: Operating on AutoDAB Connect 16 1. Press LINK and the screen will show the current FM Transmitting Frequency. 2. Keep pressing LINK and it will go thru from frequency 1 to frequency 3 for each time your press, and the display will show 《 SX Frequency 》 where X ranges AutoDAB Connect User Guide from 1 to 3 and Frequency is the auto scanned frequency. Stay at the frequency you prefer, which will be the new FM frequency for transmitting. 3. Press the Rotary Knob or after a 10 seconds timeout, the FM transmitter will set and transmit FM signal at the new frequency. Now you can listen to DAB stations via this FM frequency. Operating on Car Radio 1. Manually change your car radio’s FM frequency to match the new AutoDAB Connect transmitting frequency setup. To Set FM Transmitting Frequency Manually If you wish to change the setting and use your own selected FM transmitting frequency manually, do the following: 1. Press LINK, and the screen will show the current FM Transmitting Frequency 《 Frequency 》. 2. Then you can accelerate rotating the Rotary Knob [◄] [►] to step up or down FM frequency by 2MHz, or just rotate the Rotary Knob [◄] [►] to step up or down FM frequency by 100KHz, to choose a frequency until the desired FM frequency is displayed (e.g. 106.7MHz). Make a note of that frequency number. 3. Press the Rotary Knob or after 10 seconds timeout, the AutoDAB Connect will set and transmit FM signal at this new frequency and the screen will show 《 TO Frequency 》. 4. Press FM preset of your car radio corresponding to the same frequency from step 2 if you have previously saved for DAB reception. Otherwise, tune the car radio to the same FM frequency. 5. Now you can listen to DAB stations via this new FM Frequency. Note: It is recommended to set the selected FM frequency as one of the memory presets of your car radio, selecting this particular preset FM frequency together with setting the AutoDAB Connect’s FM transmitting frequency will quickly enable you to start listening to DAB stations. To Save a Desired FM Transmitting Frequency in Memory As unused FM frequency may vary from one area to another, it is suggested to save a few frequencies (up to 4 frequencies) in AutoDAB Connect so that you can switch to a new FM transmitting frequency instantly when you drive into an area where the original FM frequency for DAB is no longer available. 17 1. Press LINK, and the screen will show the current FM Transmitting Frequency 《 Frequency 》. 2. Then you can rotate the Rotary Knob [◄] [►] to step up or down FM frequency by 100KHz, to choose a frequency, and the screen will show 《 Frequency 》 AutoDAB Connect User Guide where Frequency is the chosen frequency. 3. Press and hold a PX button (where X is from 1 to 4) to save the current selected FM frequency into the corresponding preset memory FX. 4. The screen will display a short message of 《 FX SAVED》. Note: The default FM frequencies saved in presets F1 to F4 are 87.6MHz, 92.5MHz, 102.5MHz and 107.9MHz, respectively. It is suggested to set those FM frequencies saved in AutoDAB Connect into FM preset locations of your car radio. Selecting the FM preset of your car radio and the matching FM preset of AutoDAB Connect will switch the FM transmission frequency instantly for a clear reception of the DAB station. Saving the frequency in memory does not affect the current FM transmitting frequency; it remains the same as before saving the frequency. To Recall FM Transmitting Frequency Saved in Memory You may drive into an area where the FM frequency transmitted by AutoDAB Connect is used by an FM broadcaster. When this happens, your reception of DAB station will be getting worse with increasing interference from another FM program. Switch to a free FM frequency will ensure continuous and clear reception of the DAB station to which you are currently listening. 1. Press LINK, and the screen will show the current FM Transmitting Frequency. 2. Press a PX button (where X is from 1 to 4) to select a corresponding memory preset FX and the screen will show the FM frequency saved in memory, make a note of that frequency number. 3. Press the Rotary Knob or after 10 seconds timeout, the AutoDAB Connect will set and transmit FM signal at this new frequency and the screen will show 《 TO Frequency 》 where Frequency is the frequency saved in the preset FX. 4. Press FM preset of your car radio corresponds to the same frequency from step 2 if you have previously saved for DAB reception. Otherwise, tune the car radio to the same FM frequency. 5. Now you can listen to DAB stations via this new FM Frequency. To Force Immediate FM Transmitting Frequency Change This function can be used in either AFC or AutoScan mode to force a FM transmission frequency change immediately. In AFC_H or AFC_L Mode While listening to a DAB station, if you hear static noise or a FM program and before AFC tunes to a clear frequency you can force an immediate frequency change by: 18 AutoDAB Connect User Guide 1. Press and hold LINK, the screen will show《 AF Frequency 》where Frequency is the new frequency that AutoDAB Connect will set and use to transmit FM signal and force radio to tune to the same frequency automatically. 2. Now you can listen to DAB stations via this new FM Frequency. Note: While setting a new transmit frequency operation is in process and《 AF Frequency 》is displayed, other than press and hold the BACK key, any other keys pressed are ignored by the system. In AutoScan Mode If you notice your current listening DAB program is being interfered with, you can force an immediate frequency change. AutoDAB Connect will automatically choose and set a new frequency but you must tune the car radio to match AutoDAB Connect’s new frequency manually. Do the following: Operating on AutoDAB Connect 1. Press and hold LINK, the screen will show《 TO Frequency 》where Frequency is the new frequency that AutoDAB Connect will set and use to transmit FM signal. Operating on Car Radio 1. Manually change your car radio’s FM frequency to match the new AutoDAB Connect transmitting frequency setup. To Set FM Transmitting Frequency Setting to Preset F1 This function allows you to set the FM transmitting frequency to the frequency saved in FM frequency preset F1. AutoDAB Connect will change the transmitting frequency immediately. 1. Press and hold BACK to set FM transmitting frequency to the frequency saved in FM preset F1. Note: After setting the FM frequency to preset F1, You have the option to return to the default FM transmitting frequency 87.6MHz by, within 30 seconds after step 1, press and hold BACK again. 19 AutoDAB Connect User Guide MENU SETTINGS You must press the Rotary Knob then MENU button to enter the menu function, rotate the Rotary Knob [◄] [►] to select a menu setting, and then press the Rotary Knob to confirm the selection. To Reset FM Transmitting Frequency Setting This function allows you to reset the FM transmitting frequency to the default setting FM 87.6MHz. 1. 2. Reset AutoDAB Connect’s FM transmitting frequency by either way below: a. Enter the menu function, the screen will show 《 87.6MHz 》. Then, Press the Rotary Knob to reset FM transmitting frequency to 87.6MHz. b. Press and hold BACK twice in succession to reset FM transmitting frequency to 87.6MHz. Press FM preset of your car radio to the frequency 87.6MHz if you have previously saved for DAB reception. Otherwise, tune the car radio to FM frequency 87.6MHz manually. To Enable DLS/DL+ Display When you enable DLS/DL+ Display, the radio will show DLS information such as song titles, music types and news or traffic updates from the station if DLS is being received, or DL+ information, song track, song artist if DL+ is being received. 1. In the menu function, rotate the Rotary Knob [◄] [►] until the screen shows 《 RADIOTXT 》. 2. Press the Rotary Knob to enter radio text selection operation. 3. Then you can rotate the Rotary Knob [◄] [►] until the screen shows《 ON 》 to enable the DLS/DL+ display on radio. 4. Or you can rotate the Rotary Knob [◄] [►] until the screen shows 《 OFF 》to disable the DLS/DL+ display on radio. 5. Finally, press the Rotary Knob to set the DLS/DL+ display. The screen will then show 《 DONE 》. Note: The default DLS/DL+ setting is ON. 20 AutoDAB Connect User Guide To Enable AFC (Automatic Frequency Change) If your car radio does not have AF feature then please refer to To Enable AutoScan. It may become necessary to change the FM transmitting frequency as you drive into an area where the FM frequency transmitted by AutoDAB Connect is used by an FM broadcaster. AutoDAB Connect has an AFC function that allows you to continuously listen to DAB programs through your car radio system without the need to change the FM frequency manually. (Subject to car radio compatibility) To perform this AFC function, your car radio must have AF (Alternative Frequency) feature and the AF feature of your car radio must be activated. When the AFC function of AutoDAB Connect is enabled and the AF feature of your car radio is activated, your car radio will tune to an unused FM frequency automatically when you drive into an area where the original FM frequency for DAB is no longer available. Furthermore, there are two AFC modes, AFC_H (High Sensitive) & AFC_L (Low Sensitive). While in AFC mode, AutoDAB Connect will detect and determine if a frequency change is necessary constantly. Set AFC_L mode, if you experience the FM frequency is being changed too often, and set AFC_H mode, if you often hear static noise and the FM frequency is not changed. By default AutoDAB Connect is already set to use AFC_H mode; however, if you want to change or return to AFC mode, do the following: Setting on AutoDAB Connect 1. In the menu function, rotate the Rotary Knob [◄] [►] until the screen shows 《 LINKMODE 》. 2. Press the Rotary Knob, and then rotate the Rotary Knob [◄] [►] until the screen shows 《 AFC_H 》or 《 AFC_L 》. 3. Press the Rotary Knob, the AFC function is now enabled and the AutoDAB Connect is operating in the AFC mode. Setting on Car Radio 1. Enable the Alternative Frequency feature of your car radio (Consult your car radio manual or the car dealer if your car radio has the AF feature, and how to enable AF feature). Note: If your car radio does not have AF feature, the AFC function must not be enabled, and refer to To Enable AutoScan. If the AF feature of your car radio and AutoDAB Connect’s AFC function are not compatible, the AFC function must not be enabled; instead, refer to To Enable AutoScan. The system default is AFC_L mode enabled. If you hear static noise or a FM program and before AFC tunes to a clear 21 AutoDAB Connect User Guide frequency you can force an immediate frequency change manually, refer to the procedure outlined in the TROUBLESHOOTING section for detail. While in AFC mode, if the FM transmitting frequency for AutoDAB Connect and the car radio listening frequency is out of sync and you wish to reset them, refer to the procedure outlined in the TROUBLESHOOTING section for detail. ATTENTION The AutoDAB Connect comes with the AFC function. In order to use this function, your car radio must have AF (alternative frequency) feature, and AF must be enabled. Please consult your car radio manual or the car dealer for these requirements before using this function. While working with the AFC function, the possible factors that could affect its normal operation are: 1. The FM sensitivity varies among car radios and the sensitivity can affect AFC’s performance. 2. The algorithm implemented in each car radio’s AF feature varies and this can affect radio’s FM frequency tuning when triggered by AFC. If AFC function is unable to function normally, please disable AFC and use AutoScan mode instead. Refer to the next section To enable AutoScan. To Enable AutoScan If your car radio does not have AF feature, then you must not enable AFC. However, you can use AutoScan to automatically search for unused FM frequency for transmitting. When this function is activated, the AutoDAB Connect will keep searching available FM frequencies, and display these frequencies whenever you need. You may select one of them as the new transmitting frequency and tune your car radio in this new FM frequency to receive DAB services continuously. 22 1. In the menu function, rotate the Rotary Knob [◄] [►] until the screen shows 《 LINKMODE 》. 2. Press the Rotary Knob, and then rotate the Rotary Knob [◄] [►] until the screen shows 《 AUTOSCAN 》. 3. Press the Rotary Knob, the function of AutoScan is now enabled and the AutoDAB Connect is operating in the AutoScan mode. AutoDAB Connect User Guide Note: Switching to the AutoScan mode does not change the current FM transmitting frequency as it remains the same as before the switch. Switching to the AutoScan mode, it disables the AFC function. To Enable RC Beep Tone When you enable RC beep tone, AutoDAB Connect will respond with a beep tone, each time an operation is performed on the remote control. 1. In the menu function, rotate the Rotary Knob [◄] [►] until the screen shows 《 RC BEEP 》. 2. Press the Rotary Knob to enter RC beep tone selection operation. 3. Then you can rotate the Rotary Knob [◄] [►] until the screen shows《 BEEP ON 》 to enable the RC beep tone. 4. Or you can rotate the Rotary Knob [◄] [►] until the screen shows 《 BEEP OFF 》 to disable the RC beep tone. 5. Finally, press the Rotary Knob to set the RC beep tone, screen will then show 《 DONE 》. Note: The default setting is OFF. To Set Antenna Power For AutoDAB Connect to work with the active antenna, the antenna power must be set to ON; for AutoDAB Connect to work with a passive antenna, the antenna power must be set to OFF. 1. In the menu function, rotate the Rotary Knob [◄] [►] until the screen shows 《 ANTENNA 》. 2. Press the Rotary Knob to enter Antenna Power selection operation. 3. Then you can rotate the Rotary Knob [◄] [►] until the screen shows《 ANT ON 》to set the Antenna Power On. 4. Or you can rotate the Rotary Knob [◄] [►] until the screen shows《 ANT OFF 》 to set the Antenna Power Off. 5. Finally, press the Rotary Knob to set the Antenna Power. Note: The default Antenna Power setting is OFF. 23 AutoDAB Connect User Guide To Perform DAB Reset 1. In the menu function, rotate the Rotary Knob [◄] [►] until the screen shows 《 DABRESET 》. 2. Press the Rotary Knob to perform a reset operation for DAB Presets. 3. If you do want to reset, rotate the Rotary Knob [◄] [►] to find《 YES 》and then press the Rotary Knob for confirmation. Otherwise, you can press the Rotary Knob to cancel while the screen is showing 《 NO 》. The screen will show 《 RESETING 》to indicate that DAB reset is in progress. Note: DAB reset will erase the station list but keep the memory presets for all DAB Presets, and then perform a full scan of DAB stations automatically after the DAB has reset. It does not erase the current FM transmitting frequency and all FM transmitting frequency presets. To Restore to Factory Settings 1. In the menu function, rotate the Rotary Knob [◄] [►] until the screen shows 《 FACTORY 》. 2. Press the Rotary Knob to perform a factory reset operation. 3. If you do want to reset, rotate the Rotary Knob [◄] [►] to find《 YES 》and then press the Rotary Knob for confirmation. Otherwise, you can press the Rotary Knob to cancel while the screen is showing《 NO 》. 3.1 The screen will show《 RESETING 》to indicate that factory reset is in progress. 3.2 The system will perform a scan of DAB stations automatically after the factory reset is completed. You must switch the car radio to FM 87.6MHz to continue DAB listening. Note: Factory reset will erase all previous system’s settings and set them to default. To Display Software Version This function allows you to display the current software version of your AutoDAB Connect. 24 1. In the menu function, rotate the Rotary Knob [◄] [►] until the screen shows 《 VERSION 》. 2. Press the Rotary Knob to display the software version, the screen will show the current software version number《 x.x.x.x 》. AutoDAB Connect User Guide To Upgrade Software This function is used by the maintenance personnel only, to upgrade the existing AutoDAB Connect module software to a new version. 25 AutoDAB Connect User Guide TROUBLESHOOTING Please read this user manual carefully before using the AutoDAB Connect In-Car DAB Adapter. If you still have difficulties to use this unit, this section gives some of the most likely solutions to the problems you might have. I cannot find any DAB stations. Ensure that DAB coverage exists in your area. Please visit www.worlddab.org or www.digitalradionow.com to check for DAB coverage. I can find DAB stations, but I cannot get any sound. Make sure that the car radio is not mute; check the volume settings of the car radio. I forget the FM transmission frequency setting of AutoDAB Connect. Press LINK key the screen will show the current FM Transmitting frequency. I cannot hear DAB program when I start up my car and turn on the car radio. Check the following: 1. Follow the instruction on the section STARTING UP THE SYSTEM to initialize the FM transmitting frequency on AutoDAB Connect and the car radio. 2. Make sure AutoDAB Connect is not in the Auxiliary mode, please refer to To Set the Auxiliary input mode to check and return to DAB mode. While listening to a DAB station, I lost reception suddenly and hear static noise or a FM program 1. Check if AutoDAB Connect’s station information shows 《 POOR SIG 》 or 《 UNAVAIL 》, if so, you may be leaving the signal coverage area, please refer to To Listen to the DAB stations to select another station. Also, the station may be unavailable temporarily as you drive into a tunnel. 2. If AutoDAB Connect is in AFC mode, the FM transmitting frequency for AutoDAB Connect and the car radio listening Frequency maybe out of sync. To reset them, do the following: a) Reset to 87.6MHz Operating on Car Radio 26 Press FM preset of your car radio to the frequency 87.6MHz if you have previously saved for DAB reception. Otherwise, tune the car radio to FM frequency 87.6MHz manually. AutoDAB Connect User Guide Operating on AutoDAB Connect Enter the menu function, the screen will show 《 87.6MHZ 》 , then press Rotary Knob to reset FM transmitting frequency to 87.6MHz; or Or press and hold BACK twice in succession to reset FM transmitting frequency to 87.6MHz. b) Reset to frequency that has been saved in FM frequency preset 1 Operating on Car Radio Press FM preset of your car radio corresponds to the same frequency as in AutoDAB Connect’s FM frequency preset 1, if you have previously saved for DAB reception. Otherwise, tune the car radio to that FM frequency manually. Operating on AutoDAB Connect 3. Press and hold BACK to reset FM transmitting frequency to FM frequency preset 1. If AutoDAB Connect is in AutoScan mode, the FM channel you selected for DAB mode may be occupied by an existing radio station. You need to change the frequency settings of FM Transmitter. Please refer To enable AutoScan to set a suitable new frequency. If you hear static noise or a FM program and before AFC tunes to a clear frequency, you can force an immediate frequency change manually by one of the following: Refer to FM Transmitting Frequency Settings section: 1. Set FM transmitting frequency manually 2. Recall FM transmitting frequency saved in the memory 3. Force immediate FM transmitting frequency change 4. Set FM transmitting frequency to memory preset F1 Refer to MENU SETTINGS section: 5. Reset FM transmitting frequency to default 87.6MHz 27 AutoDAB Connect User Guide TECHNICAL SPECIFICATIONS Digital Audio Services: DAB/DAB+. RF Frequency Range: DAB Band III (174 MHz ~ 240 MHz). RF Sensitivity for DAB Band III: -98dBm ~ -100dBm. FM Transmit Range: 87.6 MHz ~ 107.9 MHz. Mains Power: 11 V ~16V DC Input Connectors: DC power jack, 3.5mm stereo audio jack. Presets: 4 DAB station presets (for each DAB mode) and 4 FM transmit presets. Operating Temperature Range: -10℃ ~ +70℃. Storage Temperature Range: -40℃ ~ +85℃. DAB Antenna Connector: - Connector Type: SMB - Output Voltage: 12V 28 AutoDAB Connect User Guide INFORMATION ON WASTE DISPOSAL This mark on a product and/or accompanying documents indicates that when it is to be disposed of, it must be treated as Waste Electrical & Electronic Equipment (WEEE). Any WEEE marked waste products must not be mixed with general household waste, but kept separate for the treatment, recovery and recycling of the materials used. For proper treatment, recovery and recycling; please take all WEEE marked waste to your Local Authority Civic waste site, where it will be accepted free of charge. If all consumers dispose of Waste Electrical & Electronic Equipment correctly, they will be helping to save valuable resources and preventing any potential negative effects upon human health and the environment, of any hazardous materials that the waste may contain. Note about Remote control battery: There is a risk of explosion if battery is replaced by an incorrect type. Dispose of used batteries according to the instructions. 29 AutoDAB Connect_ 201501