1
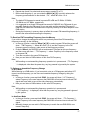
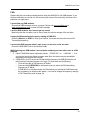
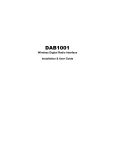
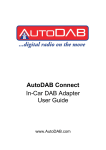
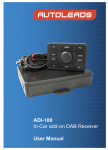
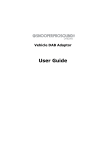
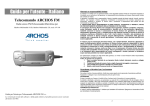
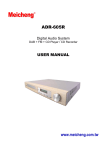
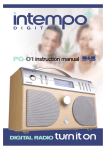
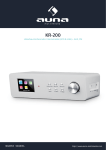
DAB1002 Wireless Digital Radio Interface Installation & User Guide DAB1002 User Guide Contents Contents .................................................................................................................................... 2 Introduction ................................................................................................................................ 3 Contents of Package .................................................................................................................. 4 Installation.................................................................................................................................. 5 Product Overview ................................................................................................................... 5 Installation Procedure ............................................................................................................. 5 General Operation ..................................................................................................................... 8 Display ................................................................................................................................... 8 Remote Control Operation ...................................................................................................... 9 Setting up the DAB1002 ........................................................................................................10 Using the Remote Control .....................................................................................................11 Menu Settings ...........................................................................................................................13 Setting the DAB1002 Transmission Frequency .........................................................................16 FAQ ..........................................................................................................................................19 Technical Specifications............................................................................................................20 2 DAB1002 User Guide Introduction The DAB1002 is a wireless interface that offers a flexible and cost effective way to listen to digital radio via your existing in-car audio system. Your present AM/FM system can be easily upgraded to receive DAB/DAB+ digital radio services using an FM-RDS micro-transmitter and without the addition of complex cabling. The DAB1002 DAB receiver is operated using a remote control, while all messages related to the system’s operations, such as service names, memory presets etc., are converted to RDS text and displayed on the LCD screen of your in-car audio system. The flexible configuration options of DAB1002 make it easy to install in a range of car makes and models. In areas of high FM usage, the DAB1002 may need its broadcast frequency changed to avoid interference. DAB1002 uses its AFC (Automatic Frequency Change) function, allowing you to continuously listen to your favourite DAB programs through your car system, without the need to change the FM frequency manually. Consult your car radio manual to find if your car radio has an AF (Alternate Frequency) function and how it can be enabled. If this AF function is not built in to your car radio, the DAB1002 has an Autoscan function that can automatically scan for 3 useable FM frequencies. These can be synchronised with the incar system to allow for consistent reception. The DAB1002 also provides a 3.5mm jack auxiliary input to allow another music source to play on the in-car system. This function requires an additional cable. Note: DAB1002 must operate with an RDS car radio in order to properly display the relevant system message on the in-car radio display. 3 DAB1002 User Guide Contents of Package 4 DAB1002 Power Cable With Accessory Socket Powered DAB Antenna Wheel Remote Control CR2032 Battery Dual Lock Tapes x2 25mm x 55 mm Dual Lock Tape x1 25mm x 35mm Screw x2 Quick Reference Guide DAB1002 User Guide Installation Product Overview DAB1002 connections: AERIAL – SMB connector for the DAB antenna AUX In – 3.5mm stereo audio jack for an auxiliary cable 12VDC – Power socket for connecting to the Accessory Charging Point Installation Procedure Please read the installation procedure carefully prior to installation. Consult a professional installer if you have any issues or concerns with the installation. 1. For the best performance, locate the DAB1002 under the car’s glove compartment. If using a different location, ensure it is away from metal objects and in an open area. 2. DAB1002 should be located with the bottom cover up and all cable and connectors to the rear. 3. Secure the DAB1002 using the supplied dual lock tapes and screws. The following diagram shows the correct positioning of the mounting tape and screws. 5 DAB1002 User Guide 4. Install the supplied DAB antenna referring to the separate antenna installation guide for instruction. The antenna supplied with DAB1002 is a phantom DAB Antenna. Power will be supplied to the antenna by the DAB1002 interface. ATTENTION Replacing the supplied antenna with a third party product may result in reduced performance. When connecting/disconnecting the antenna from DAB1002, please disconnect the DAB1002 form the power first. Damage resulting from incorrect installation of the antenna is not covered by the warranty. Consult a professional installer if you have any issues or concerns with the installation. 5. Minimise coiling loops of excessive power and antenna cable, and do not secure them to the DAB1002. Any excess cable that does require looping should be done at least 10cm from the DAB1002 unit. Not 10 cm 10 cm Cable attaches to DAB1002 6 DAB1002 User Guide 6. Connect one end of the power cable into DAB1002 and the accessory plug into car’s accessory socket. There is a lock mechanism on the plug of Power Cable to DAB1002. Connect the DAB1002 before plugging in the accessory socket (see page 10). Rotate 90° to ensure the plug locks into position 7. The DAB1002 is now ready for use. 7 DAB1002 User Guide General Operation Display The DAB1002 unit is operated by using a remote controller; the system messages from the remote control operation are converted to RDS text and displayed as an 8 character display on the LCD screen of your in-car audio system. Below is a list of DAB1002 system messages displayed on the in-car audio system: Messages Display after DAB1002 is powered on. Display the 8-character short service name of the DAB station. text info Display DLS/DL+ (station text information) if enabled. TUNING Indicate tuning a DAB station is in progress. Indicate performing a DAB reset or factory reset is in progress. Confirm completion for certain system operation, i.e., set a DAB preset mode. Indicate FM transmitting frequency is being returned to a new frequency. Indicate DAB1002 is changing FM transmitting frequency to a new frequency from a manual setting. Indicate DAB1002 is changing FM transmitting frequency to a new frequency from the AFC function. Display after DAB1002 is turned off (into the standby mode). Indicates the remote controls battery is low. Battery replacement is recommended. DABRADIO station name RESETING DONE RETUNING TO frequency AF frequency POWEROFF RC LOW 8 Description DAB1002 User Guide Remote Control Operation Below is a list of remote control operations and their affect on the DAB1002: Control key General operation Wheel Press Turn on DAB1002 while it is off. Confirm a selection. Display DLS/DL+ (station information) while listening to a DAB station. Press followed by SCAN, MENU or SYNC to enter selection. Press and hold to turn off DAB1002. Rotate [▲] [▼] Step tune to select a DAB station. Navigate to items, sub items while in MENU settings. Navigate to DAB preset modes, AUX mode while in AUX/DAB settings. Adjust FM transmitting frequency by 100 KHz in SYNC settings. Accelerate Rotation [▲] [▼] Quick tune to select a DAB station. Adjust FM transmitting frequency by 2MHz in SYNC settings. P1 SYNC Press Recall station preset P1 in a DAB preset mode. Return to last listened DAB preset mode from AUX mode and recall station preset P1. Press and Hold Programs preset P1 when a radio station is selected in the current DAB preset mode. P2 SCAN Press Recall station preset P2 in a DAB preset mode. Return to last listened DAB preset mode from AUX mode and recall station preset P2. Press and Hold Programs preset P2 when a radio station is selected in the current DAB preset mode. P3 Press Recall station preset P3 in a DAB preset mode. Return to last listened DAB preset mode from AUX mode and recall station preset P3. Press and Hold Programs preset P3 when a radio station is selected in the current DAB preset mode. 9 DAB1002 User Guide P4 MENU Press Recall station preset P4 in a DAB preset mode. Return to last listened DAB preset mode from AUX mode and recall station preset P4. Press and Hold Programs preset P4 when a radio station is selected in the current DAB preset mode. AUX/DAB Press Set the auxiliary input mode, or a DAB Preset mode. PREVIOUS Press Recall the last listened DAB station. Revert the screen back to station name display from SCAN, SYNC and MENU settings Press and Hold Press and hold to return the FM transmitting frequency to 87.6MHz. Setting up the DAB1002 1. Turn on your in-car audio system. 2. Enable the AF function on your car radio if it is equipped (Consult your car radio manual or the car dealer if your car radio has AF feature). This feature is typically enabled as standard. 3. Tune the car radio’s FM frequency to FM 87.6MHz, which is the same as DAB1002 default FM TX frequency. 4. Start DAB1002 by plugging the cigarette-lighter power plug into the cigarette lighter, the audio system display will show 《 DABRADIO 》. 5. DAB1002 will perform a Scan of DAB stations automatically. 6. If FM 87.6MHz is already used by an existing FM station, change the initial FM TX frequency as below: DAB1002 Operation Press the Wheel then SYNC to enter the sync function, then press and hold SYNC, the DAB1002 will now set a new and clear frequency to transmit the FM signal. Car Radio Operation Use auto scan function of your car radio to search for the FM broadcast having program service name《 DABRADIO 》. Tune on this channel. The DAB1002 and car radio are now synchronized. 7. Listen to DAB stations using the remote control buttons and wheel. 8. To avoid unnecessary draining of the car battery, the DAB1002 will automatically turn off after 4 hours if it is not being used. 10 DAB1002 User Guide Using the Remote Control The remote control uses advanced RF communication to operate the DAB1002 and further can be used from any position within the vehicle (front or rear). Please also note that due to the time required to update the vehicle’s existing AM/FM RDS radio display there is typically a “short delay” between pressing a remote control button and the vehicle display showing the function. This is normal behaviour of the DAB1002 user interface. To Turn On or Off DAB1002 The DAB1002 can be turned on or off by the following: Press the Wheel, while DAB1002 is off, to return it to operating mode. Press and hold the Wheel, while DAB1002 is in the operating mode, to turn it off. To Listen to the DAB Stations There are two options available for you to select and listen to a DAB station: Quick Tune and Step Tune. Quick Tune allows you to move more quickly through the list of stations to a specific letter of the alphabet corresponding to the initial letter of a station. Once you have reached the desired initial character; you can then use Step Tune to move to the exact station. Quick Tune Fast rotation of the Wheel [▲] [▼] tunes to the first station in the next/previous alphabet. Repeat the action one character at a time, until the screen shows the DAB station with desired initial character. Step Tune Rotate the Wheel [▲] [▼] to step through the stations, one by one, until the screen shows the desired station: 《 station name 》. Note: When the DAB station you have selected is not available, the screen will show 《 UNAVAIL 》. There will be no audio output from the DAB1002. When the signal strength of the DAB station you have selected is too weak, the screen will show《 POOR SIG 》. Each time you start DAB1002, if the station list is empty, it will perform a Full Scan of DAB stations automatically. To Display Radio Text DAB1002 is capable of receiving real time Dynamic Label Segment (DLS) station information such as song titles, music type and news or traffic updates, or Dynamic Label Plus (DL+) extended information for song track and song artist. 1. While listening to a DAB station, press the Wheel, the station name display will be replaced by the station text. 2. If the feature is not enabled, the screen will show《 TEXT OFF 》. After a system time out, the screen will revert back to station name. To Set a DAB Preset Mode The DAB1002 provides memory positions for up to three sets of DAB Presets. The DAB Preset positions are: DAB1, DAB2, and DAB3. Each DAB Preset position has its own 4 Memory Presets. This allows the user to setup three sets of four separate DAB Presets. These can be used for different drivers, passengers or music choices. 11 DAB1002 User Guide 1. Press AUX/DAB to enter AUX or DAB Preset selection mode, the screen will show the current DAB Preset position or it is in Auxiliary input mode. 2. Press AUX/DAB repeatedly until the screen shows the desired DAB Preset《 DABx 》. 3. Press the Wheel (or after timeout) the system will set the selected DAB Preset and the screen will show 《 DONE 》. The screen will revert back to station name being played. Note: When you switch to a different DAB Preset Mode, the Memory Preset list of the selected DAB Preset will be loaded into the internal operating system of the DAB1002 automatically. The DAB1002 will then use the Memory Preset list based on the settings of this DAB Preset Mode. The system default is DAB1. To Save a DAB Memory Preset You can save your favorite stations in the DAB Memory Preset List. There are 4 memory presets. 1. Rotate the Wheel [▲] [▼] to select a desired station. 2. Press and hold P1, P2, P3 or P4. 3. The screen will display a short message of 《 PX SAVED》. Note: This new setting will overwrite a previous setting in Memory Preset X. To Recall a DAB Memory Preset This function allows you to recall the favorite preset DAB station from the Memory Preset list for the current DAB preset mode. 1. Press a PX button (where X is from 1 to 4) to select the memory preset. 2. If there is no DAB station saved in Memory Preset PX, the screen will show 《 PX EMPTY 》. To Set the Auxiliary Input Mode The DAB1002 provides the capability to play audio device such as MP3 or iPod® etc. through your car radio. 1. Press AUX/DAB to enter AUX or DAB Preset selection mode. The screen will show the current DAB Preset position or it is in Auxiliary input mode. 2. If DAB1002 is not in the Auxiliary input mode currently, press AUX/DAB again, the screen shows《 AUX 》. 3. Press the Wheel (or after timeout), the system will switch to auxiliary input mode and start listening to the audio device. The screen will then show 《 AUX MODE 》. Note: You must connect your audio cable between the Aux-In jack of DAB1002 and the audio device (cable not supplied). While in auxiliary input mode, press a PX button (where X is from 1 to 4) to return to the DAB preset mode that was last listened to and tune to the memory preset PX. If the memory preset PX is empty then DAB1002 will tune to the last listened station instead. To Recall the Last Listened DAB Station The DAB1002 automatically remembers the station that is last listened to. 1. Press PREVIOUS to recall the station that was last listened to. 12 DAB1002 User Guide Menu Settings Press the Wheel then MENU button to enter the menu function. Rotate the Wheel [▲] [▼] to select a menu setting then press the Wheel to confirm. To Display Station’s Signal Strength This function allows you to display the signal quality of the station you are currently listening to. 1. In the menu function, rotate the Wheel [▲] [▼] until the screen shows 《 SHOW SIG 》. 2. Press the Wheel to display station’s signal quality value, the screen will show 《 SIG xx% 》where xx is the signal quality value. To Enable DLS/DL+ Display When you enable DLS/DL+ Display, the radio will show DLS information such as song titles, music types and news or traffic updates from the station if DLS is being received, or DL+ information, song track, song artist if DL+ is being received. 1. In the menu function, rotate the Wheel [▲] [▼] until the screen shows 《 RADIOTXT 》. 2. Press the Wheel to enter radio text selection operation. 3. Then you can rotate the Wheel [▲] [▼] until the screen shows《 ON 》 to enable the DLS/DL+ display on radio. 4. Or you can rotate the Wheel [▲] [▼] until the screen shows 《 OFF 》to disable the DLS/DL+ display on radio. 5. Finally, press the Wheel to set the DLS/DL+ display. The screen will show 《 DONE 》. Note: The default DLS/DL+ setting is ON. To Scan for the DAB Stations This function searches for all DAB stations found, adding them to the station list in alphabetical order. 1. In the menu function, rotate the Wheel [▲] [▼] until the screen shows 《 FULLSCAN 》then press the Wheel to begin scanning for DAB stations in the channel range. 2. Alternatively, you can press the Wheel then the SCAN button to do a FULLSCAN. Note: Each time you start DAB1002, if the station list is empty, it will perform a Full Scan of DAB stations automatically. You may also need to perform a Scan function if you drive your car to a new area where the broadcasting DAB stations are not on the current station list. During a scan the screen will show 《 SCANNING 》. While the Scan operation is in process, you can press the Wheel or PREVIOUS at any time to stop the scan. If the DAB Station List is not empty before scanning then after completion of a scan, the DAB1002 will revert to playing the last DAB station automatically. If the DAB Station List is empty before scanning, the DAB1002 will tune in the first station of the new DAB Station list. If the DAB Station List is empty before scanning, and there is no station detected by DAB Scan, the screen will show 《 EMPTY 》. 13 DAB1002 User Guide To Enable AFC (Automatic Frequency Change) There are two AFC modes, AFC_H (High Sensitive) & AFC_L (Low Sensitive). While in AFC mode, DAB1002 will detect and determine if a frequency change is necessary constantly. Set AFC_L mode, if you experience the FM frequency is being changed too often. Set AFC_H mode, if you frequently hear static noise and the FM frequency is not changed. By default DAB1002 is already set to use AFC_H mode. Setting AFC 1. In the menu function, rotate the Wheel [▲] [▼] until the screen shows 《 SYNCMODE 》. 2. Press the Wheel, and then rotate the Wheel [▲] [▼] until the screen shows 《 AFC_H 》 or 《AFC_L 》. 3. Press the Wheel, the AFC function is now enabled and the DAB1002 is operating in the AFC mode. The screen will then show 《 DONE 》. Note: If your car radio does not have AF feature, the AFC function must not be enabled (refer to section on page 14). When your DAB1002 identifies a need to switch FM transmission frequency this will usually force the car radio to change FM frequency automatically and the car radio display will show 《 AF Frequency 》where Frequency is the new frequency DAB1002 is transmitting. If you hear static noise or a FM program and before AFC tunes to a clear frequency you can force an immediate frequency change manually by the following methods: 1. Perform an immediate frequency change (refer to section on page 17). 2. Recall and change FM Transmitting Frequency Saved in Memory (refer to section on page 17). 3. Change the FM Transmitting Frequency Manually (refer to section on page 16). 4. Reset the FM transmitting frequency to 87.6MHz (refer to section on page 16). While in AFC mode, if the FM transmitting frequency for DAB1002 and the car radio listening frequency is out of sync and you wish to reset them, do the following: 1. Tune the car radio to 87.6MHz. 2. Press and hold PREVIOUS to return the FM transmitting frequency to 87.6MHz. To Enable AutoScan If it is not possible to use the AFC feature you can use AutoScan to automatically search for unused FM frequencies. When this function is activated, the DAB1002 will keep searching for 3 available FM frequencies automatically. You may select one of them as the new transmitting frequency and tune your car radio in this new FM frequency to receive DAB services continuously. 1. In the menu function, rotate the Wheel [▲] [▼] until the screen shows 《 SYNCMODE 》. 2. Press the Wheel, and then rotate the Wheel [▲] [▼] until the screen shows 《 AUTOSCAN 》. 3. Press the Wheel, the function of AutoScan is now enabled and the DAB1002 is operating in the AutoScan mode. The screen will then show 《 DONE 》. Note: 14 Switching to the AutoScan mode does not change the current FM transmitting frequency as it remains the same as before the switch. DAB1002 User Guide While in the AutoScan mode, DAB1002 will automatically search for three unused FM frequencies and save them into the memory in sequence (from frequency 1 to frequency 3) through the sync function. (refer to section on page 18). To Set Antenna Power For DAB1002 to work with the supplied active antenna, the antenna power must be set to ON. If you replace the supplied antenna with any third party antenna, you must set the antenna power to OFF. 1. In the menu function, rotate the Wheel [▲] [▼] until the screen shows 《 ANTENNA 》. 2. Press the Wheel to enter the antenna power selection operation. 3. Then you can rotate the Wheel [▲] [▼] until the screen shows《 ANT ON 》to set the antenna power on. 4. Or you can rotate the Wheel [▲] [▼] until the screen shows《 ANT OFF 》to set the antenna power off. 5. Finally, press the Wheel to set the antenna power. The screen will then show 《 DONE 》. Note: The default Antenna Power setting is ON. To perform DAB Reset 1. In the menu function, rotate the Wheel [▲] [▼] until the screen shows《 DABRESET 》 . 2. Press the Wheel to enter reset function, the reset will erase the DAB station list but keep the DAB station presets unchanged. 3. If you do want to reset, rotate the Wheel [▲] [▼] to find《 YES 》and then press the Wheel for confirmation. 4. The screen will show《 RESETING 》to indicate that DAB reset is in progress. 5. The system will perform a full scan of DAB stations automatically after it has reset. To Restore to Factory Settings 1. In the menu function, rotate the Wheel [▲] [▼] until the screen shows 《 FACTORY 》. 2. Press the Wheel to perform a factory reset operation. 3. Rotate the Wheel [▲] [▼] to find《 YES 》and then press the Wheel for confirmation. Otherwise, you can press the Wheel to revert back to station name. 4. The screen will show《 RESETING 》to indicate that factory reset is in progress. 5. The system will perform a scan of DAB stations automatically after the factory reset is completed. You must switch the car radio to FM 87.6MHz to continue DAB listening. Note: Factory reset will erase all previous system’s settings and set them to default. To Display Software Version This function allows you to display the current software version of your DAB1002. 1. In the menu function, rotate the Wheel [▲] [▼] until the screen shows 《 VERSION 》. 2. Press the Wheel to display the software version, the screen will show the current software version number《 x.x.x.x 》. 15 DAB1002 User Guide Setting the DAB1002 Transmission Frequency If required, the FM transmission frequency can be set manually by pressing the Wheel then SYNC to enter the sync function. To Display the current FM Transmitting Frequency 1. Press the Wheel then SYNC to enter sync function, the screen will show 《 Frequency 》 where Frequency is the current FM Transmitting Frequency. To Reset FM Transmitting Frequency Setting This function allows you to reset the FM transmitting frequency to the default setting FM 87.6MHz. 1. Press and hold PREVIOUS to return the FM transmitting frequency to 87.6MHz. 2. Tune the car radio to FM frequency 87.6MHz manually. To Set the FM Transmitting Frequency 1. In the sync function, rotate the Wheel [▲] [▼] until the screen shows《 MANUAL 》. 2. Press the Wheel to confirm the selection, the screen will show the current FM Transmitting Frequency《 Frequency 》. 3. Quick rotation of the Wheel [▲] [▼] steps up or down FM frequency by 2MHz. Slow rotation of the Wheel [▲] [▼] steps up or down FM frequency by 100KHz. Choose a frequency until the desired FM frequency is displayed (e.g. 106.7MHz). Make a note of that frequency number. 4. Press the Wheel, the DAB1002 will set and transmit the FM signal at this new frequency and the screen will show 《 TO Frequency 》. 5. Tune the FM preset of your car radio corresponding to the same frequency. 6. Now you can listen to DAB stations via this new FM Frequency. Note: It is recommended to set the selected FM frequency as one of the memory presets of your car radio, selecting this particular preset FM frequency and together with setting the DAB1002’s FM transmitting frequency will quickly enable you to start listening to DAB stations. While setting a new transmit frequency operation is in process and《 TO Frequency 》is displayed, other than the power key, any key pressed is ignored by the system. To Save an FM Transmitting Frequency in the Memory It is suggested to save a few known free transmitting frequencies (up to 4 frequencies) in DAB1002 so that you can switch to a new FM transmitting frequency instantly when you drive into an area where the original FM frequency for DAB is no longer available. 1. Press the Wheel and then press MENU button to enter menu function. 2. Rotate the Wheel [▲] [▼] until the screen shows 《 FMPRESET 》. 3. Press the Wheel to confirm the selection, the screen will show 《 F1 》. 4. Press the Wheel to confirm the selection, the screen will show 《 Frequency 》where Frequency is the frequency saved in the preset F1. 5. Then you can accelerate rotating the Wheel [▲] [▼] to step up or down FM frequency by 2MHz, or just rotate the Wheel [▲] [▼] to step up or down FM frequency by 100KHz, to choose a frequency until the desired FM frequency is displayed (e.g. 106.7MHz), and then press the Wheel to save. The screen will show 《 F1 SAVED 》 and then show 《 F2 》. 16 DAB1002 User Guide 6. Repeat step 4 and 5 to select and save memory presets F2 to F4. 7. Before executing step 4, you can rotate the Wheel [▲] [▼] to quickly advance the frequency preset selection to the desired《 FX 》where X is from 1 to 4. Note: The default FM frequencies saved in presets F1 to F4 are 87.6MHz, 92.5MHz, 102.5MHz and 107.9MHz, respectively. It is suggested to set those FM frequencies saved in DAB1002 into FM preset of your car radio. Selecting the FM preset of your car radio and the matching FM preset of DAB1002 will switch the FM transmission frequency instantly for a clear reception of the DAB station. Saving the frequency in memory does not affect the current FM transmitting frequency; it remains the same as before saving the frequency. To Recall an FM Transmitting Frequency from the Memory If you wish to change the setting and switch to a previously saved free FM transmitting frequency manually, do the following: 1. In the sync function, rotate the Wheel [▲] [▼] to select a preset FX and the screen will show 《 FX Frequency 》 Where X is from 1 to 4, and the Frequency is the FM frequency saved in memory, make a note of that frequency number. 2. Press the Wheel, the DAB1002 will set and transmit FM signal at this new frequency and the screen will show 《 TO Frequency 》 where Frequency is the frequency saved in the preset FX. 3. Tune the car radio to the same FM frequency. 4. Now you can listen to DAB stations via this new FM Frequency. Note: While setting a new transmitting frequency operation is in process and《 TO Frequency 》is displayed, other than the power key, any key pressed is ignored by the system. To Perform an Immediate Frequency Change In AFC Mode: While listening to a DAB station, If you hear static noise or a FM program and before AFC tunes to a clear frequency you can force an immediate frequency change by doing the following: 1. In the sync function, press and hold SYNC, the screen will show《 AF Frequency 》 where Frequency is the new frequency that DAB1002 will set and use to transmit FM signal and force radio to tune to the same frequency automatically. 2. Now you can listen to DAB stations via this new FM Frequency. Note: While setting a new transmitting frequency operation is in process and 《 AF Frequency 》is displayed, other than the power key, any key pressed is ignored by the system. In AutoScan Mode 1. In the sync function, press and hold SYNC, the screen will show 《 TO Frequency 》 where Frequency is the new frequency that DAB1002 will set and use to transmit FM signal. 2. Manually change your car radio’s FM frequency to match the new DAB1002’s new transmit frequency. 17 DAB1002 User Guide To Perform a Frequency Change in AutoScan Mode While in the AutoScan mode, DAB1002 will automatically search for three unused FM frequencies and save them into the memory in sequence (named frequency 1 to 3). These frequencies can be displayed by the following method. 18 Operation on the DAB1002 In the sync function, repeatedly pressing SYNC now will cycle through the frequencies (1 to 3), at each stage showing 《 SX Frequency 》, where X is the frequency name (1 to 3). Stay at the preferred frequency. Press the Wheel and the DAB1002 will set and transmit FM signal at this new frequency. Operation on Car Radio Manually change your car radio’s FM frequency to match the new DAB1002’s new transmit frequency. DAB1002 User Guide FAQ Please read this user manual carefully before using the DAB1002 In-Car DAB Adapter. If you still have difficulties to use this unit, this section gives some of the most likely solutions to the problems you might have. I cannot find any DAB stations. Ensure that DAB coverage exists in your area. Please visit www.worlddab.org or www.digitalradionow.com to check for DAB coverage. I can find DAB stations, but I cannot get any sound. Make sure that the car radio is not on mute; check the volume settings of the car radio. I forget the FM transmission frequency setting of DAB1002. Press the Wheel then SYNC to enter sync function, the screen will show the current FM Transmitting frequency. I cannot hear DAB program when I start up my car and turn on the car radio. Ensure the DAB1002 is not in the Auxiliary mode. While listening to a DAB station, I lost reception suddenly and hear static noise or a FM program. 1. Check if DAB1002 station information shows 《 POOR SIG 》or 《 UNAVAIL 》, if so, you may be leaving the signal coverage area. Also, the station may be unavailable temporarily as you drive into a tunnel. 2. If DAB1002 is in AFC mode, the FM transmitting frequency for DAB1002 and the car radio listening Frequency maybe out of sync. To reset them, do the following: Tune the car radio to FM frequency 87.6MHz. Press and hold PREVIOUS on the remote control to return the FM transmitting frequency to 87.6MHz. If DAB1002 is in AutoScan mode, the FM channel you selected for DAB mode may be occupied by an existing radio station. You need to change the frequency settings of FM Transmitter (refer to page 16). 19 DAB1002 User Guide Technical Specifications Digital Audio Services: DAB/DAB+. RF Frequency Range: DAB Band III (174 MHz ~ 240 MHz). RF Sensitivity for DAB Band III: -98dBm ~ -100dBm. FM Transmit Range: 87.6 MHz ~ 107.9 MHz. Mains Power: 11 V ~16V DC Input Connectors: DC power jack, 3.5mm stereo audio jack. Presets: 4 DAB station presets (for each DAB mode) and 4 FM transmit presets. Operating Temperature Range: -10℃ ~ +70℃. Storage Temperature Range: -40℃ ~ +85℃. DAB Antenna Connector: - Connector Type: SMB - Output Voltage: 12V Information On Waste Disposal This mark on a product and/or accompanying documents indicates that when it is to be disposed of, it must be treated as Waste Electrical & Electronic Equipment (WEEE). Any WEEE marked waste products must not be mixed with general household waste, but kept separate for the treatment, recovery and recycling of the materials used. For proper treatment, recovery and recycling; please take all WEEE marked waste to your Local Authority Civic waste site, where it will be accepted free of charge. If all consumers dispose of Waste Electrical & Electronic Equipment correctly, they will be helping to save valuable resources and preventing any potential negative effects upon human health and the environment, of any hazardous materials that the waste may contain. Note about Remote control battery: Risk of explosion if battery is replaced by an incorrect type. Dispose of used batteries according to the instructions. 20