1
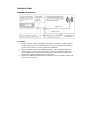
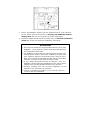
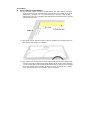
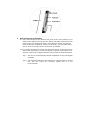
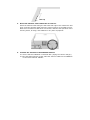
Vehicle DAB Adaptor User Guide DAB2000 User Guide TABLE OF CONTENTS INTRODUCTION CONTENTS OF PACKAGE INSTALLATION DAB2000 Installation Antenna Installation OVERVIEW OF CONTROLS AND CONNECTORS STARTING UP THE SYSTEM USING REMOTE CONTROL KEYS To turn on or off DAB2000 To listen to the DAB stations To display station’s information To set a DAB preset mode To save a DAB memory preset To recall a DAB memory preset To set the auxiliary input mode To recall the last listened DAB station To display the current FM transmitting frequency To set the FM transmitting frequency To save a desired FM transmitting frequency in memory To recall FM transmitting frequency saved in memory To perform an immediate frequency change MENU SETTINGS To reset FM transmitting frequency setting To set FM transmitting frequency setting to preset F1 To scan for the DAB stations To enable AFC (Automatic Frequency Change) To enable auto scan To set antenna power To reset DAB presets To restore to factory settings To display software version To upgrade software TROUBLESHOOTING TECHNICAL SPECIFICATIONS INFORMATION ON WASTE DISPOSAL INTRODUCTION The DAB2000 is a vehicle audio adaptor that offers a flexible and cost effective way to apply modern digital audio technology to your existing analogue vehicle audio system. The existing analogue system in your vehicle can be easily upgraded to receive DAB/DAB+ digital radio services. DAB2000 uses an FM-RDS micro-transmitter and no complex cabling to connect to your vehicle’s audio system. The DAB2000 receiver is operated using a remote control , while all messages related to the DAB2000’s operations, such as servi ce name, memory preset, etc., are converted to RDS text and displayed on the LCD screen of your vehicle audio system. The flexible configuration options of the DAB2000 make it easy to install in different vehicle makes and models. Furthermore, DAB2000 has an AFC (Automatic Frequency Change) function that allows you to listen to your favourite DAB programs through your vehicle radio system without the need to change the FM frequency manually when you drive into a metropolitan area where FM stations are highly concentrated. Without AFC, the manual frequency change can be hazardous and inconvenient, as the driver will have to find an unused FM frequency by manually retuning the vehicle radio, then changing the FM transmitter to use the same unused frequency, and repeat this process each time the FM transmi tter frequency is subjected to interference by another FM radio station. Consult your vehicle radio manual or contact the vehicle dealer to determine if your vehicle radio has an AF (alternative frequency) function, and how to enable the AF function before using the AFC function on the DAB2000. If your vehicle’s radio does not have the AF function, you can use the DAB2000’s ‘auto scan’ function to scan automatically for three unused FM frequencies; you will need to choose a frequency from the scanned frequencies to set and synchronize between the vehicle’s radio and the DAB2000 manually. Alternatively, you can use the DAB2000 to set a new FM transmitting frequency manually or to set a frequency from one of the FM transmitting frequency presets, which have been previously saved, and then set the vehicle’s radio FM frequency to match. Note: The DAB2000 needs to operate with an RDS vehicle radio to display the relevant system message from the DAB2000 via the vehicle radio display. CONTENTS OF PACKAGE DAB2000 Module Rotary Knob Remote Control Hook & Loop Tape x1 25mm x 35mm Power Cable with Vehicle Power Adaptor DAB Antenna with Mini Clip x3 CR2032 Battery Hook & Loop Tape x2 25mm x 55 mm Screw x2 User Guide INSTALLATION DAB2000 Installation Procedure: 1. Please read the entire installation instruction procedure carefully before commencing with the actual installation. Consult a professional installer if you have any issues or concerns with the installation. 2. 3. Select a location to place the DAB2000 module. For the best performance, please place it in the centre front of the vehicle or behind the vehi cle’s glove compartment. For any other locations you may consider, please place it away from metal objects and in an open area. Position the DAB2000 module with the bottom cover up and the cables and connectors to the back. 4. Secure the DAB2000 module with the supplied hook & loop tape and screws. Please refer to the section on Securing the DAB2000 module, Step by Step later in this user guide for further information. 5. Install the suppl ied DAB antenna; pl ease refer to Antenna Installation Guide later in this user guide for installation instructions. ATTENTION 1. We have fully tested the supplied DAB antenna to work with DAB2000. If you replace it with a third party DAB antenna, the performance may suffer. 2. For DAB2000 to work with the suppl ied active antenna, the antenna power must be set to ON. DAB2000 can also work with a passive antenna; t he antenna power must be set to OFF. If you replace the supplied antenna with any third party antenna, you must set the antenna power to OFF. 3. If you need to disconnect/connect the antenna from the DAB2000, please unplug the DAB2000 from the vehicle power adaptor first, to avoid possible damage to the antenna. 4. Damage resulting from the incorrect installation of the antenna is not covered by the warranty. 5. Consult a professional installer if you have any issues or concerns with the installation. 6. Minimize coiling loops of excessive power and antenna cables, and do not secure them on to the DAB2000 module. Please refer to the section on Installation do’s and don’ts later in this user guide. 7. Plug one end of the power cable into the D AB2000 module, and the cigarette-lighter plug end into the vehicles power point. There i s a lock mechanism on the pl ug of the power connection to the DAB2000 module. First, plug the power cable into the 12V DC jack (1), and then turn the power plug 90 degrees clockwise (2) as illustrated below. This will ensure that the power cable will be connected to the DAB2000 module at all times. 8. Start to use the D AB2000 with the remote control; please refer to the sections on OVERVIEW OF CONTROLS AND CONNECTORS and STARTING UP THE SYSTEM later in this user guide for further information. Antenna Installation ❷ ➌ ❶ ❷ ➌ ➍ ➎ ❶ Antenna 1 Antenna 2 Signal Booster Antenna Cable SMB Connector ➍ ➎ Caution: 1. 2. 3. 4. 5. 6. 7. Please read all of the installation instructions carefully before commencing the actual installation. This glass-mount DAB antenna is exclusively for use inside the vehicle. It is not suitable for use on reflective-coated glass. In situations like these, the DAB antenna needs to be placed on the rear view window. Do not bend or damage the antenna. The antenna should be fitted either on the passenger side of the front windscreen, or on the rear windscreen as a safety precaution. The DAB2000 provides a 12v phantom power supply to the SMB connector for the DAB antenna to operate. Warning: Once the antenna is adhered to the windscreen it cannot be relocated. Please test the antenna in the location you intend to fit it before removing the adhesive separator and permanently fixing it to the windscreen. Once the DAB antenna has been adhered to i ts location, then it cannot be returned for credit or warranty claims. Procedure: 1 Front windscreen installation 1.1 For the best digital reception performance, the glass-mount antenna must be placed in the top left hand corner and on the inside of the front windscreen. If there is a UV protection layer across the top of the windscreen then you must place the DAB antenna with Antenna 1 at least 5cm below this layer. 1.2 The glass-mount antenna must be placed outside the sweeping area of the windscreen wipers (see below). 1.3 The windscreen usually has a black enamel band around the edges that contains a border of dots and a black-shaded area. Please place Antenna 2 over at least part of the black-shaded area and not just over the dotted area only. Please al so position, as cl ose to, but not inside the A pillars cover (shown below) to get a better signal reception. 2 Rear windscreen installation 2.1 If the cable length for the antenna can reach to the rear windscreen, the glass-mount antenna can be placed in the top left hand corner and on the inside of the rear windscreen that is not reflective-coated. As with the front windscreen installation, attach the antenna 2 over the black band, and as close to the edge of the windscreen as possible. 2.2 For ‘heated’ windscreens (these have tiny electric lines across the glass to assist with defrosting); for the best digital reception performance, the antenna 1 must not be aligned with the electric lines as illustrated below: Fig 1: This is the recommended antenna installation for the best digital reception. Fig 2: This illustrates that the top of antenna 1 is aligned with an electric line; this will reduce the reception quality and it is not recommended. Fig 1 3 Fig 2 Clean the windscreen. Ensure the antenna location on the windscreen is clean and free of dirt, water, or any other substance, which will prevent the antenna from adhering properly to your vehicle’s windscreen. Clean the glass with an alcohol prep pad, and wait until the surface is completely dry before attaching the glass-mount DAB antenna. Note: Do not use a cleaner with surfactant to clean the windshield because Antennas 1 & 2 and the Signal Booster may not adhere to the glass. 4 Attach the glass-mount antenna to the windscreen. 4.1 As the glass-mount antenna can only be installed once, if the antenna is removed, it will not adhere again. Therefore, it is recommended that you try using the antenna on the chosen locati on first before attaching the antenna permanently. 4.2 Gently peel off the adhesive separator of Antenna 2, and paste it on the inside of the windscreen on the chosen location, press and rub to bond it to the glass. 4.3 Repeat step 4.2 for the Signal Booster and then Antenna 1. 4.4 Secure the antenna cable along the edge of the side windscreen. a. Use the three mini-clips supplied and attach them to the antenna cable just below the antenna. b. Gently peel off the clips’ adhesive separator. c. Fix the clips along with the antenna cable on the edge of the windscreen. Mini Clip 5 Route the antenna cable within the car interior. Route the antenna cable along the left hand side edge of the windscreen and then route the antenna cable within the vehicle interior to the DAB receiver. Make sure the antenna cable does not interfere with the safe operation of the steering wheel, air bags, and seatbelts or any other equipment. 6 Connect the antenna to the DAB2000 module. 6.1 Ensure that the DAB2000 is switched OFF (unplug the vehicle charger). 6.2 Plug the SMB connector at the end of the antenna cable into the DAB2000 in the socket marked ‘AERIAL’. DAB Antenna DAB Receiver NOTE: To achieve the best digital reception, antenna 1 must not be placed over a UV protection layer . There is no such restriction to antenna 2. Securing the DAB2000 module, Step by Step To secure the DAB2000 module in your chosen location using the supplied hook & loop tape and/or screws, please do the following: 1. Locate the positions on the back of DAB2000 module and your chosen store location (e.g. in the centre front of the vehicle or behind the vehicle’s glove compartment) where you want to apply the hook and loop tapes. 2. Clean both the surfaces on the DAB2000 module and your chosen l ocation, with alcohol if available and wipe dry before you start. Remove one side of the backing from the two pieces of hook and loop tape and adhere them onto the back of DAB2000 on the marked positions as per the diagram above. Remove the other side of the backing and adhere the DAB2000 module to the chosen location with the DAB2000’s cables and connectors to the back. Carefully, separate the two pieces of the hook and loop tape so that the DAB2000 module and the location each has a piece of the tape. Apply the pressure evenly to all four pieces on the DAB2000 module and the location, so that the tapes adhere to both surfaces securely. Wait eight hours for the adhesive to cure and bond to the surfaces, and then join the pieces together. Alternatively, or in addition, you can secure the DAB2000 module in place with the screws supplied. 3. 4. 5. 6. 7. 8. Installation do’s and don’ts As the DAB2000 module has an external antenna and FM Transmitter, it is important to avoid signal interference from coiling the excess cable. Below are the do’s and don’ts when coiling and storing the DAB2000’s excess antenna cable and power cable. 1. Do not entwine the antenna and power cables together. 2. Minimize coiling loops of excess power cable or antenna cable, and do not secure them on or beside the DAB2000 module. The coiling of excess power or antenna cables should start about 10cm away from the DAB2000 module. Not 10 cm Cable attached to DAB2000 10 cm 10 cm OVERVIEW OF CONTROLS AND CONNECTORS DAB2000 Module AERIAL - SMB Connector for DAB antenna AUX IN - 3.5mm stereo audio jack, for aux cable 12VDC - Power jack, for power cable with vehicle adaptor Vehicle Audio System LCD Display The DAB2000 is operated by using a remote control; the system messages from operating the remote control are converted into RDS text and are displayed as up to eight characters on the LCD screen of your vehicle’s audio system. Below is a list of DAB2000 system messages displayed on the vehicle’s audio system LCD display, whilst operating with the remote control: Messages DABRADIO station name TUNING RESETING DONE RETUNING Description Displays after the DAB2000 is switched on. Displays the 8-character short service name of the DAB station. Indicates that tuning to a DAB station is in progress. Indicates the DAB2000 is performing a DAB reset or a factory reset is in progress. Confirms completion for certain system operations, i.e., setting a DAB preset mode. Indicates that the FM transmitting frequency is being re-tuned to a new frequency. Indicates the DAB2000 is changing the FM transmitting TO frequency frequency to a new frequency from a manual setting. Other than the power button, any remote control buttons pressed are ignored before the change is completed. Indicates that the DA B2000 is changing the FM tr ansmitting AF frequency POWEROFF frequency to a new frequency using the AFC function. Other than the power button, any remote control buttons pressed are ignored before the change is completed. Displays when the DAB2000 is switched off (into the standby mode). Remote Control Please refer to next sections, USING REMOTE CONTROL KEYS, USING REMOTE CONTROL MENU KEY for a detailed description of each operation. Control key General operation Rotary Knob Press Switches the DAB2000 on. Confirms a selection. Change station information while listening to a DAB station. Press and hold to turn the DAB2000 off. Rotate Slowly [◄] [►] Step tune to select a DAB station. Navigate to items, sub items, and settings after MENU is pressed. Adjust FM transmitting frequency by 100 KHz after FM is pressed. Quick Rotation [◄] [►] Quickly tune to select another DAB station. Adjust the FM transmitting frequency by 2MHz after FM is pressed. MODE Select one of the three DAB preset modes to listen to DAB, or the Aux mode to listen to an external audio source. Press and hold to scan for DAB stations. Displays DAB2000’s current FM transmitting frequency. Select and set the FM transmitting frequency from a FM manual setting or from one of the four memory presets. In ‘auto scan’ mode, select and set the FM transmitting frequency from one of the three ‘auto scan’ frequencies. Press and hold FM to perform an immediate frequency change. Save or recall the 4 presets of DAB stations in a DAB preset Presets + & - mode. Save or recall the 4 presets of FM transmitting frequencies after FM is pressed. Recall the last listened to DAB station. Last Station Press and hold to reset the FM transmitting frequency to the frequency saved in FM preset 1. Within 30 seconds, press and hold to return the frequency to 87.6 MHz. Enter MENU settings, press and turn the Rotary Knob MENU [◄] or [►] to navigate to menu items and settings. 87.6MHz – Default FM transmitting frequency. FM MODE – select operating mode (AFC_H/AFC_L/ auto scan). FULLSCAN – A fu ll scan for DAB stations within the channel frequency 5A to 13F will be performed. ANTENNA – Set to ON for a certified active DAB antenna, set to OFF for all other antennas. DABRESET – Clear all DAB stations presets for the three DAB preset modes. FACTORY – Returns all settings to factory default settings. VERSION – Displays the current firmware version. STARTING UP THE SYSTEM 1. Turn on your vehicles audio system. 2. Enable the AF function on your vehicle radio if it is equipped with it (consult your vehicle radio manual or contact the vehicle dealer to determine if your vehicle radio has the AF feature, and how to enable AF feature). 3. Tune the vehicle radio’s FM frequency to FM 87.6 MHz, which is the same as the DAB2000’s default FM TX frequency. 4. Switch on the DAB2000 by plugging the vehicle charger into the vehicles power point, the audio system display will show 《 DABRADIO 》. 5. The DAB2000 will perform a scan for DAB stations automatically. 6. If FM 87. 6 MHz is already used by a FM broadcaster or the frequency is ‘noisy’, change the initial FM TX frequency as below: Operation on DAB2000 Press and hold the FM button for three seconds; the DAB2000 will select a new and clear frequency to transmit the FM signal. Operation on vehicle radio Use the ‘auto scan’ function of your vehicle’s radio to search for an FM broadcast displaying the service name 《 DABRADIO 》. Stay tuned to this frequency. Your DAB2000 and the vehi cle radio are now synchronized. 7. If your vehi cle’s radio does not have the AF feature, do the following to change DAB2000’s FMTX mode to ‘auto scan’ instead of the default AFC_H. 7.1 Press the MENU button and then turn the Rotary Knob [◄] [►] until the display shows 《 FM MODE 》. 7.2 Press the Rotary Knob to confirm, and then turn the Rotary Knob [◄] [►] until the screen displays 《 AUTOSCAN 》. 7.3 Press the Rotary Knob to confirm, the function of ‘auto scan’ is now enabled and the DAB2000 is operating in ‘auto scan’ mode. 8. Listen to the DAB stations. Please refer to the USING REMOTE CONTROL KEYS section for further information. 9. While you are using the ‘auto scan’ function and you experience noise on the DAB station you are listening to, please refer to the USING REMOTE CONTROL MENU KEY section, To enable auto scan to select an auto scanned FM frequency, or To set the FM transmitting frequency setting to manually switch to another FM frequency. 10. To avoid draining the vehicle’s battery unnecessarily when the DAB2000 is idle, after 4 hours from the user’s last action, the DAB2000 will automatically switch off. To switch the DAB2000 back on, press the Rotary Knob to return DAB2000 back to the operating mode. USING REMOTE CONTROL KEYS To switch DAB2000 On or Off The DAB2000 can be switched on or off by doing the following: 1. Press and hold the Rotary Knob, while the D AB2000 is operating, to switch it off. 2. Press the Rotary Knob, while the DAB2000 i s off, to return it to the operating mode. To listen to DAB stations There are two options available for you to select and listen to a DAB station: Quick Tune and Step Tune. Step Tune is used when you want to step through the list of available DAB stations one by one and in alphabetical order. Quick Tune allows you to move more quickly through the list of stations by advancing to the fi rst station in the previous/next alphabet character of the station list. Once you have reached the desired initial alphabet character, you can then use Step Tune to refine your selection of the desired DAB station. Step Tune 1. Turn the Rotary Knob [◄] [►] to step through the stations, one by one, until the screen shows the desired station: 《 station name 》. 2. Press the Rotary Knob to confirm your selection. After 3 seconds, the DAB2000 will tune to the station you selected if the rotary knob is not pressed. The screen will show 《 TUNING 》. Once tuning is complete, the screen will show 《 station name 》 where station name is the new DAB station name selected. Quick Tune 1. Turn the Rotary Knob [◄] [►] quickly to tune to the first DAB station in the previous/next letter of the alphabet. Repeat the action, until the screen shows the DAB station with the desired initial letter of the alphabet. 2. Then use the Step Tune feature to step through the DAB stations, one by one, until the screen shows the desired DAB station: 《 station name 》. 3. Press the Rotary Knob to confirm your selection. After 3 seconds, the DAB2000 will tune to the station you selected if the rotary knob is not pressed. The screen will show 《 TUNING 》. Once tuning is complete, the screen will show 《 station name 》 where station name is the new DAB station name selected. Note: When the DAB station you have selected is not available, the screen will show 《 UNAVAIL 》. There will be no audio output from the DAB2000. When the signal strength of the DAB station you have selected is too weak, the screen will show 《 POOR SIG 》. Each time you start the DAB2000, if the channel list is empty, it will perform a full scan for available DAB stations automatically. To display the DAB station’s information The DAB2000 provides certain information about the current DAB station you are listening to. This information can be displayed repeatedly by pressing the Rotary Knob button. 1. Each time you press the Rotary Knob whilst listening to a DAB station, the screen will cycle through the DAB station’s information below: 《 station name 》where station name is the name of the DAB station. 《 SIG xx% 》 where ‘xx’ is the signal quality. To set a DAB preset mode The DAB2000 provides individual memory settings for up to three sets of DAB preset modes: DAB1, DAB2, and DAB3. Each DAB preset mode has its own memory presets of DAB stations; please refer to To save a DAB memory preset and To recall a DAB memory preset sections later in this user guide for further information. This allows a user to set up to three DAB presets for different users (driver or passengers) or a different group of DAB stations to enjoy based on the individual settings. 1. Press the MODE button to select a particular DAB preset mode. 2. Press the Rotary Knob to confirm your selection. After 3 seconds, the system will tune to the selected preset mode. The screen will then show 《 DONE 》. Note: When you switch to a different DAB preset mode, the memory preset list of the selected DAB preset will be loaded into the internal operating system of the DAB2000 automatically. The DAB2000 will then perform all funct ions based on the settings of this DAB preset mode. The system default is DAB1. To save a DAB memory preset You can save your favourite stations in a memory preset list. There are 4 memory presets available for you to store DAB stations in the memory preset list for each DAB preset mode. 1. Select a DAB station to save in a memory preset. 2. Press the + or – buttons to select a preset PX (where X is from 1 to 4) that you want to save, and then press and hold the + or – buttons to save the current DAB station into memory preset X of the present DAB preset mode. The screen will show 《 PX SAVED 》. Note: This new setting will overwrite any previous setting in the memory preset X. To recall a DAB memory preset This function allows you to recall a favourite preset DAB station from the memory preset list. 1. Press the + or – buttons to select a preset PX (where X is from 1 to 4). 2. If there is no DAB station saved in the memory preset PX, the screen will show 《 PX EMPTY 》. If a DAB has been stored, the screen will show 《 * station name 》 where “station name” i s the name of the DAB station saved in the memory preset PX. 3. Press the Rotary Knob to confirm your selection. Alternatively, after 3 seconds, the system will tune to the preset station if a DAB station is stored. Note: This function only recalls the stations saved in the memory preset list of the parti cular DAB Preset Mode ( please refer to ‘To set a DAB preset mode’ section for further details). To set the auxiliary input mode The DAB2000 provides the capabi lity to play audio devices such as MP3 or iPod® etc. through your vehicle radio. 1. Press the MODE button until the screen displays 《 AUX 》. Press the Rotary Knob to confirm your selection. Alternatively, after 3 seconds, the DAB2000 will swi tch to the auxiliary input mode and you can start listening to the audio device. Note: You must connect your audio cable between the Aux-In jack of DAB2000 and the audio device. While in the auxiliary input mode, you must press the MODE button and select one of the DAB preset modes to return to listening to a DAB station. To recall the last listened to DAB station The DAB2000 automatically remembers the last DAB station that you were listening to. This allows you to go back to the DAB station you were listening to quickly; even if it is not in the memory preset list. 1. Press the Last Station button to recall the station that was most recently listened to. The screen wi ll show 《 LS EMPTY 》 if the last listened to station has not been memorized yet or 《 station name 》 if it has. 2. Press the Rotary Knob to confirm your selection. Alternatively, after 3 seconds, the DAB2000 will switch to the last listened to station automatically. To display the current FM transmitting frequency 1. Press the FM button, and the screen will show 《 Frequency 》 where Frequency is the current FM transmitting frequency. To set the FM transmitting frequency You can set DAB2000 to either AFC or auto scan mode (refer to sections, To enable AFC and To enable auto scan for further information) to change the FM transmitting frequency. However, if you wish to change the setting and use your own selected FM transmitting frequency manually, please follow the steps in this section or in the sections To save a desired FM transmitting frequency in memory, and To recall FM transmitting frequency saved in memory to change the FM transmitting frequency manually. 1. Press the FM button, the screen will show the current FM Transmitting Frequency《 Frequency 》. 2. Turning the Rotary Knob [◄] [►] quickly will allow you to st ep up or down the FM frequency by 2MHz, or just turn the Rotary Knob [◄] [►] to step up or down the FM frequency by 100KHz, until your desired FM frequency is displayed (e.g. 106.7MHz). Make a note of the frequency you have chosen. 3. Press the Rotary Knob to confirm your selection. Alternatively, after 10 seconds, the DAB2000 will set and transmit on the new FM frequency and the screen will show 《 TO Frequency 》. 4. Press the FM preset of your vehicle radio corresponding to the same frequency from step 2 above, if you have previously saved an FM frequency for DAB reception. Otherwise, tune the vehicle radio to the same FM frequency you selected on the DAB2000. 5. You can now listen to DAB stations via this new FM Frequency. Note: It is recommended to set the selected FM frequency you wish to use as one of the memory presets of your vehicle’s radio. Selecting this particular preset FM frequency, together with setting the DAB2000’s FM transmitting frequency, will enable you to start listening to DAB stations quickly. While setting a new transmitting frequency is in operation and 《 TO Frequency 》 is displayed, with the exception of the power button, any button pressed is ignored by the DAB2000. To save a desired FM transmitting frequency in memory As unused FM frequencies may vary from one area to another, it is recommended to save a few FM frequencies (up to a maximum of 4 frequencies) in the DAB2000 so that you can switch to a new FM transmitting frequency instantly when you drive into an area where the original FM frequency for DAB is no longer available. 1. Press the FM button, the screen will show the current FM transmitting frequency 《 Frequency 》. 2. Turn the Rotary Knob [◄] [►] to step up or down the FM frequency by 100KHz, and choose a frequency, the screen will show 《 Frequency 》 where Frequency is the chosen frequency. 3. Press the + or – buttons to select a preset memory FX where X is from 1 to 4, and then press and hold the + or – button to save the selected frequency to memory and it will show 《 FX SAVED 》. Note: The default FM frequencies saved in the FM presets F1 to F4 are 87.6MHz, 92.5MHz, 102.5MHz and 107.9MHz, respectively. It is recommended to use the same FM frequencies saved in the DAB2000 as FM presets in your vehicle’s radio where possible. Selecting the FM preset of your vehicle’s radio and the matching FM preset of the DAB2000 will switch the FM transmission frequency instantly for a clear reception of the DAB station. Saving the FM frequency into the memory of the DAB2000 does not affect the current FM transmitting frequency; it remains on the current FM frequency as before. To recall an FM transmitting frequency saved in memory You may drive into an area where the FM frequency transmitted by DAB2000 is used by an FM broadcaster. When this happens, your reception of the DAB station will get worse with increasing interference from the other FM transmission. Switching to a free FM frequency will ensure continuous and clear reception of the DAB station you are currently listening to. 1. Press the FM button, the screen will show the current FM transmitting frequency. 2. Press the + or – buttons to select a preset FX and the screen will show the FM frequency saved into memory. Make a note of that frequency number. 3. Press the Rotary Knob to confirm your selection. Alternatively, after 10 seconds timeout, the DAB2000 will set and transmit an FM signal at this new frequency and the screen will show 《 TO Frequency 》 where Frequency is the frequency saved in the preset FX. 4. Check that the FM preset of your vehicles radio corresponds to the same frequency from step 2 if you have previously saved one for DAB reception. Otherwise, tune the vehicle radio to the same FM frequency of the DAB2000. 5. You can now listen to DAB stations via the new FM Frequency. Note: While the DAB2000 is setting a new FM transmission frequency (《 TO Frequency 》 is displayed) with the exception of the power button, any button is pressed during this time is ignored. To perform an immediate frequency change This function can be used in either AFC or auto scan mode to force an FM transmission frequency change immediately. Note: You may also refer to To recall FM transmitting frequency saved in memory, To reset FM transmitting frequency setting, or To set FM transmitting frequency setting to preset F1 to perform an immediate frequency change. In AFC_H or AFC_L mode While listening to a DAB station, if you hear static noise or another FM broadcast and before AFC tunes to a clear frequency, you can force an immediate frequency change by doing the following: 1. Press and hold the FM button, the screen will show 《 AF Frequency 》 where Frequency is the new frequency that the DAB2000 will set and use to transmit an FM signal. This will force the radio to tune to the same FM frequency automatically. 2. You can now listen to DAB stations via this new FM Frequency. Note: While the DAB2000 is in the process of setting a new transmission frequency (《 AF Frequency 》 is displayed), with the exception of the power button, any button pressed during this time is ignored. In Auto Scan mode If you notice the DAB transmission is subject to interference, you can force an immediate FM frequency change. The DAB2000 will automatically choose and set a new FM frequency but you must tune the vehicle radio to match the DAB2000’s new FM frequency manually. Operating on DAB2000 1. Press and hold the FM button, the screen will display 《 TO Frequency 》 where Frequency is the new frequency that the DAB2000 will set and use to transmit an FM signal. Operating on vehicle radio 1. Manually change your vehicle radio’s FM frequency to match the new DAB2000 transmitting FM frequency. MENU SETTINGS To reset the FM transmitting frequency setting This function allows you to reset the FM transmitting frequency to the default setting of 87.6MHz. 1. 2. Reset DAB2000’s FM transmitting frequency by either way described below: a. Press the MENU button, and the screen will display 《 87.6MHz 》 and then press the Rotary Knob to reset the FM transmitting frequency to 87.6MHz b. Press and hold the Last Station button twice to reset the FM transmitting frequency to 87.6MHz Press the FM preset of your vehicles radio to the frequency 87.6MHz if you have previously saved this frequency for DAB reception. Otherwise, tune the vehicles radio to the FM frequency 87.6MHz manually. To set FM transmitting frequency setting to preset F1 This function allows you to set the FM transmitting frequency to the frequency saved in FM frequency pr eset 1 (F1). DAB2000 will change the transmitting frequency immediately. 1. Press and hold the Last Station button to set the FM transmitting frequency to the frequency saved in FM preset 1 (F1). 2. To return to the default FM transmitting frequency, within 30 seconds after step 1, press and hold the Last Station button again to return to 87.6 MHz. To scan for available DAB stations This function searches for all available DAB stations in Band III from channel frequency 5A to channel frequency 13F that are available in the area where your vehicle is presently located. DAB stations found as a result of the search are added to the station list in alphabetical order. 1. To select full scan, and start scanning for available DAB stations 1.1 Press the MENU button and then turn the Rotary Knob [◄] [►] until the screen shows: 《 FULLSCAN 》 then press the Rotary Knob to begin scanning for DAB stations in the channel range. 1.2 Alternatively, you can press and hold the MODE button to do a full scan of DAB stations. Note: Each time you start the DAB2000, if the station list is empty, it will perform a full scan of the DAB stations automatically. You may also need to perform a scan if you drive your vehicle to a new area where the broadcasting DAB stations are not on the current station list. During the scanning for DAB Stations, the screen will show 《 FFF N 》, in which FFF shows the current channel being scanned, and N indicates how many stations have been detected so far. While the scan operation is in process, you can press the Rotary Knob at any time to stop the scan function and revert to listening to the currently selected station. If the DAB station list is not empty before scanning then after completion of the D AB scan, the DAB2000 will revert to pl aying the last DAB station automatically. If the D AB station list is empty before scanning, the D AB2000 will tune to the first station of the new DAB station list resulting from this DAB scan. If the DAB s tation list is empty before scanning, and there is no station detected by the DAB scan, the screen will show 《 EMPTY 》. There are no DAB stations available in the area where you performed the DAB scan function. To enable AFC (Automatic Frequency Change) If your vehicle’s radio does not have the AF feature then please refer to the section To enable auto scan. It may become necessar y to change the FM transmitting frequency as you drive into an area where the FM frequency transmitted by the DAB2000 is being used by an FM broadcaster. DAB2000 has an AFC function that allows you to continuously listen to DAB programs through your vehicle’s radio system without the need to change the FM frequency manually. (Subject to vehicle radio compatibility) To perform this AFC function, your vehicle’s radio must have the AF (Alternative Frequency) feature and the AF feature of your vehicle radio must be activated. When the AFC function of DAB2000 is enabled and the AF feature of your vehicle radio is activated, your vehicle’s radio will tune to an unused FM frequency automati cally when you drive into an area where the original FM frequency for DAB is no longer available. You do not need to do To enable auto scan or To set the FM transmitting frequency setting in the sections below, to switch to an unused FM transmitting frequency. Furthermore, there are two AFC modes, AFC_H (High Sensitive) & A FC_L (Low Sensitive). While in AFC mode, DA B2000 will constantly detect and determine if a frequency change is necessary. Set AFC_L mode, if you experience the FM frequency is being changed too often, and set AFC_H mode, if you often hear static noise and the FM frequency is not changed. By default, the DAB2000 is set to use the AFC_H mode; however, if you want to change or return to AFC mode, do the following: Setting on DAB2000 1. Press the MENU button and then turn the Rotary Knob [◄] [►] until the screen shows 《 FM MODE 》. 2. Press the Rotary Knob to select, and then turn the Rotary Knob [◄] [►] until the screen shows 《 AFC_H 》 or 《 AFC_L 》. 3. Press the Rotary Knob to confirm your selection. The AFC function is now enabled and the DAB2000 is operating in the AFC mode. Setting on vehicle radio 1. Enable the Alternative Frequency feature of your vehicle’s radio (Consult your vehicle radio manual or the vehicle dealer if your vehicle radio has the AF feature, and how to enable the AF feature). Note: If your vehicle radio does not have the AF feature, the AFC function must not be enabled on the DAB2000, and refer to the section below To enable auto scan. If the A F feature of your vehicle’s radio and the DAB2000’s AFC function are not compatible, the AFC function must not be enabled; instead, refer to the section below To enable auto scan. The system default is AFC_H mode enabled. When your DAB2000 identifies a need to switch the FM transmission frequency this will usually force the ve hicle radio to change the FM frequency automatically in most cases and the vehicle’s radio display will show 《 AF Frequency 》 where Frequency is the new frequency DAB2000 is transmitting on. If you hear static noise or another FM program and before AFC tunes to a clear frequency you can force an immediate frequency change manually by the following methods: 1. Perform an immediate frequency change; refer to section on page 21, To perform an immediate frequency change. 2. To recall and change the FM transmitting frequency saved in memory; refer to the section on page 21, To recall FM transmitting frequency saved in memory. 3. To change the FM transmitting frequency manually; refer to the section on p age 20, To set the FM transmitting frequency setting. 4. To reset the FM transmitting frequency to 87.6MHz; refer to the section on page 23, To reset FM transmitting frequency setting. 5. To perform an immediate frequency change to the frequency saved in FM Preset 1 (F1); refer to the section on page 23, To set FM transmitting frequency setting to preset F1. While in AFC mode, if the FM transmitting frequency for DAB2000 and the vehicle’s radio frequency is out of sync and you wish to reset them, do the following: a) Reset to 87.6MHz Operating on vehicle radio Press the FM preset of your vehicles radio to the frequency 87.6MHz if you have previously saved this frequency for DAB reception. Otherwise, tune the vehicle’s radio to the FM frequency 87.6MHz manually. Operating on DAB2000 Press the MENU button and then press the Rotary Knob. This will reset the DAB2000’s FM transmitting frequency to 87.6MHz and the DAB2000 will use this new frequency to transmit the signal; or Press and hold the Last Station button twice in succession to reset the FM transmitting frequency to 87.6MHz. b) Reset to a frequency that has been saved in the FM frequ ency preset 1 Operating on vehicle radio Press the FM preset on your vehicle radio that corresponds to the same frequency as the DAB2000’s FM frequency preset 1, if you have previously saved this for DAB reception. Otherwise, tune the vehicle radio to that FM frequency manually. Operating on DAB2000 Press and hold the Last Station button to reset the FM transmitting frequency to FM frequency preset 1. ATTENTION The DAB2000 comes with the AFC function. In order to use this function, your vehicle radio must have the AF (alternative frequency) feature, and AF must be enabled. Please consult your vehicle radio manual or the vehicle dealer for these requirements before using this function. While working with the AFC function, there are possible factors that could affect its normal operation: 1. The FM sensitivity varies among vehicle radios and the sensitivity can affect the AFC’s performance. 2. The algorithm implemented in each vehi cle radio’s AF feature varies and this can affect the radio’s FM frequency tuning when triggered by AFC. If the AFC function is unable to function normally, please disable AFC and use the ‘Auto Scan’ mode instead. Refer to the next section To enable auto scan. To enable auto scan If your vehicle radio does not have the AF feature, you must not enable AFC. However, you can use ‘auto scan’ to automatically search for unused FM frequencies for transmitting. When this function is activated, the DAB2000 will keep searching for available FM frequencies, and display these frequencies whenever you need them. You may select one of them as the new transmitting frequency and tune your vehicle radio to this new FM frequency to receive DAB services continuously. 1. Press the MENU button and then rotate the Rotary Knob [◄] [►] until the screen shows 《 FM MODE 》. 2. Press the Rotary Knob to confirm, and then rotate the Rotary Knob [◄] [►] until the screen displays 《 AUTOSCAN 》. 3. Press the Rotary Knob to confirm, the function of ‘auto scan’ is now enabled and the DAB2000 is operating in the ‘auto scan’ mode. Note: Switching to the ‘auto sca n’ mode do es not change the current FM transmitting frequency, as it remains the same as before the switch. While in the ‘auto scan’ mode, the DAB2000 will automatically search for three unused FM frequencies and save them into the memory in sequence (from frequency 1 to frequency 3). When you are using the DAB2000 to listen to a DAB service and you experience constant interference from another source, this means that you are driving into an area where the present FM frequency is used by an FM broadcaster. When this happens, you will need to find an unused FM frequency for transmitting the DAB service to your car radio. The enabled ‘auto scan’ feature can help you to do such a change quickly by doing the following steps: Operating on DAB2000 1. Press the FM button and the screen will show the current FM transmitting frequency. 2. Keep pressing the FM button and it will go through the options from frequency 1 to frequency 3,and the display will show 《 SX Frequency 》 where X ranges from 1 to 3 and Frequency is the auto scanned frequency. Select the frequency you prefer and this will be the new FM frequency for transmitting. 3. Press the Rotary Knob to confirm your selection. Alternatively, after 10 seconds, the FM transmitter will set and transmit the FM signal at the new frequency. You can now listen to DAB stations via this new FM frequency. Operating on vehicle radio 1. Manually change your vehicle radio’s FM frequency to match the new DAB2000 transmitting frequency. Note: Alternatively, you can choose to recall an FM preset to change frequency if the preset frequency i s unused and available. Please refer to section on To recall FM transmitting frequency saved in memory. To set antenna power For the DAB2000 to work with the supplied active antenna, the antenna power must be set to ON. The DAB2000 can also work with a passive antenna; the antenna power must be set to OFF in these circumstances. If you replace the supplied antenna with any third party antenna, you must set the antenna power to OFF. 1. Press the MENU button and then turn the Rotary Knob [◄] [►] until the screen shows 《 ANTENNA 》. 2. Press the Rotary Knob to confirm and enter the antenna power selection operation. 3. Then you can turn the Rotary Knob [◄] [►] until the screen displays 《 ANT ON 》to set the antenna power On. 4. Or you can turn the Rotary Knob [◄] [►] until the screen shows 《 ANT OFF 》to set the antenna power Off. 5. Finally, press the Rotary Knob to confirm the antenna power setting. Note: The default antenna power setting is ON. To reset DAB presets 1. Press the MENU button and then turn the Rotary Knob [◄] [►] until the screen displays 《 DABRESET 》. 2. Press the Rotary Knob to perform a reset operation for DAB presets. 3. If you do want to reset the DAB2000, turn the Rotary Knob [◄] [►] to find《 YES 》and then press the Rotary Knob for confirmation. Otherwise, you can press Rotary Knob to cancel while the screen is showing 《 NO 》. 3.1 The screen will show 《 RESETING 》to indicate that DAB reset is in progress. 3.2 The DAB2000 will perform a scan of available DAB stations automatically after the DAB reset is completed. Note: DAB reset will erase all previous DAB settings, including all memory presets, for all DAB presets of the system, except the current FM transmitting frequency and all FM transmitting frequency presets. To restore to factory settings 1. Press the MENU button and then turn the Rotary Knob [◄] [►] until the screen shows 《 FACTORY 》. 2. Press the Rotary Knob to perform a factory reset operation. 3. If you want to reset the DAB2000, turn the Rotary Knob [◄] [►] to find 《 YES 》 and then press the Rotary Knob for confirmation. Otherwise, you can press the Rotary Knob to cancel while the screen is showing 《 NO 》. 3.1 The screen will show 《 RESETING 》to indicate that factory reset is in progress. 3.2 The system will perform a scan of available DAB stations automatically after the factory reset is complete. You must switch the vehicle radio to FM 87.6MHz to continue DAB listening. Note: Factory reset will erase all previous system settings and set them to default. To display software version This function allows you to display the current software version of your DAB2000. 1. Press the MENU button and then turn the Rotary Knob [◄] [►] until the screen displays 《 VERSION 》. 2. Press the Rotary Knob to display the software version, the screen will show the current software version number 《 x.x.x.x 》. To upgrade software This function is used by maintenance personnel only, to upgrade the existing DAB2000 software to a new version. TROUBLESHOOTING Please read this user manual carefully before using the DAB2000 vehicle DAB adaptor. If you still have difficulties in using this unit, this section gives some of the most likely solutions to the problems you might have. I cannot find any DAB stations. Ensure that DAB coverage exists in your area. Please visit www.worlddab.org or www.digitalradionow.com to check DAB coverage for your area. I can find DAB stations, but I cannot get any sound. Make sure that the vehicle radio is not muted; check the volume settings of the vehicle radio. I have forgotten the FM transmission frequency setting of DAB2000. Press the FM button and the screen will show the current FM Transmitting frequency. I cannot hear any DAB program when I start my vehicle and turn on the vehicle radio. Check the following: 1. Follow the instruction in the section STARTING UP THE SYSTEM to initialize the FM transmitting frequency on DAB2000 and the vehicle radio. 2. Make sure DAB2000 is not in the auxiliary mode, please refer to section To set the auxiliary input mode to check and return to DAB mode. While listening to a DAB station, I have lost reception and only hear static noise or another FM program 1. Check if the DAB2000 station information shows 《 POOR SIG 》 or 《 UNAVAIL 》, if so, you may be leaving the signal coverage area, please refer to the section To listen to the DAB stations and to select another station. In addition, the station may be temporarily unavailable as you drive into a tunnel, for example. 2. If DAB2000 is in AFC mode, the FM transmitting frequency for DAB2000 and the vehi cle radio listening frequency may be out of sync. To reset them, do the following: a) Reset to 87.6MHz Operating on vehicle radio Ensure that the FM preset of your vehicle radio is set to the frequency 87.6MHz if you have previously saved for it DAB reception. Otherwise, tune the vehicle radio to FM frequency 87.6MHz manually. Operating on DAB2000 Press the MENU button, and the screen will show 《 87.6MHZ 》 and then press the Rotary Knob to reset the FM transmitting frequency to 87.6MHz; or Press the Last Station button twice to reset the FM transmitting frequency to 87.6MHz. b) Reset to a frequency that has been saved in the FM frequency preset 1 Operating on vehicle radio Ensure that the FM preset of your vehicle radio corresponds to the same frequency as in DAB2000’s FM frequency preset 1, if you have previously saved it for DAB recepti on. Otherwise, tune the vehicle radio to that FM frequency manually. Operating on DAB2000 3. Press and hold the Last Station button to reset the FM transmitting frequency to FM frequency preset 1. If DAB2000 is in ‘auto scan’ mode, the FM channel you selected for DAB mode may be occupied by an existing radio station. You need to change the frequency settings of the FM transmitter. Please refer to the section To enable auto scan to set a suitable new FM frequency. TECHNICAL SPECIFICATIONS Digital Audio Services: DAB/DAB+. RF Frequency Range: DAB Band III (174 MHz ~ 240 MHz). RF Sensitivity for DAB Band III: -98dBm ~ -100dBm. FM Transmit Range: 87.5 MHz ~ 108.0 MHz. Mains Power: 11 V ~16V DC Input Connectors: DC power jack, 3.5mm stereo audio jack. Presets: 4 D AB station presets (for each D AB mode) and 4 FM transmi t presets. Operating Temperature Range: -10℃ ~ +70℃. Storage Temperature Range: -40℃ ~ +85℃. DAB Antenna Connector: - Connector Type: SMB - Output Voltage: 12V INFORMATION ON WASTE DISPOSAL This mark on a product and/or accompanying documents indicates that when it is to be disposed of, it must be treated as Waste Electrical & Electronic Equipment (WEEE). Any WEEE marked waste products must not be mixed with general household waste, but kept separate for the treat ment, recovery and recycling of the materials used. For proper treatment, recovery and recycling; please take all WEEE marked waste to your Local Authority Civic waste site, where it will be accepted free of charge. If all consumers dispose of Waste Electrical & Electronic Equipment correctly, they will be helping to save valuable resources and preventing any potential negative effects upon human health and the environment, of any hazardous materials that the waste may contain. Note about remote control battery : Caution: There is a risk of explosion if the battery is replaced by an incorrect type. Dispose of used batteries according to the instructions. SERVICE UNDER WARRANTY The DAB2000 comes with a standard 12-month manufacturer’s return to base warranty. If, for some reason your unit requires service under warranty return the DAB2000 by special delivery and in suitable packaging to: The Returns Dept., Performance Products Limited, Cleaver House, Sarus Court, Stuart Road, Manor Park, Runcorn WA7 1UL. Tel: 0333 240 1000 Fax: 0333 240 1100 Enclose the following information: (a) Your name, address and a full description of the problem. (b) A telephone number where you can be reached during business hours. (c) Serial number of your unit. (d) Proof of Purchase PLEASE NOTE: We cannot process any warranty claims unless proof of purchase is provided. Please retain your receipt as a precaution. Full terms and conditions of warranty are available on request.