1
If you have not already read the “So You're Purchasing a VMS Display”
document, please read that document before continuing. The “So You're
Purchasing a VMS Display” document details how to download and install the
various software packages, contains instructions on setting up your
directSMS account, and more. If you do not have a copy of that document,
please contact Data Signs. This document describes how to setup your VMS
display for the first time.
Pre-requisite Items
At this point, you will have obtained the following items:
• SIM card(s).
• Registration plates; if not already attached to your VMS display trailer.
• Two locks (optional) to lock the tires into place.
The “So You're Purchasing a VMS Display” document provides more
information about these items.
Within one of the battery boxes on your VMS display trailer, you will find the
following items:
• A set of keys, in the plastic bag.
• Security bit used to undo security screws on Sign head, also in the
plastic bag .
• Weigh Certificate (if applicable).
• Manuals including the VMS Designer User Manual, this Quick Start
Guide, and SMS Cheat Sheet pack, etc.
• Small bag of fuses (if applicable).
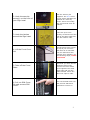
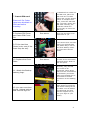
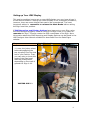
VMS Display Once-Only Setup
When your VMS display arrives, you will need to open the Sign head to
enable various features of the Sign. Unfortunately, you can’t immediately
switch the Sign on and begin updating it with new messages; some steps
must be taken to setup the Sign. This process is detailed below, along with
photos to guide you through. This will only need to be done once per Sign.
Step
1. Remove the
protective-wrap that
may have been applied
to the Sign head.
Photo Illustration
Description
If you use a Stanley knife,
make sure you do not
damage the head while
removing the bubblewrap.
2