1
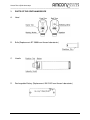
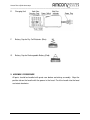
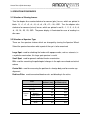
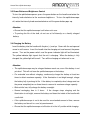
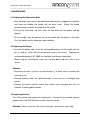
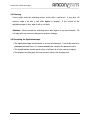
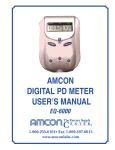
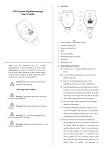
DIRECT OPHTHALMOSCOPE
USER’S MANUAL
EQ-6750
1-800-255-6161• Fax 1-800-397-0013
www.amconlabs.com
CONTENTS
Disclaimer and Safety Warnings.............................................................................. 2
1. Parts of the Ophthalmoscope............................................................................. 3
2. Assembly Procedure ........................................................................................... 4
3. Operation Procedures ......................................................................................... 5
3.1 Selection of Viewing Lenses.................................................................................. 5
3.2 Selection of Aperture Type .................................................................................... 5
3.3 Power Button and Brightness Control ................................................................... 6
3.4 Charging the Battery.............................................................................................. 6
4. Maintenance ......................................................................................................... 7
4.1 Replacing the Illumination Bulb ............................................................................. 7
4.2 Replacing the Battery ............................................................................................ 7
4.3 Replacing the Fuse ............................................................................................... 7
4.4 Cleaning ................................................................................................................ 8
4.5 Protecting the Ophthalmoscope ............................................................................ 8
5. Trouble Shooting Guide ...................................................................................... 9
6. Transportation and Storage................................................................................ 9
7. Specifications .................................................................................................... 10
Amcon Direct Ophthalmoscope
_____________________________________________________________ ______________________
DISCLAIMER
Amcon: The Eyecare Supply Center makes no representations or warranties, either
expressed or implied, with respect to the contents hereof and specifically disclaims any
warranties, merchantability or fitness for any particular purpose. Further, Amcon: The
Eyecare Supply Center reserves the right to revise this publication and to make
changes from time to time in the contents hereof without obligation of this company to
notify any person of such revision or changes.
NOTE: Neither Manufacturer nor distributor assumes any responsibility or liability for
any damages caused by negligence or ignorance of precautions in this manual.
GENERAL SAFETY REQUIREMENTS
Follow the proceeding Warnings to avoid injury and damage to the ophthalmoscope.
WARNINGS:
1. Do not use this instrument around heat or open flame. Keep away from dust and
moisture.
2. Use only the fuse specified in this manual.
3. Use only the power cable supplied with this instrument.
4. Turn off the main power before changing the fuse and bulb.
5. Turn off the power when not in use.
6. In case of trouble with this instrument, first consult the trouble shooting guide. If
the instrument is still not working properly, contact Amcon Laboratories or a
professional instrument repair company.
2
Amcon Direct Ophthalmoscope
_____________________________________________________________ ______________________
1.
PARTS OF THE OPHTHALMOSCOPE
A.
Head
B.
Bulb (Replacement: BT-3000 from Amcon Laboratories)
C.
Handle
D.
Rechargeable Battery (Replacement: BA-224G from Amcon Laboratories)
3
Amcon Direct Ophthalmoscope
_____________________________________________________________ ______________________
E.
Charging Unit
F.
Battery Cap for Dry Cell Batteries (Blue)
G.
Battery Cap for Rechargeable Battery (Red)
2. ASSEMBLY PROCEDURE
All parts should be handled with great care before and during assembly. Align the
position tab on the handle with the groove in the head. Push the handle into the head
and rotate clockwise.
4
Amcon Direct Ophthalmoscope
_____________________________________________________________ ______________________
3. OPERATION PROCEDURES
3.1 Selection of Viewing Lenses
Turn the diopter disc counterclockwise for convex (plus) lenses, which are printed in
black: 0, +1, +2, +3, +4, +5, +6, +8, +10, +12, +16, +20D. Turn the diopters disc
clockwise for concave (minus) lenses, which are printed in red: 0, -1, -2, -3, -4, -5, -6,
-8, -10, -16, -20, -25, -35D. The power display is illuminated for ease of reading in a
dim room.
3.2 Selection of Aperture Type
There are five aperture choices which are changed by turning the Aperture Wheel.
Select the aperture based on what aspect of the eye is to be examined.
Large Spot: used for checking the fundus with opaque media, such as cataracts; in
a mydriatic examination, this large spot aperture is useful
Small Spot: used for general undilated fundus examination
Slit: used for examining the pathological changes in the optic nerve head and retinal
edema
Central Net: used for measuring the position of a foreign body and to examine eye
alignment
Red-free Filter: used to examine blood vessels and bleeding in the retina
Filter
Large Spot
Small Spot
Image Diameter
on Fundus (mm)
2
3.2
1
1.6
1.6
2.56
0.2
0.32
0.4
0.64
1.6
2.56
Length
2
3.2
Width
0.2
0.32
Red Free
Between
Notches
Central
Inner Circle
Net
Outer Circle
Slit
Aperture
Diameter (mm)
5
Amcon Direct Ophthalmoscope
_____________________________________________________________ ______________________
3.3 Power Button and Brightness Control
To turn the ophthalmoscope on, press the green button on the handle and rotate the
intensity knob clockwise to the maximum brightness. To turn the ophthalmoscope
off, rotate the intensity knob counterclockwise until the green button pops up.
Attention:
• Ensure that the ophthalmoscope is off when not in use.
• To prolong the life of the bulb, do not use at full intensity on a freshly charged
battery.
3.4 Charging the Battery
Insert the battery into the handle with the plus (+) end up. Cover with the red cap and
screw in until secure. Insert the handle into the charging unit and connect the power
source. Turn on the power switch, and the green indicator light will be illuminated.
The yellow indicator light signals that the unit is charging. When the battery is fully
charged, the yellow light will turn off. Turn off the charging unit when not in use.
Attention:
• The ophthalmoscope may be charged between each use, even if the battery is not
yet dead. This will not harm the ophthalmoscope or the battery.
• For extended use without charging, continuously charge the battery at least two
times to obtain maximum capacity. If the illumination is not bright enough, charge
the battery fully to prolong its life. If the battery is completely dead, charge and use
the power completely two or three times to recover its maximum charge capacity.
• Before initial use, fully charge the battery overnight.
• Normal recharging time is 3 hours.
If the charger stops charging and the
illumination is not bright, remove the battery and clean the inside of the handle with
a soft cloth.
• If the ophthalmoscope is not to be used for an extended amount of time, remove
the battery and store it in a cool, dry environment.
• Ensure that the ophthalmoscope on/off button is in the ‘off’ position while charging.
6
Amcon Direct Ophthalmoscope
_____________________________________________________________ ______________________
4. MAINTENANCE
4.1 Replacing the Illumination Bulb
• After the bulb is cool, remove the ophthalmoscope head by snapping the head with
one hand and holding the handle with the other hand.
Rotate the handle
counterclockwise and pull the head off of the handle.
• Pull out the used bulb, and then insert the new bulb with the groove and pin
aligned.
• To reassemble, align the position tab on the handle with the groove in the head.
Push the handle into the head and rotate clockwise.
4.2 Replacing the Battery
• Unscrew the battery cap. Insert the rechargeable battery into the handle with the
plus (+) end up. Cover with the red cap and screw in until secure. Replacement
rechargeable batteries (BT-3000) are available from Amcon Laboratories.
• When using dry cell batteries, cover with the blue batter cap and screw in until
secure.
Attention:
• Ensure that the plus (+) pole is up and the minus (-) is down, and is in contact with
the battery cap.
• Remove batteries when the ophthalmoscope is not used for a prolonged time
period.
• Remove the plastic isolation sleeve from handle when changing from dry cell
batteries to rechargeable batteries.
4.3 Replacing the Fuse
Turn off the power and unplug the charging unit. Unscrew the fuse holder cap and
replace with a new 250V 63mA fuse, then screw the cap on.
Attention: Please select the fuse of the same types, specification, and rating.
7
Amcon Direct Ophthalmoscope
_____________________________________________________________ ______________________
4.4 Cleaning
If dust settles onto the reflecting mirrors, brush with a soft brush. If any dust still
remains, wipe it off with a soft cloth dipped in alcohol.
If the surface of the
ophthalmoscope is dirty, wipe it with a soft cloth.
Attention: Never scratch the reflecting mirror with fingers or any hard material. Do
not wipe with any corrosive detergent to prevent damage.
4.5 Protecting the Ophthalmoscope
• The ophthalmoscope should remain in a clean environment. If not to be used for a
prolonged period of time, it is recommended to be stored in the protective case.
• The handle bottom should remain clean at all times to ensure normal charging.
• Do not place anything over the heat exhaust hole on the charging unit.
8
Amcon Direct Ophthalmoscope
_____________________________________________________________ ______________________
5. TROUBLE SHOOTING GUIDE
In case of trouble with the performance of the ophthalmoscope, please refer to this
guide. If the problem is not corrected, please contact Amcon Laboratories or an
ophthalmic instrument repairperson.
Problem
No Illumination.
Illumination is too dim.
Green indication light on
but charging unit is not
on.
Fuse is blown.
Possible Cause
Button is not pressed or
not rotated.
Solution
Press the button and
rotate clockwise.
Bulb is burnt out.
Replace the bulb.
Battery is not fully
charged.
Bulb is almost
burnt out.
Switch of charging unit is
turned off.
Charge or replace
batteries.
Turn charging unit switch
on.
Fuse is blown.
Replace the fuse.
Using fuse of incorrect
specification.
Replace with the correct
fuse.
Replace the bulb.
6. TRANSPORTATION AND STORAGE
• The ophthalmoscope has been carefully assembled and adjusted to meet certain
quality standards. Do not disassemble the ophthalmoscope.
• During transportation, protect the ophthalmoscope from moisture and vibration.
• Store in a well ventilated room without corrosive gas, with a relative humidity of
10% to 80% at a temperature of -40°C to 50°C.
9
Amcon Direct Ophthalmoscope
_____________________________________________________________ ______________________
7. SPECIFICATIONS
Illumination:
3.5V, 2.8W Mini Halogen Bulb, BT-3000 from Amcon Laboratories
Recharging unit:
Input Voltage: 220V ± 10%V
Input Frequency:
50 Hz ± 1Hz
Input Power:
8VA
Battery:
Rechargeable BT224G from Amcon Laboratories
Viewing Lenses:
0, ±1, ±2, ±3, ±4, ±5, ±6, ±8, ±10, ±12, ±16, ±20, -25, -35
Apertures:
Large Spot, Small Spot, Slit, Central Net, and Red-free
New Weight:
118g (excluding battery)
Total Weight:
340g
Dimensions:
42mm x 32mm x 210mm
This instrument complies with Medical Electrical Equipment Part I General Safety
Standard. Class Two, Type B.
10