1
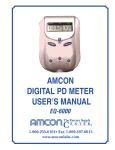
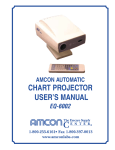
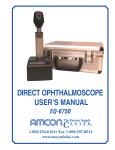
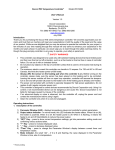
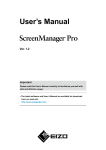
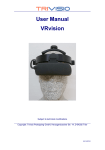
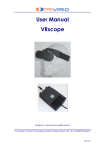
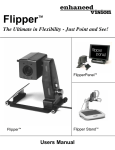
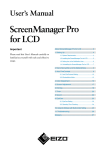
BINOCULAR
INDIRECT OPHTHALMOSCOPE
USER’S MANUAL
EQ-6760
1-800-255-6161• Fax 1-800-397-0013
www.amconlabs.com
CONTENTS
Disclaimer and General Safety Requirements .......................................2
1. Nomenclature ......................................................................................3
2. Assembly .............................................................................................3
3. Using the Binocular Indirect Ophthalmoscope ................................5
4. Maintenance ........................................................................................6
5. Storage.................................................................................................6
6. Troubleshooting Guide.......................................................................7
7. Specifications......................................................................................8
Amcon Binocular Indirect Ophthalmoscope
_____________________________________________________________________________
DISCLAIMER
Amcon: The Eyecare Supply Center makes no representations or warranties,
either expressed or implied, with respect to the contents hereof and specifically
disclaims any warranties, merchantability or fitness for any particular purpose.
Further, Amcon: The Eyecare Supply Center reserves the right to revise this
publication and to make changes from time to time in the contents hereof without
obligation of this company to notify any person of such revision or changes.
NOTE: Neither Manufacturer nor distributor assumes any responsibility or liability
for any damages caused by negligence or ignorance of precautions in this
manual.
GENERAL SAFETY REQUIREMENTS
Please read the following warnings carefully to avoid injury as well as to not
damage the instrument.
WARNINGS
1. Do not use the instrument under flammable, explosive, or dusty
environments. Keep it clean and dry. Avoid high temperatures.
2. Confirm that the power cord is plugged in before using.
3. Be sure to turn off the instrument power before replacing the bulb.
4. Use the dimmest illumination possible and always switch off the power
supply after use.
5. Do not unplug by pulling on the electrical cord. Always pull on the plug to
remove.
6. Do not touch the lens surface with any object, including fingers or sharp
objects.
7. In case of trouble with the instrument, first read the troubleshooting guide.
If this does not solve the problem, contact an authorized ophthalmic
equipment service repairperson.
2
Amcon Binocular Indirect Ophthalmoscope
_____________________________________________________________________________
1. NOMENCLATURE
Figure 1
2. ASSEMBLY
All parts should be removed from packaging with great care in order to avoid
damaging the instrument.
Number
1
Part Name
Ophthalmoscope Head Unit
Quantity Included
1
2
Power Transformer
1
3
Scleral Depressor
2 (1 large, 1 small)
4
Spare Bulb BT-6765
2
5
Teaching Mirror
1
6
Plano Lens
2
7
Lens Cleaning Cloth
1
8
Accessories Box
1
3
Amcon Binocular Indirect Ophthalmoscope
_____________________________________________________________________________
2
3
4
5
1
8
7
6
Figure 2
Align the groove on the electric plug of the optical unit with the tab on the socket
of the dimmer then insert the plug in the socket. To prolong the life of the bulb,
turn the light control knob on the dimmer to position “O” and then insert the plug
of the transformer into the power socket.
Before using, remove the dustproof cover from the illumination window. Insert
the transformer plug in the net power socket and turn the light control know on
the dimmer. If the green light is on, the power is on. Turn the knob until light
projects from the illumination window. To choose various filters, move the filter
switch on the front of the head piece.
4
Amcon Binocular Indirect Ophthalmoscope
_____________________________________________________________________________
3. USING THE BINOCULAR INDIRECT OPHTHALMOSCOPE
Adjusting the Head Set
Place the head set on the head and turn the circumference knob and height knob
to make the instrument comfortable and secure on the head. Unscrew two side
knobs of the head set to change the position of the optical unit. Place the oculars
close to the eyes and then tighten the side knobs. Turn the power on and
observe a spot of light about 30 to 40 cm of focus. Turn the illumination control
knob so that the light spot appears centered vertically in the view.
Replacing the Ocular Lenses
The instrument is supplied with +2.00D ocular lenses in place. According to the
user’s need, plano lenses (which are included in the accessory box) can be
inserted by unscrewing the clamping ring of the ocular and removing the +2.00D
lenses. Then insert the plano lenses and screw the clamping ring into place.
Adjusting the Pupillary Distance of the Oculars
Observe the light spot alternately with the right then the left eye. Adjust the PD
knobs so that the light spot is seen in the center with each of the right eye and
the left eye. The stereoscopic view should be centered also. Take the
instrument off of the head and check whether the PD knobs are set at equal
distances. If they are not at equal distances, move each to an equal distance
from the other, being sure to keep the total binocular PD the same.
Using the Instrument
Choose the diaphragm size according to the size of the patient’s pupil. Select
the appropriate filter for the task. Using a +20D lens (or similar) in front of the
patient’s eye, observe the fundus. Adjust the illumination for the specific patient.
After use, turn the light control knob counterclockwise to the position “O” until the
green light is off, indicating that the power supply is off.
Installing the Teaching Mirror
The teaching mirror is installed in the front of the viewing window on the optical
unit. Hold both sides of the base of the teaching mirror and insert it with the
dovetail aligned with the slot on the bottom of the optical unit.
Figure 3
5
Amcon Binocular Indirect Ophthalmoscope
_____________________________________________________________________________
4. MAINTENANCE
Replacing the Bulb (BT-6765)
Turn off the power supply before removing the old bulb. After the bulb has
cooled, unscrew and pull open the back cover and take out the used bulb. Clean
the new bulb with a soft cloth. Insert the new bulb aligning the position pin to the
slot inside the lamp housing. Close the back cover and fasten the screw.
Cleaning the Instrument
The lens and viewfinder can be wiped with a lens cleaning cloth and AR Kleen
liquid. The headset can be cleaned using soap and water, wiping with a soft
cloth. Do not touch the lens with fingers or sharp objects.
Protecting the Instrument
This instrument has been calibrated before leaving the factory. Do not
disassemble the instrument. The instrument should be used in a clean
environment.
5. STORAGE
Periods of Nonuse
If it is not to be used for a long period of time, store it in the provided protective
case to protect from dust.
Transporting the Instrument
This instrument should be stored in a well ventilated room where the relative
humidity is between 10-80%. The temperature should be from -40° to 50°C.
6
Amcon Binocular Indirect Ophthalmoscope
_____________________________________________________________________________
6. TROUBLESHOOTING GUIDE
Problem
Bulb will not
turn on
Possible Cause
Transformer and net
socket are not
connected tightly
Light control knob is
in the "O" position
Connection between the
socket and plug is loose
Back cover of the bulb
is not in position
Solution
Page
Fasten the transformer
4
Turn the knob clockwise
4
Fasten the plug
4
Close the back cover
and fasten screw
6
Bulb is damaged
Replace the bulb
6
Light control knob
isn'
t in position
Turn the knob clockwise
4
Illumination
is too dim
Bulb is old
Replace the bulb
6
Incorrect filter selection
Change the filter selection
4
Clean the lens
6
Spot light is
not complete
Lens or viewfinder
has been stained
Diaphragm or filter
is not in position
Turn to the position
4
7
Amcon Binocular Indirect Ophthalmoscope
_____________________________________________________________________________
7. SPECIFICATIONS
Working Distance:
50.5mm (from the user’s cornea to aspheric lens)
Pupillary Distance:
Adjustable from 52-74mm
Illumination Intensity:
Continuously adjustable up to 500 Lx
Head Band Size:
530-630mm circumference, 85-125mm depth
Light Spots:
Large, Medium, Small
Filters:
Clear, Red-free, Cobalt Blue
Teaching Mirror:
Coated mirror with viewing through both sides
Input Voltage:
220V ± 10%V
Input Frequency:
50Hz ± 1Hz
Input Power:
20VA
Illumination Power Supply:
6V/10W Halogen Bulb, BT-6765 from Amcon
Dimensions:
142 x 48 x 128mm
Weight:
230g
8