1
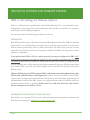
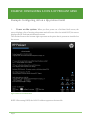
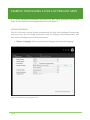
ECO4CLOUD USER MANUAL ADDENDUM - POWER MANAGEMENT With: VMware VSphere 4.x VMware VSphere 5.x This document supports the version of each product listed and supports all subsequent versions until the document is replaced by a new edition. To check for more recent editions of this document, see http://www.eco4cloud.com/support. The Eco4Cloud Web site also provides the latest product updates. If you have comments about this documentation, submit your feedback to [email protected]. Copyright © 2014 Eco4Cloud. All rights reserved. This product is protected by Italian and international copyright and intellectual property laws. Eco4Cloud products are covered by one or more patents listed at http://www.eco4cloud.com/patents. SUMMARY Summary About this book ___________________________________________________________________________________________ 1 Intended Audience _________________________________________________________________________________________________ 1 Document Feedback _______________________________________________________________________________________________ 1 Background Material ______________________________________________________________________________________________ 1 IPMI or iLO Settings for VMware vSphere ______________________________________________________________ 2 Prerequisites _______________________________________________________________________________________________________ 2 Prerequisites For Eco4cloud: TCP and UDP ports _______________________________________________________________ 2 Procedure __________________________________________________________________________________________________________ 3 Example: Configuring iLO on a Hp proliant Gen8 ______________________________________________________ 5 Setting preferences ________________________________________________________________________________________________ 6 Activation ___________________________________________________________________________________________________________ 7 Example: Configuring iLo2 on a HP server _____________________________________________________________ 9 Example: Configuring iRMC on a Fujitsu server ______________________________________________________ 11 Example: Configuring iDRAC on a Dell server ________________________________________________________ 12 Example: Configuring IMM on an IBM server ________________________________________________________ 13 ABOUT THIS BOOK About this book This document, the Eco4Cloud User Manual Addendum – Power Management, describes how to configure and manage IPMI implementation for several server vendors in a VMware environment. These configurations are a requirement for Eco4Cloud consolidation process, because they make it possible to automatically powering on servers. INTENDED AUDIENCE The information presented in this manual is written for system administrators who are experienced Windows or Linux system administrators and who are familiar with VMware virtual machine technology and datacenter operations. DOCUMENT FEEDBACK Eco4Cloud welcomes your suggestions for improving our documentation. If you have comments, send your feedback to [email protected]. BACKGROUND MATERIAL VmWare Documentation: VMware vSphere 4 - ESX and vCenter Server - Configure IPMI or iLO Settings for VMware DPM. Page 1 IPMI OR ILO SETTINGS FOR VMWARE VSPHERE IPMI or iLO Settings for VMware vSphere IPMI is a hardware-level specification and Hewlett-Packard iLO is an embedded server management technology. Each of them describes and provides an interface for remotely monitoring and controlling computers. You must perform the following procedure on each host. PREREQUISITES Both IPMI and iLO require a hardware Baseboard Management Controller (BMC) to provide a gateway for accessing hardware control functions, and allow the interface to be accessed from a remote system using serial or LAN connections. The BMC stays powered on even when the host itself is powered-off. If properly enabled, the BMC can respond to remote power-on commands. If you plan to use IPMI or iLO as a wake protocol, you must configure the BMC. BMC configuration steps vary according to model. See your vendor’s documentation for more information. With IPMI, you must also ensure that the BMC LAN channel is configured to be always available and to allow operator-privileged commands. On some IPMI systems, when you enable "IPMI over LAN" you must configure this in the BIOS and specify a particular IPMI account. VMware DPM using only IPMI supports MD5- and plaintext-based authentication, but MD2-based authentication is not supported. vCenter Server uses MD5 if a host's BMC reports that it is supported and enabled for the Operator role. Otherwise, plaintext-based authentication is used if the BMC reports it is supported and enabled. If neither MD5 nor plaintext authentication is enabled, IPMI cannot be used with the host and vCenter Server attempts to use Wake-on-LAN. PREREQUISITES FOR ECO4CLOUD: TCP AND UDP PORTS Here follows the required TCP ports for communication with management software and IPMI protocol, basing on a VMware Knowledge Base article: Page 2 IPMI OR ILO SETTINGS FOR VMWARE VSPHERE 22 TCP port required for old iBM server. 80 TCP port required for iLO protocol. 443 TCP port required for iLO protocol. 623 UDP/TCP for DPM with IPMI (iLO/BMC) ASF Remote Management and Control Protocol 3002 TCP port required by some iLO implementation for RAW commands NOTE: UDP 623 is fundamental PROCEDURE 1 Select the host in the vSphere Client inventory. 2 Click the Configuration tab. 3 Click Power Management. Figure 1 vSphere Client Host Configuration tab Page 3 IPMI OR ILO SETTINGS FOR VMWARE VSPHERE 4 Click Properties. 5 Enter the following information. • • • User name and password for a BMC account. (The user name must have the ability to remotely power on the host.) IP address of the NIC associated with the BMC, as distinct from the IP address of the host. The IP address should be static or a DHCP address with infinite lease. MAC address of the NIC associated with the BMC. Figure 2 IPMI/iLO settings 6 Click OK. Page 4 EXAMPLE: CONFIGURING ILO ON A HP PROLIANT GEN8 Example: Configuring iLO on a Hp proliant Gen8 1. Power on the system: When you first power on a ProLiant Gen8 server, the server displays a list of booting subsystems and self tests. After the initial POST, the server displays the HP ProLiant initialization screen. The checked icons at the bottom right represent each option that is present or installed on the server: Figure 3 HP ProLiant initialization NOTE: When using DHCP, the iLO 4 IP address appears at bottom left. Page 5 EXAMPLE: CONFIGURING ILO ON A HP PROLIANT GEN8 2. Start Intelligent Provisioning (pressing F10). Wait while Intelligent Provisioning loads. The Intelligent Provisioning preferences screen appears. SETTING PREFERENCES The Set Preferences screen displays automatically the first time Intelligent Provisioning runs on aserver. You can change preferences later by clicking Perform Maintenance, and then clicking Intelligent Provisioning Preferences. 1. Choose a language: Choose your interface language and keyboard language. Figure 4 Intelligent Provisioning preferences Page 6 EXAMPLE: CONFIGURING ILO ON A HP PROLIANT GEN8 2. Accept the EULA: Click Read to open the EULA. To continue, you must accept the EULA by clicking Accept. Click Reboot to cancel configuration using Intelligent Provisioning and reboot the server. Set the rest of the preferences according to network requirements: • Initial Network Settings — Select the active NIC (marked with a green status icon) from the list. Next, choose an IP addressing scheme: o DHCP Auto-Configuration — HP recommends that you select DHCP to have IP addresses assigned automatically to your server. o IPv4 Static — Selecting IPv4 causes four new fields to be added, for static IPv4 address, network mask, gateway address, and DNS address. o IPv6 Static — Selecting IPv6 causes two fields to be added, for the static IP address and the Gateway address. IPv6 Static must be 128–bit only. NOTE: If your network uses proxy servers, click Use Proxy and then enter the proxy server address and port. • iLO Network Settings — Select an iLO network IP addressing scheme: o DHCP Auto-Configuration — HP recommends that you select DHCP to have iLO IP addresses assigned automatically. o IPv4 Static — Selecting IPv4 causes three new fields to be added, for static IPv4 address, network mask, and gateway address. o Off — Selecting Off makes this server unavailable through iLO. For more information about using iLO, see the HP iLO 4 User Guide on the HP website: http://www.hp.com/go/ilo/docs. ACTIVATION After configuring all other preference (date and time, etc.), click Continue: The Intelligent Provisioning activation page appears. To continue select Activate (Recommended) and then click Continue. Page 7 EXAMPLE: CONFIGURING ILO ON A HP PROLIANT GEN8 Figure 5 Intelligent Provisioning activation When activated, you can access Intelligent Provisioning during server POST by pressing the F10 key. If you disable Intelligent Provisioning, pressing the F10 key during POST does not launch Intelligent Provisioning. To re-enable Intelligent Provisioning, from the RBSU Boot menu, select Server Security→Intelligent Provisioning (F10 Prompt)→Enabled. After enabled Vmware can access to IMPI and use power management. Page 8 EXAMPLE: CONFIGURING ILO2 ON A HP SERVER Example: Configuring iLo2 on a HP server 1. Accessing to management and configuration of iLO2 application with web browser if you know the URL, Username and password. 2. This is the first page with the status summary Page 9 EXAMPLE: CONFIGURING ILO2 ON A HP SERVER 3. Go to System information Tab and copy Mac address of iLO2 interface. So now you have all required information to configure Vcenter Power management: • • • • 4. Username Password BMC IP address BMC Mac address In the settings page you can chang port for accessing to iLO or enable/disable other parameters Page 10 EXAMPLE: CONFIGURING IRMC ON A FUJITSU SERVER Example: Configuring iRMC on a Fujitsu server 1. After Accessing to management application with web browser if you know the URL, Username and password, you have to go in Networking settings and then in Network interface for copying Mac address. 2. Then Page 11 in Ports and Services you can change the ports and enable/disable services. EXAMPLE: CONFIGURING IDRAC ON A DELL SERVER Example: Configuring iDRAC on a Dell server 1. After Accessing to management application with web browser if you know the URL, Username and password, you have to go in iDRAC Settings, then in Network/ Security tab and then in Network section for copying Mac address of NIC dedicated to iDRAC control. 2. In Service section you can change the ports and enable/disable services for accessing iDRAC protocol Page 12 EXAMPLE: CONFIGURING IMM ON AN IBM SERVER Example: Configuring IMM on an IBM server 1. After Accessing to management application with web browser if you know the URL, Username and password, you have to go in IMM Control Settings, then in Network interface tab for copying Mac address of Integrated Management Module. 2. In Port Assignments section you can change the ports and enable/disable services for accessing IMM Control protocol Page 13