1
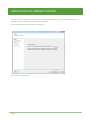
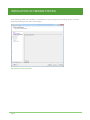
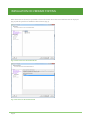
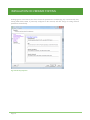
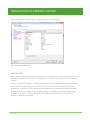
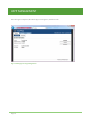
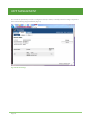
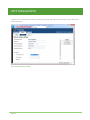
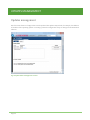
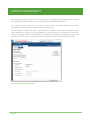
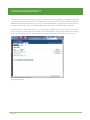
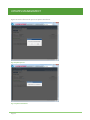
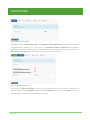
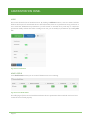
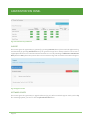
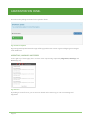
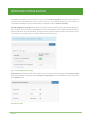
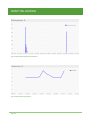
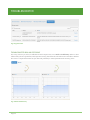
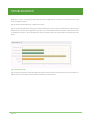
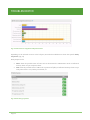
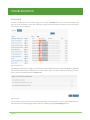
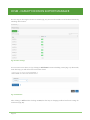
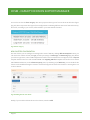
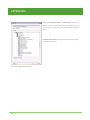
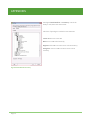
ECO4CLOUD USER MANUAL ECO4CLOUD SUITE FOR DATA CENTERS V 2.0 With: VMware VSphere 4.x VMware VSphere 5.x This document supports the version of each product listed and supports all subsequent versions until the document is replaced by a new edition. To check for more recent editions of this document, see http://www.eco4cloud.com/support. The Eco4Cloud Web site also provides the latest product updates. If you have comments about this documentation, submit your feedback to [email protected]. Copyright © 2013-2014 Eco4Cloud. All rights reserved. This product is protected by Italian and international copyright and intellectual property laws. Eco4Cloud products are covered by one or more patents listed at http://www.eco4cloud.com/patents. SUMMARY Summary About this book ___________________________________________________________________________________________ 1 Intended Audience _________________________________________________________________________________________________ 1 Document Feedback _______________________________________________________________________________________________ 1 Installation requirements ________________________________________________________________________________ 2 Hardware and Software compatibilities _________________________________________________________________________ 2 Minimum System Requirements _______________________________________________________________________________ 2 Recommended System Requirements _________________________________________________________________________ 2 Operating system and features ___________________________________________________________________________________ 2 Installation on VMware Systems ________________________________________________________________________ 3 Installation through ovf import ___________________________________________________________________________________ 3 Best Practices _____________________________________________________________________________________________________ 11 VApp Management _____________________________________________________________________________________ 12 VMware Console __________________________________________________________________________________________________ 12 WEB Application __________________________________________________________________________________________________ 15 Updates management __________________________________________________________________________________ 22 Updates Logs. _____________________________________________________________________________________________________ 26 Setup of a proxy update server __________________________________________________________________________________ 26 Initial setup of Eco4Cloud dashboard_________________________________________________________________ 27 Monitoring ______________________________________________________________________________________________ 30 Resource MAIN tab _______________________________________________________________________________________________ 31 resource power tab _______________________________________________________________________________________________ 32 Consolidation Scenarios __________________________________________________________________________________________ 33 Simulation results ________________________________________________________________________________________________ 36 Resources utilization without Eco4Cloud ____________________________________________________________________ 36 Resources utilization using Eco4Cloud_______________________________________________________________________ 36 Administration Panel___________________________________________________________________________________ 38 Licenses ___________________________________________________________________________________________________________ 38 SUMMARY Mailer ______________________________________________________________________________________________________________ 38 company info ______________________________________________________________________________________________________ 39 Advanced Configurations_________________________________________________________________________________________ 40 Users _______________________________________________________________________________________________________________ 41 Health Status ______________________________________________________________________________________________________ 41 Support ____________________________________________________________________________________________________________ 42 Software updates _________________________________________________________________________________________________ 42 Migrations, Warnings and errors ________________________________________________________________________________ 43 Search resources __________________________________________________________________________________________________ 44 Workload Consolidation _______________________________________________________________________________ 45 Settings on cluster, host and vm _________________________________________________________________________________ 47 CHARTS ____________________________________________________________________________________________________________ 47 Smart Ballooning _______________________________________________________________________________________ 49 Troubleshooter _________________________________________________________________________________________ 51 Toubleshooter Settings ___________________________________________________________________________________________ 51 Troubleshooter Risk and efficiency _____________________________________________________________________________ 53 Details view _______________________________________________________________________________________________________ 56 CDSM - Capacity Decision Support Manager _________________________________________________________ 58 CDSM wizard ______________________________________________________________________________________________________ 58 New clusters configuration ______________________________________________________________________________________ 61 Existing clusters configuration __________________________________________________________________________________ 62 Load variation __________________________________________________________________________________________________ 62 Load on Cluster in terms of Vm _______________________________________________________________________________ 62 Host Action _____________________________________________________________________________________________________ 63 CDSM Report ______________________________________________________________________________________________________ 63 Appendixes______________________________________________________________________________________________ 65 Appendix A – Privileges __________________________________________________________________________________________ 65 Requirements __________________________________________________________________________________________________ 65 Manual Role creation __________________________________________________________________________________________ 65 Automatic Role Creation by powershell script ______________________________________________________________ 66 SUMMARY Appendix B – IMPORTANT NOTES about eco4cloud software ________________________________________________ 77 ABOUT THIS BOOK About this book This document, the Eco4Cloud User Manual, describes how to install and use the Eco4Cloud software components, monitor and manage the information generated by the components, build your Eco4Cloud datacenter environment, consolidate virtual machines within the datacenter environment, and set up rules for virtual machines, hosts and clusters included into the datacenter environment. INTENDED AUDIENCE The information presented in this manual is written for system administrators who are experienced Windows or Linux system administrators and who are familiar with VMware virtual machine technology and datacenter operations. DOCUMENT FEEDBACK Eco4Cloud welcomes your suggestions for improving our documentation. If you have comments, send your feedback to [email protected]. Page 1 INSTALLATION REQUIREMENTS Installation requirements Eco4Cloud is composed of two components: a java monitor and virtual machines consolidator, and a web dashboard. Eco4Cloud provides a vApp to simplify the software installation. The vApp can be imported into a VMware Datacenter or into free, stand-alone systems, like VMware Player or VMware Server or non-free systems, like VMware Workstation. HARDWARE AND SOFTWARE COMPATIBILITIES Eco4Cloud Virtual Machine has a VMware version 7 virtual hardware, and has the following requirements. Minimum System Requirements 4 GB of RAM memory; 1 processor; 20 GB of thin provisioned storage – SATA drive with a 15MBps throughput; 1 network card. Recommended System Requirements 8 GB of RAM memory; 1 processor; 40 GB of thick provisioned, eager zeroed, storage – SSD drive with a 100MBps throughput; 1 network card. Virtual systems supporting vApp are: ESX/ESXi 4.x - 5.x vCenter 4.x - 5.x vCloud Director 1.x Server 2.0 Workstation 6.5.x - 7.x VMware Player. OPERATING SYSTEM AND FEATURES VApp is a Virtual Machine with an Ubuntu 10.04 Operating System with a single 64-bit processor, 4GB of RAM memory, a network card and a CD-ROM. Of course, virtual hardware can be modified according to new needs even after the installation. Page 2 INSTALLATION ON VMWARE SYSTEMS Installation on VMware Systems INSTALLATION THROUGH OVF IMPORT Default Virtual Machine format is OVF 1.0, so compatibility is guaranteed with VMware vSphere 4.x and 5.x or VMware vCloud Director 1.0. If requested, also OVF 0.9 is available, as it can be imported into legacy systems like ESX/ESXi 3.5 and VMware stand-alone products as Workstation 6.5.x or 7.x. Moreover, ZIP format for free systems as VMware server and player is available, too. The following procedure shows standard OVF 1.0 format import. Choose the option “Deploy OVF Template” (Fig. 1), from “File” menu in the vSphere Client connected to vCenter. A wizard will start, including an automatic download of Eco4Cloud virtual application files. Fig. 1 Deploy OVF Template wizard Page 3 INSTALLATION ON VMWARE SYSTEMS In the first wizard window, the .ovf file URL for Internet download will be requested. Alternatively, it is possible to enter a folder from local file system or CD-ROM. In the following procedure a URL will be used (Fig. 2). Fig. 2 Selecting .ovf file source Page 4 INSTALLATION ON VMWARE SYSTEMS Clicking on “Next” button, a first virtual machine features recap window will be shown (Fig.3). Fig. 3 OVF template details. Page 5 INSTALLATION ON VMWARE SYSTEMS In the following window it is possible to accept End User License Agreement by clicking “Accept” and then going ahead clicking on the “Next” button (Fig.4). Fig. 4 End User License Agreement. Page 6 INSTALLATION ON VMWARE SYSTEMS The next step is the choice of Eco4Cloud virtual machine name and the datecenter wherein it must be deployed (Fig. 5). Fig. 5 Virtual machine name and datecenter. Page 7 INSTALLATION ON VMWARE SYSTEMS When datacenter is selected, it is possible to choose the cluster where the virtual machine must be deployed (Fig. 6) and the specific host within the chisen cluster (Fig. 7). Fig. 6 Cluster choice for the Eco4Cloud VM Fig. 7 Host choice for the Eco4Cloud VM Page 8 INSTALLATION ON VMWARE SYSTEMS Furthermore it is possible to insert the datastore where virtual disks will be stored, and their format (Fig.8 e Fig. 9). Fig. 8 Storage choice for the Eco4Cloud VM Fig. 9 Storage format for the Eco4Cloud VM Page 9 INSTALLATION ON VMWARE SYSTEMS Clicking again on “Next” button, the choice of network parameters is available (Fig. 10). It is noteworthy that, leaving blank fields, DHCP, if previously configured in the network, will take charge of setting network parameters automatically. Fig. 10 Network properties Page 10 INSTALLATION ON VMWARE SYSTEMS Finally, clicking on the “Finish” button, the import procedure will start (Fig. 11). Fig. 11 Final configuration recap. BEST PRACTICES Once Eco4Cloud virtual appliance starts working, network communication starts between the appliance and the vCenter. For performances reasons, it is advisable to run Eco4Cloud and vCenter on the same physical machine. In order to do that, it is possible to set affinity rules between the virtual appliance and the virtual machine where vCenter runs. Depending on vCenter installation, if the vCenter has been installed directly on a physical host, an affinity rule can be set between E4C appliance and the physical host running the vCenter. If affinity rules are not available, it is also possible to disable consolidation of E4C virtual appliance (and optionally of the vCenter virtual machine itself) via E4C dashboard, as described in section “Virtual machines consolidation constraints”. Page 11 VAPP MANAGEMENT VApp Management VMWARE CONSOLE After importing Eco4Cloud vApp into vCenter, in needs to be powered on. The first boot can be slower because the virtual machine has to install possible new Operating System updates and configure the environment. Once the boot is completed, the starting window, the console, will appear (Fig. 12). Fig. 12 Vapp Console. Page 12 VAPP MANAGEMENT The vApp can be managed via browser, inserting the IP address, as suggested in the screen shown in Figure 12. Alternatively, the console let the user to log in into the Operating System (Ubuntu 10.4.4) or to modify time zone settings. Choosing Set Timezone the screen in Figure 13 will appear. The following screens show how to modify the time zone. Fig. 13 Time zone modify. Page 13 VAPP MANAGEMENT Fig. 14 Time zone modify - 2. Fig. 15 Location choice. Page 14 VAPP MANAGEMENT WEB APPLICATION The vApp can be managed via browser, inserting the url https:\\IPaddress:5480, as previously suggested in the screen shown in Figure 12 and using the following credentials: User name: eco4cloud Password: cloud4eco Fig. 16 Initial screen for login. Page 15 VAPP MANAGEMENT Once the login is completed, the initial vApp screen appears, with three tabs. Fig. 17 Initial page for vApp configuration Page 16 VAPP MANAGEMENT The first tab (default) is “System”, wherein all main information on software version, virtual machine name and operating system. On the right, one can find “Actions” button, useful to reboot or shutdown the vApp. Clicking on “Time zone” button, it is possible to modify the assigned time zone. After entering all the desired settings modifications, it is necessary to press button “Save Settings”. Fig. 18 Time zone modify page Page 17 VAPP MANAGEMENT The second tab (Network) is useful to configure network, or better, to modify network settings compared to those entered during vApp installation (Fig. 10). Fig. 19 Network Settings Page 18 VAPP MANAGEMENT In the “Status” page, network settings currently used by vApp are available, as IP address, DNS address, etc. Modifying settings is possible by clicking on the “Address” button (Fig. 20). Fig. 20 Network Settings using DHCP In the example in Figure 20, the DHCP automatically sets up network configuration, but it is possible to configure statically the network choosing a different option in the dropdown menu. Page 19 VAPP MANAGEMENT In Figure 21 it is shown how modify the default gateway, the DNS address, the IP address, the subnet mask, and the hostname. Fig. 21 manual network settings Page 20 VAPP MANAGEMENT The last button “Proxy” allows configuring the vApp (Fig. 22) in order to surf the internet using a proxy server. To do so, check the option “Use a proxy server” and enter further requested information as IP address, port, user name and password. Finally, save all new information clicking “Save Settings”. Fig. 22 Proxy server settings Page 21 UPDATES MANAGEMENT Updates management One of the best features of vApp is that it can be updated. The updates may include, for example, the addition of modules of the operating system or running a particular configuration script or changes in the Eco4Cloud software. Fig. 23 Update Status and appliance version. Page 22 UPDATES MANAGEMENT By clicking on the “Update” tab, you will see a summary page on the application version. Before you can check for new updates you need to click on the “Settings” button and verify all the parameters. The configuration page allows you to automate or semi-automate or manual leaving all the updates management. By default, automatic updates are not enabled (Fig. 24). You can change the settings and choose "Automatic check for updates" with which the vApp periodically checks whether new updates have been published, but not install them. The installation is carried out manually by clicking on the button "Install updates" from the first screen (Fig. 23). Finally, if you want to fully automate you have to select "Automatic check and install updates" and choose the frequency and time. Fig. 24 Automatic updates management Page 23 UPDATES MANAGEMENT At the bottom of the screen you have to choose the update repository. By default it is configured eco4cloud company repository server. Otherwise, if the vApp does not have internet access, Eco4Cloud will send a CDROM with the updates, and then you need to select “Use CD-ROM Updates”. Finally, if the URL of the repository changes, you will need to select “Use Specified Repository”, writing the new url and login credentials. As stated above, for manual installation or a manual check for updates, click on the “Status” button back to the previous page, and then click “Check Updates” and “Instll Updates” (Fig.25). If new updates are available, anotify appears with the words “Available Updates” and the serial number of the new software version. Fig. 25 Updates check Page 24 UPDATES MANAGEMENT Figures 26 and 27 illustrate the process of updates installation. Fig. 26 Update process Fig. 27 Updates installation Page 25 UPDATES MANAGEMENT UPDATES LOGS. If for some reason the updates were not installed properly will need to check the logs. In order to do this, you need to access the console or via ssh to vApp and read files updatecli.log and vami.log in the /opt/vmware/var/log/Vami folder. SETUP OF A PROXY UPDATE SERVER It’s possible to maintain independently a proxy server for Eco4cloud vApp updates management. The only prerequisite is to have a web server available. In case of Windows environments the web server may be IIS web server, in case of Linux environments this may be Apache web server. Once you have successfully configured the web server, simply copy the two folders for managing updates, manifest and package-pool, in the web server root folder. These will be sent in a zip file. The customer has to properly explode it in the root of the web sever. The example below shows a possible configuration. A “Ecorep” site was created and the two folders, manifest and package-pool, copied in it. In this example the Ecorep site is available via the url http://<name-of-server> or http://<server-ip-address>. All the network communications will take place through HTTP protocol on TCP port 80. Fig. 28 Example of IIS configuration for update Page 26 INITIAL SETUP OF ECO4CLOUD DASHBOARD Initial setup of Eco4Cloud dashboard Once Eco4Cloud virtual appliance is installed, it is possible to access it remotely, via browser, entering the url https://IPaddress of the virtual machine, either assigned by DHCP, or entered manually. The first requirement is to log in the Eco4Cloud dashboard, filling the module shown in Figure 29. Each Eco4Cloud virtual appliance comes with the following default credentials: User name: admin Password: cloud4eco After logging in for the first time, it is required to configure the Eco4cloud dashboard following a simple wizard. Fig. 29 Eco4Cloud Dashboard Login The first step is to change admin password. You also have to compile a form (Fig. 30) with company info, such as Company name (the only mandatory field), company website, a brief description of the company, and finally you can add Company logo Page 27 INITIAL SETUP OF ECO4CLOUD DASHBOARD Fig. 30 First login form The next step is to configure your Server Farm, inserting a Farm Name and a brief description (Fig. 31) useful if you will work with several farms at the same time. Fig. 31 Farm Information Moreover, there are other two parameters: Page 28 Target Resource Utilization: The percentage of host utilization (CPU, RAM) that Eco4Cloud Workload Consolidation will try to achieve. Default value is 80%; INITIAL SETUP OF ECO4CLOUD DASHBOARD Maximum Resource Utilization: The maximum host utilization (CPU, RAM) allowed. If Exceeded, Eco4Cloud Workload Consolidation will migrate VMs to other hosts. Default value is 90%. In the next step another form (Fig. 32) collect data about your virtualization platform such as Ip address, username and password to gain access to your virtual farm. Fig. 32 Virtualization Platform information After clicking on next button, you can configure your smtp server (Fig. 33 ) settings (you can configure it afterwards as explained in the Mailer paragraph of Administration panel section of this manual) or skip this step and begin to use the dashboard. Fig. 33 Smtp configuration Page 29 MONITORING Monitoring When the user logs into the dashboard all Eco4Cloud products (Monitor, Workload Consolidation, Troubleshooter, CDSM) appear on the top of the page. At the very beginning, only Monitor product is active and free for use. Once the configuration wizard is completed, monitoring become to collect performance data (Fig. 34). Fig. 34 Performances data collection. When historical performances data are completely collected, you can see the resources inventory of your farm on the top left side of the home page. Fig. 35 Dashboard Home You can change any Virtualization Platform information, including Virtualization Platforms Manager name and description, IP, username or password, by clicking on Virtualization Platforms in the resources inventory and then on Advanced Settings. After modifying parameters, you can click on update button. Page 30 MONITORING Fig. 36 Performances data collection. In the Main tab the three following charts are available: Cpu and Ram utilization, Performances, Cpu Ready Time and Ballooned Memory. CPU Ready time is a metric showing how much time virtual CPU is ready to be scheduled on the physical host. Ballooned Memory is the RAM Memory reclaimed by Vmware balloon driver. The user can monitor both performance metrics, allowing to know when they get too high: this is a symptom of contention on CPU and memory, respectively. RESOURCE MAIN TAB After selecting an resource in the resource inventory on the left side of main window, further information and details will be shown in the right pane. For example, clicking on a host (Fig. 37) the status of VMs belonging to will be shown. Moreover Host Details pane will show some hardware and software information about the host. Page 31 MONITORING Fig. 37 Resource properties RESOURCE POWER TAB The second tab is Power tab(Fig. 38). The chart shows the power consumption of the hosts compliant with the power consumption monitoring feature Page 32 MONITORING Fig. 38 Power consumption CONSOLIDATION SCENARIOS It is a feature that allows to simulate Eco4cloud Workload Consolidation in your own farm. After clicking on your company a page with Consolidation scenarios tab appears. In this pane you can find the New Consolidation Scenario button (Fig. 39) and a list of the previous consolidation scenarios. Fig. 39 Simulation list window After clicking on New consolidation scenario button, a wizard pops up to configure a new simulation (Fig. 40). First of all select the farms of the scenario. Page 33 MONITORING Fig. 40 Simulation list window In the next step, fill the Simulation name field, Target Resource Simulation (E4C Workload Consolidation will optimize host utilization up to this value) and Maximum Resource Utilization (E4C Workload Consolidation will migrate VMs away from hosts with utilization rates higher than this value) finally choose Start Date and End Date (both not older than two weeks) of simulation (Fig. 41). Fig. 41 Simulation Parameters In the next step, Advanced settings of clusters, servers and VMs can be set. For servers and VMs you can decide to switch on/off Consolidation and automated StandBy for idle hosts, for each cluster you can set the minimum host number that must be always on (Fig. 42). Page 34 MONITORING Fig. 42 Advanced simulation Parameters Clicking next, simulation runs and results are shown. Page 35 MONITORING SIMULATION RESULTS The results are divided in four sections: Test Description, Resources utilization without Eco4Cloud, Resources utilization using Eco4Cloud and an appendix with scenario parameters details . Resources utilization without Eco4Cloud This section reports four graphs: The first chart is Average CPU and RAM utilization of the hosts before using Eco4Cloud and it shows the average CPU utilization of the hosts during the monitoring period. It also shows the average RAM allocation (again in percentage with respect to the total amount of RAM) of the servers. The second chart is Average power consumption of each server. Eco4Cloud is able to collect hosts power consumption data, so the overall power consumption of the physical hosts in the data center and the overall energy consumption per host per day can be reported. The third chart reports the CPU ready time. VMWare has set two thresholds for the CPU ready time of a VM: 5% is a warning threshold, while 10% represents an alert. The fourth chart reports the amount of ballooned memory. VMWare specifies that the presence of ballooned memory should be avoided, even if a small presence of memory ballooning is not a sign of serious memory contention Resources utilization using Eco4Cloud This section includes two charts: Page 36 The first chart is the Number of active servers with and without Eco4Cloud (Fig. 43) and it reports the number of active servers, with and without the use of Eco4Cloud. The second chart is the Number of overload prevention and workload consolidation migrations per hour and it reports the number of migrations per hour in the whole data center during the week of simulated Eco4Cloud operations. MONITORING Fig. 43 Number of active servers with and without Eco4Cloud Page 37 ADMINISTRATION PANEL Administration Panel In the right top of home page, there is the Menu’ for changing admin password, logout from session and Administration panel. Fig. 44 Right top Menu The administration panel allows you to manage products licenses, mailer, users, Advanced configurations and Support. LICENSES In the license section, you can find all licensed products, license expiration date, number of hosts supported, current active licenses, residual licenses number and the license status. To add or upgrade a license you have to contact Eco4Cloud by clicking on Request License button. A pre-compiled form appears and you have just to specify which product you want to license, then press Send button to email to eco4cloud support your request. If you haven’t configured the smtp server in the mailer section yet, you have to compile the form and then click on the link just below send button and follow the instruction. MAILER The Fig. 45 shows mailer configuration panel. Eco4Cloud sends periodical reports of its activity and immediately notifies users of possible malfunctions. In order to obtain this service, the user needs to configure the mail service. Host name, port, sender mail and sender name are mandatory fields. If you enable Server Authentication, you have to fill Username and password field too. If you use an SMTP server that requires an encrypted session, you have to switch on SSL Connection. Page 38 ADMINISTRATION PANEL Fig. 45 Mailer configuration In the Mail receivers section you can add the email address of users that will receive Reports, usage data, Errors generated by eco4cloud service. The section also to modify/remove a recipient (Fig. 46), and to enable or disable the message dispatch of each category. Fig. 46 Mail Receivers COMPANY INFO The company info section (Fig. 47) shows the information about your company. All data can be edited. After completing click on update company button to save your changes. Page 39 ADMINISTRATION PANEL Fig. 47 Company info ADVANCED CONFIGURATIONS This section shows other advanced configurations of Eco4cloud dashboard (Fig. 48). The first switch permits to install Eco4cloud plug-in in the vClient. After switched on a new eco4cloud item appears when you right click an resource as a host or a VM. By clicking on Eco4cloud menu’ you can manage all Eco4cloud parameters from vmware vclient. Performance Data Interval, permits to specify the number of days (starting from now to backward) in order to save performances data on database. Performances data are used to run consolidation scenarios and/or CDSM scenarios. More days require more datastore allocation for eco4cloud Virtual appliance. Fig. 48 Advanced configurations Page 40 ADMINISTRATION PANEL USERS This section shows the list of Eco4Cloud users. By clicking on Add User button, a new user wizard . Fill the fields in the first part of wizard with the user data information, then set its permissions as Fig. 49 shows. A user could have Administrator permissions (i.e. Full Control on selected farm), read only or read/write permission. Finally confirm data. After creating a new user, you can modify its permissions by clicking edit link. Fig. 49 User Permissions HEALTH STATUS In the health status section you can control if the E4C services are running. Fig. 50 Services Health Status The table (Fig. 51) below service health status shows the user permissions that eco4cloud user has to have so that all services work properly. Page 41 ADMINISTRATION PANEL Fig. 51 Eco4cloud user permission SUPPORT This section gives the opportunity to generate (by pressing Generate button) the Eco4cloud application log and download (by pressing Download button), the generated tar.gz file to desktop. This file can be sent to [email protected] to control Eco4Cloud anomalies or errors. By switching on Obfuscate content Data Base (default is OFF), datacenter private data are not written into logs and not showed to Eco4Cloud support. Fig. 52 Support section SOFTWARE UPDATES This section gives the opportunity to upgrade software (Fig. 53). After Eco4cloud support sends you the zip file containing updates, you have to click on Upload Patch file button. Page 42 ADMINISTRATION PANEL Then selects the package and waits for the upload to finish. Fig. 53 Software Updates By pressing Install Update button the vapp will be upgraded to new version. Logout and login again to navigate in the dashboard. MIGRATIONS, WARNINGS AND ERRORS In the right top of home page, there are three icons representing respectively Migrations, Warnings and Errors (Fig. 54). Fig. 54 Errors By clicking on view all errors, you can see more details. In the same way, you can view warnings and migrations. Page 43 ADMINISTRATION PANEL SEARCH RESOURCES In the Left top of home page there is the search box (Fig. 55). Simply inserting part of name of an resource such as a cluster or VM, search function will list all resources containing typed character. Fig. 55 Search Page 44 WORKLOAD CONSOLIDATION Workload Consolidation Workload Consolidation requires you insert a license. In order to obtain a valid code, contact Eco4Cloud support at [email protected], go to Administration Panel, click on Licenses, then Add licence and insert it. After that, click on Workload Consolidation button and select a farm previously configured. Enabling Consolidation, Eco4Cloud will be able to migrate VMs between hosts inside this farm and switch on/off hosts (if BMC are correctly configured in power management section in VMware vClient). Fig. 56 Workload Consolidation Settings. Fig. 56 shows workload consolidation settings. You can enable or disable consolidation with the appropriate switch. You have to specify the reason (at least 10 characters) of the operation and finally confirm. You can also change: Page 45 Target Resource Utilization, the target percentage of hosts’ resource utilization to be reached through virtual machines consolidation; Maximum Resource Utilization, the maximum percentage of hosts’ resource utilization to be reached through virtual machines consolidation. If the resource utilization goes above this threshold, virtual machines migrations will be issued to lower the utilization; Power off min uptime: Minimum number of minutes of activity before a host can be powered off (default: 120) Power on min uptime: : Minimum number of minutes of activity before a host can be powered on (default: 120) WORKLOAD CONSOLIDATION By enabling consolidation on farm, all the resources in the resource inventory will inherit this property. If you don’t want consolidation be active for some resource, it can disabled separately. On the contrary, if consolidation is disabled on farm, automatically it is disabled on entire resource inventory. Override Migration warnings button shows a warning’s list that could be ignored during VMs migrations. You can switch on/off nearly every warning based on your polices (Fig. 57). For example: Eco4Cloud wants to migrate a VM and a “No guest heartbeats” warning stops the migration. In this scenario, if the switch is on the “on” position, the warning will be overridden and the migration can go on. Fig. 57 Override Migration warnings New Vcenter button allows to add a new vCenter server. You have to fill the form (Fig. 58) filling Server Host field with IP address or hostname, then username and password of an administrative account, and finally press Update button. Fig. 58 New Vcenter Page 46 WORKLOAD CONSOLIDATION This configuration data can be modified/deleted afterwards, selecting the vCenter in the left pane. New Domain Controller button allows to add a new Domain controller to manage Microsoft Hyper-V environments. Finally, you can also delete a Datacenter. SETTINGS ON CLUSTER, HOST AND VM Depending on the selected resource in the left pane, the Workload Consolidation settings pane has a second different field other than consolidation switch. For clusters: Always-on hosts field is the minimum number of hosts that must be always switched on in this cluster For hosts: StandBy Enabled field. If it is disabled and Consolidation is enabled on this server, Eco4Cloud will be able to migrate VMs (in/out this server), but the server will never be switched off. CHARTS Selecting a farm, or a cluster, additional information is available, a chart and two tables respectively: Number of active hosts with and without Eco4Cloud, Host Switch On/Off Events, VM Migrations Fig. 59 Number of active hosts with and without Eco4Cloud graph The chart in Fig. 59 reports the number of active servers with and without the use of Eco4Cloud. The table Host Switch On/Off Events shows which hosts, and when, E4C Workload Consolidation switched on/off. The last table VM Migrations (Fig. 60) shows the VM migrations issued by E4C Workload Consolidation. Page 47 WORKLOAD CONSOLIDATION Fig. 60 VM Migrations issued. Selecting a Host, you can see only Host Switch On/Off Events and VM Migrations. Finally, selecting a VM you will see only VM Migrations. Page 48 SMART BALLOONING Smart Ballooning Smart Ballooning allows releasing unused memory by virtual machines and making it available for ESX/ESXi, which possibly will allocate it to other Virtual machine in the data center. Smart Ballooning is inspired by a mechanism already available in VMware systems, named memory ballooning, and which allows releasing consumed memory. In order to enable Smart Ballooning, switch it on in Smart Ballooning Settings pane. Fig. 61 Smart Ballooning settings Under Smart ballooning setting pane, you will find the Smart Ballooning Operations table (Fig. 62) that shows the Smart Ballooning activities on each VM. In the table you will see when Smart Ballooning activities happened, as well. Fig. 62 Smart Ballooning Operations The next two charts (Fig. 63 e Fig. 64) show the amount of memory reclaimed hourly by Smart Balloning and RAM Memory reclaimed by Vmware balloon driver respectively. Page 49 SMART BALLOONING Fig. 63 Smart Ballooning Reclaimed Memory Fig. 64 Smart Ballooning Memory Page 50 TROUBLESHOOTER Troubleshooter Virtualization comes with a wealth of needed configurations, along with the benefits delivered by isolation of virtual machines. More often than expected, a virtualized environment is not properly configured, and nonoptimal configurations lead to resources waste, poor consolidation ratio, uncertain SLA compliance. Troubleshooter performs continuous monitoring of well-known virtualization options and sets immediate warning/alerts when wrong configurations are detected and Help virtual infrastructure administrator to solve possible drawbacks. TOUBLESHOOTER SETTINGS By clicking on troubleshooter button, the configuration settings pane appears (Fig. 65): Fig. 65 Troubleshooter settings You can immediately generate a report by selecting Start date and End date, moreover you can switch on Send report by email after generation to automatically send the Report to the Mail Receivers configured in Mailer configuration settings. You can also download the generated Report clicking on Download. Fig. 66 Schedule Weekly Report Page 51 TROUBLESHOOTER By selecting Schedule Weekly Report (Fig. 66) you can automatically receive weekly report. You need to specify the day and the hour and which users will receive the report by email. By selecting Configure Visibility categories (Fig. 67), you can customize your reports. Fig. 67 Configure Visibility categories Every category in the list is included in the report. If you want to exclude one of them from the report, click on Ignore rule on the right side, and a new pop-up appears (Fig. 68). Then you can decide if ignoring this category on all entities switching on the side button and/or Ignore Category on Single Entity such as Cluster, Farm Host or VM. Fig. 68 Ignore Category list In the last tab of Troubleshooter settings, there is a summary of all Ignored rules (Fig. 69). Every ignored rule can affect a single entity or a category or both. By clicking on Resolve, the rule is canceled. Page 52 TROUBLESHOOTER Fig. 69 Ignore Rules TROUBLESHOOTER RISK AND EFFICIENCY For every resource you select, troubleshooter will compute two scores: Risk and Efficiency. Risk is a value influenced by the set of problems, and respective severity, that affect the selected resource and all its children. The score is comprised between 0% (no observed problems) to 100% (maximum risk severity) value. Fig. 70 Risk and Efficiency Page 53 TROUBLESHOOTER Efficiency is a score conveying the right allocation (and configuration) of resources of selected resource and of all its children under it. Fig. 70 shows risk and efficiency computed on a farm. Fig. 71 represents Risk Factor deriving from hosts health state. In this charts, Troubleshooter represents the main risks for a farm such as high CPU ready time or too much Ballooned memory. Other risks are the Hosts in maintenance mode or hosts disconnected. Host operational status is represented also with the pie chart below. Fig. 71 Host health state Fig. 72represents the factors affecting VMs performances such as Resources Limit, Resources reservation, etc. VMs resources reservation is represented also with the pie chart below. Page 54 TROUBLESHOOTER Fig. 72 VMs resources assignment and performances Depending on the selected resource in the left pane, Eco4cloud Troubleshooter shows the specific Entity Properties (Fig. 73) Entity Properties for: Hosts: show the possible states of hosts such as disconnected or Maintenance mode or ballooned memory alarm or Cpu ready time alarm. VMs: show the possible states of VMs such as powered off (idle) or ballooned memory alarm or Cpu ready time alarm or over/under provisioned, etc. Fig. 73 Host entity properties Page 55 TROUBLESHOOTER DETAILS VIEW In order to understand errors and warnings, you can click on Details button near overview. Another pane (Fig. 74) opens and shows errors and warning by Categories and Problems and below you can find ignore rules that you have configured. Fig. 74 Details view By clicking on the name of a category a new browser window links the Eco4cloud Knowledge Base explaining the problem and the official solution by the relative vendor and/or Eco4Cloud. Beside the category, there is the occurrences number and then the ignore link. Fig. 75 Ignore You can choose if to ignore the error on the selected entity, or on all entities, or even to ignore all problems on the entire Farm, by switching right side button on/off, finally pressing Save Changes button. Page 56 TROUBLESHOOTER On the right side of Details pane there is the list of all problems. By clicking on a single problem you can see the details, such as where the problem is, at which time it occurred, and the description. Finally, on the bottom of details pane, you can find the exclusion rules. Clicking on active link you can see Ignore Reason List (Fig. 76) that shows where the rule is applied. On the right side, you can click on resolve to cancel the rule. Fig. 76 Ignore Reason List Page 57 CDSM - CAPACITY DECISION SUPPORT MANAGER CDSM - Capacity Decision Support Manager Capacity Decision Support Manager (CDSM) is a capacity planning software, enhanced by Eco4Cloud’s workload consolidation algorithm, which provides a solution to efficiently plan and use shared pools of resources in virtualized data centers. Eco4Cloud’s CDSM addresses and solves the capacity planning problem by modeling it with historical workloads and considering the peak workload for resource allocation. In fact, CDSM creates demand patterns through the analysis of workload traces measured in the data center. This enables CDSM to accurately predict future demands. CDSM allows planning the whole virtualization layer within few minutes from the initial deployment. The setup is quick and hassle-free. CDSM immediately starts collecting historical performance data sampled by virtualization platform and makes capacity planning features available in few minutes. The results obtained through CDSM are enhanced by Eco4Cloud’s workload consolidation algorithm, guaranteeing the best resource utilization possible. CDSM WIZARD Clicking CDSM button, the CDSM list pane appears. This shows all CDSM scenarios you made and a new CDSM button to create a new one. In the general settings you can choose the scenario name and the type of environment: Production to priorize QoS or Test and Dev to priorize resources efficiency. Fig. 77 New CDSM wizard In the next page, you can choose the farm included in the scenario, if you have more than one. Page 58 CDSM - CAPACITY DECISION SUPPORT MANAGER The next step is choosing the clusters to include (Fig. 78). You can also exclude one of the listed clusters by switching off the button. Fig. 78 Cluster settings You can create a new cluster, too, by clicking on Add Cluster button and adding a name (Fig. 79). Afterwards, in the final step, you will choose the load for this cluster. Fig. 79 Add Cluster After clicking on Add and then clicking on Next, the final step is changing workload and hosts settings for each cluster (Fig. 80). Page 59 CDSM - CAPACITY DECISION SUPPORT MANAGER Fig. 80 Cluster Settings First and foremost, you can choose the global settings (Fig. 81) for all clusters such as Load or Hosts Action Fig. 81 Global Settings Page 60 CDSM - CAPACITY DECISION SUPPORT MANAGER You can choose also the host category. The menu proposes three types of host as shown in the below figure (Fig. 82). These represent three typical host configurations combining different amount of CPU and memory. The hosts, according to your choice, will be added to your environment if needed. Fig. 82 Host category NEW CLUSTERS CONFIGURATION For new clusters you can configure incoming load in term of VMs. By clicking Add VM Template button, you can choose the number of VMs, the type, and the percentage of CPU usage and RAM usage (Fig. 83). When you click on type menu, a list of VMs templates that will be used to simulate the load appears, from a tiny VM template with one CPU core and 512 MB of RAM until Gigantig VM Plus template with 24 CPU cores and 64 GB of RAM. Furthermore, in the Cluster Property pane, by switching on/off Relocate, you can decide if this cluster can be modified during the scenario creation moving in hosts from other clusters or moving hosts out to other clusters. Fig. 83 Adding load to new cluster Finally, if you would to add new hosts to this cluster, switch on Add. Page 61 CDSM - CAPACITY DECISION SUPPORT MANAGER EXISTING CLUSTERS CONFIGURATION The first step of an existing cluster configuration, is to decide if the type of load on the cluster will be calculated on percentage of Load variation or in term of VMs. Load variation Default choise is Load variation and it can be modified increasing or decreasing Cluster Load slider. When the percentage gets modified, the number of VMs in the Current Cluster Load pane varies. The Type of VM displayed represents a sample of all VMs inside the cluster. In the case that the cluster load type is based on Load variation, the type of VM, CPU usage (Typical daily based maximum CPU usage of the VM) and RAM usage (Typical daily based maximum memory usage of the VM) cannot be modified. Fig. 84 Load Variation (%). Load on Cluster in terms of Vm Choosing Load on Cluster in terms of VM, you could change all the values in Cluster Load pane (Fig. 85). The number of VMs currently shown, represents the original number of VMs; it can be changed with the best value that fits your aim. The type of VM displayed is a representative sample of all VMs inside the cluster and cannot be modified. Instead, CPU usage and RAM usage can be modified either by the slider or manually writing the value in the field. If you want Additional workload, you can add other VMs, by pressing Add VM Template button. In this pane, you can modify number of VMs, Type of VM, CPU usage and RAM usage. Page 62 CDSM - CAPACITY DECISION SUPPORT MANAGER Fig. 85 Load in term of VMs. When you click on Type menu, a list of VMs templates that will be used to simulate the load appears, wich allows selecting the VM category ranging from a tiny VM template with one CPU core and 512 MB of RAM up to Gigantic VM Plus template with 24 CPU cores and 64 GB of RAM. Host Action In the Host Action pane you can specify which actions to enable on the hosts of the current cluster. The Relocate and Add options have already been covered. Dismiss option allows to remove obsolete and inefficient hosts from this cluster. CDSM REPORT After configuring all settings and pressing the Run button, CDSM will generate a report. A brief introduction will describe what CDSM is and what the output of the scenario will be. The first paragraphs of the report will describe the scenario of the test and the Resources utilization, with a major focus on Ram usage during monitoring period. In Scenario Parameter paragraph, you will find the summary of configuration settings of all clusters that you made. Page 63 CDSM - CAPACITY DECISION SUPPORT MANAGER The following paragraph will show the results that consist in two scenarios for all single clusters, both of them contains: • • • • Residual workload on each cluster How many hosts, if any, are needed to add to each cluster Which hosts are recommended to relocate for optimal hardware usage Which hosts are recommended to dismiss due to inefficiency The first scenario, called "Low Impact" is a light solution, where workload is distributed on available hosts and only useless hardware is dismissed. The second scenario, called "High Impact" is a solution in which all obsolete hardware is replaced by newer and more efficient hardware. At last, the Final Considerations paragraph will display the list of actions you need to take on the hosts in order to achieve the given goals, for each scenario, and eventually the shopping list! Page 64 APPENDIXES Appendixes APPENDIX A – PRIVILEGES The following tables list the privileges that should be assigned to the Eco4Cloud user. When setting permissions, verify all the object types are set with appropriate privileges for each particular action. Some operations require access permission at the root folder or parent folder in addition to access to the object being manipulated. The best practice is to add privileges to the root folder in order to ensure the user has all the needed privileges all over the virtualized environment. Requirements Initially, a Windows user must be registered on the server where vCenter is installed with the name of eco4cloud. The user can be created locally if working on a stand-alone server or in the domain if working on an active directory environment. Manual Role creation In the section Home -> Administration -> Roles (Fig. A) a new role must be created with the set of privileges in the following. The name to assign to role will be E4CRole Fig. A Role creation Page 65 APPENDIXES Automatic Role Creation by powershell script We create two PowerCli scripts for automatic role creation: 1. 2. CreateEco4CloudRole.ps1 CreateEco4CloudRole_PowerCLI4.0.ps1 The first one is for powerCli version 5.0 or above, the second one for Powercli version 4.0 The scripts can be used on the vCenter server locally or remotely from other PC with Powercli installed on. In local mode you have to open a PowerCli console with administrator permission and launch CreateEco4CloudRole.ps1. The script will create E4CRole with the necessary permissions. In remote mode you have to open a PowerCli console and launch the same script with following parameters: vCenter Ip Address, vCenter administrator username and password CreateEco4CloudRole.ps1 vCenterAddress vCenterUsername vCenterPassword After creating E4CRole, you can add eco4cloud user account to the role. Page 66 APPENDIXES Now it is possible to assign the needed privileges by clicking with the right button of the mouse on the name of the role. Alarms privileges: control the ability to set and respond to alarms on inventory objects. This class of privileges is useful to insert automatic alarms within the vCenter in case of overloads. Acknowledge alarm: recognition of an alarm Create alarm: creation of a new alarm. Disable alarm action: block of the reaction to an alarm Modify alarm: modify of an alert object Remove alarm: removal of an alert object Set alarm status: modify the status of an alarm to Normal, Warning, or Alert Fig. B Alarms Global privileges: control global tasks related to tasks, scripts, and extensions. Furthermore it is used to manage custom attributes such as Annotations. Act as vCenter Server: Prepares or starts a vMotion Cancel task: Cancels an executing task Manage Custom attributes: Add, remove, or rename custom field definitions. Script Action: Schedule a scripted action in conjunction with an alarm. Set Custom attribute: View, create, or remove custom attributes for a managed object. Fig. C Global Page 67 APPENDIXES Privileges Host->configuration: in this section privileges for hosts configuration are set. This class of privileges is useful to put hosts in maintenance mode or power them down. Connection: Change the connection status of a host (connected or disconnected). Maintenance: allows to put a host in maintenance mode for administrator tasks, such as update and reconfiguration, and allows to power down and reboot a host. Power: configuration of energy savings settings. Fig. D Host: configuration Page 68 APPENDIXES Privileges Host->inventory: in this section privileges for hosts inventory are set: Host inventory privileges control adding hosts to the inventory, adding hosts to clusters, and moving hosts in the inventory. So it is required to put a cluster in partially/fully automated or manual mode Modify cluster: Change the properties of a cluster. Fig. E Host: Inventory Page 69 APPENDIXES Privileges Host->Local Operations: controls action executed when vSphere Client is directly connected to a host. This class of privileges is needed by the “smart ballooning” module, because the module should modify VM memory resources limits. Reconfigure virtual machine: reconfgure virtual machine memory limits Fig. F Host: Local Operations Page 70 APPENDIXES Privileges Resource: controls resources pool and virtual machines migrations. Apply reccomendation: Ask the server to go ahead with a suggested vMotion. Assign virtual machine to resource pool: Assign a VM to a specific resource pool Create resource pool: resource pool creation Migrate: VM migration to a resource poll or a host Modify resource pool: modificare pool di risorse Move resource pool: spostare un pool di risorse Query vMotion: verify compatibility of a VM to a target host for vMotion Remove resource pool: cancel a resource pool Rename resource pool: rename a resource pool Fig. G Resource Page 71 APPENDIXES Privileges Scheduled Task: control the ability to create, modify and removed scheduled tasks. Create tasks: create a new scheduled task Modify task: modify a scheduled task Remove task: remove a scheduled task Run task: run a scheduled task Privileges Tasks: control extensions ability to create and update activities on vCenter server. Create task: allows an extension to create a user defined task. Update task: allows an extension to modify a user defined task. This class of privileges are useful to schedule needed operations to VM consolidation. Fig. H Tasks and Scheduled task Page 72 APPENDIXES Privileges Virtual Machine -> configuration: control the ability to configure VM and devices options. Advanced: add or modify advanced options in VM configuration file. Change resource: Change resource configuration of a set of VM nodes in a given resource pool. It is required for the use of the Smart Ballooning . Memory: modify the allocated memory to the VM. Fig. I Virtual Machine: configuration Page 73 APPENDIXES Privileges Virtual Machine -> Interaction: control the ability to interact with VM console, configure media, execute power up/down operations and install VMware Tools. Console Interaction: interaction with VM, using mouse, keyboard and monitor. Fig. L Virtual Machine: Interaction Page 74 APPENDIXES Privileges Virtual Machine -> Inventory: control the ability to add, move and remove VMs. This class of privileges is needed to issue vMotions. Create new: Create a new VM Move: move a VM in the hierarchy Register: add a VM to vCenter server or host inventory Unregister: remove a VM to vCenter server or host inventory Fig. M Virtual Machine Inventory Page 75 APPENDIXES Privileges Extension: control the ability to install and manage plug-ins This class of privileges is needed to use Eco4Cloud Plugin Register extension: Registers an extension (plug-in) Unregister extension: Unregisters an extension (plugin) Update extension: Updates an extension (plug-in) Fig. N Extension Page 76 APPENDIXES APPENDIX B – IMPORTANT NOTES ABOUT ECO4CLOUD SOFTWARE During normal operations, eco4cloud software will generate two scheduled tasks 1. 2. "HypervisorLifeChecker" "E4C Crash Detection Task" and an alarm: 1. "E4C Crash Detection Alarm" These tasks and alarms are needed to allow normal vCenter operation in case of failure of eco4cloud or in case vApp doesn’t reach vCenter. These tasks and alarms must not be canceled. Page 77


![Autocad [2007-2009] User manual](http://vs1.manualzilla.com/store/data/005776291_1-e398978f20775312922048f8d5b8f7a5-150x150.png)
![Autodesk MAP [2007-2009] User manual](http://vs1.manualzilla.com/store/data/005814944_1-7d4ade0f748ad8f526e057550ef902e1-150x150.png)