1
Z1000 AC Drive
Quick Start Procedure
Page 2 of 2
Step
Step
Z1000 Quick Setup
4
5
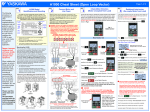
This step shows how to setup the most important parameters using the Z1000 Quick Setup function. Apply power to the Z1000
after all the electrical connections have been made and the terminal cover has been re-attached. At this point DO NOT RUN
THE MOTOR the digital operator should be reading as shown in Fig. 3. to the right.
1.
Press
2.
three times until the
digital operator shows the Quick Setting menu.
Press
to start the
3.
Select Application
Press
Quick Setup.
Step
Check Motor Rotation and Direction
and use
to switch
between applications. Press
to select.
After selecting the Application the Z1000 Quick Setup will display the dedicated application parameters to setup your Z1000
HAND MODE
In this step the motor is checked for proper direction
and operation. This test is to be performed solely
from the digital operator. Apply power to the Z1000
after all the electrical connections have been made
and protective covers have been re-attached. At
this point, DO NOT RUN THE MOTOR, the Digital
Operator should display as shown in Fig. 3.
Available Applications:
0: General: Basic Drive Operation
1: Fan General: Fan Application without PI Control
2: Fan Application with PI Control
3: Return Fan with PI Control
4: Cooing Tower Fan without PI Control
5: Cooling Tower Fan with PI Control
6: Pump (Secondary) without PI Control
7: Pump with PI Control
Hand / Auto Mode Operation
6
The Z1000 can be operated in HAND mode when the following actions have been
performed:
· All parameters are programmed
· Motor direction has been checked
Fig. 3: Digital Operator
Motor Rotation Test
Press
PRESS HAND BUTTON
Drive for the selected application. Press
to access a parameter, and use
to select the digit and use
to change the parameter value.
Press
to save the value.
Green LED
is blinking.
Next, press
Press
to move the cursor one
position to the right and
Press
PRESS TO TURN OFF
First Digit
Flashing
to access Hand Speed. Use
Hand Speed value. Press
to increase the
to change
to save value.
to go to the next parameter to continue the Quick Setup programming.
frequency reference (d1-01) to 10.00 Hz.
When Quick Setup is completed press
AUTO MODE
“Home” to exit the Quick Setup menu and go to operation.
Press
to save freq. reference.
10.00 Hz
The Z1000 can be operated in AUTO mode when the following actions have been
performed:
· All parameters are programmed
· Motor direction has been checked
· Auto Mode: Reference source selected in parameter b1-01 (See step 3)
· Auto Mode: Run source selected in parameter b1-02 (See Step 3)
Frequently Used Parameters
The motor should now be operating at low speed
Parameter
Default
Value
A1-06
0
Application Selection
See Application list under step 4.
b1-01
1
Reference Source 1
Speed Control Method
0 = Digital Operator (Adjust Motor Speed from keypad)
1 = Terminals (Speed Pot. / 0 – 10V / 4—20mA)
b1-02
1
Run Source 1 /
Start/Stop Control Method
1 = Terminals (Start/Stop using external contact / switch)
3 = Communication
Description
Comments
running in the correct forward (clockwise) direction.
Next, press
on the Digital Operator.
If motor rotation is not correct, power down the drive, wait five minutes and
swap 2 motor leads at the drive output terminals.
b1-03
1
Stop Method Selection
0 = Ramp to stop (Motor ramps down at stop command)
1 = Coast to stop (Motor freewheels at stop command)
b5-01
0
PI Mode Selection
0 = Disabled, 1 = Enabled, 3 = Fref + PI
b5-02
2.00
PI Proportional Gain Setting
Only active when b5-01 is set to value greater than 0
b5-03
0.5 sec.
PI Integral Time Setting
Only active when b5-01 is set to value greater than 0
b5-20
1
PI Setpoint Scaling
0 = Hz,1= %, 2 = rpm, 3 = custom (use b5-38, b5-39 and b5-41)
C1-01
30.0 sec.
Acceleration Time
The time it takes to ramp up from 0 to maximum motor speed.
Use precaution, and refer to
Fig.1 or 2, swap any two of the
three output leads to the motor
C1-02
30.0 sec.
Deceleration Time
The time it takes to ramp down from maximum motor speed to 0.
d2-01
100.0 %
Frequency Reference Upper Limit
Maximum motor speed allowed (e.g. 100 % = Max rpm)
d2-02
0.0 %
Frequency Reference Lower Limit
Minimum motor speed allowed (e.g. 100 % = Max rpm)
E1-01
*
Input Voltage Setting
Motor nameplate voltage
E2-01
*
Motor Rated Current
Motor nameplate current
H3-09
1
Terminal A2 Signal Level Selection
0 = 0 to 10V, 1 = -10 to 10V, 2 = 4 to 20mA, 3 = 0 to 20mA
H3-10
1
Terminal A2 Function Selection
Predefined signals, see Z1000 User Manual
!
DANGER
After the power has been turned OFF, wait at least five minutes until the
charge indicator extinguishes completely before touching any wiring, circuit
boards or components.
(U/T1, V/T2 and W/T3). After the
wiring change, repeat Step 5
and recheck motor direction.
Digital Operator
turned off.
YAI Document Number: TM.Z1000.01 05/10/2013 ©2012 Yaskawa America, Inc. - (800) YASKAWA (927-5292)
AUTO REFERENCE
LED is blinking
when AUTO mode
is active but AUTO
Run Command is
not active.
PRESS AUTO BUTTON
PRESS TO TURN OFF
Press the AUTO button to put the Z1000 into AUTO mode.
In AUTO mode the Z1000 is capable of starting or stopping based on the Run
Source Selection setting parameter b1-02. (See Step 3 Select Start/Stop
Control Method)
The Speed Command used in AUTO mode is based on the Reference Source
Selection setting parameter b1-01. (See Step 3 Select Speed Method)
Fax (847) 887-7310
[email protected]
www.yaskawa.com