1
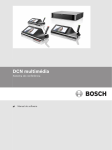
Webcast Planner and Player
DCNM-LWA
en
Software manual
Webcast Planner and Player
Table of Contents | en
3
Table of contents
1
About this manual
4
1.1
Intended audience
4
1.2
Copyright and disclaimer
4
1.3
Document history
4
2
System overview
5
2.1
Software and License requirements
7
3
Installation
8
3.1
Webcast Planner home page
4
Configuration (webcast planner)
11
4.1
Customisation
11
4.2
Booking a webcast
12
4.3
Feedback
14
4.4
Adding Items
15
4.4.1
Adding/editing a link
15
4.4.2
Adding/editing a document
15
4.4.3
Adding/editing a presentation
15
4.4.4
Adding/editing a poll
16
4.4.5
Adding/editing a survey
16
4.4.6
Adding/editing agenda points
17
4.5
Published webcasts
17
4.6
Delete webcasts
18
4.7
Statistics
19
5
Operation (webcast planner)
20
5.1
Micro site layout
20
5.2
Microsite branding and privacy
20
5.3
Player viewership
21
5.4
Player controls and captions
21
5.5
Starting and stopping webcasts
21
5.6
Player tabs
22
5.6.1
Home tab
23
5.6.2
Index tab
23
5.6.3
Presentation tab
24
5.6.4
Geotags tab
24
5.6.5
Poll/Survey tab
25
5.6.6
Speaker tab
25
5.6.7
Help icon
25
5.7
Share form
25
5.8
Feedback form
25
5.9
Player on mobile devices
26
6
Troubleshooting
27
Bosch Security Systems B.V.
8
Software manual
2014.01 | V1.0 | DCNM-LWA
4
1
en | About this manual
Webcast Planner and Player
About this manual
The purpose of this manual is to provide information required for installation, configuration
and operating the DCN multimedia Webcast Planner and Player application. This manual
describes no hardware installation instructions. If required, refer to the DCN multimedia
Webcast Application software manual.
This manual is available as a digital document in the Adobe Portable Document Format (PDF).
For more information about DCN multimedia in general, refer to the product related
information on www.boschsecurity.com.
1.1
Intended audience
This manual is intended for operators and users of the DCN multimedia Webcast Planner and
Player application.
1.2
Copyright and disclaimer
All rights reserved. No part of this document may be reproduced or transmitted in any form by
any means, electronic, mechanical, photocopying, recording, or otherwise, without the prior
written permission of the publisher. For information on getting permission for reprints and
excerpts, contact Bosch Security Systems B.V..
The content and illustrations are subject to change without prior notice.
1.3
Document history
2014.01 | V1.0 | DCNM-LWA
Release date
Documentation version
Reason
2014.01.27
V1.0
1st edition.
Software manual
Bosch Security Systems B.V.
Webcast Planner and Player
System overview | en
5
System overview
2
The DCN multimedia Webcast Planner and Player is a password protected website used to
book and manage meetings in the Player Micro site (start time, settings and appearance) as
well as attach content such as agenda points, presentations, polls/surveys, links and
documents. Once meeting times and content are finalised, they are then loaded into the
Webcast Application.
The Micro site is the website which hosts all the webcasts published by the Webcast
Application. The Player is included in the Micro site and is used to view any live or published
webcasts along with the attached content added in the Planner.
Webcasting with HD cameras
13
14
11
12
9
6
10
15
16
7
8
2
1
3
5
18
17
4
1.
DCN multimedia - Multimedia Device (DCNM-MMD).
–
2.
DCN multimedia Audio Powering Switch (DCNM‑APS).
–
3.
For information, refer to the DCN multimedia manuals.
For information, refer to the DCN multimedia manuals.
Audio to Serial Digital Interface (SDI) converter. Used with HD cameras.
–
NOTICE: Use Audio output 2 (recording output) on the DCNM-APS.
–
For information, refer to Requirements and the available documentation of the SDI
converter.
4.
Bosch HD Conference Dome.
–
5.
For information, refer to the available documentation of the used camera.
HD‑SDI video switcher for HD cameras (Needed when more than 1 camera will be used.).
–
For information, refer to the available documentation of the used video switcher or
Allegiant.
6.
DCN multimedia software suite.
–
7.
Bosch Security Systems B.V.
For information, refer to the DCN multimedia manuals.
Audio and video from the HD‑SDI converter to the HD‑SDI capture card.
Software manual
2014.01 | V1.0 | DCNM-LWA
6
en | System overview
Webcast Planner and Player
–
For information, refer to Requirements and the available documentation of the SDI
converter.
8.
Ethernet connection to the HD‑SDI video switcher (by using HD cameras).
–
For information, refer to Requirements and the available documentation of the video
switcher or capture card.
9.
DCN multimedia Webcast Application (DCNM‑LWA).
–
For information, refer to the DCN multimedia Webcast Application software manual.
10. Windows PC.
–
For information, refer to the DCN multimedia Webcast Application software manual.
11. Sync webcast booking (Webcast planner).
–
For information, refer to this software manual.
12. Stream or publish webcast (Webcast Player + Microsite).
–
For information, refer to the DCN multimedia Webcast Application software manual
and this software manual.
13. Client booking a webcast.
–
For information, refer to this software manual.
14. Internet environment.
15. Webcast Planner (internet accessible) application.
–
For information, refer to this software manual.
16. Webcast Player + Microsite (internet accessible).
–
For information, refer to this software manual.
17. Users view the webcast on PC or MAC.
18. Users view the webcast on mobile device.
2014.01 | V1.0 | DCNM-LWA
Software manual
Bosch Security Systems B.V.
Webcast Planner and Player
2.1
System overview | en
7
Software and License requirements
The Player and Micro site is designed to run on the browsers and operating systems listed
below:
Computers need to use the following internet browsers:
Browser
Instructions
Internet Explorer 9 or To view live webcasts, IE users must install a free flash plug-in,
higher.
version 11.
Firefox 16 or higher.
To view live webcasts, Firefox users must install a free flash plug-in,
version 11.
Chrome (22) or
higher.
Safari 6 or higher.
To view live webcasts, Safari users must install a free flash plug-in,
version 11.
Smart phones and tablets, need to use the following operating systems:
Operating system
Instructions
iOS version 5.0 or
higher
Android 4.0 or higher Browser: Chrome (22). To view live webcasts, Android users must
install a free flash plug-in, version 11. Notice: Chrome for Android is
supported from Android V4.0.
Windows Phone 7.5
IE browser. Live Webcast not supported by Windows. Published
webcasts are viewable.
Bosch Security Systems B.V.
Software manual
2014.01 | V1.0 | DCNM-LWA
8
3
en | Installation
Webcast Planner and Player
Installation
Webcast Planner and Player do not need to be installed on your computer. It is an internet
based application which runs on the browsers and operating systems as listed in section
Software and License requirements, page 7.
Notice!
To link the Webcast Planner and Player with the Webcast Application:
Refer to the Webcast Application user manual.
Website Login
To load the Webcast Planner website, type the following address in your internet browser:
1.
https://planner.boschsecuritywebcasting.com
You will be requested to enter your login username and password (received by e-mail
after activation of the webcast application software).
2.
Type your username and password in the text box and click Login
After logging in, the Webcast Planner home page appears as default destination.
3.1
Webcast Planner home page
The Webcast Planner home page is the default destination after logging in or after clicking
Home in the menu. The home page lists all the webcasts of the current and previous month.
This chapter is based on the fact that webcasts are planned already. A new customer has to
start with booking a webcast. If required, refer to Booking a webcast, page 12.
Home page filtering
The filter settings allow you to view webcasts in the past or future:
4
Click Reset to show webcasts of the current month.
Webcast titles, attachments and Icons
Each webcast is listed with the following:
–
The title of the webcast.
–
A count of any included agenda points or attachments.
–
These would be displayed in text next to the title; i.e.‘3 attachments’ or ‘3 agenda
points’.
–
If the webcast is live, private or published, they would include one of the following icons:
–
An earth icon shows if webcast is live.
–
A padlock icon shows if the webcast is private.
–
An archived icon shows if the webcast has been published.
Visibility setting
The Visibility column shows whether the webcast is shown on the Micro site and RSS feed
(see Micro site layout, page 20):
1.
Clicking on the word visible changes it to hidden.
2.
To change it back to visible, simply click the word hidden.
Hits column and activity report
The Hits column shows the number of times the webcast has been loaded by viewers:
4
Clicking on the number of hits takes you to the activity report for that webcast.
Date column
The Date column shows the date of the meeting. For archived webcast, it also shows the
expiry date.
2014.01 | V1.0 | DCNM-LWA
Software manual
Bosch Security Systems B.V.
Installation | en
Webcast Planner and Player
9
Extending webcasts
Clicking the expiry date (displayed in the date column) allows you to extend the webcast by 1
year. Please note that; extending the webcast will deduct webcasting hours of your existing
webcast hours. If there are no webcast hours remaining, you need to buy new webcast hours.
Webcast Menu
Hovering on the webcast title shows a menu for that webcast with the following items:
Edit
This will allow you to edit a previously created webcast booking. This is
the same as using the menu item Webcast > Edit a webcast.
Add an agenda
This only shows in the menu if a webcast has no agenda points
point
attached. It will take you to the Edit Agenda Point form where you can
enter agenda points for each webcast.
Add item
This allows you to add a link, document, presentation, polls or survey to
a webcast.
Clone
This will allow you to duplicate a webcast or create reoccurring
webcasts (refer to the Cloning webcasts description following).
Delete
This will allow you to delete the webcast.
View
This will open up a new window showing you the webcast player as it is
setup. (refer to the Webcast URL paragraph following).
Edit webcast index Menu item visible only at a published webcast.
points
Embedding
You can embed the webcast in any website.
Note: iFrame will only work in iFrame enabled websites.
Viewing attached items
If the webcast has no attachments or agenda points, it shows a white dot in the blue square.
If the webcast has attached items or agenda points, then an arrow is shown instead.
Clicking the arrow button expands the table to show any attached items or agenda points.
Hovering over any item will show an Edit link for that item.
Viewing agenda points
If agenda points exists, they can be expanded by using the down arrow next to Agenda.
Hovering over Agenda, shows an Edit button which takes you to the Edit Webcast Agenda
form where agenda points can be added, reordered or deleted.
Reordering attached items
Items attached to a webcast can be reordered by dragging them directly in this view.
This can only be done for items on the root of the webcast.
Items attached to the agenda points can be edited or reordered in the Edit Webcast Agenda
form.
Cloning webcasts
Webcasts can be cloned using the Clone link on any webcast. This means that a duplicate of a
webcast can be recreated on a new date. The cloning feature can also be used to create a
recurring webcasts which can be set to repeat daily, weekly, monthly or annually.
This is the same feature as the Webcast > Clone an existing webcast menu item.
Bosch Security Systems B.V.
Software manual
2014.01 | V1.0 | DCNM-LWA
10
en | Installation
Webcast Planner and Player
Webcast URL
The planned webcast can be accessed in advance of it being available on the micro site via the
URL available through the View link on the webcast row. Clicking View will open up a new
window showing you the webcast as it will appear in the player. View is the last menu item
which appears on the webcast row menu. This menu appears when you hover over the
webcast title as described in the Webcast Menu paragraph previous.
It can also provide the URL you need to send to users if you want them to view the webcast
before the day it goes live.
Information Dashboard
The Webcast Planner site also has an information dashboard on the Home page, above the
webcast listing, showing 3 important items of client information:
–
The client hosting service end date.
–
A display of how many webcast hours left.
Notification and restriction of hours
If the number of contracted hours falls to less than 10% you will receive a notification email.
If your webcast hours have run out, you will not be able to book, publish or play any webcasts.
2014.01 | V1.0 | DCNM-LWA
Software manual
Bosch Security Systems B.V.
Webcast Planner and Player
Configuration (webcast planner) | en
4
Configuration (webcast planner)
4.1
Customisation
11
Edit site title text
From the Site > Edit site title form, the site title text can be removed entirely by checking the
Display site title text box. The site title text can be edited in another section on the Edit site
title form, reached via the Site > Edit site title menu item.
Edit site introduction text
The micro site also has customisable title and introductory text on the home page underneath
the Welcome bar. The introductory text is edited on the Edit site introduction form, reached
via the Site > Edit site introduction menu item.
There is a simple box for the introductory text's title. The introductory text itself is edited
using a rich text editor, allowing formatting and inclusion of pictures in the introduction.
Edit default player text
The player itself also has a home page text area called the Player Text which can be set as
default text to appear on all webcasts unless it is customised per webcast.
The Default Player Text for the webcast player can be edited on the Edit default player text
form, reached via the Site > Edit default player text menu item.
The player text is edited using a rich text editor.
Fonts and colors
The appearance of the Micro site and Player can be altered in the Planner, via the Site >
Fonts and colors menu item.
–
You can select 1 of 2 options: Default or Custom.
–
Default will be the Bosch branding, according to the Bosch style guide.
–
All Custom branded sites footers will show ‘powered by Bosch’.
Custom branding will enable you to alter the appearance of three areas:
1.
The banner image file (max 992px x 400px).
2.
The micro site's title text.
3.
The navigation bar (color, navigation font color, size and font family).
Miscellaneous Settings
Banner Image
To upload a banner image, select Use new image and click browse to select an image file from
your computer, ensure that it is a maximum pixel size of 992px x 400px. The file will be
uploaded when the entire Edit site banner and navigation form is submitted.
Navigation Bar
The custom navigation bar color and font are chosen on the Edit fonts and color form by
either entering the RGB value directly, or selecting it from the color picker by moving the clear
circle around the color palette. The color can then be selected by clicking the color circle on
the bottom right.
The navigation font family and size are also customisable from this same form.
You must click submit before these customisations will take effect.
Customisation settings
If you have not previously chosen custom branding, when switching from default to custom,
the base brand settings will be: no logo, no title and grey menu bar.
If you have previously chosen custom branding, when switching from default to custom, the
brand settings including banner image file, colours and fonts will appear as previously set.
Default Twitter Account
By linking a Twitter account to the micro site, a tweet will be sent up to 1 hour before each
meeting's planned start time, with details and a link to the webcast.
Bosch Security Systems B.V.
Software manual
2014.01 | V1.0 | DCNM-LWA
12
en | Configuration (webcast planner)
Webcast Planner and Player
In the Site > Miscellaneous Settings form, click the Add twitter access link and enter the
correct Twitter account details.
Default Map Location
In the Site > Miscellaneous Settings menu item you can set a default map location by entering
latitude and longitude, or the name of a place, into the Default map centre point string field.
Whenever a webcast or agenda item is then Geotagged, this default location will appear on
the pop-up map.
Default Email Address
The default email address where notifications of published webcasts and notification of
passwords are sent to can be entered in Site > Miscellaneous Settings menu item.
Sharing Settings
The sharing feature which allows users to share webcasts via email and social networks can
be enabled or disabled by default on the player site wide in this Site > Miscellaneous Settings
menu.
Micro site privacy setting
The micro site itself can be made private at any point in the Site > Miscellaneous settings
menu item by changing the micro site privacy setting to yes and supplying a webcast access
code.
–
–
Only one webcast access code can be set against the micro site.
If a micro site webcast access code is set, upon correctly entering the credentials, the
viewer has access to all available webcasts, except for webcasts which were made
private before the micro site was passworded.
Webcast privacy setting
Individual webcasts can also be made private by setting the privacy setting to yes and
supplying a webcast access code in either the book a webcast and edit a webcast forms.
–
Only one webcast access code can be set against each webcast.
–
When the webcast’s private setting is no, the webcast is viewable by all.
–
When the webcast’s private setting is yes, the webcast is viewable by anyone entering
the correct webcast access code.
4.2
Booking a webcast
The first task to be completed in the Planner is booking a webcast, which can be done via the
Webcast > Book a Webcast menu item.
Live Webcast check box
You can choose whether the meeting is to be broadcast live or not (default is live) via the Live
Webcast check box.
Start Time and Date
To create a valid webcast booking you must first select a time and date in the future. Clicking
the date box will also bring up a popup calendar.
The webcast start time cannot be edited once a webcast has started.
Hidden Webcasts
Webcasts can be made to not appear on the Micro site webcast listings nor in the RSS feed
by clearing the Show on Site checkbox in the Book a Webcast and Edit a Webcast forms.
The default state for a ‘live’ webcast is show on site.
The default state for a non-'live' webcast is hidden and therefore show on site is unchecked.
Private Webcasts
Each webcast can also be made private which means it will appear on the webcast listings but
needs an access code to be able to view it.
2014.01 | V1.0 | DCNM-LWA
Software manual
Bosch Security Systems B.V.
Configuration (webcast planner) | en
Webcast Planner and Player
13
To make a webcast private, simply check the Make webcast private box and enter an access
code of your choosing. See Customisation, page 11 section.
Feedback email
Each webcast has a feedback form so users can submit comments directly about the webcast.
This email is viewable in the Feedback > View feedback and can also be sent directly to a
specific email address.
The default feedback email is set in the Site > Edit Feedback menu item. See Feedback, page
14 section.
If feedback for a particular webcast needs to go to a different email address, then in the Book
a webcast (or Edit a webcast) form, choose the Use Custom setting of the Feedback email
address section to add a new email address. See Feedback, page 14.
Sharing Webcasts
When enabled in the settings, all webcasts can be shared by users via email or through social
networks. By default all webcasts will follow the site default.
To turn off this default, select the No sharing option on the Book a Webcast or Edit a
Webcast forms.
Geolocation
To associate a webcast to a specific location, click on the Geographical data field on the Book
a webcast and Edit a webcast forms and you will be presented with a zoomable Google street
map.
In the search box you can either type a zip code, a street name and city, latitude and longitude
or just a city name. Geo-location is more appropriate for locating agenda items.
To remove the location, click in the Geographical data box and click the Remove Marker
button so the red marker disappears.
Webcast Title & Description
The title and description is the only other setting apart from the Time and Date which is
necessary in order for a webcast to be valid and booked. The description information will
appear.
Player Text
The player text is the text which appears in the home tab of a webcast. The content of this tab
will default to the custom Player Text set in the Site > Edit default player text, unless it is
customised here.
If the Use Custom is chosen, then a rich text editor appears allowing formatting and inclusion
of pictures in the introduction.
Bosch Security Systems B.V.
Software manual
2014.01 | V1.0 | DCNM-LWA
14
4.3
en | Configuration (webcast planner)
Webcast Planner and Player
Feedback
Each webcast has a feedback form so users can submit comments directly about the webcast.
The Feedback form can be both customised and disabled on the Feedback tab > Edit
Feedback.
Enable/Disable Feedback
The Show feedback (site wide) dropdown can be set to either, Show or Hide. If Hide is
chosen, the feedback icon will disappear from the player for all webcasts.
Default feedback email
The default feedback email address to where all feedback is also sent can be changed in the
email form box. The feedback email can also be changed for a particular webcast in the Book
a webcast or Edit a webcast form.
Feedback option
There is a checkbox to ‘Save feedback to database only (don't send email)’. This means that
feedback will only be viewable from the Feedback tab > View Feedback. The default is to
receive feedback to the email address as well as in the database.
Feedback Spam filter
Feedback forms in the Player by default include a spam filter by way of a ReCaptcha question
to ensure that the form is being submitted by a real person. The Use spam filter checkbox
option allows you to switch the spam filter off (by default it is checked for on).
Feedback Name
The Feedback name box allows you to change the name of the Feedback form which appears
on the Player. The default name entered is Feedback.
Feedback Thank you
The Feedback form also allows you to change the thank you message on the Feedback form to
anything. The default is Thank you for your feedback. (This appears after the feedback has
been sent).
2014.01 | V1.0 | DCNM-LWA
Software manual
Bosch Security Systems B.V.
Webcast Planner and Player
4.4
Configuration (webcast planner) | en
15
Adding Items
Clicking the Add Item link on the webcast row brings up the Add items to webcast popup box
where the following items can be added to webcasts (The webcast row is found by going to
the home menu, then hover your webcast):
–
Add a link (Adding/editing a link, page 15)
–
Add a document (Adding/editing a document, page 15)
–
Add a presentation (Adding/editing a presentation, page 15)
–
Add a poll (Adding/editing a poll, page 16)
–
Add a survey (Adding/editing a survey, page 16)
Items can also be added directly to Agenda Points using the same pop up box. See Adding/
editing agenda points, page 17.
4.4.1
Adding/editing a link
In the Add a link form accessible from the Add Item popup box, you can enter a web link to
attach to any webcast or agenda point.
In the Add a link form, simply enter a web link. The http://...... must also be included in the
web address.
Edit link
To edit a link later, on the home page use the arrow to show the list of attached items and
hover over the link to bring up the Edit link which takes you to the Edit a link form.
4.4.2
Adding/editing a document
In the Add a document form accessible from the Add Item popup box, you can upload a
document and enter its title.
Documents can be of any format; the only limit is that the file must be less than 10 MB.
Editing or deleting documents
To edit or delete a document, hover over the item in the home page to reveal the Edit | Delete
link. Once in the Edit a document form you can change the title of the document.
Deleting a document from a webcast, deletes it permanently from the server.
Updating documents
If a document needs to be replaced with a different version, then in the same Edit a document
form, choose Use new document from the dropdown box the document title and choose a
new document to upload.
4.4.3
Adding/editing a presentation
In the Add a presentation form accessible from the Add Item popup box, you can set the title
of the presentation and select a PowerPoint file to be converted (Max. 10 MB).
–
You can upload files with the following file extensions: pptx, ppt, pptm, ppsx, pps, ppsm,
potx, pot, potm, odp.
–
You will be shown an error message if the file is invalid.
–
Below the upload box there is some text warning you that animations or embedded
videos will not be replicated in the uploaded version.
Uploading presentations
While the file is uploaded you are shown a waiting message.
Once the conversion is finished, the page is automatically reloaded to show the individual
slides on the edit presentation page.
If the PowerPoint file is corrupted, the user will be shown an error message and the site
administrator will automatically receive an email to check the issue.
Bosch Security Systems B.V.
Software manual
2014.01 | V1.0 | DCNM-LWA
16
en | Configuration (webcast planner)
Webcast Planner and Player
Rearrange slides
Once uploaded, you are taken to the Edit a presentation form where you can rearrange slides
by dragging and dropping.
Edit / Delete slides
In the Edit a presentation form, the Edit and delete links appear by hovering over the
individual slides.
Using Edit you can edit the title of the slide. In the same form you can upload a new image by
selecting Use new slide image from the drop down box and choosing a new file to replace the
existing one.
To edit the presentation later, on the home page use the arrow to show the list of attached
items and hover over the presentation to bring up the Edit link which takes you to the Edit a
presentation form.
Uploading images rather than PowerPoint
If you are not using PowerPoint for your presentations, then it’s possible to just upload JPG or
PNG files instead.
Use the Add a Presentation form in the Add item menu item, enter the title of the
presentation, then instead of choosing a presentation file click the Browse button and click
the Add button instead. You will then be taken to the Add a slide form where you can enter
the title and browse for the image file.
4.4.4
Adding/editing a poll
In the Add a poll form accessible from the Add Item popup box, you can enter a poll's title, its
live date, duration, Poll question and thank you message.
One Poll question can be entered per poll with multiple answers.
If you need a poll to appear immediately, ensure that the live date is set to present time or in
the past.
Poll answers
Once you have entered a Poll question and clicked Add, you are taken to the Edit a poll page
where you can add one answer at a time. There are no restrictions on the amount of answers
which can be added.
Reordering answers
The order in which answers are presented can be ordered (or reordered at any time) by using
the drag and drop function on the Edit a poll form.
Editing/deleting answers
Hovering on any answer you will see an Edit | Delete link which allows you to edit or delete
the answer at any point.
4.4.5
Adding/editing a survey
In the Add a survey form accessible from the Add Item popup box, you can enter a survey
title, its live date, duration and thank you message.
Survey questions
After clicking Add in the Add a survey form, you are taken to the Edit a survey form where
you are able to add questions to the survey.
4 types of questions can be added:
1.
Quantitative question (one answer from a selection).
2.
Quantitative question (multiple answers from a selection of checkboxes).
3.
Qualitative question (free text - single line).
4.
Qualitative question (free text - multiline).
2014.01 | V1.0 | DCNM-LWA
Software manual
Bosch Security Systems B.V.
Webcast Planner and Player
Configuration (webcast planner) | en
17
Entering and ordering answers
After selecting quantitative questions, you are taken to the Edit question form where you can
add answers for that question.
Each answer can be reordered by using the drag and drop function.
To edit answers afterwards, simply hover over them to either edit or delete them.
Edit Survey
After entering questions and answers, you can go back to the Edit a survey form using the
Return to edit survey link at top of the form.
On the Edit a survey form, each question can be reordered, edited or deleted
4.4.6
Adding/editing agenda points
Agenda points are added to webcasts by clicking the Add an agenda point link in the webcast
row menu. To add subsequent agenda items, you can also use the Edit webcast agenda form.
If the webcast contains agenda points, they can be edited by hovering over the Agenda title
and clicking edit. This brings up the Edit webcast agenda form.
Editing Agenda Items and adding items
Hovering over any agenda point will bring up a menu row with three items: Edit, Add Item and
Delete. Editing the agenda item will allow you to change its name and add a multilingual
agenda if you have a multilingual site.
Agenda Geolocation
Associating agenda items with a geographical location allows viewers to go straight to agenda
items (in published mode) straight from the Geotag map.
In the Edit webcast agenda form, there is a Geographical data field which when clicked shows
a zoomable Google street map.
In the search box you can either type a zip code, a street name and city, latitude and longitude
or just a city name. A yellow arrow will appear which you can use to more precisely locate the
webcast position using the zoom buttons, then click Ok. Geolocation is more appropriate for
locating agenda items.
To remove the location, click in the Geographical data box and click the Add/Remove Marker
button so the yellow arrow disappears.
Attaching items to agenda points
Clicking the Add Item link next to each agenda will bring up the same Add Item popup box.
This will allow you to attach multiple documents, presentations, links, polls and surveys to an
agenda item. Documents and links attached to agenda items move with their associated
agenda item.
Reordering Agenda Points
Items in the agenda can be reordered by dragging and dropping agenda items on the Edit
webcast agenda form.
4.5
Published webcasts
Published webcasts means they are no longer live but are accessible to be viewed from the
archive.
Webcast that have been published using the Webcast Application will show a Published icon
on the planner home page.
Edit Index Points
Published webcast will show an extra link on hover: Edit webcast index points.
The Edit webcast index points form allows you to edit the time of existing index point or
delete it.
New webcast index points can also be added to the published webcast. Select any of the
following and select a time in hours, minutes and seconds:
Bosch Security Systems B.V.
Software manual
2014.01 | V1.0 | DCNM-LWA
18
en | Configuration (webcast planner)
Webcast Planner and Player
Captions
Information label added to specific point in the webcast.
Agenda points
Choose from dropdown list of pre-existing agenda points (If you need to
add or amend agenda items, see the Adding/editing agenda points, page
17 section).
Slides
Choose from a dropdown list of pre-existing presentation slides (If you
need to add or amend a presentation slides, see the Adding/editing a
presentation, page 15 section).
Requests and active speaker lists are not editable.
4.6
Delete webcasts
Webcasts can be marked as deleted by clicking the delete link that appears when you hover
over the webcast row on the Home page. Webcasts are then moved to the Recycle Bin.
Deleted webcasts don't appear in webcast listings in the micro site nor in the RSS feed.
Deleted webcast cannot be viewed via their URL.
Undelete webcasts
Webcasts are undeleted by clicking the Recycle bin button on the Home page and then click
the restore link that appears when the mouse hovers over the item. The webcast will appear
again in webcast listings, RSS feeds and via its URL.
After two months of being marked deleted, a webcast can no longer be undeleted.
2014.01 | V1.0 | DCNM-LWA
Software manual
Bosch Security Systems B.V.
Webcast Planner and Player
4.7
Configuration (webcast planner) | en
19
Statistics
Webcast statistics are available from the top level > Statistics menu item.
There are two types of reports available:
Webcast report
The Webcast Report allows you to see the total number of hits a webcast has received in the
Hits column, then breaks that number down into hits during live and published states.
The webcast report can be filtered per month or across several months as well ordered by
title, live date, hits, live hits, or published hits.
Each report also includes a link for viewing the webcast in its player.
Individual webcast report
Clicking the webcast title in the webcast report shows the single webcast report for that
webcast.
The single webcast report page shows the number of hits (live, published and total) per
monthly period since it was created.
Session/IP Reports
The Session/IP report shows the number of sessions per IP addresses which visited the micro
site or player pages.
The report can be generated per month or across several months.
Bosch Security Systems B.V.
Software manual
2014.01 | V1.0 | DCNM-LWA
20
en | Operation (webcast planner)
Webcast Planner and Player
5
Operation (webcast planner)
5.1
Micro site layout
The Player micro site is the website which hosts all the webcasts published by the Bosch
Webcast Application. The micro site and player URL address will be unique to each client and
automatically generated when purchased the webcast application.
The micro site has two pages in the navigation: Home and Webcasts.
Home page
The Home page is the default landing page for the micro site and comprises all the items
following:
Introductory text
The introductory text is the first welcome to the micro site and possibly to webcasting which
end users will have. It is therefore important that this text is welcoming and explains the site
well.
See Customisation, page 11 > Introductory Text for instructions on how to edit the text, which
can be done using HTML and images.
Future and recent webcasts
The list of webcasts on the Home page shows a maximum of 5 future and 5 recent webcasts.
Each webcast is displayed by its title, description and date. Clicking a webcast opens the
player in a new page.
Current webcasts
If a webcast is planned for the current day, the micro site displays the link to the webcast
below the introduction text along with the live time.
Search box
The search box allows you to search through all current and published webcasts by keyword.
The search includes webcast titles and descriptions as well as the title of any attachments.
RSS feed
An RSS feed (of webcasts) is available and represented by the RSS icon, which appears on
the Home page or the Webcasts page.
Webcasts
The Webcasts link goes to a list of all the available published webcasts.
Webcasts appear in chronological order, newest to oldest. Each webcast will open in a new
page.
5.2
Microsite branding and privacy
Default branding
A micro site with default branding will have a blue navigation bar, and a Bosch logo as
described in the Micro site layout, page 20 section.
Custom branding
A micro site with custom branding will adhere to the settings selected in the Planner (nav bar
color, nav bar text color, size, and custom image). See Customisation, page 11 section.
Site password
A viewer attempting to load any page or webcast from a micro site that has a site-wide
username and password set, will be required to enter these before they can continue to the
requested page.
Webcast password
A viewer attempting to view any webcast that has a username and password set will be
required to enter these before they can continue to view the webcast.
2014.01 | V1.0 | DCNM-LWA
Software manual
Bosch Security Systems B.V.
Webcast Planner and Player
5.3
Operation (webcast planner) | en
21
Player viewership
Live viewership
Each live webcast will restrict viewership to 10,000 (ten thousand) simultaneous viewers.
Published viewership
Each published webcast will restrict viewership to 100,000 (one hundred thousand)
simultaneous viewers.
Caution!
!
5.4
Keep in mind the fair use policy.
Player controls and captions
Player size and Aspect ratio
The player window size is 480 x 270 pixels and will show videos in a 16:9 aspect ratio window.
Video that is 16:9 aspect ratio will fill the player window.
Video that is 4:3 aspect ratio will be centred in the player window with black to left and right.
Flash plugin
If the viewer doesn't have the flash plug-in installed on their computer they will receive a
message, in the GUI language, informing them that it needs to be installed.
Caption & Message overlays using Flash
On players that support flash, the name of the person is speaking (the speaker caption) is
overlayed on the bottom of the player screen seen below.
The agenda point or any messages (such as Pause, or Webcast not started yet) is overlayed
on the top of the player screen.
Video controls
Some of the controls differ in live and published mode, those that do are described below.
Each control setting allows you to:
1.
Start and pause the video in both live and published view.
See the video time elapsed in minutes and seconds.
2.
Move the video to any point in a published mode only using the scrubber bar.
The total length of the video in minutes in published mode. In live mode this will show the
status Live.
3.
Mute the webcast (In published and live webcasts.).
4.
Increase or decrease the volume of the video (Also in published and live webcasts.).
5.
Makes the video full screen. Pressing the keyboard ESC button brings it back to the
default player (Also in published and live webcasts.).
5.5
Starting and stopping webcasts
Pausing video
If the webcast is paused through the Webcast Application, the Player will automatically stop
the video and show Webcast paused. The webcast will restart automatically when the
Webcast Application is set to restart.
After pausing the webcast in live mode, restarting the video will replay from the live stream
only i.e. the webcast does not cache locally.
Stopping video
If the webcast is stopped through the Webcast Application, the top overlay will display
Webcast has concluded.
Bosch Security Systems B.V.
Software manual
2014.01 | V1.0 | DCNM-LWA
22
en | Operation (webcast planner)
–
Webcast Planner and Player
The player shows video around 15-30 seconds later than the Webcast Application,
therefore it is important to add that time onto the end of a webcast before stopping it.
Not started alert
In live mode, if the webcast has not started, the top overlay will show the message Webcast
has not started yet.
Video start
If the webcast is started through the Webcast Application, the top text is cleared and the
video is launched automatically after a few seconds of buffering.
5.6
Player tabs
The Player tabs shows all the tabs which can appear as part of a live or published webcast.
The Player tabs only appear if an item of that type has been attached to the webcast. i.e. the
presentation tab only appears on webcasts which have a presentation attached.
The viewer can move between different tab sections by clicking the tabs. Hovering on the tab
shows the tab name as a tooltip
–
Home tab, page 23
–
Index tab, page 23
–
Presentation tab, page 24
–
Geotags tab, page 24
–
Poll/Survey tab, page 25
–
Speaker tab, page 25
–
Help icon, page 25
–
Share form, page 25
–
Feedback form, page 25
See also
–
2014.01 | V1.0 | DCNM-LWA
Customisation, page 11
Software manual
Bosch Security Systems B.V.
Webcast Planner and Player
5.6.1
Operation (webcast planner) | en
23
Home tab
The home tab shows the Player Text information which can be customised in the Planner.
See Customisation, page 11 for global customisation, or to customise the text per webcast see
Player text of Booking a webcast, page 12.
5.6.2
Index tab
Index tab – live webcasts
Before and during a meeting, the index tab will show the agenda and any associated
documents, presentation slides, links, polls or surveys.
Documents, presentation slides links, polls or surveys attached to the root of the webcast
appear at the top above the agenda points.
–
Any items attached to specific agenda points will appear below its associated agenda
point.
–
Clicking a document or link on the index tab opens up the document or link in a new
page.
–
Clicking a presentation slide opens up the presentation tab in the thumbnail mode (see
Presentation tab, page 24).
–
Clicking on a poll or survey opens up the poll or survey in its tab.
If an agenda point has been geo tagged, an earth icon next to the agenda allows you to switch
automatically to the Geotag tab and displays the corresponding pin pop-up.
Index tab – published webcasts
The Index tab of published webcasts will work in the same way as live webcasts except for a
few differences listed below.
For published webcast, the index tab shows a list of timed events, in chronological order, with
timestamp next to the names of the active speaker.
–
Clicking an event in the index tab moves the video to play from that time point.
Sharing agenda points
The share button also appears next to agenda items in published view and will allow viewers
to share links by email and social networks. Sharing from agenda items will provide a link
which starts directly at the agenda item in the webcast. See Share form, page 25 section.
Detail view – published webcasts
The viewer can determine the level of detail that they can see in the index tab of published
webcasts by using show/hide controls:
–
Show/hide polls or surveys.
–
Show/hide presentations.
–
Show/hide speaker profiles.
Bosch Security Systems B.V.
Software manual
2014.01 | V1.0 | DCNM-LWA
24
en | Operation (webcast planner)
5.6.3
Webcast Planner and Player
Presentation tab
Before a meeting has started, the Presentation tab will show the presentations available for
that webcast.
Presentation views
The viewer can switch between thumbnail, individual and timed slides mode for viewing the
presentation. The viewer can switch between the presentation viewing modes at will.
Thumbnail view
The Thumbnail view, the icon to the right, shows a thumbnail of each presentation slide. The
scroll bar will take you through multiple presentations. Clicking a thumbnail will switch the
view to the individual mode, with the clicked slide showing.
Individual view
In Individual view, the middle icon shows each slide in its default size or hovering over the
slide will reveal a zoom icon. Using the zoom icon, the slide can also be opened in an external
browser window at a larger size.
Clicking the slide directly will take you to the next slide in the presentation.
Hovering over slide will allow you to use the left and right arrows to go to the next or previous
slide.
Timed slides
Timed slides mode, the left icon, automatically shows the slide as currently selected by the
webcast operator. This works in both live and published view.
A message will be displayed in the slide area, to show when the first timed slide is available.
Slide alert
If the operator updates the live slide whilst the viewer is not on the Presentation tab, the
Presentation tab will blink, and continue to blink until the viewer selects that tab or until the
slides have been unselected in the Webcast application.
When the viewer clicks on a blinking Presentation tab the presentation will open in timed
slides mode.
5.6.4
Geotags tab
When a webcast, or any of its agenda items, has geo-location information associated with it,
the Geotags tab shows in the player.
Associating agenda items with a geographical location is a very useful way to break down
meeting content and allows viewers to go straight to agenda points (in published mode)
straight from the Geotag map.
The Geotags tab shows a Google map with pins for the webcast and agenda geo-locations.
Geolocated webcasts
On the Geotags tab, the location of the webcast is indicated by a red pin. Clicking the pin
brings up a pop-up box with the title of the meeting. This location is set in the Planner,
Webcast -> Book a webcast menu item. See Geolocation in Booking a webcast, page 12
section.
Geolocated agenda points
On the Geotags tab, the location of an agenda point is indicated by a blue pin. Clicking the pin
brings up a pop-up box with the title of the agenda point. In published webcasts there will
also be a link which takes the viewer directly to that index point in the video. This location is
set in the Planner, Edit > webcast agenda menu item. See Agenda Geolocation in Adding/
editing agenda points, page 17 section.
By default, the map is zoomed automatically to show all pins associated with the webcast and
its agenda items, so even if pins are in different countries, the default map would be zoomed
out to show both countries.
2014.01 | V1.0 | DCNM-LWA
Software manual
Bosch Security Systems B.V.
Webcast Planner and Player
5.6.5
Operation (webcast planner) | en
25
Poll/Survey tab
If there is one or more polls or surveys associated with a webcast, they will be shown on the
Polls/Survey tab.
If a poll or survey has been started before the webcast date and time viewers will be able to
fill it in. See Adding/editing a poll, page 16 section on how to setup a poll or survey.
Polls and surveys can only be filled out once per computer.
Poll results
Once a poll has reached its end date, on clicking it the viewer will be able to see the final
results.
Survey results
Once a survey has reached its end date, on clicking it, the viewer will see the message This
survey has been closed.
5.6.6
Speaker tab
The Speakers tab will show two lists:
–
The first shows all delegates who have their microphones on.
–
The second shows all delegate names that are on the waiting list while the video is
playing. The order of delegates in each list is undefined.
5.6.7
Help icon
The help page shows player-specific help and information to the viewer. This information is
not customisable.
5.7
Share form
The share form allows viewers to share a link to a webcast with others via email, send to a
Friend link, or via social networks, Link to This link.
The Link to This form, allows viewers to attach the webcast link directly to 3 main social
networks including into their browser’s favourite bar.
5.8
Feedback form
If enabled in the Planner, a feedback button appears on the right hand side of the window.
The feedback form allows viewers to submit feedback to the client. The title of the webcast is
entered as the subject of the feedback email which can also be set to go directly to the clients
email box.
If the spam filter has been enabled in the Planner, Site > Edit Feedback section, then viewers
will have to fill in the recaptcha words in order to send any feedback. This ensures that only
real people are using the form.
Bosch Security Systems B.V.
Software manual
2014.01 | V1.0 | DCNM-LWA
26
5.9
en | Operation (webcast planner)
Webcast Planner and Player
Player on mobile devices
Mobile Flash detection
When a mobile device is detected, the page detects what plugin the video needs. On iOS, the
flash player and controls are replaced by QuickTime.
Flash Overlay
The QuickTime player cannot display the captions or agenda as an overlay. This data is
available in the index and speakers tabs instead.
480 and 1002 pixels,
If the device's horizontal resolution is between 480 and 1002 pixels, the tabs will move
underneath the video. The micro site image (Bosch or custom) becomes invisible to save on
space.
320 and 480 pixels
Between 480 and 320 pixels the video gets resized as do the tabs underneath. The help and
feedback buttons become hidden to save on space.
Tab layout
When the tabs go underneath the video, the page will change height depending on how much
content is in the tab, so you do not have double scrolling on touch devices.
Metadata sync
The metadata on a live webcast may get out of sync on mobile players.
2014.01 | V1.0 | DCNM-LWA
Software manual
Bosch Security Systems B.V.
Webcast Planner and Player
6
Troubleshooting | en
27
Troubleshooting
Problem
Possible cause
Possible solution
Not able to view a live
Live webcasts can't be
It is possible to view the
webcast on the player from
viewed on a Windows
publised webcast.
my Windows smartphone.
smartphone.
Can't view a live webcast.
Internet connection lost or
Reconnect to the internet.
too slow.
Check minimum
requirements.
I can’t upload a powerpoint in –
10MB is the maximum of
the planner.
a powerpoint.
–
The powerpoint is
–
Keep out high resolution
pictures.
–
corrupt.
Check the powerpoint on
corrupted files or upload
a new one.
–
Internet connection is
–
Reconnect to the
internet and try again.
too slow to upload
(timeout).
My booked webcast is lost.
The webcast is moved to the
–
recycle bin.
Restore the booked
webcast.
–
If the expiration date is
reached, extend the
webcast.
Customer service
If a fault cannot be resolved, please contact your supplier or system integrator, or go directly
to your Bosch representative.
Bosch Security Systems B.V.
Software manual
2014.01 | V1.0 | DCNM-LWA
Bosch Security Systems B.V.
Torenallee 49
5617 BA Eindhoven
The Netherlands
www.boschsecurity.com
© Bosch Security Systems B.V., 2014