1
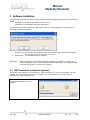
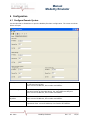
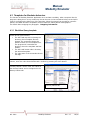
Manual
Modality Emulator
User Manual
Modality Emulator
25/02/2009
PB - PHC.
Modality Emulator
Rev: 17
1/30
Manual
Modality Emulator
Table of Contents
1
2
3
4
5
6
7
Introduction ................................................................................................................5
1.1
Revision History ...................................................................................................5
1.2
General ...............................................................................................................5
1.3
Summary ............................................................................................................5
1.4
Key Features .......................................................................................................5
1.5
Audience .............................................................................................................5
1.6
System Requirements ...........................................................................................5
1.7
Acronyms and Abbreviations..................................................................................6
1.8
Glossary..............................................................................................................6
Software Installation ....................................................................................................7
2.1
.NET Framework installation (optional)....................................................................7
2.2
Modality Emulator installation .............................................................................. 10
Modality Emulator – User Interface............................................................................... 13
3.1
File Menu .......................................................................................................... 13
3.2
Help menu......................................................................................................... 13
3.3
Button bar......................................................................................................... 14
Configuration............................................................................................................. 15
4.1
Configure Remote System ................................................................................... 15
4.2
Configure Emulator............................................................................................. 17
4.3
Templates for Emulator behaviour ........................................................................ 18
Perform DICOM actions ............................................................................................... 21
5.1
MWL - Worklist Query ......................................................................................... 21
5.2
MPPS – Modality Performed Procedure Step ........................................................... 22
5.3
DICOM Store ..................................................................................................... 22
5.4
Storage Commit ................................................................................................. 23
Special usage ............................................................................................................ 25
6.1
Extract the templates from a capture .................................................................... 25
6.2
Load the templates in the Emulator ...................................................................... 27
Mapping information................................................................................................... 29
PB - PHC.
Modality Emulator
Rev: 17
3/30
Manual
Modality Emulator
1 Introduction
1.1 Revision History
Version
0.1
Author
P.G. Brouwer
Date
13-10-2008
0.2
P.G. Brouwer
28-10-2008
Description
First version of this document, describing the
functionality of version 3.1.1.
This document describes the functionality of
version 3.1.1.
1.2 General
The Modality Emulator software has been tested on a regular computer with Windows XP
Professional SP3 loaded. For compatibility with other operating systems see the DVTk website.
1.3 Summary
The Modality Emulator can be used to emulate all the DICOM functions of a modality system. You
can use it:
• To test and verify communication with all the DICOM services a real modality would use.
• Or if you want to test the interaction of your own applications services with a modality.
The detailed reporting gives you full feedback and analyses of all the communication.
It can use DICOM files as input for Queries, MPPS and Storage actions, allowing you to utilize
your own real medical data.
1.4 Key Features
•
•
•
•
•
•
•
TCP/IP Ping and DICOM Verification
Query Modality Worklist
Modality Performed Procedure Step updates
Storage
Storage Commitment
Detailed results with data highlighting
Validation of attribute mapping
1.5 Audience
Service engineers can quickly replace real modalities in medical environments with the emulator
and verify the connectivity of all the DICOM services involved. Test engineers and developers can
use it to emulate a medical environment for testing software products with complete workflow
scenarios.
1.6 System Requirements
•
•
Microsoft Window XP
.NET 2.0 Framework
PB - PHC.
Modality Emulator
Rev: 17
5/30
Manual
Modality Emulator
1.7 Acronyms and Abbreviations
Term
Meaning
IHE
Integrating the Healthcare Enterprise. For more information see
HIS
Hospital Information System
IHE
Integrating the Healthcare Enterprise
IOD
Information Object Definitions
MPPS
Modality Performed Procedure Step
MWL
Modality Worklist
NEMA
National Electrical Manufacturers Association
PACS
Picture Archive and Communication System
PPS / MPPS
Performed Procedure Step / Modality Performed Procedure Step
RIS
Radiology Information System
RSNA
Radiological Society of North America
SCU
Service Class User
SCP
Service Class Provider
UID
Unique Identifier
1.8 Glossary
Term
Actor (IHE)
Broker
HL7
IHE
RIS
Template
PB - PHC.
Meaning
Actors are information systems or components of information systems that
produce, manage, or act on information associated with operational activities.
One of the tasks that a Broker does is converting HL7 messages into DICOM
messages. In this document the term RIS will be used, when actually the
broker is mend, for two reasons:
Modality manuals generally refer to RIS instead of Broker,
The screens of the Modality Emulator also refer to RIS.
The MWL functionality is supplied by the Broker! See also: “1 Error! Not a
valid result for table.”
Health Level 7. A compact language used in medical environment to transmit
information.
Integrating the Healthcare Enterprise. For more information see www.ihe.net
Radiology Information System. RIS systems typically “speak” HL7. A new
trend is “Brokerless”, which means that Broker functionality is integrated into
the RIS system.
In this document the term template is used to indicate a (part of a) DICOM
that can be used to simulate the Modality Emulator behaviour.
Modality Emulator
Rev: 17
6/30
Manual
Modality Emulator
2 Software Installation
The software installation procedure of the Modality Emulator application consists of the following
steps:
- Installation of the Microsoft .NET Framework R2.0.
- Installation of the Modality Emulator application.
The installer checks the presence of .NET Framework 2.0. If this package is not installed, the
following message will appear:
•
•
Pressing Yes: The software will be downloaded from the Microsoft website and installed.
(This step requires an internet connection.).
Pressing No: The installation will be stopped.
Important:
Before starting with the Modality Emulator application installation, remove any
previous installed version of the Modality Emulator application. Use windows “Add
or Remove Programs” to remove the program.
2.1 .NET Framework installation (optional)
On the Microsoft website the executable for .NET Framework 2.0 can be downloaded. Use this
method when no internet connection is available. The steps below guide you through the
installation of .NET Framework 2.0.
When the .NET Framework installation
is started, the following screen
appears.
PB - PHC.
Modality Emulator
Rev: 17
7/30
Manual
Modality Emulator
Press “Next”
After reading the End-User License
Agreement, tick the box “I accept the
terms of the License Agreement”.
Press “Install”.
PB - PHC.
Modality Emulator
Rev: 17
8/30
Manual
Modality Emulator
Time for coffee ….
Click “Finish” to complete the .NET
Framework installation.
PB - PHC.
Modality Emulator
Rev: 17
9/30
Manual
Modality Emulator
2.2 Modality Emulator installation
Click the Modality Emulator installation
file to start the installation.
Press “Next”.
After reading the License Agreement,
tick the box “I agree”.
Press “Next”.
PB - PHC.
Modality Emulator
Rev: 17
10/30
Manual
Modality Emulator
Keep the default destination for the
place where the program will be
installed.
Keep the default “everyone”.
Press “Next”
Press “Next”
PB - PHC.
Modality Emulator
Rev: 17
11/30
Manual
Modality Emulator
Another coffee …
Press “Close” to complete the
installation.
PB - PHC.
Modality Emulator
Rev: 17
12/30
Manual
Modality Emulator
3 Modality Emulator – User Interface
3.1 File Menu
Press “File, Configure Systems” to add an extra tab in the application.
In this Configure Remote Systems menu the various
parameters are set to connect to the remote systems.
Press “File, Configure Emulator” to add several tabs in the application.
In these tabs various parameters can be set.
Press Exit to exit the application
3.2 Help menu
Press “Help” to view the version
number.
PB - PHC.
Modality Emulator
Rev: 17
13/30
Manual
Modality Emulator
3.3 Button bar
Just below the menu bar you can see the “button-bar”.
Icon
Meaning
Press this button to get the “Configure Emulator” tabs
Press this button to get the “Configure Systems” tab
Press this button to display the results
Press this button to get the tab “activity logging”.
To stop the emulator
Go Back (only applicable in “Results” window)
Go Top (only applicable in “Results” window)
Go Forward (only applicable in “Results” window)
PB - PHC.
Modality Emulator
Rev: 17
14/30
Manual
Modality Emulator
4 Configuration
4.1 Configure Remote System
Use the Menubar or Buttonbar to open the Modality Emulator configuration. The screen as shown
below will open:
RIS System
Here you should read the Worklist provider. Mostly this is the broker that
is connected to the RIS!
Enter correct IP-Address, Port number and AETitle.
MPPS Manager
The MPPS manager handles the MPPS messages. In most cases this is
the same broker as described above, but using different AET/port.
Enter correct IP-Address, Port number and AETitle.
PACS/Workstation
Systems
The location where the images will be stored.
Enter correct IP-Address, Port number and AETitle.
Store Commit Config
When the store location above is the PACS, a Storage Commit can be
requested. Enter correct IP-Address, Port number and AETitle.
PB - PHC.
Modality Emulator
Rev: 17
15/30
Manual
Modality Emulator
When the IP-Addresses, Port-Numbers and AET’s have been entered, the connections can be
tested. Go to the tab “Control”.
In the area RIS System:
• Press the button Ping RIS. When the text “Ping Successful” is displayed, the TCP/IP
connection between Modality Emulator and RIS is OK.
• Press the button DICOM Echo. When the text “DICOM Echo Successful” is displayed, the
DICOM association (“DICOM Ping”) between Modality Emulator and RIS is OK.
In the area PACS/Workstation Systems:
• Press the button Ping PACS/Workstation. When the text “Ping Successful” is displayed,
the TCP/IP connection between Modality Emulator and PACS/Workstation is OK.
• Press the button DICOM Echo. When the text “DICOM Echo Successful” is displayed, the
DICOM association (“DICOM Ping”) between Modality Emulator and PACS/Workstation is
OK.
Experience based tip: When the settings have been made, and the “ping” and “DICOM echo” was
successful, close the program, followed by restarting the program. Why?
Then the settings are stored. If you would have to kill the program, nonstored settings are lost.
PB - PHC.
Modality Emulator
Rev: 17
16/30
Manual
Modality Emulator
4.2 Configure Emulator
Use the Menubar or Buttonbar to open the Configure Emulator tab’s. Select the tab “Configure
Emulator”. The screen as shown below will open:
System Name
Although this name is not so important, some remote systems use the
combination System Name and Local IP-Address as authorization to allow
access.
AE Title
The name that will be used in the association negotiation. Most systems
require that this name is known/configured in the remote configuration.
Local IP Address
IP-Address of the computer that runs the Modality Emulator application. The
default entry is taken from the network settings. Only when more network
cards are used, make sure the correct address is selected.
Listen Port
The port on which the Modality Emulator application can receive a DICOM
association.
Storage Commit
mode.
Single association: The connection between the Emulator and the PACS
remains open for the N-Event-Report, unless the wait time has elapsed.
Different association: The connection between the Emulator and the PACS
will close directly after the Commit request. The PACS will open a new
association to sent the N-Event-Report.
Wait time for
N-Event-Report.
When this time (in seconds has elapsed) the association will be closed.
Only applicable for single association Storage Commit mode.
PB - PHC.
Modality Emulator
Rev: 17
17/30
Manual
Modality Emulator
4.3 Templates for Emulator behaviour
The function of Modality Emulator Application is to emulate a modality, what a surprise! But the
program is doing this in a very smart way! As can be seen in the screenshot below, several tab’s
exist for configuring the behaviour of the emulator. When the system has queried for a specific
patient, the MPPS and Store templates will be modified to match patient demographics.
For details about mapping see paragraph: 7 Mapping information.
4.3.1 Workflow Query template
When the Worklist Query tab is pressed, the
screen at the right is shown:
• The left-hand top side is showing the
directory where template files are
located. The screenshot shows the
default location for the template files.
The program will remember the
directory where the template was last
loaded.
• The left-hand bottom side is showing
the selected template.
• The right pane of the screenshot shows
the tags.
Load the template that matches your use. The values can be changed by clicking in the “value”
column, enter the value that should match. Confirm by pressing the enter button.
When no connection is made to a RIS, the
“Dummy Patient” can be used. The values of
the Dummy Patient can be configured in the
Dummy Patient tab.
Dummy Patient tab
PB - PHC.
Modality Emulator
Rev: 17
18/30
Manual
Modality Emulator
4.3.2 MPPS – Progress template
When the MPPS Progress tab is pressed, the
screen at right-hand side is shown:
• The left-hand top side is showing the
directory where template files are located.
The screenshot shows the default location
for the template files. The program will
remember the directory where the template
was last loaded.
• The left-hand bottom side is showing the
selected template.
• The right pane of the screenshot shows the
tags with values that are send.
4.3.3 MPPS – Discontinued template
When the MPPS Discontinued tab is pressed,
the screen at right-hand side is shown:
4.3.4 MPPS – Completed template
When the MPPS Completed tab is pressed, the
screen at right-hand side is shown:
PB - PHC.
Modality Emulator
Rev: 17
19/30
Manual
Modality Emulator
4.3.5 Image Storage
When the Image Storage tab is pressed, the
screen at right-hand side is shown:
• The left-hand top-side is showing the
directory where image files are located.
• All images in that directory will be send.
(see example screenshot below).
PB - PHC.
Modality Emulator
Rev: 17
20/30
Manual
Modality Emulator
5 Perform DICOM actions
RIS
Broker
Modality
PACS
5.1.1
5.1.2 MWL
5.2.1 MPPS
5.3 Store
5.2.3 MPPS
5.4 Commit
5.1 MWL - Worklist Query
5.1.1 Make a booking on the RIS first!
Before a Worklist query can be done, make sure that a patient is scheduled. The Booking must be
done for the AET that has been done in step “Configure Emulator”.
5.1.2 Perform the MWL query
Press the button “Request Worklist”.
No Patients Found
When no patients are found, or the query failed, the screen below will be shown. The only patient
shown, is the “Dummy Patient”.
Select the “Dummy Patient” to continue. The text next to the Request Worklist button will
indicate that no results have been found:
Patients Found
When the query results in one or more founds, the found names are listed, including the dummy
patient.
PB - PHC.
Modality Emulator
Rev: 17
21/30
Manual
Modality Emulator
Select a patient to continue. The text next to the Request Worklist button will indicate the
number of patients that match the query:
5.2 MPPS – Modality Performed Procedure Step
5.2.1 Progress
Press the button:
When the message has been send
successfully, a return message is
displayed:
5.2.2 Discontinued
Press the button:
When the message has been send
successfully, a return message is
displayed:
5.2.3 Completed
The button completed does not exist yet. You first need to send an image.
See next paragraph DICOM Store for the steps to store an image.
Press the button:
When the message has been send
successfully, a return message is
displayed:
5.3 DICOM Store
PB - PHC.
Modality Emulator
Rev: 17
22/30
Manual
Modality Emulator
Press the button:
When the image has been send
successfully, a return message is
displayed:
Now the button MPPS completed
button becomes available:
5.4 Storage Commit
Press the button:
When Storage Commitment has been
successful, a return message is
displayed:
PB - PHC.
Modality Emulator
Rev: 17
23/30
Manual
Modality Emulator
6 Special usage
6.1 Extract the templates from a capture
Maybe the most powerful usage of the Modality Emulator is the ability to load parts of a capture
file that you have made to analyze the behaviour of a specific modality.
6.1.1 DICOM Network Analyzer
The first step is to make a capture using DICOM Network Analyzer.
Change from Capture to analysis mode. Depending on what you have captured one or more
streams must be visible:
The paragraphs below describe how to extract the Worklist Query part and the MPPS messages.
6.1.2 MWL template
Assuming that a capture has been made, is loaded in DICOM Network Analyzer and you are
looking at the program in analysis mode.
To be able to extract a MWL-template from the capture, it must be there! Search in the available
DICOM Associations for the stream that contains “C_FIND_RQ” (below an example).
PB - PHC.
Modality Emulator
Rev: 17
25/30
Manual
Modality Emulator
Right-click on the “C_FIND_RQ[Data]” and select “Save As File”:
Navigate to a logical place and use a name that makes sense (e.g. US_HD11_WLM.dcm).
6.1.3 MPPS – N-Create
Repeat the steps as described for MWL.
To be able to extract a MPPS-template from the capture, it must be there! Search in the available
DICOM Associations for the stream that contains “N_CREATE_RQ”.
Right-click on the “N_CREATE_RQ[Data]” and select “Save As DCM File”:
Navigate to a logical place and use a name that makes sense (e.g. US_HD11_MPPS_C.dcm).
6.1.4 MPPS – N-Get
Repeat the steps as described for MWL.
To be able to extract a MPPS-template from the capture, it must be there! Search in the available
DICOM Associations for the stream that contains “N_SET_RQ” (below an example).
Navigate to a logical place and use a name that makes sense (e.g. US_HD11_MPPS_S.dcm).
PB - PHC.
Modality Emulator
Rev: 17
26/30
Manual
Modality Emulator
6.2 Load the templates in the Emulator
6.2.1 Load MWL template
•
•
•
Select the Worklist Query tab,
Navigate to the location where the MWL
template has been stored.
Click the file.
6.2.2 Load MPPS-Progress template
•
•
•
Select the MPPS Progress tab,
Navigate to the location where the MPPS
template has been stored.
Click the file.
6.2.3 Load MPPS-Completed template
•
•
•
Select the MPPS Completed tab,
Navigate to the location where the MPPS
template has been stored.
Click the file.
PB - PHC.
Modality Emulator
Rev: 17
27/30
Manual
Modality Emulator
7 Mapping information
In Paragraph “6.1 Extract the templates from a capture” you have learned how to extract
templates from a capture file. Next step is loading this template as “behaviour” for the Emulator.
Now you may wonder why you want to store MPPS information of Mr. X while having Mr. Y in the
Modality Emulator application! The overview below shows the re-mapping of the tool:
C-FIND-RSP:
This is the response after a Modality Worklist Query
C-STORE:
In the Modality Emulator these items are taken over from the C-FIND-RSP.
N-CREATE-RQ: In the Modality Emulator these items are taken over from the C-FIND-RSP.
CFINDRSP(Modality_Worklist_Information_Model_FIND)
SPECIFIC_CHARACTER_SET, CS
ACCESSION_NUMBER, SH
SCHEDULED_PROCEDURE_STEP_SEQUENCE, MODALITY, CS
REFERENCED_STUDY_SEQUENCE, SQ
PATIENTS_NAME, PN
PATIENT_ID, LO
PATIENTS_BIRTH_DATE, DA
PATIENTS_SEX, CS
STUDY_INSTANCE_UID, UI
REQUESTED_PROCEDURE_ID, SH
SCHEDULED_PROCEDURE_STEP_SEQUENCE, SCHEDULED_PROCEDURE_STEP_ID, SH
REQUESTED_PROCEDURE_DESCRIPTION, LO
SCHEDULED_PROCEDURE_STEP_SEQUENCE, SCHEDULED_PROCEDURE_STEP_DESCRIPTION, LO
CSTORERQ
SPECIFIC_CHARACTER_SET, CS
ACCESSION_NUMBER, SH
MODALITY, CS
REFERENCED_STUDY_SEQUENCE, SQ
PATIENTS_NAME, PN
PATIENT_ID, LO
PATIENTS_BIRTH_DATE, DA
PATIENTS_SEX, CS
STUDY_INSTANCE_UID, UI
REQUEST_ATTRIBUTES_SEQUENCE, REQUESTED_PROCEDURE_ID, SH
REQUEST_ATTRIBUTES_SEQUENCE, SCHEDULED_PROCEDURE_STEP_ID, SH
REQUEST_ATTRIBUTES_SEQUENCE, SCHEDULED_PROCEDURE_STEP_DESCRIPTION, LO
PERFORMED_PROCEDURE_STEP_ID, SH
PERFORMED_PROCEDURE_STEP_DESCRIPTION, LO
NCREATERQ(Modality_Performed_Procedure_Step)
SPECIFIC_CHARACTER_SET, CS
SCHEDULED_STEP_ATTRIBUTES_SEQUENCE, ACCESSION_NUMBER, SH
MODALITY, CS
SCHEDULED_STEP_ATTRIBUTES_SEQUENCE, REFERENCED_STUDY_SEQUENCE, SQ
PATIENTS_NAME, PN
PATIENT_ID, LO
PATIENTS_BIRTH_DATE, DA
PATIENTS_SEX, CS
SCHEDULED_STEP_ATTRIBUTES_SEQUENCE, STUDY_INSTANCE_UID, UI
SCHEDULED_STEP_ATTRIBUTES_SEQUENCE, REQUESTED_PROCEDURE_ID, SH
SCHEDULED_STEP_ATTRIBUTES_SEQUENCE, SCHEDULED_PROCEDURE_STEP_ID, SH
SCHEDULED_STEP_ATTRIBUTES_SEQUENCE, REQUESTED_PROCEDURE_DESCRIPTION, LO
SCHEDULED_STEP_ATTRIBUTES_SEQUENCE, SCHEDULED_PROCEDURE_STEP_DESCRIPTION, LO
PERFORMED_PROCEDURE_STEP_ID, SH
PERFORMED_PROCEDURE_STEP_DESCRIPTION, LO
PB - PHC.
Modality Emulator
Rev: 17
29/30
Manual
Modality Emulator
DICOM attribute
TAG
DICOM Item
VR
Filling values for
MWL
Store
MPPS
retrieved
0008,0005
0008,0050
0008,1110
0010,0010
0010,0020
0010,0030
0010,0040
0020,000D
0032,1060
0040,0253
0040,0254
0040,0270
-> 0008,0050
SPECIFIC CHARACTER SET
ACCESSION NUMBER
REFERENCED STUDY SEQUENCE
PATIENTS NAME
PATIENT ID
PATIENTS BIRTH DATE
PATIENTS SEX
STUDY INSTANCE UID
REQUESTED PROCEDURE DESCRIPTION
PERFORMED PROCEDURE STEP ID
PERFORMED PROCEDURE STEP DESCRIPTION
SCHEDULED STEP ATTRIBUTES SEQUENCE
ACCESSION NUMBER
CS
SH
SQ
PN
LO
DA
CS
UI
LO
SH
LO
SQ
SH
Source
Source
Source
Source
Source
Source
Source
Source
Source
0040,0270
-> 0008,1110
SCHEDULED STEP ATTRIBUTES SEQUENCE
REFERENCED STUDY SEQUENCE
SQ
SQ
Source
0040,0270
-> 0020,000D
SCHEDULED STEP ATTRIBUTES SEQUENCE
STUDY INSTANCE UID
SQ
UI
Source
0040,0270
-> 0040,1001
SCHEDULED STEP ATTRIBUTES SEQUENCE
REQUESTED PROCEDURE ID
SQ
SH
Source
0040,0270
-> 0040,0009
SCHEDULED STEP ATTRIBUTES SEQUENCE
SCHEDULED PROCEDURE STEP ID
SQ
SH
Source
0040,0270
-> 0032,1060
SCHEDULED STEP ATTRIBUTES SEQUENCE
REQUESTED PROCEDURE DESCRIPTION
SQ
LO
Source
0040,0270
-> 0040,0007
SCHEDULED STEP ATTRIBUTES SEQUENCE
SCHEDULED PROCEDURE STEP DESCRIPTION
SQ
LO
Source
0040,0275
-> 0040,1001
REQUEST ATTRIBUTES SEQUENCE
REQUESTED PROCEDURE ID
SQ
SH
Source
Copy from
source
0040,1001
0040,0275
-> 0040,0009
REQUEST ATTRIBUTES SEQUENCE
SCHEDULED PROCEDURE STEP ID
SQ
SH
Source
Copy from
source
0040,0009
0040,0275
-> 0040,0007
REQUEST ATTRIBUTES SEQUENCE
SCHEDULED PROCEDURE STEP DESCRIPTION
SQ
LO
Source
0040,1000
-> 0008,0060
0040,1000
-> 0040,0009
0040,1000
-> 0040,0007
0040,1001
SCHEDULED PROCEDURE STEP SEQUENCE MODALITY
MODALITY
SCHEDULED PROCEDURE STEP SEQUENCE
SCHEDULED PROCEDURE STEP ID
SCHEDULED PROCEDURE STEP SEQUENCE
SCHEDULED PROCEDURE STEP DESCRIPTION
REQUESTED PROCEDURE ID
SQ
CS
SQ
SH
SQ
LO
SH
Source
Copy from
source
0040,0007
Copy
Copy
Source
Copy
Copy
Source
Copy
Copy
PB - PHC.
Modality Emulator
Copy
Copy
Copy
Copy
Copy
Copy
Copy
Copy
Copy
Copy
Copy
Copy
Copy
Copy
Copy
Copy
Source
Source
Copy from
source
0008,0050
Copy from
source
0008,1110
Copy from
source
0020,000D
Copy from
source
0040,1001
Copy from
source
0040,0009
Copy from
source
0032,1060
Copy from
source
0040,0007
Source
-
Source
Rev: 17
30/30