1
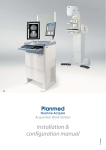
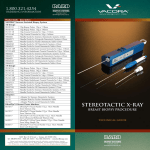
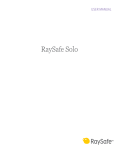
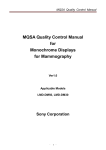
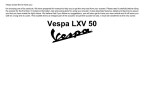
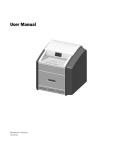
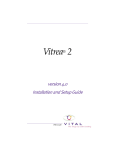
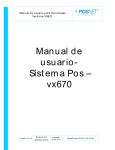
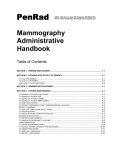
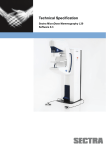
Mammography Accreditation Program Testing Instructions 1891 Preston White Drive, Reston, VA 20191-4397 These instructions refer to both paper and online applications. If you have applied in the ACRedit online database (https://acredit.acr.org), there are additional instructions within the online Testing Package. Your Barcode labels describe the accreditation cycle that your facility is currently undergoing. Submit both clinical and phantom images for INITIAL accreditation, accreditation RENEWAL, REINSTATEMENT or a VALIDATION FILM CHECK. If you are REPEATING a test for a deficiency, only submit images from the deficient test (i.e., all clinical images or the phantom). PHANTOM IMAGE A. Required items for testing 1. One approved accreditation mammographic phantom: Gammex (RMI) Model 156, Nuclear Associates (Fluke) Model 18-220 or CIRS Model 015. 2. Bar-coded identification labels to be affixed to the phantom image and the Test Image Data form (If you chose to upload your images you will not have image labels). IMPORTANT: These labels are for a specific unit and are marked “Phantom Image” and “Test Image Data.” Be sure to put the appropriate label on the appropriate item. 3. One Test Image Data form for each mammography unit you are testing. Note: If you are accrediting both FFDM computed radiography and screen-film on a single mammography unit, you will test that unit twice, once for CR and once for screen-film. Be sure to use the labels marked “CR” for the computed radiography testing. B. Procedure 1. The phantom and clinical images from each unit must be taken within 30 days of each other. (Validation film check images must be from the requested date.) 2. When positioning the ACR phantom, center it laterally on the image receptor so that the chest-wall edge of the phantom is aligned with the chest-wall edge of the image receptor as shown in the photo. (Follow the Phantom Exposure Instructions below that are specific to your unit.) 3. For Hard-Copy Film submission a. For FFDM: 1. Process the image as typically done for digital mammography. 2. Window and level the display to best show the test objects. 3. Do not zoom or rotate the image. 4. Using the film printer normally used to make hardcopies of digital mammograms for transfer purposes, print the phantom image so that Calcifications appear white, and The phantom image is as close to “true size” as possible (i.e. no magnification or minification). b. For screen-film, process the image using the processor normally used to process mammograms. c. Your supervising radiologist must review and approve the hardcopy phantom image prior to labeling it and sending it to the ACR. d. Label the film with the appropriate bar-coded label. e. Complete one Test Image Data form for each mammography unit tested. 4. For Electronic Submission a. Process the images as typically done for digital mammography This document is copyright protected by the American College of Radiology. Any attempt to reproduce, copy, modify, alter or otherwise change or use this document without the express written permission of the American College of Radiology is prohibited. Page 1 of 8 S:\MammoMaster\Test Materials Pkg\TESTING INSTRUCTIONS_8-28-15.docx Revised: 8-28-15 b. c. d. Upload the DICOM image into your online Testing Package using TRIAD Windows Client or TRIAD Web Client (see User Instructions for Electronic Submission of Images) Your supervising radiologist must review and approve the DICOM phantom image prior to submitting your online Testing Package. Complete the Phantom Test Image Data Form in your online Testing Package. *****There should be only one phantom image for each unit.***** PHANTOM EXPOSURE INSTRUCTIONS Full-Field Digital Mammography – Computed Radiography (CR) Agfa, Carestream, Fuji, iCRco and Konica Minolta Position the phantom as shown in the photo on the first page. (With some units it may be necessary to move the phantom slightly in from the chest wall to ensure that the entire phantom will be visible on the image.) Place the acrylic disk on the phantom as it would be for routine QC. Be sure that the disk does not cover any test object locations. Take preliminary images of the phantom to ensure correct positioning of the phantom. Lower the compression device until it just touches the phantom. Move the AEC detector so that it is under the center of the wax insert. Set the clinical technical factors (AEC mode, target, filter, kVp, density control setting, etc.) currently used for a 4.2-cm compressed breast of average density. Make an exposure. Record the technical factors on the Test Image Data form. Full-Field Digital Mammography – Direct Radiography Fischer Position the phantom as shown in the photo on the first page. (It may be necessary to move the phantom slightly in from the chest wall to ensure that the entire phantom will be visible on the image.) Take preliminary images of the phantom to ensure correct positioning of the phantom. At the Technique Screen, turn Automatic Technique Recommendation OFF. Select the manual clinical technical factors used for a 4.2-cm compressed breast of average density. Make an exposure. Record the technical factors on the Test Image Data form. Display the image using an image size of “fit width”. Review the image using “full resolution.” Ensure that the Displayed Processed image mode is not enabled. Fuji Position the phantom as shown in the photo on the first page. (It may be necessary to move the phantom slightly in from the chest wall to ensure that the entire phantom will be visible on the image.) Place the acrylic disk on the phantom as it would be for routine QC. Be sure that the disk does not cover any test object locations. Set up the system as described in the QC manual for exposing the phantom: o Lower the compression device so it comes in contact with the phantom. o Set clinical AEC mode (Auto, Semi or Fixed) and technical factors currently used for a 4.2-cm compressed breast of average density. Take preliminary images of the phantom to ensure correct positioning of the phantom. Lower the compression device until it just touches the phantom. Make an exposure with the routine AEC clinical conditions used above. Record the technical factors on the Test Image Data form. This document is copyright protected by the American College of Radiology. Any attempt to reproduce, copy, modify, alter or otherwise change or use this document without the express written permission of the American College of Radiology is prohibited. Page 2 of 8 S:\MammoMaster\Test Materials Pkg\TESTING INSTRUCTIONS_8-28-15.docx Revised: 8-28-15 General Electric If you are using the Automatic Optimization of Parameters (AOP) AEC mode (which involves auto-timing with auto kVp and/or auto selection of target and filter) for your clinical examinations, the phantom will not appropriately simulate the attenuation of an average breast due to the nature of the unit’s automatic parameter selection and exposure control. Consequently, you must first use GE’s 4.0 cm thick acrylic plates to find a manual technique to expose the phantom. o Position the acrylic plates on the image receptor as typically done for the AOP and SNR Check. o Lower the compression device onto the acrylic plates and apply moderate compression force. o Make an exposure under routine clinical AOP conditions (CNT, STD or DOSE) currently used for a 4.2 cm compressed breast of average density. o Record the technical factors (AOP mode, kVp, mAs, focal spot size, target and filter) on the Test Image Data form. Position the phantom as shown in the photo on the first page. (It may be necessary to move the phantom slightly in from the chest wall to ensure that the entire phantom will be visible on the image.) Do NOT use an acrylic disc on the phantom. Take preliminary images of the phantom to ensure correct positioning of the phantom. Lower the compression device until it just touches the phantom. Reproduce the kVp, focal spot size, target and filter, and select a manual mAs as close as possible to the one determined by the acrylic plates in the first step. Do not use the technical factors in the GE QC Manual. Make an exposure. Record the technical factors on the Test Image Data form. IMS/Giotto Image 3D – 3DL Position the phantom as shown in the photo on the first page. (It may be necessary to move the phantom slightly in from the chest wall to ensure that the entire phantom will be visible on the image.) Set up the system as described in the QC manual for exposing the phantom. Do NOT use an acrylic disc on the phantom. Take preliminary images of the phantom to ensure correct positioning of the phantom. . Lower the compression device until it just touches the phantom. Make an exposure. Record the technical factors on the Test Image Data form. Lorad/Hologic Selenia Without the phantom in place: o Set the system to the AEC mode that is used clinically (e.g., AUTO-KV, AUTO-FILTER). o Lower the compression paddle until the compression thickness reads 4.5 cm. o Make a note of the kVp and filter indicated on the AWS screen. o Raise the compression paddle. Position the phantom as shown in the photo on the first page. The chest wall side of the phantom must be completely flush with the chest wall side of the image receptor. Place the acrylic disk on the phantom as it would be for routine QC. Be sure that the disk does not cover any test object locations. Take preliminary images of the phantom to ensure correct positioning of the phantom. Lower the compression device until it just touches the phantom. Change the AEC mode to AUTO-TIME and the kVp and filter to the values noted above. Select AEC sensor position 2. Make an exposure. Record the technical factors on the Test Image Data form. Lorad/Hologic Selenia Dimensions Position the phantom as shown in the photo on the first page. Place the acrylic disk on the phantom as it would be for routine QC. Be sure that the disk does not cover any test object locations. Set up the system as described in the Dimensions QC manual for exposing the phantom: o Select an “ACR Phantom Conv” view from the “Procedure” screen on the acquisition station. o Lower the compression device to compress the phantom lightly. o Set clinical technical factors (Mode, Focal Spot, Compensation Step) currently used for a 4.2-cm compressed breast of average density. o Select AEC sensor position 2. Take preliminary images of the phantom to ensure correct positioning of the phantom. Lower the compression device until it just touches the phantom. Make an exposure. Record the technical factors on the Test Image Data form. This document is copyright protected by the American College of Radiology. Any attempt to reproduce, copy, modify, alter or otherwise change or use this document without the express written permission of the American College of Radiology is prohibited. Page 3 of 8 S:\MammoMaster\Test Materials Pkg\TESTING INSTRUCTIONS_8-28-15.docx Revised: 8-28-15 Philips (Sectra) Position the phantom as shown in the photo on the first page. It may be necessary to move the phantom slightly in from the chest wall to ensure that the entire phantom will be visible on the image. o Do NOT use an acrylic disc on the phantom. o Compress the phantom with 5 to 7 daN. o Make an exposure using the SmartAEC. o Record the technical factors (kVp and mAs) displayed in the acquired image on the Test Image Data form. o Take preliminary images of the phantom to ensure correct positioning of the phantom.. Lower the compression device until it just touches the phantom. Using manually set technical factors, select a kVp and mAs as close as possible to the one determined in the first step. Make an exposure. Record the technical factors on the Test Image Data form. Planmed Position the phantom as shown in the photo on the first page. The chest wall side of the phantom must be completely flush with the chest wall side of the image receptor. Set up the system as described in the QC manual for exposing the phantom. Do NOT use an acrylic disc on the phantom. Take preliminary images of the phantom to ensure correct positioning of the phantom. Lower the compression device until it just touches the phantom. Make an exposure. Record the technical factors on the Test Image Data form. Siemens Position the phantom as shown in the photo on the first page. The chest wall side of the phantom must be completely flush with the chest wall side of the image receptor. Do not use an acrylic disc on the phantom. Take preliminary images of the phantom to ensure correct positioning of the phantom. Lower the compression device until it just touches the phantom. Select AEC mode “AUTO” and the center AEC chamber position. Set the clinical technical factors currently used for a 4.2-cm compressed breast of average density. Make an exposure. Record the technical factors on the Test Image Data form. Screen-Film All Units Position the phantom as shown in the photo on the first page. (With some units it may be necessary to move the phantom slightly in from the chest wall to ensure that the entire phantom will be visible on the image.) Place the acrylic disk on the phantom as it would be for routine QC. Be sure that the disk does not cover any test object locations. Take preliminary images of the phantom to ensure correct positioning of the phantom. Lower the compression device until it just touches the phantom. Move the AEC detector so that it is under the center of the wax insert. Set the clinical technical factors (AEC mode, target, filter, kVp, density control setting, etc.) currently used for a 4.2-cm compressed breast of average density. Make an exposure. Record the technical factors on the Test Image Data form. This document is copyright protected by the American College of Radiology. Any attempt to reproduce, copy, modify, alter or otherwise change or use this document without the express written permission of the American College of Radiology is prohibited. Page 4 of 8 S:\MammoMaster\Test Materials Pkg\TESTING INSTRUCTIONS_8-28-15.docx Revised: 8-28-15 CLINICAL IMAGES A. Required items for testing 1. If submitting hard copy film: Bar-coded identification labels to be affixed to the clinical images and the Test Image Data form. IMPORTANT: These labels are for a specific unit and are marked “Fatty Images,” “Dense Images,” “Clinical Images” (for validation film checks) and “Test Image Data.” Be sure to put the appropriate label on the appropriate item. If you are REPEATING this test for a clinical accreditation deficiency, you must submit both fatty and dense cases performed after the date on your DEFICIENCY REPORT. 2. One Test Image Data form in your online Testing Package for each examination and mammography unit you are testing. B. Procedure 1. The clinical and phantom images from each unit must be taken within 30 days of each other. All clinical images should be clearly dated. (Validation film check images must be from the date specified in the cover memorandum.) 2. Submit the following cases (see “Submitting Clinical Images” for further guidance): a. For accreditation (initial, renewal, repeat, or reinstatement): one dense case and one fatty case. b. For validation film checks: two cases, one each of fatty and dense breast examples, if available. 3. Select cases consisting of CC and MLO images of both breasts. (All images for each exam must be from the same patient.) ® a. The cases must be “negative” (BI-RADS Assessment Category 1). Do not submit “benign” (Category 2) cases or “incomplete” (Category 0) cases. If you cannot submit “negative” images (e.g., you do diagnostic exams only), call the ACR. b. For accreditation, select examples of your facility’s best work. The ACR reviewers will evaluate them accordingly. (See the “Clinical Image Evaluation” section of the 1999 ACR Mammography Quality Control Manual for the review criteria.) c. Do not submit images that are performed on models or volunteers. d. Only select cases where the entire breast can be imaged in a single exposure on each projection. e. Images must be labeled with the MQSA-required identification information; ACR reviewers will evaluate this. f. The images must be of “final interpretation quality”. 4. For Hard Copy Film Submission: a. FFDM: 1. Adjust the image display and process the image as typically done when interpreting digital mammography. 2. Print the clinical images as close to “true size” as possible (i.e. without magnification or minification). Use the film printer normally used to make hardcopies of digital mammograms for transfer purposes. b. Complete the Phantom Test Image Data Form in your online Testing Package. c. Important: Your supervising radiologist must review and approve the hardcopy image selection prior to labeling them and sending them to the ACR. d. Label each image with the bar-coded labels; do not cover the patient ID information or any part of the breast with the label. e. Fill out one Test Image Data form for each mammography unit you have tested. 5. For Electronic Submission: a. Process the images as typically done for digital mammography b. Upload the DICOM image into your online Testing Package using TRIAD Windows Client or TRIAD Web Client (see User Instructions for Electronic Submission of Images) c. Your supervising radiologist must review and approve the DICOM image selection prior to submitting your online Testing Package. d. Fill out the Test Image Data Form in your online Testing Package. IMPORTANT: Submit only clinical images that are “negative”. If ACR reviewers determine that any submitted cases require additional evaluation or follow-up they will be returned immediately. In these situations, the supervising radiologist must attest that he or she will review the findings and follow-up with the patient as appropriate before a final accreditation report is issued. This document is copyright protected by the American College of Radiology. Any attempt to reproduce, copy, modify, alter or otherwise change or use this document without the express written permission of the American College of Radiology is prohibited. Page 5 of 8 S:\MammoMaster\Test Materials Pkg\TESTING INSTRUCTIONS_8-28-15.docx Revised: 8-28-15 *****There should be one phantom image and/or eight clinical images for each unit.***** Submitting Clinical Images In order for the ACR Clinical Image Reviewers to assess your image quality for a range of breast types, you must submit one complete exam of fatty breasts and one complete exam of dense breasts. If you are REPEATING because you received a deficiency for clinical image quality, you must resubmit both fatty and dense cases. If the ACR Reviewers do not believe that your images are of an appropriate density, we will return them to you and request another examination. (Note: Validation Film Check images may be of any breast density.) In addition, ALL FILMS MUST BE INTERPRETED AS NEGATIVE ® (i.e., BI-RADS Assessment Category 1: “There is nothing to comment on. The breasts are symmetrical and no masses, architectural disturbances or suspicious calcifications are present”). If you have difficulty submitting negative images, please call the ACR. EXAMPLES OF FATTY BREAST IMAGES ® The fatty breast images must meet one of the two fatty breast BI-RADS Breast Composition Categories: “the breast is almost entirely fat” or “there are scattered areas of fibroglandular density”. EXAMPLES OF DENSE BREAST IMAGES ® The dense breast image must meet one of the two dense breast BI-RADS Breast Composition Categories: The breasts are heterogeneously dense, which may obscure small masses or the breasts are extremely dense, which lowers the sensitivity of mammography. This document is copyright protected by the American College of Radiology. Any attempt to reproduce, copy, modify, alter or otherwise change or use this document without the express written permission of the American College of Radiology is prohibited. Page 6 of 8 S:\MammoMaster\Test Materials Pkg\TESTING INSTRUCTIONS_8-28-15.docx Revised: 8-28-15 REQUIRED FORMS AND DOCUMENTS Locate the type of accreditation cycle listed on your testing package and follow the column to see the items required for submission. If your testing package is online, through the ACRedit database, you will complete some forms online instead of on paper. If you have chosen to upload these documents, do not send them to the ACR in addition to uploading. Personnel Summary Form (Enter Data Online) Initial Renewal Reinstatement New Unit Reinstate New Unit Addendum Repeat Yes Yes Yes Yes N/A N/A N/A Yes Yes Yes Yes Yes, if this is your facility’s 1st submission for a new modality N/A, if this is not your facility’s 1st submission for a new modality completed Evaluation of Site’s Tech QC Program Summary) Yes Yes Yes Yes Yes N/A Full Physicist Report Yes Yes Yes Yes Yes N/A Equipment QC Section J (Enter Data Online) Yes Yes Yes Yes Yes N/A Test Image Data (Enter Data Online) Yes Yes Yes Yes Yes Yes Yes Yes Yes Yes Yes N/A Personnel Forms: Sections G, H, I (Forms Available at www.acr.org) Medical Physicist Summary (Include a Mammography QC Checklists Daily and Weekly Checklist (send 1 month, must include the dates that the accreditation clinical and phantom images wer taken. (if this is a new unit, send all available) Monthly, Quarterly and Semi-Annual Checklist (send previous calendar 12 months. ( if this is a new unit, send all available) (Forms Available at www.acr.org) This document is copyright protected by the American College of Radiology. Any attempt to reproduce, copy, modify, alter or otherwise change or use this document without the express written permission of the American College of Radiology is prohibited. Page 7 of 8 S:\MammoMaster\Test Materials Pkg\TESTING INSTRUCTIONS_8-28-15.docx Revised: 8-28-15 MAILING INSTRUCTIONS For facilities submitting by hard-copy film: Return the required forms and documents (see table above), along with your phantom image and/or the clinical images to the following address by a traceable method: Mammography Accreditation Program American College of Radiology 1891 Preston White Drive Reston, VA 20191-4397 The images submitted for review will be returned once the accreditation evaluation is complete. However, you should maintain copies of all images as well as a record of the patient names whose clinical images were sent for accreditation purposes until you receive official notification your accreditation is approved. For facilities submitting images electronically: Upload all images, forms and documents (see table above) into your online testing package in the ACRedit Database: https://acredit.acr.org This document is copyright protected by the American College of Radiology. Any attempt to reproduce, copy, modify, alter or otherwise change or use this document without the express written permission of the American College of Radiology is prohibited. Page 8 of 8 S:\MammoMaster\Test Materials Pkg\TESTING INSTRUCTIONS_8-28-15.docx Revised: 8-28-15