1
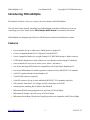
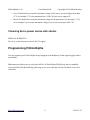
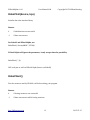
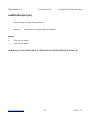
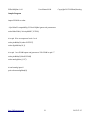
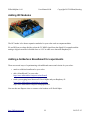
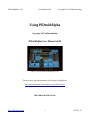
PiDroidAlpha v1.00
User Manual 0.84
Copyright 2015 William Henning
Using PiDroidAlpha
Copyright 2015 William Henning
PiDroidAlpha User Manual v0.83
Photo 1: Fully assembled PiDroidAlpha v1.00
The most up to date documentation will always be available at:
http://www.mikronauts.com/raspberry-pi/pi-droid-alpha/
PRELIMINARY RELEASE
http://Mikronauts.com
1
2015-07-15
PiDroidAlpha v1.00
User Manual 0.84
Copyright 2015 William Henning
Table of Contents
Introducing PiDroidAlpha..........................................................................................................................3
Features.................................................................................................................................................3
Compatibility.........................................................................................................................................4
Printed Circuit Board.............................................................................................................................5
Schematics.............................................................................................................................................6
3x8 servo headers (SERVO, DIO A, DIO B, AIN)...............................................................................7
Wago Screw Terminals (Servo VIN, Motor VIN, Motor 1, Motor 2)...................................................7
Choosing Servo power source with shunts............................................................................................8
Programming PiDroidAlpha......................................................................................................................8
PiDroidAlpha I/O pin definitions..........................................................................................................9
Installing Required Software...............................................................................................................10
Raspbian.........................................................................................................................................10
Adding a WiFi adapter....................................................................................................................10
pigpio..............................................................................................................................................10
PDALib.py......................................................................................................................................10
Introducing PDALib.................................................................................................................................11
Python RoboLib Constants..................................................................................................................12
Python RoboPiLib Functions..............................................................................................................12
RoboPiInit(device, bps).......................................................................................................................13
RoboPiExit()........................................................................................................................................13
readMode(pin).....................................................................................................................................14
pinMode(pin, mode)............................................................................................................................15
digitalRead(pin)...................................................................................................................................16
digitalWrite(pin, val)...........................................................................................................................16
analogRead(chan)................................................................................................................................17
analogReadRaw(chan).........................................................................................................................17
analogWrite(pin, val)...........................................................................................................................18
servoRead(pin)....................................................................................................................................19
servoWrite(pin, val).............................................................................................................................19
readDistance(int pin)...........................................................................................................................20
Adding I2C Modules...........................................................................................................................22
Adding a Solderless Breadboard for experiments...............................................................................22
Examples..................................................................................................................................................23
Reading a bumper switch or whisker..................................................................................................23
Lighting an LED..................................................................................................................................23
Sounding a Buzzer...............................................................................................................................23
Controlling Gear Motors.....................................................................................................................23
Controlling a Servo.............................................................................................................................23
Reading an IR distance sensor.............................................................................................................23
Random Driving Robot #1: Bumper Switches / Whiskers..................................................................23
Appendix A: Data Sheets.........................................................................................................................24
Appendix B: Support...............................................................................................................................24
Appendix C: Frequently Asked Questions...............................................................................................25
http://Mikronauts.com
2
2015-07-15
PiDroidAlpha v1.00
User Manual 0.84
Copyright 2015 William Henning
Introducing PiDroidAlpha
This manual will show you how to control your robot chassis with PiDroidAlpha.
You will need to have already assembled your PiDroidAlpha controller board before you can try
controlling your robot. Please see the PiDroidAlpha Build Manual for assembly instructions.
PiDroidAlpha was designed specifically for STEM robotics education and hobbyists at home.
Features
•
8 servo headers for up to eight servos, PWM outputs or digital I/O
•
16 servo compatible headers for 5V digital I/O via MCP23S17
•
8 servo compatible headers for an eight channel 0-5V MCP3008 analog to digital converter
•
L293D dual h-bridge motor driver (shares two servo headers and four digital I/O headers)
•
screw terminals for servo power, motor power, motor 1 and motor 2
•
uses 26 pin stacking GPIO header for compatibility with 26 and 40 pin Raspberry Pi’s
•
two ten-pin Mikronauts I/O module expansion connectors for the MCP23S17 I/O expander
•
4 pin I2C expansion header for the Raspberry Pi
•
5 pin HCOM connector (optional)
•
6 pin SPI connector for up to seven additional MCP23S17 I/O expanders (optional)
•
silk screened “cheat sheet” for voltages and I/O connections on the PCB
•
mounting holes matching Rev.2 Model A and Model B
•
Mikronauts EZasPi prototyping board can stack below Pi Droid Alpha
•
Mikronauts Pi Jumper can stack on top of Pi Droid Alpha
•
Mikronauts SchoolBoard ][ and other Propeller products are compatible with Pi Droid Alpha
http://Mikronauts.com
3
2015-07-15
PiDroidAlpha v1.00
User Manual 0.84
Copyright 2015 William Henning
Compatibility
Pi Droid Alpha is compatible with the following Raspberry Pi models:
•
Raspberry Pi 2 Model B
•
Raspberry Pi Model A
•
Raspberry Pi Model B
•
Raspberry Pi Model A+
•
Raspberry Pi Model B+
Pi Droid Alpha is currently supported for Raspbian with the pigpio library.
Pi Droid Alpha should be compatible with any operating system on the above model Raspberry Pi's as
long as the pigpio library is available for the users choice of operating system.
Other single board computers that have a 26 pin Raspberry Pi compatible header are electrically
compatible with Pi Droid Alpha, however if pigpio and/or servo blaster has not been ported to the other
SBC, servo and PWM functionality will not be available.
http://Mikronauts.com
4
2015-07-15
PiDroidAlpha v1.00
User Manual 0.84
Copyright 2015 William Henning
Printed Circuit Board
The image above shows the parts layout of Pi Droid Alpha.
You can refer to this image when connecting servos, motors, sensors and other devices to Pi Droid
Alpha.
http://Mikronauts.com
5
2015-07-15
PiDroidAlpha v1.00
User Manual 0.84
Copyright 2015 William Henning
Schematics
The schematic below shows you how Pi Droid Alpha works, and may help you decide how to connect
your sensors etc to Pi Droid Alpha.
http://Mikronauts.com
6
2015-07-15
PiDroidAlpha v1.00
User Manual 0.84
Copyright 2015 William Henning
3x8 servo headers (SERVO, DIO A, DIO B, AIN)
The servo headers are used to connect standard servos, and other 5V input and output signals.
•
SERVO1-SERVO8 are connected to Raspberry Pi pins through a voltage divider
•
DIO A0-A7 and DIO B0-B7 are connected to the MCP23S17 I/O expander pins.
•
AIN 0-7 are connected to the MCP3008 analog to digital converter.
Wago Screw Terminals (Servo VIN, Motor VIN, Motor 1, Motor 2)
There are four screw terminals on Pi Droid Alpha.
From left to right:
•
Servo VIN – external power for servo motors
•
Motor 2 – connector for motor 2 of the L293D dual h-bridge motor driver
•
Motor 1 – connector for motor 1 of the L293D dual h-bridge motor driver
•
Motor VIN – external power for the motors connected to Motor 1 & Motor 2
Please note that Servo VIN and Motor VIN have protection diodes in case you accidentally connect the
batteries in reverse.
http://Mikronauts.com
7
2015-07-15
PiDroidAlpha v1.00
User Manual 0.84
Copyright 2015 William Henning
•
Servo VIN should not exceed the maximum voltage for the servos you are using by more than
0.7V, for example 6.7V is the maximum Servo VIN if all your servos support 6V
•
Motor VIN should not exceed the maximum voltage for the gear motors you are using > 1.4V,
so for example if your motors maximum voltage is 6V, do not exceed more than 7.4V
Choosing Servo power source with shunts
SERVO1-4 & SERVO5-8
Do not try to run the motors from the Pi's 5V supply!
Programming PiDroidAlpha
You can program your Pi Droid Alpha in any language on the Raspberry Pi that supports pigpio and/or
servoblaster.
Mikronauts provides an easy to use Python API for Pi Droid Alpha (PDALib.py) that is compatible
with our RoboPi API (RoboPiLib.py) allowing you to write code that will run with either of our robot
controllers.
http://Mikronauts.com
8
2015-07-15
PiDroidAlpha v1.00
User Manual 0.84
Copyright 2015 William Henning
PiDroidAlpha I/O pin definitions
You can use the handy pin header table below to plan your robot:
Label
GPIO
RoboPi API
Used For
GPIO4
GPIO17
GPIO18
GPIO27
GPIO22
GPIO23
GPIO24
GPIO25
0
1
2
3
4
5
6
7
HCOM
Motor1 PWM
Motor2 PWM
__________________________________
(not available if HCOM is used)
__________________________________
__________________________________
__________________________________
__________________________________
(not available if L293D is used)
(not available if L293D is used)
DIO A0
DIO A1
DIO A2
DIO A3
DIO A4
DIO A5
DIO A6
DIO A7
-
8
9
10
11
12
13
14
15
Motor1 DirA
Motor1 DirB
Motor2 DirA
Motor2 DirB
__________________________________
__________________________________
__________________________________
__________________________________
(not available if L293D is used)
(not available if L293D is used)
(not available if L293D is used)
(not available if L293D is used)
DIO B0
DIO B1
DIO B2
DIO B3
DIO B4
DIO B5
DIO B6
DIO B7
-
16
17
18
19
20
21
22
23
-
__________________________________
__________________________________
__________________________________
__________________________________
__________________________________
__________________________________
__________________________________
__________________________________
AIN 1
AIN 2
AIN 3
AIN 4
AIN 5
AIN 6
AIN 7
AIN 8
-
0
1
2
3
4
5
6
7
-
__________________________________
__________________________________
__________________________________
__________________________________
__________________________________
__________________________________
__________________________________
__________________________________
SERVO 1
SERVO 2
SERVO 3
SERVO 4
SERVO 5
SERVO 6
SERVO 7
SERVO 8
SERVO 1-8
Planned Use for my Robot
5V safe digital input/output direct to Raspberry Pi GPIO's
DIO A0-A7, B0-B7 5V digital input/output provided by MCP23S17
AIN 1-7
0-5V analog to digital input channels
http://Mikronauts.com
9
2015-07-15
PiDroidAlpha v1.00
User Manual 0.84
Copyright 2015 William Henning
Installing Required Software
Raspbian
Please download the latest version of Raspbian from http://www.raspberrypi.org/downloads/
Then follow the instructions you can find at the link below to install Raspbian.
https://www.raspberrypi.org/documentation/installation/installing-images/README.md
After you have installed Raspbian, please type the following into a terminal session:
sudo raspi-config
From the 'advanced menu', please enable SPI and I2C, and then choose
'expand filesystem', finish and re-boot.
Adding a WiFi adapter
Please follow the instructions provided by the Raspberry Pi Foundation at
https://www.raspberrypi.org/documentation/configuration/wireless/
pigpio
Please follow the instructions at the link below to install pigpio
http://abyz.co.uk/rpi/pigpio/download.html
The PiDroidAlpha demos require that pigpio is installed on your Raspberry Pi.
PDALib.py
Please download PDALib_py.txt from http://www.mikronauts.com/raspberry-pi/pi-droid-alpha/
use “mv PDALib_py.txt PDALib.py” from the command line, or use the file manager to rename it.
http://Mikronauts.com
10
2015-07-15
PiDroidAlpha v1.00
User Manual 0.84
Copyright 2015 William Henning
Introducing PDALib
PDALib is a library designed to provide an easy to use Python interface for Pi Droid Alpha on a
Raspberry Pi.
PDALib was designed to make it easy to write programs on the Raspberry Pi that use all of the features
of Pi Droid Alpha, and was designed to be familiar to those coming to Pi Droid Alpha from WiringPi,
Arduino or Wiring environments.
The Python PDALib interface is almost identical to the RoboPiLib Python interface for Mikronauts
RoboPi Advanced Robot Controller – allowing you to write robot applications in Python that will work
with either of our robot controller boards.
http://Mikronauts.com
11
2015-07-15
PiDroidAlpha v1.00
User Manual 0.84
Copyright 2015 William Henning
Python RoboLib Constants
Digital pins can be configured for one of the following four modes:
INPUT
pin mode for a digital input
OUTPUT
pin mode for a digital output
PWM
pin mode for a PWM output (0..255)
SERVO
pin mode for a servo output (0..2500)
Python RoboPiLib Functions
RoboPiInit(device, bps)
use RoboPiInit(“/dev/ttyAMA0”,115200)
RoboPiExit()
close the serial connection with RoboPi
readMode(pin)
returns int
pinMode(pin, mode)
digitalRead(pin)
returns INPUT/OUTPUT/SERVO/PWM
set pin to one of INPUT/OUTPUT/SERVO/PWM
returns int
digitalWrite(pin, val)
returns 0 or 1 state of pin
sets pin to 0 or 1
analogRead(chan)
returns int
returns 0..1023 from specified channel
analogReadRaw( pin)
returns int
returns 0..4095 from specified channel
analogWrite(pin, val)
servoRead(pin)
write 0..255 to PWM pin (off to full on)
returns int
return last servo value written to pin
servoWrite(pin, val)
set servo on pin to val (0..2500 us)
readDistance(pin)
future expansion, not available at this time
http://Mikronauts.com
12
2015-07-15
PiDroidAlpha v1.00
User Manual 0.84
Copyright 2015 William Henning
RoboPiInit(device, bps)
Initialize the robot interface library
Returns
0
if initialization was successful
-1
if there was an error
For RoboPi and PiDroidAlpha, use
RoboPiInit(“/dev/ttyAMA0”,115200)
Pi Droid Alpha will ignore the parameters, it only accepts them for portability.
RoboPiInit(“”,0)
Will work just as well on PiDroid Alpha (but not on RoboPi)
RoboPiExit()
Free the resources used by PDALib, call before exiting your program.
Returns
0
if freeing resources was successful
-1
if there was an error while freeing resources
http://Mikronauts.com
13
2015-07-15
PiDroidAlpha v1.00
User Manual 0.84
Copyright 2015 William Henning
readMode(pin)
returns int
returns INPUT/OUTPUT/SERVO/PWM/PING
Returns
mode the current mode of the specified pin
-1
if the pin is invalid
pin = 0..7
pin = 8..24
Raspberry Pi pins used for SERVO1-8 support the following modes
INPUT
returns 0 or 1 from digital input
OUTPUT
sets digital output to 0 or 1
SERVO
set servo position to 0 or 500-2500us
PWM
set PWM output from 0..255
PING
reserved for future Propeller Ping and other ultrasonic sensor support
for the DIO pins A0-A7, B0-B7
INPUT
returns 0 or 1 from digital input
OUTPUT
sets digital output to 0 or 1
Returns
0
if the mode was set correctly
-1
if the pin or mode was invalid
http://Mikronauts.com
14
2015-07-15
PiDroidAlpha v1.00
User Manual 0.84
Copyright 2015 William Henning
pinMode(pin, mode)
set pin to one of INPUT/OUTPUT/SERVO/PWM
pin = 0..7
pin = 8..24
Raspberry Pi pins used for SERVO1-8 support the following modes
INPUT
returns 0 or 1 from digital input
OUTPUT
sets digital output to 0 or 1
SERVO
set servo position to 0 or 500-2500us
PWM
set PWM output from 0..255
PING
reserved for future Propeller Ping and other ultrasonic sensor support
for the DIO pins A0-A7, B0-B7
INPUT
returns 0 or 1 from digital input
OUTPUT
sets digital output to 0 or 1
Returns
0
if the mode was set correctly
-1
if the pin or mode was invalid
http://Mikronauts.com
15
2015-07-15
PiDroidAlpha v1.00
User Manual 0.84
Copyright 2015 William Henning
digitalRead(pin)
returns int
returns 0 or 1 state of pin
Returns
0
if the mode was set correctly
-1
if the pin or mode was invalid
digitalWrite(pin, val)
Returns int
sets pin to 0 or 1
Returns
0
if the pin was written
-1
if the pin was invalid
http://Mikronauts.com
16
2015-07-15
PiDroidAlpha v1.00
User Manual 0.84
Copyright 2015 William Henning
analogRead(chan)
returns int
returns 0..1023 from specified channel
Returns
value the current analog value of the specified channel
-1
if the channel was invalid
analogReadRaw(chan)
returns int
returns 0..4095 from specified channel
Returns
value the current analog value of the specified channel
-1
if the channel was invalid
As Pi Droid Alpha uses the ten bit MCP3008 Analog-to-Digital converter, analogReadRaw() returns
the ten bit result shifted left two bits to generate a 12 bit number at this time.
Future API releases may change to returning the sum of four consecutive samples in order to generate a
12 bit result.
http://Mikronauts.com
17
2015-07-15
PiDroidAlpha v1.00
User Manual 0.84
Copyright 2015 William Henning
analogWrite(pin, val)
write 0..255 to PWM pin (off to full on)
You must
pinMode(pin,robot.PWM)
before you can analogWrite() to the pin
Returns
0
if the PWM value was set
-1
if the PWM channel was invalid
http://Mikronauts.com
18
2015-07-15
PiDroidAlpha v1.00
User Manual 0.84
Copyright 2015 William Henning
servoRead(pin)
returns int
return last servo value written to pin
Returns
0
if the pin was written
-1
if the pin was invalid
servoWrite(pin, val)
set servo on pin (0..7) to val (0..2500 us)
Returns
0
if the pin was written
-1
if the pin was invalid
Note: the specified pin must be configured for servo output in order for the servoWrite() to take effect.
http://Mikronauts.com
19
2015-07-15
PiDroidAlpha v1.00
User Manual 0.84
Copyright 2015 William Henning
readDistance(int pin)
Reserved name, currently being worked on
returns int
return distance to nearest object in milimeters
Returns
0
if the pin was written
-1
if the pin was invalid
readDistance() IS NOT AVAILABLE IN THIS RELEASE, RESERVED FOR FUTURE USE
http://Mikronauts.com
20
2015-07-15
PiDroidAlpha v1.00
User Manual 0.84
Copyright 2015 William Henning
Sample Program
import PDALib as robot
# for RoboPi compatibility, Pi Droid Alpha ignores the parameters
robot.RoboPiInit(“/dev/ttyAMA0”,115200)
# set pin 16 to an output and write 1 to it
robot.pinMode(16,robot.OUTPUT)
robot.digitalWrite(16,1)
# set pin 1 to a PWM output and generate a 50% PWM on pin 17
robot.pinMode(1,RoboPi.PWM)
robot.analogWrite(1,127)
# read analog input 0
print robot.analogRead(0)
http://Mikronauts.com
21
2015-07-15
PiDroidAlpha v1.00
User Manual 0.84
Copyright 2015 William Henning
Adding I2C Modules
The I2C header is for future expansion modules for your robot such as compass modules.
R1 and R2 form a voltage divider so that the 5V MISO signal from the digital I/O expander and the
analog to digital converter is divided down to 3.3V in order not to harm the Raspberry Pi.
Adding a Solderless Breadboard for experiments
There are several ways of experimenting with additional sensors and circuits for your robot:
•
attach a solderless breadboard to your robot
•
add a SchoolBoard ][ to your robot
http://www.mikronauts.com/proto/schoolboard/
•
stack a prototyping board between Pi Droid Alpha and your Raspberry Pi
http://www.mikronauts.com/raspberry-pi/ezaspi/
http://www.mikronauts.com/proto/ezaspieproto300/
You can then use Dupont wires to connect to the headers on Pi Droid Alpha.
http://Mikronauts.com
22
2015-07-15
PiDroidAlpha v1.00
User Manual 0.84
Copyright 2015 William Henning
Examples
Reading a bumper switch or whisker
Lighting an LED
Sounding a Buzzer
Controlling Gear Motors
Controlling a Servo
Reading an IR distance sensor
Random Driving Robot #1: Bumper Switches / Whiskers
http://Mikronauts.com
23
2015-07-15
PiDroidAlpha v1.00
User Manual 0.84
Copyright 2015 William Henning
Appendix A: Data Sheets
MCP3008 Analog to Digital converter
http://ww1.microchip.com/downloads/en/DeviceDoc/21295C.pdf
MCP23S17 Digital I/O expander
http://ww1.microchip.com/downloads/en/DeviceDoc/21952b.pdf
L293D motor driver
http://www.st.com/st-web-ui/static/active/en/resource/technical/document/datasheet/CD00000059.pdf
Appendix B: Support
Please visit our forums at:
http://forums.mikronauts.com
Once you register there, you can get support for Pi Droid Alpha in its support forum
http://Mikronauts.com
24
2015-07-15
PiDroidAlpha v1.00
User Manual 0.84
Copyright 2015 William Henning
Appendix C: Frequently Asked Questions
Q: Where can we buy PiDroidAlpha?
A: Currently you can buy PiDroidAlpha:
Directly from us – please email us at [email protected] with desired quantity and postal address,
we will be happy to send you a quote. We accept PayPal from verified buyers.
From our Ebay store – please visit us at out Mikronauts Ebay store!
<add actual URL>
Distributors and dealers are welcome to contact us for quantity discounts – we would love to have you
on-board!
Q: Are quantity and educational discounts available for PiDroidAlpha?
A: Yes! We are happy to offer quantity based discounts to our educational users and distributors.
Please contact us for a custom quote.
Q: Can we make our own PiDroidAlpha printed circuit boards?
A: I am afraid not. While PiDroidAlpha is an open platform in that it is fully documented, with source
code
available for its libraries and demo applications, PiDroidAlpha is a commercial product, and may not
becopied.
Q: Can we use the MCP3208 12 bit analog to digital converter instead of the MCP3008?
A: Yes, you can – but the driver needs to be modified, and the PiDroidAlpha libraries and demo
programs assume that an MCP3008 is used.
Q: Do you have any distributors in <name of country>?
A: We are working hard to set up our distribution network. Please email your favorite web stores and
have them contact us if they are interested in PiDroidAlpha.
http://Mikronauts.com
25
2015-07-15