1
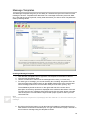
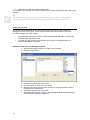
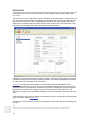
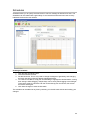
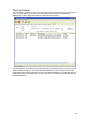
1
2
Insight Communicator
User Manual: First Edition
For use with Insight software version 3.2.0
May 28, 2007
© Copyright 2007
Inner Range Pty. Ltd.
Text and Layout
Steve Mitchell
Jason Snell
Proofing
Brett D’Elton
Part Number: 634416USER
3
(This page has been left intentionally blank.)
4
Contents
Getting Started Guide.................................................................................................................... 7
Introducing Insight Communicator................................................................................................. 9
Main Interface ............................................................................................................................ 9
The Toolbar.............................................................................................................................. 10
The Restart Communicator Server Dialog............................................................................... 11
Communicator Server Status Dialog ....................................................................................... 12
The Custom Messages Dialog .................................................................................................... 13
To Send a Custom Message ................................................................................................... 13
Message Rules............................................................................................................................ 14
Creating a Message Rule ........................................................................................................ 14
Message Templates..................................................................................................................... 16
Creating a Message Template................................................................................................. 16
Playing Sound Files ................................................................................................................. 17
Enabling Sound Files in a Message Template..................................................................... 17
Recipient Groups......................................................................................................................... 18
Recipients.................................................................................................................................... 19
Using a Recipient to Communicate with a Device or another System .................................... 20
Schedules.................................................................................................................................... 22
Creating a Schedule ................................................................................................................ 22
The Log Viewer ........................................................................................................................... 23
Configuration ............................................................................................................................... 24
System Settings....................................................................................................................... 24
Email ........................................................................................................................................ 24
SMS ......................................................................................................................................... 25
Pager ....................................................................................................................................... 25
Plugins ..................................................................................................................................... 26
Sound Plugin ........................................................................................................................ 26
COMText and COMHex Plugins .......................................................................................... 26
Licence..................................................................................................................................... 26
Registering Insight Communicator....................................................................................... 26
5
(This page has been left intentionally blank.)
6
Getting Started Guide
This section gives you the minimum to get Insight Communicator running quickly. Note that
Insight Communicator also requires Insight V3.2 or higher to run. For more detailed
information, consult the rest of the manual.
1
2
Step 1: Install Insight Communicator
1.
2.
3.
4.
Locate the Insight Communicator install program and open it
Follow the on-screen prompts
Select Finish
Restart the computer if you are prompted to do so
Step 2: Register Insight Communicator
You need to register Insight Communicator to use it in conjunction with Insight. If you do not
register Insight Communicator, you will only be able to send one-off “Custom Messages”.
1. Run Insight Communicator. By default, this would be Start > All Programs > Inner
Range > Insight Communicator > Insight Communicator Client
2. Navigate to the Licence Settings section of the Settings tab. Copy the serial number
here into the Communicator registration form. You will also need to fill in the serial
number of the Insight Installation that this copy of Communicator will connect to. Fill in
and send the registration form to Inner Range
3. Once the registration details have come back from Inner Range, select the Register
button in Licence Settings. You will be prompted to enter the Name this copy of Insight
Communicator is registered to, as well as the Insight Communicator key. Enter this
information and select OK
4. Note that you will also have to enter the second key provided in Insight Licence
Manager in order for this copy of Insight Communicator to work with your Insight
installation.
3
4
Step 3: Initialise Comms Settings
5
Step 5: Setup Message Rules and Templates
6
Step 6: Restart the Insight Communicator Server
1. Set the Insight User in Settings tab > System tab
2. For each of the comms methods you will be using to send alarms, initialise the settings
on the related tab under the Settings tab
Step 4: Setup Schedules, Recipients and Groups
1. Schedules need to be created to control when certain types of message are sent out.
For instance, you might want to limit SMS Messages for some recipients to only be sent
during business hours. Create as many Schedules as your application needs in the
Schedules tab.
2. The next step is to set up all of the Recipients using the Recipients tab. Here, you can
set the department the Recipient is in as well as what forms of messages they will
receive and on what Schedules
3. Next, you can put your Recipients in to Groups you define on the Groups Tab
1. You need to make Templates to format the messages that come from Insight by
navigating to the Templates tab and selecting New Template
2. To make messages to send to Recipients, you need to make Rules to intercept Insight
Review messages and determine who to send these messages to as well as prioritising
them. You also need to select the Message Template This is done by selecting the
Rules tab and pressing the New Message Rule button
1. Bring up the Restart Server dialog from Server menu > Restart Server
2. Select the “All” check-box and press OK
3. Communicator is now set up. Be sure to consult the rest of this manual for more information.
7
(This page has been left intentionally blank.)
8
Introducing Insight Communicator
The Insight Communicator has been designed as an addition to the Insight program, allowing
Insight Review messages to be conveyed over several electronic communications media.
Communicator can be configured to readily send messages over email, SMS and paging
systems when key words match those found in any Insight Review message, so you can
receive notification on any event occurring with your security/access system directly to your
phone or inbox. You can also have Review messages sent to other devices that accept ASCII
text input connected to your computer’s COM port.
Main Interface
Almost all of Insight Communicator’s functionality is performed in the main interface, which is
shown below:
Toolbar
Main Tabs
Status
•
•
•
9
The Toolbar is used to control the Insight Communicator Server
The Main Tabs are used to access and manage the different aspects of Insight
Communicator’s functionality
The Status bar shows whether the Insight Communicator application is connected to
the Insight Communicator or not.
The Toolbar
Icon
Function
Start the Communicator Server
Description
Issues a call to Windows to start the server's
service
Stop the Communicator Server
Issues a call to Windows to stop the server's
service
Connect to the Communicator
Server
Attempts to establish a connection to the server
with the client. This is required to be able to check
server status as well as issue restarts commands.
When connected, the status bar will show
'Connected to Server' and the Connect button will
be greyed out.
Restart the Communicator
Server
Opens the Restart Communicator Server Dialog,
allowing for certain components of the server to be
restarted. This does not actually restart the whole
server’s service, but instead restarts selected
sections of it.
Check Status of the
Communicator Server
Opens the Communicator Server Status Dialog
which will show each of the server's components
and their status, along with any error messages if
there is one. Will also allow access to starting,
stopping and restarting the individual components.
Dialog will only open if the client is connected to the
server.
10
The Restart Communicator Server Dialog
The Restart Server Dialog allows the user to restart certain areas of the Communicator Server,
generally used so that changes made by the client can take effect.
)
Note
The dialog will only open if the client is connected to the server.
Insight Connection: Restart the section of the server which connects to Insight. Use this option
if login details have changed or if Communicator has just been registered. During the restart
process for this component, any Review events generated by Insight will not be caught.
Rule Matcher: Restarts the Rule Processor section of Communicator. This allows changes
made to Recipients, Recipient Groups, Message Rules and Templates to take effect.
)
Note
Message text changed in Templates will take effect as soon as Save Changes is clicked, but
ticking/unticking a 'Send message using XXX' check box will not work until the Rule Processor
restarts.
Message Senders: Restarts the components of the server which handle the outbound
communications from Communicator. This allows changes to comms and Plugin settings to
take effect.
All: Restarts all components of the Communicator server.
11
Communicator Server Status Dialog
The Server Status dialog lists each of the server's separate components and their status, along
with any relevant error messages.
The components can be individually selected and either started, stopped or restarted, allowing
each section of the server to be controllable. The dialog will poll the server for a status update
once every two seconds, automatically updating the text with the latest information. By clicking
the Refresh button, the dialog will refresh the component listing and retrieve the status of each
section instantly.
)
Note
The dialog will only open if the client is connected to the server.
12
The Custom Messages Dialog
The Custom Message Dialog allows you to append a message ready to be sent to the message
queue, containing whatever text you wish, its own priority rating and to any number of
recipients.
To Send a Custom Message
1.
2.
3.
4.
Select Custom Message from the Messages menu.
Select which media you wish the message to be sent over in the Send To box.
Type in your message into the Message box.
Set the message priority. As with Message Rules, a higher priority will mean it will be
sent before those with a lower priority.
5. Select the Recipients. This is achieved by highlighting any Groups or Recipients you
wish to send the message to. The box on the right will show a list of all Recipients who
will receive that message.
6. Click the “Send” button. If a Recipient is selected, a dialog will appear stating the
message was successfully added to the queue, along with what mediums the message
was sent with. This message will act as if it was processed by the message processor,
and seamlessly fit into the message queue.
13
Message Rules
The Message Rules tab is where the bulk of Communicator's functionality resides. Rules are
created here linking Insight Review messages with priorities, Recipients and Templates.
Creating a Message Rule
1. Click the New Message Rule button to append a new rule to the bottom of the list.
2. Give the new rule a name.
3. Decide whether you wish to use basic Text Matching or Regular Expressions to
successfully match a Rule with an Insight Review message.
3.1. Text Matching: Text matching is a straight forward and simple way to match
Review messages. Any text entered into the Contains field will attempt to be
matched to the Review message which is received and the same process applies to
Doesn't Contain. A wildcard * can be used to represent any number of words to aid
in matching. I.e. “Alarm*Area1” would match text “Alarm in Area1” and also “Alarm
detected in Area1”.
9
Tip
Text Matching is case sensitive.
3.2. Regular Expressions: Any normal regular expressions can be used to match a
Review message.
)
Note
Only use this option if you understand regular expressions, otherwise the Text Matching option
should be sufficient.
14
4. Select a Template. The template used will determine how Communicator will attempt to
send the message as well how the message is formatted.
5. Give the message a priority rating. The range is 0 – 100. A higher number increases
the priority. As would be expected, a higher priority message will be sent before
messages having a lower priority.
6. Select the Recipients who you wish to receive the message. By ticking the “Show all
who will receive” checkbox, any recipients who will receive the message due to being in
a group linked to the message will be appended to the end to the 'Recipients to send to'
list with a leading asterisk (*). This allows you to clearly see who will receive each
message.
7. Click the Save Changes button to complete the new Rule.
9
Tip
Regardless of how many times a user are listed to receive a message, they will only receive it
once.
The rule can be edited at any time by selecting it in the left hand side list and making your
changes.
9
Tip
Remember to save your changes with the Save Changes button and to restart the Rule
Processor using the Restart Server dialog so your changes take effect on the server.
15
Message Templates
The Message Templates tab gives you the ability to customise the layout and content of each
message to be sent. Templates also determine how a message will be sent (via email, SMS,
etc.), and with the use of keywords, exactly what information you wish to send. Templates are
used by Message Rules.
Creating a Message Template
1.
2.
3.
4.
Click the New Template button to append a new template to the bottom of the list.
Give the new Template a name.
Use the checkboxes to select how the messages will be sent, (i.e. Email, etc).
For each type of message, you can set the body text, including “Keywords” which let
Communicator insert dynamic text from the related Insight Alarm (such as the actual
Alarm message) and/or from Communicator itself (such as name, priority, etc).
The available keywords are shown on the right hand side of the screen and a
description of what they represent is displayed at the window at the bottom of the tab.
To insert one into your message, either select it and click the 'Insert' button or double
click the keyword. This will insert the keyword with proper syntax to where your text
cursor last was.
)
Note
The proper format for a keyword is %(message)s and the character '%' can not be used in your
message.
5. By clicking the Plugins button you can also set the formatting of messages that go to
other devices connected to the serial port, or to get communicator to play a .wav file on
the PC when a message using this template is called.
16
6. When finished, click the Save Changes button.
The template can be edited at any time by selecting it in the left hand side list and making your
changes.
9
Tip
Remember to save your changes with the Save Changes button and to restart the Rule
Processor using the Restart Server dialog so your changes take effect on the server.
Playing Sound Files
Sound files can be played on the PC that Communicator is running on when particular
messages come in from Insight. These might be used to alert an Operator or play a prerecorded message over a PA system.
•
•
Each Recipient can have a particular .WAV file associated with them, as well as the
Schedule when sounds are valid.
To make the .WAV file play, the Recipient must receive a message based on a
Template that allows a sound file
Enabling Sound Files in a Message Template
1. Select the Message Template or create a new Template
2. Click the Plugins button
3. Choose the sound Plugin from the list
4. Tick the check-box at the top of the dialog
5. Select the SoundFile keyword from the list on the right and Insert it into the
message for the sound Plugin
6. Click Save Changes then click Close
7. Remember that to play the sound, each Message Rule must call a Message
Template with the above settings in it.
17
Recipient Groups
A Recipient Group is a simple way to combine several Recipients into a manageable set.
Messages can be sent directly to a group instead of individually selecting the recipients, saving
time and also allowing an amount of organisation.
To move Recipients into a Group, highlight the desired Recipients in the “Recipients not a
member” box (left box) and click the '>>' button. This will cause the selected Recipients to move
into the “Member of this Group” box (right box). To remove Recipients from a Group, the same
method is used with the '<<' button.
The group can be edited at any time by selecting it in the left hand side list and making your
changes.
9
Tip
Remember to save your changes with the Save Changes button and to restart the Rule
Processor using the Restart Server dialog so your changes take effect on the server.
18
Recipients
A Recipient is an entity who holds information for the message senders (email, SMS, pager
etc.) to use.
The most common use of Recipients will be to represent an individual person; however they can
also be used as generic entities. For example, one Recipient may represent an employee, with
their email, phone number, name and department stored; another may represent the system
admin which contains the generic system admin email or with the use of a Sound Plugin, store
the location of a sound file that is to be associated with this Recipient.
If details for a given communications medium are blank, then Communicator will not try to send
a message to that recipient using that particular medium. This allows several different media to
be used in the same Template on the same Rule.
Schedules can be linked to each different communications medium associated with the
Recipient. This allows you to control when and if a message will be sent to a Recipient over a
particular medium. If a Schedule for a medium is provided, a message will only be sent to that
Recipient if it is received from Insight during one of that Schedule's valid time blocks. For
example, you might wish to send SMS messages to a particular Recipient during On Call hours
only.
If the Recipient is being set up to handle communications with an external device using a Plugin
(such as a DVR), see the next section.
The Recipient can be edited at any time by selecting it in the left hand side list and making your
changes.
9
Tip
Remember to save your changes with the Save Changes button and to restart the Rule
Processor using the Restart Server dialog so your changes take effect on the server.
19
Using a Recipient to Communicate with a Device or another System
Recipients can be used to route messages to external devices connected to the Communicator
PC, or indeed another system by using an appropriate Plugin.
For generic RS232 communications with external devices, Inner Range provides the COMText /
ComHEX Plugins. One application using the COMText is to superimpose Insight Review
information onto DVR footage by connecting the Communicator PC to a DVR over RS232.
Assuming the DVR has a text interface for RS232, this would be achieved by:
1. Creating a Recipient to use the Plugin
2. Adjusting any relevant Message Templates or creating templates to use the Plugin
3. If new Message Templates were created, new Message Rules must be created to call
the new Template/s
4. Add the Recipient to any Message Rule affected by the above changes. This may be
able to achieved by adding the Recipient to any relevant Groups.
Recipient Setup
8. Create a new Recipient to handle communications with this DVR. Give the
Recipient an appropriate name
9. Click the Plugins button to access the settings for Plugins that can be
individualised for each Recipient
10. The Plugins – Recipients dialog will appear
11. Since this application is going to send text out of an RS232 port, choose
COMText and enter settings to match what the DVR requires
12. Choose a schedule for this Plugin. In this case a schedule that operates 24
hours a day has been chosen
13. Click the Save Changes button, then the Close button
14. Now click the Save Changes on the Recipient tab to save the settings for this
Recipient.
15. Be sure to add this Recipient to any Groups it might need to be part of in order
to receive certain types of messages.
You must now format the messages that should be sent over the serial link in each
of the Message Templates that will be used to send messages to the DVR. The
method is overleaf.
20
Message Template Setup
1. If modifying an existing template, open the Message Template and click the
Plugins button. Otherwise, create a new Message Template, name it, then click
the Plugins button
2. Choose the Plugin to use on the left hand box. In this example, COMText is
being used
3. This will bring up a message box and a check-box for that Plugin. Tick the
check-box for COMText
4. In the message area, setup the message to suit what the device requires,
followed by the message you want to send to the device. In the example
above, the control string required by the DVR is entered, followed by the Insight
Alarm message.
5. Click the Save button, then click the Close button
6. Save the changes to the Template on the Message Templates tab
Ensure the Recipient Gets the Message(s)
Once the Recipient has been setup and the required Message Templates have been modified
and/or created, you need to make sure that:
• New Rules are created to call any new Message Templates
• The Recipient is added to the receive list of any new message rules
• The Recipient is added to the receive list of any modified message rules, either by
adding them directly to the receive list, or adding the Recipient to Group(s) who are on
the recipient lists of the modified message rules
21
Schedules
Schedules allow you to specify the time blocks in which a message is allowed to be sent. The
Schedules can be created with a granularity of 15 minute block sizes and can have as many
individual blocks as the user wishes.
Creating a Schedule
1. Click the New Schedule button.
2. Give the Schedule a name.
3. Set the block size. This is only used to change the degree of granularity and changing
the block size will not alter the already highlighted blocks.
4. To create a Time Block, simply left click and drag to highlight the desired blocks, turning
them orange. While dragging, multiple days can be set by also dragging to the left/right.
To de-select a block, hold down Ctrl then click and drag over the blocks, this will turn
the blocks white again.
5. Click Save Changes to save the Schedule.
The schedule can be edited at any time by selecting it in the left hand side list and making your
changes.
22
The Log Viewer
The Log Viewer allows you to see a list of messages which have been processed and
attempted to be sent, along with whether the attempt was successful.
The messages can be viewed by ticking the box next to the desired senders; however a limit of
1000 viewable messages is set for each individual sender. If this limit is reached, use of the
Date Range option will be required to view all of the desired messages, by limiting the view to a
certain day or set of consecutive days. To do this, set the 'From date', the 'To date' and tick the
Use Date Range box.
23
Configuration
Configuration of Insight Communicator is accessed from the Settings tab. Each configurable
item of Communicator is available on a separate sub-tab. Each of these items is described on
the following pages.
9
Tip
After changing aspects of the configuration, always remember to restart the Insight Connection
and/or Message Senders using the Restart Server dialog so your changes take effect on the
server!
System Settings
Under the System Settings tab a User Name and Password are requested in order to logon to
Insight. The User Name and Password required is one linked to an Operator in Insight with
permissions to access the module 'COM Interface'.
S
Important!
For security reasons, it is preferable to create a new Operator under Insight with access only to
the COM Interface module, to minimise risks to the Insight system.
After the User Name and Password are entered and 'Save Changes' has been clicked, the
Insight Link will need to the restarted in order to take effect. This can be achieved with the
Restart Communicator Server Dialog.
Email
Option
From Address
Description
The address to list the Communicator's message as having come
from in the Recipients Inbox.
Subject
The text which will be displayed in the Subject of emails sent from
Communicator.
Messages Per Minute
The maximum amount of emails which can be sent in a minute.
This maximum may never be reached, however it allows control
on how often messages are sent out to avoid congestion in busy
times.
SMTP Host
The Host SMTP Server to send emails with.
User Name
Used if authentication is required with the SMTP Host, otherwise
leave blank.
Password
Used if authentication is required with the SMTP Host, otherwise
leave blank.
Max Retries Per Message
On the event of an error occurring when sending a message, the
maximum number of retries before a message is marked as
'Failed'.
Changes to Email settings will take effect the Message Senders section of the Communicator
server has been restarted or by restarting the Email Sender within the Communicator Server
Status dialog.
24
SMS
At this time, Insight Communicator sends SMS messages with the use of a GSM modem
connected to the Insight Communicator PC. The SMS settings tab allows you to configure how
Communicator talks to the GSM modem.
Option
COM Port
Description
The COM port which the GSM Modem is connected to.
Baud Rate
The Baud Rate to connect to the modem with.
Byte Size
The Byte Size to connect to the modem with.
Parity
The Parity to connect to the modem with.
Stop Bits
The Stop Bits to connect to the modem with.
Messages Per Minute
The maximum amount of SMS messages which can be sent in a
minute. This maximum may never be reached, however it allows
control on how often messages are sent out to avoid congestion in
busy times. Messages are evenly spaced over the minute.
Max Retries Per Message
On the event of an error occurring when sending a message, the
maximum number of retries before a message is marked as
'Failed'.
Changes to SMS settings will take effect the Message Senders section of the Communicator
server has been restarted or by restarting the SMS Sender within the Communicator Server
Status dialog.
Pager
Insight Communicator is designed to send pager messages using a special type of modem for
this purpose which is connected to the Insight Communicator PC. The Pager settings tab
allows you to configure how Communicator talks to the Pager modem.
Option
COM Port
Description
The COM port which the Pager Modem is connected to.
Baud Rate
The Baud Rate to connect to the Pager modem with.
Byte Size
The Byte Size to connect to the Pager modem with.
Parity
The Parity to connect to the Pager modem with.
Stop Bits
The Stop Bits to connect to the Pager modem with.
Messages Per Minute
The maximum amount of Pager messages which can be sent in a
minute. This maximum may never be reached, however it allows
control on how often messages are sent out to avoid congestion in
busy times. Messages are evenly spaced over the minute.
Max Retries Per Message
On the event of an error occurring when sending a message, the
maximum number of retries before a message is marked as
'Failed'.
Protocol to Use
Allows selection from a list of possible protocols to communicate
with the Pager System with.
Changes to Pager settings will take effect the Message Senders section of the Communicator
server has been restarted or by restarting the Pager Sender within the Communicator Server
Status dialog.
25
Plugins
Insight Communicator allows Plugins to enhance its functionality. Some Plugins are shipped
with Insight Communicator such as the Sound Plugin which enables Communicator to play
sound files on the PC in response to particular Insight messages.
The Plugins Tab allows access to any core Settings which a Plugin may require. By clicking on
a Plugin's name in the list box (if any are installed) a list of options are displayed for editing.
)
Note
Some Plugins do not require any core Settings, so will not have any options appear.
Changes to Plugin settings will take effect the Message Senders section of the Communicator
server has been restarted or by restarting the Plugin within the Communicator Server Status
dialog (if shown there).
Sound Plugin
The default path of where .wav files used by Communicator are stored can be set here.
COMText and COMHex Plugins
These Plugins enable Communicator with a generic serial communications service so that you
can interface with devices other than pagers and modems (such as DVRs) if need be.
Typically, these Plugins are accessed by creating a Recipient for each device in order to
process communications. Serial Port settings for devices using the COMText/COMHex Plugin
are handled on a Recipient by Recipient basis.
Licence
The Licence Tab will show the current state of Communicator's licence if connected to the
Communicator Server. Otherwise, a message requesting you to connect to the Communicator
Server is displayed.
If you have not registered your copy of Communicator yet, the Register button will be enabled
and your Serial Number and a blank Name field will be shown.
Registering Insight Communicator
1. To register your copy of Communicator, fill out the registration form (in the packaging
and supplied electronically in the Communicator installation) and send it to Inner Range
providing the Serial Number listed in the Licence tab as well as a Name you wish to
register with. You will also need to supply the serial number of the Insight installation
you wish to use with this copy of Communicator.
2. Inner Range will provide a key for Insight Communicator (the Communicator Key) as
well as a key to enter into the Licence Manager in the Insight Software (the Insight Key).
3. Enter the Insight Key into Insight's Licence Manager.
4. In Communicator's Licence tab, click the Register button. By clicking this button, a
dialog will be displayed with an area for the registration Name and the Communicator
Key provided by Inner Range.
5. By clicking OK, the registration information will be passed to the Communicator Server,
verified and the status on the License Tab will be updated to 'Successfully Registered' if
valid information is provided.
Once the registration has been completed, the link to Insight needs to be restarted. This can be
done from the Restart Communicator Server dialog or by restarting the Insight Link within the
Communicator Server Status dialog.
S
Important!
Communicator will not connect to Insight and listen for review messages if the product is not
registered. You can only send custom messages if the product is not registered.
26