1
User Manual
Vodafone H20
English
Designed for
Vodafone Zuhause!
fadwa
Your telephone functions on a GSM network (GSM 900 MHz and DCS
1800 MHz).
We remind you that this telephone is approved in accordance with
European standards.
You should carefully read this manual so that you can use your
telephone efficiently and under the best conditions.
WARNING
Make sure that your SIM card is compatible with your telephone. If you
insert an incompatible SIM card, a message will be displayed when
you switch your telephone on. Ask your operator for information.
SIM card compatibility
Your telephone is compatible only with SIM 3V cards.
NOTE
The IMEI number identifies your mobile phone. Please write down this
number and keep it in a safe, separate location. Should your mobile
phone be stolen, you may be requested this number. Enter the
following character string on your mobile phone to display the IMEI
number on screen: *#06#.
T9® Text Input is a registered trademark of © Tegic Communications
Inc.
The CE marking certifies that the product meets the essential
requirements of Directive 1999/5/CE of the European
Parliament and of the Council pertaining to microwave radio
equipment and telecommunication terminal equipment, for
the safety and health of users, for electromagnetic
interference. Furthermore, it efficiently uses the frequency
spectrum attributed to ground and spatial communication to
prevent damaging interference.
The declaration of compliance may be looked up on the
www.sagem-communications.com site, section "support"
or can be obtained from the following address:
Sagem Communications SAS - Customer relations department
4 rue du petit albi - 95800 Cergy Saint-Christophe -France
3
Table of contents
Precautions and Safety Information
SAR
Notes to reduce impact by radio wave fields
Safety guideline
Environment
6
6
7
7
10
The telephone’s menus
Glossary
11
13
Summary of functions
14
Contents of pack
Presentation of telephone
15
16
Function buttons
Alphanumeric keyboard
17
17
Welcome screen
Activation
Information on the SIM card
Installing the SIM card and the battery
Charging the battery
Switching on/off, and activation
PIN code
Changing the PIN code
Adjusting the date and time
Searching for the network
Switching the telephone off
Tips on efficient operation
Access to menus
Making a call
Call reception
Adjusting the volume
Hands-free mode
End of communication
Address book
Displaying the address book
Memorising a number
Deleting a number
Call groups
Search for a correspondent
Speed dial
4
18
20
20
21
23
24
24
25
25
26
26
27
27
27
28
28
29
29
30
30
30
31
31
32
33
Table of contents
Service Dialling Numbers (SDN)
Fixed Dialling Numbers ( FDN )
Configure the address book
To view the state of the memory
Messages
Receiving a message
To write a message with Easy Message T9®
Read a message and reply to it
Message Folders
Voice messages
Broadcast messages
SMS settings
State of the SMS memory
History
List of recent calls
Call duration counters
Ring tones
Choose the volume and type of ring tones
Display
Display on the idle screen
The backlighting
Modifying the contrast
Settings
Call settings
Time/Date settings
Network settings
Security settings
Language
Resetting the telephone
Applications
Calculator
Games
Organiser
Calendar
Alarms
Maintenance and battery
Maintenance
Battery
Technical characteristics
Troubleshooting
Customer support
Warranty
Table of contents
33
34
34
35
36
36
36
39
39
40
41
41
42
43
43
43
44
44
45
45
45
46
47
47
50
50
51
51
52
53
53
53
55
55
55
57
57
57
58
59
64
65
5
Precautions and Safety
Information
SAR
THIS MODEL IS IN ACCORDANCE WITH INTERNATIONAL
REGULATIONS ABOUT RADIO EMISSIONS
Your mobile unit emits and receives radio signals. It is designed,
so limits for radio signal emission are not exceeded, as
stipulated by international regulations. These regulations were
developed by the independent scientific organization ICNIRP
that include safety items that ensure the safety of all people
independent of age and health.
The regulations use a measurement called SAR (specific
absorption rate). The SAR limit is set at 2 W/kg. The highest
SAR-value for this unit during test close to the ear emitted
1,35 W/kg (*). Since mobile units offer a variety of functions,
they may be used in different positions, i.e. at the body (check
description further down in this manual (**)).
(*) The tests were conducted according to international test
regulations.
(**) Information about operation is listed in section "Distance
when using", page 9.
6
Precautions and Safety Information
Since SAR is measured during highest emission power of the
unit, the actual value is usually below the value listed above.
This is caused by automatic power change of the unit, ensuring,
that only the required minimum power is used to reach the
network. Newest scientific studies of the World Health
Organization (WHO) there are currently no special safety
measures for use of mobile unit required. If, however, you have
any concerns about radio wave emissions, you can reduce them
by limiting the call length, or by using headsets or hands-free
equipment. This way the phone must not be held directly to the
body. More information at http://www.who.int/emf.
Notes to reduce impact by radio wave
fields
If you would like to minimize impact caused by radio wave fields,
the World Health Organization (WHO) has the following tips:
Safety precaution: According to current scientific knowledge, no
precautions must be taken while using mobile phones. If,
however, you have any concerns about radio wave emissions,
you can reduce them by limiting the call length, or by using
headsets or hands-free equipment. This way the phone must
not be held directly to the body.
More information is available on the WHO website http://
www.who.int/peh-emf Juni 2000.
Safety guideline
Never try to disassemble your phone. You are solely
responsible for use and possible resulting damages of your
phone.
Switch off your phone in locations, where use of mobile phones
is not permitted.
Refer to the safety precautions when using your mobile phone
to protect yourself and surroundings.
Do not use the phone in wet conditions (bath, pool area,...)
Protect it from moisture and liquids.
Precautions and Safety Information
7
Do not expose the phone to extreme conditions (below -10°C
and above + 55°C)
Physiochemical reactions during charging do increase the
temperature of the battery. The battery is automatically
protected from overheating. Do not leave the phone within
reach of small children (danger of suffocation).
Electrical safety
Only use chargers from Vodafone or SAGEM. Use of other
chargers may be dangerous. The input voltage must be within
the data listed on the charger.
In-flight Safety
You must turn off the phone in airplanes, if asked by flight
attendants or indicated by signs. Mobile phones may endanger
flight traffic.
Use of mobile phones and ignoring safety regulations in
airplanes may be prosecuted.
Explosive Material
Please look for signs at fuel stations, asking you to turn off your
mobile phone. As well in chemical plants, fuel storage and other
locations with explosion danger you need to check for mobile
phone regulations.
Potentially explosive area
Switch off your phone when in any area with a potentially
explosive atmosphere. Sparks in such areas could cause an
explosion or fire resulting in bodily injury or even death.
Electromagnetic Material
To reduce risk of demagnetization, we recommend not to store
electro-magnetic material (e.g. bank or credit cards) for longer
periods.
8
Precautions and Safety Information
Electronic equipment in medial applications
Your telephone transmits radio signals, that may disturb
electronic equipment or implants, such as hearing devices,
pace-makers, insulin pumps, etc. You should keep a minimum
distance between the mobile phone and the implant of at least
15cm. Please contact your doctor or the manufacturer of the
unit if you have any further questions.
Hospitals
Always turn your mobile phone off, if signs or staff in hospitals
indicate to do so.
Driving Safety
Only use your mobile phone while driving, if you use a hands
free device, which you can use without being distracted from
traffic. If you do need to make a call anyhow, stop the vehicle
and make the call while stationary. In many countries a handsfree device is mandatory to make calls in a car. Please check
local legislation and the vehicle documentation on use of mobile
phones while driving. Ensure, that no body part is located close
to the aerial for longer periods, if there is a metal screen (car
roof).
Distance when using
This phone model was tested and conforms to the
electromagnetic emissions and fields using the following
application notes:
- at the ear: During making or receiving a call, hold the phone
to the ear just like a regular phone.
- use while on body: During operation with added equipment
not containing metal, place the phone at least 1.5 cm away
from your body. When using other equipment, regulations for
electromagnetic compatibility and fields may not be met. If
you do not use hands free equipment or do not hold it to your
ear, you must place the phone at least 1.5 cm away from your
body.
- Data operation: During data operation, place the phone
during the entire duration at least 1.5 cm away from your body.
Precautions and Safety Information
9
Additional equipment
You should use additional equipment by SAGEM to ensure
optimal operation of the phone and the equipment.
Environment
Packaging
Please refer to your local waste management rules and
regulations for easiest recycling of your packaging material.
batteries and battery packs
Batteries and battery packs must be disposed off within
legislative requirements.
Product
The x-ed trash can indicates, that this is an electrical or
electronic product (including additional equipment). To make
recycling and reuse of electrical and electronic equipment easier
and to protect the environment, the European guideline on used
electrical and electronic equipment stipulates to conform to the
local waste separation legislation.
10
Precautions and Safety Information
The telephone’s menus
• To reach the list of menus, use the upper and lower
navigation buttons.
• Use the upper and lower navigation buttons to move within
the menus.
• Use the button
to validate an entry or go into a menu
(or a sub-menu).
• Exit a menu or return to the level of the previous menu using
the button
.
Your telephone’s directory structure is as follows:
Phonebook
View
Create contact
Speed dials
Groups
Service dialling
Fixed dialling
Options
Memory status
Messaging
New message
Inbox
Drafts
Sent items
Voice mail
Cell broadcasts
Message settings
Memory status
Call records
Incoming
Outgoing
Missed
Call duration
The telephone’s menus
11
Tones
Ring volume
Ring tone
Message tone
Keypad volume
Call volume
Display
Standby screen
Light
Contrast
Settings
Call settings
Time and date
Network settings
Locks
Language
Restore defaults
Applications
Calculator
Box game
Organizer
Calendar
Alarms
Operator
12
The telephone’s menus
Glossary
Outgoing call: A call initiated with your telephone.
Incoming call: A call received with your telephone.
SIM card: The card supporting your subscription and your
entitlement to access services. The detachable part is the
"micro-SIM".
PIN: The personal code related to your SIM card.
PIN2: The second personal code related to your SIM card for
accessing certain functions.
Terminal code: The terminal code is a confidential code
designed to protect the terminal in case it is stolen.
SMS (Short Message Service) : Dispatch and reception of text
messages.
Glossary
13
Summary of functions
Call: Enter your number, then press on
Reply: Press on
.
.
Call release: Press on
.
Switch off: Press on (long press)
.
Hands-free: In conversation, to activate or deactivate the
hands-free mode, press on Options/Speakerphone
.
NOTE !
In this mode, do not hold the telephone to your ear.
Silent mode: To activate or deactivate silent mode, make a long
press on
.
To lock the keyboard from the idle screen: Make a long press
on
.
To unlock the keyboard from the idle screen: Press on
then on
.
Call back last number: From the idle screen, press on
.
The History screen appears. The last number entered appears.
Press on
. The number is automatically dialled.
Call a number memorised in the address book:
From the address book: enter the first letter of the name
(pressing the corresponding button, example: press button 2
three times in quick succession for the letter C), move down the
list to find the person you want to call, then press on
to call
them.
To call a speed-dial number:
See paragraph "To call a speed-dial number", page 33.
14
Summary of functions
Contents of pack
When you open the box, check that all the items are present:
1 - The telephone
2 - The mains charger
3 - Ni-MH battery
4 - The user manual
Content of pack
15
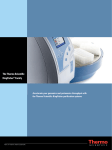
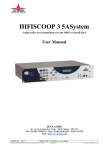
Presentation of telephone
Colour screen
Earpiece
Validate/return
function
buttons
Navigation
Call release
Switch telephone
off/on (long press)
Call acceptance
H20
Recent calls
Button
address-book
access
Direct SMS access
Alphanumeric
keyboard
Access to a
voicemail (long press)
M1: rapid access
button
M1
M2
M2 : rapid
button
access
Microphone
16
Presentation of telephone
Function buttons
Switch off/switch on - Call refusal - Call accepted.
Making a call - Receiving a call.
Idle: direct access to calendar.
Short press : return to previous menu - Deleting a
character.
Long press : delete entire entry.
Idle: access to the Calculator function Validation.
Upper and lower navigation buttons
- Enter and navigate within the menus.
- Adjust the sound level during conversation
(lower button: quieter, upper button: louder).
Alphanumeric keyboard
It has 12 keys: 0 to 9,
and
.
To obtain a letter (for example, to enter a name in the address
book or write a message in ABC mode), press the
corresponding button (example: to obtain the letter C, press
button 2 three times in quick succession).
Presentation of telephone
17
Welcome screen
According to the events that are taking place, the welcome
screen shows the following:
-
Battery charge indicator (blue = charged, white =
discharged).
-
Network signal level indicator (maximum level:
5 elements; no network coverage if there are no
elements).
Impossible to make outgoing calls: no network
coverage.
Call in progress.
The letter R means that the network does not
correspond to the subscription.
Silent mode activated.
Alarm mode activated.
Caller-identity hiding activated during communication.
Messages being received and unread messages
present.
Flashing: message memory full.
Voice messages present.
Alarm active
Call transfer activated
Keypad locked
18
Welcome screen
Buttons
and
under the screen are assigned, as
necessary, to the actions which are described at the bottom of
the screen near the buttons.
For example:
Validate: pressing button
function.
Return: pressing button
menu.
validates the current
returns to the previous
NOTE:
Use
to quickly access the SMS menu.
Use
to quickly access the list of contacts in your
address book.
Welcome screen
19
Activation
Information on the SIM card
SIM card
This card must be handled and stored with care
to avoid excessive twisting or scratching, which
would damage it. In case you lose your SIM card,
inform your operator or service provider
immediately.
NOTE
Do not let young children have access to your SIM card.
So that you can use your telephone, you have a smart card
called a "SIM card". It contains all information necessary to the
network, as well as other information specific to you and which
you can modify:
- Confidential codes (PIN code: Personal Identification
Number),
- Address book,
- Text messages,
- Functioning of particular services.
20
Activation
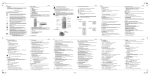
Installing the SIM card and the battery
- Turn the telephone and remove the rear cover (mark 1). Lift
the bottom of the cover from the notch (2) then lift off the top.
1
2
- Remove the battery block
- Remove the SIM card holder by pushing it to the left and lifting
it (a).
Slide the card into the cover, with the copper elements facing
the telephone and the bevelled corner at the top right (b).
Close the cover by pushing it to the right (c).
a
Activation
b
c
21
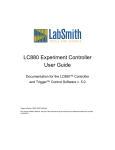
- Place the battery block (mark 3) in its location, then insert the
small connector (mark 4) in its housing, taking care to respect
the direction of the wires (mark 5).
3
5
4
Black wire
Red wire
Insertion
direction
- Place the rear cover (mark 3), first hooking the top, then
pressing the bottom down until it closes fully.
3
NOTE
If the phone is already on, first turn it off by pressing and
holding the
button before any SIM card handling.
22
Activation
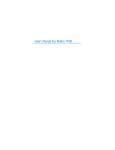
Charging the battery
Your telephone is powered by a
rechargeable battery. A new
battery must be charged for at
least 2 hours before it is used for
the first time. It will reach its
nominal capacity after several
usage cycles.
When the battery is discharged, the telephone switches off.
To recharge the battery:
- Connect the charger to a mains plug.
- Place the telephone on its charger.
- The telephone starts charging and the "moving battery" image
indicates that it is charging.
- The charge stops itself automatically.
Activation
23
NOTE
There is a danger of explosion if the battery is not replaced
correctly or if it is exposed to fire.
Do not short-circuit it.
The battery contains no elements that you can change.
Do not try to open the battery case.
Only use appropriate batteries and chargers contained
in the telephone manufacturer’s catalogue. Using any
other type may be dangerous or invalidate the
guarantee.
The used batteries must be disposed of appropriately.
In case your telephone is not used for a long period, it is
advisable to remove the battery.
You are strongly advised not to connect your telephone to
the charger if the battery is not present.
The charger is a safety element that reduces voltage. It
must never be modified, altered or replaced by another
item (ordinary mains plug, etc.).
Switching on/off, and activation
To make your first call:
Press on
to switch your telephone on.
If access to the SIM card is protected by a confidential code, the
telephone will ask you to enter the PIN code.
PIN code
Checking the PIN code
If the telephone indicates that the SIM card is absent, keep the
button pressed to switch the telephone off and check that
your SIM card is correctly positioned.
24
Activation
Keep the
button pressed to switch the telephone on.
Your telephone may ask you for your SIM card personal code
when it is switched on.
Enter the code of 4 to 8 figures provided by your operator. These
figures are not displayed on the screen for security reasons.
Press on OK
to validate.
PIN2 code
This second code, provided by your operator, secures access to
certain functions.
NOTE
If an incorrect PIN code is entered three times in a row,
your SIM card is blocked. You must then:
- enter the PUK (Personal Unblocking Key) code supplied
by your operator and validate,
- enter your PIN code and validate,
- enter your PIN code again and validate.
After 5 or 10 (according to the type of SIM card) fruitless
attempts, the SIM card is definitively locked. You must
contact your operator or your service provider.
Changing the PIN code
You may change the PIN code. See paragraph "Security
settings", page 51.
Adjusting the date and time
During first use, you must set the date and time.
A screen to set the date and time is systematically presented to
you if the battery has been totally discharged or removed.
Adjusting the time
Set the time by entering it directly in numerical form.
Activation
25
Adjusting the date
Set the date by entering it directly in numerical form.
When the date and time are correct, press on the Save
button to validate.
Searching for the network
Network indicator
The network signal level indicator shows the
quality of reception. If it shows less than three
elements, look for a better reception location, to
telephone under the best conditions.
From this moment, the telephone looks for a network with which
it can communicate:
- If it finds one, it shows the name of the network on the screen.
- You are ready to make or receive calls.
- If the letter and the name of a network is displayed, calls are
possible.
- If the letter is displayed with no network name, only the
emergency services will be accessible (ambulance, police,
fire brigade).
- If the network indicator
shows no elements, no network
is available. The telephone remains continuously searching
for a network. The icon
appears on the screen to tell you
that you cannot make a call.
Switching the telephone off
Keep the
button pressed. A final animation is displayed,
then the telephone switches off.
26
Activation
Tips on efficient operation
Your phone has a built-in antenna.
As with any other radio transmitting
device, do not touch the antenna
unnecessarily when the phone is
switched on.
Contact with the antenna affects
call quality and may cause the
phone to operate at a higher power
level than otherwise needed.
Not touching the antenna area
during a phone call optimises the
antenna performance and the
talktime of your phone.
Access to menus
To reach the list of menus, press on buttons and (upper
and lower navigation buttons).
The menus available let you check or modify the various
functions of your telephone to adapt it to your requirements.
Press on Ok
to enter a menu/sub-menu.
Press on Back
to exit a menu/sub-menu.
Making a call
The network is displayed.
Enter the number of the person you are calling.
Press on
.
During the call,
appears on the screen. You will hear tones
indicating that your call is being connected.
When the person who you are calling replies, speak.
Activation
27
International calls
Keep the
button pressed until "+" is displayed on the
screen then, without waiting for the dialling tone, enter the
country code, then the number of the person you are
calling.
Emergency services
Depending on the operator, you can obtain the emergency
services with or without a SIM card or when the keyboard
is locked. You just need to be within a zone served by a
network.
To obtain the international emergency service, enter 112
then press on
.
Other emergency service numbers may exist according to
the country.
Call reception
When you receive a call:
Press on
then speak.
Your caller’s number is displayed when it is presented by the
network.
All numbers corresponding to incoming and outgoing calls are
recorded in the list of recent calls.
Adjusting the volume
Increase or reduce the volume during the conversation by
pressing on the upper and lower navigation buttons.
28
Activation
Hands-free mode
During a call, to activate the hands-free mode, press on
Options
.
Select Speakerphone and validate with OK
.
To deactivate the hands-free mode, press on Options
Select Speakerphone off and validate with OK
.
.
NOTE
In this mode, do not hold the telephone to your ear.
End of communication
Press on
.
The "end of call" message appears on the screen.
Activation
29
Address book
Displaying the address book
You can memorise the telephone numbers that you call
regularly:
- in the SIM card,
- in the telephone.
Various icons give you information on the location of the address
book where the number is memorised:
Address book on your SIM card.
Address book on your telephone.
NOTE
The number of numbers that the address book on the SIM
card can hold varies according to its capacity; your
supplier will be able to give you information about this.
Memorising a number
It is best to memorise numbers in their international format (+,
country code and call number). You can check the content of a
record and modify it by selecting the desired name.
Go into Phonebook/Create contact.
Enter the name of your correspondent (the number of
characters accepted depends on the SIM card used). Validate
with OK
.
Enter the call number of your correspondent. Validate with
OK
.
30
Address book
Deleting a number
To delete the content of a record in the address book, choose
the name using the upper and lower navigation buttons, and
validate using Options
.
Select Delete and validate with OK
.
Call groups
You have the option of classifying correspondents recorded in
the address book into call groups.
You assign characteristics (ring tone, members, etc.,) to each
group.
By default, groups are already created in the telephone.
To display the list of groups, go into Phonebook/Groups.
Renaming a group
- Go into Phonebook/Groups.
- Select the group to rename and validate using OK
- Select Rename.
- Delete the name by successively pressing Delete
- Enter the new name and validate with Save
.
.
.
Adding contacts to a group
This menu lets you add contacts to a call group.
-
Go into Phonebook/Groups.
Select a group of your choice.
Go into Group member/Options/Add member.
The list of contacts recorded in your telephone’s memory is
displayed. Select the contact to add and press on Add
.
You can carry out several operations on members added to a
group. To do this, select a contact in the group, then choose
Options
:
Address book
31
Call:
Send SMS:
Edit:
Add member :
Delete from group:
to call the selected contact.
to send a message to the selected
contact.
to modify the selected contact.
to add a new contact to the group.
to delete the contact selected within
the group.
Associating a ring tone with an address book group
You can associate a different ring tone for each group in the
address book.
-
Go into Phonebook/Groups.
Select a group of your choice.
Select Ring tone.
Choose a ring tone using the upper and lower navigation
buttons and validate with OK
.
Search for a correspondent
- Go into Phonebook/View.
- The list of your address book appears.
- Enter the first letter(s) of your correspondent. The address
book searches for the name in the list that is nearest to these
letters.
NOTE
To call the selected contact, just press
. Your
telephone displays the contact details (name and number)
of the contact in question and calls the number
automatically.
32
Address book
Speed dial
This function lets you save the telephone numbers that you call
regularly, so that you can access them quickly. You can save
11 numbers. Each of these numbers is assigned to one of the
numeric keys (2 to 0, key 1 being assigned to calling the network
answering machine) and to buttons M1 and M2 .
To call a speed-dial number
- To call a speed dial number, from the idle screen, make a long
press on the button where the number has been programmed.
The number is then automatically dialled.
OR
Press the button where the number has been programmed,
then press on
.
- To call the numbers assigned to the memory buttons M1
and M2 , make a short press on the dedicated memory
button to have the associated number automatically dialled.
Saving your speed-dial numbers
- Go into Phonebook/Speed dials.
- From the list, select the number of the key with which you wish
to associate the number and validate with OK
.
- Select Set or edit and validate with OK
.
- The list of contacts recorded in your telephone’s memory is
displayed. Select the contact to add and press on OK
.
Service Dialling Numbers (SDN)
Use the menu Contacts/Service dialling to view the list of
Service Dialling Numbers ( SDN ).
assigned by your service provider. This menu is available if your
SIM card supports SDN
Address book
33
Scroll to the number you want.
Press
to dial.
Fixed Dialling Numbers ( FDN )
Use the menu Contacts/Fixed dialling to create a list of
contacts to be used in FDN mode, in which the phone allows
outgoing calls only to the specified phone numbers, if your SIM
card supports this feature. PIN2 code is necessary.
Enable/Disable FDN mode
Use the menu Contacts/Fixed dialling/Enable FDN or Disable
FDN.
Enter PIN2 code to enable or disable FDN mode.
Edit the list of used numbers
Use the menu Contacts/Fixed dialling/Edit list.
Press Options
to display :
- Call : to call the selected contact.
- Send SMS : to send a message to the selected contact.
- Edit : to modify the selected contact.
- Delete : to delete the selected contact from the list of
authorized numbers.
- Create contact : to add an entry to the list of authorized
numbers.
Configure the address book
My numbers
The telephone numbers assigned to your SIM card are recorded
under My numbers, if your card manages this.
To modify or display these numbers, go into Phonebook/
Options/My numbers.
34
Address book
Scroll down to the desired name or number and press on
OK
to modify the number.
Memory used
To select the address book that you want to use, go into
Phonebook/Options/Memory in use.
Select the memory to be used and validate with OK
.
Copying an address book
You can copy the names and telephone numbers from the
telephone’s memory to the SIM card memory and vice versa.
Go into Phonebook/Options/Copy all entries.
Select the type of copy that you want to perform and validate
with OK
.
Delete the entire address book
You can delete the entire address book from your telephone or
your SIM card.
Go into Phonebook/Options/Delete all entries.
Select the memory to be deleted and validate with OK
Confirm the deletion with OK
.
.
To view the state of the memory
To check how many names and numbers are currently recorded
in the address books on the telephone and the SIM card, and
how many can still be stored there.
Go into Phonebook/Memory status.
Use the upper and lower navigation buttons to see the state of
the memories.
Address book
35
Messages
The number of characters available and the number of the
current section of the entered message are shown in the upper
right corner of the screen.
Receiving a message
Access to this service depends on the network; for more
information, consult your operator or service provider.
When you receive a message, a sound signal is played (the one
selected using the menu Tones/Message tone).
The icon
appears on your telephone’s screen.
As long as the messages are not read, this icon remains on the
screen. When it flashes, the memory is full.
Go into the Messaging menu to reach the list of received
messages.
NOTE
Unread messages are shown in bold characters.
To write a message with Easy Message
T9®
The function Easy Message T9 helps you to
enter your messages easily.
Go into Messaging/New message.
36
Messages
Choosing the writing language
Language
By default, the language used is that which is activated for the
telephone’s menu display (or English if the language not
supported by Easy Message T9™ is chosen for the menus).
Choose Options / Input language.
Using the upper and lower navigation buttons, choose the
preferred language and validate with OK
.
When writing a message:
displays the options menu.
lets you select the mode (ABC, 123, T9).
Using T9 mode
As you enter text, using the keys that have been pressed, the
software uses a dictionary to search for the most frequentlyused corresponding words.
Press the button corresponding to the chosen letter once and
compose the word by continuing to press the buttons
corresponding to the various letters, without worrying about the
display, until you have finished entering the word:
this appears in reverse video, white on black.
If the suggested word corresponds to the one you wanted to
enter, press on the 0 button to validate it, create a space and
move to the next word.
It may be that several words exist in the dictionary
corresponding to the same sequence of keys entered. If the
word that appears is not the one that you wanted, press the
upper and lower navigation buttons to scroll the words present
in the dictionary that correspond to this sequence of keys. When
you find the word that you want, press on the 0 button to validate
it, create a space and move to the next word.
If the word that you want to enter is not in the dictionary, several
additional modes let you change the words entered.
Messages
37
Additional entry modes
The button
lets you select the mode.
The 123 mode is for entering figures.
The ABC mode lets you enter words that do not exist in the
dictionary, or words from another language. To enter a letter,
press quickly on the corresponding key to scroll the letters and
figure. Stop pressing when the desired letter appears.
Symbols and accented characters can be entered by making a
long press on the
button. A list of symbols is displayed.
Select a symbol using the four navigation buttons, then validate
with OK
. The symbol is inserted into the text; you will
automatically return to the mode that you were previously using.
Uppercase / Lowercase / Figures
You can enter lowercase, uppercase or figures by successively
pressing on the
button until: abc, Abc, ABC or 123
appears.
Punctuation characters
Punctuation characters are entered either using button 1
(except in 123 mode), or from the list of special characters (quick
access using the button
).
Accented characters
Accented characters are automatically generated within the
word in Easy Message T9® mode.
Options available when writing a message
If you press the OK
button, several actions are available:
- Send: to send the message to an addressee.
- Save to draft: save your message.
NOTE
The number of messages that can be saved on the SIM
card varies according to its capacity; your supplier will be
able to give you information about this.
38
Messages
- Input language: you can choose the language for the T9
mode.
Choose the preferred language using the scroll arrows and
validate with OK
. T9 mode will use this language.
Read a message and reply to it
When you receive a message, the indicator
and the number
of new messages, followed by the text "New SMS", are
displayed.
If the symbol
flashes, this means that the memory for storing
messages is full. To be able to receive new messages, delete
several old messages in the Received Messages folder.
1 - Press Select
to see the new message, or
Return
if you want to read it later.
To read the message later, go into Messaging/Inbox.
If you have received several messages, choose the one that
you want to read.
The symbol
is displayed alongside each unread
message. The symbol
is displayed alongside each
message that has been read.
2 - While reading a message, you can press Options.
The list of options lets you delete, transfer or reply. You can
also call the sender of the message or save their number in
your address book.
Message Folders
Incoming text messages are stored in the Inbox folder and sent
messages are stored in the Sent items folder under the
Messaging menu.
Messages to be sent later can be saved in the Drafts folder.
Messages which were not able to be sent are stored in the
Drafts folder.
Messages
39
Voice messages
The voice mailbox is a network service for which an additional
subscription may be necessary. For more information, or to
obtain your voice mailbox number, contact your service
provider.
Go into Messaging/Voice mail and select:
• Cal voice mail: to call your voice mailbox using the number
that you have recorded and listen to your messages.
• Change number: to enter, find or modify the number of your
voice mailbox. Press on Save
to save it.
If the network provides this function, the indicator
shows that
new voice messages have been received. Press Listen
to
call your voice mailbox.
NOTE
By keeping the
button pressed, you can directly call
your voice mailbox.
40
Messages
Broadcast messages
This network service lets you receive messages from your
service provider on various subjects, such as the weather or
road traffic. For information on the subjects available and the
corresponding numbers, contact your service provider.
Activate/deactivate
Go into Messaging/Cell broadcasts/Reception.
Select On/Off to activate/deactivate the function.
Languages
This menu lets you choose the language in which you will
receive messages.
Go into Messaging/Cell broadcasts/Languages.
Select:
- All: to receive the messages in the language of the telephone.
- Other languages: lets you choose the language.
Use Mark
to select the desired languages.
When you have finished, press Save
to save your
settings.
SMS settings
To access SMS settings, go into Messaging/Message
settings.
Change the number of the SMS centre
Select SMSC number.
Enter the number of the centre and validate with Save
Use the Delete
button to delete figure by figure (if
required).
Messages
.
41
Change the validity period
Select Validity period.
Select the preferred period and validate with OK
.
Activate/deactivate message acknowledgement
Select Delivery reports.
Select On/Off to activate/deactivate the function.
Define the reminder for unread messages
When you receive a message, the SMS alert is played by your
telephone. If unread messages remain in your inbox, this
function lets you activate an SMS tone periodically as a
reminder.
Select New message alert.
Select the type of reminder required and validate with OK
.
However, you may deactivate the reminder function by choosing
Off.
State of the SMS memory
To find out the available memory capacity for your SMS, go into
Messaging/Memory status.
42
Messages
History
The telephone records the numbers of missed calls, incoming
and outgoing calls, and the duration of your calls.
The telephone records these calls only when it is switched on
and is receiving a signal from a network that provides these
functions.
List of recent calls
Go into Call records then select:
• Missed: to see the last 10 telephone numbers from which
someone has unsuccessfully tried to call you (network
service). The name or the telephone number is followed by
the number of attempts made by the caller, displayed
between brackets.
NOTE
When a message is displayed indicating missed calls,
press Selection
to access the list of these numbers.
Scroll down until you reach the number that you want to
call and press on
.
• Incoming: to see the last 10 telephone numbers for calls
that you have accepted (network service)
• Outgoing: to see the last 10 numbers entered, whether the
call was successful or not.
If you press on Options
, you can call the number, send a
message to this number, delete the selected telephone number
(or the entire list), save it in the address book, or view it.
Call duration counters
Go into Call duration to see the duration of your incoming and
outgoing calls in hours, minutes and seconds.
History
43
Ring tones
Choose the volume and type of ring
tones
You have a choice between numerous varied melodies and
several volume adjustments, including one that is silent.
You may choose to have your telephone ring on reception of
calls and/or messages.
Go into the Tones menu, then select:
- Ring volume: choose the volume of the ring tone.
- Ring tone: choose a ring tone for incoming calls.
- Message tone: choose a ring tone for SMS reception.
- Keypad volume: choose the preferred volume for keyboard
beeps.
- Call volume: adjust the default volume of the telephone’s
earpiece.
Make your choice using the upper and lower navigation buttons,
then validate your settings with
.
44
Ring tones
Display
Display on the idle screen
Go into Display/Standby screen.
Screen background
You can configure the telephone so that a screen background is
displayed in standby mode. To do this, select Wallpaper.
Use the 4 navigation buttons to choose a screen background
and validate with OK
.
Activate/deactivate display of date/time on the title screen
Go into Show time & date/ On or Off.
The backlighting
You can set your telephone’s period of inactivity at the end of
which the screen switches off. Press any key to activate screen
backlighting.
This function saves power in standby mode.
NOTE
When the telephone does not receive a network signal, the
screensaver is deactivated because the telephone is
searching for a network.
Go into Display/Light.
Select a waiting period or choose to always activate screen
backlighting for your telephone using the "upper" and "lower"
navigation buttons, then validate with OK
.
Display
45
Modifying the contrast
Carry out this adjustment if you see that the display on the
screen is not readable.
Go into Display/Contrast.
Select the desired level with the left and right navigation buttons.
The contrast is directly visible on the screen.
Click on OK
46
when you have obtained a satisfactory level.
Display
Settings
Call settings
Go into Settings/Call settings.
Call transfer
Select Call divert.
Call transfer lets you redirect incoming calls to another number,
for example, to your voicemail box. For more details, contact
your service provider. The transfer options which are not
provided by your SIM card or your network operator might not be
displayed.
Select the preferred transfer option, for example, when busy, to
transfer voice calls when your number is occupied or if you reject
an incoming call.
The state of the function is shown on the screen. Press
Options
and select:
- Activate: to activate the transfer parameter.
Select the number towards which your calls will be be directed
and validate with Options/Accept
.
- Deactivate: to deactivate the call transfer function.
Call prohibition
The "call prohibition" network service lets you restrict your calls.
The following options are available:
- All outgoing: no outgoing calls may be made.
- All international: no international calls may be made.
Settings
47
- Outg. int’l roaming: abroad, only numbers within the current
country may be called, as well as those of your country of
origin, namely, the country where your service provider is
located.
- All incoming: no calls may be received.
- Inc. when roaming: no calls may be received when you are
using your telephone outside your original coverage zone.
- Change password: lets you define and modify the "call
prohibition" password communicated by your service
provider. You must enter the current password before
specifying a new one. After entering a new password, you
must enter it again to validate it.
To adjust the options for call prohibition
- Go into Call barring.
- Select the type of prohibition required and validate with
OK
Then press on Options
.
- Press on Activate
to validate your settings.
- Enter the "call prohibition" password communicated by your
service provider and validate with OK
.
The telephone sends your settings to the network and the
network acknowledgement is displayed.
To deactivate the specific call prohibition rules
- Go into Call barring.
- Select the type of prohibition required and validate with
. Then press on Options
.
OK
- Press on Deactivate
to validate your settings.
- Enter the "call prohibition" password communicated by your
service provider.
The telephone sends your settings to the network and the
network acknowledgement is displayed.
48
Settings
"Call waiting" service
Select Call waiting.
Choose Options/Activate
for the network to send you an
indication of a new call while a call is in progress (network
service).
Automatic redial
Select Auto redial.
Choose On, validate with OK
up to 10 times after a failed call.
for the telephone to try again
Caller identification
This function activates or deactivates the display of the caller’s
number. Activation is only effective if you are subscribed to the
"Caller identification" service.
Select Caller ID.
Choose the settings that you prefer using the upper and lower
navigation buttons and validate with OK
.
Automatic call acceptance and release
Automatic call release automatically releases the call when you
place your telephone back on its charger.
NOTE
If automatic call release is active, you can no longer
remain in communication if you place the telephone on its
charger.
Automatic call acceptance, when it is active, lets you
automatically take the call as soon as you remove the telephone
from its charger.
Select Auto pick up or Auto hang up then choose On / Off to
activate/deactivate the function in question.
Settings
49
Time/Date settings
Go into Settings/Time and date.
Adjusting the date and time
Select Set time & date.
Enter the date and the time using the keyboard buttons.
After entering, validate with OK
.
- To move from one setting to another, use the upper and lower
navigation buttons.
- To reposition the cursor while entering, use the left and right
navigation buttons.
Date/Time format
Select:
- Date format or Time format: choose a format using the
upper and lower navigation buttons, then validate with
OK
.
- Date separator: choose a separator using the upper and
lower navigation buttons, then validate with OK
.
Network settings
Go into Settings/Network settings.
Choose Auto search so that the telephone automatically
selects one of the cellular networks available in your
geographical zone.
If you select Manual select, you can choose the network,
providing that there is a roaming agreement with your named
network operator.
If "Access prohibited" is displayed, you must select another
network. The telephone remains in manual mode until you
select the automatic mode or until you insert another SIM card
in the telephone.
50
Settings
Security settings
NOTE
When you use the security functions to restrict calls (call
limiting, limited group and authorised numbers), it may be
possible to make outgoing calls to the emergency numbers
on certain networks (for example, 112, 911 or any other
official emergency number).
Go into Settings/Locks.
Select:
- SIM card PIN: so that the telephone requests the PIN code
each time it is switched on. Certain SIM cards do not allow
deactivating the request for the PIN code.
- Phone lock: so that the telephone requests the programmed
code each time it is switched on or when a new SIM card is
inserted.
- Auto key lock: to lock your telephone’s keyboard after a
period of inactivity. You may also deactivate automatic
locking.
- Change phone code: To modify the password for restriction.
Language
Go into Settings/Language.
Select the language for displaying text and validate with
OK
.
NOTE
If Automatic is selected, the telephone will choose the
language according to the information on the SIM card.
Settings
51
Resetting the telephone
When you reset your telephone, all the settings return to their
initial values (factory settings), with the exception of the address
book and the SMS.
Go into Settings/Restore defaults.
Enter the telephone’s code and press on OK
the reset.
52
to confirm
Settings
Applications
Calculator
You can use the calculator to carry out common operations. For
this go into Applications/Calculator.
- The telephone’s calculator can add (upper navigation button",
subtract (lower navigation button), multiply (right navigation
button), and divide (left navigation button).
- Press on
to enter a decimal point.
- Press on
to give the negative sign to the value entered.
- Press on OK
to display the result.
Games
Go into Applications/Box game, then select:
- Start: to begin the game.
- Go to level: to choose the desired level.
- Help: to display the instructions for the game (menu Game
guide) or see the buttons to use and the functions associated
with them (menu Key map).
Applications
53
The purpose is to put the obstacles in their places on the red
crosses. Move the man using the buttons below to reach the
objective.
Button
Action
Upper navigation button.
Move up.
Lower navigation button.
Move down.
Right navigation button.
Move to the right.
Left navigation button.
Move to the left.
key
Increase the volume of the
game
key
Decrease the volume of the
game
54
Applications
Organiser
Calendar
Go into Organizer/Calendar to see the calendar for the current
month.
To scroll to the different months (previous or following), use the
4 navigation buttons (upper, lower, left or right).
NOTE
To quickly access the calendar, press on the button
from the idle screen.
Alarms
Go into Organizer/Alarms.
Alarm triggered
The alarm function activates the phone’s alarm each day at a
time that you program.
When an alarm is programmed, the indicator
appears on the
idle screen.
When the alarm is triggered, the chosen ring tone is played for
30 seconds by the telephone’s loudspeaker and an alert screen
is displayed. Stop the alarm by pressing a button on the
telephone.
Organiser
55
Programming an alarm
You can program 3 different alarms. To do this:
Select the alarm to be programmed and press on OK
.
3 controls are available to you. Use the upper and lower
navigation buttons to move from one control to another:
- State of the alarm: use the left and right navigation buttons
and select:
Off: to deactivate the alarm.
One time: to activate the alarm once.
Mon~Fri: to activate the alarm each day from Monday to
Friday at the programmed time.
Everyday: to activate the alarm each day at the programmed
time.
- Alarm: use the left and right navigation buttons to choose a
ring tone.
- The time at which the telephone will ring: enter the time
directly using the keyboard buttons.
56
Organiser
Maintenance and battery
Maintenance
Clean your telephone with a slightly damp non-fluffy cloth.
NOTE
Certain chemical products can damage plastic materials.
Avoid using spray products, certain special cleaning
products, corrosive products, solvents, alcohol and
detergents.
Battery
After a long period of non-use (several months), when
connecting to the charger, the terminal might not start.
In this case:
- Disconnect the charger and connect it again for 1 second.
- If necessary, renew this operation several times.
Maintenance and battery
57
Technical characteristics
Weight: 124 g
Size: 133 x 47 x 17.5 mm
Original battery: Battery Ni-MH 550 mAh
Battery life communication/standby: up to 160 Minutes/240
Hours (these values are theoretical values and are only given
as an approximation)
Formats:
- Audio: Midi
- Graphical: BMP
Memory size available for messages: up to 100 SMS
Memory size available for address book: up to 100 contacts
Maximum size of each message: 160 characters
GSM frequency: 900/1800 MHz
Usage temperature: from - 10 °C to + 55 °C
58
Technical characteristics
Troubleshooting
PROBLEM SITUATION
ACTIONS
The telephone
does not switch
on
Remove the battery and replace it.
OR
Place the telephone on the charger
(check that it is plugged in) for about 5
minutes.
No network
recognition
Remove the SIM card. Check that there is
no foreign body at the location of the SIM
card. Replace the SIM card, making sure
to press it in as far as the stop.
Impossible to
start the
telephone
Put the telephone on charge for 15
minutes before starting it.
Make sure that the battery charge icon is
moving.
If yes : charge ok.
If not : disconnect the charger, then
reconnect it. Check that the battery icon
is moving. If the icon is still not moving,
repeat the charger disconnection/
reconnection operation several times. If
the battery charge is still not correct,
contact the after-sales service.
When the battery-charge icon is fixed, the
battery is charged.
Troubleshooting
59
PROBLEM SITUATION
ACTIONS
Message SIM
ABSENT
Check that the SIM card is present and
correctly inserted.
Make a visual check of the SIM card. If
the card is damaged, contact the
operator’s sales point for a check. If the
message remains, contact the after-sales
service.
Message PIN
INCORRECT
Error when entering the PIN. After three
entry errors, the SIM card is blocked.
Message SIM
BLOCKED
If an incorrect PIN code is entered three
times in a row, your SIM card is blocked.
You must then:
- enter the PUK (Personal Unblocking
Key) code supplied by your operator
and validate,
- enter your PIN code and validate,
- enter your PIN code again and validate.
After 5 or 10 (according to the type of SIM
card) fruitless attempts, the SIM card is
definitively locked. You must contact your
operator or your service provider to
obtain a new card.
60
Troubleshooting
PROBLEM SITUATION
ACTIONS
Message SIM
LOCKED
On request from the operator, the
telephone may only be usable on certain
types of SIM card. This message
indicates that the SIM card used is not
appropriate.
Remove the SIM card and restart the
mobile. If the SIM ABSENT message is
displayed, check the compatibility of the
SIM card with the organisation that sold
you the telephone. Otherwise, contact the
after-sales service.
The telephone’s
display appears
frozen
Press a key on the keyboard. If nothing is
displayed, check the positioning of the
SIM card. If the symptom persists,
contact the after-sales service.
Troubleshooting
61
PROBLEM SITUATION
ACTIONS
Communication
cannot be
established
Check the structure of the number called.
Check the presence of a least one
element of the network icon. If the R icon
is displayed without the name of an
operator being displayed, only
emergency calls are possible.
Make sure that your call credit has not
expired with your operator.
Check that the SIM card used offers the
service that you want to use and that its
validity has not expired.
Check the restriction on outgoing calls
and deactivate it, if necessary.
The network is overloaded. Call back
later.
If it remains difficult to establish
communication, contact the Hotline.
Incoming calls
cannot be
received
Try to establish communication to check
that the telephone and the network are
operational.
Check and deactivate continuous call
forwarding ("continuous call forwarding"
icon displayed).
Check the restriction on incoming calls
and deactivate it, if necessary.
If it remains difficult to receive calls,
contact the Hotline.
62
Troubleshooting
PROBLEM SITUATION
ACTIONS
Impossible to
send messages
Check that the SIM card used offers this
service.
Make sure that the message server is
correctly programmed.
Try to establish communication to check
that the telephone and the network are
operational.
Try sending the message later.
Voice mail is
absent
Check that the SIM card used offers this
service.
Program the link to the voice mailbox,
using the information supplied by the
operator.
Troubleshooting
63
Customer support
From Vodafone GSM
( restricted to some countries )
1212
From Germany
0800 172 12 12
From foreign countries
0049 172 12 12
The entire user manual could be consulted from the
WEB site : www.vodafone.de
64
Customer support
Warranty
Use the phone under normal operating conditions and for
intended use only. Sagem Communications does not assume
responsibility for use above and beyond the intended use and
possible damages resulting thereof.
Software developed for Sagem Communications is exclusive
property of Sagem. Therefore it is prohibited to modify,
translate, delete or disassemble the software or parts thereof.
Conditions of Warranty
To make any warranty claims, please contact your dealer. Have
your contract and sales documentation ready.
He will consult you about the steps to take, if your phone is not
working properly.
1.
The warranty period for the new unit (excluding consumption
parts) as well as equipment delivered with the phone is set to
24 month (excluding shipping) for parts and labour from the
point of purchase of the customer, stated on the contract.
Note: For mobile phones that have been repaired or replaced
during the warranty period, the following warranty applies:
After end of general warranty period of 24 months or 3 (three)
months after begin of Sagem support.
This warranty disclaimer does not affect your statutory rights in
accordance to national legislation or your rights against the
dealer.
For legal cases, the official warranty for manufacturing errors or
hidden defects of this unit applies
Warranty
65
2.
During the warranty period, Sagem Communications replaces
defective parts or respectively replaces the phone at its own
discretion. For this to happen, it must have been agreed that
labour required for warranty purposes is conducted at an
authorized customer service point, and that shipping costs
(transport and insurance) for returning the phone to the address
given to Sagem customer service (phone number to be included
on delivery slip) is taken over by the customer.
In accordance to fundamental legislative regulation, Sagem
Communications is not expressively nor concluding responsible
for warranty claims, not listed in this section. Sagem
Communications is not responsible for immaterial and/or direct
damages (e.g. damages for lost business or other financial or
commercial losses), whether caused during the warranty period
or not.
3.
To make any claims based on this warranty, the customer must
present a legible und unchanged contract, including name and
address of the supplier, date and place of purchasing, telephone
type and IMEI. In addition, all information on the phone ID label
must be legible and the label or respectively phone seal must be
unbroken.
Warranty only applies to normal use of the phone.
If the customer send his phone in for repair, he is responsible to
backup all data saved on the phone (phone book, settings,
backgrounds) at his own cost.. Sagem provides a list of backup
function upon request. Sagem Communications does not
assume any liability for damages to data, programs or files of the
customer. In case of loss, such information, operating elements
and file contents will not be installed in any case.
Sagem Communications reserves the exclusive right to decide,
whether to repair the phone with used or new parts, or to replace
the phone with a new or comparable similar phone. During the
repair, Sagem Communications reserves the right to make
requires technical changes to the phone, if this does not impair
the previous function of the phone.
66
Warranty
Defective parts that are replaced during repair become the
property of Sagem Communications. If not agreed otherwise,
the repair time and the time, in which the phone cannot be used
due to the repair, must not exceed the warranty time, as stated
in section 1.
The warranty conditions only apply, if the phone was fully paid
for at time of the warranty claim.
4.
The following is excluded from any warranty:
Defects or functional restrictions caused by not following the
installation and operating instructions, external impact (shock,
lightning, fire, vandalism, intended destruction, vibration, water
damages of any type, chemicals, wrong power supply, etc.),
modifications not authorized by Sagem Communications, lack of
maintenance (per operating instructions), checking and
maintaining the phone, unsuitable environmental conditions for
the phone (especially in connection with unsuitable room
temperature or humidity for the phone, consumption material or
changes in power supply), or caused by a repair or maintenance
by an unauthorized person (improper opening of the phone.
Damages, that are caused by insufficient or unsuitable
packaging of the phone being returned to Sagem
Communications. Regular wear of phone and equipment.
Connection problems caused by bad surroundings, such as:
problems in connection with Internet access or connection, e.g.
interruptions of networks, closing of subscription line on either
side. Transfer problems (insufficient geographic coverage of
the area by radio-electric transmission stations, interferences,
noise, breakdown or bad quality of phone wires...), errors in local
lines (cabling, server, user equipment) or respectively errors in
transmission network (interferences, noise, breakdown or bad
quality of the network...).
Frequency changes of mobile phone network made after the
unit was sold.
Delivery of new software versions. Current maintenance work:
Delivery of consumables, installation or replacement of these
consumables...
Warranty
67
Unauthorized repair without written permission by Sagem of a
modified or added phone or respectively rework without written
permission by Sagem of software changed or added by Sagem
Communications Functional errors, caused by use of products
and accessories that are not compatible with the phone Mobile
phones, returned to Sagem Communications, which do not fulfill
the return conditions applicable for warranty. Change of SIM
user key codes as well as repairs, resulting from changing the
SIM user key code, if this was done without consent of the
network operator.
5.
In cases of warranty exclusion and after the warranty period has
ended, the customer must ask for a cost estimate, which he
must accept before sending it back to customer service. Repair
and shipping costs (both ways), listed in the cost estimate
accepted by the customer will be billed to the customer. These
conditions apply, if no other arrangements were made with the
customer. If a section of these conditions become invalid due to
consumer protection acts of national legislation, it is removed.
The other regulations remain untouched.
68
Warranty
User Manual - Data subject to change without notice
04/2009
© Vodafone 2009.
Vodafone and the Vodafone logos are trademarks
of the Vodafone Group. Any product or company names mentioned
herein may be the trademarks of their respective owners.
© Vodafone Group 2009.
Vodafone und die Vodafone Logos sind eingetragene Warenzeichen
der Vodafone Group. Alle hier erwähnten Produkt-oder Firmennamen,
sind eingetragene Warenzeichen ihrer jeweiligen Inhaber.