1
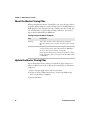
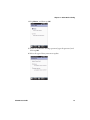
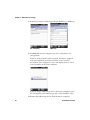
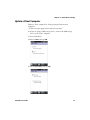
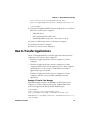
CloneNGo Device Cloning Application User Guide Intermec by Honeywell 16201 25th Ave. W. Lynnwood, WA 98087 U.S.A. www.honeywell.com The information contained herein is provided solely for the purpose of allowing customers to operate and service Intermec-manufactured equipment and is not to be released, reproduced, or used for any other purpose without written permission of Intermec Inc. Information and specifications contained in this document are subject to change without prior notice and do not represent a commitment on the part of Intermec Inc. Copyright © 2012–2015 Intermec Inc., Honeywell International Inc. All rights reserved. The word Intermec, the Intermec logo, and SmartSystems are either trademarks or registered trademarks of Intermec Inc. For patent information, please refer to www.hsmpats.com Wi-Fi is a registered certification mark of the Wi-Fi Alliance. Microsoft, Windows, and the Windows logo are registered trademarks of Microsoft Corporation in the United States and/or other countries. Bluetooth is a trademark of Bluetooth SIG, Inc., U.S.A. ii CloneNGo User Guide Document Change Record This page records changes to this document. The document was originally released as Revision 001. Version Number Date Description of Change 003 2/2015 • Updated to add the Thor CV31 computer and the USB storage device method of cloning. • Reorganized to separate basic and advanced device cloning. 002 CloneNGo User Guide 2/2013 Revised to support software update. Features include copying files, installing applications, and upgrading the operating system. iii iv CloneNGo User Guide Contents Contents Customer Support . . . . . . . . . . . . . . . . . . . . . . . . . . . . . . . . . . . . . . . . . . . . . . . . . . . . . . . . . . . . . . . vii Product Service and Repair . . . . . . . . . . . . . . . . . . . . . . . . . . . . . . . . . . . . . . . vii Send Feedback. . . . . . . . . . . . . . . . . . . . . . . . . . . . . . . . . . . . . . . . . . . . . . . . . . . vii 1 About Device Cloning ................................................... 1 About CloneNGo . . . . . . . . . . . . . . . . . . . . . . . . . . . . . . . . . . . . . . . . . . . . . . . . . . . . . . . . . . . . . . . . . 2 Supported Computers. . . . . . . . . . . . . . . . . . . . . . . . . . . . . . . . . . . . . . . . . . . . . . . . . . . . . 2 About Master and Client Computers . . . . . . . . . . . . . . . . . . . . . . . . . . . . . . . . . . . . . . . 2 About the Device Cloning Methods. . . . . . . . . . . . . . . . . . . . . . . . . . . . . . . . . . . . . . . . . 3 How to Use a Wireless Ad Hoc Network. . . . . . . . . . . . . . . . . . . . . . . . . . . . . 3 How to Use a Storage Device . . . . . . . . . . . . . . . . . . . . . . . . . . . . . . . . . . . . . . . 3 About the Device Cloning Scenarios . . . . . . . . . . . . . . . . . . . . . . . . . . . . . . . . . . . . . . . . 4 How to Clone Basic Settings . . . . . . . . . . . . . . . . . . . . . . . . . . . . . . . . . . . . . . . . . . . . . . . . . . . . . . . 5 Configure the Master Computer . . . . . . . . . . . . . . . . . . . . . . . . . . . . . . . . . . . . . . . . . . . 5 Run CloneNGo on the Master Computer . . . . . . . . . . . . . . . . . . . . . . . . . . . . . . . . . . . 5 How to Start CloneNGo on a Client Computer . . . . . . . . . . . . . . . . . . . . . . . . . . . . . . 8 Clone a Client Computer . . . . . . . . . . . . . . . . . . . . . . . . . . . . . . . . . . . . . . . . . . . . . . . . . . 8 How to Verify the Cloning Process. . . . . . . . . . . . . . . . . . . . . . . . . . . . . . . . . . . . . . . . . . 9 About Device Unique Settings. . . . . . . . . . . . . . . . . . . . . . . . . . . . . . . . . . . . . . . . . . . . . . . . . . . . . 10 Configure Device Unique Settings . . . . . . . . . . . . . . . . . . . . . . . . . . . . . . . . . . . . . . . . . . . . . . . . . 11 How to Update Master and Client Computers . . . . . . . . . . . . . . . . . . . . . . . . . . . . . . . . . . . . . . 11 About the Master Cloning Files . . . . . . . . . . . . . . . . . . . . . . . . . . . . . . . . . . . . . . . . . . . 12 Update the Master Cloning Files . . . . . . . . . . . . . . . . . . . . . . . . . . . . . . . . . . . . . . . . . . 12 Update a Client Computer . . . . . . . . . . . . . . . . . . . . . . . . . . . . . . . . . . . . . . . . . . . . . . . . 15 Restore the Master or Client Computer Configuration . . . . . . . . . . . . . . . . . . . . . . 16 2 About Advanced Cloning . . . . . . . . . . . . . . . . . . . . . . . . . . . . . . . . . . . . . . . . . . . . . . 19 About Advanced Cloning Features. . . . . . . . . . . . . . . . . . . . . . . . . . . . . . . . . . . . . . . . . . . . . . . . . 20 Create a CloningEx.xml File. . . . . . . . . . . . . . . . . . . . . . . . . . . . . . . . . . . . . . . . . . . . . . . 20 Transfer Files to Client Computers . . . . . . . . . . . . . . . . . . . . . . . . . . . . . . . . . . . . . . . . 20 How to Transfer Applications . . . . . . . . . . . . . . . . . . . . . . . . . . . . . . . . . . . . . . . . . . . . . . . . . . . . . 21 How to Configure Registry Settings . . . . . . . . . . . . . . . . . . . . . . . . . . . . . . . . . . . . . . . . . . . . . . . 23 Create the Registry Settings XML File. . . . . . . . . . . . . . . . . . . . . . . . . . . . . . . . . . . . . . 23 Configure Registry Settings . . . . . . . . . . . . . . . . . . . . . . . . . . . . . . . . . . . . . . . . . . . . . . . 24 CloneNGo User Guide v Contents How to Transfer Licenses . . . . . . . . . . . . . . . . . . . . . . . . . . . . . . . . . . . . . . . . . . . . . . . . . . . . . . . . . 24 Export Licenses from SmartSystems . . . . . . . . . . . . . . . . . . . . . . . . . . . . . . . . . . . . . . . 25 Transfer Licenses. . . . . . . . . . . . . . . . . . . . . . . . . . . . . . . . . . . . . . . . . . . . . . . . . . . . . . . . . 25 How to Clone the Operating System . . . . . . . . . . . . . . . . . . . . . . . . . . . . . . . . . . . . . . . . . . . . . . . 26 Copy a SmartSystems Bundle to Removable Media . . . . . . . . . . . . . . . . . . . . . . . . . 26 Update or Clone the Operating System . . . . . . . . . . . . . . . . . . . . . . . . . . . . . . . . . . . . 27 How to Use a Cloned Computer as a Master . . . . . . . . . . . . . . . . . . . . . . . . . . . . . . . . . . . . . . . . 28 Copy Master Cloning Files to a Cloned Computer . . . . . . . . . . . . . . . . . . . . . . . . . . . . . . . . . . 29 Create a Custom Set of Device Unique Settings . . . . . . . . . . . . . . . . . . . . . . . . . . . . . . . . . . . . . 30 3 Troubleshoot Device Cloning . . . . . . . . . . . . . . . . . . . . . . . . . . . . . . . . . . . . . . . . . 33 Problems and Possible Solutions . . . . . . . . . . . . . . . . . . . . . . . . . . . . . . . . . . . . . . . . . . . . . . . . . . 34 Troubleshoot Cloning the Operating System . . . . . . . . . . . . . . . . . . . . . . . . . . . . . . . . . . . . . . . 35 Operating System Pre-Installation Actions (Master Mode) . . . . . . . . . . . . . . . . . . . 35 Operating System Post-Installation Actions . . . . . . . . . . . . . . . . . . . . . . . . . . . . . . . . 36 vi CloneNGo User Guide Customer Support Customer Support To search our knowledge base for a solution or to log in to the Technical Support portal and report a problem, go to www.hsmcontactsupport.com. For our latest contact information, see www.honeywellaidc.com/ locations. Product Service and Repair Honeywell International Inc. provides service for all of its products through service centers throughout the world. To find your service center, go to www.honeywellaidc.com and select Support > Contact Support > Service and Repair. Contact your service center to obtain a Return Material Authorization number (RMA #) before you return the product. To obtain warranty or non-warranty service, return your product to Honeywell (postage paid) with a copy of the dated purchase record. Send Feedback Your feedback is crucial to the continual improvement of our documentation. To provide feedback about this manual, please contact the Technical Communications department directly at [email protected]. CloneNGo User Guide vii Customer Support viii CloneNGo User Guide 1 About Device Cloning 1 Chapter 1 — About Device Cloning About CloneNGo CloneNGo is a peer-to-peer device cloning application that easily transfers the configuration of a master computer to one or more clone (client) computers. You can clone: • device settings. • files. • applications. • registry settings. • licenses. • the operating system. You can also use CloneNGo to create and manage unique device settings for each mobile computer in your data collection system. Supported Computers CloneNGo is supported by these operating systems used in the following mobile computers: • • Microsoft® Windows® Embedded Handheld 6.5 with firmware version 1.50 or later: • CK3R • CK3X • CK70, CK71, CN70, CN70e (70 Series) • Ci70 Microsoft Windows Embedded Compact 7 (CE 7.0): • Thor™ CV31 About Master and Client Computers To clone data from one computer to another, you configure a master (server) computer that sends its complete configuration to one or more clone (client) computers. Only computers of the same type, family, and model (TFM) can exchange cloning data with each other. 2 CloneNGo User Guide Chapter 1 — About Device Cloning This example describes the type, family, and model for a CK3R computer: Type Family and Model for the CK3R Identity Example Description Type C The first character of the hardware version. Family K The second character of the hardware version. Model 3R The third and fourth character of the hardware version. When you start CloneNGo on a client computer using the ad hoc cloning method, the client computer looks for a master that is most similar to it. For example, if a client finds a master with the identical hardware configuration, it transfers cloning data from that master. If the client computer cannot find a master with identical hardware, the client transfers data from the first master it finds with the same TFM. About the Device Cloning Methods You can use either a wireless ad hoc network or storage device to transfer data from the master to the client computers. Note: You must use a storage device to clone CV31 computers. How to Use a Wireless Ad Hoc Network When you run CloneNGo on a master computer, the computer creates an ad hoc network for client computers to join. This temporary peer-to-peer network is created specifically to clone data from the master to the client computer. How to Use a Storage Device You can copy the cloning files from the master computer to an SD card or USB storage device, and then clone the client computers from the storage device. CloneNGo User Guide 3 Chapter 1 — About Device Cloning This method is useful in these situations: • Your master computer is not within radio range of the computers you want to clone. • You have a large amount of data you want to clone, and it may take too long to send the data through a Wi-Fi connection. • You cannot continuously supply power to the computers you want to clone. For example, a CV31 installed on a vehicle is powered when the vehicle is on, but it is not practical to leave the vehicle on. • You want to clone computers at a remote location. So, you send the cloning files electronically to the System Administrator at the remote location, and the System Administrator puts the cloning files on a storage device. You need a USB accessory to clone computers with a USB storage device: • CK3R/CK3X: insert the computer in an AD20 dock, which has a USB connector. • 70 Series: insert the computer in a DX1 dock, which has a USB connector. • CV31: connect a USB adapter cable to the CV31. About the Device Cloning Scenarios The cloning method you use depends on your configuration scenario. Device Cloning Scenarios Scenario Method Mobile computer out-of-box Ad Hoc Network Configure the master computer, create an ad hoc network, and clone a client computer. Device settings Security settings Administrator password Device unique settings Mobile computer SD card Storage Device Device settings Security settings Administrator password Device unique settings Files and applications Operating System 4 Description What You Can Clone • • • • Configure the master • computer, copy the cloning • files to an SD card, and clone • a client computer. • • • CloneNGo User Guide Chapter 1 — About Device Cloning Device Cloning Scenarios (continued) Scenario Method Mobile computer Storage Device USB storage device CV31 microSD card or USB storage device Storage Device Description What You Can Clone • • • • • • Configure the master • computer, copy the cloning • files to a microSD card or • USB storage device, and • clone a client computer. • • Configure the master computer, insert the master computer in a dock with a USB connector, copy the cloning files to a USB storage device, and clone a client computer. Device settings Security settings Administrator password Device unique settings Files and applications Operating System Device settings Security settings Administrator password Device unique settings Files and applications Operating System How to Clone Basic Settings Basic settings are settings that you can configure with Intermec Settings that are not device-specific. To clone basic settings, you configure the master computer with the settings you want to clone, and then run CloneNGo. CloneNGo creates a settings backup. Configure the Master Computer You need to configure the master computer with the settings you want to clone. 1 Set the correct date, time, and time zone. 2 Configure all other device settings. Run CloneNGo on the Master Computer If wireless security is enabled on the master computer, you need to type your pre-shared key or WEP keys. 1 If you are using a USB storage device, connect the USB storage device to the master computer. 2 On the master computer, tap Start > Settings > System > CloneNGo. CloneNGo User Guide 5 Chapter 1 — About Device Cloning 3 Tap Master, and then tap OK. 4 If you set an Intermec Settings password, type the password, and then tap OK. 6 CloneNGo User Guide Chapter 1 — About Device Cloning 5 If you have wireless security enabled, type your pre-shared key or WEP keys. Pre-shared Key WEP Keys 6 Tap Save. The master computer saves the security data to an encrypted file. If you are using a wireless ad hoc network, the master computer scans the network for an isolated channel, creates an ad hoc network for client computers to join, and displays the bar code to start CloneNGo on the client computer. If you are using a USB storage device, the master computer copies the cloning files to the USB storage device and CloneNGo closes. 7 Remove the USB storage device from the master computer. CloneNGo User Guide 7 Chapter 1 — About Device Cloning How to Start CloneNGo on a Client Computer Use one of these methods to start CloneNGo on a client computer: • Scan the bar code that appears on the master computer. • Scan this bar code: • Tap Start > Settings > System > CloneNGo. Select Clone and tap OK. • Double-tap the CloneNGo icon on the desktop. Clone a Client Computer After the CloneNGo bar code appears on the master computer, you are ready to clone client computers. 1 If you are using a USB storage device, connect the USB storage device to the client computer. 2 On the client computer, start CloneNGo. A progress bar appears on the Cloning Progress tab. The client computer automatically restarts after cloning is successfully completed. 8 CloneNGo User Guide Chapter 1 — About Device Cloning 3 (Optional) To see the status of the cloning process, tap the Cloning Details tab. 4 If you are using a USB storage device, remove the USB storage device from the client computer. How to Verify the Cloning Process After you clone one computer, use Intermec Settings or the Device Health dashboard to make sure that the settings on the master computer were successfully cloned to the client computer before you clone additional computers. You can also use ISpyWiFi or the Wireless Center to verify network settings. Note: To easily verify if the cloning process was successful, include a unique wallpaper image with the cloning files. If the cloned computer displays the new wallpaper, you know that the cloning process was successful. For help, see “Example 2: Transfer Wallpaper” on page 22. CloneNGo User Guide 9 Chapter 1 — About Device Cloning About Device Unique Settings When you clone a client computer, CloneNGo creates an XML file on the master computer. This file contains these device unique settings for the client computer: • Device Name • Static IP Address • Subnet Mask • Gateway • DNS • WINS You can edit this XML file to specify device unique settings for each client computer. For example, you can clone ten client computers and specify a unique device name for each client computer in the device unique settings XML file. Sample DeviceUniqueSettings.xml file: <StaticIPAddrs> <Entry SerialNum="101X1200005" DeviceName="Device00000001" IPAddr="192.168.1.100" SubnetMask="255.255.255.0" Gateway="192.168.1.1" DNSServer="" WINS="" /> <Entry SerialNum="101X1200023" DeviceName="Device00000002" IPAddr="192.168.1.101" SubnetMask="255.255.255.0" Gateway="192.168.1.1" DNSServer="" WINS="" /> <Entry SerialNum="101X1200035" DeviceName="Device00000003" IPAddr="192.168.1.102" SubnetMask="255.255.255.0" Gateway="192.168.1.1" DNSServer="" WINS="" /> </StaticIPAddrs> 10 CloneNGo User Guide Chapter 1 — About Device Cloning Configure Device Unique Settings To configure device unique settings, create a custom DeviceUniqueSettings.xml file that contains the device unique settings for each client computer you want to clone. 1 Clone one or more client computers. A DeviceUniqueSettings.template.xml file is created in \SmartSystems\Cloning\ on the master computer. 2 Copy the DeviceUniqueSettings.template.xml file from the master computer to your desktop PC. 3 Rename the file to DeviceUniqueSettings.xml. 4 Open the DeviceUniqueSettings.xml file. 5 Edit any parameters you want to change (except SerialNum). 6 Save the file. 7 Copy the DeviceUniqueSettings.xml file to the \SmartSystems folder on your master computer. 8 Clone the client computers again. The client computers are cloned with the settings you specified in the DeviceUniqueSettings.xml. How to Update Master and Client Computers When you update a master or client computer, you either update the computer with new configuration settings or restore the previous cloning file settings on the computer: CloneNGo User Guide • Update the master cloning files to create a new “golden copy” of settings to distribute to client computers. • Update client computers by cloning settings from updated master cloning files. • Reinstall the cloning files to restore the configuration of a master or client computer. 11 Chapter 1 — About Device Cloning About the Master Cloning Files When you update the master cloning files, you select the type of data to update. If your wireless security settings (such as Pre-Shared Key or WEP Keys) have not changed since the computer was last cloned, you can tell CloneNGo to ignore these settings. Otherwise, you need to type in the Pre-Shared Key or WEP Keys. Cloning Data for the Master Computer Data Description Settings Select this check box if you changed any settings in Intermec Settings since you last created a master cloning file. Wireless Security Only select this check box if you changed the wireless security settings (such as Pre-Shared Key or WEP Keys) since you last created a master cloning file. If you did not change these settings, leave this check box blank. Otherwise, you need to type in the Pre-Shared Key or WEP Keys. Update the Master Cloning Files If you changed the device settings or network security settings on a master computer, you need to update the cloning files on the master computer. 1 Close any open applications and save your data. 2 If you are using a USB storage device, connect the USB storage device to the master computer. 3 Start CloneNGo. 12 CloneNGo User Guide Chapter 1 — About Device Cloning 4 Tap Master, and then tap OK. 5 If you set an Intermec Settings password, type the password, and then tap OK. 6 Select the type of data you want to update. CloneNGo User Guide 13 Chapter 1 — About Device Cloning 7 If wireless security is enabled, type the pre-shared key or WEP keys. Pre-shared Key WEP Keys 8 Tap Save. The master computer saves the security data to an encrypted file. If you are using a wireless ad hoc network, the master computer scans the network for an isolated channel, creates an ad hoc network for client computers to join, and displays the bar code to start CloneNGo on the client computer. If you are using a USB storage device, the master computer copies the cloning files to the USB storage device and CloneNGo closes. 9 Remove the USB storage device from the master computer. 14 CloneNGo User Guide Chapter 1 — About Device Cloning Update a Client Computer Update a client computer by cloning settings from a master computer. 1 Close any open applications and save your data. 2 If you are using a USB storage device, connect the USB storage device to the client computer. 3 Start CloneNGo. 4 Select Clone and tap OK. 5 Select New clone and tap OK. CloneNGo User Guide 15 Chapter 1 — About Device Cloning When the client computer finds the master computer to clone from, a progress bar appears on the Cloning Progress tab. The client computer automatically restarts after cloning is successfully completed. 6 (Optional) To see the status of the cloning process, tap the Cloning Details tab. Restore the Master or Client Computer Configuration When you configure a master computer or clone a client computer, the cloning files are saved on the computer. You can reinstall these files to restore the configuration of the computer. 1 Close any open applications and save your data. 2 If you are using a USB storage device, connect the USB storage device to the client computer. 3 Start CloneNGo. 16 CloneNGo User Guide Chapter 1 — About Device Cloning 4 On the Select Mode screen, select Clone. 5 On the Select Mode screen, select Reinstall last clone. 6 Tap OK. The cloning progress bar appears. After successfully reinstalling the cloning files, the client computer automatically restarts. CloneNGo User Guide 17 Chapter 1 — About Device Cloning 18 CloneNGo User Guide 2 About Advanced Cloning 19 Chapter 2 — About Advanced Cloning About Advanced Cloning Features You can create or modify .xml files to use these advanced cloning features: • Transfer files, applications, and licenses to client computers. • Configure registry settings. • Clone the operating system. • Create a custom set of device-unique settings. Create a CloningEx.xml File The CloningEx.xml file is a special file that controls the settings for cloning and extends the features of CloneNGo. 1 Start a text editor or XML editor application. 2 Create a new file and name it “CloningEx.xml.” 3 Type opening and closing CloningEx tags in the body of the file: <CloningEx> </CloningEx> Transfer Files to Client Computers Create a CloningEx.xml file to transfer files from the master computer to one or more client computers. 1 Copy the files you want to transfer to your master computer. 2 Create a CloningEx.xml file that specifies the source file location on the master computer and the destination on the client computers. For example: <CloningEx> <File Source="\SD Card\ExampleFile1.txt" Dest="\temp\ExampleFile1.txt" HardwareVersion="*"/ > <File Source="\SD Card\ExampleFile2.bin" Dest="\temp\ExampleFile2.bin" HardwareVersion="*"/ > * * 20 CloneNGo User Guide Chapter 2 — About Advanced Cloning <File Source="\SD Card\ExampleFileN.dat" Dest="\temp\ExampleFileN.dat" HardwareVersion="*"/ > </CloningEx> 3 Copy the CloningEx.xml file from your desktop PC to one of these directories on the master computer: • \Flash File Store • \SD Card (internal microSD card) • \Hard Disk (USB storage device connected to a dock) 4 Connect a USB storage device to the master computer. 5 Configure the master computer. 6 Clone one or more client computers. How to Transfer Applications Create a CloningEx.xml file to transfer applications from a master computer to one or more client computers: • Transfer an application from a master computer to a client computer. • Transfer an application from a master computer to a client computer and install or run the application on a client computer. Optionally, you can also create a command line in another application to process the file. • Transfer an application from a master computer to a client computer, and then create an XML command to run the application. Example 1: Transfer Task Manager This XML example transfers the TaskMgr.cab file from a master computer to a client computer. The /noui command line in the wceload.exe application silently installs Task Manager. <CloningEx> <File Source="\SD Card\TaskMgr.cab" Dest="\TaskMgr.cab" App="\windows\wceload.exe" CommandLine="\TaskMgr.cab/noui" HardwareVersion="*"/> </CloningEx> CloneNGo User Guide 21 Chapter 2 — About Advanced Cloning Task Manager You need to include parameters with spaces, such as a directory path, in quotes. Use the pre-defined entity “"” to include quotation marks within an attribute value. For example: <File Source="\Flash File Store\SetWallPaper.exe" Dest="\Program Files\SetWallPaper.exe" CommandLine=""\My Documents\ qvga_monster.bmp"" HardwareVersion="*"/> Example 2: Transfer Wallpaper This XML example transfers the qvga_monster.bmp and SetWallPaper.exe files to a client computer. The \WallPaper\qvga_monster.bmp command line in the SetWallPaper.exe application sets the .bmp as the today screen wallpaper. <CloningEx> <File Source="\SD Card\WallPaper\qvga_monster.bmp" Dest="\WallPaper\qvga_monster.bmp" HardwareVersion="*"/> <File Source="\SD Card\WallPaper\SetWallPaper.exe" Dest="\WallPaper\SetWallPaper.exe" CommandLine="\WallPaper\qvga_monster.bmp" HardwareVersion="*"/> </CloningEx> 22 CloneNGo User Guide Chapter 2 — About Advanced Cloning Monster Wallpaper on a Client Computer Note: To easily keep track of which devices have been cloned, change the wallpaper when you clone a client device. You can download the SetWallPaper.exe application from the SetWallPaper_ARM41.zip file stored on Google Drive. How to Configure Registry Settings To create or change registry settings on client computers, you need to: • create a registry settings XML file and copy it to the master computer. • use a CloningEx.xml file to transfer the registry settings XML file from the master computer to client computers. Create the Registry Settings XML File Create a registry settings XML file to add, delete, or modify registry keys, values, or data on a client . For more information on modifying registry settings, go to the MSDN website at www.msdn.com. 1 In a text editor, create a file that specifies the registry settings and updates you want to transfer. For example: <wap-provisioningdoc> <characteristic type="Registry"> <characteristic type="HKCU\Software\Intermec\ExampleRegistry"> CloneNGo User Guide 23 Chapter 2 — About Advanced Cloning <parm name="ExampleInteger" value="42" datatype="integer" /> </characteristic> </characteristic> </wap-provisioningdoc> 2 Save the file as registry.xml. 3 Copy the registry.xml file to the master computer. Configure Registry Settings Use a CloningEx.xml file to manage specified registry settings on client computers. 1 Create a CloningEx.xml file that specifies the source and destination path of the registry.xml file. The destination path must be \SmartSystems\SSConfigDir. <CloningEx> <File Source="\SD Card\registry.xml" Dest="\SmartSystems\SSConfigDir\registry.xml" HardwareVersion="*"/> </CloningEx> 2 Copy the CloningEx.xml file from your desktop PC to one of these directories on the master computer: • \Flash File Store • \SD Card (internal microSD card) • \Hard Disk (USB storage device connected to a dock) 3 Connect a USB storage device to the master computer. 4 Configure the master computer. 5 Clone one or more client computers. How to Transfer Licenses To transfer licenses to client computers, you need to: 24 • export licenses from SmartSystems to the master computer. • use a CloningEx.xml file to transfer the licenses from the master computer to client computers. CloneNGo User Guide Chapter 2 — About Advanced Cloning Export Licenses from SmartSystems Use SmartSystems to export licenses to your master computer. 1 In SmartSystems, export the licenses you want to transfer. For help, see the SmartSystems online help. 2 From the SmartSystems Console, navigate to the location of the license bundle: • On Win32 platforms: C:\Program Files\Intermec\SmartSystem\SS_Lib\Licenses • On Win64 platforms: C:\Program Files (x86)\Intermec\SmartSystem\SS_Lib\Licenses 3 Save the licenses.xml file locally. 4 Copy the licenses.xml file to the master computer. Transfer Licenses Use a CloningEx.xml file to copy licenses to client computers. 1 Create a CloningEx.xml file that specifies the source and destination path of the licenses.xml file. The destination path must be \SmartSystems\SSConfigDir: <CloningEx> <File Source="\licenses.xml" Dest="\SmartSystems\SSConfigDir \licenses.xml" HardwareVersion="*"/> </CloningEx> 2 Copy the CloningEx.xml file from your desktop PC to one of these directories on the master computer: • \Flash File Store • \SD Card (internal microSD card) • \Hard Disk (USB storage device connected to a dock) 3 Connect a USB storage device to the master computer. 4 Configure the master computer. 5 Clone one or more client computers. CloneNGo User Guide 25 Chapter 2 — About Advanced Cloning How to Clone the Operating System To clone the operating system, you need to: • copy a SmartSystems bundle to removable media. • use a CloningEx.xml file to update the operating system on a master computer, and then clone the operating system to client computers. Copy a SmartSystems Bundle to Removable Media You need to copy the SmartSystems bundle with the operating system you want to install to your PC. Then, you need to copy it to a blank removable media device, such as microSD card or USB storage device. 1 Go to www.intermec.com. 2 Select Products > Computers > Computer Type > Computer Model. 3 Click the Downloads tab. 4 From the OS/Firmware/Drivers list, click the link to the SmartSystems bundle you want to install and download the files to your PC. The SmartSystems bundle is installed in one of these locations: • C:\Program Files\Intermec\SmartSystems\ss_lib\Software • C:\Program Files (x86)\Intermec\SmartSystems\ss_lib\Software 5 Copy the OS bundle folder to the root directory of the removable media device. For example: C:\Program Files (x86)\Intermec\SmartSystem\SS_Lib \Software\OS_AndromedaIII_1.60.00.1020 26 CloneNGo User Guide Chapter 2 — About Advanced Cloning Update or Clone the Operating System When you clone the operating system, the computer resets. When the computer restarts, you may need to select a language provision. 1 Create a CloningEx.xml file that specifies the operating system: <CloningEx> <Data OS="1"/> </CloningEx> 2 Copy the CloningEx.xml file from your desktop PC to one of these directories on the master computer: • \Flash File Store • \SD Card (internal microSD card) • \Hard Disk (USB storage device connected to a dock) 3 Suspend the master computer. 4 Connect an external storage device to the master computer: • microSD card: Insert the card in the master computer. • USB storage device: Insert the USB storage device into an AD20 or DX1 dock, and dock the CK3R/CK3X or 70 Series master computer, respectively. Or, • USB storage device: Connect the USB storage device to the CV31 with a USB adapter cable. 5 Turn on and configure the master computer. CloneNGo User Guide 27 Chapter 2 — About Advanced Cloning 6 When the operating system upgrade dialog box appears, tap Yes. When the upgrade is done, the master computer restarts. 7 When the language provisioning window appears, select the language you want to use on the computer. For, see your computer user manual. The master computer saves its configuration and automatically recovers it after the OS upgrade. 8 Clone one or more client computers. How to Use a Cloned Computer as a Master Any cloned computer can function as a master computer. However, when certain types of files are transferred from a master to a clone, they are processed (XML files) or installed (CAB files) and then deleted. So, these files do not exist on the cloned computer to be transferred to another computer. To make sure that these files are available on the cloned computer, you need to copy them to two different locations: one copy is processed or installed, and the other copy is available to transfer to another computer. Use a CloningEx.xml file to specify the locations. 28 CloneNGo User Guide Chapter 2 — About Advanced Cloning Sample CloningEx.xml file: <CloningEx> <!—copy CloningEx.xml --> <File Source="\Flash File Store\CloningEx.xml" Dest="\Flash File Store\CloningEx.xml" HardwareVersion="*"/> <!—copy TaskMgr.cab --> <File Source="\SmartSystems\Cloning\TaskMgr.cab" Dest="\SmartSystems\Cloning\TaskMgr.cab" HardwareVersion="*"/> <File Source="\SmartSystems\Cloning\TaskMgr.cab" Dest="\cabfiles\TaskMgr.cab" HardwareVersion="*"/> <!—copy registry.xml --> <File Source="\SmartSystems\Cloning\registry.xml" Dest="\SmartSystems\Cloning\registry.xml" HardwareVersion="*"/> <File Source="\SmartSystems\Cloning\registry.xml" Dest="\SmartSystems\SSConfigDir\registry.xml" HardwareVersion="*"/> </CloningEx> Copy Master Cloning Files to a Cloned Computer Use a CloningEx.xml file to copy master cloning files to multiple locations on a cloned computer. 1 Copy all .cab files to both of these directories on the cloned computer: • \SmartSystems\Cloning so that it can be transferred to client computers • \cabfiles so that it can be installed when the computer reboots 2 Copy all .xml files to both of these directories on the cloned computer: CloneNGo User Guide • \SmartSystems\Cloning so it can be transferred to client computers • \SmartSystems\SSConfigDir so that it can be processed 29 Chapter 2 — About Advanced Cloning 3 Copy the CloningEx.xml to one of these directories on the cloned computer: • \Flash File Store • \SD Card (such as an internal microSD card or external miniSD card) • \Hard Disk (USB storage device connected to a dock) Create a Custom Set of Device Unique Settings To generate a custom set of device unique settings, specify a starting value, such as IP address, and assign automatically incremented values for each device. 1 Create a CloningEx.xml file with this format: <CloningEx> <DeviceUnique StartingIpAddress="10.10.1.12" SubnetMask="255.255.0.0" Gateway="10.10.1.1" DNS="10.10.1.20" WINS="10.10.1.30"/> </CloningEx> 2 Copy the CloningEx.xml file from your desktop PC to one of these directories on the master computer: • \Flash File Store • \SD Card (internal microSD card) • \Hard Disk (USB storage device connected to a dock) 3 Connect an external storage device to the master computer: • microSD card: Insert the card in the master computer. • USB storage device: Insert the USB storage device into an AD20 or DX1 dock, and dock the CK3R/CK3X or 70 Series master computer, respectively. Or, • 30 USB storage device: Connect the USB storage device to the CV31 Thor with a USB adapter cable. CloneNGo User Guide Chapter 2 — About Advanced Cloning 4 Configure the master computer. 5 Clone client computers. 6 (Optional) Use Intermec Settings to verify that each client computer has a unique IP address and that other device unique settings are correct. CloneNGo User Guide 31 Chapter 2 — About Advanced Cloning 32 CloneNGo User Guide 3 Troubleshoot Device Cloning 33 Chapter 3 — Troubleshoot Device Cloning Problems and Possible Solutions Try these possible solutions to common problems with device cloning. Problems and Possible Solutions Problem Solution The client computer hangs when searching for the master computer. • The client and master computer are too far away from each other. Move the computers closer together. • There is an error in the cloning process. Check the Cloning Details tab for more information. • Restart the CloneNGo application. • Open ISpyWiFi and make sure the master / client are on the same channel AND have the same ESSID and BSSID • Make sure the master and clone computer have the appropriate IP address. For example, the IP address should have the format 1.x.x.x. • Make sure the master computer’s SSID is in the scan list. To do this, go to the Scan folder and press the Scan button, • Make sure the client computer can ping the master computer. To make sure the client can ping the master, go to the Ping tab within the ISpyWiFi application. The OS upgrade continues indefinitely when you remove the computer from the computer dock. Place the computer in the computer dock again. You are stuck in an endless loop trying to download files in the manifest received from the master. File element Source attribute should only resolve to items on the removable media. For example, locations that are not wiped out by the OS upgrade. All subfolders are included in the clone. By default, subfolder recursion is enabled when you use the wildcard character in a path. Use the IncludeSubFolders attribute to disable recursion: <File Source=”\My Documents\*.tsk” Dest=”My Documents” IncludeSubFolders=”0” /> CloneEx.xml has a CommandLine attribute value with spaces and is enclosed by the " entity. The command line parameter is not processed correctly in CloneNGo. • If the parameter is a path, set up CloneEx.xml to use 34 paths that do not contain spaces (if possible). • Download a CloneNGo version 6.90.00.0237 or later. CloneNGo User Guide Chapter 3 — Troubleshoot Device Cloning Troubleshoot Cloning the Operating System You may be able to troubleshoot problems cloning the operating system by understanding how the operating system is cloned. Note: The master computer recovers items from the removable media. Client computers recover items from the master computer. Operating System Pre-Installation Actions (Master Mode) CloneNGo performs these actions to make sure you have an uninterrupted boot cycle and that your settings and applications are recovered after the upgrade: CloneNGo User Guide • (Master) Creates the cloning settings backup directory \Flash File Store\cloning.backup. • (Master) Copies these cloning files (if they exist) to the backup directory: • \SmartSystems\Cloning\settings.xml • \SmartSystems\Cloning\security.xml • \SmartSystems\AdminPassword.bin • \SmartSystems\DeviceUniqueSettings.xml • (Master and client) Deletes SR*.cab and SP*.cab files from the \CABFILES directory on all removable media. • (Master and client) Deletes SR*.cab and SP*.cab files from the \2577 directory on all removable media. • (Master and client) Deletes SR*.cab and SP*.cab files from the \SSPB\SRS directory on all removable media. • (Master and client) Deletes specified files using the CloningEx.xml file. • (Master and client) Renames all files in the \CABFILES directory on all removable media. 35 Chapter 3 — Troubleshoot Device Cloning • (Master and client) Renames \2577\autouser.dat on all removable media. • (Master and client) Renames \UserAutoInstall\_sstransferagent.xml on all removable media. Operating System Post-Installation Actions After the operating system is installed, CloneNGo performs these actions to recover settings and applications: 36 • (Master) Restores the cloning settings files from the backup directory to their original location. • (Master and client) Applies settings and applications (The client reconnects and copies from Master). • (Master and client) Renames files to their original names. For .cab file, clears the system attribute bit to force re-installation on the next boot. • (Master and client) Cold boots. CloneNGo User Guide by Honeywell 16201 25th Avenue West Lynnwood, Washington 98087 U.S.A. tel 425.921.4290 www.honeywellaidc.com CloneNGo User Guide *934-070-003* P/N 934-070-003