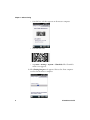
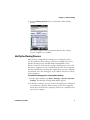
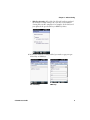
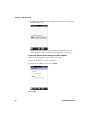
1
CloneNGo User Guide Intermec Technologies Corporation Worldwide Headquarters 6001 36th Ave.W. Everett, WA 98203 U.S.A. www.intermec.com The information contained herein is provided solely for the purpose of allowing customers to operate and service Intermec-manufactured equipment and is not to be released, reproduced, or used for any other purpose without written permission of Intermec Technologies Corporation. Information and specifications contained in this document are subject to change without prior notice and do not represent a commitment on the part of Intermec Technologies Corporation. © 2012–2013 by Intermec Technologies Corporation. All rights reserved. The word Intermec, the Intermec logo, Norand, ArciTech, Beverage Routebook, CrossBar, dcBrowser, Duratherm, EasyADC, EasyCoder, EasySet, Fingerprint, i-gistics, INCA (under license), Intellitag, Intellitag Gen2, JANUS, LabelShop, MobileLAN, Picolink, Ready-to-Work, RoutePower, Sabre, ScanPlus, ShopScan, Smart Mobile Computing, SmartSystems, TE 2000, Trakker Antares, and Vista Powered are either trademarks or registered trademarks of Intermec Technologies Corporation. There are U.S. and foreign patents as well as U.S. and foreign patents pending. Wi-Fi is a registered certification mark of the Wi-Fi Alliance. Microsoft, Windows, and the Windows logo are registered trademarks of Microsoft Corporation in the United States and/or other countries. Bluetooth is a trademark of Bluetooth SIG, Inc., U.S.A. ii CloneNGo User Guide Document Change Record This page records changes to this document. The document was originally released as Revision 001. Version Number Date 002 CloneNGo User Guide 2/2013 Description of Change Revised to support software update. Features include copying files, installing applications, and upgrading the operating system. iii iv CloneNGo User Guide Contents Contents Before You Begin. . . . . . . . . . . . . . . . . . . . . . . . . . . . . . . . . . . . . . . . . . . . . . . . . . . . . . . . . . . . . . . . . vii Global Services and Support . . . . . . . . . . . . . . . . . . . . . . . . . . . . . . . . . . . . . . . . . . . . . . vii Warranty Information. . . . . . . . . . . . . . . . . . . . . . . . . . . . . . . . . . . . . . . . . . . . vii Web Support . . . . . . . . . . . . . . . . . . . . . . . . . . . . . . . . . . . . . . . . . . . . . . . . . . . . vii Send Feedback. . . . . . . . . . . . . . . . . . . . . . . . . . . . . . . . . . . . . . . . . . . . . . . . . . . vii Telephone Support . . . . . . . . . . . . . . . . . . . . . . . . . . . . . . . . . . . . . . . . . . . . . . vii Who Should Read This Manual . . . . . . . . . . . . . . . . . . . . . . . . . . . . . . . . . . . . . . . . . . viii Related Documents . . . . . . . . . . . . . . . . . . . . . . . . . . . . . . . . . . . . . . . . . . . . . . . . . . . . . viii 1 About Cloning ............................................................ 1 About CloneNGo . . . . . . . . . . . . . . . . . . . . . . . . . . . . . . . . . . . . . . . . . . . . . . . . . . . . . . . . . . . . . . . . . 2 Clone Settings . . . . . . . . . . . . . . . . . . . . . . . . . . . . . . . . . . . . . . . . . . . . . . . . . . . . . . . . . . . . . . . . . . . . 3 Configure the Settings on the Master Computer. . . . . . . . . . . . . . . . . . . . . . . . . . . . . 3 Clone a Client Computer . . . . . . . . . . . . . . . . . . . . . . . . . . . . . . . . . . . . . . . . . . . . . . . . . . 5 Verify the Cloning Process . . . . . . . . . . . . . . . . . . . . . . . . . . . . . . . . . . . . . . . . . . . . . . . . . 7 Update the Master Computer and Clone to Client Computers . . . . . . . . . . . . . . . . 8 Reinstall Cloning Files on a Client or Master Computer . . . . . . . . . . . . . . . . . . . . . 12 Transfer Files to the Client Computers. . . . . . . . . . . . . . . . . . . . . . . . . . . . . . . . . . . . . . . . . . . . . 13 About Running the Clone as a Master . . . . . . . . . . . . . . . . . . . . . . . . . . . . . . . . . . . . . . . . . . . . . 14 Transfer Application Files to Client Computers. . . . . . . . . . . . . . . . . . . . . . . . . . . . . . . . . . . . . 15 Example of Transferring TaskManager to a Client . . . . . . . . . . . . . . . . . . 16 Example of Copying WallPaper to Clients . . . . . . . . . . . . . . . . . . . . . . . . . . 17 Transfer Registry Settings to Client Computers. . . . . . . . . . . . . . . . . . . . . . . . . . . . . . . . . . . . . 18 Create the Registry Settings XML File. . . . . . . . . . . . . . . . . . . . . . . . . . . . . . . . . . . . . . 18 Manage Registry Settings Using the CloningEx.xml file . . . . . . . . . . . . . . . . . . . . . 19 Transfer Exported Licenses to Client Computers. . . . . . . . . . . . . . . . . . . . . . . . . . . . . . . . . . . . 20 Export the SmartSystems Licenses. . . . . . . . . . . . . . . . . . . . . . . . . . . . . . . . . . . . . . . . . 20 Transfer Exported Licenses . . . . . . . . . . . . . . . . . . . . . . . . . . . . . . . . . . . . . . . . . . . . . . . 20 About Cloning the Operating System . . . . . . . . . . . . . . . . . . . . . . . . . . . . . . . . . . . . . . . . . . . . . . 21 Install a SmartSystems Bundle on Removable Media . . . . . . . . . . . . . . . . . . . . . . . . 22 Create a CloningEx.xml File. . . . . . . . . . . . . . . . . . . . . . . . . . . . . . . . . . . . . . . . . . . . . . . 22 Update or Clone the Operating System . . . . . . . . . . . . . . . . . . . . . . . . . . . . . . . . . . . . 23 CloneNGo User Guide v Contents 2 Configuring Device Unique Settings . . . . . . . . . . . . . . . . . . . . . . . . . . . . . . . . . 25 About Device Unique XML Files. . . . . . . . . . . . . . . . . . . . . . . . . . . . . . . . . . . . . . . . . . . . . . . . . . . 26 How to Change Device Unique Settings . . . . . . . . . . . . . . . . . . . . . . . . . . . . . . . . . . . . . . . . . . . . 26 How to Generate a Custom Set of Device Unique Settings . . . . . . . . . . . . . . . . . . . . . . . . . . . 28 3 Troubleshooting . . . . . . . . . . . . . . . . . . . . . . . . . . . . . . . . . . . . . . . . . . . . . . . . . . . . . . . 31 Troubleshoot the Cloning Process . . . . . . . . . . . . . . . . . . . . . . . . . . . . . . . . . . . . . . . . . . . . . . . . . 32 How CloneNGo Updates the Operating System. . . . . . . . . . . . . . . . . . . . . . . . . . . . . . . . . . . . . 33 Pre-Operating System Installation Actions (Master Mode) . . . . . . . . . . . . . . . . . . . 33 Post-Operating System Installation Actions . . . . . . . . . . . . . . . . . . . . . . . . . . . . . . . . 34 vi CloneNGo User Guide Before You Begin Before You Begin This section provides you with safety information, technical support information, and sources for additional product information. Global Services and Support Warranty Information To understand the warranty for your Intermec product, visit the Intermec web site at www.intermec.com and click Support > Returns and Repairs > Warranty. Disclaimer of warranties: The sample code included in this document is presented for reference only. The code does not necessarily represent complete, tested programs. The code is provided “as is with all faults.” All warranties are expressly disclaimed, including the implied warranties of merchantability and fitness for a particular purpose. Web Support Visit the Intermec web site at www.intermec.com to download our current manuals (in PDF). Visit the Intermec technical knowledge base (Knowledge Central) at www.intermec.com and click Support > Knowledge Central to review technical information or to request technical support for your Intermec product. Send Feedback Your feedback is crucial to the continual improvement of our documentation. To provide feedback about this manual, please contact the Intermec Technical Communications department directly at [email protected]. Telephone Support In the U.S.A. and Canada, call 1-800-755-5505. Outside the U.S.A. and Canada, contact your local Intermec representative. To search for your local representative, from the Intermec web site, click About Us > Contact Us. CloneNGo User Guide vii Before You Begin Who Should Read This Manual This user guide describes how to use and troubleshoot CloneNGo. Related Documents This is a list of Intermec related documents: • CK3R and CK3X Mobile Computer User Manual • 70 Series Mobile Computer User Manual • Intermec Settings Command Reference Manual • CK3 Series Single Dock (AD20) Instructions • DX1 Desktop Dock Quick Start Guide The Intermec web site at www.intermec.com contains our documents (as .pdf files) that you can download for free. To download documents 1 Visit the Intermec web site at www.intermec.com. 2 Click the Products tab. 3 Using the Products menu, navigate to your product screen. For example, to find the CK3X computer product page, click Computers > Handheld Computers > CK3X. 4 Click the Manuals tab. If your product does not have its own product page, click Support > Manuals. Use the Product Category, the Product Family, and Product to find your documentation. viii CloneNGo User Guide 1 About Cloning This chapter introduces CloneNGo and explains how to clone settings, files, applications, and the operating system between a master and client computers. 1 Chapter 1 — About Cloning About CloneNGo CloneNGo is a license-free peer-to-peer software application that allows you to clone the settings, files, applications, and operating system of a master computer to compatible client computers through a wireless ad-hoc network. Cloning reduces redundancy and errors by providing an efficient and accurate way to replicate the complete configuration of one computer to other computers. Once the master computer is set up, it automatically creates and uses an adhoc network to send data to the client computers. With an adhoc network, computer cloning can occur anywhere because no wireless infrastructure is needed. CloneNGo is supported by these mobile computers running Microsoft Windows Embedded Handheld 6.5 with firmware version 1.50 or later: • CK3R • CK3X • 70 Series • Ci70 Only computers of the same type, family, and model (TFM) can exchange cloning data with each other. This table explains the type, family, and model for a CK3R computer: Identity Example Description Type C The first character of the hardware version. Family K The second character of the hardware version. Model 3R The third and fourth character of the hardware version. The client computer looks for a master that is the most similar to it. For example, if a client finds a master with the identical hardware configuration, it will transfer cloning data from that master. If a master is not found with identical hardware, the client will transfer data from the first master it finds with the same TFM. 2 CloneNGo User Guide Chapter 1 — About Cloning Clone Settings Use CloneNGo to copy the settings of a master computer to completely unconfigured computers with minimal user intervention. To clone the settings from one computer to another: • configure the settings on the master computer. • clone client computers. Configure the Settings on the Master Computer Before cloning settings, verify that the master computer: • is set to the correct date, time, and time zone. • has all other settings configured with the correct values. For a list of settings and how to configure them on your computer, see the Intermec Settings Command Reference Manual. To configure wireless security and make sure the computer is connected to the network, see your computer user manual. To run CloneNGo in Master Mode for the first time 1 On the master computer, tap Start > Settings > System > CloneNGo. The CloneNGo start screen appears. 2 On the Select Mode screen, select Master. 3 Tap OK. CloneNGo User Guide 3 Chapter 1 — About Cloning 4 (If enabled) Type the Intermec Settings password and tap OK. 5 If you have wireless security enabled, you need to type your preshared key or WEP keys. Pre-shared Key 4 WEP Keys CloneNGo User Guide Chapter 1 — About Cloning 6 Tap Save. Wait for the master computer to save the security data to an encrypted file. The master computer scans the network for an isolated channel and creates an adhoc network for client computers to join. The cloning bar code appears on the master computer. Clone a Client Computer After the CloneNGo bar code appears on the master computer, start CloneNGo on the client computers you want to be cloned. To clone a client computer for the first time 1 On a client computer, perform one of the following procedures to start CloneNGo: CloneNGo User Guide 5 Chapter 1 — About Cloning • Scan the bar code that appears on the master computer. • Scan this bar code. • Tap Start > Settings > System > CloneNGo. The CloneNGo main screen appears. 2 The Cloning Progress tab appears. Wait as the client computer searches for the master computer. 6 CloneNGo User Guide Chapter 1 — About Cloning 3 Tap the Cloning Details tab to see the status of the cloning process. The client computer restarts automatically after the cloning process completes successfully. Verify the Cloning Process After you have completed the cloning process on the first device, check to make sure that cloning occurred successfully. You can use Intermec Settings, Device Health dashboard, ISpyWiFi, or the Wireless Center to check that the settings and parameters you set for the master computer were successfully cloned on the client computer. For more information on using these applications, see your computer user manual. Once the cloning process is verified, clone the rest of the client computers. To verify the cloning process using Intermec Settings 1 On the client computer, tap Start > Settings > System > Intermec Settings. The Intermec Settings Main Menu appears. 2 In Intermec Settings, view one or more setting that you configured on your master computer. If the settings on the client computer match those of the master computer, you have successfully cloned your client computer. CloneNGo User Guide 7 Chapter 1 — About Cloning Update the Master Computer and Clone to Client Computers If you update the device settings or network security settings on a master computer, you will need to update the cloning files and then clone your settings to the client computers. To update the master computer 1 Close any open applications and save your data. 2 Tap Start > Settings > System > CloneNGo. The CloneNGo start screen appears. 3 On the Select Mode screen, select Master. 4 Tap OK. You may need to type the Intermec Settings password if enabled. 5 On the Cloning Data screen, select one or more of these check boxes: • 8 Settings: Select this check box if you have updated any device settings since you last created master cloning files on this computer. CloneNGo User Guide Chapter 1 — About Cloning • Wireless Security: Select this check box if you have updated the network security settings since you last created master cloning files on this computer. For example, check this box if you updated the pre-shared key or WEP key values. 6 If you have wireless security enabled, you need to type your preshared key or WEP keys. Pre-shared Key CloneNGo User Guide WEP Keys 9 Chapter 1 — About Cloning 7 Tap Save. Wait for the master computer to save the security data to an encrypted file. When the master computer has finished scanning the network and creating the adhoc network, the cloning bar code appears. To clone the updated master settings to a client computer 1 Close any open applications and save your data. 2 Start CloneNGo on a client computer. 3 On the Select Mode screen, select Clone. 4 Tap OK. 10 CloneNGo User Guide Chapter 1 — About Cloning 5 On the Select Mode screen, select New clone. 6 Tap OK. The Cloning Progress tab appears. Wait as the client computer searches for the master computer. The client computer restarts automatically after the cloning process completes successfully. CloneNGo User Guide 11 Chapter 1 — About Cloning Reinstall Cloning Files on a Client or Master Computer If you have performed cloning on a client or master computer before, use this procedure to reinstall cloning files. To reinstall cloning files on a computer 1 Close any open applications and save your data. 2 On the Select Mode screen, select Clone. 3 On the Select Mode screen, select Reinstall last clone. 4 Tap OK. The cloning progress bar appears. After successfully reinstalling cloning files, the client computer restarts automatically. 12 CloneNGo User Guide Chapter 1 — About Cloning Transfer Files to the Client Computers You can create a CloningEx.xml file to specify files you want to transfer from the master computer to one or more client computers. To transfer files using a CloningEx.xml file 1 Copy the files you want to transfer to your master computer. 2 In a text editor, create a CloningEx.xml file. The XML specifies the source file location on the master computer and the destination on the client computers. For example: <CloningEx> <File Source="\SD Card\ExampleFile1.txt" Dest="\temp\ExampleFile1.txt" HardwareVersion="*"/> <File Source="\SD Card\ExampleFile2.bin" Dest="\temp\ExampleFile2.bin" HardwareVersion="*"/> * * * <File Source="\SD Card\ExampleFileN.dat" Dest="\temp\ExampleFileN.dat" HardwareVersion="*"/> </CloningEx> 3 Copy the CloningEx.xml file from your desktop PC to one of these directories on the master computer: • \Flash File Store • \SD Card (internal microSD card) • \Hard Disk (USB storage device connected to a dock) 4 If using a microSD card, install the card in the master computer. If using a USB storage device, insert it into a dock and dock the master computer. Here is a list of docks that support a USB storage device: CloneNGo User Guide Computer Computer Dock Model CK3R/CK3X AD20 70 Series DX1 13 Chapter 1 — About Cloning 5 Follow the instructions in Steps 1 through 5 of “Configure the Settings on the Master Computer” on page 3. 6 Use the master computer to clone one or more client computers. For help, see “Clone a Client Computer” on page 5. About Running the Clone as a Master If you want a clone to be able to function as a master you need to make sure that: • The CloningEx.xml file is copied from the master to the clone. • All files specified in the CloningEx.xml file are available on the clone after all processing is complete. CAB files and XML files copied to \SmartSystems\SSConfigDir are processed and not available to transfer to other devices. The solution for these types of files are to copy them to two different locations as shown in this example: <CloningEx> <!—copy CloningEx.xml --> <File Source="\Flash File Store\CloningEx.xml" Dest="\Flash File Store\CloningEx.xml" HardwareVersion="*"/> <!—copy TaskMgr.cab --> <File Source="\SmartSystems\Cloning\TaskMgr.cab" Dest="\SmartSystems\Cloning\TaskMgr.cab" HardwareVersion="*"/> <File Source="\SmartSystems\Cloning\TaskMgr.cab" Dest="\cabfiles\TaskMgr.cab" HardwareVersion="*"/> <!—copy registry.xml --> <File Source="\SmartSystems\Cloning\registry.xml" Dest="\SmartSystems\Cloning\registry.xml" HardwareVersion="*"/> <File Source="\SmartSystems\Cloning\registry.xml" Dest="\SmartSystems\SSConfigDir\registry.xml" HardwareVersion="*"/> </CloningEx> • 14 The CloningEx.xml file is copied to the \Flash File Store directory on the clone computer. CloneNGo User Guide Chapter 1 — About Cloning • The TaskMgr.cab is copied to the \SmartSystems\Cloning so it is available for transfer to other clones. • The TaskMgr.cab is copied to the \cabfiles directory to be installed on reboot. • The registry.xml file is copied to the \SmartSystems\Cloning so it is available for transfer to other clones. • The registry.xml file is copied to the \SmartSystems\SSConfigDir directory to be processed. Remember that in order for the CloningEx.xml file to be processed, it must be in one of these directories: • \Flash File Store • \SD Card • \Hard Disk Transfer Application Files to Client Computers You can create a CloningEx.xml file to transfer: • application files from a master computer and install or run those applications on client computers. • an application and then run that application on client computers by specifying a command line in the XML. • a file and then run another application to process that file by specifying the file and a command line. Here are a few examples of using CloningEx.xml to transfer and install files. CloneNGo User Guide 15 Chapter 1 — About Cloning Example of Transferring TaskManager to a Client The following XML example will cause the TaskMgr.cab file to be copied to the client computers. The wceload.exe application will be launched with /noui as the command line which will silently install the Task Manager application: <CloningEx> <File Source="\SD Card\TaskMgr.cab" Dest="\TaskMgr.cab" App="\windows\wceload.exe" CommandLine="\TaskMgr.cab/noui" HardwareVersion="*"/> </CloningEx> If your command line contains parameters with spaces (such as a directory path that contains spaces) those parameters need to be in quotes. You will need to use the pre-defined entity “"” to include quotation marks within an attribute value as in this example: <File Source="\Flash File Store\SetWallPaper.exe" Dest="\Program Files\SetWallPaper.exe" CommandLine=""\My Documents\ qvga_monster.bmp"" HardwareVersion="*"/> TaskManager Installed on a Mobile Computer Note: Due to a bug found version 6.90.00.0237 of CloneNGo, you cannot have spaces in command line arguments. The bug is fixed in versions of CloneNGo greater than 6.90.00.0237. 16 CloneNGo User Guide Chapter 1 — About Cloning Example of Copying WallPaper to Clients The following XML will cause the qvga_monster.bmp and SetWallPaper.exe files to be copied to the clients. The SetWallPaper.exe application will be launched with \WallPaper\qvga_monster.bmp as the command line which will set the .bmp as the client’s today screen wallpaper. <CloningEx> <File Source="\SD Card\WallPaper\qvga_monster.bmp" Dest="\WallPaper\qvga_monster.bmp" HardwareVersion="*"/> <File Source="\SD Card\WallPaper\SetWallPaper.exe" Dest="\WallPaper\SetWallPaper.exe" CommandLine="\WallPaper\qvga_monster.bmp" HardwareVersion="*"/> </CloningEx> Monster Wallpaper on a Client Computer Note: Changing the wallpaper on the client devices during the cloning process is a good way to keep track of which devices have been cloned. You can download the SetWallPaper.exe application by downloading the .zip file from Google Drive at SetWallPaper_ARM41.zip. CloneNGo User Guide 17 Chapter 1 — About Cloning Transfer Registry Settings to Client Computers You can use a CloningEx.xml file to create or change registry settings on client computers. Use these two steps to transfer registry settings: • Create the registry settings XML file. • Transfer the registry settings XML file with a CloningEx.xml file. Create the Registry Settings XML File You can create a registry settings XML file to add, delete, or modify registry keys, values, or data. For more information on modifying registry settings, go to the MSDN website at www.msdn.com. To create a registry settings xml file 1 In a text editor, create a file that specifies the registry settings and updates you want to transfer. For example: <wap-provisioningdoc> <characteristic type="Registry"> <characteristic type="HKCU\Software\Intermec\ExampleRegistry"> <parm name="ExampleInteger" value="42" datatype="integer" /> </characteristic> </characteristic> </wap-provisioningdoc> 2 Save the file as registry.xml. 3 Copy the registry.xml file to the master computer. 18 CloneNGo User Guide Chapter 1 — About Cloning Manage Registry Settings Using the CloningEx.xml file Use a CloningEx.xml file to manage specified registry settings on the client computers. To transfer registry settings using a CloningEx.xml file 1 Create a CloningEx.xml file that specifies the source and destination path of the registry.xml file. The destination path must be \SmartSystems\SSConfigDir. <CloningEx> <File Source="\SD Card\registry.xml" Dest="\SmartSystems\SSConfigDir\registry.xml" HardwareVersion="*"/> </CloningEx> 2 Copy the CloningEx.xml file from your desktop PC to one of these directories on the master computer: • \Flash File Store • \SD Card (internal microSD card) • \Hard Disk (USB storage device connected to a dock) 3 If using a microSD card, install the card in the master computer. If using a USB storage device, insert it into a dock and dock the master computer. Here is a list of docks that support a USB storage device: Computer Computer Dock Model CK3R/CK3X AD20 70 Series DX1 4 Follow instructions in Steps 1 through 5 of “Configure the Settings on the Master Computer” on page 3. 5 Use the master computer to clone one or more client computers.For help, see “Clone a Client Computer” on page 5. CloneNGo User Guide 19 Chapter 1 — About Cloning Transfer Exported Licenses to Client Computers Use a CloningEx.xml file to transfer licenses from the master computer to one or more client computers. Export the SmartSystems Licenses You can export one or more licenses on your master computer using SmartSystems. To export SmartSystems licenses 1 Use SmartSystems to export one or more licenses you want to transfer. For help on exporting licenses, see the SmartSystems Online Help. 2 On the SmartSystems Console, navigate to the directory where the license bundle is installed. For example on Win32 platforms, it is C:\Program Files\Intermec\SmartSystem\SS_Lib\Licenses, on Win64 platforms, it is C:\Program Files (x86)\Intermec\SmartSystem\SS_Lib\Licenses. 3 Save the licenses.xml file. 4 Copy the licenses.xml file from the SmartSystems Server to the master computer. Transfer Exported Licenses After you create the licenses.xml file, use the CloningEx.xml file to copy the licenses to the client computers. To transfer exported licenses 1 Create the CloningEx.xml file that specifies the source and destination path of the licenses.xml file. The destination path must be \SmartSystems\SSConfigDir. 20 CloneNGo User Guide Chapter 1 — About Cloning <CloningEx> <File Source="\licenses.xml" Dest="\SmartSystems\SSConfigDir \licenses.xml" HardwareVersion="*"/> </CloningEx> 2 Copy the CloningEx.xml file from your desktop PC to one of these directories on the master computer: • \Flash File Store • \SD Card (internal microSD card) • \Hard Disk (USB storage device connected to a dock) 3 If using a microSD card, install the card in the master computer. If using a USB storage device, insert it into a dock and dock the master computer. Here is a list of docks that support a USB storage device: Computer Computer Dock Model CK3R/CK3X AD20 70 Series DX1 4 Follow the steps to create master cloning files. For help, see “Configure the Settings on the Master Computer” on page 3. 5 Clone one or more client computers. For help, see “Clone a Client Computer” on page 5. About Cloning the Operating System CloneNGo enables you to update the operating system of a master computer and then clone the operating system to one or more client computers. To clone the operating system of a master computer, you must: CloneNGo User Guide • install a SmartSystems bundle on removable media. • create a CloningEx.xml file. • initiate CloneNGo on a master and one or more client computers. 21 Chapter 1 — About Cloning Install a SmartSystems Bundle on Removable Media Before you can update the operating system of your mobile computer, you need: • the SmartSystems bundle you want to install. SmartSystems bundles are available from the Intermec website at www.intermec.com. Go to Support > Downloads and select your mobile computer. Select the SmartSystems bundle from the OS/Firmware/Drivers list. • removable media (a microSD card or USB storage device). To install the SmartSystems bundle on the removable media 1 Download and install the SmartSystems bundle on your desktop PC. The SmartSystems bundle installs in this location: C:\Program Files\Intermec\SmartSystems\ss_lib\Software or C:\Program Files (x86)\Intermec\SmartSystems\ss_lib\Software 2 Copy the OS bundle folder to the root directory of the removable media device. For example: C:\Program Files (x86)\Intermec\SmartSystem\SS_Lib \Software\OS_AndromedaIII_1.60.00.1020 Create a CloningEx.xml File Use the following procedure to create the CloningEx.xml file to clone the operating system of the master computer. Keep in mind that XML is case-sensitive. To create the CloningEx.xml file 1 Create a CloningEx.xml file with this content: <CloningEx> <Data OS="1"/> </CloningEx> 2 Copy the CloningEx.xml file from your desktop PC to one of these directories on the master computer: 22 • \Flash File Store • \SD Card (internal microSD card) • \Hard Disk (USB storage device connected to a dock) CloneNGo User Guide Chapter 1 — About Cloning Update or Clone the Operating System During the process of cloning the operating system, the computer restarts and you will need to go through the language provisioning process again. To update or clone the operating system 1 Suspend the computer. 2 If using a microSD card, install the card in the master computer. If using a USB storage device, insert it into a dock and dock the master computer. Here is a list of docks that support a USB storage device: Computer Computer Dock Model CK3R/CK3X AD20 70 Series DX1 3 Turn on your mobile computer. 4 Follow the instructions in Steps 1 through 5 of “Configure the Settings on the Master Computer” on page 3. The operating system upgrade dialog box appears. 5 Tap Yes to upgrade the operating system. The upgrade process begins. Your mobile computer will restart during this process. CloneNGo User Guide 23 Chapter 1 — About Cloning 6 When the language provisioning window appears, select the language you want to use on the computer. For more information, see your computer user manual. During this process, the master computer saves its configuration and recovers it automatically after the OS upgrade. 7 Use the master computer to clone one or more client computers. For help, see “Clone a Client Computer” on page 5. Once you have performed the cloning process, each of the cloned computers has the same operating system as the master computer. 24 CloneNGo User Guide 2 Configuring Device Unique Settings This chapter contains the following topics: • About Device Unique XML Files • How to Change Device Unique Settings • How to Generate a Custom Set of Device Unique Settings 25 Chapter 2 — Configuring Device Unique Settings About Device Unique XML Files When you perform the cloning process for the first time, CloneNGo creates a Device Unique template XML file on the master computer with device unique settings for each client computer you clone: • Device Name • Static IP Address • Subnet Mask • Gateway • DNS • WINS If you wish to change any of these device unique settings, you can edit the Device Unique XML file created by CloneNGo and then distribute these device unique settings to multiple client computers through another cloning session. For example, if you are cloning a set of ten computers, you can use the Device Unique XML file to create a unique device name for each of the computers in the set. How to Change Device Unique Settings Use the following procedure to change device unique settings for one or more client computers you want to clone. Before changing device unique settings using CloneNGo, you need a desktop PC with ActiveSync or Windows Mobile Device Center installed. To change device unique settings 1 Perform the cloning process once with a master computer and your client computers. For help, see “Clone Settings” on page 3. A DeviceUniqueSettings.template.xml file is created on the master computer during the cloning session. 2 Establish a connection between the master computer and desktop PC using ActiveSync or Windows Mobile Device Center. For more information on establishing a connection, see your computer user manual. 26 CloneNGo User Guide Chapter 2 — Configuring Device Unique Settings 3 Copy the \SmartSystems\Cloning\DeviceUniqueSettings.template.xml file from the master computer to your desktop PC. 4 Rename the file to DeviceUniqueSettings.xml. 5 Open the DeviceUniqueSettings.xml file which has this format: <StaticIPAddrs> <Entry SerialNum="101X1200005" DeviceName="Device00000001" IPAddr="192.168.1.100" SubnetMask="255.255.255.0" Gateway="192.168.1.1" DNSServer="" WINS="" /> <Entry SerialNum="101X1200023" DeviceName="Device00000002" IPAddr="192.168.1.101" SubnetMask="255.255.255.0" Gateway="192.168.1.1" DNSServer="" WINS="" /> <Entry SerialNum="101X1200035" DeviceName="Device00000003" IPAddr="192.168.1.102" SubnetMask="255.255.255.0" Gateway="192.168.1.1" DNSServer="" WINS="" /> </StaticIPAddrs> 6 Edit any parameters you want to change (except SerialNum). 7 Save the file. 8 Copy the DeviceUniqueSettings.xml file to the \SmartSystems folder on your master computer. 9 Perform the cloning process again with the master computer and client computers represented in the DeviceUniqueSettings.xml file. CloneNGo User Guide 27 Chapter 2 — Configuring Device Unique Settings How to Generate a Custom Set of Device Unique Settings You can generate a custom DeviceUniqueSettings.template.xml that contains parameters that match your network settings (such as subnet mask and default gateway). You can also specify the starting IP address and the IP addresses will auto-increment for each device. To generate a customized device unique settings template xml file 1 Create a CloningEx.xml file with this format: <CloningEx> <DeviceUnique StartingIpAddress="10.10.1.12" SubnetMask="255.255.0.0" Gateway="10.10.1.1" DNS="10.10.1.20" WINS="10.10.1.30"/> </CloningEx> 2 Copy the CloningEx.xml file from your desktop PC to one of these directories on the master computer: • \Flash File Store • \SD Card (internal microSD card) • \Hard Disk (USB storage device connected to a dock) 3 If using a microSD card, install the card in the master computer. If using a USB storage device, insert it into a dock and dock the master computer. Here is a list of docks that support a USB storage device: Computer Computer Dock Model CK3R/CK3X AD20 70 Series DX1 4 Follow the steps to create master cloning files. For help, see “Configure the Settings on the Master Computer” on page 3. 5 Clone one or more client computers. For help, see “Clone a Client Computer” on page 5. 28 CloneNGo User Guide Chapter 2 — Configuring Device Unique Settings 6 (Optional) Use Intermec Settings to verify that each of the computers you clone has a unique IP address and the other device unique settings are correct. CloneNGo User Guide 29 Chapter 2 — Configuring Device Unique Settings 30 CloneNGo User Guide 3 Troubleshooting 31 Chapter 3 — Troubleshooting Troubleshoot the Cloning Process Use this troubleshooting table to help solve problems with the cloning process. Problems With the Cloning Process Problem Solution The client computer hangs when searching for the master computer. • The client and master computer are too far away from each other. Move the computers closer together. • There is an error in the cloning process. Check the Cloning Details tab for more information. • Restart the CloneNGo application. • Open ISpyWiFi and make sure the master / client are on the same channel AND have the same ESSID and BSSID • Make sure the master and clone computer have the appropriate IP address. For example, the IP address should have the format 1.x.x.x. • Make sure the master computer’s SSID is in the scan list. To do this, go to the Scan folder and press the Scan button, • Make sure the client computer can ping the master computer. To make sure the client can ping the master, go to the Ping tab within the ISpyWiFi application. The OS upgrade continues indefinitely when you remove the computer from the computer dock. Place the computer back in the computer dock You are stuck in an endless loop trying to download files in the manifest received from the master. File element Source attribute should only resolve to items on the removable media. For example, locations that are not wiped out by the OS upgrade. All subfolders are being included in the clone. The default is to recurse subfolders when using the wildcard in a path. Use the IncludeSubFolders attribute to disable recursion: <File Source=”\My Documents\*.tsk” Dest=”My Documents” IncludeSubFolders=”0” /> CloneEx.xml contains a 1 If the parameter is a path, set up CloneEx.xml to use CommandLine attribut value that paths that do not contain spaces (if possible). has spaces and the pre-defined entity 2 Download a CloneNGo update with a version later than " has been used to enclose the 6.90.00.0237. value in quotes. The command line parameter is not processed correctly in CloneNGo. 32 CloneNGo User Guide Chapter 3 — Troubleshooting How CloneNGo Updates the Operating System If you encounter problems while cloning the operating system, you may be able to troubleshoot where you are having difficulties by understanding how CloneNGo works. Note: Master items recover from the removable media. Clone items recover from the Master. Pre-Operating System Installation Actions (Master Mode) CloneNGo performs these actions before it upgrades (on the master) or clones the operating system (on a clone) to make sure you have an uninterrupted boot cycle and that your settings and applications are recovered after the upgrade: CloneNGo User Guide • (Master) Creates the cloning settings backup directory \Flash File Store\cloning.backup. • (Master) Copies the following cloning files to the backup directory if they exist: • \SmartSystems\Cloning\settings.xml • \SmartSystems\Cloning\security.xml • \SmartSystems\AdminPassword.bin • \SmartSystems\DeviceUniqueSettings.xml • (Master and Clone) Deletes SR*.cab and SP*.cab files from \CABFILES directory on all removable media. • (Master and Clone) Deletes SR*.cab and SP*.cab files from \2577 directory on all removable media. • (Master and Clone) Deletes SR*.cab and SP*.cab files from \SSPB\SRS directory on all removable media. • (Master and Clone) Deletes specified files (via CloningEx.xml). • (Master and Clone) Renames all files in the \CABFILES directory on all removable media. • (Master and Clone) Renames \2577\autouser.dat on all removable media. 33 Chapter 3 — Troubleshooting • (Master and Clone) Renames \UserAutoInstall\_sstransferagent.xml on all removable media. Post-Operating System Installation Actions After the operating system upgrade has been installed, CloneNGo performs these actions to recover settings and applications: 34 • (Master) Restores the cloning settings files from the backup directory to their original location. • (Master and Clone) Applies settings / applications (Clone reconnects and copies from Master) . • (Master and Clone) Renames files back to their original name (If .cab file, clears the system attribute bit to force reinstall on next boot). • (Master and Clone) Cold boots. CloneNGo User Guide Worldwide Headquarters 6001 36th Avenue West Everett, Washington 98203 U.S.A. tel 425.348.2600 fax 425.355.9551 www.intermec.com © 2013 Intermec Technologies Corporation. All rights reserved. CloneNGo User Guide *934-070-002* P/N 934-070-002