1
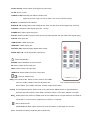
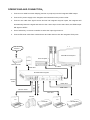
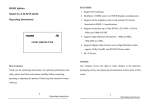
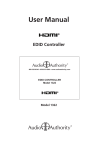
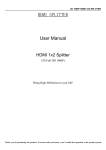
USER
MANUAL
HDTV Supply’s
HD Multimedia Integrator
(Model No HDMICVC301)
Enjoy the vivid world!
REMARK
Manufacturer does not make any commitment to update the information contained herein.
Dear customer
Thank you for purchasing this product. For optimum performance and safety, please read these
instructions carefully before connecting, operating or adjusting this product. Please keep this manual
for future reference.
The products are designed to make your A/V device use more convenient, comfortable, productive
and cost-efficient.
The HD Multimedia Integrator was designed to enhance the audio and video experience at the guest
room of the hotel and the personal home theatre. It can converter easily the multi-channel audio source
and the video signal source (Camera, Computer, BD Player, Game Console etc.) into the Full HD signal,
and can switches easily between the multiple signal sources. In addition, this product is also equipped
with a 4 port 10/100M network switcher, which is easy to let the peripheral device connected to the
internet.
Our devices offer solutions for noise, space and security concerns, data center control, information
distribution, conference room presentation, school and corporate training environments.
INTRODUCTION
FEATURES:
l
1xS-video, 1x AV, 1x VGA, 3x HDMI audio and video signal inputs, converted to 1x HDMI output
l
Support HDMI output up to 1080P/60Hz, the HDMI signal input support 3D HD source film (24fps)
l
Support 30bit, 36bit deep color
l
Support audio separation output, includes a fiber output and L&R analog output
l
Supports 3 modes of EDID management for audio formats, can switch among built-in EDID
(2CH/5.1CH) and external EDID (TV).
l
PAL/NTSC automatic video format
l
No loss of quality. Support input up to 15metres AWG26 HDMI standard cable length, output up to
20metres AWG26 cable length
l
Easily switch between devices manually or with the IR remote control
l
Plug and play
l
Support 2x USB 1A current charging interface, and support charging for Apple device
l
Built-in 4 ports 10/100M network switch, so easy to connect to the internet
l
DC5V/2A power supply
PACKAGE CONTENTS:
1. Main unit
1pcs
3. Remote controller
1pcs
2. AC power adapter
1pcs
4. User manual
1pcs
FEATURES OF THE INTERFACE:
FIG.1.0 Front Panel View
5V OUT1/2: Charging port for USB(Max current 1A and support charging for Apple device)
IR: Internal IR receiver window
: Power standby
RESET: Network switcher reset button
SOURCE: Source selection key
FIG.1.1 Rear Panel View
Rocker Switch: Power switch (LED lights for power ON)
DC 5V: 5V DC in jack
LINK/ACT LED: Network port status indicator LED
(lights off: link fail, Light on: link ok, flash: Link ok and TX/ RX activity)
RJ45x4: 10/100M Ethernet interface
AUDIO IN L/R: Analog audio input (CVBS and S-video use the same Audio signal input channel)
CVBS IN: Composite video signal input port(AV IN)
SVIDEO IN: S-Video signal input port
AUX IN: Auxiliary audio input (this audio channel is used together with the VGA Video signal input)
VGA IN: VGA input port
HDMI IN1/2/3: HDMI input ports
HDMI OUT: HDMI output port
OPTICAL OUT: Optical/Toslink digital audio output
AUDIO OUT L/R: L/R analog audio output ports
: Power ON/standby
SVIDEO: Select SVIDEO for the input port
AV: Select CVBS for the input port
VGA: Select VGA for the input port
HDMI1/2/3: Select HDMI 1/2/3 for the input port
: Source selection key
2CH : 2CH LPCM mode. Switch to 2CH mode for the HDMI
source to output LPCM 2 channels audio per the
FIG.1.2 Remote Panel View
built-in EDID. Then HDMI, OPTICAL, AUDIO output stereo audio.
5.1CH : 5.1CH bitstream Mode. Switch to B5.1CH mode for the HDMI source to output bitstream
audio per the built-in EDID. Then HDMI, OPTICAL output 5.1CH audio, AUDIO not output.
ADV: HDMI pass mode. Switch to PASS mode for the HDMI source to output audio per the EDID of
connected TV or AV receiver, supports up to LPCM 7.1 channels.
: Sound Output mute
(HDMI/SPDIF/AUDIO output mute when Press this button, Press again for unmute)
(Note: Use after the battery separator film is pulled out)
OPERATIONG AND CONNECTION:
1. Connect one cable from each display (monitor or projector) into the integrator HDMI output.
2. Connect 5V power supply to the integrator and inserted into the power socket.
3. Connect one cable from signal source devices into integrator anyone inputs, the integrator will
automatically detect the signal and switch to the current input. At the same time, the HDMI output
HD signal to HDTV.
4. Use of select key or remote controller to select the input signal source.
5. Connect Ethernet cable from modem/router and other devices into the integrator RJ45 ports.
Ethernet
HDTV/Monitor/Projector
Power amplifier
Phone
Modem /Router
AV cables
USB cable
HD Multimedia Integrator
Ethernet
Cable
HDMI cable
S-Video cable
AV CABLES
Ethernet Cable
HDM cables
VGA cable
Camera
PC
PC
DVD/STB
PS3/BD/STB
SPECIFICATIONS:
HDMICVC301
HDMI input Max resolution …………………………………………………..up to 1080P/60Hz/ 3D(24fs)
VGA input resolution..…………….……..…………….……..…………….……up to 1920 x 1080 @60Hz
HDMI output resolution ………………………………………………………up to 1080P/60Hz/ 3D(24fs)
HDMI video color format …………………………………………………………………..24bit/deep color 30bit/36bit
HDMI audio format……………………………………DTS-HD/Dolby-trueHD/LPCM7.1/DTS/Dolby-AC3/DSD
HDMI Max bandwidth…………………………………………………………….…….….…………225MHz
HDMI Max baud rate……………….…….………….……………………………….…….……… 6.75Gbps
Input/Output TMDS signal ………….…………………………….…..…….………0.5~1.5Volts p-p(TTL)
Input/Output DDC signal ……………………………………………..…….…….…….……5Volts p-p (TTL)
HDMI Input cable distance…...……………………….……….……. ≤15m AWG26 HDMI standard cable
Output cable distance ….…….…….…….…….…….…….…….……≤18m AWG26 HDMI standard cable
Switch port number…………………………………………………………………………………….4X RJ45
MAC address……………………………………………………………………………………………………… .2K
Network bandwidth……………………………………………………………………Auto-negotiation 10M/100M
Network protocol…………………………………………………………IEEE 802.3, IEEE 802.3u, IEEE 802.3x
Max working current……………………………………………………………….……….…….….…….. 1A
Power adapter format Input: ……......….….…….…….…….… AC 100V~240V 50HZ/60HZ; DC5V/3A
Operating Temperature range……..…………….………………………………………………-10 to +45℃
Storage Temperature range………………………………………………………………………-20 to +60℃
Operating Humidity range………………………….….……….……….10 to 90%RH (No Condensation)
Storage Humidity range………………………….….……….……………5 to 95%RH (No Condensation)
Product size (L x W x H) ……………………………….…………………………………280x170x40 (mm)
Weight…….…………………………….………………………………………….………………………960g
Notes:
Pls use the machine as the instruction listed to keep the long use lifetime of the machine.
1、 The machine should be placed at the spot far from the Damp, High-Temperature, Dusty, Erosive,
and oxidative environment.
2、 All parts will be free from the strong shake, hit, fall.
3、 Touching the power adapter with the wet hands is prohibited.
4、 Pls hold the power adapter head and do not pull the power cord when cut off from the socket.
5、 Pls turn the power off when the machines not used for long time.
6、 Pls do not open the cover and do not touch the inside parts.
7、 Pls use the original factory power adapter.
FAQ:
Before power on, pls check the connection line carefully. And make sure that all interfaces are normally
connected. The common trouble shooting way shows below:
No.
1
Problem Description
Non-PowerConnected
Solutions
1. Check if the power adaptor head is truly and correctly inserted the
power socket.
2. Check input signal source if it is in standby status.
1. Pls to make sure that the TV is on and has been connected with
the machine.
2
No Picture
2. To check if the signal source is on and well connected.
3. Check if the line is all good quality.
4. Check signal source channel selection is correct
1. To try again to connect the cable to be free from the unsuccessful
3
Obscure Picture
connection.
2. HDMI Cable Quality
1. Pls check the EDID settings is appropriate
4
No sound output
form audio ports
2. Pls check the audio output settings of signal source and source
format
3. Please check had voice input from input port
4. Please check mute
1.Please confirm router was connected to the Internet
5
Switch can’t
connect to network
2. Check Ethernet Cable Quality and Length(Standard class CAT6
≤ 100m)
3. Press RESET button can reset switch