1
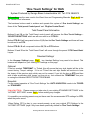
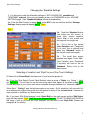
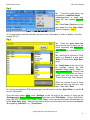
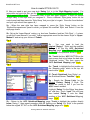
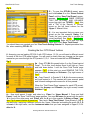
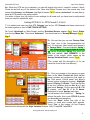
OTS
How To Create
ONE TOUCH SETTINGS
For
WERSI
OAS
INSTRUMENTS
By George Brown
Leicestershire UK
Tel: 0116 2864575
© George Brown
1
WersiClub UK.Focus
Acknowledgement
The following information has been sent by our Club
Member George Brown.
WersiClub UK.Focus would like to thank
George for allowing us to introduce his system of
‘One Touch Settings’
for Wersi OAS Instruments.
-------------------------------------------------
Article arranged and edited by Ken Belton
WersiClub UK.Focus
2
WersiClub UK.Focus
One Touch Settings
Introduction
‘One Touch Settings’ for OAS
What we are going to achieve is One Touch Settings for your Wersi
Organ or Keyboard that will work in all user respects, as well, if
not better, than those in other well known keyboards.
Included is a freeze button function.
This System will provide you with a One Touch Setting framework
within which you will be able to create your own group of voice
selections in each setting.
With a single one touch setting you will be able to select a style
with four choices of accompaniment variation and four choices of
voice variation by selecting a single style.
You will also be able to change the accompaniment without
changing the voice selection if you wish.
© George Brown
3
WersiClub UK.Focus
One Touch Settings
‘One Touch Settings’ for OAS
System Produced by George Brown Leicestershire UK. Tel: 0116 2864575
Ref.numbers are the ones used in the Wersi User and Programming Manuals. Fig 1 to 12 are
the ‘Screen Shot’ references.
The hardware buttons used to achieve and operate this system of ‘One touch Settings’ are
those of the ‘Total preset Control panel’ and ‘Rhythm Control Panel’.
Total Preset Panel Information
Buttons 9 and 10 on the Total Preset control panel will become the One Touch Settings –
‘SELECTOR BUTTONS’ which we will now refer to as ‘OTS-SL’.
Button OTS-SL.9 will use preset buttons 1,2,3,4 as the One Touch Settings and these will now
be referred to as OTS.
Button OTS-SL.10 will use preset buttons 5,6,7,8 as OTS buttons.
Buttons 11 and 12 on the ‘Total Preset Panel’ will move through the preset ‘OTS Preset Bank’
Layers.
‘Standard Settings’
In the ‘Accomp. Settings’ page, Fig.1. two ‘standard Settings’ may need to be altered. This
however will depend on your existing STD settings on this page.
Optional.
If the box marked ‘TEMPOMAT’ is ‘Ticked, this will ensure that any style loaded will be at the
correct factory ‘Tempo’ settings. If it is not ‘Ticked’ the next style loaded will continue to have
the tempo of the previous style which may not be correct. If you tick the box as STD and then
wish to alter a particular style ‘tempo’ you may do so. Just uncheck the ‘TEMPOMAT’ box prior
to saving the individual SELECTOR BUTTONS 9 &10.
Essential.
For the correct operation of ‘One Touch Settings’ the ‘AUTO VARIATION’ needs to be TICKED
as ‘STANDARD’
Important Note. Please ensure you take note of your existing STANDARD SETTINGS’ in the
‘ACCOMP SETTINGS’ screen, Fig.1. before making any changes.
It is possible your existing presets may not have used the recommended STD settings for OTS,
when they were saved.
When Exiting OTS to play to your normal presets, re-set your original STD Settings In the
‘ACCOMP SETTINGS’ page if they have been specifically altered for ‘One Touch Settings’
© George Brown & Wersiclub UK.Focus
4
One Touch Settings
WersiClub UK.Focus
Changing the ‘Standard Settings’
1. You will need to alter the Standard settings of ‘AUTO VARIATION’ essential and
‘TEMPOMAT’ optional, if they are not already set as your STANDARDS on the ACCOMP
SETTINGS page. (See ‘Standard Settings’ above for explanation)
1a - From the Main Screen (or page) Ref.4 press ACC in the top task bar and the ‘Accomp.
Settings’ display page will appear Ref. 8 Fig.1.
Fig. 1
1b – Touch the ‘Standard’ button
(red button top left corner.) A
small blue screen appears.
Touch ‘Yes’ in this screen and
the page will turn bright red.
1c - Put a tick in the square
‘Auto Variation’ and (‘Tempomat
if you wish, this is optional) and
press the ‘Standard’ button in
the top left corner once again.
1d - The small blue screen
appears once again. Touch ‘Yes’
‘Auto Variation’ and (‘Tempomat’
if required) will now be set as
‘Standard’. Return now to the
Main screen.
Selecting a ‘Location’ and ‘Style’ for your ‘One Touch Settings’
2. Select a free ‘Preset Bank’ that has none of your favourite presets in.
2a - From the ‘Style Select Control Panel Buttons’ select a group of ‘Styles’ e.g. ‘Swing’ – ‘Latin’
etc. Ref.3.6–2. You will then be on the main style panel level pages on the main screen Ref.4.
Choose any style of your choice with some noticeable changes between the ‘Variations’ ABCD.
‘Wersi Style’ - ‘Swing 1’ was the last one made on my organ. So for simplicity I will now refer to it
as a reference throughout this article as it will appear on many of the ‘screen shots’. However for
more contrast in Variations try ‘Bossa Nova’ etc.
2b - If you have ‘OAA Style Arranger’ touch ‘Quick Edit’ on the main screen and the ‘Edit Styles’
page will then appear. Fig 2 (Ref. 5-1 in the ‘Arranger Manual’) DO NOT CHANGE ANYTHING at
this stage. If you do not have the ‘OAA Arranger’ you will need to use ‘Style Edit’ (Please see
paragraph 4. for details)
© George Brown & Wersiclub UK.Focus
5
WersiClub UK.Focus
One Touch Settings
Fig 2
2c - Touch the small button, top
left labelled ‘Load/Save Panel’
(Laden/speichem) a small grey
panel will then appear Ref. 6-8
Fig.2.
2d - Press Save (Speichem) in the
grey panel and the ‘Save Style’
screen will appear. Fig. 3.
3. You now need to add the suffix X to the end of your ‘Style name’ in order to identify it from the
original ‘STYLE
Fig 3
3a - Touch the grey name bar
above the list box to bring up the
virtual ‘keyboard’ See Ref.18-4-11
User Manual for explanation of its
use.
3b - Add the X to the end of ‘Style
name’ e.g. Swing 1 x and press
‘Enter’ to return to the ‘Style Save’
page.
3c - Scroll down to the end of the
list, highlight (yellow) the next
available empty space. (Refer to
User manual Ref.5-2 ‘Saving Total
Presets’ for instructions on how to
select from the drop down lists,
‘Preset Groups’ and ‘User Groups’)
What you choose to put in these
boxes will help you find your style
later. Then touch ‘Save’
4. If you do not have the ‘OAA style arranger’ you will need to use the ‘Style Editor’ to add the X
to your ‘Style name’.
From the main screen Ref.4. touch ‘Settings’ at the top right of the screen, to bring up the
‘Settings page’ Ref.1. ‘Programming Manual, and then touch ‘Edit Styles’. On the ‘Style Editor’
page, DO NOT CHANGE ANYTHING. Touch ‘Save’ on the top task bar which will then take you
to the ‘Style Save’ page. Here you will need to follow the instructions from the above paragraph
3b beginning ‘Add the X - to - ‘Touch Save’
© George Brown & Wersiclub UK.Focus
6
WersiClub UK.Focus
One Touch Settings
How to create OTS-SL.9 & 10
5. Now you need to put your new style ‘Swing 1 x’ in to the ‘Style Mapping Levels’. For
instructions on how to do this, see the ‘Programme Guide’ ‘Accompaniment Mapping’ Ref. 9-4 to
9.4.4. pages 9-20 to 9-24. (Sometimes after a style has been ‘mapped’, it does not appear
straight away in the style level you assigned it. Press a different ‘Style group’ button on the
control panel and then press the ‘Style Group’ that your style is in again. Press the ‘Level buttons’
and your style should now appear ok.)
5a - When the new style has been mapped in, press the ‘Style Group’ button on the
‘Rhythm/Accompaniment’ panel in which you placed the modified ‘Style’ and ‘Select it’ from the
style page levels.
5b - Set up the ‘Lower Manual’ voicing, e.g. level one, Drawbars, level two ‘Duh Choir’, + 1 octave,
or split the ‘Lower Manual’ if you wish. Add an appropriate sound for the chosen ‘Style’ to ‘Upper
Manual 1’ and set up your choice of ‘Pedals’
Fig.4.
5c - You now need to load the
original ‘Swing 1’ ‘Style’ and the modified
‘Swing 1 X’ into the ‘ACC Quickload
Mapping’ page’ User Manual Ref 6 pages
6-1 to 6-4 in the positions shown in Fig 4
5d - Touch the blue ‘ACC’ BUTTON on the
main screen that is just below the dark blue
‘Quickload’ button. This then opens the
‘ACC Quickload Mapping’ page’ Fig 4.
Fig.5.
5e – Touch, to highlight the first position on
the ‘Mapping page’ which is the top left
hand corner. Fig 4.
5f - Touch ‘Quickload’, then ‘Styles’, on
the Quickload Screen ‘Task Bar’ Fig.5.
5g - Search the ‘Group Lists’ for the
Original Factory ‘Swing 1’ Style. The
Styles are easier to find if you use the
A,B,C search method.
Highlight ‘Swing 1’ in the Styles ‘drop down
list’ and then, Touch ‘Load’ This will have
then loaded ‘Swing 1’ onto the ‘first’
position of the ‘ACC Quickload Mapping’
page. Fig.4.
5h – Return to the ‘ACC Quickload Mapping’ page, Touch to highlight the position directly
below ‘Swing 1’, then repeat procedure from 5f. loading your ‘Swing 1 x’ ‘Style’ in the position
below the original ‘STYLE’ on the ‘ACC Quickload Mapping’ page as in Fig.4.
© George Brown & Wersiclub UK.Focus
7
WersiClub UK.Focus
One Touch Settings
Fig. 6.
5i - To save this OTS-SL.9 preset, press
and hold button 9 on the ‘Preset Control
Panel’ until the ‘Save Total Preset’ screen
appears. Ref.5 to 5-2 MAKE CERTAIN
THAT THE ‘ACCOMP’. AND ‘VOLUMES’
boxes (top right) are ‘TICKED’. Fig.6. Also
add a ‘Tick’ to the ‘Sounds’ & ‘Volume’
boxes on the left hand column for the
‘Upper 1’ Manual Voice.
5j - It is very important that you name your
preset as per this example ‘Swing 1 x’
Touch the grey name bar to access the
virtual keyboard. See Fig.6. (Ref.18-4-11
User Manual) Enter the X after the style
name and Touch ‘Save Total Preset’
You should have now created your first ‘One Touch Setting Selector’ 9. Repeat procedure from
5a. when createting OTS-SL.10.
Creating the four ‘OTS Preset’ buttons
6. Assuming you are loading OTS-SL.9 with OTS buttons 1,2,3,4 you will need a different sound
for each of the four OTS preset buttons. You will need to clearly hear any changes on the upper
manual as you move through the OTS presets 1,2,3,4. Now we create the four OTS buttons
Fig.7.
6a. - Copy OTS-SL.9 to preset button 1 on the ‘Preset control
Panel’. To do this, touch button 9 and it will light up. Press
and hold down button 1 until the ‘Save Total Preset’ page
appears. Fig.6. At this point you must REMOVE THE TICK
from the boxes Accomp and Volumes. (Top right corner of
Fig.7.)
6b - Copy Preset 1 to Presets 2, 3, & 4 in the same manner
as 9 was copied to 1. This ensures all Lower manual, pedal
and Volumes settings are the same for all four presets.
When the ‘Total Preset Page’ appears for each OTS preset,
check the Accomp and Volumes (top right corner) remain
Unticked. Fig.7
6c - Now touch preset 1 again, and select e.g. ‘Piano’ for ‘Upper Manual’ 1 Press and hold
Preset 1 until the ‘Save Total Preset’ page appears. You must Re-name the preset with the prefix
‘A’ in front of the style name, and ‘Piano’ after the X as in this example ‘A Swing x Piano’ (see
also, Fig.4. preset number & name bar) Then touch ‘Save Total Preset’ Save presets 2,3,&4 in
the same way, assigning a different sound to the ‘Upper 1 Manuals’ and adding the prefix, B, C, D
in front of the style name, and the Instrument name that you have assigned to Upper 2,3 & 4
after the X.
© George Brown & Wersiclub UK.Focus
8
WersiClub UK.Focus
One Touch Settings
6d - When the OTS set up is complete, you can still change the voice’s, volume’s, octave’s, WersiChord etc.and tick any of the boxes in the ‘Save total Preset’ Screen as in the normal way. Just
ensure that Accomp. and Volumes (top Right of screen Fig.7.) remain unchecked. You can then resave the OTS preset in the same position.
It is better to leave your full choice of voice settings for all levels until you have time to really decide
what you need for a particular style.
Linking OTS-SL.9 to OTS Presets 1,2,3,& 4
7. You should now have your first OTS ‘Selector’ and its four OTS Presets and these need now to
be linked together to form a ‘ONE TOUCH SETTING’.
7a. Touch ‘Quickload’ on ‘Main Screen’ and the ‘Quickload Screen’ appears Fig.5. Select ‘Styles’
from the top ‘Menu Bar’. Then touch ‘Advanced’ You should now be in ‘Accomp Manager’ Fig. 8.
Fig. 8.
7b - Be sure that you can see ‘Factory Data’
not ‘User’ next to the ‘Accompaniments List
box’. If it does say ‘User’ touch it and change it
to ‘Factory Data’. Find and highlight ‘Swing 1
x’ (Ref. Programming manual pages 9-19 to 924) Having highlighted ‘Swing 1 x’, touch the
pink box marked ‘VAR PRESETS’ in the
middle of the screen, which opens up the
‘Assign Variation Preset’ screen. Fig.9.
(This screen and the description of its use
cannot be found in the User Manual.)
Fig. 9
7c - Find your presets by the names you gave
them In the ‘User’ ‘Preset List’ (Note that the
preset numbers are progressive and relate to
the Total preset ‘Control panel’ and Wersi’s
internal preset numbering system.) Highlight
preset ‘A Swing 1 X Piano’. Touch the top box
of the four Variations that has Var A in it, and
then touch ‘Assign’. Do the same with B, C &
D presets, and Var B, C & D boxes.
Remember to touch ‘Assign’ each time.
You will notice in the ‘Preset List’ ‘Swing 1 x’
without the prefix, this is your OTS-SL.9 preset
and does not need assigning.
Touch the ‘Back’ button (top right of the
screen) a small blue screen then appears.
Touch ‘Yes’ in this screen. All four Presets
should now be linked with the ‘Style Variation’ buttons, A,B,C,D and Fill 1 and Fill 2.
© George Brown & Wersiclub UK.Focus
9
WersiClub UK.Focus
One Touch Settings
User Instructions for this OTS System
Fig.10.
PLEASE NOTE.
OTS, ON/OFF. When you are playing OTS-SL.9 or 10,
or any of their four presets, if you touch ACC on the
blue background, (the function which is to turn the
‘Styles Mapping’ page off) you will also turn OTS
OFF. Fig.10.
Fig.11.
If you now touch ‘Swing 1 x’ on the ‘Mapping’ that has
appeared you will turn OTS ON again. This function
has, to a large extent, a similar effect to a ‘Freeze’
button in as much as the keyboard voices are free of all
of all styles in all the OTS presets. Fig.11.
1. On the ‘Rhythm Control Style Panel’, select the ‘Style Group’, e.g. Swing, Latin, from which
you chose the Style that has now become ‘Style X’.
2. When you have found ‘Style X’ on the main page in mapping, touch it (select it).
3. If you are loading with ‘Easy Preset’ touching OTS-SL9 and SL10 in the ‘Direct Preset Select’
screen will load ‘OTS’ automatically.
4. Press ‘Style variation A’ and the first of the OTS buttons will light. Press B, C & D and OTS
buttons 2, 3, & 4 will light in turn.
5. Touch A, B, C, D and OTS Buttons 1, 2, 3 and 4 will light accordingly.
6. Touch 1, 2, 3, 4 and A, B, C, D will NOT change.
7. If you wish to remain on a particular OTS selection but wish to change ‘Style variation’ A,B,C, or
D , use ‘Fill 1’ for A to D and ‘Fill 2’ for D to A
8. Assuming you have another Style on OTS-S.10, and the OTS buttons are 5, 6, 7 and 8, then
you may use all 8 presets Nos 1 to 8 with either Style OTS-S.9 or OTS-S.10, but remember which
group of four responds to A, B, C and D, and for the ones that do not use ‘Fill 1’ and ‘Fill 2’.
© George Brown & Wersiclub UK.Focus
10
WersiClub UK.Focus
One Touch Settings
Complicated? Not really. You soon get used to it and it is quick, flexible and very playable. It
also means that you press three buttons. ‘Style Group’, the actual Style and your commencing
Style Variation button. Start the Rhythm unit, and play.
Choose compatible Styles and Voicing’s for 9 and 10. It is to be noted that buttons 11 and 12
move the ‘Preset Banks’ forward and backward in blocks of eight OTS preset voices. You can
plan in blocks of 100 presets which is 20 OTS selectors
‘Easy Preset’
9. - The ‘EASY PRESET’ button can be found on the main page. Touch this to access the ‘Direct
Preset Select’ screen. Fig.12.
Fig.12.
From the ‘Direct Preset Select’
screen, you will clearly see your
OTS ‘Presets’ and the OTS-SL
Selector Buttons
You will see why you gave the
OTS-SL.9 and OTS-SL.10 a
name, and their presets had the
prefix A. B, C and D attached.
9a - To load OTS correctly from
the ‘Direct Preset Select’ screen,
you need to Touch the OTS-SL
SELECTOR PRESETS 9 or 10.
9b - Then press one of the A,B,C
or D Variation Buttons on the
‘Rhythm Control Panel’.
(Please Note. - Touching the’ Presets’ with the A,B,C,D prefix on this page, will only load the
‘Manual’s, and Pedal sounds’ that are in the presets, not the complete OTS setup.) (See 9a – 9b.)
You have now completed; –
‘One Touch Settings’
© George Brown & Wersiclub UK.Focus
11
WersiClub UK.Focus
One Touch Settings
Quick Reference and Reminder List
This list acts just a reminder of what to do ‘next’ once you have the basic idea of how to set-up your
‘One Touch Settings’
1 - Auto Variation set as ‘Standard’ first time. Check ACC for ‘Ticks’ on all future 9 and 10
presets.
2 - Choose and find the ‘Style’ you wish to use.
3 - Put ‘Style’ onto main page ‘Mapping’.
4 -Take the same ‘Style’ and change the name by adding an ‘x’. Then put it into the main page
‘Mapping’ with the original.
5 - Find the preset level you wish to use and put your new ‘Style x’ into presets 9 or 10.
6 - Copy 9 into preset 1, and 10 into preset 5.
7 - Copy preset 1 into 2, 3 and 4.
8 - Go back to each new preset and choose a different voice for each and give it a name i.e.
‘A Style x Piano’. Then resave.
9 - Assign presets 1,2, 3 and 4 to 9, or 5,6,7 and 8 to 10.
10 - Job done.
© George Brown & Wersiclub UK.Focus
12